RSS
 

Posts Tagged ‘Become’

The One Skill That Will Help You Become a Better Portrait Photographer

04 Nov

Watch any accomplished people photographer at work and you’ll see deliberate intention. Not so much with their camera, but with their subject. Bruce Gilden takes just moments to photograph New Yorkers in the streets. Nick Knight spends hours with models in his studio or on location. The relationships they have with the people they photograph is calculated and purposeful.

The One Skill That Will Make You A Better Portrait Photographer Monk in a Samlor © Kevin Landwer-Johan

© Kevin Landwer-Johan

Photographers with less experience approach making a portrait differently. They’ll look at the camera in their hands, make technical decisions, alter and check settings, change lenses, perhaps add filters. All with the intention of making a better photograph.

Meanwhile, the portrait subject is probably feeling a bit lost or ignored. They may become disinterested, or even bored.

Engaging with the person you want to photograph will help you get better photos far more than fiddling with your camera at the last minute.

The One Skill That Will Make You A Better Portrait Photographer Kayaw Girl © Kevin Landwer-Johan

© Kevin Landwer-Johan

Connect and Relate

Pay attention to your subject. You won’t see an experienced professional focusing on the camera when they are with their subject. They will have already taken care of the exposure and focus options, made conversation, and paid their compliments. The smiles and laughter will come naturally, or a more somber mood established if needed.

Relating to your subject, giving them your attention and engaging them will help them relax. When the subject enjoys the process and feels good about it you’ll get much better portraits.

The One Skill That Will Make You A Better Portrait Photographer Pretty Dancer © Kevin Landwer-Johan

© Kevin Landwer-Johan

For this photo made during a street parade, I wanted to eliminate the background. This was a challenge as there were people and activity everywhere. I had to move her until there was nothing distracting behind her. As I did, I chatted with her and mimicked how I wanted her to hold her hands. She was fascinated that I was being so precise and enjoying the interaction.

Even if you have only a short time to make a portrait, learning to connect is the best thing you can do to improve your craft. For me, it was extremely difficult as I’m a naturally shy person.

The One Skill That Will Make You A Better Portrait Photographer Laughing Lady © Kevin Landwer-Johan

© Kevin Landwer-Johan

Purposefully Build Your Confidence

My career started in the photography department of a daily newspaper. I quickly realized that to be successful I needed to overcome my insecurities. Most photos in newspapers include at least one person in the composition, so if I didn’t overcome these securities, I wouldn’t have a job for long.

You probably won’t have the same pressure to perform and come up with publishable pictures. But if you aren’t accustomed to connecting with people, you’ll need to change if you want to make engaging portraits.

Shy photographers often think, ‘I don’t want to impose on people, or cause them any bother.’ This is the first aspect of portraiture you need to work on.

The One Skill That Will Make You A Better Portrait Photographer Grandpa © Kevin Landwer-Johan

© Kevin Landwer-Johan

Instead of thinking you’ll be a nuisance, think that you might just make someone’s day by photographing them. People often like attention. If you approach them with a smile and a friendly manner, you’ll be surprised at the responses.

Revisit the Same Locations

Building relationships with people over time will allow you to photograph them more easily. We run photography workshops in Chiang Mai, Thailand. The people at the markets and villages are now quite familiar with us. We know many people who enjoy being photographed. We’ve been purposely building relationships.

You may have a local farmers market or your kid’s football club you can go to regularly with your camera. Return to the same locations and photograph the same circumstances. Doing so will help build relationships – and your confidence.

The One Skill That Will Make You A Better Portrait Photographer Lemon Grass © Kevin Landwer-Johan

© Kevin Landwer-Johan

I’d never photographed this man before. But he’d seen me around taking photos and was keen to have his picture taken. This makes life easy for a photographer. Him being so open and willing meant I could easily engage with him and get a very natural environmental portrait, even though he was posing. I showed some interest in him. I asked about the produce he was selling and he responded warmly.

Take Control of Your Camera

Know your camera. Plan ahead and set your gear before you’re with your subject. Choose the right lens. Guess what the light will be like and whether you want a soft or sharply focused background. If you’re unsure about using manual controls, choose aperture priority so you can get the depth of field you want.

When you know your camera well and are in control of it, you’ll be free to engage your subject. Talking with your subject before taking their photo will be far more beneficial than messing around with your camera settings.

The One Skill That Will Make You A Better Portrait Photographer Porter © Kevin Landwer-Johan

© Kevin Landwer-Johan

I’d seen this porter at the market a number of times, and sensed he was a little shy. But I wanted to photograph him. He has an interesting face and traditional tattoos on his forearms.

When I saw him resting on his push cart I set my exposure manually and made a test frame from across the street without him being aware. I guessed my focus distance and then approached him. I anticipated him being shy, and that some of the vendors might start teasing him and encouraging him to smile.

He agreed to me photographing him. But as he did, he put his hands by his side. I asked him to put them back where he had them, explaining that I wanted to photograph his tattoos as well.

In this short moment, two or three people did start to tease him. He got embarrassed and pushed his handcart off down the street. This frame is the only clear one I got.

If I’d been ill-prepared with my camera and not engaged him, I doubt the picture would be as interesting.

The next time I saw him I gave him a print of his portrait. He always says “Hi” to me now and gives me a big smile when we visit the markets.

The One Skill That Will Make You A Better Portrait Photographer Model and Mask © Kevin Landwer-Johan

© Kevin Landwer-Johan

Learn From the Masters

When I was learning there were no YouTube or other internet resources to help me. These days there are dozens of documentaries and programs showing photographers at work. Find some you admire and wish to emulate, and learn how they do it.

This documentary about some of New York’s well-known street photographers will give you a good insight into how different people achieve their results.

One of my favorite Instagram feeds is that of Lee Jefferies’ portraits. In this video, he tells a little of his story, and how he creates his incredibly intimate portraits of homeless people.

Many of the best portrait photographers are naturally more reserved. This comes through in their photography. Their portraits speak more about the subject than the photographer.

Engage Intentionally

Next time you make a portrait, converse and connect with your subject more than with your camera.

And if you’ve had a fun conversation with someone while making a portrait, share your story with us in the comments.

The post The One Skill That Will Help You Become a Better Portrait Photographer appeared first on Digital Photography School.


Digital Photography School

 
Comments Off on The One Skill That Will Help You Become a Better Portrait Photographer

Posted in Photography


Why I’ve Become a Light Meter Convert

05 Sep

Light meters

sekonic light meter - Why I've Become a Light Meter Convert

Light meters can be an invaluable tool for photographers; especially those who use off-camera flash.

Mention a light meter in photography circles and you’re certain to get some fierce responses. Sure, some photographers will be indifferent and fewer will be in favor, but most will be adamant that you don’t need one. I used to be somewhere in the middle.

I could definitely see their utility, but I just never thought I needed one. Before a few months ago, I had picked up a light meter once in 14 years. It turns out that I was just making excuses to not spend the money on something that may be one of the most powerful tools you can buy if you use off-camera flash lighting.

Excuses

There are a lot of motives and reasons that you might avoid using a light meter in the digital era. For example:

  • You can just chimp the LCD screen.
  • It’s easy to fix it in raw processing.
  • They’re too expensive for what they do.
  • The histogram is enough for testing exposure.

I get it. All of these sentiments came out of my mouth over and over again.

Chimping and the Histogram

photographer checking settings - Why I've Become a Light Meter Convert

While you can chimp your exposures to get them right, this can take both time and guesswork. A light meter takes away both of those things.

Sure, you can look at the back of your camera after each test shot (chimping) while you’re setting up your lights. This works fine for one or two lights, but what happens when you need to create a precise lighting ratio?

How do you ensure that your fill light is exactly three stops below your key light? How do you ensure the rim lights are an even exposure with your fill? It’s possible, but all of that takes time and guesswork.

I remember doing a basic four light setup a few years back and it took the better part of an hour to get the ratios exactly how I had planned them.

Since starting to use a light meter, I set up an even more complicated five light setups, mixing really hard light with very soft light. It took me only 10 minutes to get right. I don’t know about you, but I could do with a lot more instances of saving nearly an hour of shooting time.

b/w portraits of a man in a suit - Why I've Become a Light Meter Convert

These images use five lights at a very precise contrast ratio. Using a light meter meant that the setup time was only 10 minutes.

Fix it in Raw Processing

raw processing in Lightroom - Why I've Become a Light Meter Convert

Fixing your exposures at the raw stage is a viable option, but it can take some time that might be better spent elsewhere.

Yes, you can fix the image later in raw processing. As long as your highlights and shadows aren’t clipped, raw processing is a viable tool here. However, wouldn’t it be much nicer to get it right in camera?

Think about it this way: with a light meter, you press the test button on your strobe, check the reading and dial it into your camera. The whole process takes about 20 seconds. Unless you move the light or your subject moves, every subsequent photo is now properly exposed.

Presume it takes about two minutes of fiddling to adjust the exposure of an image in Lightroom or ACR. If you’re working on 20 photos from a set, you’ve just lost 40 minutes of time to a task that could have been negated in twenty seconds.

Too Expensive

I get it, I really do. This was the main reason I avoided getting a light meter for so long. A couple hundred dollars for a decent light meter is a hard pill to swallow when there are so many things that you can buy for your photography at a much lower price. Why spend that kind of money on something you use so briefly when you can spend that money on lights, modifiers, trips, studio time, props, etc, etc.

It’s all a matter of how much you value your time and convenience. A light meter will save you time and it will make a good chunk of the set-up process easier. In the end, I’ve found that the price tag has been worth it.

Changing My Mind

model using a light meter - Why I've Become a Light Meter Convert

I had a shoot where I only had 10 minutes to set up. I borrowed a light meter from another photographer just to make my life easier. That one time completely changed how I felt about using light meters. In minutes, all of the potential benefits and values of having a light meter in my bag became apparent.

Time

As you may have guessed from my previous points, it comes down mostly to time. Faster set-ups mean you get more time actually shooting, which makes it more likely that you’ll get the shot that you’re after. Less time processing means you have more time to work on other things, like planning and arranging your next shoot.

Also, in terms of portraits, a light meter will help you minimize the time that your subjects are waiting on you between sets. Nobody, absolutely nobody (especially paying clients), wants to wait around for huge chunks of time while their photographer is messing with the lights.

Complexity

model with long hair - Why I've Become a Light Meter Convert

In this image, I wanted to experiment with a gridded stripbox as the key light and a giant octabox as fill. Using a light meter made getting the exact ratio between the key and fill lights that I wanted a breeze.

On top of time, the multiple light techniques that a light meter opens up makes it more than worth the value. With a light meter, you can dream up any number of lighting configurations, plan them down to the exact contrast ratio and set it up with no fuss.

You want a hard light source as a key at f/8, with two giant modifiers providing exactly two stops of fill at f/4 and two background lights at f/22? That’s a set-up that popped into my head one night shortly after buying my light meter. I went into the studio the next day and set it up.

I wouldn’t have bothered before, as trying to get the ratios right between those light sources would have been a major headache.

metering the light - Why I've Become a Light Meter Convert

Metering for each light individually and adjusting their exposure took about a minute or two. This only has to be done once.

behind the scenes lighting setup - Why I've Become a Light Meter Convert

If the exposure from the octabox was off, it would have destroyed the effect of the lighting from the much smaller striplight.


lighting diagram - Why I've Become a Light Meter Convert

Imagine that you’ve just had a week where you’ve saved several hours at both setting up and post-processing. If you used just a bit of that time to start drawing out and planning new light set-ups, how many do you think you could come up with?

Getting it right in-camera

Why I've Become a Light Meter Convert

When dealing with difficult subjects, like white shirts on dark backgrounds, a light meter can be an absolute blessing in terms of getting it right in the camera.

As I already mentioned, the ability to get your exposure perfect every single time is a huge benefit. In fact, when working with flash, I would posit that using a light meter might be the single most valuable step you can take to ensure perfect exposures and making your workload that much easier.

I’m a Total Convert

sekonic light meter - Why I've Become a Light Meter Convert

Over the time I’ve had it, my light meter has become indispensable. As it fits in my pocket, it now comes everywhere with me.

In the end, I regret that I put off and continually excused myself from buying a light meter for as long as I did. In the few months since I bought it, I have saved a ton of time in the studio not messing about with lights while people were waiting on me. My post-processing workload has lightened quite a bit as fixing contrast ratios in post-production is all too time to consume.

Both of these factors together mean that I now have more time for planning shoots and lighting set-ups than I had before. Those set-ups are also getting more and more complex as time goes on and most of them would have been next to impossible for me to put into use without a light meter to ensure the precise exposure ratios.

If you’re like me, and you’ve convinced yourself that a light meter is a superfluous bit of kit, I can only encourage you to challenge your own assertions. Could a light meter save you time as it has for me? Could it open new possibilities?

It’s possible that the answer is no. I can’t presume to know or understand your situation. All I can suggest is to at least ask yourself the question. It may very well be that light meter could be as valuable a tool to your photography as it is becoming to mine.

The post Why I’ve Become a Light Meter Convert appeared first on Digital Photography School.


Digital Photography School

 
Comments Off on Why I’ve Become a Light Meter Convert

Posted in Photography


Fujifilm’s X-mount has suddenly become a credible option for video

20 Feb

When Fujifilm announced its new Fujinon MK 18-55mm T2.9 and MK 50-135mm T2.9 cinema lenses about a year ago it generated a lot of interest. Fujinon is a respected name in the cinema industry and getting these lenses—based on the company’s much more expensive Cabrio line—for a price in the neighborhood of $ 4,000 was exciting to a lot of people.

Unfortunately, for users of Fujifilm’s own X-mount mirrorless cameras, there was one catch: Fujifilm released the lenses in Sony E-mount.

E-mount? That seemed like a strange choice to people in the camera world.

It’s not so strange when you consider the target market. Sony Super 35 cameras like the FS5 and FS7 are very popular among small production houses, budget filmmakers, and independent producers of various stripes, many of whom can’t afford to spend tens of thousands of dollars on a single lens. As a result, there’s a large addressable market of E-mount shooters who would be interested in this type of product.

We had a chance to use the MK 18-55mm T2.9 when it was introduced and were very impressed. Click here to read our full shooting experience.

X-mount? Not so much. Sure, the X-T2 could shoot 4K video, but came with some big caveats. Video probably wasn’t the feature driving buyers to that camera, especially those serious enough to use cinema lenses for their work.

However, Fujifilm tossed a small easter egg into that announcement: it planned to release the lenses in X-mount (as ‘MKX’ models) by the end of 2017.

However, Fujifilm tossed a small easter egg into that announcement: it planned to release the lenses in X-mount…

While that was a nice bone to throw to its mirrorless customers, it made us wonder if Fujifilm was also giving us a hint of things to come.

Now we know. The new Fujifilm X-H1 is a camera that embraces video – and video shooters – more than any X camera before.

Fujifilm’s cameras don’t have a strong history when it comes to video performance. Early iterations of the company’s video were far from best in class, and in some cases embarrassing.

The Fujinon MK series of lenses were originally released for Sony E-mount (shown here on a Sony FS7 camera), but are now available to X-mount mirrorless camera shooters.

Meanwhile, other companies, such as Panasonic and Sony, overtly courted videographers with cameras that delivered high quality footage and included deep video feature sets.

With the X-H1, Fujifilm now has a camera that’s competitive with just about anything in the DSLR/mirrorless class when it comes to video. It may not MKX-class equipment targeted at working pros, but it holds its own against its peers, with the possible exception of the Panasonic GH5/S. But to be fair, nothing else in this class really holds up to the GH5/S either.

It’s fair to say that Fujifilm shooters no longer need to feel left out in the cold when it comes to video.

It’s fair to say that Fujifilm shooters no longer need to feel left out in the cold when it comes to video

I don’t want to blow this out of proportion. I doubt Fujifilm would have developed the MKX lenses just for the X-H1. It wouldn’t have been worth the sizable development cost, and the E-mount market for these lenses is much larger. The fact that the MK lenses now work on X-mount is a great side benefit, though.

With this set of products in the mix it’s a great opportunity for Fujifilm to test the waters around video. Just a couple years ago, choosing a Fujifilm system for motion picture work was a non-starter. Today, all the pieces seem to be falling into place: high quality 4K/30p, 200Mbps codec, internal F-Log gamma profile, and even a couple high quality cinema lenses. That’s an attractive combination, and I’m sure Fujifilm will be watching to see if it gets traction.

We don’t know whether the Fujinon’s MKX lenses for X-mount signal greater ambitions for Fujifilm, but for the moment it means there’s still a very impressive set of real cinema lenses for Fujifilm’s mirrorless users.

Fujifilm’s decision to focus on the APS-C market may even be helping it here. There’s no pressure to support full frame models, so the company can put its best technologies into flagship APS-C cameras, which will appeal to people wanting to shoot content in the popular Super 35 format. Throw in Fujifilm’s Hollywood-renowned color science, and you have the ingredients for an interesting path forward.

The X-H1 shows that Fujifilm is serious about video. Whether those MKX lenses might signal greater ambitions on the camera side, or are just a pleasant side effect of having already developed them for E-mount remains to be seen.

Until recently, Fujifilm users who wanted to move into the world of video often assumed they would need to migrate to a different system to do so. No longer. Unless you really need the advanced features found in a pro-level video camera, it’s a viable alternative to other DSLR and mirrorless options.

This is a great time to be a Fujifilm shooter, especially if motion pictures are on your brain.

Click here to read our Fujinon MK 18-55mm T2.9 shooting experience

Articles: Digital Photography Review (dpreview.com)

 
Comments Off on Fujifilm’s X-mount has suddenly become a credible option for video

Posted in Uncategorized


10 Ways to Become a Better Photographer in 2018

25 Jan

Let’s face it, it’s the new year. Your heart is full of hope and your head is bursting with ideas on what you want to do this year, be a better photographer, and how you will go about executing it. You have so much hope in your heart that you will achieve your all your 2018 goals, that you walk around with a goofy smile plastered on your face!

Am I right or am I right? Or have I just described how I have been feeling ever since that clock struck midnight and we ushered in 2018!?

10 tips to become a better photographer

Here is a bouquet of stunning florals to wish you a happy 2018!

It is 2018 and let’s start the year right with a few simple, easy yet powerful things you can do if one of your goals is to become a better photographer in the next 12 months.

1. Rock the gear you currently own without buying more

Do you feel limited by the gear you own? Are you telling yourself you really need to upgrade your camera, lens or both? Great! you are exactly where I need you to be.

Challenge yourself to use your existing gear consistently for a few weeks or months. Try to get creative with what you already have instead of hitting purchase on that gear that is sitting in your cart or Amazon checkout.

10 tips to become a better photographer

I had no telephoto lens on hand to get some close-ups of these birds…so instead, I used negative space and rule of thirds to take a creative approach to this image.

2. Photograph in every possible lighting situation

I really believe there is no such thing as bad light. Light is light – it is just different at different times of the day and night. One of the best ways to understand light is to photograph in different lighting situations and challenge yourself to create something unique and different that you are proud of.

Each lighting situation will demand different things from you and your gear. Harsh midday sun will have you rethinking shadows and light. Early morning light or golden hour will have you thinking of ways to create magical images that highlight that golden light. Blue hour may challenge you to bring out the external flash so you can get creative with colors.

Use this exercise to really understand and make the most out of each scenario.

10 tips to become a better photographer

 3. Treat every subject as a rock star

Not every subject is going to be your ideal client. Until you are in a position to only attract your ideal clients, use every opportunity to work towards building your portfolio for your ideal clients. Each client deserves to be treated like they are rock stars. So it is your duty as a photographer to give them the best experience possible – be it in posing, editing, styling or general customer service.

10 tips to become a better photographer

My morning cup of tea and a simple kitchen towel was my subject matter as I practiced still life photography This image is one of the more popular ones on my social media – people really seem to gravitate to light and clean images at times.

 4. Deliberately limit yourself

Today’s DSLR cameras are quite sophisticated pieces of equipment with multiple shutter clicks per second (continuous) and creative photographic modes (Program, Shutter Priority, Aperture Priority) that do a lot of the work for you.

Instead of using those, I challenge you to limit yourself. Think like a film camera photographer and only use 24 or 36 frames to tell your story. Change to Manual mode and try to figure out how shutter speed, IS, and aperture really work to help you take more control of your photography.

10 tips to become a better photographer

I love photographing with a film camera on vacation. It really helps me maintain a good balance between having a vacation and taking pictures because I only have a limited amount of frames to use.

 5. Take an art class

This has nothing to do with photography, yet at the same time, it has everything to do with it. Sometimes stepping away from the thing that we love the most or obsess about can be a really good thing. I have found art, particularly drawing and painting, to be very therapeutic and relaxing. It also gives me a chance to look at creativity with a new lens. As I analyze shapes, sizes and brush strokes – I look at color, patterns and composition in a new light.

6. Study your camera’s manual

I remember taking a technical writing class in graduate school where we had to create a user manual for a product. It was one of the hardest classes I have ever taken because we really had to think as a layman user to design, craft and write the manual. It made me realize that manuals, if done correctly, are incredibly powerful learning tools because they really break down every aspect of the product individually as well as collectively. So don’t be so quick to throw away the camera manual – it might be just the thing you need to really understand the workings of your camera.

7. Use a traditional film camera

10 tips to become a better photographer

Medium format camera love, one of only 16 frames per roll. I love the way medium format film renders colors and tones.

This ties in to point number four above. A film camera is a great way to learn the manual mode of photography because it really makes you think about light, exposure, ISO, and aperture to produce a good, clean image. Also, there is no chimping at the back of the camera screen so you really have to slow down and think of the photo you are trying to produce and then click the shutter.

You have a limited amount of frames per film role and have the additional cost of developing and scanning your pictures at the end of the day. All these factors make you a more intentional photographer as opposed to a “spray and pray” photographer (one who takes several pictures in automatic mode and hopes that at least one will work in his/her favor).

8. Study the work of other photographers

I am sure you have a lot of photographers that you really look up to for various reasons – how they compose, how they handle difficult lighting situations, how they interact with their subjects or even how they run successful photography businesses. Follow them, study how they do things, figure out what makes them tick and how they succeed, and use those ideas to reflect in your own road to improving your photography.

10 tips to become a better photographer

Last summer in Rome I really practiced using a lot of negative space in my cityscapes. Sometimes just a hint of a popular landmark is needed to give a sense of place.

9. Experiment with new techniques

Contrary to popular belief, I feel that photography is not something that you can study in a limited amount of time and then say you are an expert in this field. The field is constantly evolving and expanding and there is always something new to learn.

Become a student no matter what your level of experience and be open to learning new and exciting things in this art of form. It is sure to bring forth much progress in your craft overall.

10 tips to become a better photographer

Triple frame shot on medium format film during an editorial shoot to showcase busyness!

10. Evaluate your own work with a critical eye

Really think about what the work you are producing. Before asking for critiques, refer back to your work and figure out what you like and don’t like in your own work. Chances are you will find several things to add to that list.

Also don’t be quick to delete photos you may not like right now. Wait for a few days to look back and assess all your images. You are more likely to find some new favorites among photos that you previously thought were not correct or worthwhile.

Conclusion

I hope these 10 tips really helped shift your mindset a little bit towards your photography. Hold on tight to that feeling of being invincible that often comes with the new year and use it to the best of your abilities to better your skill and craft.

Tell us about your photography goals for this year in the comments below.

The post 10 Ways to Become a Better Photographer in 2018 by Karthika Gupta appeared first on Digital Photography School.


Digital Photography School

 
Comments Off on 10 Ways to Become a Better Photographer in 2018

Posted in Photography


When photographers become pitchmen

14 Dec

This article was originally published on the PhotoShelter blog, and is being republished in full on DPReview with express permission.


It’s not surprising when camera companies hire photographers to pitch their products. But photographers have also been enlisted to sell other types of products; the result of Madison Avenue trying to romanticize the occupation, even though the reality often fails to meet the expectation. Nowadays photographers are more likely to spend the majority of their time sitting at a desk in post processing, or trying to collect on invoices that are 6 months past due.

Nevertheless, we’ve seen a number of companies in a variety of industries employ photographers in their ad campaigns in the past few years, spaning the gamut from the old living icons to the newest generation of light chasers.

Elliott Erwitt for Cole Haan

As a part of their “Born in 1928” campaign launched in 2013, shoe brand Cole Haan teamed up with the legendary Elliott Erwitt to celebrate the “off” year 85th anniversary of the brand. The cherubic-faced Erwitt looks smartly dressed in a pair of Cole Haan kicks, while draping his camera over his shoulder. Photographer Daniel Jackson shot the campaign.

Lynsey Addario for Audi

Decorated war photographer Lynsey Addario’s decision to appear in a 2014 Audi ad wasn’t without controversy, given the glamorization of the job vis-à-vis the death of her driver at the hands of her captors.

On the other hand, the choice to use a female war photographer undoubtedly had an impact on the public’s understanding and definition of war photographer—showing that both men and women put their lives on the line to cover the atrocities of war.

Steve McCurry and David Alan Harvey for Filson

In 2014, Filson, the longtime purveyor of outdoor clothing and bags, teamed up with Magnum Photographers Steve McCurry and David Alan Harvey to design a set of camera bags that Harvey described as, “something I could use in the Favelas in Rio, but still take to a dinner party.”

Although the bags had a limited run, Filson cleared banked on the mythology of two of the industry’s heavyweights.

Pei Ketron and Paul Nicklen for American Express

Photographer and educator Pei Ketron burst to prominence as one of the early “recommended” photographers to follow on Instagram, helping to make her one of the first photographers to gain half a million followers.

Biologist/photographer Paul Nicken’s incredible undersea images and prominence in the National Geographic’s Instagram feed has helped to propel him to over 3.8 million followers and growing.

The significant social media reach likely influenced American Express’ decision to tap both photographers in early 2016 for a series of travel-based ads touting the benefits of the AMEX Gold Card (“double and triple points, plus no foreign transaction fee!”)

Barbara Davidson for Volvo

Former Los Angeles Times photojournalist and Pulitzer Prize-winner Barbara Davidson was tapped by Volvo in 2017 to show off their XC60 urban camera safety system. Volvo’s unorthodox approach used Davidson’s skills as a photographer combined with the car-as-camera to create a commercial and gallery exhibition.

Andre D. Wagner for Cole Haan and Theory

Omaha-born social worker turned NYC street photographer, Andre D. Wagner, has been blowing up lately. His timeless street photography has gained him an appreciative audience and broad media coverage with simultaneous comparisons to photographers like Garry Winogrand.

Doing what I do, chasing light and life in @ColeHaan’s grand explore all terrain. #Extraordinaries #ColeHaanPaidSponsor

A post shared by Andre D. Wagner (@photodre) on

Young, talented, black, and handsome—it’s no wonder that brands like Cole Haan and Theory has started to flock to him as an authentic voice of a generation. Plus, he’s still shooting and developing black and white film!


Allen Murabayashi is the Chairman and Co-Founder of PhotoShelter. He’s an avid photographer and frequently speaks on how photographers can use online marketing to grow their businesses.

Articles: Digital Photography Review (dpreview.com)

 
Comments Off on When photographers become pitchmen

Posted in Uncategorized


7 Ways to Become More Spontaneous with Your Street Photography

16 Apr

As you become more experienced and comfortable doing street photography, you will notice that the way you shoot will begin to change. You will notice more, focus more on what you like, and your work will improve significantly. At this point, it can be important to embrace spontaneity in the way that you shoot.

street photography NYC

So often the first shot of a scene that you take will be the best, for reasons I can’t explain, except that your gut and instinct are something to embrace with this type of photography. The more experienced you become, the more vital they will be.

Here are some tips that have helped me to shoot in a more spontaneous fashion.

1. Choose your camera settings so that you can forget about them

The first step is to figure out your camera settings so that you can forget about them. You don’t want to worry about your camera or changing settings as you’re shooting. When you’re feeling good, it often feels like the camera isn’t there.street photography

If it’s a shady day and the lighting is consistent, then it’s easy to choose your settings and not have to worry about them. But it becomes tough when you are shooting in direct sunlight, where some areas are lit with extreme light and others are in the shadows.

For these situations, what I will do is change my camera to Aperture Priority mode, around f/8, and I will put my ISO up high, to around 1600. I will make sure that when I point my camera at shady areas it will still give me a fast enough shutter speed, like 1/250th of a second, to freeze motion in people. Then, when I point the camera in sunny areas, the shutter speed will be something insane, maybe 1/1000th or more of a second.

Obviously, these settings are not perfect for sunny areas since the ISO is high, but with newer cameras, ISOs of 1600 look beautiful. I prefer to shoot with these settings because it allows me to forget about my settings regardless of what light I walk into. It makes the day much more fun and relaxing, and I can spend more energy looking around.

2. Slow down and shoot quick

street photography NYC

When I work with newer photographers, I often seeing them run from place to place, searching for that elusive spectacular moment, as if the more ground they cover will yield more of those moments. Those moments will occur whether you are moving fast or not. Except when you are moving fast, you’re not focusing on the area that you’re in at the moment. There are interesting photos everywhere, particularly in places that you might have previously disregarded.

The slower you move, the faster you will be able to react when something happens. By increasing your awareness, you will allow yourself to be more spontaneous. You will have more gut feelings to follow. This will allow you to react much quicker when actually capturing the photograph.

3. Spend more time looking with your eyes than the viewfinder

street photography scene

In street photography, your eyes should be the real viewfinder. Focus your energy on looking around. It’s actually hard to do, especially if you are easily distracted or going from place to place. Notice the potential for something to happen with your eyes and get in position, then the viewfinder and camera will follow. But it should almost feel like the camera isn’t there – the hard work is done before you even bring it up to your eye.

4. Figure out how to take good photographs anywhere

street photography - garbage

Stop taking things for granted. The more you think an area will not provide you with a good photograph, the more you should try to get a good one there. Much of the time you’ll get nothing, but you will be surprised how often this works out, and it’s a fantastic way to train your eye.

This will also allow you to create unique and interesting photographs. By shooting in areas where not many others photograph, your good shots will be unexpected. They will stand out.

5. Go with your gut

street photography - crosswalk

We’ve talked a lot about going with your gut already, but what does that really mean? When you’re out there shooting, you’re going to get feelings that moments are about to happen. Most people wait to actually see something happen before they shoot, and often the moment has disappeared by then.

When you feel something good is about to occur, capture the moment in a quick and spontaneous way. Go for it instinctively – use your instincts to your advantage and develop them. While many of these shots will turn out to be nothing, when you hit one at the perfect moment, you will be left with an incredible image that you could not have captured otherwise. Be spontaneous.

6. Don’t worry about perfection

street photography

It is common for newer photographers to worry about cutting people’s feet off, something getting in the way, or the shot being skewed. I have heard so many comments about wishing that a person, group, or object wasn’t in the background or in a certain location. This is, of course, important stuff to consider. But when I hear these comments being made, I detect that the reason they find these things annoying is because they ruin the perfection of the image.

Have you ever shown an image to someone and the first thing they notice is this random background detail that’s barely noticeable? This is part of having too much focus on perfection, and it can drive you crazy. You’re trying to get the most perfect and clean image possible, and that is rarely possible in street photography. You take what is given to you, and an interesting moment is an interesting moment.

Street photography is supposed to feel real, and so many of those imperfections can add to that feeling of it being a spontaneous moment. They can improve an image just as much as they can ruin it. Try to embrace these imperfections when you can as being part of a real and special moment.

7. Don’t be afraid to take weird photographs

street photography - weird

These photographs are for you. You don’t need to take photographs that appeal to everyone, and not everything has to be perfect, grand, and pleasing. Capture photos that are not standard, off in some way, and weird. Focus on what interests you and try to foster that. This is where the voice in your work will begin to shine.

The post 7 Ways to Become More Spontaneous with Your Street Photography by James Maher appeared first on Digital Photography School.


Digital Photography School

 
Comments Off on 7 Ways to Become More Spontaneous with Your Street Photography

Posted in Photography


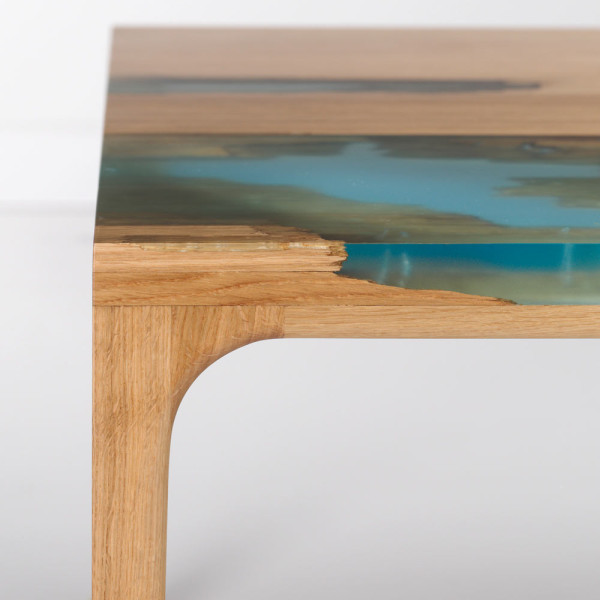
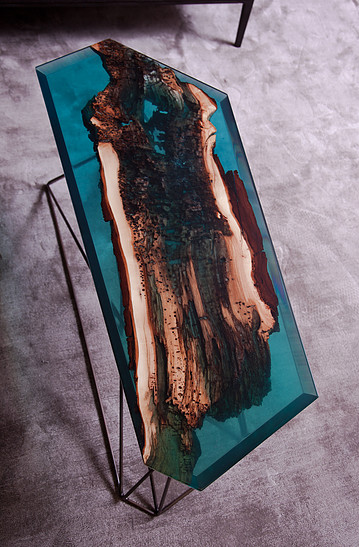
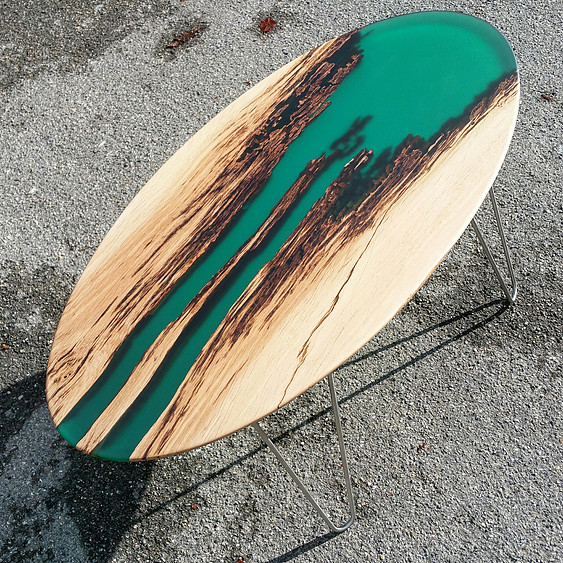
Filling the Void: 25 Resin-Inlaid Wood Furniture Designs Become Whole Again

11 Apr

[ By SA Rogers in Design & Furniture & Decor. ]

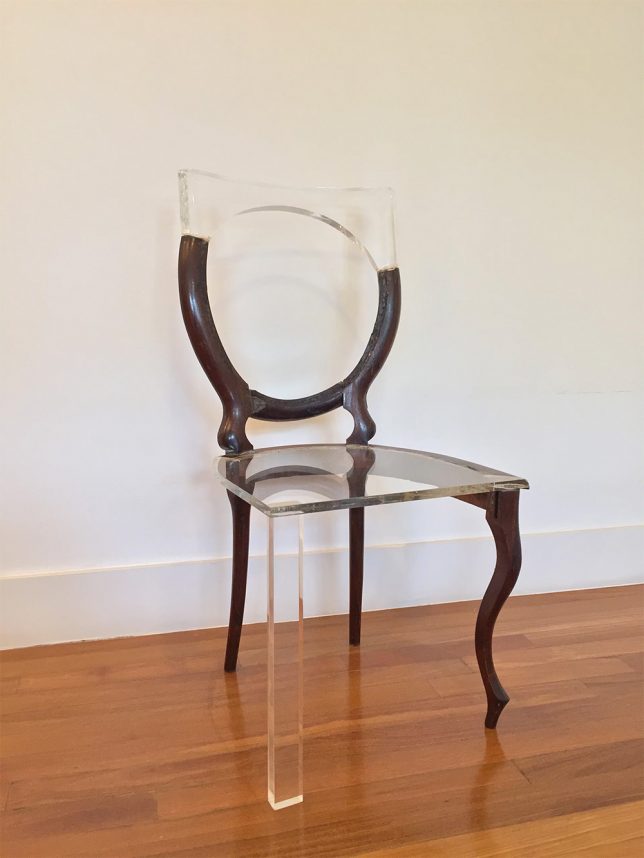
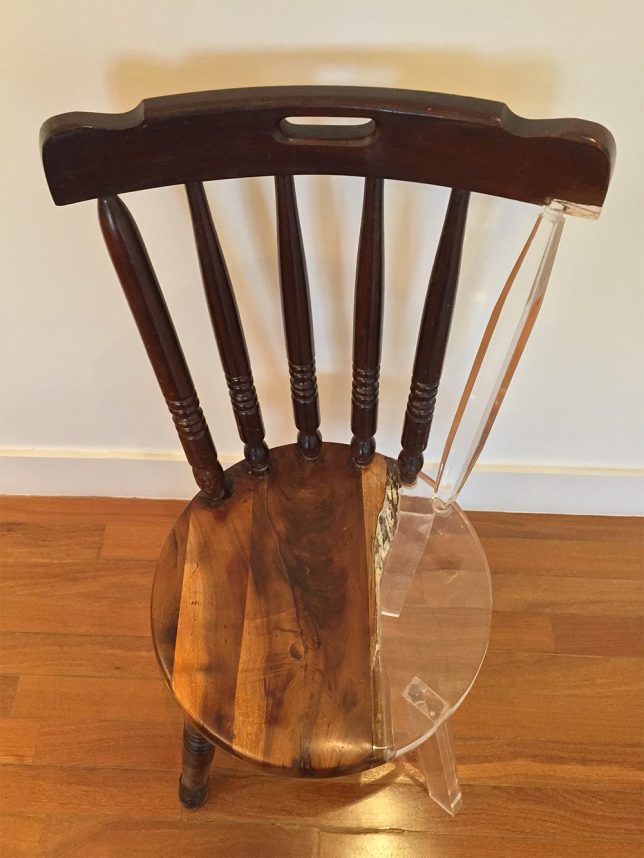
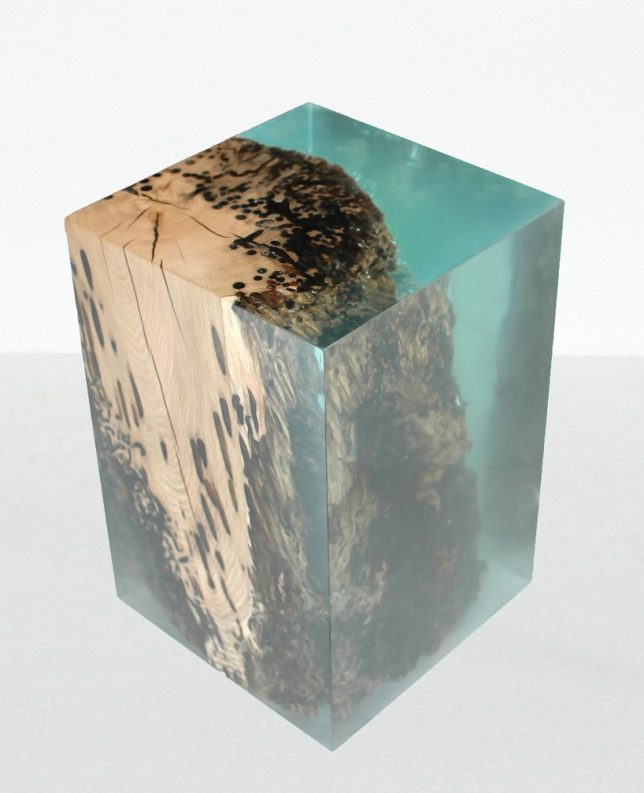
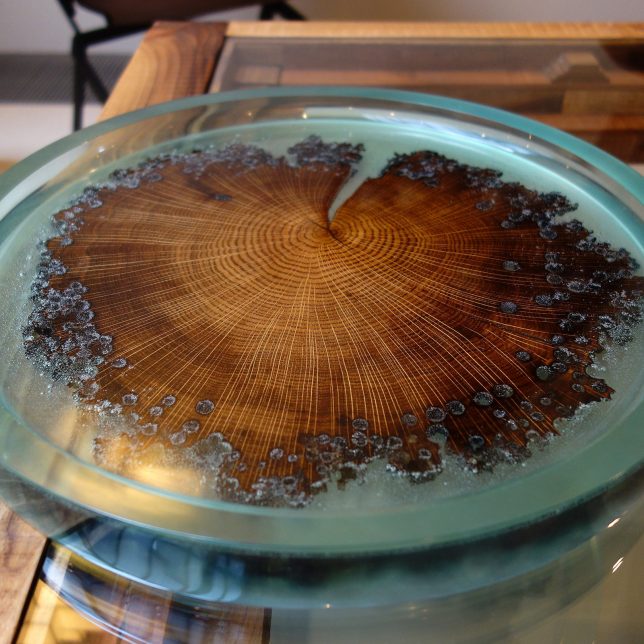
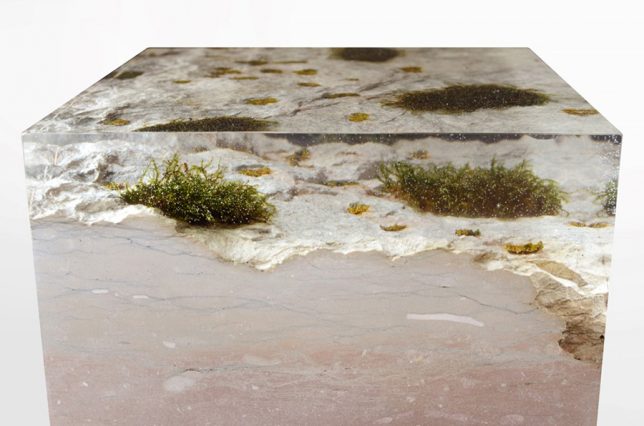
When married with clear resin, voids in wood or stone created by years of use, natural burls, intentional damage and even shipworms are made whole again, while leaving their ‘wounds’ visible. Broken furniture is repaired with ghostly additions, splintery snapped boards are made smooth and literally ancient time-worn wood is preserved for posterity like insects caught in amber. The results not only salvage items though to be beyond repair, but also make them feel like museum-worthy artifacts.

Disappearing Furniture: Broken Pieces Healed with Resin

Pieces of furniture that seem broken beyond repair are proven salvageable after all, with their missing pieces seemingly made invisible. Tatiane Freitas created the series ‘My Old New chair’ using translucent acrylic, the new elements matching the scale of the older pieces but not the style. The results intentionally leave the ‘wounds’ of the old furniture visible and highly noticeable, as if the acrylic is a ghost of what once was or a hint at what it could evolve into.

Broken Board Series by Jack Craig

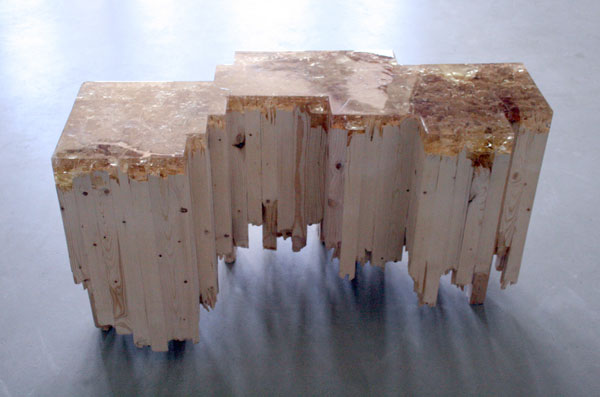
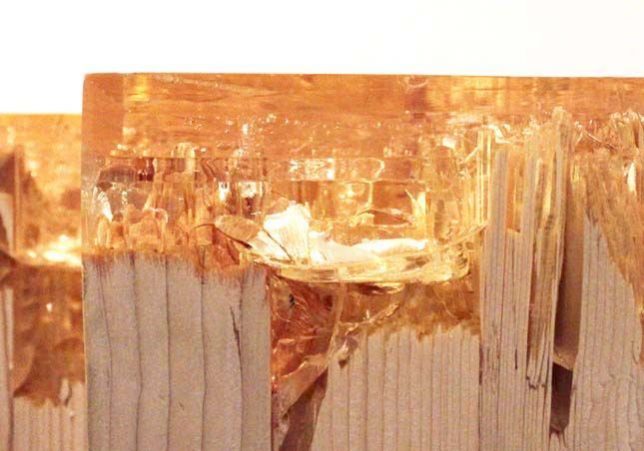
Smashed and reconstituted pine wood gets a whole new purpose – and surface – thanks to Detroit-based industrial designer Jack Craig, who seals them with caramelized resin for his ‘Broken Board Series.’ The splintered ends of the wood are visible through the resin for an interesting textural effect.

Forest Artifacts by Alcarol

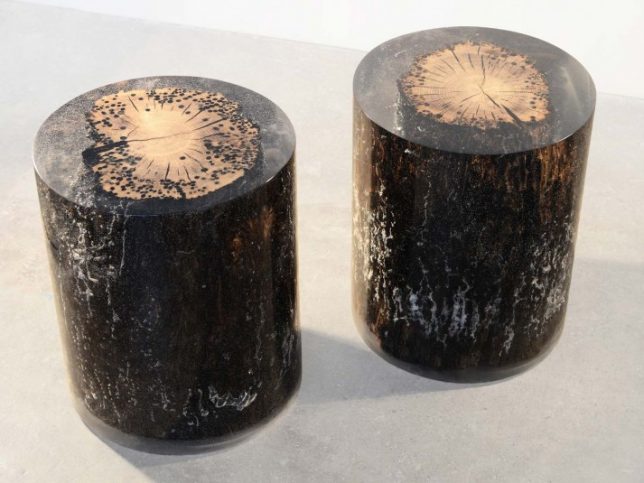
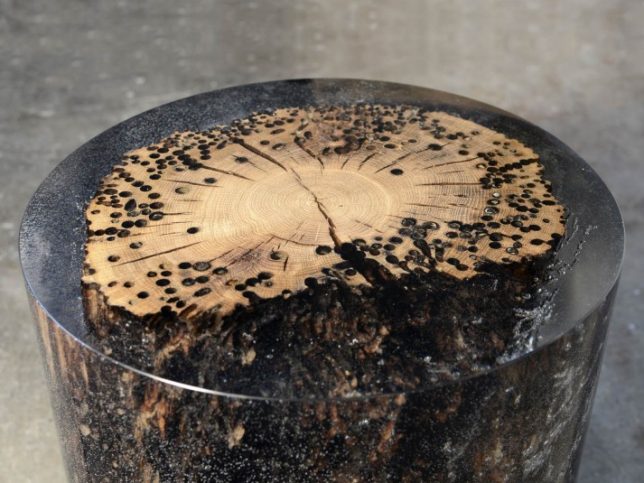
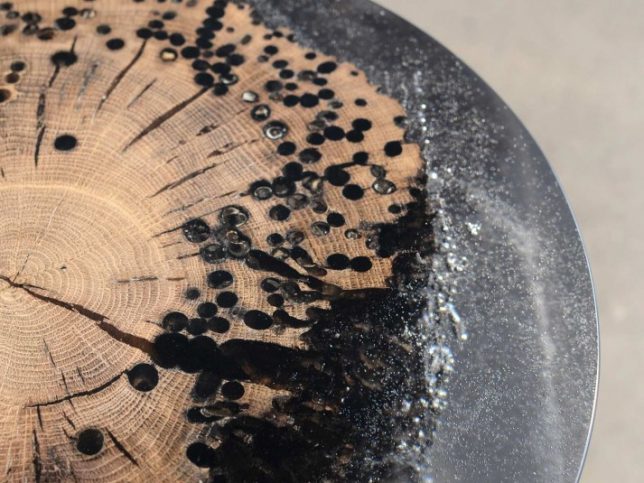
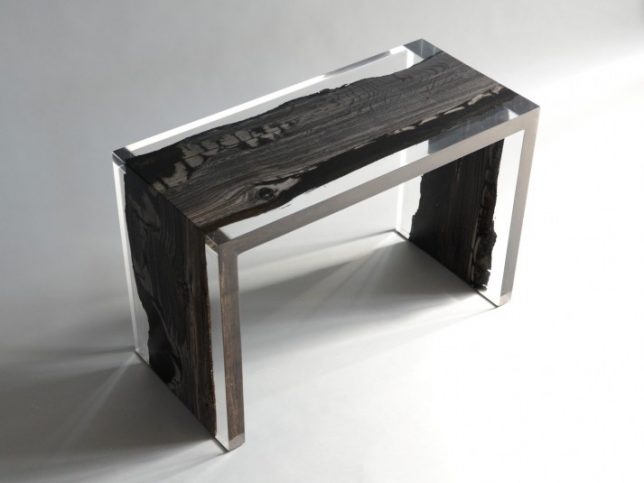
Design duo Alcarol creates ‘forest artifacts’ by pairing wood and resin in various designs, from an irregular wooden bench made sharply rectilinear to ‘fisheye stools,’ the latter of which features timber poles salvaged from the foundations of the city of Venice. The poles, the designers explain, were “driven into the lagoon’s caranto layer – a mixture of solid clay and sand situated at great depths. In spite of everything, Venice continues its fight against the muddy ground and ever increasing water levels. Fish Eye, which is sculpted by water, salt, shipworms and time, is a tribute to this epic submarine struggle that has transcended millennia. During their stay in the Laguna, these Oak logs are deeply sculpted by Teredo Navalis, shipworms that leave traces of their passing on the wooden surface producing striking patterns of circular holes, whilst avoiding the inner core of the log, allowing it to maintain its health and strength. This creates a beautiful contrast between other decay and inner robustness.”

MANUFRACT Furniture Inspired by Self-Healing Trees

The MANUFRACT series of furniture by Marcel Dunger mimics the way trees heal themselves by releasing resin into their ‘wounds.’ The hand-crafted furniture is made of broken wood patched with tinted resin in a manner reminiscent of kintsugi, the Japanese art of repairing a broken piece of pottery with gold.

VOLIS by Atelier Insolite

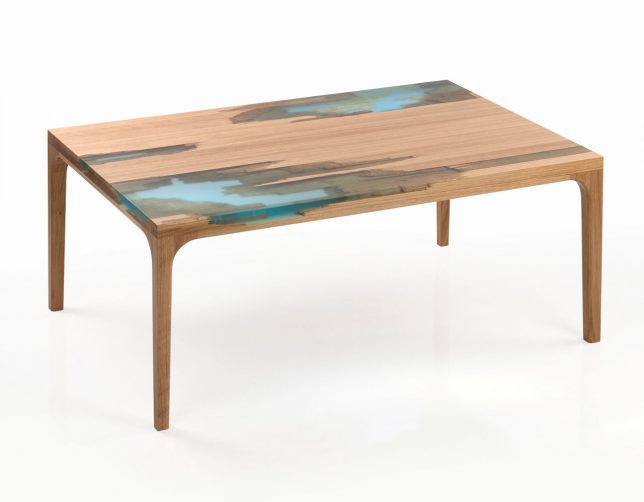
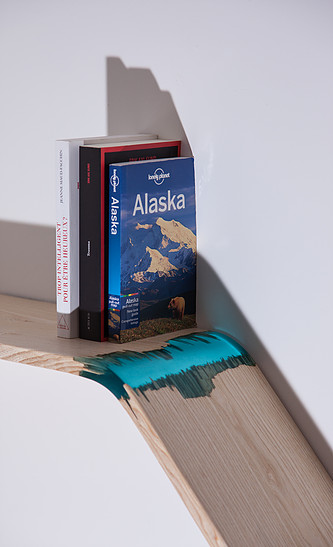
The ‘VOLIS’ series by Atelier Insolite embeds objects with resin, including shelves, side tables, coffee tables, consoles and other furniture items. The designers intentionally seek out wood with natural voids and broken-off elements so they can fill in the spaces with blue-tinted resin, giving the finished pieces an oceanic feel.

Next Page – Click Below to Read More:
Filling The Void 25 Resin Inlaid Wood Stone Furniture Designs

Share on Facebook


[ By SA Rogers in Design & Furniture & Decor. ]

[ WebUrbanist | Archives | Galleries | Privacy | TOS ]


WebUrbanist

 
Comments Off on Filling the Void: 25 Resin-Inlaid Wood Furniture Designs Become Whole Again

Posted in Creativity


9 Things You Need to Know to Become a Nature Photographer

29 Mar

Nature photography is a very popular field to be involved in. That’s no surprise though, as it gets you outdoors and seeing our planet in a way that others may miss. When I first started as a nature photographer, I began to see things differently. It sounds cliché, but I paid more attention to my surroundings and saw things from different angles.

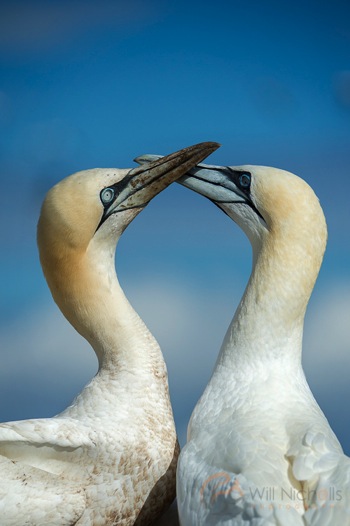
Will Nicholls 3This tutorial will look at some of the most important things to keep in mind if you are looking to become a nature photographer.

#1 You’ve got to love it

Luckily this isn’t a very hard thing to adhere to, but you must love nature to excel at capturing it on camera. Nature photographers spend a lot of time outdoors. If you’re a landscape photographer, you’ll spend lots of your time hiking through scenic areas for just a few clicks of the shutter. Wildlife photographers often spend hours and hours sitting in one place, waiting for an animal to appear. Without the passion and drive behind you, this can be mind-numbing.

So it’s not for everyone, but if you’re reading this article, then chances are you have that interest programmed within you already!

#2 Be different

While it’s great that nature photography is so popular, this brings with it one big challenge – everybody is doing it. This means you need to figure out how you can be different (assuming you want your photos to be noticed).

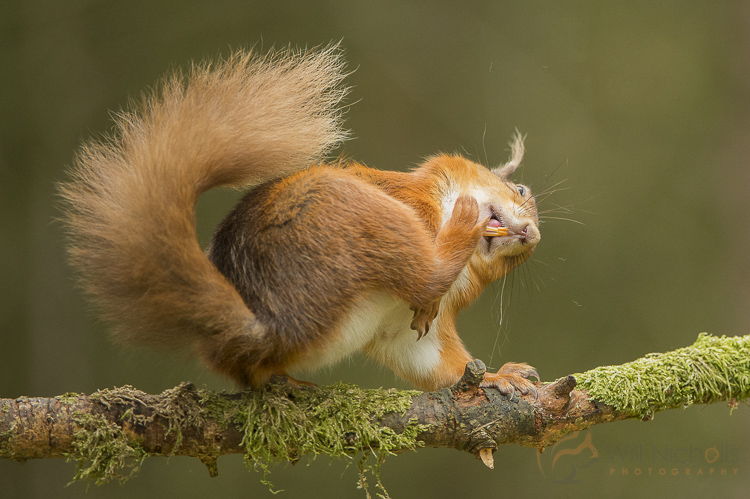
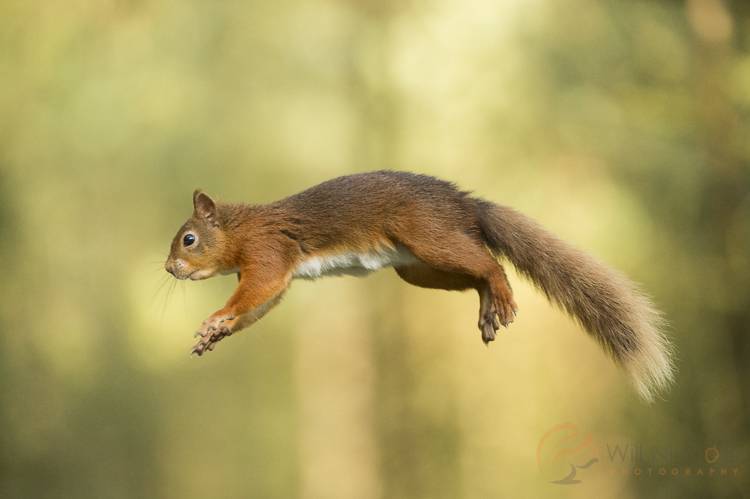
This could be anything from focusing, and specializing on a single family or species of animal, to developing an artistic quirk and style in your photography. Personally, I spend a lot of my time photographing red squirrels – thousands of hours actually, to give you some idea. All this time has allowed me to learn about the animal, and capture behaviour that others have not managed.

Will Nicholls 5

#3 Take risks

By taking risks I mean with your time, not necessarily something dangerous to your wellbeing. As the saying, “Nothing ventured, nothing gained.” suggests, if you don’t take risks then you are unlikely to capture those truly mesmerizing images.

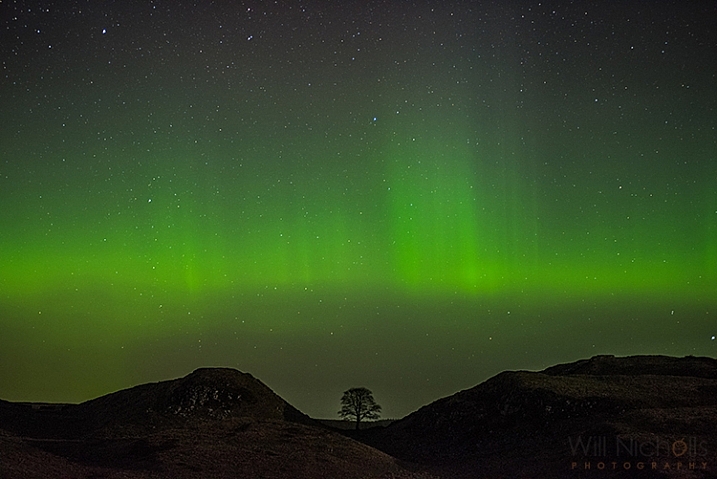
Recently in the North of England, there was a display of the aurora borealis. Typically, it is hard to predict this phenomenon, and the available forecasts only look an hour ahead. It can finish as quickly as it starts, so planning for such an event is not really possible. I decided that I wanted to capture the Northern Lights with a particular castle in the foreground, but it was over two hours away. Nevertheless, at 2 a.m. I dropped everything, and raced off to the coast. When I arrived the display was weakening, but I waited a further two hours and the lights erupted in front of me. I got home at 8 a.m., but it was well worth it.

I’m particularly pleased with this result as photographing the Aurora Borealis can be especially challenging because we are positioned only just north enough to see them.

Will Nicholls 8

#4 Be respectful of nature

Unfortunately, this is one thing that is not adhered to by everyone who calls themselves a nature photographer. Having an ethical approach to your photography, especially when it involves animals, is of the upmost importance. Those who don’t are shamed within the industry, and immediately lose the respect of the majority of photographers who really care about their subjects.

No photo should come before the welfare of an animal or place. It’s just that simple, and remembering this rule will help to improve your photos in the long run. The best photographers don’t cut corners, and you’ll find they have a great affinity with the environment.

Will Nicholls 4

#5 Think about what you’re photographing

It’s easy to press the shutter when you finally find what you’re looking for, whether that be an animal or a scene, but clicking the shutter without thought will often result in unimpressive photos. Think about what you’re trying to convey to the viewer. You want the person looking at the picture to feel like they are in your shoes, looking at the scene themselves.

For landscape photography, this often comes with effective composition, thinking about both your foreground and background to properly document a scene, and avoiding a flat appearance.

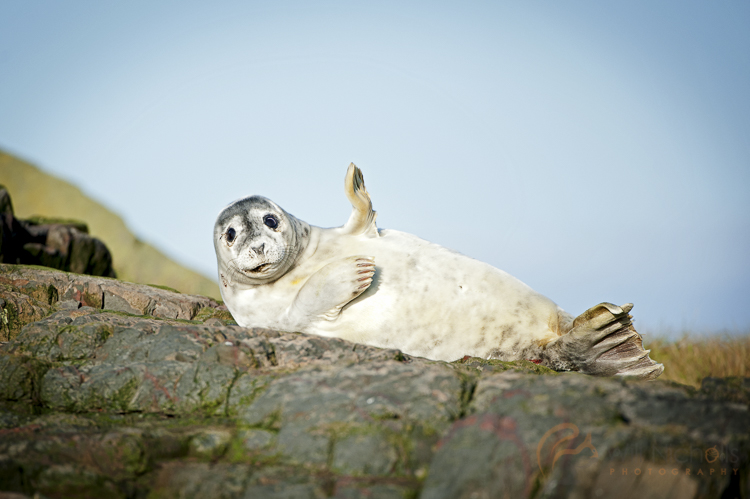
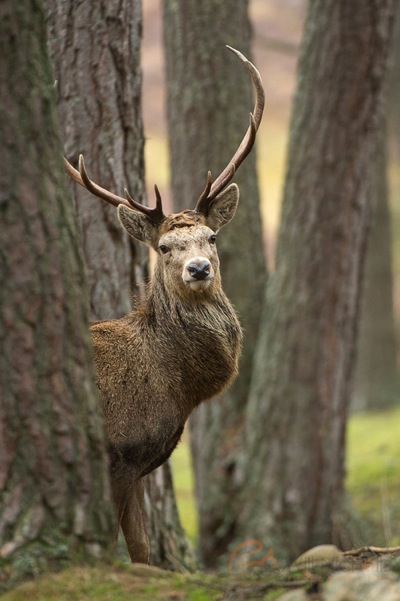
With wildlife photography, this comes from capturing the character and behaviour of an animal. Impactful photos can be achieved by establishing eye contact between the viewer and the subject.

Will Nicholls 7

#6 Introduce scale

Sometimes we are just bowled over by the scale of something in nature. Documenting this with a camera can be tricky as you’re recording a three dimensional scene with a two dimensional medium. Think about using objects to show scale in your photos.

For this photo of the Northern Lights, I photographed it above a tree. This tree is particularly famous, resting in a gap on Hadrian’s Wall in England – and it’s actually rather large itself! This helps to convey the expanse of the sky and display above.

nature photography


#7 Try a different lens

This is another way of experimenting with your photos, and it works for both landscape and wildlife photography. If you usually shoot with a wide-angle lens, then put it down and pick up a telephoto. If you use a telephoto, then try something shorter. This forces you to play with perspective, and capture something new.

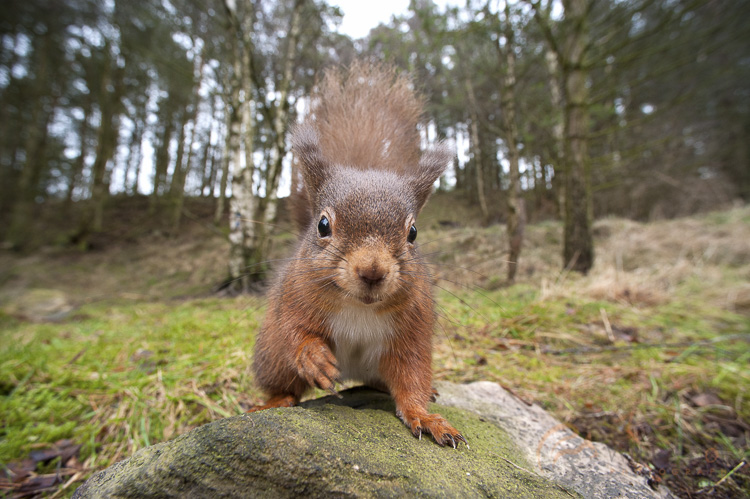
Photographing wildlife with a wide-angle lens is great fun, and can result in some fun shots that incorporate the surroundings into the image.

Will Nicholls 2

#8 Plan your shoots

Just because nature is relatively unpredictable, that doesn’t mean you shouldn’t plan your shoots. Have an idea of a photo you want to capture, and keep at it. Maintaining a long-term study of an area, or animal, will allow you to capture something extra special. It may be that particular shot you’ve been chasing, or something completely different.

#9 Don’t give up

If it was easy then everyone would do it. Nature photography requires a huge amount of time, but it should also be something that you can relax and enjoy – it definitely shouldn’t be a burden on you.

Will Nicholls 6

Results don’t come instantly, and like anything, it takes practice to achieve great images. Since you can’t direct nature and tell it what to do, taking good photos can be a longer process than in the other disciplines, but the challenge is what keeps it interesting.

Please share any other things you’ve noticed about being a nature photographer, and your nature images in the comments below.

amzn_assoc_placement = “adunit0”;
amzn_assoc_enable_interest_ads = “true”;
amzn_assoc_tracking_id = “dpsgeneral-20”;
amzn_assoc_ad_mode = “auto”;
amzn_assoc_ad_type = “smart”;
amzn_assoc_marketplace = “amazon”;
amzn_assoc_region = “US”;
amzn_assoc_linkid = “6710d26f550e9793f41475ee806fee9e”;
amzn_assoc_emphasize_categories = “13900861”;
amzn_assoc_fallback_mode = {“type”:”search”,”value”:”digital cameras”};
amzn_assoc_default_category = “Photo”;

googletag.cmd.push(function() {
tablet_slots.push( googletag.defineSlot( “/1005424/_dPSv4_tab-all-article-bottom_(300×250)”, [300, 250], “pb-ad-78623” ).addService( googletag.pubads() ) ); } );

googletag.cmd.push(function() {
mobile_slots.push( googletag.defineSlot( “/1005424/_dPSv4_mob-all-article-bottom_(300×250)”, [300, 250], “pb-ad-78158” ).addService( googletag.pubads() ) ); } );

The post 9 Things You Need to Know to Become a Nature Photographer by Will Nicholls appeared first on Digital Photography School.


Digital Photography School

 
Comments Off on 9 Things You Need to Know to Become a Nature Photographer

Posted in Photography


Disused 15-Mile Railway to Become Country-Wide Park in Singapore

18 Dec

[ By WebUrbanist in Architecture & Cities & Urbanism. ]

nature converted rail

An ambitious infrastructure conversion project in Singapore will turn 15 miles of a abandoned rail corridor into a continuous mixed-use trail-and-park system stretching from one end of the island city-state to the other.

nature park map

Led by the Urban Redevelopment Authority and designed by Japanese firm Nikken Sekkei, the coast-to-coast master plan features over 100 access points and 20 modular platforms for various uses, strung together with contiguous bicycling and pedestrian paths.

nature park

nature park singapore

Some spaces will be dedicated to nature-oriented activities, including secluded boardwalks and rainforest viewing stations. Other nodes will be community-oriented, with outdoor movie projectors, climbing walls, information stations, food vendors and additional activity centers.

nature park information

The southern terminus will be the Tanjong Pagar Railway Station, and the long route north will bring the trail system past a series of both remote and urban areas, under viaducts and over bridges, offering access to city dwellers but also escapes into nature and compelling views. In some cases, redundant infrastructure (like former train stations) will be incorporated into this rails-to-trails redevelopment plan.

nature park climbing wall

nature park urbanism

The goal is to create “seamless public space” that prioritizes the “preservation and reintegration of existing green areas and a relaxed extension of modern life,” according to the designers. The rail corridor should be “inspiring, accessible, comfortable, memorable, eco-friendly and growing/evolving … acting as a catalyst to development and community bonding.”

Share on Facebook


[ By WebUrbanist in Architecture & Cities & Urbanism. ]

[ WebUrbanist | Archives | Galleries | Privacy | TOS ]


WebUrbanist

 
Comments Off on Disused 15-Mile Railway to Become Country-Wide Park in Singapore

Posted in Creativity


24 Hour Deal: Become a Lightroom Expert Quickly and Easily

15 Dec

Today we have an amazing deal for you as deal 2 in our 12 Deals of Christmas.

It’s 85% off Cole Joseph’s Lightroom Training Workshop.

NewImage

Cole Joseph has processed over half a million photos in his career and so certainly knows a thing or two about Lightroom.

In this workshop he’ll share his best tips and tricks with you to help you prices the highest quality final edits to your images in no time at all.

Walking you through Lightroom step by step, Cole will demonstrate exactly how to use Lightroom to its full potential. You’ll not only learn how to edit more quickly, but see how to get the same results he does.

Buy today at a crazy 85% off, and by this time tomorrow, you’ll be a Lightroom master!

PS: Cole is offering this training with a no risk 30 day money back guarantee. If you buy it and don’t find it meets your expectations – simply ask for your money back. What could be better than that!

googletag.cmd.push(function() {
tablet_slots.push( googletag.defineSlot( “/1005424/_dPSv4_tab-all-article-bottom_(300×250)”, [300, 250], “pb-ad-78623” ).addService( googletag.pubads() ) ); } );

googletag.cmd.push(function() {
mobile_slots.push( googletag.defineSlot( “/1005424/_dPSv4_mob-all-article-bottom_(300×250)”, [300, 250], “pb-ad-78158” ).addService( googletag.pubads() ) ); } );

The post 24 Hour Deal: Become a Lightroom Expert Quickly and Easily by Darren Rowse appeared first on Digital Photography School.


Digital Photography School

 
Comments Off on 24 Hour Deal: Become a Lightroom Expert Quickly and Easily

Posted in Photography