RSS
 

Posts Tagged ‘Backlight’

Think Tank launches MindShift BackLight Elite 45L backpack for outdoor photographers

01 May

Think Tank Photo has launched the new MindShift BackLight Elite 45L backpack for outdoor photographers. As its name suggests, the new BackLight bag features a 45-liter capacity; there’s space for both camera gear and a 17″ laptop and 10″ tablet. The backpack’s exterior includes attachment points for additional gear, including axes, skis or a snowboard, tripod, and ropes.

The BackLight Elite 45L is constructed from 420D rip-stop nylon (external) and 200D polyester (internal), as well as high-performance Sailcloth, 350G and honeycomb airmesh, nylon webbing, YKK AquaGuard zippers, and more. Think Tank describes the backpack as ‘storm-resistant.’

Features include an internal aluminum frame, lumbar padding, waist belt, foam ventilation ridges, and a quick-dry back panel. The BackLight Elite likewise sports a waterproof heavy-duty tarpaulin base, space for a hydration reservoir, back and top panel access, two water bottle pockets, and front pockets offering a total of 17 liters of space.

The company provides the following examples of possible gear packs that the backpack can accommodate:

  • Nikon D3S attached to 70–200mm f/2.8, SB-910 Speedlight, 105mm f/2.8 Macro, Sigma 35mm f/1.4 ART, 50 f/1.4, Filter Nest Mini, 24–70mm f/2.8, 14–24mm f/2.8
  • Canon 1DX attached to 70–200mm f/2.8, GoPro Hero 5, DJI Mavic Pro, Mavic Controller, 24–70mm f/2.8, 16–35mm f/2.8, 90mm f/2.8 TS-E
  • Sony A7R II attached to 24–70mm f/2.8 GM, GoPro Hero 5, DJI Mavic Pro, Mavic Controller, Filter Nest Mini, A7R II attached to 16–35mm f/4
  • Holds a gripped Nikon DSLR and a 600mm f/4 FL ED VR 70–200mm f/2.8 GM, 90mm f/2.8 Macro
  • Canon 1DX attached to 24–70mm f/2.8, GoPro Hero 5, 85mm f/1.8, 90mm f/2.8 TS-E, 1DX attached to 16–35mm f/2.8, 70–200mm f/2.8, 2x Teleconverter
  • Nikon D3S attached to Sigma 150–600mm f/5-6.3 Sport, SB-910 Speedlight

The BackLight Elite 45L backpack is available from Think Tank Photo now for $ 399.99 USD.

Articles: Digital Photography Review (dpreview.com)

 
Comments Off on Think Tank launches MindShift BackLight Elite 45L backpack for outdoor photographers

Posted in Uncategorized


How to Make Dramatic Photos with Backlight

24 Feb

The post How to Make Dramatic Photos with Backlight appeared first on Digital Photography School. It was authored by Mat Coker.

Most people don’t notice light. But visual artists do. Light is one of the essential ingredients in your photographs.

Light can be tricky to deal with until you understand camera settings. But once you’re familiar with your camera, light is wonderful to play with in your photos.

Personally, I love backlight. It adds a sense of drama and beauty to your photography.

I’ll show you examples of backlight with food, landscape, and portrait photography (studio and outdoors).

In order to achieve backlight in your photo, have the main light source behind your subject coming toward your camera. In this photo, you can actually see the warm setting sun as the source of backlight.

What is backlight good for?

I love backlight because it adds depth and drama to an otherwise flat, two-dimensional photo.

Backlight helps to bring out the texture of objects that you photograph (sidelight is good for this as well). Texture is created through a combination of highlights and shadows. Since photographs are two dimensional, texture adds depth to your photo.

A strong burst of backlight adds drama to your photo. Think about the bursts of light at a rock concert or other performances. The temperature of the backlight (warm or cool) adds to the drama of the photo.

The backlight source might be in your photo along with your subject (as with the sunset photo above). Or the light source can be outside of the frame (as long as it illuminates your subject).

Any source of backlight can be used creatively, but sunlight, windows, and strobes are among the most popular.

The principals of backlight are the same no matter what camera you’re using, even your phone.

This ice-covered tree is backlit by the sun. Without backlight shining through the branches, this tree would not have stood out so much.

Food

It’s great to begin practicing backlight with food. Backlight can be used to illuminate steam and bring out the texture of the food.

While any light source will work, many photographers love using window light to illuminate food.

The light source is not visible in this photo, but there is a window backlighting the food and making the steam visible.


This food was photographed while still in the oven. The warm backlight is coming from the oven light.


This is an example of soft backlight produced by a large window. I wanted to bring out the texture in the cookies. An iPhone 4s was used to capture the image and Lightroom was used to process it.

Your food photos will be less flat and have more pop to them when you use back (or side) light. Just look for a window or any other light source. Get creative and use the light from fridges, stoves, and lamps.

The great thing about practicing backlight with food is that if you can’t reposition the light source, you can easily reposition yourself and the food.

Landscape and Nature

Once you get the hang of backlight with food, use it to add drama to your landscape photos. In most cases, you won’t be able to reposition your backlight source since it will likely be the sun. However, you can always reposition yourself in relation to the sun and your subject.

I saw this scene as I looked in the rearview mirror. I couldn’t resist pulling over to take a photo. The setting sun is the light source for this scene. You can’t see it in the frame but it’s behind the trees to the left. Notice how the electricity wires are shining and standing out from the dark trees in the background.


The setting sun behind this crab apple tree caught my eye during a walk. I came back with my camera and found a perspective where the sun was visible filtering through the tree. An aperture of f/11 was used to create the starburst effect.


A combination of backlight and water droplets on the lens created this special effect. I don’t recommend letting your lens get wet, I was using a waterproof case. The case was still wet from using my camera underwater.

Portraits

I love to incorporate backlight into portraits to accent the emotion. Beautiful or intense moments are brought out even more with the use of backlight.

Studio

The best part about backlight in a studio is that you can position your light source any way you like.

Two off camera flashes were used to produce this dramatic backlight.


Superheros are dramatic characters by nature. Using harsh backlight instead of soft front light is better for bringing out the nature of the subject.


Natural light

When using natural light, you’ll have to position yourself and your subject according to the light source.

This little guy is backlit by the setting sun, while the big open sky in front of him illuminates his face.

Troubleshooting

One of the biggest problems about backlight is that your photo may turn out as a silhouette when you don’t want it to.

You’re likely using a semi-automatic setting such as aperture or shutter priority. Your camera sees the bright backlight and meters itself accordingly. You can use exposure compensation to help you avoid unwanted silhouettes. Try setting your exposure compensation to +1 or +2. You’ll need to experiment according to the light conditions.

If you’re experienced then manual mode might be the best option for you.

The main light source is the sky in the background. The sun has not risen over the horizon yet.

Practice backlight with everything

Once you get the hang of it, you can introduce backlight into all sorts of situations. Use it to bring out texture and to heighten dramatic moments.

Concerts are a wonderful place to have fun with backlight. The rapidly changing lights will create a challenge for you. Take lots of photos and be happy with the few that work out.

I love how golden hour can add a nostalgic feel to photos.

Use a combination of low angles and backlight to make your photo more exciting.

I always wait until evening to visit the beach. That way the sun isn’t shining straight down onto the sand. Instead it shines down at a lower angle, creating texture through shadow and highlight.


I love my little guy’s hair. There is a window just above him as the source of backlight.

The post How to Make Dramatic Photos with Backlight appeared first on Digital Photography School. It was authored by Mat Coker.


Digital Photography School

 
Comments Off on How to Make Dramatic Photos with Backlight

Posted in Photography


How to Use Backlight to Create Incredible Images

07 Sep

How to Use Backlight to Create Incredible Images - dandelion bright

With hundreds of thousands of photographers out shooting, how do you distinguish yourself from the pack? How do you repeatedly come home with images that make audiences everywhere gasp? One way is to use a more unique, dramatic style – backlight.

But how do you do this? In fact, it’s rather simple.

In this tutorial, you’ll find a sequence of steps for working with backlight. When you’re finished reading, you’ll have the know-how necessary to take incredible backlit photographs that everyone will love.

backlit flower - How to Use Backlight to Create Incredible Images

Step 1: Shoot early or late in the day

Backlight refers to a lighting situation when the light comes from directly behind the subject.

How to Use Backlight to Create Incredible Images - yellow flower and bokeh

A backlit Black-Eyed Susan.

Because backlit photography requires such a specific lighting angle, it can only be done when the sun is low in the sky. This means photographing early or late in the day.

Too early in the afternoon and the sun won’t offer much directional light. For dramatic backlighting, the sun needs to point across (and into the eyes of the photographer). But during midday, the sun points down.

Also, the golden quality of the light during morning and evening makes for a much more pleasing backlit images.

snow close up - How to Use Backlight to Create Incredible Images

I photographed this backlit snow late in the evening.

Step 2: Find a distinct subject

The subject is the focal point of your image. It is what you want to stand out, what you want to emphasize in your photograph.

interesting flower shape - How to Use Backlight to Create Incredible Images

The best subjects have distinct outlines. That is, they don’t overlap with other elements in the photograph.

A mishmash of trees? Not the greatest subject for a backlight photograph. The trees will all blend together, creating a load of messy shadows.

A single tree against the sky? Now you’re off to a great start.

Step 3: Get low

Once you’ve found your subject, it’s time to begin actually composing your image.

As mentioned above, the best backlight compositions have a distinct subject. But even if you have a relatively distinct subject, it’s important to work to further isolate your subject so that you get the strongest backlit photograph possible.

One way to isolate your subject is by getting down low.

dandelion seedhead - How to Use Backlight to Create Incredible Images

I took this photograph of a dandelion seedhead while lying on the ground. Getting down so low allowed me to isolate the individual seeds.

When you crouch, kneel or even lie on the ground, you change your perspective. Your subject seems to rise into the sky, framed against the bright sky.

This is exactly what you want. A darker subject against a brighter sky is a perfect start to a stunning backlight photograph that you can be proud of.

Step 4: Choose where to put the sun

I have a straightforward recommendation when it comes to backlit photography. That is not to include the sun in the frame.

If you do include the sun, nine times out of ten you’ll find yourself with a bright white blob in your image. That is not very photogenic at all.

Instead, try to place the sun just outside the frame. This way, you’ll still have a brilliant brightness in the sky—which I love to have in my backlight photography—without it being overpowering.

close up of tree bark - How to Use Backlight to Create Incredible Images

The sun is just outside the frame of this tree photograph.

You can also place the sun behind your main subject. This is another effective technique for hiding the sun while getting the full force of a brilliant sky.

Step 5: Expose with the main subject in mind

Exposure refers to the level of brightness in the image. In backlight photography, I recommend exposing the image in one of two ways.

First, you can create a silhouette.

flower silhouette - How to Use Backlight to Create Incredible Images

I captured this near silhouette in the late evening.

In order to do this, start by exposing for the bright sky. That is, dial back the brightness of the image so that the sky itself has some nice detail in it. If there are clouds in the sky, you should be able to see them in your image.

silhouette and bokeh of a flower - How to Use Backlight to Create Incredible Images

Because the sky is naturally so bright, dialing back the exposure will make your main subject dark, which is exactly what you want. After this, it’s a matter of tweaking the exposure to get the exact effect you’re looking for.

Second, you can expose for the main subject.

Personally, I prefer this form of backlight photography. I like to keep some detail in the main subject, while also getting that beautiful backlit glow.

white flower - How to Use Backlight to Create Incredible Images

Here, I was careful to make sure this flower photograph was light enough.

For this type of photography, I start by making sure the exposure is light enough that I can see the main subject. I don’t let it get too bright, because then the sky becomes overpowering.

Of course, feel free to take a few images and experiment with the exposure. Slightly different levels of brightness will give your photographs subtly different moods, so make sure to shoot the scene in several different ways!

In Conclusion

Creating unique images can be difficult. But by using backlight in your photographs, you’ll be able to take incredible images that will impress even the best photographers. Just be sure to shoot when the sun is low in the sky. Make sure you find a distinct subject. Place the sun out of the frame. Finally, be sure to carefully choose the brightness of your image.

Have any other tips for shooting in backlight? Let me know in the comments below.

purple flower close up - How to Use Backlight to Create Incredible Images

The post How to Use Backlight to Create Incredible Images appeared first on Digital Photography School.


Digital Photography School

 
Comments Off on How to Use Backlight to Create Incredible Images

Posted in Photography


MindShift Gear releases 18L version of its popular BackLight daypack

17 Apr

$ (document).ready(function() { SampleGalleryV2({“containerId”:”embeddedSampleGallery_3616816138″,”galleryId”:”3616816138″,”isEmbeddedWidget”:true,”selectedImageIndex”:0,”isMobile”:false}) });

After releasing a set of weather-resistant Exposure messenger bags earlier this month, MindShift Gear is back with a new product: the BackLight 18L backpack for photographers. This new model expands MindShift’s existing BackLight rear panel access backpack lineup, offering the same convenient access in a smaller overall size.

The 18L offers the same features as the larger 26L and 36L backpacks. The bag’s exterior is made with 420D velocity nylon and high-density nylon, 320G UltraStretch mesh, 350G air mesh, YKK RC-Fuse zippers, 3-ply bonded nylon thread, and a water-repellant coating. The interior includes a 210D nylon lining, high-density closed-cell foam, hexa-mesh pockets, PE board reinforcement, and the same 3-ply thread.

One of the BackLight lineup’s biggest features is the ability to remove/replace items without taking the daypack off. Instead, the wearer, after securing the waist belt, rotates the bag to the front and uses the rear panel to access the gear inside. The bag accommodates various gear configurations, such as a pair of gripped DSLRs with attached lenses and an additional 1 – 3 zoom lenses, or a pair of gripped mirrorless cameras with attached lenses and and 3 – 5 additional lenses.

Additionally, the BackLight 18L supports up to 13-inch laptops and a 10-inch tablet, plus there are front compartments with a total 5L capacity for personal items.

Additional features include a front/side mounting system for a tripod/monopod, a pair of large water bottle pockets, lash points, daisy chain, ice axe loops, interior mesh pockets, lumbar support and an air channel. Plus, the bag is compatible with MindShift’s existing Tripod Suspension Kit, Switch Case, Filter Nest, and Filter Hive.

The BackLight 18L is available from MindShift now in Woodland Green and Charcoal colors for $ 200 USD. To learn more, head over to the MindShift Gear website.

Press Release

MindShift Gear’s BackLight 18L Outdoor Photography Daypack Offers Added Comfort and Quick Rear-Panel Access

SANTA ROSA, CALIF – MindShift Gear announces the release of an 18-liter version of its popular BackLight series, the BackLight® 18L rear-panel backpack. This smaller version offers a lightweight daypack that enables photographers to access gear without taking off the backpack. They can change lenses or just snap a quick photo simply by rotating the bag to the front while the waist belt is still secured. Rear-panel access also adds security when traveling since camera gear is protected from behind.

This back-panel access allows photographers to work out of the bag without getting the harness dirty, wet, muddy, or icy. It features dedicated compartments that fit up to a 13” laptop and a full-size tablet. As a daypack, its front pockets total 5 liters in personal gear carry for a day’s outing, such as extra layers, a light jacket, food, and more. It is available in two colors, Charcoal and Woodland Green, and meets most international and U.S. airline carry-on requirements.

This new backpack holds a variety of camera kits:

  • Two gripped DSLRs with lenses attached and one to three standard zoom lenses
  • Two gripped Mirrorless bodies with lenses attached and three to five lenses
  • Fits up to a 13” laptop and a 10” tablet
  • Fits personal gear in the 5L front compartments
  • Maximum lens size: 300mm f/2.8 or 150–600mm f/5–6.3 attached to a body

“The BackLight 18L was designed with comfort in mind,” said Doug Murdoch, MindShift’s CEO and Lead Designer. “The air channel on the rear panel was designed for maximum comfort. It features a large padded waistbelt to support heavy gear and a contoured backpanel for extra lumbar support.”

Additional Features and Benefits

  • Daisy chain, ice axe loops and additional lash points for expanding carry capacity
  • Includes tripod/monopod mounting system on front or side
  • Comfortable padded waist belt for all day comfort on the trail with webbing rail for additional MindShift accessories
  • Flap-keeper neck strap allows unencumbered access to gear
  • Two large water bottle pockets with cinch cord fit a 32oz Nalgene
  • Side compression straps with locking SR buckles for additional lash points
  • Air channel and lumbar support on rear-panel for all-day comfort
  • Ergonomic zipper pulls are easily gripped with gloves or frozen fingers
  • Highest quality YKK zippers, 420D Velocity and 420D high-density nylon for long lasting durability and strength
  • Front stuff pockets for trail essentials, e.g., headlamp, gloves, chargers
  • Adjustable dividers for large telephoto lenses, traditional photo gear, or personal items
  • Top zippered pocket for quick access essentials
  • Interior mesh pockets for storing filters, batteries, cables, etc.
  • Seam-sealed rain cover included, folds flat for use as a ground cover
  • Compatible with MindShift’s Tripod Suspension Kit, Filter Nest, Filter Hive and Switch Case

Materials

Exterior: For superior water resistance, all exterior fabric has a durable water-repellant coating, plus the underside of the fabric has a polyurethane coating. Features the highest-quality abrasion-resistant YKK® RC-Fuse zippers, 420D velocity nylon, 420D high-density nylon, 320G UltraStretch mesh, 350G airmesh, nylon webbing, 3-ply bonded nylon thread

Interior: 210D silver-toned nylon lining, hexa-mesh pockets, high-density closed-cell foam, PE board reinforcement, 3-ply bonded nylon thread

Specifications

  • Exterior Dimensions: 10.6” W x 18.5” H x 7.1” D (27 x 47 x 18 cm)
  • Interior Camera Compartment: 9.4” W x 16.7” H x 5.5” D (24 x 42.5 x 14 cm)
  • Laptop Pocket: 8.9” W x 13.8” H x 0.8”D (22.5 x 35 x 2.1 cm)
  • Tablet Pocket: 8.7” W x 10.2” H x 0.6” D (22 x 26 x 1.5 cm)
  • Total Volume: 18L
  • Weight: 3.5 lbs. (1.6 kg)

Articles: Digital Photography Review (dpreview.com)

 
Comments Off on MindShift Gear releases 18L version of its popular BackLight daypack

Posted in Uncategorized


How to Backlight Translucent Objects for Dramatic Effect

22 Dec

Incorporating translucent elements into your compositions can add an interesting dynamic of luminosity to your photographs. Especially if you can backlight them.

How to Backlight Translucent Objects for Dramatic Effect

Water spray, smoke, steam, and things such as flags, flowers, and fabric when backlit can take on an almost surreal quality because of the way the light refracts as it passes through these types of semi-transparent elements. In this article, I want to share with you some ideas and examples of how to make the most of backlighting translucent objects.

Front light versus backlight

How to Backlight Translucent Objects for Dramatic Effect

If you light a translucent element from the front it will look pretty normal as the light will reflect naturally. Lighting translucency from behind means the light is refracted, (bent,) and scattered before your camera’s sensor records it.

As you can see from the two example photos of the mad scientist with the red liquid in the flask. Notice how the color of the liquid appears very different in the two photos. See how dark it is above, compared to the bright red color in the image below where it has backlighting.

How to Backlight Translucent Objects for Dramatic Effect

Any colored liquid in a glass, or even any colored glass containing no liquid, will take on a dramatically different quality when it’s backlit. The colors will appear lighter than if they are lit from the front.

Position yourself to create backlight

Water spray, steam and smoke all provide you with great opportunities to produce creative photos. Backlighting and photographing any of these elements will return very different results than if you position yourself so the light is behind you and the camera.

As the light passes through these elements, (or anything translucent,) the rays are bent and the light is diffused before your camera records it. Backlit semitransparent things tend to glow because of this.

How to Backlight Translucent Objects for Dramatic Effect

In the image above, I found a good location where the sun was in front of me to photograph during the Song Khran festival in Chaing Mai, Thailand, (which is one huge water fight). This lit up the water spray as buckets were thrown and hoses sprayed on revelers.

Seeing the monk sweeping leaves and burning them in the temple grounds (below) I carefully positioned myself to photograph the sun coming through from behind the smoke.

How to Backlight Translucent Objects for Dramatic Effect

Good subjects for backlighting

Flags and flowers are two of my other favorite translucent things to photograph. If you can find an angle where the sun is coming from behind a flag or row of flags the resulting photos can be far more colorful and interesting than if the flag is front-lit.

How to Backlight Translucent Objects for Dramatic Effect

Photographing flowers where you have the opportunity to light them from behind, or even part of them from behind, (as in this image of the purple orchids,) can really make them pop. However, if you are wanting to get clear and realistic correct color of flowers you are photographing it is probably better to light them from the front.

How to Backlight Translucent Objects for Dramatic Effect

Exposure notes

When you are photographing any backlit element take care to expose well. Don’t be too concerned about getting a “correct” exposure as often slightly overexposing will enhance the effect. Expose to create a feeling or mood rather than to achieve a technically precise result.

Your camera’s exposure meters measure reflected light. When you photograph refracted light passing through a translucent element your camera may not give you an acceptable result if you are using any of the automatic modes. Being in control of your exposure manually will allow you to experiment and set it to give you the result that you think looks best.

How to Backlight Translucent Objects for Dramatic Effect - colorful drinks

The background matters

If you are able to include a dark background in this style of photograph this can often enhance your pictures as well. The glow of a backlit semitransparent element can really stand out from a dark background where the light is three or more stops lower.

This photo of a Lahu man smoking against the dark background of my outdoor studio is a good example of this.

How to Backlight Translucent Objects for Dramatic Effect

Processing

Taking a little more time to post-process photos you have made using this technique is advisable. Because of the unusual nature of the lighting and the subject your camera may not always record the photo exactly how you want it. Manipulating the contrast levels, blacks, highlights and using the dehaze feature will allow you to enhance your photos of translucent backlit subjects.

How to Backlight Translucent Objects for Dramatic Effect

Please share your photos in the comments below of smoke, spray, steam or any other translucent elements with backlighting that you’ve enjoyed making.

The post How to Backlight Translucent Objects for Dramatic Effect by Kevin Landwer-Johan appeared first on Digital Photography School.


Digital Photography School

 
Comments Off on How to Backlight Translucent Objects for Dramatic Effect

Posted in Photography


Review of the MindShift BackLight 26L Backpack

12 Jun

PWC-Mindshift-Backlight-26-5844
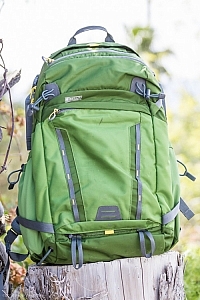
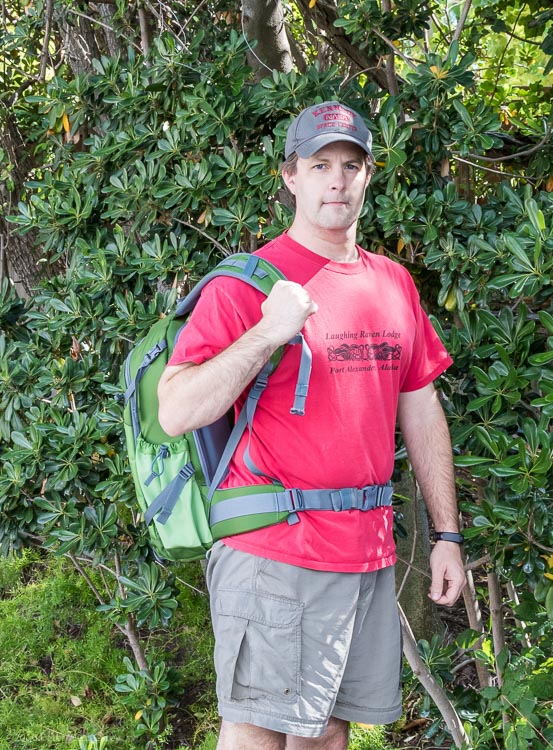
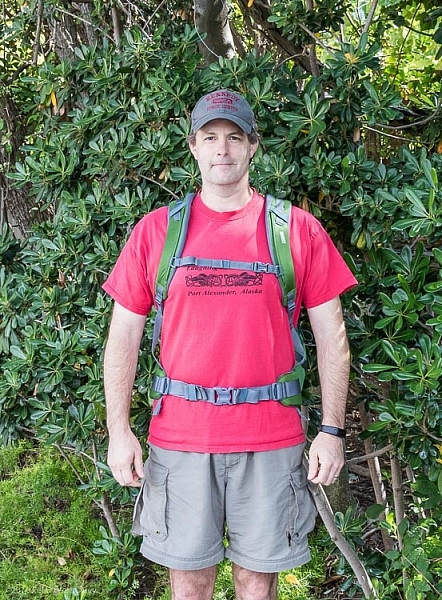
It sounded like another gimmick but I’ll give you the short of it: The MindShift Gear BackLight 26L works as a backpack that can rotate around your body, and give access to all your gear without getting muddy on the trail.

Mindshift has tried the rotating thing before (see my previous review of the Rotation 180 here on DPS) and this time they are trying to make the entire pack come all the way around your body for easy access. Sounds incredible, doesn’t it? Let me show you how it works, and some aspects that need attention.

An overview

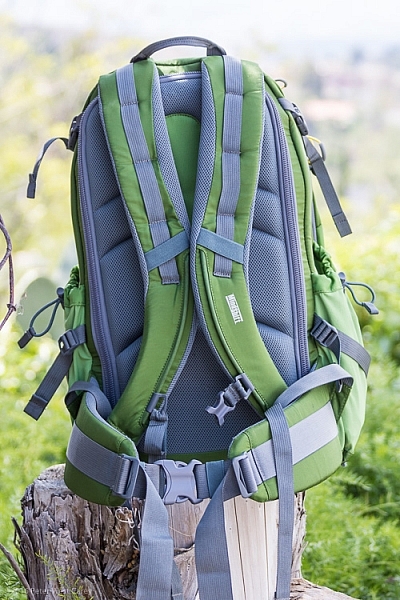
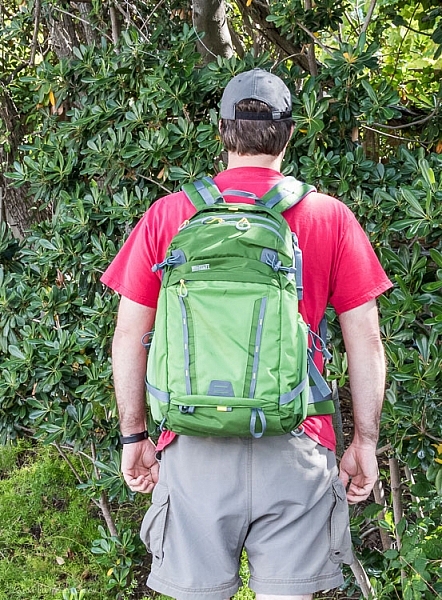
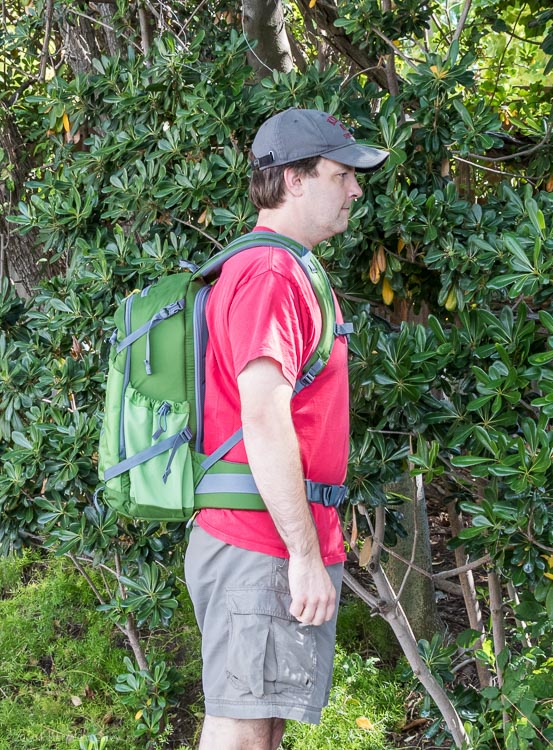
The pack looks normal enough; side compression straps, just enough padding on the hip belt, zippers here and there, and good back support.

PWC-Mindshift-Backlight-26-5856

PWC-Mindshift-Backlight-26-5847

PWC-Mindshift-Backlight-26-5845

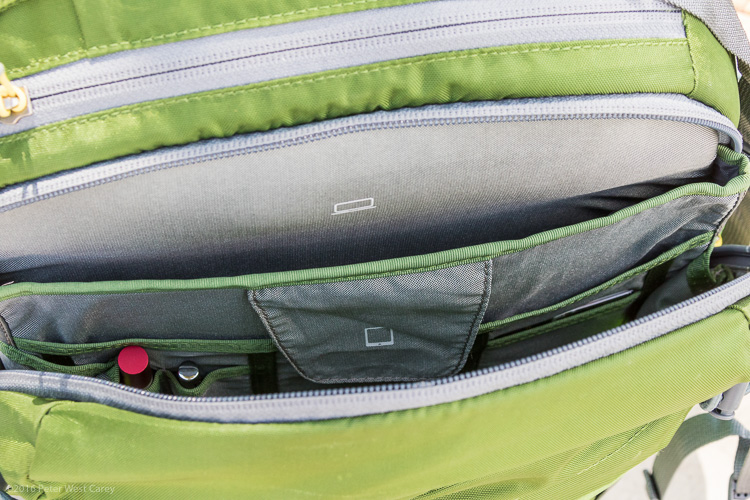
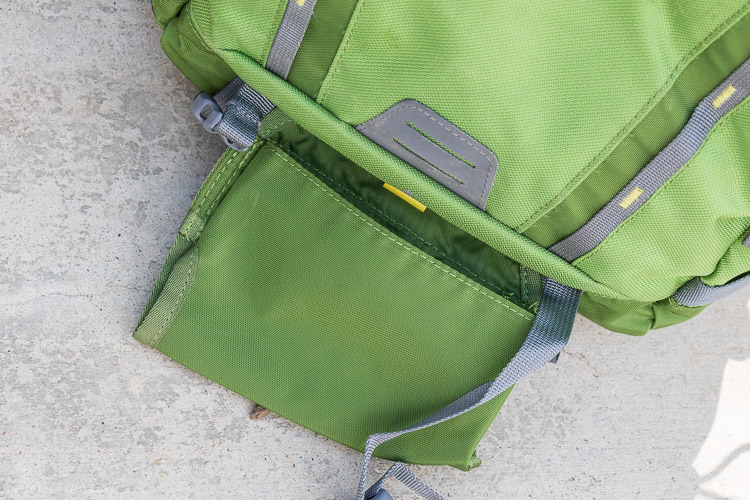
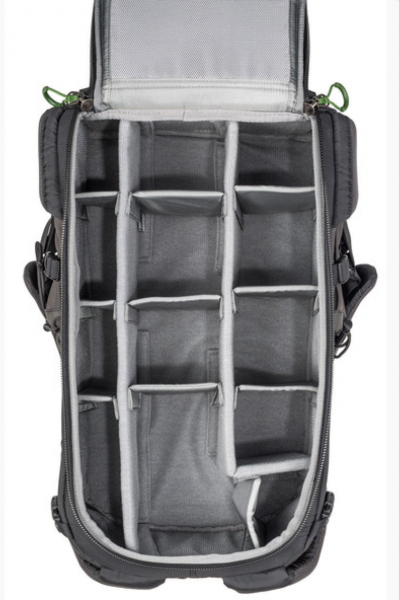
It has loops on the back for securing ice axes, trekking poles, and other miscellaneous whatnot. Inside the main compartment on the back is space for a laptop, a tablet, and even a book. Just not a thick book. There is an organizer for pens, cards, and the top section has a small pocket with a hook for car keys. Kind of the normal items we expect from a photography backpack.

PWC-Mindshift-Backlight-26-5850

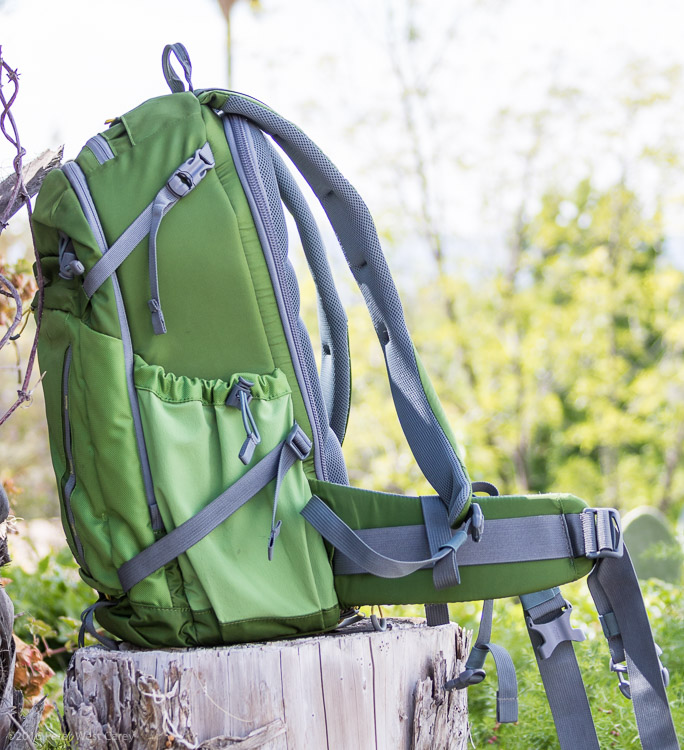
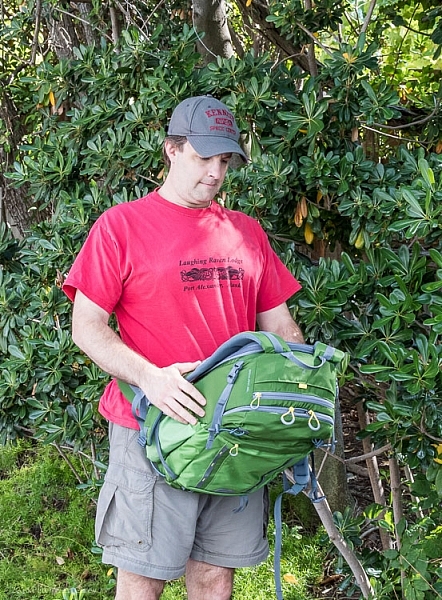
But there is one key difference in the shoulder straps. They are attached, and cut in such a way, to enable full removal with the hip belt still attached. The pack is then rotated around so you can access all your goodies inside the camera compartment. You can see how it works in the sequence of photos below.

PWC-Mindshift-Backlight-26-5861 PWC-Mindshift-Backlight-26-5862

PWC-Mindshift-Backlight-26-5863

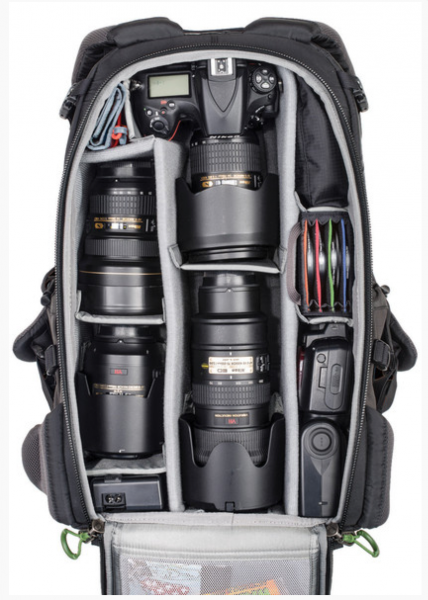
Inside you can store a fully gripped DSLR and big old 70-200mm lens. You will need to modify the highly customizable storage space, but as you can see, not only will the camera and lens fit, but there is room for a second body, secondary lens, all kinds of filters, batteries, flash, cards and even a hat.

PWC-Mindshift-Backlight-26-5867

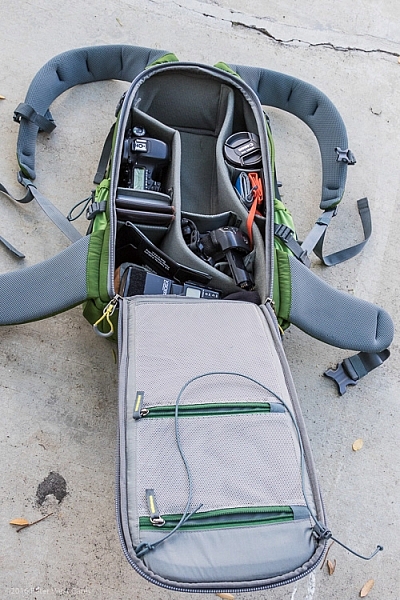
My personal configuration above is meant for a DSLR with a grip. The standard images below from Mindshift are without a grip on the camera. You can technically fit the gripped camera upright, bit it will poke into your back a little.

Mindshift-Backlight26-22 Mindshift-Backlight26-21

The main flap has a loop on it, that I think is a little goofy, but I see why they added it. It is meant to go around your neck to hold the flap up and out of the way, as seen here.

Mindshift-Backlight26-20

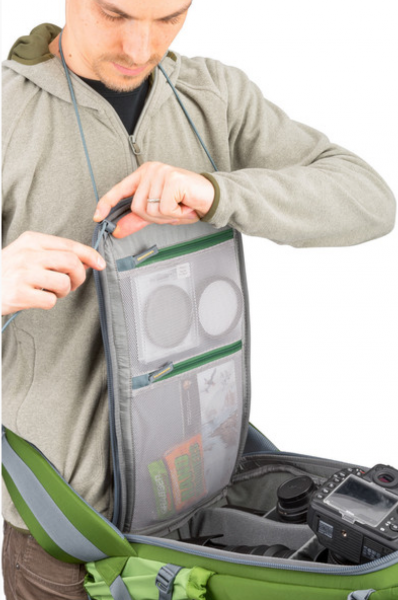
Great in concept, but I found it annoying in practice.

What About the Other Features?

Some features I like on the pack:

  • Just the right amount of space for two DSLR bodies and my gear (as seen in the photos above).
  • Organizer inside has room for what I need: iPad, pens, business cards, note pad, dental floss.
  • Comes with a rain cover.
  • Ample attachment points.
  • Hipbelt is easy to adjust.
  • Deep water bottle holders.
  • Seven months of constant use shows little wear and tear. Zippers are great.
  • Fits under a typical airplane seat. Great for taking aerial shots on commercial flights.
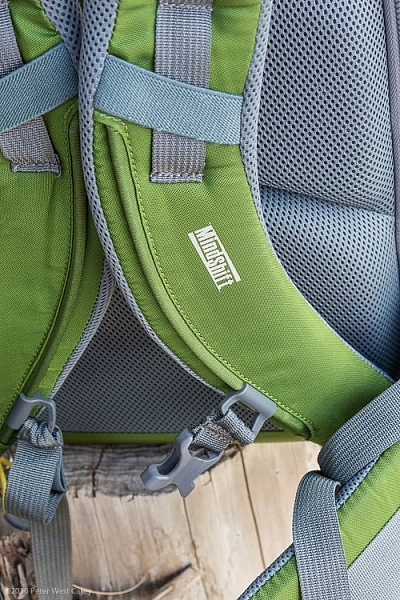
  • The sternum strap goes low enough! This is a big one for me. It’s been a bane of most bags that for a taller torso, the sternum strap rides too high, sometimes at my neck. This strap goes extra low, or as I like to call it, just right.
PWC-Mindshift-Backlight-26-5849 PWC-Mindshift-Backlight-26-5859

Then there are some things I can see that need improving:

  • Just not enough space for a sandwich. Makes a day hike harder, as bananas and other squishables don’t work as well.
  • To get into the main back compartment fully, the compression straps need to be removed. Minor annoyance.
  • That neck loop thing used when opening the pack? It often sticks out and gets in the way of the zipper.
  • My wife doesn’t like the color, but I do (it also comes in charcoal, which hides even more dirt and use).
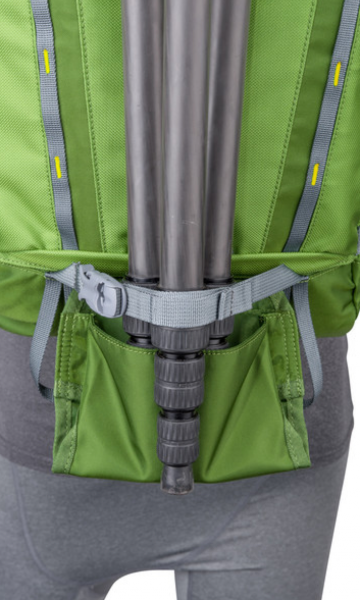
  • There is a mount for a tripod, but it hangs below the bottom of the pack. So it works (and is great how it hides away on the top and bottom of the pack) but it means you can’t easily set your pack down.

PWC-Mindshift-Backlight-26-5852

Mindshift-Backlight26-23

Testing it in real life

This has been my travel, and around town pack for the last seven months. This is why the pack you see in the photos here looks a little worked in. I’m trying to give more of my review items a solid, semi-lengthy test. How better to tell how a pack rides on your back than to wear it 50+ times?

One of my gripes with the pack is the overall amount of usable space inside. When I place my iPad in the sleeve, I can’t imagine fitting an actual laptop behind it. Even sliding in a legal pad of paper takes some pushing. I think it’s built for one or the other. A thin laptop could work, I suppose.

The same goes for fitting in a couple smaller books. Fitting one book in the very back pocket works just fine, but when I try to place a second book inside, I have to wiggle it in. This isn’t the end of the world, by any means, and it does keep the unit nice and compact for fitting under a plane seat. It’s something to be aware of if you normally carry lots of planners, books, and bulkier items.

Now then, about that spinning around thing this pack is built for.

PWC-Mindshift-Backlight-26-5863

I know, it looks goofy that way, but once you get accustomed to NOT taking off the hip belt to get to your stuff, the system works quite well. NOTE: If the pack is filled with lots of heavy glass, as in the stock photos above, it will tip far forward and feel odd in the wrong places for some of us.

I’ve mentioned in other reviews that I often travel with my family, and they are prone to leaving me behind when I stop to take a photo. This pack has seen me be left in the dust far less. Its ease of swinging around and getting into the pack, has me taking more shots than I would with a pack that I have to fully remove for my camera.

When swinging the pack to return to my back, I find my shirt tends to bunch up, but that’s a minor thing. On the dusty and wet hikes I have been on, I have greatly appreciated this pack’s ability to stay off the elements and keep my gear clean. It comes with a rain cover that does not need to be removed to get to your camera. Bonus!

I like the way the pack rides for my height (6’1″ or 1.8m). I also appreciate the dual water bottle holders of ample size, so an extra large bottle does not tip out easily.

PWC-Mindshift-Backlight-26-5860

Conclusion

I wouldn’t have kept testing the MindShift Gear BackLight 26L backpack for months on end if I didn’t like it. It’s a great size for two cameras and the essentials, while allowing me to carry the basics of my mobile office.

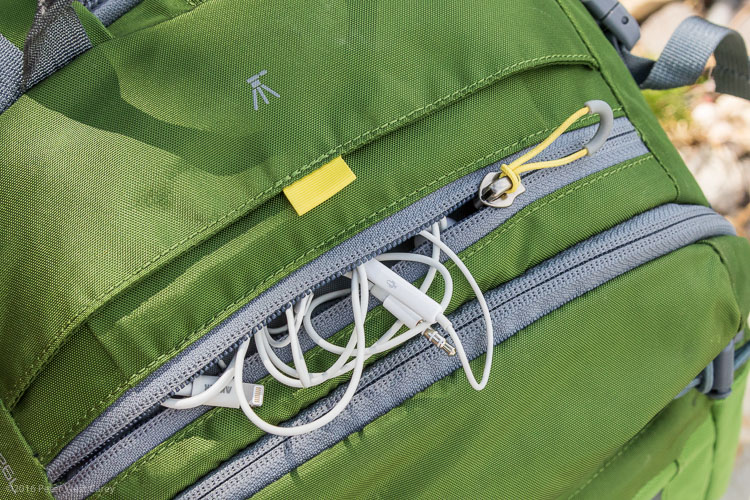
It’s not perfect for a day hike, in my opinion, because there isn’t enough space in the back to pack things like apples, bananas, or sandwiches, without them getting a little scrunched. If I don’t fill the main camera area with gear, I can fit food in there. So it can get the job done if you have space. There is space on the top for keys, headphones, and charging cables, which makes them easy to get to on a plane when the bag is under a seat.

The bag retails for $ 249.99 in the US and can be found on Amazon.

googletag.cmd.push(function() {
tablet_slots.push( googletag.defineSlot( “/1005424/_dPSv4_tab-all-article-bottom_(300×250)”, [300, 250], “pb-ad-78623” ).addService( googletag.pubads() ) ); } );

googletag.cmd.push(function() {
mobile_slots.push( googletag.defineSlot( “/1005424/_dPSv4_mob-all-article-bottom_(300×250)”, [300, 250], “pb-ad-78158” ).addService( googletag.pubads() ) ); } );

The post Review of the MindShift BackLight 26L Backpack by Peter West Carey appeared first on Digital Photography School.


Digital Photography School

 
Comments Off on Review of the MindShift BackLight 26L Backpack

Posted in Photography


MindShift introduces BackLight 26L Photo Daypack

19 Sep

MindShift Gear has launched its new BackLight 26L Photo Daypack for pre-order, and will begin shipping it next month. The bag features a 26 liter capacity with compartments able to accommodate a 15″ laptop, 10″ tablet, a standard sized DSLR with up to six lenses, a flash, and two large water bottles. Read more

Articles: Digital Photography Review (dpreview.com)

 
Comments Off on MindShift introduces BackLight 26L Photo Daypack

Posted in Uncategorized


Three Types of Light: Diffused, Backlight and Reflected – What are They and When to use Them

26 Aug

Light: it is the main component for every image that you will take. It does however come in many different forms, producing very different results. Some of these types of light are diffused, backlit and reflected. There will be times when each of these types of light is more readily available than another, or even in some cases multiple types of light at once. Some people create their full photographic style by using a certain type more, or less, exclusively in their work. But, knowing how to first spot the different light forms will allow you to take full of advantage of every scenario and add depth, variety and a sense of individuality to your images.

Figure 3

Diffused Light

Diffused light that which is not harsh and direct, it has been softened in some way. A great example is when you are outside and the sun is shining, with no clouds in the sky. The light is harsh and you will notice that there will be a lot shadows falling on or around your subject. But, if clouds are in the sky and they block out some of that harsh sunlight, the light then becomes diffused.

You can use diffused lighting to your advantage in a great way. If you are shooting portraits on an overcast (diffused) day, you are pretty much shooting with nature’s own softbox. You will be able to work with your subject easier, and have different angles to shoot from, because you won’t be limited by the harsh lines and shadows that undiffused light can create. Overcast (diffused) lighting is preferred by many photographers, as it is a flat and even light. If it were a particularly sunny and bright day, shooting in the shade would also offer you some diffused lighting.

Figure 1

This particular image shows the use of diffused lighting, using the shade of the building to soften the light, while also reflecting light shades back to the subject.
Figure 2

Backlight

Backlighting is where you are illuminating your subject from the back, as opposed to from the front, or the side. Working with backlight you can silhouette your subject, or give them a glow. To Silhouette your subject, you would meter for the sky and to create a glow around your subject, you would meter for the subject itself. You need to place your subject in front of your preferred light source and allow that light to illuminate your subject. If you are using the sun as your light source, different times of the day will give you different types of backlighting. The lower the sun falls, the softer the light will feel. You may find that sometimes you will have to move yourself into a position where your camera can autofocus or switch to full manual, as the light can be so strong that your focusing point struggles to find what it is you want to focus on.

Figure 4

Reflected Light

Reflected light can be found everywhere, on most surfaces. Reflected light is literally the light that is reflected from a particular surface or material. If you were to shoot a portrait next to a white building, the light hitting the building would be reflected on to your subject, creating a soft light. If you were in the middle of the red Moroccan Atlas Mountains and you were to shoot a portrait, there would be a softer red reflection coming onto your subject from the ground. Or, if you were doing a portrait session outside and you wanted to bounce some additional light into your subject’s face, you could use an actual reflector. They normally come in two colours; one side gold, and one side white.

Reflected light tends to be quite soft and takes on the colour of the surface/material that it is being bounced off.

Figure 5

The reflector was being used with the gold side to reflect a warm glow onto the subject’s face.

Figure 6

  • How To: Silhouette Photography / Self Portraits
  • Tips for Photographing in Different Weather Conditions
  • Let’s Talk About Light – 3 Types of Lighting Conditions and how to Use Them
  • Choosing the Right Color Reflector for Your Photography

The post Three Types of Light: Diffused, Backlight and Reflected – What are They and When to use Them by Natasha Cadman appeared first on Digital Photography School.


Digital Photography School

 
Comments Off on Three Types of Light: Diffused, Backlight and Reflected – What are They and When to use Them

Posted in Photography


Backlight: Weekly Photography Challenge

28 Sep

The Stories

This week we explored the technique of back lighting subjects in a blog post so thought it might make a good challenge topic.

Paris Saint Germain

Backlighting is something that can add impact to many types of photography – portraits, landscapes, wildlife etc and it can be done with both natural and artificial light – so you should have lots of scope to take some great shots this week.

There's a light that never goes out

Once you’ve taken your ‘Back Lighting’ shots, upload your best ones to your favourite photo sharing site either share a link to them even better – embed them in the comments using the our comments tool to do so.

devendra banhart:dragonflies

If you tag your photos on Flickr, Instagram, Twitter or other sites with Tagging tag them as #DPSBACKLIGHT to help others find them. Linking back to this page might also help others know what you’re doing so that they can share in the fun.

Also – don’t forget to check out some of the great shots posted in last weeks In Motion challenge – there were some great shots submitted.

Post originally from: Digital Photography Tips.

Check out our more Photography Tips at Photography Tips for Beginners, Portrait Photography Tips and Wedding Photography Tips.

Backlight: Weekly Photography Challenge


Digital Photography School

 
Comments Off on Backlight: Weekly Photography Challenge

Posted in Photography


Using Backlight in Nature Photography

18 Jan

Antelope Canyon, Arizona
Backlight is when the sun is directly in front of you lighting the back of your subject.

Shooting a backlit scene is more difficult technically but that is no reason to shy away from what can become a dynamic and energizing image.

One of the strengths of backlight is that it emphasizes shape so you will want to find subjects with strong shapes.

In this image of Antelope Canyon in Arizona, it would be hard to distinguish the shape of this part of the canyon wall had the sun not been high in the sky.

Because it was mid-day, the light went straight down the slot canyon lighting up the canyon walls. I was at the bottom of the canyon shooting straight up, so my subject was backlit.

Lobster Cove Lighthouse

I always think of this image as the shot I almost didn't make. It was an after thought. My intention was to get down to the beach for a seascape and I was disappointed that I couldn't find a way down. As I went back to the parking lot feeling defeated I looked back and thought "I just have to capture that sky regardless of how boring those buildings are." When I looked at the photo on my computer afterwards I learned my lesson that an image only needs one really exciting element. I was able to bring quite a bit of detail out of the shadows in post-processing.

Egret, Ding Darling Wildlife Refuge, Florida

Backlight creates the rim light you often see in portraits but this effect works on wildlife too.

In this image of an egret the majority of the light was coming from behind the bird, causing the feathers around the edge of the bird to glow, but there was still enough ambient light to capture detail in the front.

When there is not enough ambient light to capture the details in the foreground you can use fill flash or a reflector.

The part that can be technically more challenging when it comes to backlit scenes is getting the proper exposure. If you have your camera set to evaluative metering it will take into account the entire scene and try to determine the best exposure. This works great when you have a fairly evenly lit scene, but when you have a scene with high contrast it doesn’t work as well. Your camera can’t meter for both the bright areas and the dark areas at the same time.

The solution is to switch to a different metering mode, such as spot metering, so you can tell your camera which part of the frame is important to you. You can choose to meter on the darker area to maintain detail in the shadows and let the highlights go completely white as I did in the photo of Antelope Canyon above. Or you can meter on the bright part of the scene and let the shadows go completely dark to create a silhouette.

Mono Lake Silhouette

One of my favourite techniques is to create a starburst effect in a silhouette image when the sun is still above the horizon. To do this, position yourself so that the sun is partially hidden behind an object and use a small aperture, like f/22.

Arches National Park, Utah

When the sun is in your frame it’s a good idea to use your live view on your LCD monitor to protect your eyes rather than looking through the viewfinder, especially if you are using a telephoto lens.

Lens Flare
Be sure to watch for lens flare when you are shooting directly into the sun. Lens flare is when the light hits your lens directly and reflects inside the lens causing bright streaks or polygonal shaped bright spots with rainbow colours to appear. This is not necessarily a bad thing but if you don’t like it you will need to shade your lens with a lens hood or your hand. Shading your lens is not usually possible when the sun is in your frame but you can reduce the lens flare by positioning yourself so the sun is partially behind an object.

Tips:

  • Find a subject with great shape.
  • Change your exposure mode to spot metering.
  • Point your camera directly at the part of the scene you want to exposure for and use the exposure lock feature on your camera to set the exposure (check your camera manual to find the exposure lock function on your camera). Then you can recompose and press the shutter half way to set the focus while the exposure remains locked.
  • Use a small aperture to create a starburst.

Once you master the art of setting the exposure for a backlit scene you will open the door to new possibilities by looking into the light.

Post originally from: Digital Photography Tips.

Check out our more Photography Tips at Photography Tips for Beginners, Portrait Photography Tips and Wedding Photography Tips.

Using Backlight in Nature Photography


Digital Photography School

 
Comments Off on Using Backlight in Nature Photography

Posted in Photography