RSS
 

Posts Tagged ‘Auto’

Auto White Balance: Yay or Nay?

20 Jul

So what exactly is white balance and why is it so important to digital photography?

The rudimentary answer is that light (the foundation of photography) has variable color temperatures at different times of the day. Your eyes are much better at processing color than a digital camera. Thus a white object will always appear white to you, despite the conditions. White balance is the process that the camera uses to remove color casts produced by these different color temperatures and helps your camera emulate whaty our eyes do naturally when dealing with white.

Auto White Balance: Yay or Nay?

Auto White Balance sometimes give very close results to what you see with your eyes.

Auto White Balance: Yay or Nay?

Daylight White Balance can be used to enhance the existing colors of your scene.

Auto White Balance (AWB)

The Auto White Balance (AWB) setting helps your camera “guess” the best option or choose the one closest to what your eyes might see. Many times AWB works better when you are outdoors dealing with natural lighting, than with more complex lighting situations.

The White in White Balance

To understand when AWB works well and is applicable, it is also important you understand the different White Balance presets your camera offers. They include; Daylight, Cloudy, Shade, Tungsten, and Fluorescent. Added to these are Flash, Kelvin and Custom White Balance. Of note, the Custom White Balance Mode is used when you have especially challenging lighting conditions and need to lock in your whites based on those conditions. It is an under-used option that gives great results, so check your manual and experiment with it sometime.

Auto White Balance: Yay or Nay?

Delicate Arch, Utah – shot with the AWB setting.

Auto White Balance: Yay or Nay?

Delicate Arch, Utah – edited with a Custom White Balance setting.

The Auto White Balance setting assesses your scene and chooses the brightest part of your image as the white point, which unfortunately can vary from one shot to the next. Over the years though, significant improvements have been made to AWB systems and the results are getting better. Even with these developments, it is difficult for Auto White Balance to correct certain kinds of lighting (e.g. artificial or combination lighting setups). Another instance where it’s not recommended to use AWB is when doing panoramic shots, as you run the risk of varying light on your stitched image.

Auto White Balance: Yay or Nay?

Boats shot with a Custom WB. In a panoramic shot, if AWB is used, it can vary from shot to shot

The opposite problem exists as well – when AWB corrects color casts you do not want it to, such as when you are shooting a sunset or any scene where the color of the light is essential to the image. Some of the White Balance presets listed above, are set in-camera to provide some level of correction to typical lighting scenarios. Here you tell the camera the right setting for the occasion and take more control over your final image.

RAW Power

If you shoot in RAW, you are probably aware that RAW files retain all the color data captured by your camera. This retention allows you to change or choose a different White Balance setting while post-processing your RAW files. Some argue that even with this handy feature, AWB does not give you the best colors.

Auto White Balance: Yay or Nay?

Shot with Daylight WB (camera) vs processed Daylight WB (Photoshop)

Another perspective of setting White Balance in camera ensures that in the processing stage, your color rendition is consistent across all your shots (e.g. when shooting a wedding). Also of note, AWB can give you different results within the same scene. So you can go from one set of colors in a wide-angle shot to a different set of colors when you zoom in. Both of these are examples of losing the harmony when you are working on a series of images.

Taking Control

You may use AWB because it is easier to let the camera figure out the white balance based on the scene in front of you. However, as stated before, it is useful when you know how and when to use it. Setting white balance is not as daunting as it sounds though and when the conditions are not variable, you only need to set your white balance once (for those conditions).

Auto White Balance: Yay or Nay?

Using RAW and WB to take control of the appearance of your results.

So, if you are outdoors on a sunny day, set your white balance to Daylight or Sunny. If it is cloudy, choose the Cloudy white balance and similarly if you are in shade, choose Shade. These are very straightforward to remember based on the easy naming convention. When indoors, for incandescent lights, choose Tungsten (or Incandescent) and when shooting an area with fluorescent lights, choose Fluorescent. This is called setting your white balance to match your shooting conditions.

You can also set your white balance to modify your existing conditions. Once you start experimenting with white balance and understand how it affects your images, use it to get creative or make your image look either warmer or cooler.

Auto White Balance: Yay or Nay?

White Balance used to make the image look cooler.

Conclusion

Auto White Balance is a handy setting to have when you are unsure of what white balance would work for your scene. If you shoot in RAW, you can easily change your White Balance after the fact to find the best option.

If you want more control of your results, choose one of the camera white balance presets, already tailored for specific conditions, or create your own (custom white balance). Setting your white balance eliminates that extra post-processing step of fixing it from scene to scene and gives you more consistent results.

What is your go-to white balance and are you a fan of using AWB? Tell me in the comments below.

The post Auto White Balance: Yay or Nay? by Nisha Ramroop appeared first on Digital Photography School.


Digital Photography School

 
Comments Off on Auto White Balance: Yay or Nay?

Posted in Photography


Datacolor updates Spyder5 calibration software to add auto ambient light switching

30 Mar

Calibration company Datacolor has updated the Spyder5 software package that accompanies its Spyder5 monitor calibration devices for Pro and Elite customers. The update sees the packages renamed Spyder5Pro+ and SpyderElite+ to indicate that both now feature automatic ambient light switching and what the company calls 1-Click Calibration. The ambient light feature relies on the Spyder5 calibration device recognising that the lighting conditions in the monitor room have altered to trigger a different monitor profile. In previous versions users had to remember to make the adjustment manually.

The new 1-Click Calibration system is really a 1-click solution for monitors that have already been calibrated by the device before, and allows the re-calibration with a single click without having to go into the menu system. Both versions of the software also provide more in-depth control of saved profiles through an extra profile management tool.

The Elite package additionally offers a better soft-proofing workflow as well as Enhanced StudioMatch which helps users to calibrate multiple monitors so they all look the same.
For more information, including pricing for upgrades for each of the packages, see the Datacolor website.

Press release

Datacolor Announces Spyder5+ Software Upgrade with Enhanced Display Calibration Features

Datacolor®, a global leader in color management solutions, today announced the release of Spyder®5+, the next generation software expertly designed to build upon its popular color calibration tools for photographers, designers, videographers and imaging professionals.

“Spyder5 is already an amazing tool for getting the best color out of your display. With the Spyder5+ upgrade, Datacolor has added several really nice features that are an absolute no-brainer for the price,” said David Cardinal, professional photographer and Datacolor Friend with Vision. “I’ve been using the new capabilities and am really pleased with how much time they’ve saved me, as well as the additional productivity they’ve provided.”

The software upgrade is now available for all existing and new Spyder5 customers, with the option to purchase Spyder5PRO+ or Spyder5ELITE+. Spyder5+ adds unique features to the Spyder5 calibration tools by enhancing users’ digital color workflow, including:

* Automatic Room Light Switching ensures users’ monitor profile changes as the room light conditions shift, with no user interaction required
* 1-Click Calibration streamlines a user’s workflow with a single click to start the calibration without having to re-select saved settings
* Profile Management Tool gives users the ability to edit, remove, rename, locate, and activate each display profile for ultimate control and flexibility

Users who purchase the Spyder5ELITE+ upgrade will have access to all of the above features, in addition to:

* Spyder SoftProof improves “Screen-to-Output” matching with a new workflow to simulate how photos will look on any printer or device – including home printers, online or retail printers, and certain mobile/tablet devices
* Enhanced StudioMatch verifies precise monitor matching and takes the guess work out of making all connected displays look the same – including a new visual verification step that assists you by fine tuning your results

“We’re very excited to add this upgrade to our Spyder5 product line. This new software offers unique tools to ensure color management across all devices, so our customers can remain confident in their decision to choose Datacolor for their color calibration needs,” said Stefan Zrenner, Director Global Sales & Marketing Imaging, Datacolor. “With a competitive set of features, Spyder5+ is the perfect tool for creatives that rely on consistency in their work.”

New and existing Spyder5 customers wishing to purchase the Spyder5+ software add-on can find out more and buy via the Datacolor website. Upon software purchase, customers will receive a software serial number and a step-by-step guide for easy download.

Articles: Digital Photography Review (dpreview.com)

 
Comments Off on Datacolor updates Spyder5 calibration software to add auto ambient light switching

Posted in Uncategorized


The Benefits of Shooting in Auto Mode

14 Feb

I can still hear the words I was told when I bought my first DSLR ringing in my ears just as clearly as if I heard them this morning. “You have to learn to shoot in manual mode.” When I started to get serious about photography I had no idea what aperture, shutter, or ISO meant, and thought P meant Professional. I didn’t know what I was doing at all and because everyone seemed to say so, I dove right into YouTube tutorials and online articles about how to get away from the dreaded Auto Mode setting on my camera. After all, no serious photographer would be caught dead using Automatic…right?

The Benefits of Shooting in Auto Mode

Auto Mode – don’t knock it until you try it. And even then, maybe give it a second chance.

The truth, like most things in life, isn’t so black and white. Auto mode, while often derided by online commenters and popular YouTube photographers, is not the scourge upon modern photography that some people claim. While it might not be the best way to get exactly the picture you want, and learning to shoot in manual is, of course, a rewarding and hugely beneficial way to increase your skills as a photographer, there is nothing inherently wrong with using Auto.

In fact, there are some clear benefits to using Auto. So, I’d like to explore some of its advantages and offer a few reasons why you shouldn’t feel so bad if you set your expensive DSLR camera on that familiar green Auto setting.

It just works – usually

It is certainly true that you have a much better idea of the picture you are trying to take than your camera does. However, it’s also true that you may not know how to (or care) make your camera do what you want it to do, in order to get the picture you want. Photographers sometimes talk about

use-auto-mode-gum-ball

Photographers sometimes talk about the decisive moment, which was a term used by Henri Cartier-Bresson to describe that instant in which all the elements within the frame come together to form the perfect photographic opportunity. Unfortunately, many amateur photographers will wistfully watch that moment pass by because they are fiddling with aperture controls and thinking about shutter speeds.

I’m all for learning more about how to use your camera (I write for DPS and that’s what we do!) but sometimes it’s nice to just put your camera in Auto mode and let it do all the grunt work for you.

The trade-off

Modern cameras are filled to the brim with all sorts of high-tech enhancements compared to their counterparts from days gone by, and along with this has been a string of steady improvements to their built-in Auto mode. For the most part, shooting in Auto will give you a well-exposed picture that will probably suit your needs. The downside is that your camera might make different choices than you prefer when it comes to selecting an aperture, shutter speed, or ISO value, and if there is not enough light you will likely see the pop-up flash rear its ugly head.

use-auto-mode-food

This is when you may start thinking about learning to use some of the other modes on your camera. But, if you don’t mind the creative decisions your camera makes or just don’t feel like learning the complexities of the Exposure Triangle, then, by all means, go ahead and shoot in Auto Mude. After all, it’s about the picture, and if you’re happy with the results then why not keep using it?

Auto lets you focus on other things too

When you take your camera out to record a moment, memory, or special event, there is usually a lot going on around you and that little black box in your hand. There may be people, kids, music, animals, wind, rain, or a combination of all that, plus much more.

An experienced photographer will know exactly how to set her camera to get the kind of pictures she is looking for and will know just what settings to tweak and change in order to get the right images. However, even experienced photographers can get a bit overwhelmed when there is so much going on, and for casual photographers, it is even worse. It’s times like these when Auto mode can be your best friend. You should not only not feel embarrassed about using it, but my advice is to openly embrace that comfortable little green setting.

The Benefits of Shooting in Auto Mode

Missing the shot due to not knowing the settings

One of the worst times for a photographer is that sinking feeling when you realize you just missed the shot. Even photographic veterans have been known to leave the lens cap on from time to time. If you are just getting started with photography or trying to improve your skills, then fiddling with aperture controls or trying to figure out the right metering mode for a particular scene is enough to make you want to toss your camera out the window in frustration. Many a photographer has missed the opportunity to take a picture because they were wrestling with camera settings and trying to get things just right before clicking the shutter.

By contrast, using Auto can free you up to take pictures while also taking in the rest of the experience around you. Instead of worrying about the ISO, trying to figure out what shutter speed to use, or wondering if you need to use the flash, Auto mode will just take care of these for you. The trade-off is that the results might not be exactly what you wanted (maybe you were going for a shallower depth of field, or would have preferred to not use the flash). But at least you’ll walk away with some pictures while also having the freedom to talk to other people, take in the scene, and be present in the moment. That is unless you accidentally leave your lens cap on!

The Benefits of Shooting in Auto Mode

Auto can help you understand your camera

One of the biggest barriers to entry for people who want to learn more about cameras and photography is all the technical details inherent in the art form. Understanding the basic elements of exposure is enough to make your head swim. On top of that, there are all sorts of other considerations like white balance, focal length, megapixels, etc. The list goes on and it often seems like a cruel and unforgiving proposition that is more alienating than inviting.

Fortunately shooting in Auto mode is a great way to dip your toes into the more complex aspects of photography, provided you don’t mind doing a little bit of legwork on your own.

The Benefits of Shooting in Auto Mode

Embedded in the metadata of every single picture, whether taken on an iPhone or a high-end DSLR, is a whole slew of information known as EXIF data. Most image editing programs, even basic ones like Apple Photos or online solutions like Flickr and Google Photos, let you peek inside the EXIF data to find out more about the technical underpinnings of a photo.

What Auto mode can show you

If you take pictures using Auto mode all the details such aperture, shutter speed, and ISO are saved in the EXIF data along with a slew of additional information like your camera model, whether the flash fired, what type of metering mode was used, even the location of the picture if your camera has GPS capability. Looking at the EXIF data of your photos, and other photos you see online is a fantastic way to learn about the technical aspects of photography so you can get a better sense of how the picture was taken. It’s almost like getting a movie on DVD or Blu-Ray and watching the behind-the-scenes bonus features or listening to the director’s commentary, in that you can get a good idea of what creative decisions were made in order to get the final result.

If you have ever wanted to get more serious about shooting in Manual or one of the semi-automatic modes on your camera, try shooting in Auto and then using the EXIF data to replicate that same shot in Manual mode. Then tweak the settings like aperture or shutter speed and you will start to see how changing these values affects the final image. But be careful – doing this can open you up to a much larger world of photography by helping you learn to creatively control your camera in ways you might have never thought possible!

The Benefits of Shooting in Auto Mode

Conclusion

There’s some kind of a stigma attached to Auto mode, where people sometimes think you are less of a photographer if that’s all you use. I liken this to people who get into arguments about Ford versus Chevy, Android versus iPhone, or any of the other sorts of silly things over which people tend to squabble. If you use Auto and you like it,

If you use Auto Mode and you like it, then by all means, keep using it! Certainly, it’s nice to have more control over your camera, but some people find that by giving up control and just using Auto they are free to focus on other things that matter more to them. If that sounds like you, then by golly (as my dad would say) put your camera mode dial to the green square and click away.

googletag.cmd.push(function() {
tablet_slots.push( googletag.defineSlot( “/1005424/_dPSv4_tab-all-article-bottom_(300×250)”, [300, 250], “pb-ad-78623” ).addService( googletag.pubads() ) ); } );

googletag.cmd.push(function() {
mobile_slots.push( googletag.defineSlot( “/1005424/_dPSv4_mob-all-article-bottom_(300×250)”, [300, 250], “pb-ad-78158” ).addService( googletag.pubads() ) ); } );

The post The Benefits of Shooting in Auto Mode by Simon Ringsmuth appeared first on Digital Photography School.


Digital Photography School

 
Comments Off on The Benefits of Shooting in Auto Mode

Posted in Photography


MINT SLR670-S Noir is a refurbished Polaroid SX-70 with added auto modes

17 Nov

MINT has launched a refurbished and upgraded Polaroid SX-70 camera, dubbing it the SLR670-S Noir. In addition to all the features of the original Polaroid base model, MINT’s updated version includes A100 and A600 auto modes for using SX-70 film and ISO 600 film. 

According to MINT, its refurbished camera features ten shutter speeds with speeds up to 1/2000sec, two shutter options for long exposure, a focusing distance of 26cm to infinity, and a three-year warranty for maintenance. The camera itself is priced at $ 675, though a ‘Starter Pack’ with limited accessories is offered at $ 765 and an ‘Ultimate Package’ is offered at $ 869. It isn’t clear how many of these refurbished cameras MINT has available.

Via: The Phoblographer

Articles: Digital Photography Review (dpreview.com)

 
Comments Off on MINT SLR670-S Noir is a refurbished Polaroid SX-70 with added auto modes

Posted in Uncategorized


Google adds auto image rotation, GIF creation to Photos app

13 Oct

Google has added four new features enhancing its Photos app for iOS and Android.

The first two features are similar in that they highlight photos related to specific people. A ‘Rediscover your memories’ feature will dig up old pictures of people who have appeared in more recent images. A ‘Recent highlights’ option will bring up a ‘card’ showing the best photos of a subject you’ve taken pictures of recently, such as a baby.

Perhaps a more useful feature is the ability to rotate images to the correct orientation, as illustrated above.

Finally, the Photos app can analyze videos you’ve taken to find ‘action’ and then turn it into an animated GIF.

Google blog via Droid Life

Articles: Digital Photography Review (dpreview.com)

 
Comments Off on Google adds auto image rotation, GIF creation to Photos app

Posted in Uncategorized


Unfree Wheeling: Amusingly Surreal Vintage Soviet Auto Ads

21 Aug

[ By Steve in Culture & History & Travel. ]

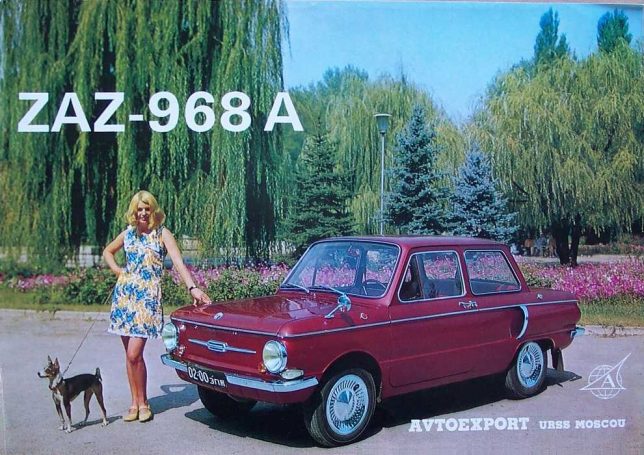
soviet-auto-ad-zaz968-2

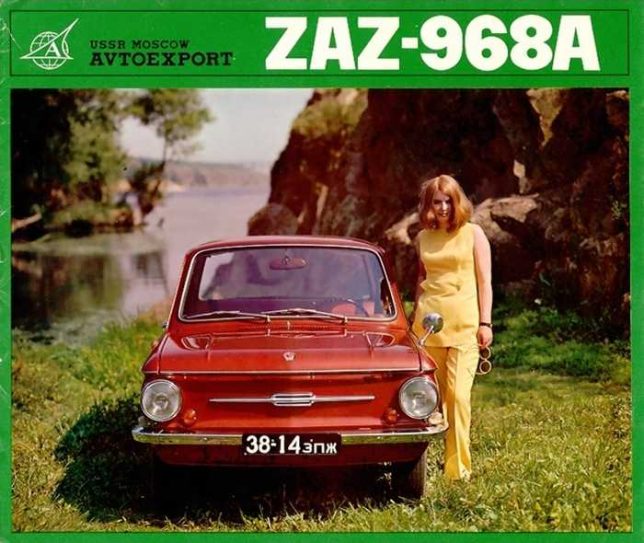
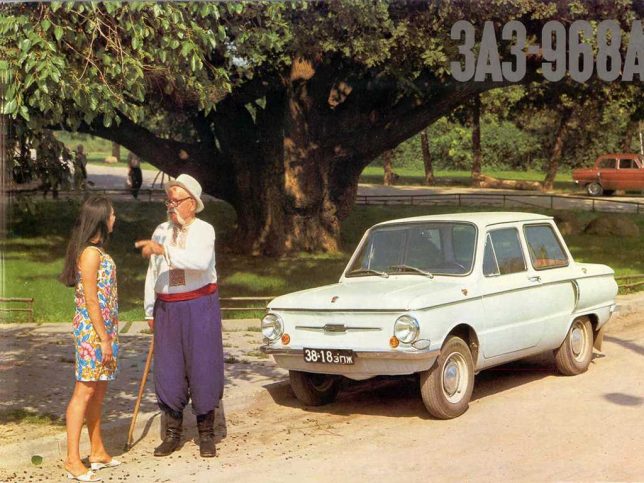
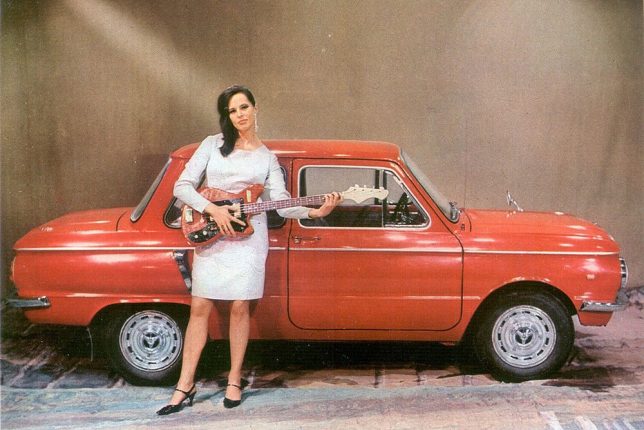
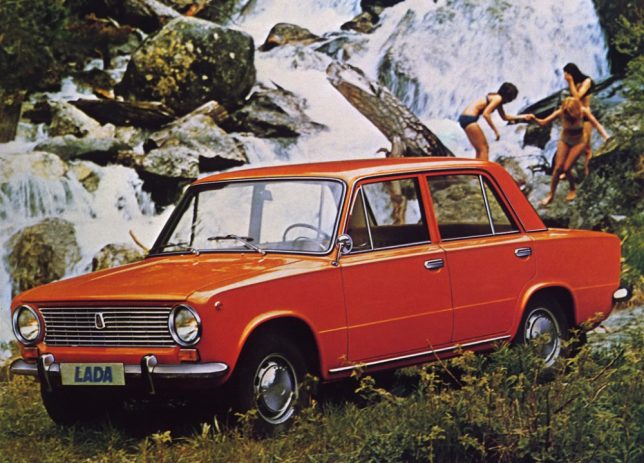
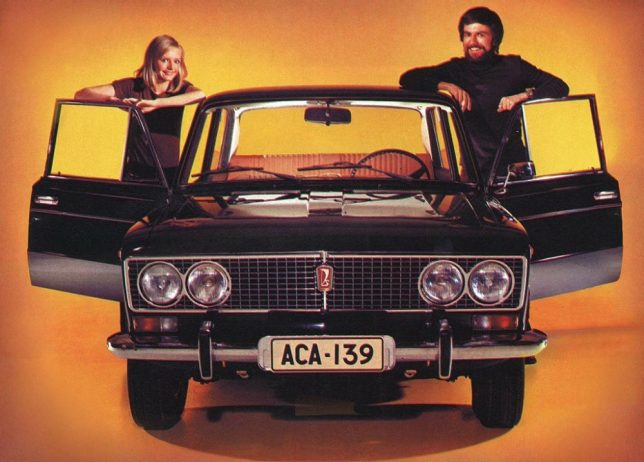
The Soviet Union not only manufactured cars, they exported them to buyers charmed (or duped) by some amusingly and bemusingly photographed advertisements.

soviet-auto-ad-zaz968-4

soviet-auto-ad-zaz968-1

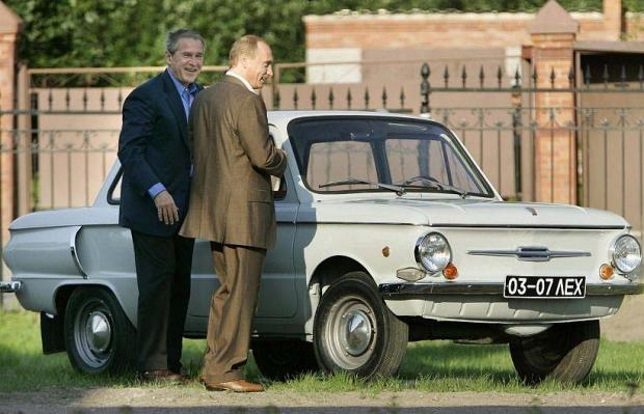
Putin the pedal to the metal lately? Don’t let the jet-fighter-like rear fender air intakes fool you, the ZAZ-968 “Zaporozhets” wasn’t exactly a muscle car even by Soviet standards. Built at the Zaporizhian Automobile Factory in Melitopol, Ukrainian SSR from 1971 through 1980, the ZAZ-968 was propelled by a 40hp air-cooled V4 engine mounted in the rear. Export versions were upgraded with international-spec headlights, a safety glass windscreen and an anti-theft steering lock which was rarely, if ever, tested.

soviet-auto-ad-zaz968-3

soviet-auto-ad-zaz968-putin

Wonder if that guitar-playing model knows “Back In The USSR”. Designed to be a “people’s car” that was sturdy yet affordable, the Zaporozhets is fondly recalled by Russians of a certain age… including some guy named Vladimir Putin. According to the Russian President’s official website, Putin’s mother won a ZAZ-968 in a lottery when young Vlad was a third year university student. His parents then gave the car to Putin – no word if he frequently drove it shirtless.

Whole LADA Love

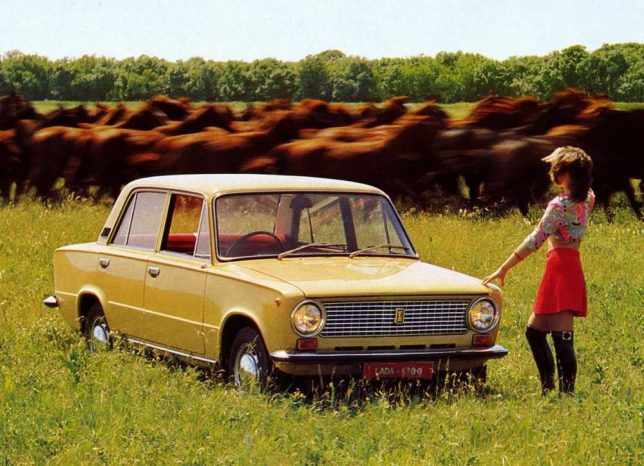
soviet-auto-ad-lada-2

soviet-auto-ad-lada-1

soviet-auto-ad-lada-3

soviet-auto-ad-lada-4

soviet-auto-ad-lada-5

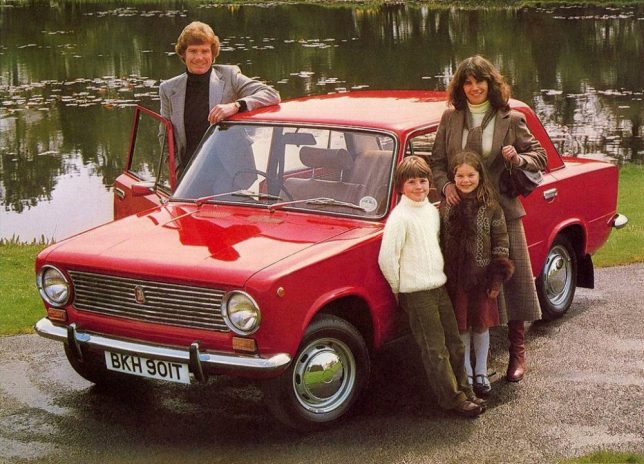
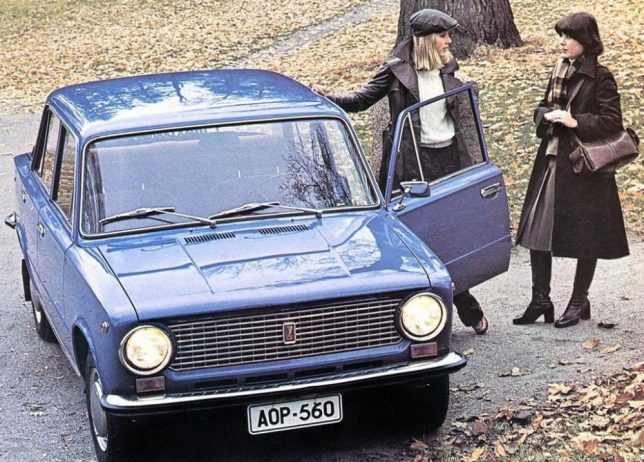
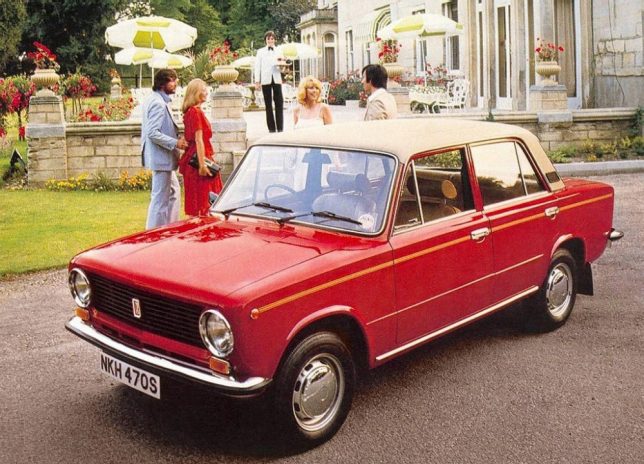
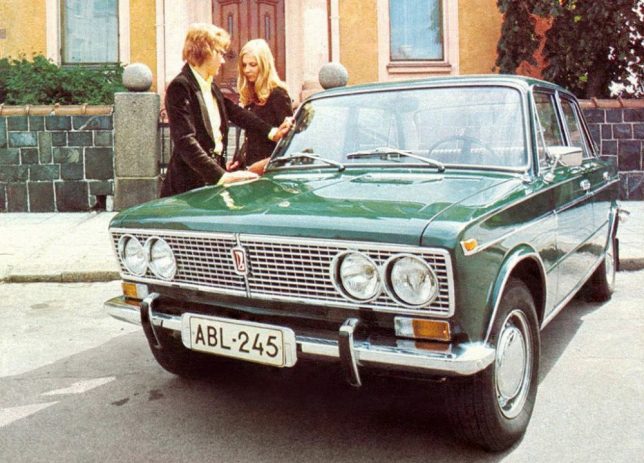
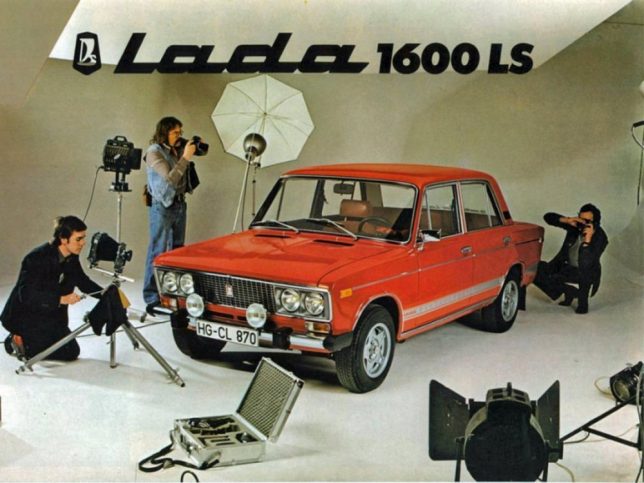
Russian car manufacturer AvtoVAZ, based in Tolyatti, Samara Oblast based their boxy Lada Classic on the mid-sixties Fiat 124 sedan. Between 1966 and 2012, over 20 million Classic sedans and station wagons had been sold without the vehicle undergoing a major design change. Dig that groovy vinyl roof on the last ad above; it kinda breaks up the Red Square look.

soviet-auto-ad-lada-4headlights-1

soviet-auto-ad-lada-4headlights-2

soviet-auto-ad-lada-4headlights-3

About 60% of all Lada Classics were exported to both East Bloc and West Bloc nations – the USA being a notable exception; Americans had to wait for the Yugo to “enjoy” owning a workers-paradise-made copy of a Fiat. Note what appears to be (at first glance) a Soviet laptop computer in the faux photoshoot ad above.

soviet-auto-ad-lada-samara

AvtoVAZ introduced the VAZ-2108 in 1984 with export versions named Samara and domestic market cars labeled Sputnik – hey, Plymouth had a Satellite so why not? The French copy on the ad above translates to “More stylish and less expensive. Hold on! Yeah, hold on to your wallet.

Next Page – Click Below to Read More:
Unfree Wheeling Amusingly Surreal Vintage Soviet Auto Ads

Share on Facebook


[ By Steve in Culture & History & Travel. ]

[ WebUrbanist | Archives | Galleries | Privacy | TOS ]


WebUrbanist

 
Comments Off on Unfree Wheeling: Amusingly Surreal Vintage Soviet Auto Ads

Posted in Creativity


DEAL: How to Get Your Camera Out of Auto Mode

11 Jul

It is Day 5 of our 7 day Summer Sale.

Today only, you can buy our two popular Photo Nuts courses together for just $ 35.

Pnbvideo

Normally you’d pay $ 118 to get them both. But today you’ll save 70% when you purchase them in a bundle.

Grab them here.

In these two courses, Neil Creek goes through all the basics of photography and explains tech concepts in a way anyone can understand.

This 2 course bundle includes:

  1. Photo Nuts and Bolts – Over 2 hours of practical online video lessons that teaches you all about your camera and gets you out of “auto” mode.
  2. Photo Nuts and Shots – 2.5 hours of online video lessons, that teach you the craft of photography – so you can take photos that truly connect with people and reflect your creative vision.

Only want the one course? Then pick up either for just $ 19 for today only. Usually $ 59, you’ll save 68%.

Remember, these deals only last for 24hrs so grab this offer while you can.

Note: As with all dPS products these come with a 60 day money back guarantee so there’s no risk. If you don’t find them useful simply let our team know and we’ll arrange a refund.

googletag.cmd.push(function() {
tablet_slots.push( googletag.defineSlot( “/1005424/_dPSv4_tab-all-article-bottom_(300×250)”, [300, 250], “pb-ad-78623” ).addService( googletag.pubads() ) ); } );

googletag.cmd.push(function() {
mobile_slots.push( googletag.defineSlot( “/1005424/_dPSv4_mob-all-article-bottom_(300×250)”, [300, 250], “pb-ad-78158” ).addService( googletag.pubads() ) ); } );

The post DEAL: How to Get Your Camera Out of Auto Mode by Darren Rowse appeared first on Digital Photography School.


Digital Photography School

 
Comments Off on DEAL: How to Get Your Camera Out of Auto Mode

Posted in Photography


How I Learned to Stop Worrying and Love Auto ISO

26 May

ISO is one of the three critical elements of exposure, and yet among the people I have talked to it seems to cause the most confusion. Aperture can be physically represented by simply making a circle with your fingers to represent the size of the opening in your camera lens, and shutter speed can be mimicked by closing your eyes, opening them briefly, and then shutting them. Neither one is a perfect comparison but it helps get the point across, especially to those who are new to photography.

ISO, in my experience, is a bit trickier to explain, and yet it can make or break a picture, even if you have the other two elements set just right. Or…it could make or break a picture in days gone by.

We have reached somewhat of a unique time in the history of photography in that ISO is, to some degree, no longer relevant in the same way that aperture and shutter speed still are. While I certainly would not let my camera choose the aperture and shutter speed for most of my shots, I have all but abandoned my misgivings about Auto ISO, and now almost always let the camera choose for me. As a photographer it has not been an easy leap for me to make, but it has been incredibly liberating, and I think it could be for you too.

A tack-sharp picture shot at ISO 4000 with minimal digital noise.

A tack-sharp picture I shot at ISO 4000 with minimal digital noise.

My first real digital camera, not counting a few point-and-shoot models I had in the early part of the previous decade, was a Nikon D200. It was a beast of a camera, with some features that outclassed even most modern models, like a maximum shutter speed of 1/8000 second and a weather-sealed body. One thing it did not do so well was high ISO values, specifically anything past 400. I could shoot at 800 in a pinch, but going all the way up to 1600 resulted in pictures that were a muddy mess and 3200, its maximum possible value, was an unmitigated disaster. This trained me to use the following thought process in virtually all shooting situations:

  • Shoot in Aperture Priority (I set the aperture and let my camera set the shutter speed)
  • Set the ISO to 100, 200, or 400 depending on the lighting
  • Select an aperture that would give me the depth of field or overall image sharpness I wanted
  • Hope the shutter speed wasn’t too slow so I didn’t get a blurry picture
  • If the shutter speed was too slow, raise the ISO to no more than 800
  • If the shutter speed was still too slow, compromise my artistic vision by opening up the aperture
auto-iso-sunset

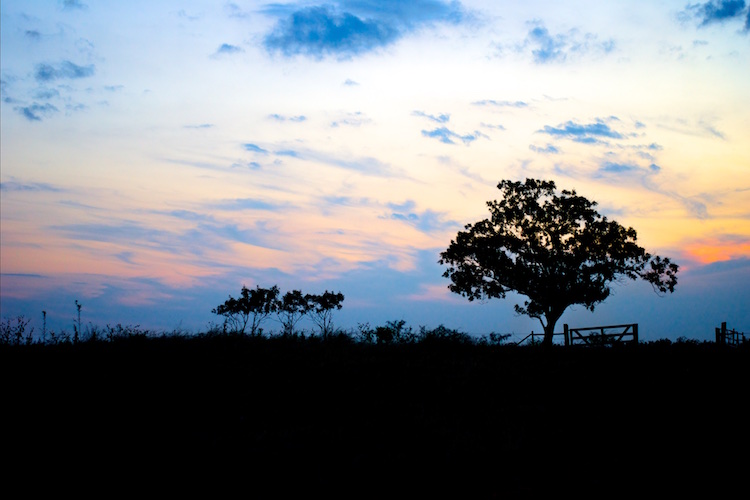
Even my old D200 could produce some fine images, though things quickly went south above ISO 400.

It was a process that worked somewhat successfully, but often resulted in images that were compromised in one way or another. When I finally upgraded to a much newer camera, a Nikon D7100, I still had the same mindset when it came to setting the ISO. I wanted to do it myself, lest my camera make some kind of silly decision on its own, that resulted in a picture with way too much noise for my taste. For a while I used the same thought process as shooting with my D200, even though the D7100 had vastly superior high ISO capabilities (which have since been surpassed by nearly every modern camera on the market today including its own successor, the D7200).

At first I used the old rule that had been burned in my mind regarding anything higher than ISO 400, which was to avoid it at all costs. Despite the evidence right in front of my eyes I was still used to the old way of doing things, and mentally set my maximum threshold at ISO 800, which I told myself, could only be exceeded in the most dire of circumstances. It took me far too long to discard this line of thinking, and I’m hoping you won’t have to make the same mistakes I did to get there.

Shot on my D200 at ISO 400.

Shot on my D200 at ISO 400.

A Brief History Lesson

The term ISO is somewhat of a holdover from the days of analogue film, when you would go to a camera store and buy an entire roll of film with an ASA value of 100, 200, or 400. ASA 200 was twice as sensitive to light as 100, 400 was twice as sensitive as 200 (which made it four times as sensitive as 100), and so on. Once the film was loaded in your camera you could not simply change your mind and use a different value; you had to shoot the entire roll before changing to another ASA for different lighting conditions.

ASA 100 film was great for outdoor situations or other scenarios where there was a lot of light, just like shooting at ISO 100 on a digital camera. ASA 400 was better for indoor situations when you needed film that was more sensitive to light, if there was simply not much to work with. If you looked hard enough you could get film that went up to ASA 800 or 1000, but anything beyond that was about as common as a polycephalous bos taurus (two-headed cow).
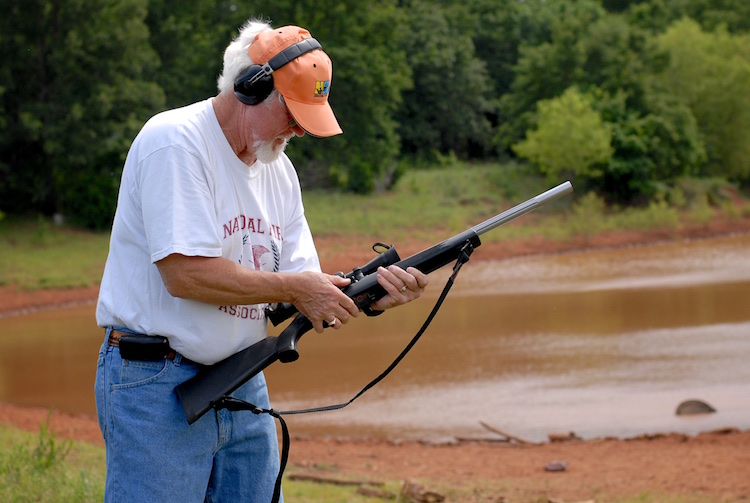
I took this photo of a champion marksman on my old D200 at ISO 400. If you look super close at the trees you will see some noise in the image, but doing that kind of misses the point of the photo.

I took this photo of a champion marksman on my old D200 at ISO 400. If you look super close at the trees you will see some noise in the image, but doing that kind of misses the point of the photo.

Early digital cameras, not unlike my world-weary Nikon D200, did not offer much in the way of low-light shooting capabilities that their film-based counterparts didn’t already have. Even as recently as a decade ago if you wanted to shoot in a low-light situation you might as well just grab a roll of high-ASA film, since most digital cameras just weren’t very good at their (roughly) equivalent high ISO values. (ISO and ASA are not directly 1:1 equivalent, but the measurements can be treated as fairly similar for the purposes of comparison.)

However, all this started to change rapidly as digital sensor technology advanced over the years, and now we are at the point where virtually any consumer camera can shoot up to ISO 3200 or even 6400 (a value that was unheard of with analog film) without much of a penalty in terms of overall color and luminance noise. In fact, most digital cameras are so good they can set the ISO automatically (hence the term Auto ISO), essentially removing a critical element of the exposure equation altogether, and freeing you so you only have to think about aperture and shutter speed.

Why I Use Auto ISO

This line of thinking was what used to stop me dead in my tracks as a photographer. The whole reason I learned to shoot in Manual mode was so I could have more control over my photos! Why on earth would I want to give control back to my camera, as if it knows better than I do what settings I want? The answer, I discovered over several years of shooting, is not as black and white as I once thought.

In most situations, the primary element of exposure that concerns me is the aperture, since it dramatically affects things such as depth of field and image sharpness. Of course I also have to pay attention to the shutter speed, since I generally don’t want motion blur, which then leaves the question of ISO. After shooting with my D7100, and subsequently my full-frame D750, I have realized that in most cases, I’m happy to let my camera decide the ISO for me, because I simply don’t care about it anymore. This might sound a bit extreme, but I humbly submit that perhaps you shouldn’t either.

Shot at ISO 2000 on a three-year-old Canon SL1 (EOS 100D)

Shot at ISO 2000 on a three-year-old Canon SL1 (EOS 100D)

Some photographers are prone to pixel-peeping, and I must admit I am certainly one of them. Zooming in on a picture to 100% magnification, in order to take note of barely-visible imperfections is a great way to compare various aspects of cameras, lenses, and even similar photographs. Shooting at high ISO values will often reveal noisy blemishes that stick out like a sore thumb when viewed up close. However, what I have come to realize, even when shooting with my D7100 which is over three years old, is that I simply don’t need to view my photos at ultra-close range to enjoy them, and for the most part don’t care about the noise that shows up when I see those ISO values skyrocketing. If I have to choose between a blurry picture and a noisy picture, I’ll take the latter every time, and twice on Sunday.

How to Use Auto ISO

The exact mechanics of enabling Auto ISO vary from one camera to the next, but on most models from major manufacturers like Canon, Nikon, Sony, Fuji, Olympus and their peers, there is usually an option in one of the menus that allows you to do a few things:

  • Enable Auto ISO
  • Choose a maximum ISO value
  • Choose a minimum shutter speed

Once you learn to find your comfort zone with these settings, you might find yourself thinking less about ISO, and more about things like framing and composition. On my D7100 I’m comfortable shooting up to ISO 3200, so I set that as the maximum value. I have the minimum shutter speed set to 1/(2x lens focal length). This means if I’m using a 50mm lens and shooting in Aperture Priority, my camera will lower the shutter speed to no less than 1/100th in order to get a properly-exposed picture, and if that still doesn’t do the trick it will then automatically raise the ISO clear up to 3200.

Learning to relinquish this amount of control has been incredibly freeing, so much so that for a while it actually felt like I was cheating because I was not manually selecting the ISO for every single shot. On my D750 I use similar settings but set the maximum value at 6400.

As you play around with this on your gear you are going to have to find a solution that works for your individual needs and photographic taste. Some cameras only let you specify one single value for the minimum shutter speed (as opposed to calculating it based on the focal length of your lens) and your mileage for how effective this technique is may vary, but if you can learn to embrace Auto ISO and let your camera do some of this heavy lifting, you might find yourself getting a lot more keepers on your memory card.

For this impromptu Easter photo I set the aperture at f/3.3 and let my camera do the rest. It chose a shutter speed of 1/100 and then raised the ISO as high as it needed to (2800) in order to get a good exposure.

For this impromptu Easter photo I set the aperture at f/3.3 and let my camera do the rest. It chose a shutter speed of 1/100 and then raised the ISO as high as it needed to (2800) in order to get a good exposure.

I would be remiss if I did not mention some of the downsides of Auto ISO as well, as not all is bright and sunny, and warm and fuzzy on this side of the fence.

One of the most significant limitations of shooting at high ISO values is the lack of dynamic range – basically, how much data your image sensor is able to capture in a given picture. If you have a RAW file that was shot at ISO 5000, and you need to use Lightroom to recover detail from the shadows, or raise the exposure of the whole image, you will find you have much less room to work with than if you shot the photo at ISO 100.

Also, depending on your camera, you may also find cases of severe banding, or ugly horizontal lines, that show up when you try to recover shadow detail at high ISO values. Finally, all things being equal a picture shot at ISO 4000 will generally have less vibrant colors, and skin tones will seem a little more artificial and false, than a similar picture shot at ISO 400.
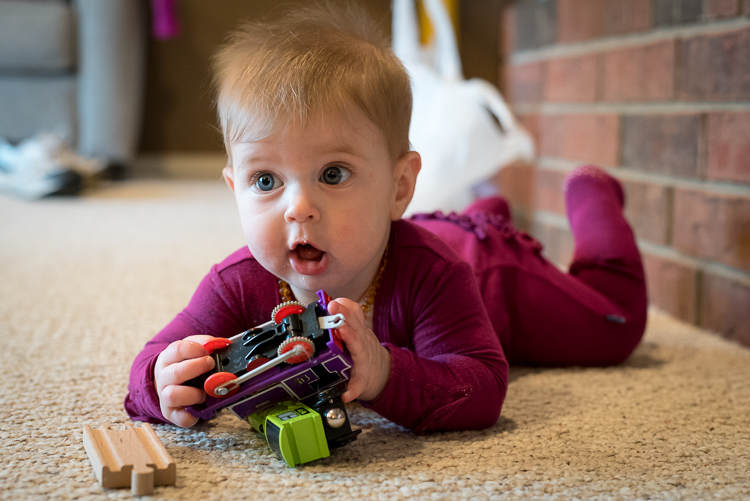
Selecting the ISO was the last thing on my mind; I used an aperture of f/4 and a minimum shutter speed of 1/100. My camera selected an ISO of 5000 and I could not be more pleased with the result. A year ago I would have never gone that high, and would have had a blurry photo instead.

Selecting the ISO was the last thing on my mind when I made this image. I used an aperture of f/4 and a minimum shutter speed of 1/100, my camera selected an ISO of 5000, and I could not be more pleased with the result. A year ago I would have never gone that high, and would have had a blurry photo instead.

Despite these limitations, shooting with Auto ISO has been a huge boon for me, and I think it could be for you too. If you have never tried Auto ISO, I recommend giving it a chance and see how you like the results. For me it was a little like enabling back-button focus, in that I was highly skeptical at first, but after a few weeks I was hooked and now I don’t think I could ever go back.

Do you use Auto ISO? Share your thoughts in the comments below, and I’d love to see some of your favorite high-ISO images as well. Cameras today really are incredible imaging machines, and it’s fun to see what they can do if we push them a little bit.

googletag.cmd.push(function() {
tablet_slots.push( googletag.defineSlot( “/1005424/_dPSv4_tab-all-article-bottom_(300×250)”, [300, 250], “pb-ad-78623” ).addService( googletag.pubads() ) ); } );

googletag.cmd.push(function() {
mobile_slots.push( googletag.defineSlot( “/1005424/_dPSv4_mob-all-article-bottom_(300×250)”, [300, 250], “pb-ad-78158” ).addService( googletag.pubads() ) ); } );

The post How I Learned to Stop Worrying and Love Auto ISO by Simon Ringsmuth appeared first on Digital Photography School.


Digital Photography School

 
Comments Off on How I Learned to Stop Worrying and Love Auto ISO

Posted in Photography


Detroit Agate: Auto Factory Paints Accidentally Form ‘Fordite’

20 May

[ By WebUrbanist in Art & Sculpture & Craft. ]

shaped fordite

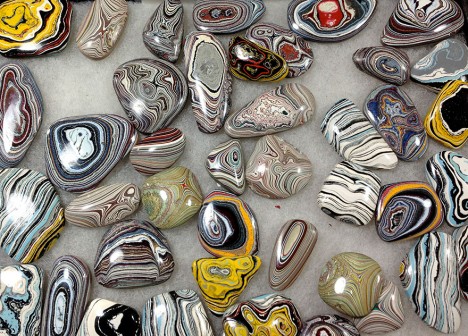
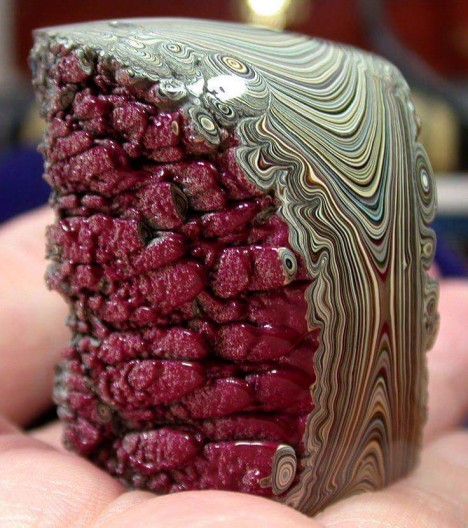
Culled from paint deposits in old car factories, these may look like exotic gemstones, but their colors reflect years of layering and hundreds to thousands of assembly-line stops. They are frequently referred to as Detroit Agate, or simply: Fordite.

fordite image

Workers at the time, and urban explorers in later years, grew fascinated and started chipping off the results to save and ultimately shape into jewelry and other objects.

fordite rings

Historically, automotive bodies were painted by hand, and the spray-painted layer would drip onto surrounding surfaces and equipment (or simply be coated indirectly).

natural detroit aggregate

The pain would end up backed onto these surfaces, where it would solidify and grow thicker over time, up to inches over the years.

fordite encursted form

Like layers in a rock to a geologist, these faux-minerals tell stories of automotive history through their vibrant and varied colors, including changes in favorites over time. While you can still find this in raw form or polished pieces online, be warned: pre-1970s layers may contain lead.

Share on Facebook


[ By WebUrbanist in Art & Sculpture & Craft. ]

[ WebUrbanist | Archives | Galleries | Privacy | TOS ]


WebUrbanist

 
Comments Off on Detroit Agate: Auto Factory Paints Accidentally Form ‘Fordite’

Posted in Creativity


How Auto White Balance Can Hinder Your Photography

01 Feb

You’ve likely heard that auto settings like auto exposure and autofocus aren’t fail-proof. They’re strong features, no doubt, and most photographers take advantage of them at least some, if not all, of the time. But the key to success with auto-anything is to make it work for you; that is, to understand its limitations, and know when it’s not going to give you the best results.

If you’ve been a photographer for very long, you’ve likely run into the situation in which a very bright scene, a snowy landscape, for example, caused your camera’s auto exposure to significantly underexpose the shot, giving you murky gray snow instead of brilliant white. Likewise, a shot that was naturally dark, like a portrait of a black dog, might have been recorded too light, also resulting in unwanted gray or brown.

In both of these cases, the auto exposure was tricked by the scene’s overall light or dark tone, and attempted to compensate for this problem by doing exactly what it’s designed to do: choose an exposure that will average out the tones in the scene. For many photographs, auto exposure does a fine job of selecting a correct exposure, for scenes when average is correct. The trouble is when a situation is not average. In those cases, it’s up to you, the photographer, to make the necessary adjustments.

DJ ATM7 40 2

DJ ATM7 40

The exact same thing happens with your camera’s Auto White Balance, only in this case, the issue is not with light intensity, but with color.

The Color of Light

Not all light is the same; different types of light have different colors built-in to them. Daylight is basically white, while light from a sunrise or sunset has a red, orange, or pink cast to it (caused by the light being bent through deeper layers of atmosphere). Shade is usually a bit blue, as is snow, as both of these situations are receiving reflected blue light from the sky. Standard incandescent (tungsten) lightbulbs give off a strong yellow cast, while fluorescent lights, long the bane of photographers, can be anywhere from blue, to purple, to green.

Your camera needs to know the color of the light so that it can accurately record the rest of the colors in the scene. With film, this White Balance” is built into the product (i.e., Daylight film and Tungsten film), but with digital cameras, we have the ability to change the White Balance on the fly. If you shoot a room illuminated only by tungsten light with your camera’s Daylight White Balance setting, the resulting photo will show incorrect colors that are skewed towards yellow (try it and see for yourself). You could also shoot an outdoor natural-light photo with the tungsten setting and get some simply awful blue images. But when these situations are shot with the correct White Balance selected, the colors in the photos should be spot-on accurate.

The Auto White Balance Blues

Your camera likely offers a handful of White Balance choices, settings like: Daylight, Cloudy, Shade, Flash, Tungsten, and Fluorescent. There is also, surprise, an Auto choice.

Many beginning photographers tend to set their White Balance selection to Auto and leave it there. This mistake can be the cause of quite a few photographic problems. Like your auto exposure, Auto White Balance is pretty good. Especially when dealing with artificial light sources, the results of Auto can be very satisfactory. The trouble arises when a color cast is desirable, or when shooting a subject that is mostly one color.

DJ CWG 3 11 E 2

DJ CWG 3 11 E

A great example is a classic sunrise or sunset scene. In this case, there can be quite a lot of red or orange light illuminating the scene. If you choose Auto White Balance for this shot, the camera will evaluate the scene and think, “Hey, something’s wrong! There’s a lot of red here! Better back off on the reds.” The problem is, you do NOT want your camera to correct for those colors. In this case, having a lot of red in the scene is correct according to the subject and your intention. Auto White Balance will probably deliver a sunset that has a much more bluish feel, not as dramatic, and not what the scene actually looked like.

Another way Auto White Balance can be fooled is with objects that are mostly one color. A good example is flower photography. Suppose you’re photographing a large pink flower that fills the frame almost entirely. Auto White Balance will look at this shot and think, “Whoa, too much pink! Gotta back off on that.” Auto White Balance has no way of knowing if subject is truly that color, or if it’s the lighting. The only thing it can do is try to deliver what it perceives to be an average color balance for the image. In this case, the flower in the photo won’t appear the correct, vibrant pink that it was.

DJ 776 9 2

DJ 776 9

Auto White Balance can even cause slight inaccuracies to everyday outdoor photos, often resulting in shots with just a bit too much purple than they should have (the result of Auto trying to over-compensate for green vegetation).

Use Presets!

So what’s the solution? Use those White Balance presets! Many photographers, including me, use the Daylight setting a great deal of the time, to help ensure accurate colors during all times of the day and in many weather conditions. The Shade and Flash presets can also be quite useful. If you’re shooting JPEG files, selecting the correct White Balance at the time of shooting is critical. But even if you shoot RAW files and have the (very useful) ability to adjust your White Balance in post-production, choosing the correct White Balance preset at the time of shooting can start your images off right, and save you plenty of time, and who doesn’t like that?

Do you have any other stories or examples where Auto White Balance did you wrong? Please share in the comment below.

googletag.cmd.push(function() {
tablet_slots.push( googletag.defineSlot( “/1005424/_dPSv4_tab-all-article-bottom_(300×250)”, [300, 250], “pb-ad-78623” ).addService( googletag.pubads() ) ); } );

googletag.cmd.push(function() {
mobile_slots.push( googletag.defineSlot( “/1005424/_dPSv4_mob-all-article-bottom_(300×250)”, [300, 250], “pb-ad-78158” ).addService( googletag.pubads() ) ); } );

The post How Auto White Balance Can Hinder Your Photography by Daniel Johnson appeared first on Digital Photography School.


Digital Photography School

 
Comments Off on How Auto White Balance Can Hinder Your Photography

Posted in Photography