RSS
 

Posts Tagged ‘Asked’

How to Shoot in Low Light – 9 Commonly Asked Questions

24 Nov

The post How to Shoot in Low Light – 9 Commonly Asked Questions appeared first on Digital Photography School. It was authored by Bruce Wunderlich.

low light photography moon rise
This image of a moonrise over Marietta, Ohio was taken 20 minutes after sunset during the blue hour; the sun had set and the sky was a dark blue. The city lights create a great warm glow over the city.

According to British photojournalist Donald McCullin, “There is no such thing as bad light, just misunderstood light.” Yet many photographers still consider low light to be bad light.

The purpose of this article is to encourage you to not consider low light as inferior or unusable, but to instead look for subjects that work well with the available low light. Shooting in low light can often be a struggle, however, which is why I’ll answer nine of the most frequently asked questions about low light photography.

Keep in mind that low light photography is not exclusively night photography. Low light photography opportunities may appear at any time of the day.

For instance, shooting waterfalls in low light allows you to use a slow shutter speed, prevents overexposure of the white water of the falls, and helps you create a beautiful silky effect (by blurring the moving water).

Using a flash will light up any subject, of course, but let’s take a look at how to improve your photography in naturally-occurring low light.

Low light photography FAQs

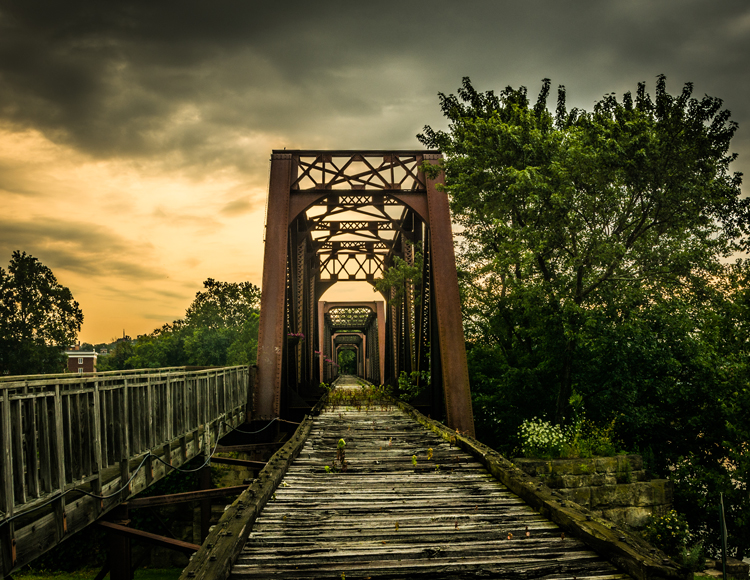
low light photography bridge
Low light creates very dramatic scenes. Dark storm clouds turned this potential sunrise into a great low light opportunity.

1. My low light images are blurry. Would a better lens alleviate the blur?

The short answer to this question is, “Yes.” A fast lens with a maximum f-stop of f/1.8, for instance, will give you better results than a kit lens with a maximum f-stop of f/3.5 or f/5.6. 

But even the faster, more expensive lenses will give you undesirable results if you’re using the wrong settings. You see, the wider aperture opening on fast lenses allows you to use a faster shutter speed, which helps you capture a sharper image – but unless you dial in the correct shutter speed, your shots will often turn out blurry anyway!

Lenses with larger maximum apertures are called “fast” because they allow you to shoot with faster shutter speeds, thanks to the additional light that enters your camera through the bigger aperture opening.

2. What are the best camera settings for shooting in low light?

These are the best low light camera settings:

Manual mode

Shooting in Manual mode is essential for successful low light photography, as it allows you to control every functional aspect of your camera.

Once in Manual mode, you basically have three ways to get more light onto your camera sensor:

  • Shutter speed
  • Aperture
  • ISO

These three controls are together called the exposure triangle, and each of the settings can have a positive or negative result on your image’s exposure.

Therefore, learning how to use shutter speed, aperture, and ISO for the best result is the key to low light photography.

Note that your in-camera light meter will reveal where adjustments should be made to the camera settings, and well-exposed images will be the result.

Shutter speed

If you are shooting handheld, a good rule of thumb is to set your shutter speed to match the reciprocal of your focal length.

For example, if you are shooting at 50mm, your shutter speed shouldn’t be any slower than 1/50s. Of course, if the subject of your photo is moving, then you will need to increase your shutter speed to freeze the action. Because while choosing a slower shutter speed will allow more light into your camera, you’ll also risk getting a blurry result.

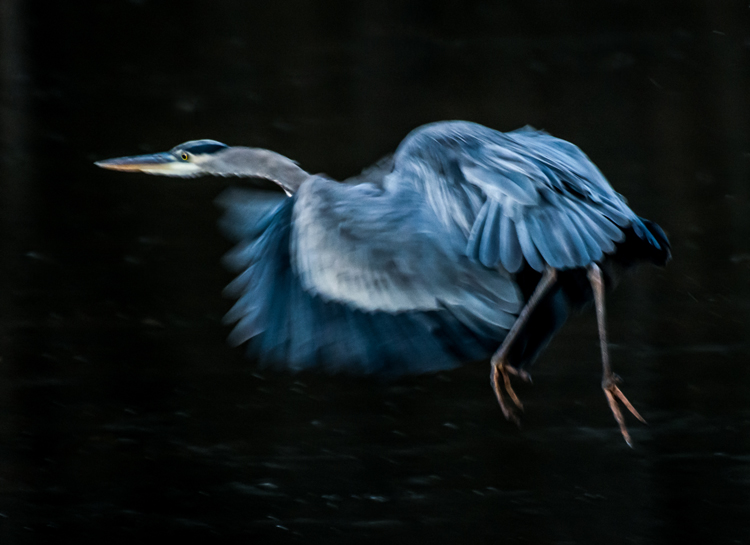
low light photography great blue heron
A great blue heron in a fight was the subject of this low light image. I shot this at 1/250s, f/5.6, and ISO 1250. Using a combination of a slower shutter speed and a higher ISO, I was able to create the blurry wings while panning to match the speed of the fight.

Aperture

In most low light situations, you will probably need to shoot with your aperture wide open.

But if there is enough light to shoot with a smaller f-stop, you’ll get an increased depth of field.

So here’s what to consider:

Choosing a wider aperture will let more light into your camera, but will decrease your depth of field. And this could lead to an important part of your image being out of focus.

So what should you do?

Generally, it’s better to risk an out-of-focus shot than to guarantee a blurry one – so, if necessary, widen that aperture!

ISO

The higher the ISO, the brighter the resulting shot.

But there’s an important trade-off here:

The higher the ISO, the more digital noise you’ll be adding to your image.

So keep your ISO as low as possible, and only increase your ISO after you have decreased your shutter speed and widened your aperture.

Shoot in RAW

For the best results, shooting in RAW is recommended.

This is for one simple reason: Your camera will save more shadow detail in RAW format compared to the compressed JPEG format.

Also, it is very helpful to learn how to check your histogram; that way, you don’t have to just rely on what you see on your camera’s LCD screen. Use the histogram to check your exposure, and avoid clipping the highlights and shadows.

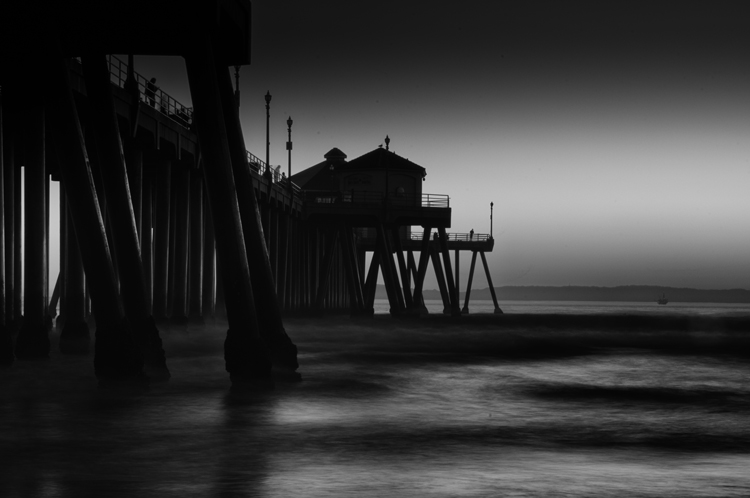
black and white beach house
I used the low light at Huntington Beach, California to create this black and white image with a five-second exposure.

3. How do I take low light action shots?

Shooting action in low light can be very challenging, and it is almost always going to require you to shoot with your aperture at its widest setting.

Once your aperture is set, adjust your shutter speed to match the action you are trying to freeze. Of course, depending on the situation, there may simply not be enough light. If that is the case, adjust the ISO to a higher setting until a good exposure is set. If your ISO setting is so high that you are getting an unacceptable amount of digital noise, you have two options:

Either add light with a flash or some other source, or live with the noise and try to remove some of it in post-processing.

Sometimes, with the noise issue, it comes down to getting the shot with noise versus not taking the shot at all.

4. How do I reduce the digital noise level in low light images?

The simple answer to this question is to shoot at the lowest ISO that you can. But it is also a good idea to know the ISO at which your camera produces noise that you consider unacceptable.

And always make sure your exposure is correct. Even at a low ISO, if your image is underexposed, you will have some noise in the shadow areas.

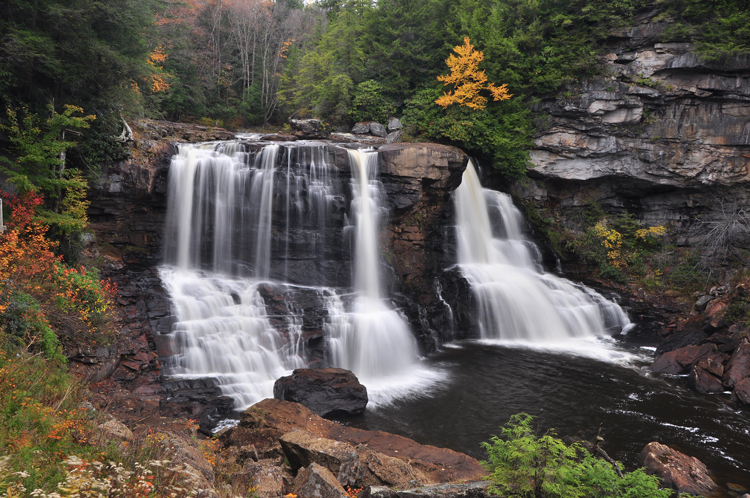
long exposure waterfall
A cloudy day at Blackwater Falls, West Virginia allowed for a long exposure without blowing out the highlights.

5. How do I focus in low light?

Another reason for blurry images in low light is the fact that some cameras just aren’t manufactured to focus properly with less light.

So what should you do?

Try shining a light on your subject to give your camera enough light to focus. You can also use your lens’s focusing ring to fine-tune your focus.

Focusing via the central AF point may also help, as it usually focuses faster and more accurately than surrounding AF points.

6. How can I take pro-like images in low light?

Here are four things that most pros do in low light:

  1. Use a tripod
  2. Shoot in RAW
  3. Shoot in Manual mode
  4. Use the histogram
low light photography silhouette
Low light makes for great silhouettes!

7. How do I choose the best white balance for low light?

Set your white balance to match your environment:

  • Tungsten for photographing indoors with light from a regular lightbulb
  • Fluorescent for light from fluorescent bulbs
  • Cloudy for low light created by an overcast day
  • Shade for shooting in a shaded or shadowy area

One thing to remember:

If you are shooting in RAW, you can adjust your white balance later in post-processing.

But if you are shooting JPEGs, it is very important to get your white balance correct in-camera. For this reason, if your camera is set to capture JPEGs, you should not use the automatic white balance function. White balance is hard, and sometimes impossible, to correct later in a JPEG.

8. Should I raise my ISO or lower my shutter speed in low light?

Assuming that you are shooting with your aperture wide open, in most situations this is an easy one to answer:

Adjust your shutter speed!

And only raise your ISO as a last resort.

Remember that raising your ISO is going to add more noise into the image.

Now, most new DSLRs do a much better job with noise levels at higher ISO settings. But as I mentioned earlier, it is a good idea to know what noise levels are unacceptable, and what ISOs these correspond to. In situations where your subject is moving, it may become necessary to boost the ISO to keep your shutter speed fast enough to freeze the action.

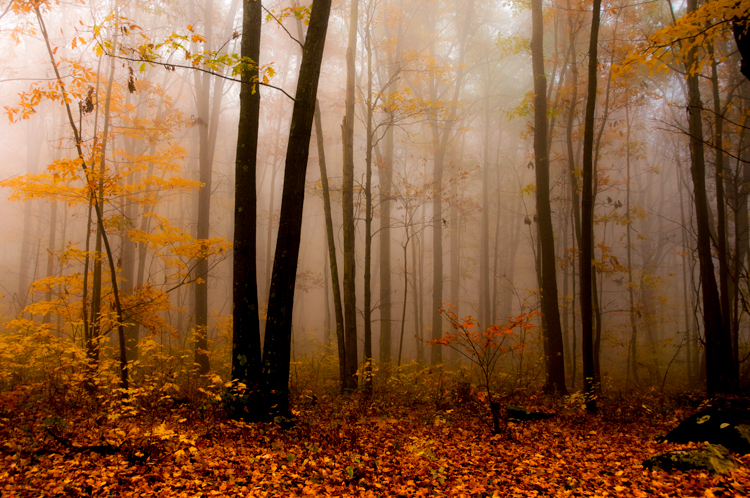
fall scene with fog
Fog created the low light conditions in this fall image.

9. Why aren’t my low light shots sharp even when I use a tripod?

Remember that, in most low light, you will be shooting with your aperture wide open (or nearly so).

Hence, your depth of field will be very shallow (which can lead to blurry results).

So be extra careful to lock your focus (you can even try back-button focus) on the part of your scene that needs to be in sharp focus.

Case in point:

When shooting a low light portrait, it is important to have the subject’s eyes in focus. So focus on the eyes!

Also, if your subject is moving, increase your shutter speed until the subject is frozen by your camera. And when shooting with a tripod, make sure your camera’s image stabilization is turned off, because it can actually create blur!

10. A bonus tip

In low light, the LCD screen on the back of your camera is going to look very bright – and this will give you an inaccurate sense of your photo’s exposure.

So if your camera has an adjustment for the brightness of your LCD screen, turn it down. You want to ensure your image will not seem overly bright when you view it!

low light photography

How to shoot in low light: conclusion

The trick to low light photography is to take control of your camera, and know that every action or setting will have a reaction.

Now, how is that different from photography in any other type of light?

It’s not, really. Just consider photography in low light as an opportunity to be creative.

Now over to you:

What subjects do you like to shoot in low light? And do you have any low light shooting tips? Share your thoughts in the comments!

The post How to Shoot in Low Light – 9 Commonly Asked Questions appeared first on Digital Photography School. It was authored by Bruce Wunderlich.


Digital Photography School

 
Comments Off on How to Shoot in Low Light – 9 Commonly Asked Questions

Posted in Photography


‘Like being asked to cook for Gordon Ramsey’ Photographer Jerry Ghionis on shooting portraits of Joe McNally

20 May

When Jerry Ghionis got a call asking if he was interested in photographing portrait legend Joe McNally, he jumped at the opportunity. Using just one lens – Nikon’s Z 85mm F1.8 S – Jerry and Joe turned their cameras on one another. Watch the video above to see how they got on.

What’s it like to take pictures of a portrait legend? In an exclusive interview, Jerry explains the background to the shoot and what it was like to work with Joe, as well as offering some insight into his work, and his approach to portrait photography.


Tell us how you got involved with this shoot

When I got the call about taking portraits of Joe McNally, I thought wow – that’s like being asked to cook for Gordon Ramsey!

The brief was just to shoot portraits of one another, have some fun, and see what comes of it. I wasn’t intimidated, I was excited. I want to create flattering and meaningful portraits of people, and I thought, well, here’s a guy who’s done this for everyone, and he deserves something for himself. That was the opportunity I was excited about: creating something for Joe that he’s done for so many people.

For this shot, Jerry posed Joe with the first Nikon camera he ever used, an FTn with F36 Motor Drive.

Photo by Jerry Ghionis, courtesy Nikon USA.

The one shot that was pre-planned was the portrait of Joe with the Hollywood lights and me in the mirror. For that one I thought it would be cool to feature Joe with the first Nikon camera he ever used. He’s a tall guy, and I wanted to style him like a trendy 50s or 60s-era photographer, with a blue background working with his blue eyes, and the contrast against the color of his hair. So I found some old studio lights, a vintage mirror and some other things. I knew what I wanted, but I only had literally about five minutes to set it up and another five to shoot it. That was quite tough. I’m trying to light Joe, who’s a lighting master!

Everything on this shoot, including the video, was shot using the 85mm alone. Was that intimidating?

No, not at all. Once you’ve shot a few weddings and you know how to do it, very few things intimidate you. At least in terms of gear. And anyway, some of the recent weddings I’ve shot, most of the images I took were using that one lens.

The 85mm suits my style of photography because I like longer focal lengths

How long had you been working with the 85mm at that point?

Probably a month or two, before the shoot. And I loved it. The 85mm suits my style of photography because I like longer focal lengths. My usual favorite lens is a 70-200mm, so I was looking for something longer to use with my Z6 and Z7, which might become my new ‘go to’ lens.

$ (document).ready(function() { SampleGalleryV2({“containerId”:”embeddedSampleGallery_8520686272″,”galleryId”:”8520686272″,”isEmbeddedWidget”:true,”selectedImageIndex”:0,”isMobile”:false}) });

What is it about the 85mm that makes it useful to you?

Whenever you use a lens that’s faster than F2 for portraiture, you’re going to want to shoot a handful of images, sort of rapid fire, to make sure that you get a shot where the focus is exactly where you want it. That’s just the nature of portrait photography on fast lenses. But the 85mm has just become my reliable everyday go-to lens. I’d say the last six months of weddings I’ve shot, I’ve used the 85mm probably about 90% of the time. It’s so light. Focus is perfect at F1.8 and it’s completely sharp. I’ve made an incredible amount of pictures using that lens, I love it.

Had you worked with Joe on a project together before?

No this was the first time we’d shot together. It’s rare on campaigns like this that you’d shoot with somebody else. It was great, it was just two guys, no egos – we just wanted to have some fun and create some cool pictures.

The whole thing was probably one of the biggest honors of my photographic career.

It’s rare on campaigns like this that you’d shoot with somebody else

Did Joe like the pictures you took of him?

He did! He’s referred to the pictures on stage in his presentations. He’s been very generous and kind. And most importantly his wife likes them too!

What lenses would you advise someone should invest in who wants to get into portrait and event photography?

Most of the weddings and portraits I’ve shot lately have been on the 85mm F1.8, and at a minimum, I would recommend an 85mm, two camera bodies, a 24-70mm, and a 70-200mm, and two flashes. One camera’s not enough, and you’ll need cameras from the same system, so that you can switch between them without thinking.

The Z 85mm F1.8 S is a compact short-telephoto prime lens for the Z System. Sharp and almost aberration-free wide open, the Z 85mm is a useful lens for portraiture and available light shooting.

What simple things can someone do to improve their portrait photography?

The biggest problem I see is people shooting too quickly. When you’re photographing a wedding or a portrait, you can’t just show what someone looks like, you need to show who they are. To do that, you need to slow down, connect with them, and know how to flatter them. You can’t do that if your eye is glued to the viewfinder or your head is buried in your camera’s menu system. Shooting too quickly contributes to a lack of confidence.

The other thing is people don’t practice enough. I practice all the time. I’ll often shoot once a week just for myself, trying a new technique or a different lighting setup. I have a mannequin at home, so if I want to produce a particular lighting setup that I haven’t done before, while the hair and makeup person is doing their thing, I’m practicing with the mannequin and by the time my subject is ready I’ve prepared the full lighting setup.

What advice would you give to someone who is trying to get into photography seriously?

Remember that you’re only as good as your last shot. You don’t have to be the best, you just have to be better than you were last week.


This is sponsored content, created with the support of Nikon. What does this mean?

Articles: Digital Photography Review (dpreview.com)

 
Comments Off on ‘Like being asked to cook for Gordon Ramsey’ Photographer Jerry Ghionis on shooting portraits of Joe McNally

Posted in Uncategorized


This online tool calculates the “exposure” you should demand when being asked to work for free

03 Apr

Many photographers (and other creatives) know the situation very well: you’re offered a freelance job but once the conversation turns to remuneration it becomes clear that there won’t be any hard cash but instead you’re expected to accept ‘exposure’ in some vague shape or form as payment.

Problem is, it’s very hard to put a value on exposure. The people behind Photography Domination have now come up with a way of quantifying how many ‘exposures’ your photography is worth.

The Exposure Calculator is an easy-to-use online calculator that lets you input some information about your work, for example your level of experience, the photographic genres you work in, your equipment, the number of followers of your Instagram account etc. When you hit the “Calculate” button you get the number of “exposures” you should asking for as a result.

In a very helpful way the calculator also provides conversion rates to US dollars, leads and exposure to social media followers.

Just in case it wasn’t entirely clear that the calculator shouldn’t be taken too seriously, there are notes saying ‘This calculator is obviously created with parody intentions’ and ‘Of course, if you’re serious about becoming a photographer you should almost never work for “exposure” alone.’

Maarten Mellemans, the creator of the calculator, has also authored a blog post in which he gives advice to photographers receiving ‘work-for-exposure’ offers.

Articles: Digital Photography Review (dpreview.com)

 
Comments Off on This online tool calculates the “exposure” you should demand when being asked to work for free

Posted in Uncategorized


Capitol Hill photographers asked to delete protest images, claim journalists

27 Jul
Photo by Phil Roeder, licensed under Creative Commons

Journalists photographing a protest in the US Capitol building report that they were told by Capitol Police to delete photos and videos of arrests. The events unfolded yesterday in the third floor Senate wing of the building as demonstrators protested the vote that would begin an effort to repeal the Affordable Care Act.

As police handcuffed and removed protestors from the hallway outside of the Senate chambers, journalists were reportedly told by police to stop taking photos, and were instructed to delete photos and videos they had captured.

Official policy for press in the Senate Gallery states that photography is indeed prohibited in that area. However, the ACLU spoke up to remind press that police may not force anyone to delete a photo or video without a warrant, no matter the circumstances.

Articles: Digital Photography Review (dpreview.com)

 
Comments Off on Capitol Hill photographers asked to delete protest images, claim journalists

Posted in Uncategorized


We asked three Canon lens masters to name their first and favorite lens designs

22 Mar

What is your first and your favorite Canon lens?

It’s not everyday you get to sit down with three master lens designers, but it’s also not every day you tour Canon’s Utsunomiya lens factory (read the interview and take the tour). Each of the three gentlemen we posed our two questions to – what was the first lens you designed and what is your favorite lens – has decades of experience designing Canon glass.

Masato Okada (center), the Deputy Chief Executive of Image Communication Products and Operations, first began designing lenses for Canon back in 1982. Meanwhile, Kenichi Izuki (right), the Plant Manager and Masato Okada (left), the Deputy Chief Executive of Image Communication and Products Operations, have each been designing Canon lenses since the late 80’s/early 90’s.

It takes decades of experience to design a lens like the Canon EF 16-35mm F2.8L III USM.

What was the first lens design you worked on at Canon?

Masato Okada: “It would go back many years, maybe you weren’t even born yet (Editor’s note: I was not), but the first lens I worked on was the FD 150-600mm F5.6L. It was one of those lenses where it was on a box and you actually had a one-touch action to do the zoom and one-touch action to do the focus. That was a big revelation.”

Masato Okada is the Deputy Chief Executive of Image Communication and Products Operations at Canon’s Utsunomiya lens factory. 

What was the first lens design you worked on at Canon?

Shingo Hayakawa: “It launched in 1991, the 75-300mm F4-5.6 USM, was the first lens I worked on and also the very first lens in that series. At the time, we actually launched the product at a lower price than the third party manufacturers, which was big news. The version “III” of that lens is still on the market.”

Shingo Hayakawa is the Deputy Group Executive of Image Communication and Products Operations at Canon’s Utsunomiya lens factory.

What was the first lens design you worked on at Canon?

Kenichi Izuki: “Because I joined Canon as a technical engineer I have so many memories of all the products I’ve worked on. Initially, I handled maybe 10 products over the course of a year. But the very first one that I worked on, which is now discontinued, is the EF 100-300mm F4.5-5.6 USM. It’s also one of my favorites.”

Kenichi Izuki is the Plant Manager at Canon’s Utsunomiya lens factory.

What is your favorite Canon lens design?

Masato Okada: “For me I’d have to say the 11-24mm F4L USM, because when launched, it allowed the widest angle possible on a full frame with no distortion. And I was torn at the time of production because we could have gone for the 12-24mm F2.8, which I thought would be more customer-prone. But I was developing the lens more in terms of particular users: a videographer for example, needing that extra field of view, even if they can’t physically back out. Other manufacturers were doing the 12-24mm, but only Canon was doing 11-24mm. We thought it was something we should go for. And it was really difficult in terms of the design for mass production. So because of those challenges, I’d say this would be my pick.”

Masato Okada is the Deputy Chief Executive of Image Communication and Products Operations at Canon’s Utsunomiya lens factory.

What is your favorite Canon lens design?

Shingo Hayakawa: “I can say that in terms of the lenses we’ve been launching over the years, we’re proud of them all. But the ones that came out last year in 2016, the 16-35mm F2.8L III USM in particular, was very highly spec’d at the time of its release. I’m proud of it because it has amazing performance and resolution. But if I were to narrow it down, my choice would be a lens that came out in 2012: the Canon 24-70mm F2.8L II USM. And if I were to choose a telephoto, I’d say the 200-400mm F4L IS USM with the 1.4x internal extender. But the 24-70mm II is my overall pick.”

Shingo Hayakawa is the Deputy Group Executive of Image Communication and Products Operations at Canon’s Utsunomiya lens factory.

What is your favorite Canon lens design?

Kenichi Izuki: “My favorite, which I truly remember because it was so hard to design, was the original Canon 70-200 F2.8 L USM non-IS. I actually worked on the 70-200mm F2.8L USM version II with IS when I became a manager of the division. That posed a challenge because we had to exceed the requirements of the previous version.”

Kenichi Izuki is the Plant Manager at Canon’s Utsunomiya lens factory.

Have your say, what’s your favorite Canon lens?

So what do you think of the responses we received – were there any surprises? And what is your all time favorite Canon lens? Let us know in the comments!

Articles: Digital Photography Review (dpreview.com)

 
Comments Off on We asked three Canon lens masters to name their first and favorite lens designs

Posted in Uncategorized


What’s In Your Cam Bag?We Asked, You Answered!

17 Jul

Ever wonder about the goodies that photographers hide away in their camera bags?

Wonder no more! We asked seven photogs from all walks of life to open up their cam bags to us so we can see what exactly they’re working with.

As you’d expect, no two bags are the same. The one thing they all have in common, though? They’re unique and awesome, just like the photogs they belong to!

Camera Bag Items Revealed!

(…)
Read the rest of What’s In Your Cam Bag?
We Asked, You Answered! (1,091 words)


© Taylor for Photojojo, 2015. |
Permalink |
No comment |
Add to
We Asked, You Answered!”>del.icio.us

Post tags:


Photojojo

 
Comments Off on What’s In Your Cam Bag?We Asked, You Answered!

Posted in Equipment


How to Shoot in Low Light – 9 Commonly Asked Questions

03 Jun
DSC_4289-Edit-Edit

This image of Moon Rise over Marietta, Ohio was taken 20 minutes after sunset during the Blue Hour when the sun had set and the sky was a dark blue. Here the city lights make a great warm glow over the city.

According to British photojournalist Donald McCullin, “There is no such thing as bad light, just misunderstood light.” Many photographers consider low light to be bad light. The purpose of this article is to encourage you to not consider low light as inferior or unusable, but rather to look for subjects to photograph that react well to the available light.

Keep in mind that low light photography is not exclusively night photography. Low light photography opportunities may appear any time of the day as well. For instance, shooting waterfalls in low light allows you to shoot with a slow shutter speed, prevents over-exposure of the white water of the falls, and thereby creates a beautiful silky effect capturing the moving water. Using a flash will light up any subject, of course, but let’s take a look at how to improve your photography in naturally occurring low light. Some frequently asked questions about low light photography are addressed below.

Low Light Photography FAQs

14595250669_30c342a792_o

Low light create very dramatic scenes. Dark storm clouds turned this potential sunrise into a great low light opportunity

My low light images are blurry. Would a better lens alleviate the blur?

The short answer to this question is YES, a fast lens with maximum f-stop of 1.8 for instance, will give you better results than a kit lens with a maximum f-stop of 3.5 or 5.6. But even the faster, more expensive lens, will give you undesired results with the wrong settings. The wider aperture opening will allow you to use a faster shutter speed resulting in a sharper image. These lenses with larger maximum apertures are called “fast” because they allow you to shoot with faster shutter speeds, due to more light that is entering your camera through the bigger opening.

What are the best camera settings for shooting in low light?

Manual Mode

Shooting in manual mode is paramount to successful low light photography as it allows you to control every functional aspect of your camera. You basically have three ways to get more light on your camera sensor: Shutter speed, Aperture and ISO. These three controls are called The Exposure Triangle, and each of these can have a positive or negative result to your image’s exposure. Therefore, learning how to use them for the best result is the key to low light photography. Your in-camera light meter will reveal where adjustments should be made to the camera settings, and well-exposed images will be the result.

Shutter Speed

If you are shooting handheld, a good rule of thumb is to set your shutter speed to match your focal length. For example, if you are shooting at 50mm your shutter speed shouldn’t be any slower than 1/50th of a second. Of course, if the subject of your photo is moving, then you will need to increase your shutter speed to be fast enough to freeze the action. Therefore, choosing a slower shutter speed will allow more light into your camera, but with that setting, the possibility of a blurry picture occurs.

Great Blue Heron in Fight was the subject of this low light image. Exposure 1/250 of a second, f/5.6, ISO 1250. Here using the combination of slower shutter speed and a higher ISO to create the blur of the wings and panning to match the speed of the fight of the heron.

Great Blue Heron in fight was the subject of this low light image. Exposure 1/250 of a second, f/5.6, ISO 1250. Using the combination of slower shutter speed and a higher ISO to create the blur of the wings and panning to match the speed of the fight of the heron.

Aperture

In most low light situations you will probably need to shoot with your aperture wide open. But if there is enough light to allow you to shoot with a smaller f-stop, it will increase your depth of field. The principle to consider: choosing a wider aperture will let more light into your camera, but will decrease your depth of field, which could lead to an important portion of your image being out of focus.

ISO

The higher the ISO number the more light your camera will record. The trade-off here is, the higher the ISO, the more digital noise you are adding to your image. Keep your ISO as low as possible and only increase your ISO after you have maxed out your shutter speed and aperture.

Shoot in RAW

For best results, shooting in RAW is recommended, for the simple reason that your camera will save more shadow detail in RAW format compared to the compressed format of jpg.

It is very helpful to learn how to check your histogram, and not just rely of what you see on your camera’s LCD screen. Use the histogram to check your exposure, and avoid clipping the highlights and shadows.

11943436386_0912d70961_o

Using the low light at Huntington Beach California to create this black and white image with a five second exposure.

How do I take low light action shots?

Shooting action in low light can be very challenging and is almost always going to require you to shoot with your aperture at its widest setting. When your aperture is set, then your shutter speed should be adjusted to match the action that you are trying to freeze. Of course, depending on how low of a light situation you are shooting within, there may simply not be enough light. If this is the case, adjust the ISO to a higher setting until a good exposure is set. If your ISO setting is so high that you are getting an unacceptable amount of digital noise, you have two options: either add light with a flash or some other source, or live with the noise and try to remove some of it in post processing. Sometimes with the noise issue, it comes down to getting the shot with noise, or not taking the shot at all.

How do I reduce the digital noise level in low light images?

The simple answer to this question is to shoot at the lowest ISO that you can. But it is also a good idea to know the ISO at which your camera produces noise that you consider unacceptable. Always make sure that your exposure is correct. Even at a low ISO, if your image is underexposed you will have some noise in the shadowed areas.

4016735972_59e71999ac_o

An over casted  cloudy day at Blackwater Falls West Virginia allowed for this long exposure without blowing out the highlight.

How do I focus in low light?

Another reason for blurry images in low light is the fact that some cameras just aren’t manufactured to focus properly with less light. Try shining a light on your subject to give your camera enough light to focus. You also may use you manual focus ring to fine-tune your focus. Using the center focus dot may also help as it is usually a cross-point type which focus faster and more accurately than others.

How can I take pro-like images in low light?

Four things that most pros are going to do in low light:

  1. Use a tripod
  2. Shoot in RAW
  3. Shoot in Manual Mode
  4. Use the histogram
8038775792_361ab83c88_o

Low light makes great silhouettes.

How do I choose the best white balance for low light?

Set your white balance to match you environment –  Tungsten for indoors with light from a regular lightbulb, Fluorescent for light from fluorescent bulbs, Cloudy for low light created by an overcast day, and Shade for shooting in a shaded or shadowy area. But, one thing to remember if you are shooting in RAW format is that you can adjust your white balance later in post-processing. But if you are shooting JPGs it is very important to get your white balance correct in-camera. For this reason you should not shoot Auto white balance, it’s very hard, sometimes impossible, to correct later from a JPG.

Should I raise my ISO or lower my shutter speed in low-light?

Assuming that you are shooting with your aperture wide open, in most situations this is an easy one to answer. Adjust your shutter speed and raise your ISO as a last resort. Remember that raising your ISO is going to add more noise into the image. Most new DSLRs do a much better job with the noise levels in their higher ISO settings, but as mentioned earlier, it is a good idea to know at what noise level you are unwilling to accept, and what ISO that is for your camera. In situations where your subject is moving, it may become necessary to adjust the ISO to keep your shutter speed fast enough to freeze the action.

DSC_0101-Edit

Fog created the low light in this fall image.

Why aren’t my low light shots sharp even when I shoot using a tripod?

Remember in most low light you will be shooting with your aperture wide open (or nearly so), hence your depth of field will be very shallow. Be extra careful to lock your focus (even try back-button focus) on the part of your image that needs to be in sharp focus. Case in point: when shooting a low light portrait, it is important to have the subject’s eyes in focus. If your subject is in motion, increase your shutter speed until it freezes the motion of the image. Also, make sure your camera’s vibration reduction is turned off, as this can actually create blur in your image even if shooting with a tripod.

Bonus tip

In low light the LCD screen on the back of your camera is going to look much brighter than the actual conditions. So, if your camera has an adjustment for the brightness of your LCD screen, turn it down so that your image will not appear to be overly bright when you view it, even if it is underexposed.

7496092624_15c8de2ffe_o

Conclusion

The trick to low light photography is to take control of your camera, and know that every action or setting will have a reaction. So, how is that different than photography in any light? It’s not, really. Just consider photography in low light as an opportunity to be creative. What subjects do you like to shoot in low light?

googletag.cmd.push(function() {
tablet_slots.push( googletag.defineSlot( “/1005424/_dPSv4_tab-all-article-bottom_(300×250)”, [300, 250], “pb-ad-78623” ).addService( googletag.pubads() ) ); } );

googletag.cmd.push(function() {
mobile_slots.push( googletag.defineSlot( “/1005424/_dPSv4_mob-all-article-bottom_(300×250)”, [300, 250], “pb-ad-78158” ).addService( googletag.pubads() ) ); } );

The post How to Shoot in Low Light – 9 Commonly Asked Questions by Bruce Wunderlich appeared first on Digital Photography School.


Digital Photography School

 
Comments Off on How to Shoot in Low Light – 9 Commonly Asked Questions

Posted in Photography