RSS
 

Posts Tagged ‘Artificial’

Weekly Photo Challenge – Artificial Light

27 Mar

The post Weekly Photo Challenge – Artificial Light appeared first on Digital Photography School. It was authored by Sime.

There’s no question that when we start out in photography, at some point, we find ourselves needing to add light to an image we have in our mind.

But you only use ‘natural light’ I hear you say? Well, flash is available, so is a desk lamp or a torch – this is the week to try them out!

This week’s photo challenge is ‘Artificial Light’ you can use any light source that isn’t the sun (or you can combine the sun with artificial) for your photo. Use the hashtag #dPSLight

Light comes in MANY shapes and sizes, my first try with adding light to a photo came from a funny little desk lamp (We called it ghetto lighting) I used to stand around trying to get the ceiling light (one of those big paper ball things) in the right spot to give me the light I wanted, the addiction starting mostly on the 29th of September, 2008…

Simon Pollock Ghetto Lighting

These days lighting comes in many (as many as it always has, plus a couple more?) forms, I’ll share the ones I use – I have a single flash, it’s a Jinbei HD-2 Pro and a very capable little unit! If I need more power, and what I use on any commercial shoot, as well as the HD-2 Pro, are my two Westcott FJ-400 studio lights, they’re very nice, powerful enough for pretty much anything I need them for. Other lights I love and use often are the two little Aputure AL-MW lights (they’re waterproof) and I have two Spiffy RGB LED lights, too… A collection of many years I guess you’d say!

Weekly Photo Challenge – Artificial Light

BUT you don’t need to have “proper lighting gear” you need to have a desire to learn and a desk lamp! SO for this week’s challenge, we want you to use ANY sort of artificial light in your photograph (Just one photograph for the challenge, folks) and share it in the comments below or via social media (Tag us!) and make sure you tag #dPSLight on social media.

Missed a Challenge? Don’t sweat it, find all of our previous challenges here!

Share on Instagram or Twitter and use the hashtag #dPSEyes so we can see them!

How do I upload my photo to the comments?

Simply upload your shot into the comments field (look for the little camera icon in the Disqus comments section) and they’ll get embedded for us all to see. Or, if you’d prefer, upload them to your favorite photo-sharing site and leave the link to them.

Weekly Photography Challenge – Looking Up

Have a great weekend!

If you get stuck, leave a comment below or drop us a note on the dPS help desk! support@digital-photography-school.com

The post Weekly Photo Challenge – Artificial Light appeared first on Digital Photography School. It was authored by Sime.


Digital Photography School

 
Comments Off on Weekly Photo Challenge – Artificial Light

Posted in Photography


Portrait Editing with Luminar 4 – Using Artificial Intelligence

02 Nov

The post Portrait Editing with Luminar 4 – Using Artificial Intelligence appeared first on Digital Photography School. It was authored by Caz Nowaczyk.

In this video by Jacques Gaines, he looks at Portrait editing in Luminar 4 using the artificial intelligence features.

?

Luminar 4 is a stand-alone software or works as a plugin in Adobe Photoshop (which is great if you like working in Photoshop and don’t want to completely swap to new software).

This video uses the plugin version with Photoshop.

Jacques uses a retouched, flattened image in Photoshop and then opens the Luminar 4 plugin and does further editing work on his portrait.

He discusses the different portrait enhancement options that Luminar 4 offers.

Within Luminar, there is a section called “Portrait.”

This is the section that consists of:

  • AI Skin Enhancer
  • Portrait Enhancer
  • High Key
  • Orton Effect

AI Skin Enhancer

Smoothes out the skin on a portrait and does it realistically. You can decide how much you want to apply it from 0-100%.
If you don’t want it to apply to certain sections, you can also mask it out using a brush tool.

Portrait Enhancer

The Portrait Enhance panel consists of:

  • Face Light
  • Red Eye Removal
  • Eye Whitening
  • Eye Enhancer
  • Dark Circles Remover
  • Slim Face
  • Enlarge Eyes
  • Eyebrow Improve
  • Lips Saturation
  • Lips Redness
  • Lips Darkening
  • Teeth Whitening

Jared shows the effects these settings have on a portrait.

When you apply the changes in Luminar, it makes the image as a new Photoshop layer. You can then use a mask to paint out any areas in the image that you don’t want the effects applied to.

Have you done portrait editing with Luminar 4? Share with us your thoughts in the comments!


You may also like:

  • Five Common Portrait Retouching Mistakes to Avoid
  • 5 Must-Know Photoshop Retouching Tips and Tricks for Photographers
  • How to do Portrait Retouching With Luminar
  • Top 10 Luminar 2018 Features That I Discovered by Accident
  • How to Create a Grunge Look with Luminar 2018
  • Your Guide to Understanding the Luminar 2018 Dashboard


The post Portrait Editing with Luminar 4 – Using Artificial Intelligence appeared first on Digital Photography School. It was authored by Caz Nowaczyk.


Digital Photography School

 
Comments Off on Portrait Editing with Luminar 4 – Using Artificial Intelligence

Posted in Photography


Real Estate Photography: Artificial Light versus Natural Light

05 Apr

The post Real Estate Photography: Artificial Light versus Natural Light appeared first on Digital Photography School. It was authored by Nisha Ramroop.

Architecture: Michael Vail Design. Photo: © Sallie Moffatt.

This article is written by Nisha Ramroop and Ron Pepper.

Real estate interior photography can seem simple, but that impression can change when trying to capture a space that has big bright window views, and many areas of light and shadow inside. Often, it’s important to achieve balance amongst the bright and dark areas, whilst also capturing the view outside the window.

In this article, we’ll discuss shooting interiors using various lighting methods. These methods include using single and multiple Speedlight flashes, larger strobe lights, and using bracketed exposures for HDR.

Artificial lighting

Speedlight flash

The term ‘Speedlight’ refers to the kind of flash that can be connected to the camera’s hot shoe. These battery-powered flash units are very versatile and relatively inexpensive (often available used) because they can also be used off-camera. Nikon uses this term for this kind of flash, Canon uses the very similar ‘Speedlite’ and others might say ‘on-camera flash’ or other terms.

Architecture: Michael Vail Design. Photo: © Sallie Moffatt.

Using only a single Speedlight flash with your camera to light a room can be a good way to capture interiors quickly with minimal equipment. This does require some practice and a powerful Speedlight.

Usually, you want to retain detail in the brightest part of your room (either the view through the window or in a light fixture) and build your flash lighting around that.

To achieve this, you need to establish a base shot which exposes for the window view. If the window is the brightest area in the room, the rest of the room gets underexposed. Thus you need to light the underexposed areas of your room with your flash. Experiment with your flash at different power levels to equalize the light in the room. You can also use a light meter to measure the light being thrown in a particular area. This helps you adjust the flash output deliberately.

Lighting equipment enables you to fill areas of shadow to capture details in those dark areas. A powerful technique is to “Bounce” your Speedlight flash off a wall or ceiling to fill your areas of shadow more evenly.

Note: While bouncing flash softens the light before it hits your subject and gives you non-directional light, you can use it to supplement any directional light, so that the shadows from your natural light source make sense.

Keep in mind the following technical details, when finding the perfect balance using flash:

  • Your shutter speed does not affect the flash settings – it only affects the ambient light in your room (ambient light refers to any continuous light sources in the room. For example, sun or lamps). If you slow your shutter speed, it raises all the ambient light levels, which means it also affects the view out of your window.
  • The aperture affects both the flash and ambient light because a smaller aperture reduces the amount of all light that passes through the lens.
  • ISO also affects both flash and ambient light. It does this by altering the camera’s sensitivity to light.

Pros

  • Image almost finished in-camera, very little post-processing
  • Enables you to have creative control over the final image
  • Allows you to choose your best angle/composition early in the process and light for that specifically
  • You don’t need a tripod
  • Less camera equipment needed

Cons

  • Depending on the room, you may need more than one flash/light
  • These smaller flashes produce more “hard” light when fired directly into the scene
  • Some expertise is required. If done incorrectly, you may end up with inconsistent shadows to your natural light source or appear unnatural/fake
  • Your exterior needs to be correctly metered to your camera’s flash sync speed
  • Cost and management of batteries

Note: Using only one speed light can be tricky to achieve balanced light when window sources are large with bright sunlight.

Using multiple Speedlights with a remote trigger

Using multiple Speedlights on stands with a remote trigger can be handy when shooting larger spaces with overbearing natural light sources coming through the window. In some cases, you may need between two and four Speedlights to allow for enough internal light to equalize strong external window light – especially if shooting with direct sun outside the window. Shooting with multiple flashes allows you to get the right shot with a single image, rather than having to use bracketed exposures.

Architecture: Michael Vail Design. Photo: © Sallie Moffatt.

Pros

  • Allows fine control over the interior lighting
  • It allows you to light more dark areas
  • You can set each individual flash unit’s exposure to your needs
  • No need for a tripod

Cons

  • Relatively complex set-up normally requiring an experienced photographer
  • Carrying needed equipment can be challenging
  • Multiple points of (battery) failure
  • Need to set flashes so they are not in the shot
  • While no tripod is needed, multiple light stands are needed

Strobe lights

Here a ‘strobe’ refers to larger, more powerful lights. Modern strobes are powered by batteries. In the past (and lower-end current strobes), strobes needed to be plugged into electrical power or large battery packs.

Architecture: Michael Vail Design. Photo: © Sallie Moffatt.

Strobe Lights can be great to use for interior real estate photography, particularly if there is a large window light source. The greater power brings flexibility. For instance, adding a light modifier makes the light softer, avoiding harsh shadows that happen with smaller flashes.

Set your strobe light/s for the darker areas of the room. Depending on your shooting angle, you could set the strobe behind your camera line and bounce flash off the wall or ceiling above or behind you to fill any shadows in front of you.

Pros

  • A larger light source means softer, more attractive light
  • Full control over lighting
  • Tripod optional
  • Light is white and clean
  • Can solve color cast

Cons

  • Equipment is heavy to carry
  • Expensive compared to Speedlights
  • Can be hard to set up in small spaces
  • May need to be plugged in if not a higher-end battery-powered strobe

Natural or available light

There is an alternative to using artificial lighting to capture a room with bright and dark areas. Perhaps using Speedlights or strobes isn’t possible because the photographer doesn’t have this equipment, doesn’t know how to use it, or simply prefers the technique below.

Architecture: Michael Vail Design. Photo: © Sallie Moffatt.

We face the same challenge that the camera can see either the bright area, or the dark area, but not both. This can be solved, not by adding light, but by adding more exposures from the camera.

High Dynamic Range (HDR)

When using natural light for real estate interiors, there is some level of post-processing involved. One of the most common processing techniques used is High Dynamic Range (HDR) processing. The HDR technique means that you’ll take bracketed exposures using the camera, then they are combined using HDR software.

Architecture: Michael Vail Design. Photo: © Sallie Moffatt.

1. Bracketing exposures

So where do you start to capture the dynamic range of your interior (what your eyes see)? Since you may be working with a scene of high contrast, start with a process called “Exposure Bracketing.”

Exposure Bracketing is where you take (a minimum) of three identically composed images at different exposures. The first image uses the settings recommended by the camera. Then one or more images are intentionally overexposed, and one or more get deliberately underexposed.

One of the challenges with getting that first image (where the camera recommends settings for as properly exposed) is that the camera can choose the shutter speed based on the bright window light. This selection can leave the rest of the image too underexposed. A good solution for this underexposure is to lock your exposure on an area that is neither too bright nor too dark and use that as your baseline shot. When taking bracketed images indoors, use a tripod. Keep your aperture constant, ISO low, and vary your shutter speeds to achieve your different exposures.

Most DSLR cameras now have built-in bracketing called “Automatic Exposure Bracketing” (AEB), making it an easy, one-click process. If you are unfamiliar with this term, your camera manual is an excellent source for learning about this cool feature, and videos showing how to set AEB on many popular cameras are here.

If you are familiar with AEB, go ahead and set the exposure compensation values to plus and minus 2 EV (+/-2EV) or the maximum exposure increment (EV spacing) your camera allows. Your camera display should now show three exposure markers: one underexposed by 2-stops (-2EV), one correctly exposed (0), and one overexposed by 2-stops (+2EV). These represent the three shots that the camera takes.

Important note: The example above is for a three-shot HDR image. If your camera is capable of taking more pictures for HDR merging (some take 5 or 7), you can use the maximum number of shots available to you.

Put your camera into its Continuous Shooting Mode, compose your image and take your shots. Minimizing shake is highly recommended, so use a remote shutter release or timer where possible. Your bracketed images are now ready for the next step.

2. HDR software

As expressed previously, combining these bracketed images ensures you get a properly exposed image. This method is especially useful when you have challenging lighting situations and is a popular processing method for real estate photographers. Photomatix Pro is one of the top software used by professionals for the merging process.

One of the unspoken rules of real estate photography is that the vertical lines must, well, be vertical. Also, the horizon must be level. This is easy to achieve by leveling the camera. However, if you find that the image isn’t quite level, The Finishing Touch Panel in Photomatix Pro allows you to correct perspective issues with ease.

Benefits of using this method:

  • Easy to learn shooting technique
  • Fast shooting with a little practice
  • Minimal equipment needed (camera/lens and tripod,)
  • Natural shadows
  • No heavy equipment to lug around/set up
  • Some flexibility with composition
  • Great for shooting virtually any space
  • Compact gear — photographer can pick up tripod/camera and put it down for next shot

Challenges

  • Shooting angles may be limited, to avoid flare, etc.
  • Color cast happens more compared to using artificial light
  • Post-processing required
  • Memory needed to save the bracketed photos
  • A tripod is required

Architecture: Michael Vail Design. Photo: © Sallie Moffatt.

Conclusion

As noted, there are pros and cons to each lighting method when photographing real estate interiors. When deciding which method is best for you, consider the needs of the shoot you are undertaking.

If you are a beginner, it is also good practice to experiment first with natural light. Doing so helps you understand how light works before you move on to adding artificial light to your room.

If you are comfortable adding light, remember to keep it soft and be aware of your light direction at all times. If you are shooting with available light, master your processing techniques. Use HDR software such as Photomatix Pro to combine your Exposure Bracketed photos and achieve a nice exposure balance.

No matter what technique you use, some key things to remember are: show details, balance your well-lit areas against those in the shadows and show the space in the most flattering way – just as you see it as you walk in the room.

Disclaimer: HDR Soft is a paid partner of DPS.

The post Real Estate Photography: Artificial Light versus Natural Light appeared first on Digital Photography School. It was authored by Nisha Ramroop.


Digital Photography School

 
Comments Off on Real Estate Photography: Artificial Light versus Natural Light

Posted in Photography


Artificial Lighting Recommendations for Beginners

12 Jul

At our studio, we incorporate many different types of lighting techniques and light sources into our repertoire so that we can be fully prepared for any type of lighting scenario. We utilize various types of artificial light sources into our in-studio sessions as well as our on-location photography shoots. Cultivating and perfecting the use of artificial light is very important Continue Reading

The post Artificial Lighting Recommendations for Beginners appeared first on Photodoto.


Photodoto

 
Comments Off on Artificial Lighting Recommendations for Beginners

Posted in Photography


Skylum announces creation of ‘Skylum AI’ artificial intelligence lab

24 May

Skylum Software, formerly known as MacPhun and the developers of the Luminar photo editing application, today announced the creation of a research and development division dedicated to artificial intelligence in imaging. The division is called the Skylum AI Lab, and it is a collaboration between Skylum and its sister company, Photolemur, makers of an AI-powered image editor.

The team at Skylum AI Lab, which will be headed by former Let’s Enchance CEO Alex Savsunenko, is already working on a number of new AI solutions. These include artificial intelligence- and machine learning-powered image upscaling, tagging and segmentation, as well as automated image enhancement systems.

As Skylum CEO Alex Tsepko explains:

By using AI-based technologies in our products, our customers save time vs. manual editing, and can often get better results. Our neural networks are being trained on millions of images taken by cameras from Fujifilm, Sony, Olympus, Nikon, Canon and many others, which means outstanding results for all photographers, regardless of what style they shoot and what gear they are using.

There is clearly a lot of buzz around artificial intelligence in imaging lately, and the possibilities do seem endless. It’s still early days, but with most major smartphone manufacturers implementing AI-powered functions in their smartphone cameras, it only makes sense to push the technology on the desktop and other platforms as well.

Whether it’s improved auto-tagging or lossless upscaling of images, we’re looking forward to the ideas and solutions coming out of Skylum AI lab in the future.

Press Release

Skylum Software doubles down on Artificial Intelligence by creating new Skylum AI Lab and joining forces with leading AI-based image editor, Photolemur

Skylum also hires Alex Savsunenko, former CEO of Let’s Enhance, to lead AI-based photo technologies to the next level.

May 22, 2018 — Bellevue, WA — Today, Skylum Software announced the formation of a new research and development division dedicated to the advancement of artificial intelligence technologies in image processing. The Skylum AI Lab leverages the company’s prior work developing smart filters in its award-winning Luminar software, as well as technology from its “sister company” Photolemur, which was founded in 2016 by Dima Sytnik and Alex Tsepko, co-founder and CEO of Skylum respectively.

“Clearly, AI can simplify our lives. By using AI-based technologies in our products, our customers save time vs. manual editing, and can often get better results,” said Alex Tsepko, CEO at Skylum. “Our neural networks are being trained on millions of images taken by cameras from Fujifilm, Sony, Olympus, Nikon, Canon and many others, which means outstanding results for all photographers, regardless of what style they shoot and what gear they are using.”

To spearhead the new Skylum AI Lab, the company has hired Alex Savsunenko, former CEO of Let’s Enhance, a leader in machine learning for visual content. Savsunenko will manage all research and development for technologies based on artificial intelligence, machine learning, and neural networks. Promising results will ultimately be implemented in Skylum products and solutions for image and video enhancement, with the aim to help users make their workflow faster, smarter and more efficient.

Currently, the Skylum AI Lab is testing over a dozen of new solutions, including:

  • Image upscaling:uses deep convolutional neural networks to improve low-resolution images and scale them up for superior viewing and printing.
  • Tagging: generates tags that describe the image and its objects based on image recognition.
  • Segmentation: smart recognition of image areas that can be automatically enhanced using different filters and corrections based on the type of object.
  • Automatic enhancement: applies smart image corrections to photos based on a variety of issues

To further reinforce its AI prowess, Skylum has also joined forces with Photolemur, creator of the world’s first fully automatic photo enhancement solution. Photolemur app has been sold for several years, with hundreds of thousands of customers worldwide. It enhances images utilizing artificial intelligence without the need to use any manual controls. Development will continue on Photolemur, with the next evolution of the app likely to be a cloud solution that helps high-volume users enhance images as batch process.

About Skylum Software

Skylum Software (formerly Macphun) is a Washington-based photo software developer with the mission to make complex photo editing simple and user-friendly. Thanks to its innovative approach and high-end proprietary technologies, Skylum products have won dozens of various awards, including “Best of the Year” awards by Apple for six straight years. Luminar was honored with the “Best Imaging Software 2017” award by TIPA and “Best Software Plugin” in October 2017 by the Lucie Technical Awards. Aurora HDR was selected as the “Best Mac App of 2017” by Apple.

To learn more about Skylum, please visit http://skylum.com/.

Articles: Digital Photography Review (dpreview.com)

 
Comments Off on Skylum announces creation of ‘Skylum AI’ artificial intelligence lab

Posted in Uncategorized


Steel Mesh Kraken Sunken Off British Virgin Islands to Create an Artificial Reef

23 Oct

[ By SA Rogers in Destinations & Sights & Travel. ]

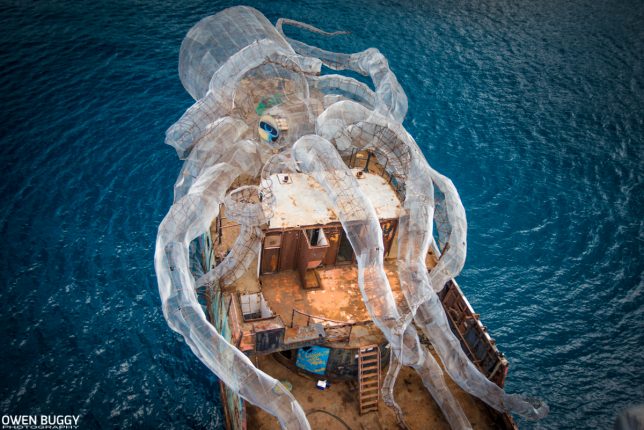
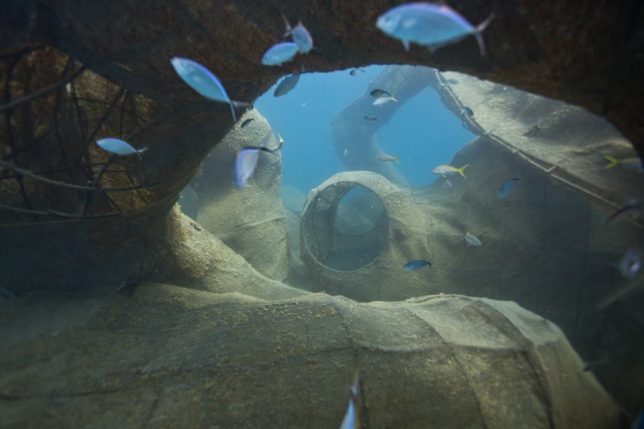
Perched atop the Kodiak Queen, a former WW2-era Navy fuel barge, this 80-foot ‘Kraken’ now serves as the base of an artificial reef and marine research station on the ocean floor near the British Virgin Islands. The project, entitled BVI Art Reef, accomplishes a range of goals all at once: saving a decorated ship from destruction, transplanting coral to a new site in the hopes that it will flourish, creating an epic dive site and underwater art gallery, and providing a new habitat for marine life.

Photographer Owen Buggy documented the process, from the early stages of building the massive sea monster to sinking it in April 2017 to checking out the results a few months later. Sunken off the coast of the island Virgin Gorda with the help of tugboats and helicopters, the installation is already helping to rehabilitate heavily over-fished marine populations. Filmmaker Rob Sorrenti also got some great footage, presented as a documentary entitled ‘The Kodiak Queen,’ which is due for release in early 2018.

“This is the story of learning from past lessons and coming together to create something greater; rooted in joy and fueled by the power of play,” reads the BVI website. “This is the story of a group of friends from around the world who fell in love with the BVIs… and turned a weapon of war into a platform for unity – and a catalyst for new growth. This charitable kick-off in the British Virgin Islands combine art, ocean conservation, world history, marine science and economy… to solve a series of challenges in the BVIs by asking: how can we use play and collaboration to install permanent solutions that boost the local economy, secure the prosperity of these pristine islands for generations to come?”

“Our solution: a fantasy art eco-dive and ocean conservation site that puts the BVIs on the map as having one of the most unique and meaningful dive sites in the world… and one of the most forward-thinking approaches to creative problem solving that secures the education of its youth, and the health and prosperity of this island nation.”

Get updates on the project at the BVI Art Reef Facebook page.

Share on Facebook


[ By SA Rogers in Destinations & Sights & Travel. ]

[ WebUrbanist | Archives | Galleries | Privacy | TOS ]


WebUrbanist

 
Comments Off on Steel Mesh Kraken Sunken Off British Virgin Islands to Create an Artificial Reef

Posted in Creativity


Pixelmator Pro will use artificial intelligence to power photo editing features

07 Sep

Pixelmator, the company behind a $ 30 image editing application for Mac, has just announced a new product called Pixelmator Pro. Though it hasn’t yet been revealed how much this software will cost, the company has detailed many of its features, some of them powered by artificial intelligence.

Pixelmator Pro, an editor designed specifically for macOS, taps Apple’s Core ML framework to bring machine learning capabilities to certain features including: horizon detection, automatic layer naming, an object-removing repair tool, and a quick selection tool.

The editor itself has a single-window design alongside a ‘reimagined editing workflow,’ the company explains, saying its app is ‘totally and completely’ designed for Apple’s operating system. Despite the simplicity of its design, Pixelmator Pro is promised to pack a robust array of tools for editing images (including Raw files), digital painting, adjusting colors, adding non-destructive effects, and more.

Speaking to The Verge, Andrius Gailiunas of Pixelmator explained that Pixelmator Pro is designed for use by anyone. “Our goal has always been to create an image editor that absolutely anyone could use and enjoy,” says Gailiunas. Because the software is designed for Mac, users will have access to iCloud backups and syncing, support for the Touch Bar on new MacBook Pro laptops, and support for split-screen multitasking.

Pixelmator plans to launch its Pro application this autumn, but hasn’t stated the price yet. In that same interview with The Verge, the company said it will price Pro as affordably as possible; however, we presume it will cost more than the $ 30 they’re charging for the regular Pixelmator editor.

Articles: Digital Photography Review (dpreview.com)

 
Comments Off on Pixelmator Pro will use artificial intelligence to power photo editing features

Posted in Uncategorized


Dream Deep: Trippy Maps Reenvisioned by Google’s Artificial Neural Network

29 Jun

[ By WebUrbanist in Art & Drawing & Digital. ]

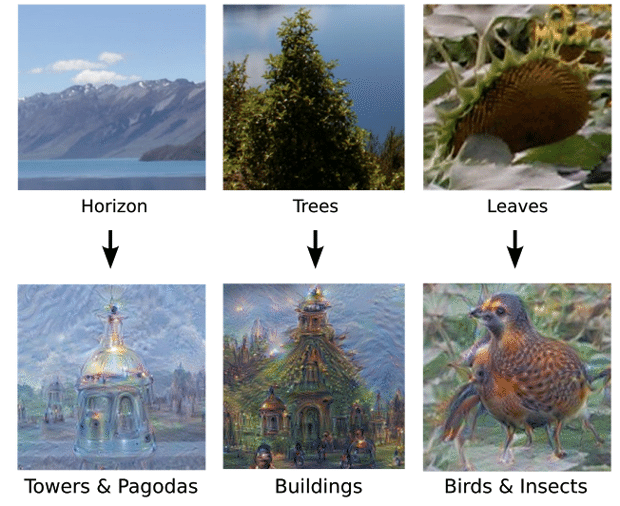
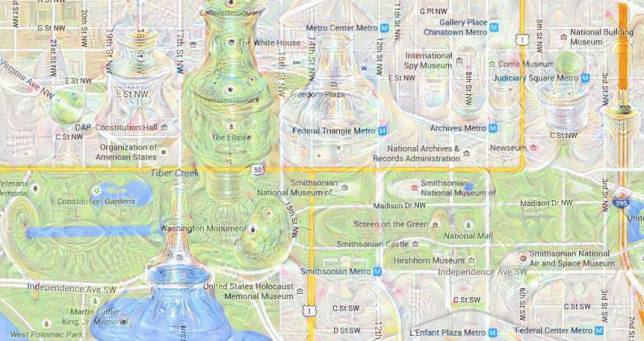
FaceApp and similar reality-warping applications are especially fun to use in ways their designers never intended. Along similar lines, Google’s DeepDream (designed for photo manipulation) creates fascinating results using photographs but is even more stunning when applied to representations of cityscapes.

While training DeepDream (a neural network that adapts like a brain to new inputs) to identify, differentiate and understand images, Google researchers discovered it could “over-interpret” results as well. In short: it could start to “read into” images from previous experience, resulting in an array of beautiful (if disturbing) hybrids.

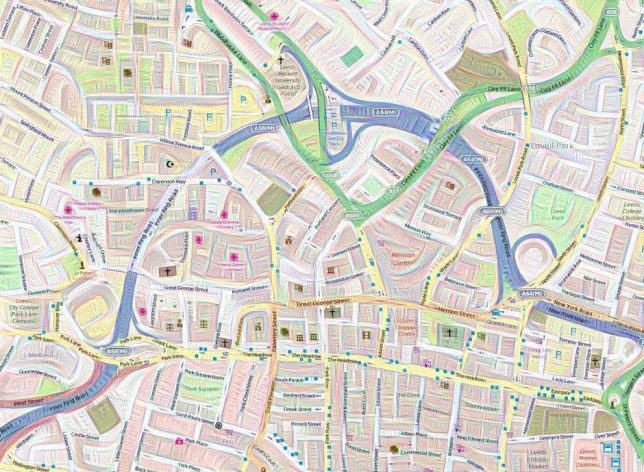
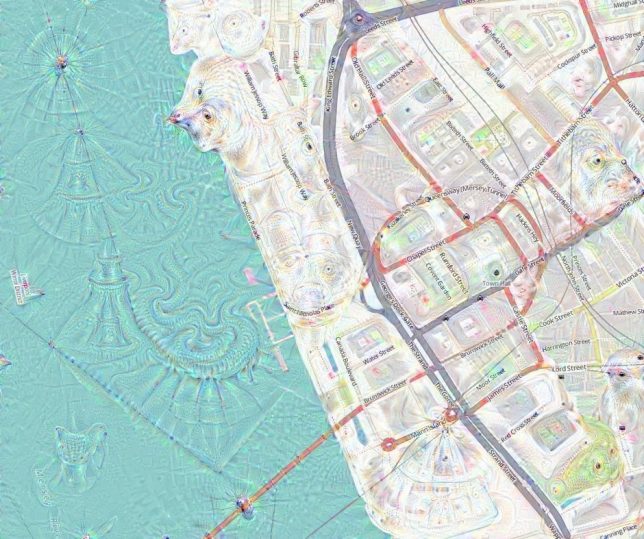
Once it went public, mapmakers were among those intrigued by the possibilities of geo-visualization, turning flat maps into seemingly living landscapes. Tim Waters, a geospatial developer, began taking OpenStreetMap data and running it through the system, generating these strangely psychedelic urban environments.

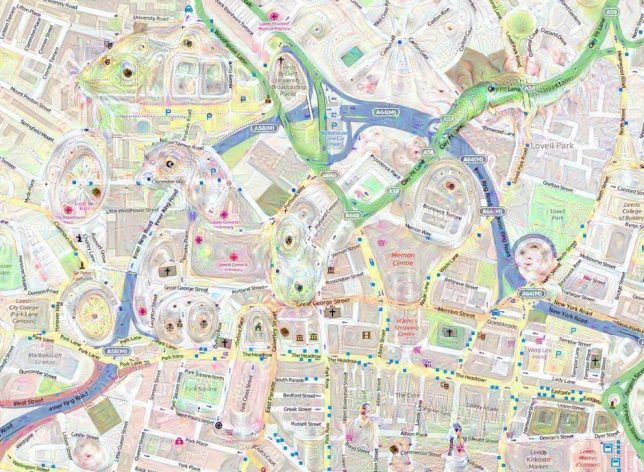
He discovered that a short run could create fractal and quilting effects, while longer and reiterated processing started to introduce faces and creatures to the mix.

Above: monkeys and frogs seem to emerge from the grid, while a coastal region forms the head of a bear, making the landscape look like a giant bearskin rug. Overall, the effects are quite beautiful, creating a sense of depth and adding character to what would otherwise be fairly generic representations.

Share on Facebook


[ By WebUrbanist in Art & Drawing & Digital. ]

[ WebUrbanist | Archives | Galleries | Privacy | TOS ]


WebUrbanist

 
Comments Off on Dream Deep: Trippy Maps Reenvisioned by Google’s Artificial Neural Network

Posted in Creativity


Arsenal is artificial intelligence for your DSLR or mirrorless camera

26 May

A new product being funded on Kickstarter, Arsenal, aims to simplify the process of capturing images using a DSLR or mirrorless camera by utilizing artificial intelligence. The system is composed of a hardware component sits on the hotshoe and connects to the camera’s USB port, as well as mobile apps for iOS and Android that communicate via WiFi or Bluetooth to the main unit. Among other things, Arsenal chooses ideal camera settings for a particular scene based on what it has learned from thousands of similar existing photographs.

Arsenal was created by engineer and photographer Ryan Stout as a way to quickly shoot ‘amazing images’ in any condition, and without having to manually adjust the camera’s settings. The related mobile app provides total control over the camera, as well as one-tap access to an AI assistant – trained from a database of millions of photographs and their metadata – that chooses optimal settings based on the scene in front of the camera. The software then goes on to refine its chosen settings based on 18 environmental factors. It even takes vibrations into account, thanks to its highly sensitive accelerometer.

Photographers are given a live preview of the scene through the mobile app, as well as manual control over aperture, ISO, and shutter speed. You can focus by tapping on your phone’s touchscreen as well, or tap multiple points and Arsenal will ensure they’re all focused. Arsenal also supports advanced camera functions, like automated photo stacking for HDR images, focus stacking, long exposures without the need for ND filters, and time lapse creation. The resulting Raw files are saved directly to the camera.

Images on your camera can be viewed, even at 100%, directly in the app. From there you can instantly share to social media using your phone’s social sharing capabilities. You can even rate images and enter Lightroom compatible notes, and they’ll all show up upon import.

Arsenal supports cameras from Canon, Nikon, Fujifilm, and Sony; photographers can input their own camera on this page to see whether it is supported. The camera assistant is currently being funded through Kickstarter, where the $ 50,000 goal has been exceeded with nearly a quarter-million in funding. Backers can get a Kickstarter Exclusive Arsenal by pledging at least $ 150; shipping is estimated to start in January.

Our gallery below explains more about Arsenal’s features. View full-screen for captions.

$ (document).ready(function() { SampleGalleryV2({“containerId”:”embeddedSampleGallery_4614991868″,”galleryId”:”4614991868″,”isEmbeddedWidget”:true,”standalone”:false,”selectedImageIndex”:0,”startInCommentsView”:false,”isMobile”:false}) });

Via: Kickstarter

Press Release:

Arsenal, leaving stealth mode, unveils AI-powered camera hardware on Kickstarter

Intelligent camera assistant wirelessly controls DSLR and Mirrorless cameras from a smartphone, uses machine learning to find optimal settings in any conditions.

BOSEMAN, MT—May 23, 2017—Arsenal, a camera technology startup, today announced the world’s first intelligent camera assistant powered by machine learning. The new hardware and software product, launched on Kickstarter, enables photographers to wirelessly control their cameras and quickly perform advanced techniques.

Arsenal’s artificial intelligence (AI) is powered by a series of machine learning algorithms trained on a database of millions of photographs and their metadata. By comparing new scenes with its database and adjusting based on environmental variables, Arsenal enables photographers to get the perfect shot every time.

“Today’s cameras have amazing optics, but they do very little to actually help you take a good photo,” said Ryan Stout, Arsenal’s founder and CEO. “You can go spend a thousand dollars and out-of-the-box it will take worse photos than your smartphone. Arsenal changes that by making your existing camera smarter.”

Arsenal will serve the growing market for Digital Single Lens Reflex (DSLR) and Mirrorless cameras. Its initial product will be compatible with dozens of popular models made by Canon, Nikon, Sony, and Fuji.

In addition to its AI capabilities, Arsenal gives photographers control over their camera from up to 100 feet away. Users can adjust settings, watch a live preview, and trigger the shutter remotely from their smartphone.

Arsenal also simplifies several advanced photographic techniques. Arsenal will perform photo stacking (the process of combining multiple photos for more dynamic range or sharper focus), long exposures, and timelapses. In each case, the resulting RAW files are saved directly on the camera.

The Arsenal app also includes powerful photo review capabilities. Users can wirelessly browse the photos on their camera’s card and view individual RAW files in full resolution. Photos can then be shared directly to Instagram, Snap, and Facebook.

The Arsenal system, which is currently being tested in the field, consists of two parts: an ultralight hardware device that sits on top of a user’s camera, and an iOS/Android mobile app. The app wirelessly communicates with the device via wifi or Bluetooth, which in turn controls the camera via a micro-USB connection.

Backers of Arsenal’s Kickstarter campaign will be the first to receive the product, which is scheduled to ship in January 2018.  

For more information on Arsenal, the intelligent camera assistant, visit https://witharsenal.com.

Articles: Digital Photography Review (dpreview.com)

 
Comments Off on Arsenal is artificial intelligence for your DSLR or mirrorless camera

Posted in Uncategorized


Natural Light Versus Artificial Light: Which is Better?

06 Jun

Light is the backbone of photography. Without light, there are no photos. After all, the word photo means light. However, which type of lighting is best: natural or artificial? There are a lot of proponents for either camp, but this article will try and dissect the argument from both perspectives, and give you a chance to add your opinion at the end.

Natural Light

natural-light-versus-artificial-light-2689

The arguments in favor of natural light are many, which means it’s not difficult to see why it is attractive to many photographers.

The pros of natural light

Cost

Natural light costs nothing to make use of; there are plenty of gadgets and accessories available, such as reflectors and diffusers, that do help to maximize results, but even without them, it is easy enough to get beautiful results using natural light, without spending any money. This apparent lack of a financial entry barrier makes it much easier for most photographers to immediately assume a preference for natural lighting.

Learning Curve
natural-light-versus-artificial-light-0729

Learning how to see, manipulate and utilize light, whether natural or artificial, is the most critical skill set for a photographer to learn. Fortunately, these break down into many individual skills that can be learned one at a time. In terms of natural light, a lot of these skills are easy to learn and put into practice. For example, you can read a tutorial on using an area open shade to diffuse and soften the light, then put it into immediate practice ten minutes later.

Another thing to keep in mind here is that cameras are designed for use in natural light first. So, a new photographer working their way through the technical basics of their camera, such as metering, aperture and shutter speed, is almost certainly learning with natural light, thereby improving both their camera and lighting skills simultaneously.

Semantics

This point may seem a bit strange, but I have seen it crop up in various conversations, and it does affect some people’s perceptions. We live in a world that is currently obsessed with the word natural. It seems difficult to go more than five minutes without seeing words like organic, all-natural and free from. Of course, most of this applies to food and health products, but the mindset and lifestyle that go with it have become so expansive, that it has seeped into all manner of other aspects in our lives. Whether or not you buy into that sort of thing, try to ask yourself what sounds better and more appealing: natural or artificial? This may not seem rational in terms of photography (an inorganic, mechanical medium), but the appeal is more of an emotional one, and more often than not, emotion trumps rationale.

The biggest concern here is one of marketing. A photographer who refers to themselves as a natural light photographer may very well simply be attempting to appeal to the quite large demographic that holds value over that kind of thing.

The cons of natural light
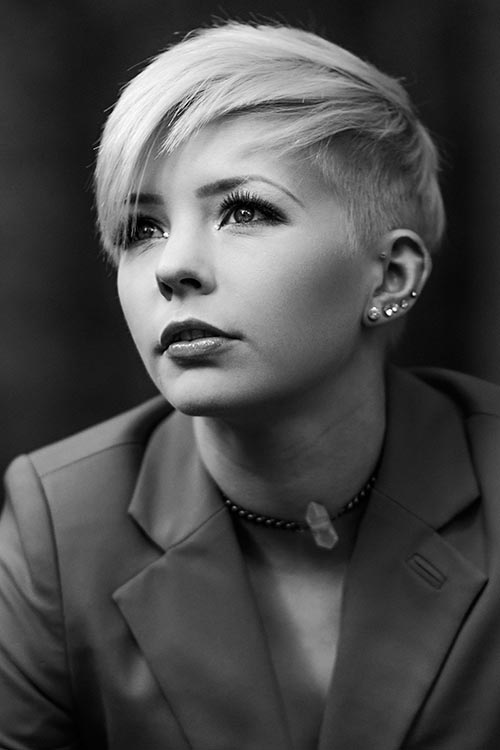
natural-light-versus-artificial-light-0962While natural light has its advantages, it is not without its own set of shortcomings.

Unpredictability

While the sun is a near constant during daylight hours, the availability of light is only one factor that needs to be taken into account. Clouds and other weather conditions are just a couple examples of things that will alter specific qualities of the light you are trying to work with. Softness, intensity, and color can all change in a split second at the whim of mother nature. If you are attempting to work towards a specific goal, these changes can be a nightmare.

Night

After sunset, what do you do if you’re in a situation where you still want (or need) to take photographs. If you’re relying solely on natural light, the answer is: not a whole lot. Many photographers have no problem with this limitation; however, try to imagine what you can achieve with just another hour or two a day working towards your photography.

Environment

natural-light-versus-artificial-light-2691

Aside from its effect on light, shooting outdoors means you are at the constant mercy of the weather. Cold temperatures, rain, snow, and wind can all make for some uncomfortable experiences for both you and your subjects or clients.

If you’re photographing in areas open to the public, you may be subject to the whims of passers-by. This can lead to an unwelcome audience, or even worse, hecklers. Believe me when I relate, that nothing kills the general mood of a session for both the subject and the photographer faster than excessive and undue attention from strangers.

These environmental problems can often be solved by finding an indoor location and using window light. While the effects of weather and other people are gone, this solution is not without its own limitations. Window light, while often beautiful for photography, can be quite dim and may require slower shutter speeds than you might like for portrait photography. A lack of space is also a common problem when shooting indoors.

Artificial light
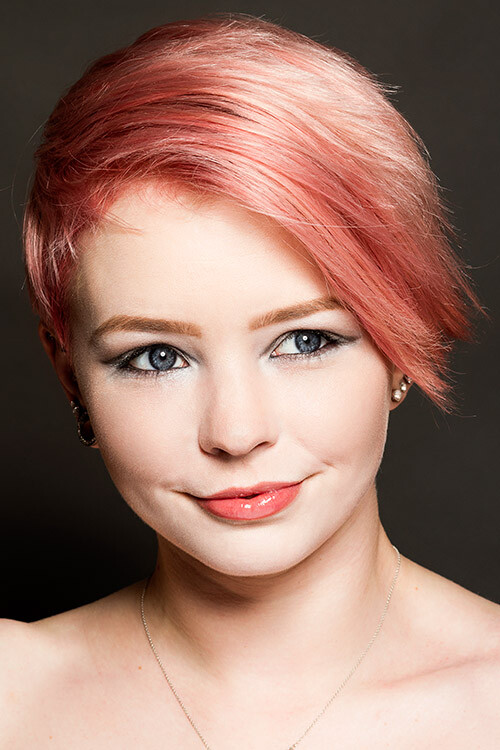
natural-light-versus-artificial-light-3213

Like natural light, artificial light, whether strobes, flashguns or continuous lighting, has its own set of advantages and shortcomings.

The pros of artificial light

Convenience

By owning an artificial lighting solution, you have the means to take photographs at any time day or night, indoors or out, and the weather has no effect on you. If for some reason you want to do food photography at midnight, by all means, go for it.

If you own a set of flashguns (speedlights), they are not only convenient, but portable as well, and can be taken just about anywhere and set up with ease.

Versatility

With studio strobes and the like, the sheer number of ways that they can be used for a vast array of creative results is their strongest selling point. These range from simple one light setups that mimic natural light, to complicated setups with seven or more lights.

Control

Another great strength of studio lighting is the control it offers you over your final photograph. By controlling every bit of light in your scene, artificial lighting negates the unpredictability that you get with natural light. If you want a particular look or mood, all that you have to do is set up the lights, and take photos until you have your results. There’s no worry that a cloud will move in and block your light.

Reliability
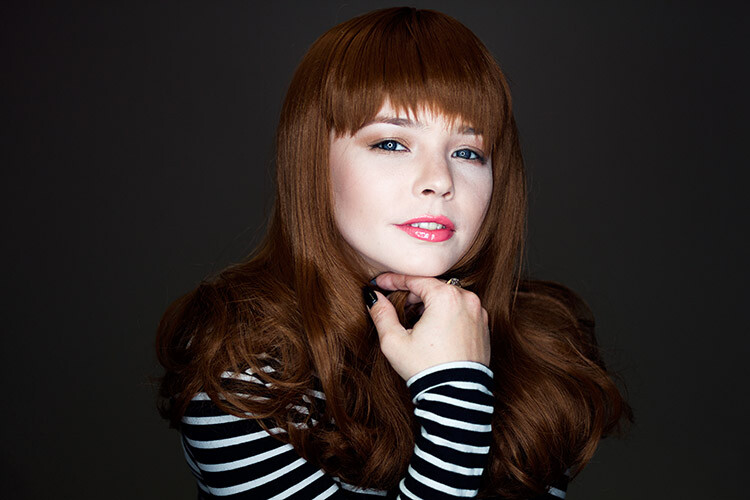
natural-light-versus-artificial-light-4689

Apart from removing the environmental issues associated with natural light, studio strobes and flashguns are quite reliable. Most models in the moderate price range, and above, are very well made. This means that the power output, as well as color output, is consistent every time it fires. This a huge advantage over the fast changing conditions of natural light.

The cons of artificial light

Cost
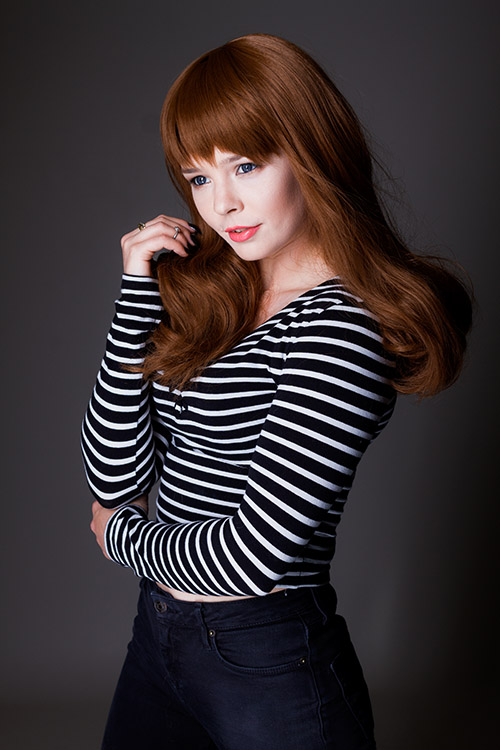
natural-light-versus-artificial-light-4563Probably the most off-putting aspect of studio lighting is cost. It doesn’t matter whether you choose studio strobes, flashguns (speedlights), or continuous lighting; decent quality lighting equipment does not come cheap and a good set, along with modifiers, can easily cost over $ 1000. With natural light being a free and capable resource, it’s easy to understand why so many photographers steer clear of artificial lighting.

Learning Curve

Another initial disadvantage of studio lighting is the amount of knowledge you have to gain, in order to start using it. It’s very possible to accidentally take a beautifully lit photo in natural light. With artificial light, that’s next to impossible.

A lot of photographers, me included, would probably gladly tell you how atrocious their first attempts with studio lighting were. To get good results, you have to spend an enormous amount of time reading and practicing. This involves things like new aspects of aperture and shutter speed in relation to flash, qualities of light, effects of modifiers and the dreaded inverse square law.

So, which is better?

In my opinion? Neither and both are better.

It depends on the job at hand. Both are just tools to be used at each photographer’s discretion. After all, nobody walks into a newly built house and waxes lyrical about the type of hammers that were used. Good photography is good photography, no matter how it was made. If something screams out to be lit with natural light, then natural light is better. Likewise with artificial light.

Each method is capable of stunning results and I would rather have a full toolkit to use for every opportunity, than miss out on something because I restricted myself from using the right tool for the job.


Editor’s Note: This is one of a series of articles this week that are Open for Discussion. We want to get the conversation going, hear your voice and opinions, and talk about some possibly controversial topics in photography.

Give us your thoughts below on the article above on natural versus artificial, and watch for more discussion topics this week.

See all the recent discussion topics here:

  • 7 Commonly Accepted Photography Beliefs Debunked
  • Is HDR dead? Some dPS Writer’s Thoughts on this Controversial Topic
  • How to Find your Personal Photographic Style
  • Why You May be Failing to Reach Your Potential as a Photographer
  • To Process or Not To Process? Let’s Discuss
  • How much do you process your images? – a dPS POLL
  • Does the Camera Matter? SLR versus Mirrorless versus Smartphone

googletag.cmd.push(function() {
tablet_slots.push( googletag.defineSlot( “/1005424/_dPSv4_tab-all-article-bottom_(300×250)”, [300, 250], “pb-ad-78623” ).addService( googletag.pubads() ) ); } );

googletag.cmd.push(function() {
mobile_slots.push( googletag.defineSlot( “/1005424/_dPSv4_mob-all-article-bottom_(300×250)”, [300, 250], “pb-ad-78158” ).addService( googletag.pubads() ) ); } );

The post Natural Light Versus Artificial Light: Which is Better? by John McIntire appeared first on Digital Photography School.


Digital Photography School

 
Comments Off on Natural Light Versus Artificial Light: Which is Better?

Posted in Photography