RSS
 

Posts Tagged ‘Aperture’

Aperture in Photography: A Beginner’s Guide (+ Examples)

06 Jul

The post Aperture in Photography: A Beginner’s Guide (+ Examples) appeared first on Digital Photography School. It was authored by Darren Rowse.

aperture in photography: a beginner's guide

What is aperture in photography? How does it work? And how can you use it to capture photos like the pros?

Aperture is an essential camera setting; in my opinion, it’s where the magic happens in photography. So in this article, I’m going to take you through all the ins and outs of aperture, including:

  • What aperture actually is (in simple, easy-to-understand terms)
  • How you can use aperture to capture artistic images
  • How to choose the perfect aperture for landscape photography, portrait photography, and more
  • Plenty of other tips and tricks!

If you can master aperture, then you’ll gain a huge amount of creative control over your photography.

Ready to take your photos to the next level?

Let’s dive right in, starting with the most important question of all:

What is aperture?

Aperture is the opening in the camera lens. A larger hole allows more light to hit the sensor, lightening your photos. A smaller hole allows less light to hit the sensor, darkening your photos.

And by adjusting the aperture setting on your camera, you can adjust the size of the aperture (and, in turn, affect a photo’s brightness).

the lens aperture
The aperture is that (bladed) hole inside your lens!

Aperture and f-stops

Aperture is measured in terms of f-stops, also known as f-numbers. Like this: f/2.8, f/4, f/5.6, f/8, f/22, etc.

As shown in the diagram below, the smaller the f-number, the larger the aperture hole:

Aperture Diagram - f-stops
As the f-number increases, the aperture size decreases.

Now, each full stop corresponds to a halving of aperture size. So when you go from f/2.8 to f/4, you cut the aperture in half. And when you go from f/4 to f/5.6, you cut the aperture in half again.

(Of course, to double the aperture size, you just go in the reverse direction: from f/5.6 to f/4, and from f/4 to f/2.8.)

So f/2.8 is a much larger aperture than f/22. And f/11 is a much smaller aperture than f/4.

Does that make sense? It can be confusing at first, especially because large aperture sizes correspond to smaller f-stop numbers and vice versa. But stick with it, and it’ll become second nature.

How does aperture affect your photos?

At this point in the article, you should know what aperture is: a hole in the lens that increases and decreases depending on your camera settings (i.e., your f-stop value).

But what does aperture actually do? How does it affect your photos?

In the next two sections, I’ll discuss the primary effects of aperture:

  1. Exposure
  2. Depth of field

Aperture and exposure

As you may already know, exposure refers to the brightness of a photo.

In general, the goal is to end up with a photo that’s not too dark and not too bright; instead, you want a shot that’s just right, one with lots of detail.

So where does aperture come into play?

Aperture is one of the three key variables that affect your exposure. (The other two variables are shutter speed and ISO.)

Remember what I said above? By widening the aperture, you let in more light, which brightens your image. And by narrowing the aperture, you let in less light, which darkens your image.

So if you’re photographing a beautiful sunset and your photos keep turning out too bright, you can always narrow the aperture to darken down the image. (In fact, using a narrow aperture is often a good idea when shooting sunsets!)

sunset with narrow aperture
A sunset scene like this will often benefit from a narrow aperture.

And if you’re photographing a forest and your photos keep turning out dark and shadowy, you can always widen the aperture to brighten up the image. (As you might expect, this is a standard low-light photography practice.)

forest scene
If you’re photographing a subject in the shade, a wider aperture will brighten things up.

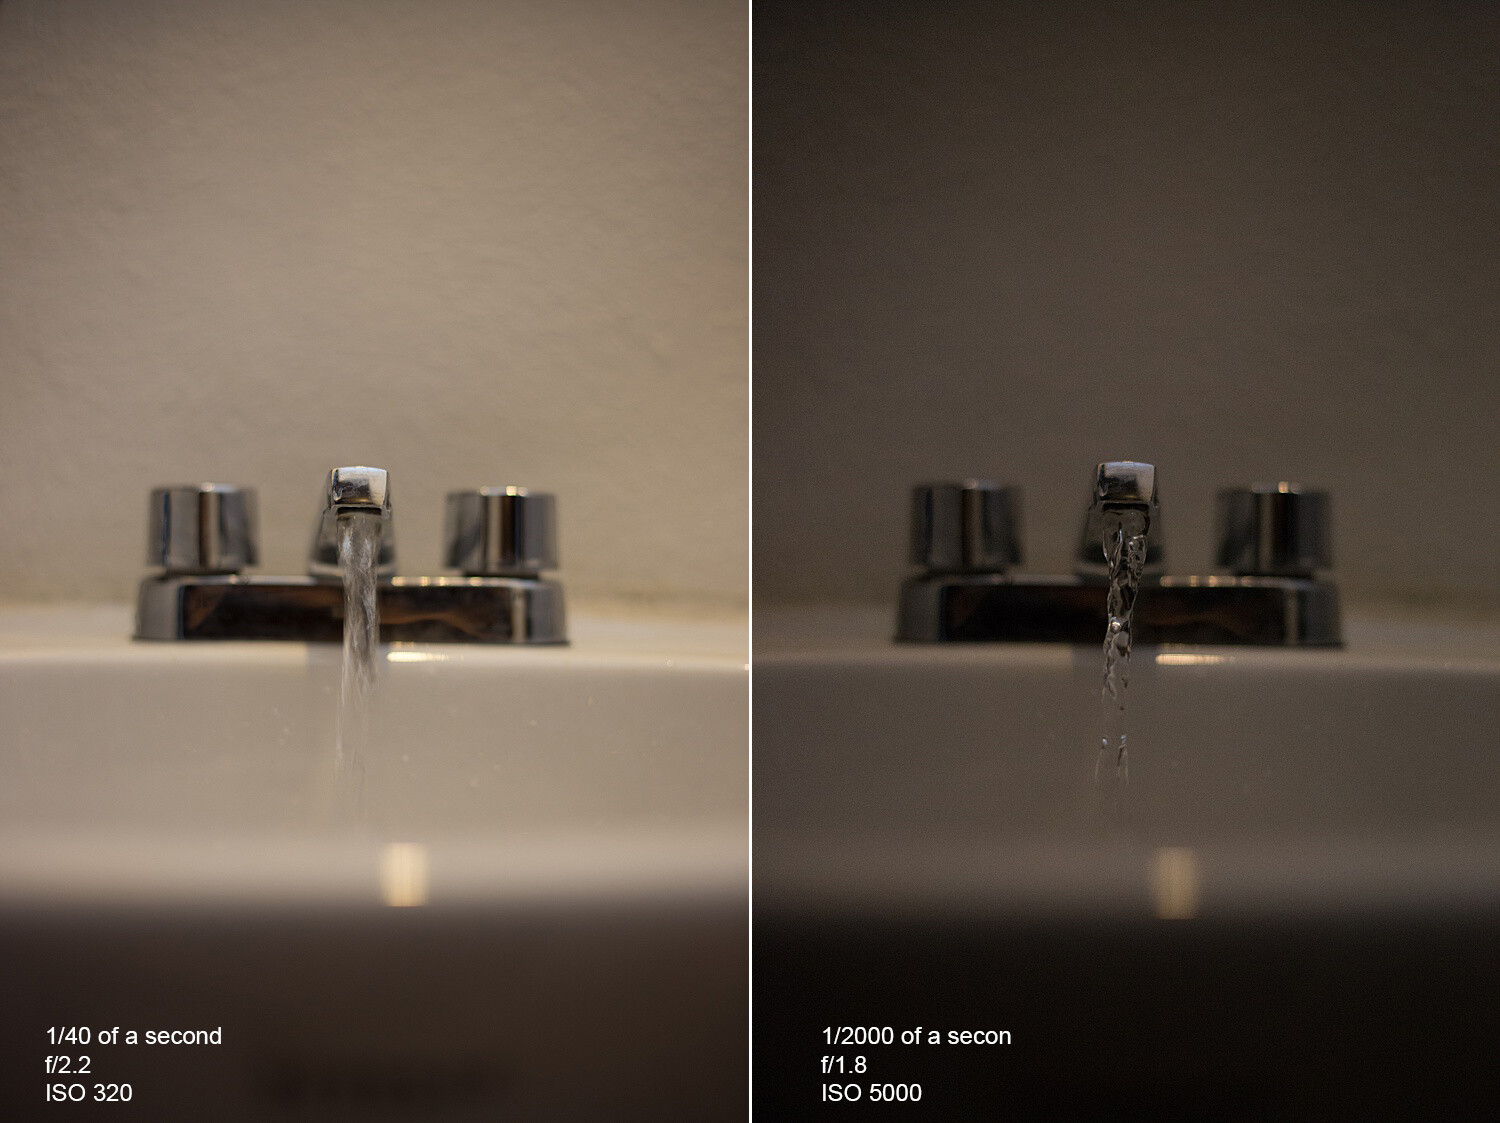
Of course, aperture isn’t the only variable that affects exposure. If you want to brighten a photo, you can also lower the shutter speed or boost the ISO. And if you want to darken a photo, you can raise the shutter speed or drop the ISO.

In terms of exposure, widening your aperture by a full stop has the exact same effect as lowering your shutter speed by a full stop or boosting your ISO by a full stop. A key consequence of this: different exposure variables can cancel each other out. Increase your ISO by a stop while decreasing your aperture by a stop, and you’ll end up with an identical exposure.

The point here is that, while aperture does determine exposure, you can’t think about it in isolation. Aperture, shutter speed, and ISO work together to give you a well-exposed (or poorly exposed) image.

Aperture and depth of field

Aperture also affects the depth of field in your photos.

What exactly does that mean? Well, depth of field (DOF) is the amount of your shot that is in focus. So a photo with a large depth of field will have most of the image in focus, like this:

deep depth of field sand dunes

Do you see how sharpness stretches from the foreground to the background? That’s thanks to the large depth of field.

A photo with a small depth of field, on the other hand, will have only a sliver in focus, like this:

shallow depth of field dahlia

As you can see, the effect is pretty artistic; you get a sharp subject but a blurry background. Neat, right? Because a blurry background helps the subject to stand out, this is an effect you’ll often see in portrait photography.

As for aperture, the wider the aperture (and the smaller the f-number!), the shallower the depth of field.

So an image with an f/2.8 aperture will have very little in focus:

wide aperture portrait

And an image with an f/16 aperture will have all of the scene in focus:

narrow aperture grand canyon

Got it? If you’re still struggling to understand – and if you are, don’t be embarrassed! – let me illustrate using two pictures I took in my garden:

Side by side aperture depth of field example

The first picture was taken with an aperture of f/22, while the second picture was shot at f/2.8. The difference is obvious, right? The f/22 picture has both the flower and the bud in focus and you’re able to make out the fence and leaves in the background. Whereas the f/2.8 shot has the left flower in focus, but the right flower is less in focus and the background is completely blurry.

That’s all thanks to aperture, which controls the depth of field.

4 simple aperture examples

Here are a handful of additional aperture examples to help you wrap your head around its effects – in particular, how aperture affects the depth of field.

First, take a look at this landscape shot. It was captured with a narrow aperture, which resulted in a deep depth of field and sharpness throughout:

arches national park deep depth of field

Now take a look at this street photo, which was taken with a wide aperture; it has a shallow depth of field:

shallow depth of field (wide aperture) street photo

And here’s a third example, which has a midrange depth of field. The entire photo isn’t sharp, but the main subject plus some of the surrounding area look crisp:

midrange depth of field person walking down the street

Finally, here’s one more example with an ultra-wide aperture for an ultra-shallow depth of field:

wide aperture close-up flower

What’s important to know is that the aperture offers you creative control as a photographer. Want to create a blurry background? Pick a wide aperture. Want to keep your shot sharp throughout? Pick a narrow aperture.

Of course, you also have to remember the effect of aperture on exposure, which is what makes things a bit more complex (but a lot more fun!).

Adjusting the aperture on your camera

Now that you’ve made it this far, you might be wondering:

How can you actually change the aperture on your camera? What do you have to do?

Fortunately, adjusting the aperture is easy. You just set your camera’s shooting mode to Manual or Aperture Priority. Then rotate the relevant camera dial to change the f-number. (The specific dial will depend on your camera model; if you’re struggling, consult your manual.)

Which aperture is best?

When photographers first learn about aperture, this is a question that crops up constantly.

But as you’ve hopefully gleaned from the sections above, there is no single best aperture that you can use all the time. Sometimes you’ll want a deep depth of field or you’ll want to darken down a too-bright shot, in which case you’ll need to use a narrow aperture. Other times you’ll want a shallow depth of field or you’ll want to brighten up a too-dark shot, in which case you’ll need to use a wide aperture.

That said…

There are apertures that get used consistently in certain genres. I’ll cover them briefly below, starting with:

The best landscape photography aperture

Landscape photographers gravitate toward small aperture settings, such as f/8, f/11, and even f/16.

Why?

When you’re shooting a sweeping photo of the land, sea, or sky, you often want to keep the whole shot sharp. That way, the viewer can appreciate every little detail of your majestic scene.

mountain landscape
Landscape photos like this one generally require a narrow aperture.

Plus, a deep depth of field makes the shot feel more real, like the viewer could physically step into the scene.

The best portrait photography aperture

In portrait photography, it can be handy to have your subject perfectly in focus but the background nice and blurry. That way, your main subject stands out and the background doesn’t become a distraction.

wide aperture portrait
Wide apertures work great for portraits!

In other words, use a large aperture to ensure a shallow depth of field.

It’s a trick used by family portrait photographers, headshot photographers, fashion photographers, and more.

The best macro photography aperture

Macro (i.e., close-up) photographers tend to disagree over aperture.

Some macro photographers use a very narrow aperture because depth of field gets shallower at high magnifications. And by using a narrow aperture, a macro photographer can ensure that their entire subject is in focus, even if the background is blurred.

bee with a narrow aperture
This macro photo was shot at f/13; at such high magnifications, keeping an entire insect in focus is tough.

Whereas other macro photographers embrace a shallow depth of field. They use a very wide aperture for a soft-focus effect.

dandelion seed head with a wide aperture
A soft-focus effect looks great in macro photography.

Which is the way to go? That depends on your preferences! Both approaches work well, and there are plenty of professionals using each technique, so don’t stress about it too much.

Aperture in photography: final words

Hopefully, you now have a good understanding of aperture in photography and how you can use it to gain creative control over your photos.

But if you’re still a little confused, that’s okay. Grab your camera and do some experimenting. Find a subject – an apple works great! – and shoot it with different apertures. Watch as the depth of field changes.

Pretty soon, it’ll click. And your photos will (genuinely!) never be the same again.

The post Aperture in Photography: A Beginner’s Guide (+ Examples) appeared first on Digital Photography School. It was authored by Darren Rowse.


Digital Photography School

 
Comments Off on Aperture in Photography: A Beginner’s Guide (+ Examples)

Posted in Photography


Venus Optics’ new $549 7.5mm F2 MFT lens now has electronic aperture control

11 Jun

Venus Optics has announced an updated version of its Laowa 7.5mm F2 Micro Four Thirds (MFT) lens that has electronic aperture control and an onboard chip for transferring metadata from the lens to the camera.

The new lens features the same optical construction as its fully-manual predecessor (13 elements in nine groups), but adds an electronically-controlled aperture at the cost of reducing the number of aperture blades to five (there are seven in the manual version).

$ (document).ready(function() { SampleGalleryV2({“containerId”:”embeddedSampleGallery_7732375722″,”galleryId”:”7732375722″,”isEmbeddedWidget”:true,”selectedImageIndex”:0,”isMobile”:false}) });

As for dimensions, the lens comes in at 3mm (.12”) larger in diameter and 7mm shorter (.28”) than the manual version. Also, despite adding the electronic aperture control and onboard CPU chip, Venus Optics managed to reduce the lens’ weight to 150g (5.3oz), down from the 170g (6oz) weight of the manual version.

Below is a video review of the lens from YouTube channel RED35:

The Laowa 7.5mm F2 lens with electronic aperture control is available to order on Venus Optics’ website for $ 549. You can view a gallery of full-sized sample images on Venus Optics’ Flickr album.

Articles: Digital Photography Review (dpreview.com)

 
Comments Off on Venus Optics’ new $549 7.5mm F2 MFT lens now has electronic aperture control

Posted in Uncategorized


Getting Landscapes Sharp: Hyperfocal Distances and Aperture Selection

07 Mar

The post Getting Landscapes Sharp: Hyperfocal Distances and Aperture Selection appeared first on Digital Photography School. It was authored by Elliot Hook.

How to use hyperfocal distance for sharp landscapes

Want to know how to master depth of field and hyperfocal distance – so you can capture consistently sharp landscape photos?

You’ve come to the right place.

Because in this article, I’m going to tell you everything you need to know about hyperfocal distance.

And by the time you’ve finished, you’ll be able to confidently use it in your own landscape photography.

Let’s get started.

Keeping your landscape photos sharp: depth of field

Great landscape photos generally have all of their key elements sharp.

This includes foreground objects that are just meters from your camera, as well as background elements that are kilometers away.

Sunrise over the limestone pavement hyperfocal distance for sharp landscapes
In this scene, it was important to capture everything in sharp focus – from the frozen puddle in the foreground to the hills in the background.

So how do you achieve such perfect front-to-back sharpness?

By ensuring that your depth of field is large enough to render everything of interest suitably sharp.

Let me explain:

When you focus on an individual point within your landscape, you are creating a plane of focus that lies parallel to the sensor.

Everything in front of and behind that plane is technically not in focus. But there is a region within which objects will appear acceptably sharp – even though they’re not in focus!

That region is the depth of field.

Put another way, the depth of field is the range of acceptable sharpness within a scene, moving outward from the point of focus.

For instance, in the graphic below, the camera is focused on a rock:

Hyperfocal Distance Diagram 1
A theoretical example showing the depth of field for a given focal length, aperture, and point of focus.

So the plane of focus sits parallel to the sensor at that rock, and the limits of acceptable sharpness that form the edges of the depth of field lie in front of and behind that plane.

If you were to fire the shutter button on that camera, you’d get a photo with a sharp rock. The front of the first tree would be sharp, and the rest of the trees would fade into softness.

Make sense?

Factors affecting depth of field

Thus far, I’ve talked about depth of field as if it were a fixed property.

But it’s not. Your depth of field can change depending on three key factors:

  1. Focal length
  2. Aperture
  3. The distance between the camera and the point of focus.

Let’s take a closer look at how each of these elements affects depth of field, starting with:

Focal Length

A short focal length (e.g., 20mm) will give you a greater depth of field than a long focal length (e.g., 400mm).

So while it’s easy to keep an entire scene in focus with a wide-angle lens, you’ll struggle to do the same with a long telephoto.

Of course, changing your focal length will alter your field of view and therefore your composition, so you should rarely adjust your focal length to change the depth of field. Instead, select your focal length, frame your composition, and then use the next factor on this list to achieve the perfect depth of field:

Aperture

A narrower aperture, such as f/16, will produce a deep depth of field. A wider aperture, such as f/2.8, will give you a shallow depth of field.

So if you’re after an ultra-sharp, deep-depth-of-field shot, you’ll want to use a narrow aperture.

But be careful; extremely narrow apertures are subject to an optical effect called diffraction, which will degrade image sharpness. So while you should absolutely use aperture to adjust the depth of field, be on the lookout for blur.

Distance to the point of focus

If your focal point is close to the camera, then you’ll get a shallower depth of field. If your focal point is far from the camera, you’ll get a deeper depth of field. So if you shoot a distant subject, it’ll be much easier to get the entire scene sharp!

In other words:

To increase the depth of field, you can either choose a more distant subject…

…or you can back up to frame a wider shot.

Note that these three factors work together to determine the depth of field.

grasses and mountain landscape using the hyperfocal distance to keep the landscape sharp

No one factor is important than any of the others; instead, they’re three variables in the depth of field equation.

So if you want a deep depth of field, you could use a narrow aperture or move farther away from your subject or use a wide-angle lens.

(You could also do all three of these things for an ultra-deep depth of field.)

And if you want a shallow depth of field, you could use a wide aperture or move closer to your subject or use a telephoto lens.

Keeping the entire scene sharp with hyperfocal distance

If you’re dead-set on capturing a scene with front-to-back sharpness, then you’ll need to understand another key concept:

Hyperfocal distance.

Hyperfocal distance is the point of focus that maximizes your depth of field.

In fact, by focusing at the hyperfocal distance, you can often ensure that the entire scene is sharp, from your nearest foreground subject to the most distant background element.

Look at the graphic below:

Hyperfocal Distance Diagram 2
By focusing at the hyperfocal distance, the entire scene will fall within the depth of field.

Do you see how the area from the point (or plane) of focus onward is sharp?

That’s what the hyperfocal distance will do for you.

And it’s the reason landscape photographers love using the hyperfocal distance.

Because by selecting a narrow aperture, and by moving the point of focus to the hyperfocal distance, you can render the entire scene in focus – for a stunning result!

(By the way, when focusing at the hyperfocal distance, the near acceptable sharpness limit is half of the hyperfocal distance.)

Now, you’re probably wondering:

How do you determine the hyperfocal distance when out shooting?

Technically, you can do a mental calculation, but this can get pretty complex. So I’d recommend you use a hyperfocal distance chart or calculator (there are plenty of apps for this, such as PhotoPills).

Eventually, you’ll be able to intuitively identify hyperfocal distances for common apertures and focal lengths – so you won’t even need to use an app!

Aperture selection and the dangers of diffraction

As you should now be aware, a narrow aperture deepens the depth of field.

So if you want your entire scene sharp, you generally need a narrow aperture.

Unfortunately, choosing your aperture isn’t as simple as dialing in f/22. Thanks to diffraction, if you set such a narrow aperture, you may get the entire scene in focus – but still end up with a blurry image.

For example, the image below shows a comparison of the same scene, shot at f/8 (left) and f/16 (right):

images taken at f/8 and f/16 to illustrate the dangers of a narrow aperture

The frosty fern leaf is an important part of the foreground interest here. And though both images look perfectly sharp when resized and compressed for browser viewing, the 100% crop for each image below shows a significant difference in detail:

100% crops of the f/8 and f/16 images, to illustrate hyperfocal distance for sharp landscapes
The sharpness of the fern leaf at f/8 (left) versus f/16 (right). The image was captured with greater sharpness via a wider aperture of f/8 – though I took care to focus on the hyperfocal distance.

Do you see how the image on the right (taken at f/16) is blurrier than the image on the left (taken at f/8)?

That’s diffraction at work.

And note that, for the scene in question, both apertures resulted in a depth of field that extends from before the fern leaf to infinity.

(In other words: The blurriness has nothing to do with depth of field.)

Diffraction becomes an issue in all lenses as the aperture gets smaller, though it is more pronounced on inexpensive lenses. Typically, the sweet spot, in terms of lens performance, is somewhere between f/8 and f/11.

So when selecting your aperture, you’ll want to keep your lens as close to the sweet spot as possible, while also ensuring sufficient depth of field.

Getting landscapes sharp: conclusion

Now that you’ve finished this article, you can hopefully see that it’s worth understanding hyperfocal distance, aperture selection, and how they affect each other.

So make sure you find a nice hyperfocal distance app.

And remember to avoid tiny apertures (because they cause diffraction).

That way, you can get consistently sharp landscape shots!

Now over to you:

Do you struggle to keep your landscape photos looking sharp? Do you think an insufficient depth of field is the culprit? Or is it diffraction? Share your thoughts in the comments below!

The post Getting Landscapes Sharp: Hyperfocal Distances and Aperture Selection appeared first on Digital Photography School. It was authored by Elliot Hook.


Digital Photography School

 
Comments Off on Getting Landscapes Sharp: Hyperfocal Distances and Aperture Selection

Posted in Photography


What’s the Best Aperture for Portraits?

23 Feb

The post What’s the Best Aperture for Portraits? appeared first on Digital Photography School. It was authored by Simon Ringsmuth.

the best aperture for portraits

Choosing the best aperture for portraits doesn’t have to be complicated…

…but there are some guidelines to follow if you want your shots to look stunning.

And in this article, I’m going to break it down for you. I’ll share with you my favorite apertures for different types of portraits – so that you can confidently pick the perfect aperture whenever you’re out shooting!

Let’s get started.

Best Aperture for Portraits family by a forest
Nikon D750 | Nikon 70-200 f/2.8 | 185mm |1/350s | f/4 | ISO 2000

Why is aperture important in portrait photography?

Aperture matters for several reasons:

First, aperture is one of the three components of exposure. If you don’t get your aperture right, you might end up with a too-dark or too-light image.

And, because of its effect on exposure, your aperture limits your shutter speed and ISO.

The right aperture also puts your viewer’s attention squarely on your subject and regulates your depth of field to get just the right amount of background blur.

Now, the best portrait lenses have wide apertures of f/2.8 to f/1.2. With these lenses, you can capture photos in virtually any lighting condition, plus you can create dreamy bokeh behind your subject.

As you consider what aperture to use when shooting portraits, you also need to pay attention to the focal length of your lenses, as well as how close you’ll get to your subjects.

A wide aperture on a 35mm lens won’t blur the background as much as a wide aperture on an 85mm lens. Also, longer focal lengths require fast shutter speeds to reduce vibration, unless the lens or camera has built-in stabilization. Wide apertures can help get those fast shutter speeds without requiring a high ISO (and a high ISO might result in unwanted noise or grain).

girl sitting on a trail
Nikon D750 | Nikon 70-200 f/2.8 | 200mm | 1/180s | f/2.8 | ISO 250

What is the best aperture for portraits?

The best aperture for individual portraits is f/2 to f/2.8. If you’re shooting two people, use f/4. For more than two people, shoot at f/5.6.

These aren’t the only apertures you can use, and there are certainly other elements to consider. But if you want great results, you can’t go wrong with these rules of thumb.

They’ll help ensure your portraits are sharp and your subjects are all in focus.

Best Aperture for Portraits woman headshot
Nikon D750 | Nikon 70-200 f/2.8 | 200mm | 1/350s | f/4 | ISO 2000

Apertures in portrait photography: A detailed breakdown

Unfortunately, there is no single best aperture for portraits. There are myriad factors that affect the final photo, so you’ll need to adjust your aperture depending on your subject.

Let’s take a closer look at some different shooting scenarios and the apertures I recommend:

The best aperture for individual portraits

While I stand by my earlier recommendation for an f/2 to f/2.8 aperture, you should consider those apertures as starting points, or as an insurance policy of sorts. Depth of field is so thin at wider apertures that it’s best to start a bit smaller than your lens’s maximum aperture value, simply to make sure your bases are covered.

After all, shooting at f/1.2 can keep a person’s eyelashes in focus while their iris ends up blurry!

Best Aperture for Portraits senior graduation
Nikon D750 | Nikon 70-200 f/2.8 | 200mm | 1/250s | f/2.8 | ISO 100

Note that, when using a wider focal length, you can shoot at larger apertures, because the depth of field won’t be as shallow.

For example, if you use a 35mm prime lens, you can go all the way to f/1.8 or wider and keep plenty of your subject in focus.

One caveat: Some lenses, especially less-expensive zooms and even some primes, lose sharpness at maximum apertures. For that reason, I recommend shooting conservatively and not always going as wide as you can.

Of course, each lens is different, so test out different apertures and see what you’re comfortable with.

Best Aperture for Portraits child smiling
Nikon D7100 | Nikon 35mm f/1.8 | 1/750s | f/1.8 | ISO 200

I like to take a two-pronged approach when shooting portraits.

First, I always use Aperture Priority mode paired with Auto ISO. This lets me specify the aperture while my camera takes care of the shutter speed and ISO.

Since the aperture is my primary consideration, I need to get that right. As long as my camera doesn’t drop below a certain shutter speed or go beyond a specific ISO value, I know my photos will be fine.

Second, I always start by taking several shots with a smaller aperture. It’s how I cover my bases; that way, I know I have at least some shots where everything is in focus and the depth of field isn’t too shallow.

Then, like stepping on the gas pedal of a sports car, I spin my camera dial and widen the aperture. This lets me turn my portraits up to 11, and clients love the results – but I know that, if my depth of field does turn out too shallow and something isn’t in focus, I can always rely on the narrow-aperture shots I started with.

Best Aperture for Portraits senior closeup
Nikon D750 | Nikon 85mm f/1.8G | 1/180s | f/1.8 | ISO 250. I took lots of shots at f/2.8 and then went all the way to f/1.8, knowing I had a fallback plan if the wide-aperture photos didn’t turn out sharp. Fortunately, the f/1.8 shots were great!

The best aperture for small group photos

Selecting the right aperture for small groups depends on a number of factors.

Though you can’t go wrong with f/4, there are variables to consider that will help you get the best shots possible.

(One reason f/4 works well is that it gives you depth of field wiggle room while still producing great results.)

When photographing a single subject, it’s essential to get the eyes in focus, or at least the one eye that is closest to the camera.

But when working with small groups, you ideally want everyone’s eyes in focus. So the depth of field should be wider, which requires a smaller aperture.

Fortunately, when shooting groups, you’ll be positioned farther back from your subjects, and this will deepen the depth of field.

An f/4 aperture strikes a great balance between blurring the background, sharpening your subjects, and giving your clients frame-worthy photos.

parents and child
Nikon D750 | Nikon 70-200 f/2.8 | 200mm | 1/250s | f/4 | ISO 900

Note that apertures wider than f/4 can work, but people must be aligned perfectly with one another; otherwise, there’s a good chance someone will be out of focus.

So apertures such as f/3.5 and f/2.8 tempt fate, and you might not realize it until it’s too late.

In fact, if your subjects are too far out of alignment, even f/4 won’t do the trick. Look at the photo below; the mother is holding her son on her lap, and his eyes are sharp while her head is blurry. She is only a few inches behind her son, and f/4 resulted in her being out of focus:

mother and child
Nikon D750 | Nikon 85mm f/1.8 | 1/250s | f/4 | ISO 800. The mother’s eyes are just a bit blurry, which could have been fixed by using a smaller aperture of f/5.6.

Even though f/4 is my go-to aperture for small group photos, it’s a good idea to get shots at smaller apertures, as well. Otherwise, things can get so chaotic that you might not have time to check all your shots, and only after you load your images in Lightroom will you realize that you didn’t get everyone in focus.

This has happened to me more than I care to admit! For that reason, I recommend taking some pictures at f/5.6 even if you’re pretty sure you nailed the shot at f/4.

And by all means, go wider, too. Just be aware that, as the number of people increases, you are far less likely to get everyone in focus.

husband and wife
Nikon D750 | Nikon 85mm f/1.8 | 1/250s | f/3.3 | ISO 500. I opened up the aperture after getting several great shots at f/4, and I ended up with some beautiful images.

The best aperture for large group photos

The larger the group, the smaller the aperture, right?

Unfortunately, it’s not that simple. Smaller apertures mean less light enters the lens, so you have to use slower shutter speeds and/or higher ISO values.

Plus, shrinking the aperture keeps the background sharp – so you won’t get the creamy background that many clients love.

Therefore, f/5.6 is a great place to start when dealing with large groups.

Best Aperture for Portraits family walking
Nikon D750 | Nikon 70-200 f/2.8 | 130mm | 1/180s | f/5.6 | ISO 1100

There are exceptions to this guideline. You can use a wider aperture if you’re able to get everyone positioned (somewhat) in alignment.

Of course, this isn’t always possible, especially when kids are involved, since they tend to be somewhat less predictable. But if you have the option, it’s worth trying larger apertures.

That is, as long as you’ve already captured some small-aperture photos to make sure your bases are covered!

Best Aperture for Portraits family standing
Nikon D750 | Nikon 70-200 f/2.8 | 200mm | 1/180s | f/4 | ISO 1250

When doing large group shots, you are usually standing much farther away, so depth of field isn’t as much of an issue compared to single-person portraits.

You still have to be careful when using wide apertures, but sometimes you simply need to let in a lot of light and a wide aperture is the best option.

When shooting the image below, I was losing daylight as a light drizzle came on. I lined everyone up on my homemade photo benches and shot this picture at f/4.

family sitting
Nikon D750 | Nikon 70-200 f/2.8 | 200mm | 1/500s | f/4 | ISO 2200

After getting a couple of shots at f/4 and f/5.6, I went all the way down to f/2.8. The result is okay, but the adults in the back row are just a bit out of focus. The image isn’t worthy of printing; let it serve as a cautionary tale about the importance of using smaller apertures like f/5.6 for large groups.

family sitting
Nikon D750 | Nikon 70-200 f/2.8 | 200mm | 1/400s | f/2.8 | ISO 1100

The best aperture for close-up portraits

Doing extreme close-up portraits, whether with macro lenses or close-up filters, can be exceedingly tricky.

Why?

Because the depth of field is incredibly thin. Wider apertures further increase this issue, so it’s best to shoot in well-lit conditions and use a small aperture like f/5.6.

child closeup
Nikon D750 | Nikon 50mm f/1.8 with a close-up filter | 1/90s | f/5.6 | ISO 6400

Wide apertures can work fine when doing macro photography with still subjects, but people (especially young children) move around so much that it helps to have some depth of field breathing room.

baby closeup
Nikon D750 | Nikon 50mm f/1.8 with a close-up filter | 1/180s | f/5.6 | ISO 6400

The best aperture for portraits: Final words

Choosing the best aperture for portraits isn’t difficult, but it does take a bit of experience and practice.

I recommend starting with the advice I’ve laid out here, but don’t be afraid to tweak it to suit your own style.

For example, you can’t go wrong shooting single-person portraits at f/2.8 – but over time, you may decide you prefer going much wider.

Or perhaps your clients like the look of smaller apertures with more depth of field. The choice is yours, and as long as you like the results, then there’s no bad option!

husband wife portrait
Nikon D750 | Nikon 70-200 f/2.8 | 200mm | 1/500s | f/2.8 | ISO 800
Q: Is f/2.8 enough for portraits?

A: Certainly! Many lenses have a maximum aperture of f/2.8 and this is a great middle ground for letting in enough light while still keeping the depth of field under control.

Q: I only have a kit lens. Can I use it for portraits?

A: Kit lenses work just fine for portraits, though they typically don’t have apertures that go as wide as prime lenses. I recommend zooming in as far as your kit lens will go and using your maximum aperture, even though it might only be f/5.6. This will blur the background as much as possible.

Q: Can I shoot large group portraits with very wide apertures?

A: Yes, but make sure everyone is lined up so your depth of field is under control. I shot this group photo at f/2, and it only worked because everyone was in a straight line:What's the Best Aperture for Portraits?

Q: I want to use a very wide aperture in bright sunlight, but my photos always turn out overexposed. How can I prevent this?

A: You’ll either need a very fast shutter speed or an ND filter.

Q: Do I need to get an expensive f/1.4 lens to shoot portraits?

A: Absolutely not! F/1.8 prime lenses are outstanding for portraits and won’t break the bank. Canon and Nikon make affordable 50mm f/1.8 lenses, and many other manufacturers have relatively inexpensive options, as well. Don’t ever fall into the trap of thinking you have to spend thousands of dollars to get great portraits!

Q: My camera has a Portrait mode. Should I use that for portrait photography?

A: You can, though I recommend using Aperture Priority mode; it lets you select the exact aperture you want to use. Portrait mode tries to make decisions based on available light and can give you apertures that are wider or narrower than what you might want.

The post What’s the Best Aperture for Portraits? appeared first on Digital Photography School. It was authored by Simon Ringsmuth.


Digital Photography School

 
Comments Off on What’s the Best Aperture for Portraits?

Posted in Photography


Aperture and Shutter Priority Modes

22 Dec

The post Aperture and Shutter Priority Modes appeared first on Digital Photography School. It was authored by Darren Rowse.

aperture priority mode and shutter priority mode explained

What is Aperture Priority mode, what is Shutter Priority mode, and why do they matter?

Over the last few months, we’ve been looking at different elements of exposure and how to move off “Auto” mode on your digital camera. We’ve looked at aperture, shutter speed, and ISO. We’ve discovered what each setting is and what impact changing it will have on your images.

But now that we’ve looked at the theory of how changing these elements impacts an image, I’d like to discuss how to use them by examining two key shooting modes that many digital cameras offer. These should help you take a step away from the automatic settings that you might be spending a lot of time with.

So if you’re ready to learn all about Aperture Priority mode and Shutter Priority mode, then let’s get started.

The elements of exposure: A quick recap

In other articles, I’ve discussed how the three elements of the exposure triangle impact one another. This is particularly important when it comes to aperture and shutter speed.

Remember:

As you increase the size of your aperture (i.e., make the hole that you shoot through bigger), you let more light onto your image sensor.

As a result, you’ll need a shorter shutter speed to get a well-exposed image.

Conversely, if you increase the length of time your shutter is open, you decrease the aperture size that you need to get a well-exposed shot.

Make sense?

Priority modes

Aperture and Shutter Priority modes are really semi-manual (or semi-automatic) modes.

They give you some control over your settings, but also ensure you have a well-exposed image.

You see, semi-automatic modes such as Aperture Priority and Shutter Priority work by letting you select some of the settings. Your camera then chooses the remaining settings (in order to create a nice exposure).

Let’s take a look at each mode separately:

Aperture Priority mode

Often, Aperture Priority mode is represented on your camera Mode dial with an “A” or an “Av.”

In this mode, you set the aperture you wish to use, and the camera sets the shutter speed based on its evaluation of the light.

When would you use Aperture Priority mode?

Aperture impacts the depth of field of your images.

(In other words: By adjusting the aperture, you change how much of your scene is in focus. A narrow aperture results in focus from foreground to background, whereas a wide aperture results in a small sliver of focus surrounded by blur.)

As a result, most people use Aperture Priority mode when they want control over the depth of field.

aperture priority mode and shutter priority mode dandelion seed head

If you want a shallow depth of field (for example, in the shot above, the depth of field is very shallow, keeping the front dandelion seed in focus but blurring out the background), you’ll select a large aperture (f/2.8, for example, as in the dandelion photo) and let the camera choose an appropriate shutter speed.

But if you want an image with everything in focus, you must pick a smaller aperture (for example, f/16) and let the camera choose an appropriate shutter speed.

When choosing an aperture in Aperture Priority mode, keep in mind that the camera will be selecting the shutter speed.

And there comes a point where shutter speeds get too long to handhold your camera (usually around 1/60s).

Once you go below 1/60s or so, you’ll need to consider using a tripod.

(Also, if you’re photographing a moving subject, your shutter speed will impact how it’s captured; a slow shutter speed will mean your subject will be blurred.)

Shutter Priority mode

Shutter Priority mode often has a symbol of “Tv” or “S” on your camera Mode dial.

In Shutter Priority, you choose the shutter speed you wish to shoot at, and you let the camera decide on the best aperture for a well-exposed shot.

When would you use Shutter Priority mode?

In our tutorial on shutter speed, we talked about how the main impact of different shutter speeds is how movement is captured in your images.

As a result, most people switch to Shutter Priority mode when they want more control over the sharpness of a moving subject.

For example, if you want to photograph a bird in motion, and you want to freeze it so there’s no motion blur, you’d choose a fast shutter speed (e.g., 1/1000s, like in the photo below). Your camera would then take into consideration how much light is available in the scene and set an appropriate aperture.

aperture priority mode and shutter priority mode tricolored heron

But if you instead want to photograph a subject with some motion blur to illustrate its movement, you might choose a slower shutter speed, such as 1/25s. And your camera will select a smaller aperture as a result.

The photo below was taken at 0.4s as the flower waved in the wind. Do you see the motion blur that the slow shutter speed created?

aperture priority mode and shutter priority mode blurry flower

But don’t forget:

As the camera chooses different apertures, the depth of field in your image will change. If you choose a fast shutter speed to freeze your fast-moving object, your camera will choose a wider aperture – and your photo will have a narrower depth of field.

My final recommendation: Practice!

As you can see, Shutter Priority and Aperture Priority do give you more control over your images – but getting used to them can take some practice.

So as you use these semi-automatic shooting modes, don’t just think about the setting that you select; also keep an eye on the settings that the camera selects for you.

I find that, when shooting in “Av” or “Tv” modes, it’s often best to bracket your shots and shoot a number of images of the same subject (when you have time) at different settings. This will ensure you’re likely to get at least one shot that meets your needs.

The best way to learn about Shutter Priority and Aperture Priority modes is to grab your camera, head out with it, and experiment. Switch to “Av” or “Tv” and start playing with the different settings (taking lots of shots as you go). Particularly pay attention to how the camera makes changes to compensate for your selections and what impact it has on the shots you take.

In Aperture Priority mode, take some shots at the largest aperture you can (i.e., use small f-numbers) and see how this blurs the background (and also increases the shutter speed). Then head to the other end of the spectrum to take some shots at the smallest aperture you can (i.e., use high f-numbers) and see how this keeps more of your image in focus.

In Shutter Priority mode, play with fast and slow shutter speeds to see how they impact your photo’s depth of field.

Don’t be frustrated if your initial shots are not what you expect; it takes practice to wrap your head around these modes. But keep in mind that, when you do master both Aperture Priority and Shutter Priority, you’ll have a lot more creative control over your shots!

aperture priority mode and shutter priority mode shallow depth of field dahlia

The post Aperture and Shutter Priority Modes appeared first on Digital Photography School. It was authored by Darren Rowse.


Digital Photography School

 
Comments Off on Aperture and Shutter Priority Modes

Posted in Photography


MonsterAdapter’s new LA-KE1 adapter brings autofocus, aperture control to Pentax K-mount lenses on Sony E-mount cameras

25 Nov

MonsterAdapter, a relatively new player in the lens adapter game, has revealed the details of the LA-KE1, a new adapter that will make it possible to mount Pentax K-mount glass to Sony E-mount mirrorless camera systems.

There isn’t much information available about MonsterAdapter. The company’s Facebook page, which appears to be its only online presence, was created on May 20, 2020, when the company announced the development of the LA-EA4r, a modified version of Sony’s LA-EA4 adapter that expanded functionality and support. MonsterAdapters has since released another adapter, the LA-VE1, which makes it possible to adapt Minolta Vectis V-mount lenses to Sony E-mount mirrorless cameras.

Now, the company is promoting its forthcoming LA-KE1, which it claims is the ‘first of its kind in the world.’ The adapter offers full autofocus, aperture control and EXIF data transfer for Pentax K-mount lenses (KAF, KAF2, KAF3 and KAF4) to Sony E-mount cameras. The adapter uses a pair of motors for turning the screw-drive autofocus in older K-mount lenses.

This not only brings the ability to shoot with Pentax lenses to Sony E-mount cameras, but also enables many of Sony’s AI-assisted focusing modes to be used with the Pentax lenses, new and old. MonsterAdapter says the exact functionality will vary depending on what camera you’re using — noting a more powerful camera likely means more features — but both Human and Animal Eye-AF focus modes should be able to work on adapted glass.

MonsterAdapter also notes that due to the limits of screw-drive lenses, this adapter is best suited for still photographs—not video. In addition to the images of the prototype adapter in this article, SonyAlphaRumors has also shared a hands-on video demonstration of it in action:

No price is given for the LA-KE1 adapter, but it is set to ‘hit the market within this year,’ according to the company’s announcement post. You can keep up with the latest news on MonsterAdapter’s Facebook page.

Articles: Digital Photography Review (dpreview.com)

 
Comments Off on MonsterAdapter’s new LA-KE1 adapter brings autofocus, aperture control to Pentax K-mount lenses on Sony E-mount cameras

Posted in Uncategorized


Hasselblad’s new XH Converter 0.8 reduces focal length, increases aperture of HC/HCD lenses on X system cameras

03 Nov

Hasselblad has announced the XH Converter 0.8, a new Speedbooster-style adapter that makes it possible to use H system lenses on Hasselblad’s mirrorless X system while reducing the focal length by 0.8x and increasing the maximum aperture of the adapted lenses by two-thirds of a stop.

The XH Converter 0.8 works similarly to other focal length reduction adapters, such as Metabones’ popular Speedbooster line of adapters. Thanks to the extra flange distance going from a mirrored body to a mirrorless body, Hasselblad is able to pack not only the adapter components inside the unit, but also five optical elements in three groups. This differentiates the XH Converter 0.8 from Hasselblad’s previously-released XH Lens Adapter, which simply keeps the focal length and apertures the same across the board with adapted lenses.

Hasselblad has created a thorough chart showing what effective aperture and focal length compatible H system lenses would be when using them with this adapter on a Hasselblad X system camera:

Hasselblad has also shared a collection of sample images captured by photographer Tom Oldham on a 907X 50C using the XH Converter 0.8 with various lenses:

$ (document).ready(function() { SampleGalleryV2({“containerId”:”embeddedSampleGallery_0131422922″,”galleryId”:”0131422922″,”isEmbeddedWidget”:true,”selectedImageIndex”:0,”isMobile”:false}) });

As tends to be the case with many adapters, not all lenses can use all of the features. The XH Converter 0.8 requires all HC/HCD lenses with firmware version 18.0.0 or later to be updated to firmware version 19.1.0 if you want autofocus compatibility, with the exception of the HC 120 and HC 120 II, which are limited to manual focus mode.

Likewise, any HC/HCD lenses that weren’t updated to firmware version 18.0.0 can’t be updated to firmware version 19.1.0 due to hardware limitations and will therefore be limited to manual focus. Hasselblad does not that since HCD lenses ‘were originally designed for a smaller format than HC lenses […] some reduction of performance in extreme corners can occur.’

Firmware version 19.1.0 for various lenses can be downloaded on Hasselblad’s website.

Hasselblad cameras must also be updated to the latest firmware, The X1D 50C must be updated to firmware version 1.25.0 or later, while the X1D II 50C, 907X 50C and 907X Special Edition models require firmware version 1.4.0 or later to work with the adapter.

The XH Converter 0.8 is made in Sweden and is available today for $ 950 on Hasselblad’s online store.

Press release:

HASSELBLAD LAUNCHES XH CONVERTER 0,8 UNLOCKING A WHOLE NEW SET OF LENSES

The XH Converter 0,8 brings new opportunities to Hasselblad photographers with the ability to unlock a whole new set of H System lens capabilities. The XH Converter 0,8, used on HC/HCD lenses attached to an X System or 907X camera, reduces the focal length of the lens by a factor of 0,8x, which delivers a wider field of view and improves the maximum aperture of the lens by two-thirds of a stop. Additionally, the XH Converter 0,8 improves lens performance in terms of contrast and apparent sharpness across the entire frame.

An impressive combination for maximizing aperture is achieved when attaching the XH Converter 0,8 to the HC f/2,2 100mm lens, transforming the aperture and focal length to f/1,8 and 80mm, respectively. This creates an extremely large aperture that proves even faster than the XCD f/1,9 80mm lens, which until now has been the highest aperture lens option for X and 907X camera systems. An example of reducing focal length with the XH Converter 0,8 is when combined with the HCD f/4,8 24mm lens, it creates an aperture of f/3,8 with a 19mm focal length. This results in an even wider lens option than the existing XCD 21 lens, the widest lens in the X System.

The XH Converter 0,8 joins a range of Hasselblad adapters and converters, including the XH Lens Adapter which allows the usage of all 12 H System lenses as they are on X and 907X camera systems. The addition of the XH Converter 0,8 to the existing accessories lineup now provides these systems with enhanced functionality for H Lenses. In addition, H System users who decide to branch into the X or 907X systems gain more versatility from their current HC/HCD Lens options.

All H System lenses with firmware 18.0.0 or later must be updated to the newest version 19.1.0 to work with the XH Converter 0,8 and to get auto focus (HC 120 and HC 120 II can only be used in manual focus mode). Other H System lenses (except HC 120 and HC 120 II) with firmware older than 18.0.0 will work but only in manual focus mode. Please note that only HC/HCD lenses with firmware 18.0.0 or later can be updated to 19.1.0. Lenses with older firmware have older hardware and therefore cannot be updated. Additionally, the X1D-50c must be updated with firmware 1.25.0 or later and the X1D II 50C, 907X 50C and 907X Special Edition cameras must all be updated with firmware 1.4.0 or later.

The XH Converter 0,8 is available now for purchase with a MSRP of €959 / £859 including VAT and $ 944 excluding sales tax. See more at www.hasselblad.com/x-system-accessories/xh-converter-0-8/.

Download H System Lens Firmware Update 19.1.0 here.

Articles: Digital Photography Review (dpreview.com)

 
Comments Off on Hasselblad’s new XH Converter 0.8 reduces focal length, increases aperture of HC/HCD lenses on X system cameras

Posted in Uncategorized


Aurora Aperture unveils new rear mount filter system for Canon, Nikon, Sigma & Sony ultra wide-angle lenses

16 May

Aurora Aperture Inc. has announced a next-generation rear mount filter system for wide-angle lenses. The new filter system is designed to allow for the use of filters with many popular ultra wide-angle lenses, including those which do not include a front filter thread.

In 2017, Aurora Aperture released a rear mount filter system for the Canon EF 11-24mm F4L USM lens. The newly-announced next-generation system works with the 11-24mm lens, plus the Canon EF 8-15mm F4L Fisheye USM, EF 14mm F2.8L USM (versions I and II), EF 15mm F2.8 Fisheye, EF 16-35mm F2.8L USM (versions II and III are not supported), EF 17-35mm F2.8L USM and EF 17-40mm F4L USM. In addition to Canon lenses, Aurora Aperture’s new filter system is also compatible with the Nikon Nikkor AF-S 14-24mm F2.8G ED, Sigma 14-24mm F2.8 DG HSM Art (Canon EF, Sony E and L mount versions), Sigma’s 14mm F1.8 DG HSM Art for Canon EF mount and the Sony FE 12-24mm F4 G lens.

Not only is Aurora’s latest rear mount filter system compatible with a wider array of lenses, but it also includes other new features. The new rear mount filter system utilizes a magnetic quick-release structure, allowing for easier installation and removal from the lens. In addition, there are a variety of new filters available for the system, including graduated neutral density filters and light pollution reduction filters.

Neutral density – Aurora Aperture refers to them as PowerND – filters are available in 2, 4, 6, 8 and 12 stop variants. Graduated neutral density (GND) filters are available in 1.5, 2.5 and 3.5 stop densities. Each GND filter features a soft transition at 60 percent of the image frame height. Finally, the new PowerDusk filter is designed to filter out artificial lighting and reduce visible light pollution in urban areas, which Aurora Aperture states will allow for better astrophotography and even improved nighttime street photography. For specific information on how the PowerDusk filter reduces the light which hits your image sensor at different wavelengths, click here.

Image credit: Aurora Aperture

In order to utilize the magnetic filters on the rear of your wide-angle lens, you must first install the new rear mount filter system. The installation process will vary depending on the lens in question, but it ranges from using specialty adhesive to replacing existing gel filter holders. Once the filter holder adapter has been installed, using and changing filters is as placing a small glass filter into the magnetic filter holder.

The Aurora Aperture next generation rear mount filters will be available through a Kickstarter campaign starting this month and general availability is expected in September. The price of lens adapters range from $ 35 to $ 41 USD and filter prices range from $ 43 to $ 113. Stay tuned to Kickstarter and to Aurora Aperture’s website for additional information and availability.


Disclaimer: Remember to do your research with any crowdfunding project. DPReview does its best to share only the projects that look legitimate and come from reliable creators, but as with any crowdfunded campaign, there’s always the risk of the product or service never coming to fruition.

Articles: Digital Photography Review (dpreview.com)

 
Comments Off on Aurora Aperture unveils new rear mount filter system for Canon, Nikon, Sigma & Sony ultra wide-angle lenses

Posted in Uncategorized


Fotodiox’s new EF to L-mount adapter features AF, aperture and image stabilization support

07 Apr

Fotodiox has announced the release of its new Canon EF to L-Mount Pro Fusion adapter, which offers complete electronic control and communication between the lens and the camera it’s attached to.

The adapter works with both EF and EF-S lenses and converts them to L-Mount mirrorless cameras. It features an all-metal design with chrome-plated brass mounts and features a built-in Micro USB for updating the firmware of the adapter.

Fotodiox uses its ‘Fusion’ technology to add complete electronic communication and control between the lens and camera body, including autofocus, aperture control and image stabilization. EXIF and aperture data is also transmitted between the lens and camera. In the event you’re using a manual lens, the ‘Fn’ button on the adapter can be pressed to turn off all electronic communication between the lens and camera body.

Fotodiox notes continuous AF and video AF aren’t currently supported due to ‘unsatisfactory’ performance, but other autofocus modes should work with minimal issues. It’s also pointed out that some third party lenses, such as those from Sigma and Tamron might struggle with autofocus a bit more than first-party lenses.

The adapter is backed by a two-year manufacturer warranty, comes packed inside a padded bamboo box and is currently available to purchase for $ 179.95 (B&H).

Articles: Digital Photography Review (dpreview.com)

 
Comments Off on Fotodiox’s new EF to L-mount adapter features AF, aperture and image stabilization support

Posted in Uncategorized


Making Sense of the Exposure Triangle – ISO, Aperture, and Shutterspeed Made Simple

26 Feb

The post Making Sense of the Exposure Triangle – ISO, Aperture, and Shutterspeed Made Simple appeared first on Digital Photography School. It was authored by Jackie Lamas.

making-sense-of-the-exposure-triangle

Ever hear other photographers talking about shooting in manual mode, and using terms like ISO, aperture, and shutter speed and have no idea what they’re talking about? Then this article is for you. While making sense of the Exposure Triangle may seem overwhelming, you’ll learn everything there is to know so that you can get shooting in manual mode quicker!

Image: Canon 6D, 28mm, f/5.6, 1/250, ISO 400

Canon 6D, 28mm, f/5.6, 1/250, ISO 400

Everything in photography has to do with light

All three settings, ISO, aperture and shutter speed are collectively called the Exposure Triangle. They work together to allow more or less light to enter the camera depending on the light that you see with your eye in a given situation.

making-sense-of-the-exposure-triangle

For example, the brighter the light outside, the less you need to enter your camera to record the image. The less light around you, the more light you’ll need the camera to capture in order to make the image visible.

Each part of the Exposure Triangle works together to create a good exposure while controlling the camera fully to suit your creative direction.

What is ISO?

When making sense of the exposure triangle, you first need to understand ISO. ISO is the light sensitivity of the camera’s sensor.

So, think of this as your eye. When it’s really bright outside, your eyes tend to be less sensitive and need to strain less to focus, see, and look at the world around.

Image: When it’s particularly bright outside, like in this photo, use a lower number ISO.  Cam...

When it’s particularly bright outside, like in this photo, use a lower number ISO.  Camera settings: f/5.0, 1/800, ISO 200, 85mm shot on Canon 6D.

On the other hand, when you’re in a dark location with little to no light, your eyes strain and become more sensitive to any lights in the scene, helping you see better at night as well.

The same thing happens to a camera’s sensor. The more sensitive, the more light you’ll be able to pick up. The less sensitive, less light will enter the camera.

making-sense-of-the-exposure-triangle

ISO is measured in numbers ranging from 50 to 25,600 on some models. There is usually a button on your camera that is labeled ISO. This is where you’ll be able to change the ISO depending on the lighting situation.

Image: Here, we used auto mode to get an idea of the exposure we would need to take a photo of these...

Here, we used auto mode to get an idea of the exposure we would need to take a photo of these stuffed animals setting the ISO at 100.

The ISO also affects the quality of the image, so be careful when you’re using higher ISO numbers. They tend to record a lot of digital noise (or grain points) that you see when zoomed in.

Image: As you can see in this photo, using a high ISO added more light than we needed.

As you can see in this photo, using a high ISO added more light than we needed.

Using a higher ISO can help you in low light situations when you want to keep a relatively fast shutter speed to avoid camera shake. However, you need that boost in light to help expose correctly.

Image: When you use a high ISO, your camera is more sensitive to light and causes digital noise – li...

When you use a high ISO, your camera is more sensitive to light and causes digital noise – little points on your image that make it look grainy.

Aperture

When making sense of the exposure triangle, you need to understand aperture next. Aperture, is the opening and closing of the lens. Measured in F-numbers, it affects both the amount of light entering the camera, and the depth of field in your image.

making-sense-of-the-exposure-triangle

Camera settings f/2.5, 1/100, IS0 400, 50mm. In order to get the baby’s hand in focus and nothing else, we had to use an open aperture of f/2.5.

The depth of field is how much is in focus from foreground to background. A lower f-number will open your lens and let more light in, but it will also give you a narrower focus range (a shallow, or small depth of field). While a higher f-number will close your lens, and lessen the light entering, it will give you a wider focus range (a wide, or large depth of field).

making-sense-of-the-exposure-triangle

This is especially important to keep in mind when taking portraits so that you can determine how much you want in focus.

For an individual portrait, any f-number between f/2.8 and f/5.6 works great. You still have your subject in focus but you do get some bokeh (blurry background due to a low f/number).

making-sense-of-the-exposure-triangle

Here we have a more open aperture and therefore less is in focus.

For groups of people, you’ll want a high f-number like f/8 or f/11 because, at a lower f/number, you have less depth of field. This means your plane of focus is narrower. If you have people standing outside the plane of focus, they will be blurry. Therefore, in order to have everyone in focus, a high f/number is best because it gives you a wider plane of focus.

making-sense-of-the-exposure-triangle

Here we are using a closed aperture, allowing more to be in focus.

Again, opening and closing of the lens affects how much light enters the camera. Eventually, in manual, you’ll have to compensate with one of the other two settings to make up for the lack of light or excess of light entering your camera.

Image: To capture the bird and the landscape surrounding it, we used an aperture of f/9. Other camer...

To capture the bird and the landscape surrounding it, we used an aperture of f/9. Other camera settings are ISO 400, 1/250, at 28mm.

Use Av or A mode on your camera to play with aperture. The camera will set the shutter speed for you to maintain correct exposure. However, you’ll be able to see a noticeable difference in your depth of field and in light entering your camera.

Shutter speed

When making sense of the exposure triangle, shutter speed is the next thing you need to know. Shutter speed dictates the length of time that the shutter is open.

Image: To get a silhouette, you’ll need a fast shutter speed. This image has a shutter speed o...

To get a silhouette, you’ll need a fast shutter speed. This image has a shutter speed of 1/1000, f/16, ISO 400, 28mm.

Shutter speed is measured from seconds to fractions of a second (slow to fast shutter speeds). The slower the shutter speed, the longer it stays open to capture light. The faster it opens and closes, the less light is captured to make your photo.

making-sense-of-the-exposure-triangle

For example, on a really bright afternoon, use faster shutter speed in order to create a good exposure. In a low light situation, like a nighttime scene or a dark cafe, a slower shutter speed can help capture enough light to make the photo.

making-sense-of-the-exposure-triangle

In these two photos, we only changed the shutter speed and kept the other camera settings the same. You can see a significant difference in light.

Keep in mind, the slower the shutter speed, the more chance of camera shake occurring. Camera shake is an accidental blur due to the camera shaking, either in your hands, or due to some other force.

At slower shutter speeds, usually 1/125th of second or slower you are more likely to get camera shake. At faster shutter speeds this isn’t a problem as the camera opens and closes too quickly to register the shake.

making-sense-of-the-exposure-triangle

Using a slow shutter speed can give you interesting images with movement. Camera settings f/6.3, 1/13, ISO 400, 50mm.

Shutter speed also allows you to show movement in your photos or freezes moments. Slow shutter speed will show more movement, for example, a child running or playing. While a faster shutter speed will freeze the moment or action that you’re capturing.

Manual Mode

Manual mode is where you have to set all three adjustments manually, therefore, giving you complete control of the light and look of your photo.

Think of these three as a pulley system, all working together. When one is moved, one or both of the other settings must also adjust and compensate.

making-sense-of-the-exposure-triangle

The photo on the left has a slow shutter speed, an open aperture, and low ISO. The slow shutter speed and open aperture help light enter. It also allows the camera to pick up the movement of the water.

In the photo on the right, we get more of an action shot of the water. This is because we have now changed the ISO to 1/2000 sec – a pretty fast shutter speed. With this fast shutter speed, we had to compensate for the loss of light from the fast shutter speed. So, we added light by using a higher ISO and a more open aperture. Even so, it wasn’t enough to get a correct exposure as the photo is a little dark.

The best way to get started in manual mode is to think about what kind of photo you want to make. Are you shooting still life? Is there enough light? Do you want to control your focus range? Is this a portrait? All of these things can help you to determine where to start.

making-sense-of-the-exposure-triangle

For example, you’re taking photos of your kid’s soccer game in the early evening, and there is still a lot of light left, but it’s not harsh. You want to freeze the action of the game, and so you’d start by setting a fast shutter speed first.

If you’re taking a portrait of someone, then you’d start with the aperture in order to control your depth of field. Then you’d adjust the other two settings accordingly.

Image: Camera settings f/5.6, 1/100, IS0 400, 53mm.

Camera settings f/5.6, 1/100, IS0 400, 53mm.

For landscapes, you’d likely start with aperture and shutter speed. You may need a small aperture (eg f/11) to capture a wide plane of focus. Depending on whether there is water in your landscape, you may want to freeze the water or give it a silky look by slowing your shutter speed right down.

Knowing what you’re shooting and type of light will give you a starting point

Also, in manual mode, there is a built-in light meter. This meter looks like a tiny ruler either at the bottom of the live view or inside the viewfinder. It helps you determine if your photo is too bright (metering to the right), or too dark (metering to the left).

When the line is in the middle, or at zero, you’ve got what the camera considers a perfectly-exposed photo.

making-sense-of-the-exposure-triangle

The ruler at the bottom of the live view, or through the viewfinder, can help you expose your photos correctly. To the right of the ruler your photo will be brighter, and to the left, it will be darker.

Aim to keep it in the middle as you practice in manual mode. Sett one of the adjustments and then move the other two to add or take away light accordingly until the meter is in the middle.

It’s all about practice and really getting to know what each setting does on its own before switching to full manual. This can feel overwhelming, so try using one of the other modes, like Tv/S or Av/A modes first. Doing so may give you a better understanding of the settings and more control over your photos.

making-sense-of-the-exposure-triangle

Camera settings f/22, 30 seconds, ISO 200, 28mm.


Image: Camera settings f/10, 1/640, ISO 400, 50mm.

Camera settings f/10, 1/640, ISO 400, 50mm.

Conclusion

The technical side of photography can sometimes seem overwhelming and it seems like there is always something new to learn before feeling confident. Making sense of the exposure triangle will set your creativity free and give you full control of your camera.

The post Making Sense of the Exposure Triangle – ISO, Aperture, and Shutterspeed Made Simple appeared first on Digital Photography School. It was authored by Jackie Lamas.


Digital Photography School

 
Comments Off on Making Sense of the Exposure Triangle – ISO, Aperture, and Shutterspeed Made Simple

Posted in Photography