RSS
 

Posts Tagged ‘Anywhere’

Review: The DJI Pocket 2 is a vlogging machine you can take anywhere (even in your pocket)

09 Nov

DJI Pocket 2
$ 349 | DJI.com

The DJI Pocket 2 is a second-generation all-in-one camera with a built-in three-axis stabilizer. A follow up to the Osmo Pocket, the camera remains roughly the same size as the original but features a larger sensor, a wider lens, an improved autofocus system, more microphones, and the ability to shoot higher-quality photos and videos.

The camera remains incredibly easy to use and is a great option for vloggers and content-creators who need to capture stabilized video and don’t want to be weighed down with lots of gear.


Sample photos

$ (document).ready(function() { SampleGalleryV2({“containerId”:”embeddedSampleGallery_0679875218″,”galleryId”:”0679875218″,”isEmbeddedWidget”:true,”selectedImageIndex”:0,”isMobile”:false}) });

View our DJI Pocket 2 sample gallery

Back to top


Key Specifications:

  • 1/1.7” CMOS sensor
  • 20mm (equiv.) F1.8 lens
  • 64MP and 16MP photo modes
  • Video: 4K/60p, 2.7K/60p, 1080/60p
  • 8x zoom (64MP mode), 4x lossless zoom in 1080p or 16MP mode
  • Panorama modes in 3×3 and 180°
  • 4 microphones with directional audio and sound tracking
  • Micro SD slot up to 256 GB
  • 140 min. battery life (1080/24p)
  • Weight: 117 g
  • Dimensions: 124.7×38.1×30 mm
  • HDR Video: 2.7K/30p (arriving in a future firmware update)

Body and design

The exterior design of the Pocket 2 is similar to the original but now includes a Mini Control Stick that slides into the area previously reserved for a smartphone connection. If you’re using the Mini Control Stick, the buttons to control the Pocket increase to five from the original two. Although there are some changes with the button layout, the operation remains familiar to the original.

The Mini Control Stick (just below the screen at left) makes the Pocket 2 easier to operate than the original.

The Pocket’s power button sits on the right side of the camera, and the micro SD card slides into a slot on the left. The bottom left record button records video or shoots stills, and the button next to it allows you to swap between the two modes easily. The Pocket 2 now has the ability to pause recording while shooting video by pressing and holding the record button.

If you’ve slid the Mini Control Stick into position, you will be able to customize the joystick to Zoom or Tilt and switch between Tilt Lock, FPV, and Follow using the button on the top right. Touchscreen controls allow you to access additional shooting modes (slow-mo, timelapse, pano, HDR Video), customize the Mini Control Stick settings, select recording resolution, review files, and access Pro Mode.

Some Pocket 2 accessories: Do-It-All handle (attached to the base of camera), a wireless mic with windscreen, tripod mount and smartphone connectors.

The Pocket 2 has been redesigned so that the wrist strap can attach to the camera instead of just the carrying case. It’s a subtle upgrade but a useful one. The Pocket now has a detachable base that can be swapped out for a base with a tripod mount or an accessory called the Do-It-All handle ($ 99), which turns the Pocket into a live streaming tool and allows you to use it with the DJI Mimo app without attaching your phone to the camera. The Do-It-All handle increases the total size a bit, but the benefits that come with this tool make that extra bulk worth it.

The Pocket still comes with accessories to connect to your smartphone without that Do-It-All handle, but doing so requires that you remove your phone case to make the connection, and the setup feels unbalanced. You’ll also have to control zoom and tilt through the app, which isn’t as intuitive as that new Mini Control Stick. The Do-It-All handle is really the way to go if you want to use your phone as a monitor or use the Pocket for live streaming. You’ll need to use the Mimo app and the Do-It-All handle if you intend to go live with the Pocket.

ISO 100 | 1/120 sec | F1.8

The majority of the time, I used the Pocket as a standalone product. The Pocket’s real genius is its simplicity and small size, and if you’re shooting with a smartphone connected, it makes things a bit more complicated. Having the Do-It-All handle attached to the Pocket and reviewing images and videos through the Mimo app was quite helpful, though.

Back to top


Video

When the original Pocket launched last year, it was clearly aimed at vloggers who needed stabilized footage while they walked-and-talked. Still, the original lens was a 25.7mm F2, resulting in shots that featured a whole lot of face and required relatively bright conditions. The new version has a wider 20mm F1.8 lens and a larger sensor, making it a much better option for those who need stabilized footage of themselves.

The Pocket 2 adds two additional mics, bringing the total to four, and features directional audio. With a future update, a new feature called SoundTrack will allow those microphones to follow whatever is making noise in a scene. The SoundTrack feature wasn’t available during our time with the Pocket, so we haven’t evaluated it, but DJI says it will arrive by way of a firmware update.

This Pocket 2 sample reel includes 4K/60p footage shot in New York City.

The audio quality on the original Pocket left something to be desired. The additional mics and new audio features make for recordings that sound better than what you might be able to get with a smartphone. The new Pocket also comes with an optional wireless mic accessory that communicates with the Do-It-All handle for even cleaner audio—a great choice for interviews done on the fly or capturing voices in noisy locations.

The Pocket 2 features hybrid AF, which uses both phase-detect autofocus and contrast-detect autofocus. We found that it did a nice job grabbing onto subjects and moving with them, like the kids dancing at a hardcore show and the band’s lead singer moving around the street. The Pocket 2 can now record 4K video up to 60fps at a 100Mbps bitrate.

The Pocket’s stabilization remains one of its most impressive features.

The Pocket’s stabilization remains one of its most impressive features. The Pocket 2 is much easier to use than larger gimbals but just as reliable. I’d never be able to ride my bike while holding a stabilizer and a traditional camera. With the Pocket, it’s possible, and it delivered footage that was remarkably smooth as I cruised around, although it did struggle as I rolled over some New York City potholes.

The camera is drop-aware, and although I didn’t intentionally drop the Pocket, it does seem sensitive. It will shut itself off if it thinks the gimbal is in danger. I tried and failed to record footage while biking over the Williamsburg bridge with the Pocket zipped into the front pocket of my jacket with the lens sticking out and the gimbal locked, but apparently, that ride was just a bit too bumpy for the Pocket 2 to feel safe and secure.

ISO 100 | 1/60 sec | F1.8

Eventually, the Pocket 2 will also shoot HDR video similar to the Mavic 2 Air drone, but according to DJI, the firmware to enable this feature won’t ship until later in 2020.

Back to top


Photos

Still image quality is noticeably improved compared to the original Osmo Pocket, partly due to the larger 1/1.7” sensor and faster F1.8 lens. Regular JPEGs top out at 16MP, but if you’re shooting in high-resolution mode, you can get 64MP files. If you swap the camera into PRO mode, you can capture Raw DNG files that clock in around 127.7 MB each. It’s a big leap in quality from the 12MP files on the original Pocket.

One interesting quirk we discovered is that the Pocket 2 won’t let you record Raw+JPEG images simultaneously—it’s an either/or decision.

The RAW files have a lot of flexibility in editing, although we noticed some chromatic aberration when zoomed in. According to DJI, the Pocket offers 8x zoom and 4x lossless zoom. In our experience, photos look crisp when the camera is at its widest vantage point, but as you zoom in, it becomes harder to nail sharp focus and the loss of quality becomes noticeable.

Boo!
ISO 100 | 1/40 sec | F1.8

The Pocket 2 has the ability to shoot 3×3 panoramas in addition to the 180º panoramas. The 180º panorama shoots four photos and stitches them into one long image, while the 3×3 panorama mode shoots 9 images and then stitches them into a 5×7 image. The process is fast, and stitching is all done within the Mimo app. A tripod comes in handy with 3×3 panoramas to limit camera shake.

The second-generation Pocket does a slightly better job capturing action, but this probably isn’t the tool you want to shoot sports photos. It does a decent job grabbing and holding focus on musicians and wiggly pets, though.

Thankfully, the ergonomic changes to the buttons on the second-generation Pocket make it nearly impossible to accidentally swap between shooting modes, which was an issue with the original.

Back to top


Conclusion:

The Pocket 2 addresses many of the original Osmo Pocket’s shortcomings, which was a great tool to capture stabilized video footage quickly, but which had notable limitations. The larger sensor, faster and wider lens, improved autofocus capabilities, and additional mics make this a more robust tool for content creators, vloggers, and possibly even professional shooters looking to capture supplementary footage for big jobs.

The controls have gotten more intuitive, and it’s no longer easy to swap between shooting modes accidentally. The zooming capabilities and the Mini Control Stick accessory are incredibly useful—the same goes for the interchangeable grips. Although the Do-It-All handle is an accessory that needs to be purchased at an additional cost, we really think it’s worth paying extra. It performs well and makes it easy to use your smartphone to monitor, review, and download footage on the go and use the Pocket as a tool for live streams—something that we only see becoming more common as large in-person events are on hold.

It’s possible to control the Pocket 2 through your smartphone, but it feels unbalanced and requires you to adjust tilt and zoom from your phone’s screen. We much prefer using the Do-It-All handle ($ 99) with the Mini Control Stick.

The ability to shoot 64MP Raw images with the Pocket is a massive leap from the original, but the loss in quality at 8x zoom is noticeable, and at the end of the day, we think the Pocket is best suited as a video tool. The Pocket is nice for capturing candid moments and unique perspectives, but realistically we think people are more likely to use their smartphone to capture those. The Panorama modes do offer something unique. Unlike smartphones, the Pocket doesn’t necessarily have to rely on steady human hands to move in a straight line to create a perfectly stitched together image.

The Pocket remains small and simple to operate and isn’t nearly as intimidating to use as larger gimbals on the market—for us, that’s a win.

What we like:

  • Stabilized 4K video footage
  • Mini Control Stick with zoom capabilities
  • Optional Do-It-All handle
  • Live streaming capability (requires Do-It-All handle)
  • Improved audio quality
  • Improved autofocus
  • Redesigned control buttons
  • Responsive touchscreen controls

What we don’t:

  • Image quality drops when zoomed
  • Still feels unbalanced when a smartphone is attached

Articles: Digital Photography Review (dpreview.com)

 
Comments Off on Review: The DJI Pocket 2 is a vlogging machine you can take anywhere (even in your pocket)

Posted in Uncategorized


Canon is using Indiegogo to crowdfund the IVY REC, a ‘Clippable, Go Anywhere Camera’

02 Jul

Earlier this year, at CP+ 2019, Canon showed off a collection of creative concept cameras it has been developing behind-the-scenes for quite some time. Now, Canon has taken the first steps to bring at least one of these cameras to market in the form of an Indiegogo crowdfunding campaign.

The first of the concept cameras Canon is hoping to make a reality is the IVY REC, a ‘clippable, go anywhere camera’ that appears to be an ultra-compact point-and-shoot camera that’s about the size of a USB flash drive and features a built-in carabiner.

Currently, the Indiegogo campaign page is nothing more than a landing page where you can sign up to receive more information on the camera and updates on when the campaign will go live. According to the campaign page, the IVY REC features a 13-megapixel 1/3-inch CMOS sensor capable of recording 1080 / 60p video.

Note what appears to be a standard 1/4-20 tripod thread beneath the lens of the IVY REC.

Canon says the IVY REC is lightweight, shockproof and waterproof1. The ultra-compact camera also features wireless connectivity via the CanonMini Cam App, which will turn your smartphone into a live view display and allow for wireless transfer of photos and video. Canon also says the square clip section of the camera can double as a primitive viewfinder.

A single dial appears to be the only menu interface on the camera itself, meaning any minute adjustments will need to be done using the accompanying smartphone app.

At first view, both the camera and the crowdfunding campaign appear extremely out of character for Canon, but in a previous interview with DPReview at CP+ 2019, Canon executives noted the company is determined ‘to capture as many customers as [it] can’ and expressed the belief that ‘there’s a new genre of capturing: a new casual capturing market,’ of sorts that has ‘potential for new developments.’ Sure, Canon has the resources to go out and built this concept for the mass market, but a crowdfunding campaign is a simple solution to gauging the public’s interest without investing any additional capital into the concepts.

There’s no pricing information or details on when the crowdfunding campaign will go live, but the landing page does note ‘early birds’ will receive upwards of 30% off the retail price. You can sign up to receive updates and see the information for yourself on the campaign’s landing page.


1Up to 30 minutes at a depth of 1m (3.3ft)

Update (July 1, 2019): A previous version of this article compared the IVY REC to Google’s Clips camera. It has been updated to remove the comparison, considering the IVY REC isn’t so much a lifelogging camera as it is a specialized point-and-shoot camera.

Articles: Digital Photography Review (dpreview.com)

 
Comments Off on Canon is using Indiegogo to crowdfund the IVY REC, a ‘Clippable, Go Anywhere Camera’

Posted in Uncategorized


How to Find Opportunities for Abstract Photography Anywhere

12 Jul

Abstract photography, otherwise known as non-objective, conceptual, or experimental photography, is a tricky subject. According to Wikipedia, abstract photography is “a means of depicting a visual image that does not have an immediate association with the object world and has been crafted through the use of photographic equipment processes or materials”.

So basically, abstract photography is image-making that doesn’t aim to represent reality but rather visually explores the components that construct conventional subject matter.

To seek out abstract photography in any opportunity, you must shift your focus away from describing the world in a literal way, focusing on line, shape, form, space, color, contrast, pattern and texture instead. These elements come together to create an image that explores the way you appreciate your visual environment.

Here are a few tips to finding opportunities for abstract photography, wherever you are!

Previsualization

How to Find Opportunities for Abstract Photography Anywhere

Previsualization in photography is a skill where a photographer “sees” the outcome of an image before it is taken. By breaking down a potential image in your mind’s eye, you can dissect a scene, prioritizing the best possible visual results.

This is especially useful in abstract photography, where the outcome of a photograph sometimes isn’t immediately obvious.

Previsualizing will help you make the most of any potential photographic opportunity. Imagine encountering a fence for example. You could easily photograph the fence line and move on, but your photograph won’t be very engaging. Or, you could mentally analyze the fence’s structure, breaking it down into abstract categories (color, shape, line, pattern, etc.) to take advantage of the scene and exploit it to its full potential.

Go macro

macro flower - How to Find Opportunities for Abstract Photography Anywhere

Macro photography is an especially unique form of photography, illuminating what often goes unseen to the naked eye. Provided you have a macro lens, extension tubes, or even a magnifying glass, one of the best things about abstract macro photography is that you can get an interesting result photographing just about anywhere.

Abstract macro photography is a great opportunity to focus on subtle details in a scene without being overly concerned about representing a specific subject. Focusing on abstracted aspects such as color and shape rather than the subject means you can explore the building blocks of an image visually.

Look for lines

Abstract photography focuses on the naked ingredients of image making, but sometimes this means a change-up in your photographic approach. One great way to tease out abstract photographic opportunities is to focus on a compositional technique. For example, focusing on lines will reveal opportunities you may have passed over before.

How to Find Opportunities for Abstract Photography Anywhere

As one of the most basic elements of composition, lines are an extremely powerful tool in visual art. Lines that guide a viewer’s eye around an image (also known as leading lines) are a way to point towards a specific subject or highlight the geometry of a scene. They can also add a sense of urgency with straight, abrupt lines or lend a sense of calm or peace with softer, curved lines.

Concentrating on lines will reveal new opportunities in any environment, all you have to do is look.

Seek out texture

Texture in photography is one of the most under-utilized compositional tools. Exploring texture creates an image that people can “feel” in their mind. The feeling of touch appeals to a viewer’s understanding of the world.

By incorporating texture into an abstract photograph, you are connecting to an audience’s knowledge of how the world behaves under the sense of touch. And because most things feel like something, there are plenty of opportunities for textural abstract photography. Try looking for peeling paint, roughed up wood or dried leaves.

How to Find Opportunities for Abstract Photography Anywhere

Investigate color

Color is all around us, it’s a universally powerful tool of communication. For example, psychologically, yellow has associations with joy and energy, whereas green is associated with nature and calm. It’s just the same in abstract photography.

Focusing on color investigates our associations with the environment around us. It transcends abstract subject matter to connect with a viewer on a psychological level.

Making color the center of interest in your photography will reveal new and unusual abstract subject matter too. Objects that may seem boring or mundane come alive with a bit of color, creating unusual and interesting abstract photography.

How to Find Opportunities for Abstract Photography Anywhere - color

Conclusion

The scope of abstract photography is exciting and endless. Although it’s exact meaning is hard to define, abstract photography provides space for creativity and experimentation.

It’s the perfect excuse to shake up your photographic practice, all you have to do is look! Please share some of your abstract photos in the comments below.

The post How to Find Opportunities for Abstract Photography Anywhere appeared first on Digital Photography School.


Digital Photography School

 
Comments Off on How to Find Opportunities for Abstract Photography Anywhere

Posted in Photography


Wiral LITE cable system lets you capture cinematic shots almost anywhere

20 Oct

A simple cable cam system called Wiral LITE has launched on Kickstarter, where the campaign has already blown away its funding goal, raising nearly a quarter-million dollars in just a few days’ time. The system is comprised of a motorized, remotely-controlled device that rolls across a cable fixed to two poles or similar structures. A camera can be attached to the bottom of Wiral LITE, which itself rolls across the cable while the camera records cinematic motion shots.

The cable cam system is being presented as an alternative to portable motorized slider devices, offering the ability to record motion shots over much larger distances than the average portable slider.

Wiral LITE features a standard camera mount on the bottom and can handle camera/lens weights up to 3.3lbs / 1.5kg. The system includes a ball joint, a GoPro mount, cable, quick reel for retracting the cable, a tightening strap, end stop clips, batteries, and a battery charger.

The cable system offers multiple modes, including a time lapse mode that moves with a minimum speed of 0.006MPH, but the device’s top speed is 28mph / 45kmh.

The team behind the device explains that the Wiral system takes 3 minutes to setup, which involves attaching both ends of the reel to a pair of objects, tightening the cable between the two, and then mounting the Wiral LITE onto the cable. In other words, setup is a breeze:

And once you’re set up, you can capture long-range panning shots like this with ease:

Wiral LITE is being sold to backers for a pledge of $ 200. Bundles are also available for those who want to pledge a bit more, such as an ‘Ultimate Kit’ for pledges of $ 250 or an ‘Extreme Kit’ for $ 1,700.

To learn more or put a pledge in yourself, head over to the Kickstarter page.

Articles: Digital Photography Review (dpreview.com)

 
Comments Off on Wiral LITE cable system lets you capture cinematic shots almost anywhere

Posted in Uncategorized


Flexible Tenikle ‘tripod’ uses suction cups to stick almost anywhere

28 Sep

A new ‘tripod’ like device called the Tenikle has just launched on Kickstarter, and it looks kind of like a Joby GorillaPod with a creative twist. As with the GorillaPod, Tenikle features three flexible arms that can be bent and reshaped for a variety of surfaces; unlike GorillaPod, Tenikle can stick to those same surfaces using the three powerful suction cups found on each arm.

Tenikle can be used by either directly attaching a small action camera (or smartphone) to a suction cup, screwing a camera mount into the device’s 1/4-20″ port, or attaching a camera directly to its 1/4-20″ screw adapter. The tripod is flexible enough to be rolled into a ball for heightened portability and strong enough to hold 8lbs / 3.6kg per suction cup.

When used dry, the creators claim that each cup is able to maintain strong suction for two or more weeks, while wet cups will maintain strong suction for four or more weeks. Both Stingray Gray and Coral colors are available, but Lagoon Blue and a special Kickstarter color will be added if the crowdfunding campaign hits stretch goals.

The team behind Tenikle plan to retail the tripod for $ 30, but is currently offering it to backers who pledge $ 25 or more. The campaign also includes pledge options such as a bundle with an adapter (and more) for $ 35 on up.

To find out more about the Tenikle or put down a pledge of your own, head over to the Kickstarter campaign by clicking here. This creative little tripod has already destroyed its initial funding goal, so it’s very likely this one will become a reality (although that’s never a guarantee…)

Articles: Digital Photography Review (dpreview.com)

 
Comments Off on Flexible Tenikle ‘tripod’ uses suction cups to stick almost anywhere

Posted in Uncategorized


Olympus debuts ‘Anywhere Classroom’ video series

27 Jun

Olympus US has announced a new video series. Titled ‘Anywhere Classroom’, the videos provide beginners with tips for a variety of shooting scenarios. The first three videos launch today, featuring Olympus Visionary Jay Dickman offering tips for outdoor photography and demonstrating with the OM-D E-M1. A second season is planned for fall 2014 featuring advice for light painting and night shooting. See video

related news: Digital Photography Review (dpreview.com)

 
Comments Off on Olympus debuts ‘Anywhere Classroom’ video series

Posted in Uncategorized


HalfBike: Compact Standing Cycle Design Goes Anywhere

22 Mar

[ By Steph in Technology & Vehicles & Mods. ]

Halfbike Compact Bicycle 1

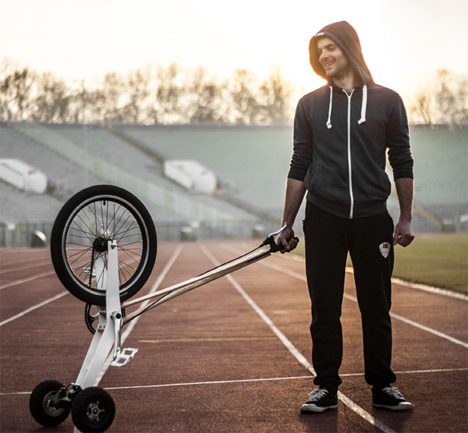
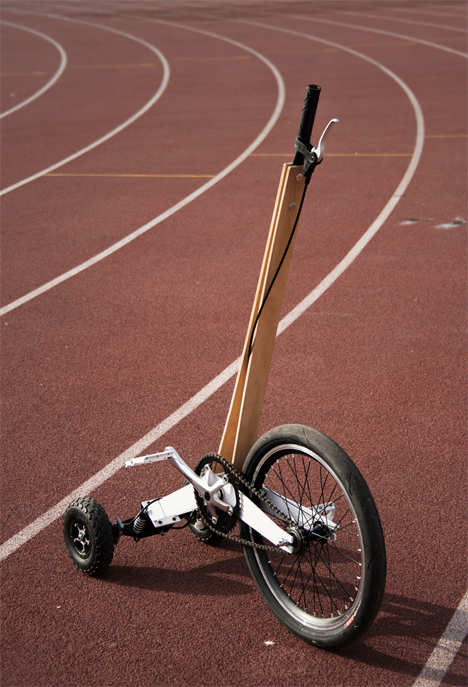
How compact can a bicycle get, enabling it to go anywhere in the city that you do? The Halfbike is an intriguing step forward for ultra-packable bikes ideally suited for the urban environment, eschewing a seat in favor of upright positioning for the rider. As a result, it fits into spaces too small for most other bicycles, including city buses and elevators.

HalfBike Compact Bicycle 2

HalfBike Compact Bicycle 4

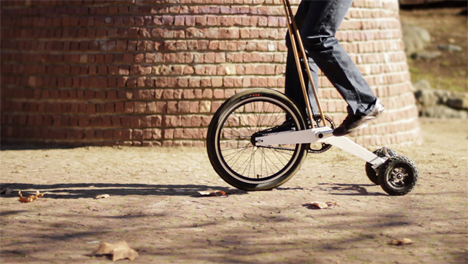
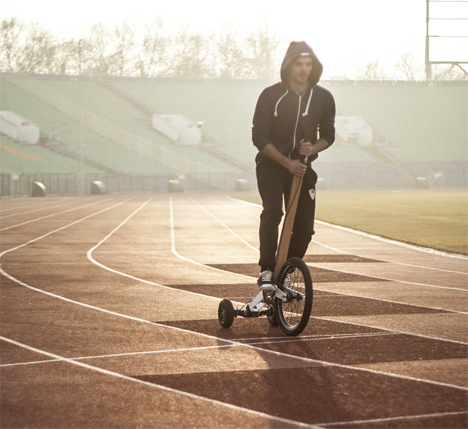
Lightweight enough to be carried up flights of stairs, the Halfbike works by a combination of cycling and smooth assisted running for a quick, fun means of getting around the city. The three-wheeled design gives it a lot of agility over a regular bicycle, cutting tight corners and sailing up stairs.

HalfBike Compact Bicycle 3

HalfBike Compact Bicycle 5

It’s easy to walk with the Halfbike one-handed, and the aluminum frame and plywood handle take up very little space. While the lack of a seat might make it less comfortable for long commutes, standing offers greater visibility.

Share on Facebook


[ By Steph in Technology & Vehicles & Mods. ]

[ WebUrbanist | Archives | Galleries | Privacy | TOS ]


WebUrbanist

 
Comments Off on HalfBike: Compact Standing Cycle Design Goes Anywhere

Posted in Creativity


Room with a View: How to Create this Window with Blinds Portrait Anywhere

13 Feb

In this post Gina Milicia – author of our brand new Posing eBook – walks us through the taking of one of her portraits of Christy Vandenberg.

Final

I’m constantly on the look out for new and interesting ways to pose my models. This shoot only took me 20 minutes from start to finish and is really basic to set up and photograph.

The following tutorial is a step by step of how I pose and light my window portrait.

This set up is great way to add mood to a portrait. The reflections caused by the glass that partly obscure my model add a sense of mystery and romance to the shot.

This image was taken in my studio using daylight and can be recreated almost anywhere.

The example I’ve given is of a full-face shot but this also works with ¾ shots and profile shots and with or without venetian blinds.

Gear Checklist

  • Canon 5D Mark II
  • Canon EF 70-200mm f/2.8L IS lens*

I’ve used a focal length of 200mm but a focal length of anywhere between 70-200mm will work. If you have a cropped frame sensor a 50mm will also give a similar result.

  • Manfrotto 475B Pro

I shoot most of my headshots using a tripod because having my camera fixed gives me the freedom to focus on expression and pose rather than having to worry about whether my vertical and horizontal angles are straight.

The other reason I love shooting on tripod is it allows me to shoot portraits at very slow shutter speeds of 1/15th or 1/8th of a second, which I could never get using hand held.

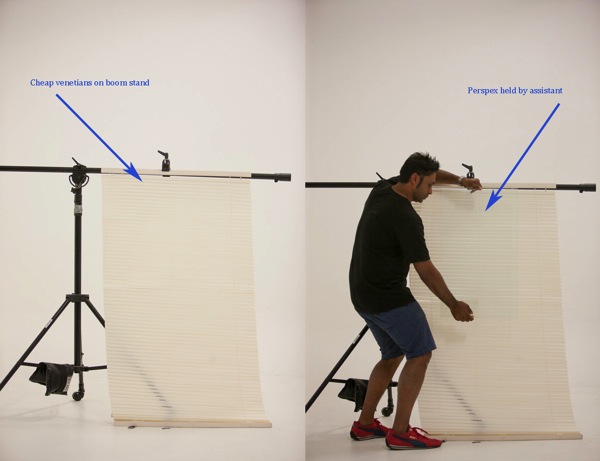
  • 1 x cheap Venetian blind + boom c stand or clothes rack to hold up venetians
  • 1 x sheet of clear Perspex* approx. 3ft x 3ft ( held by assistant)

* Perspex is lighter and cheaper than glass and easier to transport.

Camera Settings

  • ISO 400
  • 200mm
  • f/2.8 at 1/80th second
  • Daylight

I’ve used a long focal length of 200mm and short depth of field of f/2.8 because I wanted my models eyes to be in focus and the background to be out of focus.

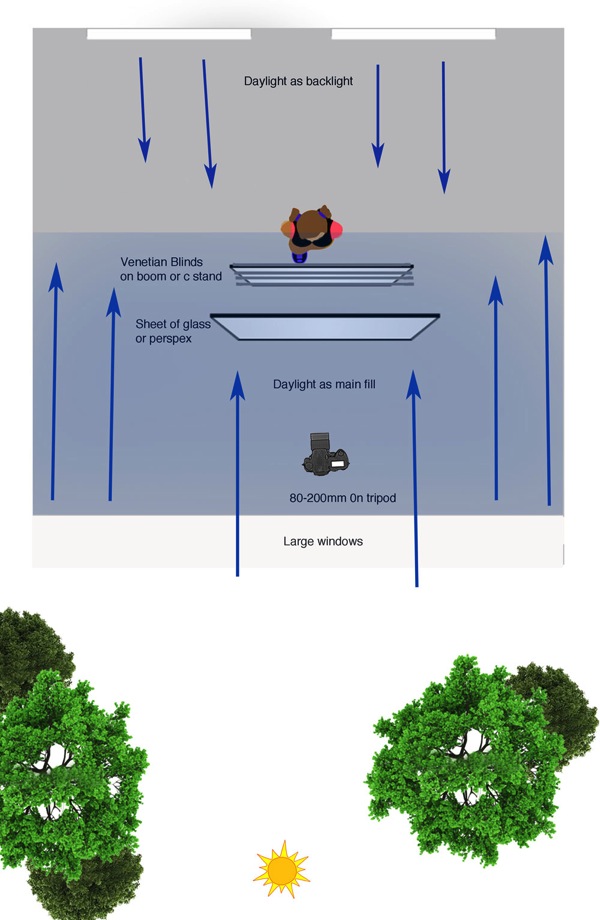
The lighting in this shot is very simple daylight coming in from a large window directly behind me.

The model is also backlit by two large windows directly behind her.

Window Diagram

Lighting diagram

Attach venetian blinds to your stand

Venetians 50

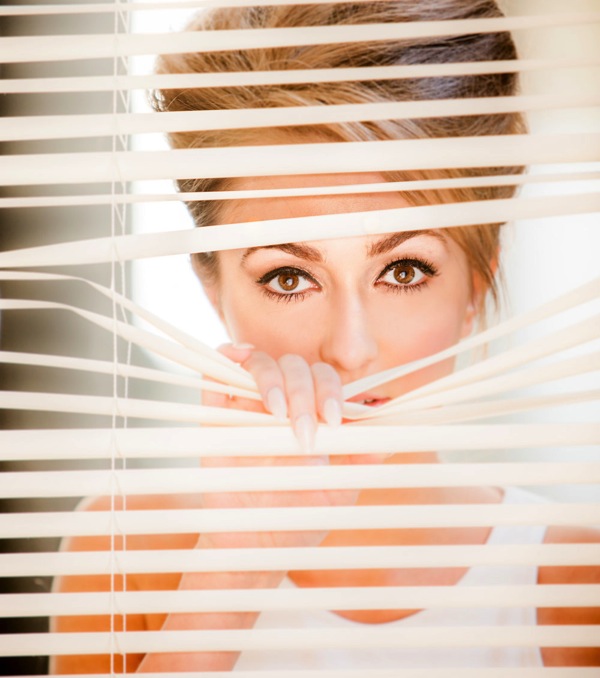
I positioned my model behind the venetians and then took a test shot to make sure my exposure was correct.

Venetian no glass 7

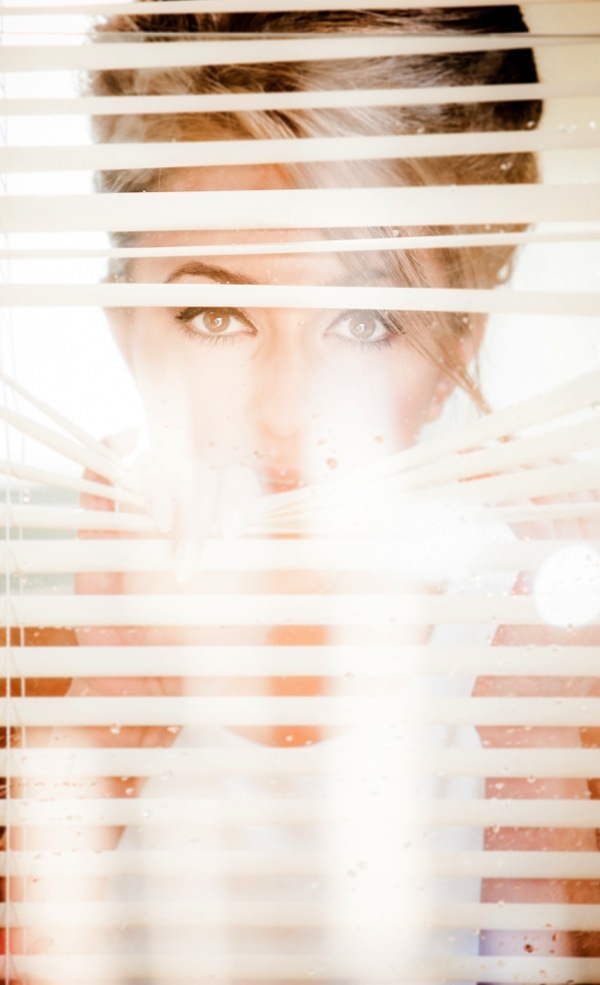
The Perspex is then held in front of the Venetian and tilted forward slightly to minimize reflections.

Flare 50

The style and type of reflections will vary depending on the location you shoot in.
I experimented by having the Perspex tilted at various angles. The example above has a slightly more mysterious vibe because the face is obscured by reflections.

Finally I introduced texture to the image by spraying water on the Perspex.

Final

The post Room with a View: How to Create this Window with Blinds Portrait Anywhere by Gina Milicia appeared first on Digital Photography School.


Digital Photography School

 
Comments Off on Room with a View: How to Create this Window with Blinds Portrait Anywhere

Posted in Photography


Posing 101: How to Pose in Pictures Like the Hottest Model Anywhere

18 Oct

In most of the photos that you see yourself in, whether candid or professional, there will always be a feature of them that you point out in dislike. Whether there are couple of lumps and bumps on show, the universally hated ‘double chin’, or that you believe that you’ve picked up two clothing sizes as soon as that shutter button Continue Reading

The post Posing 101: How to Pose in Pictures Like the Hottest Model Anywhere appeared first on Photodoto.


Photodoto

 
Comments Off on Posing 101: How to Pose in Pictures Like the Hottest Model Anywhere

Posted in Photography


Get an Invisible Black Background to Your Portraits – Shooting Anywhere [VIDEO]

14 Jun

In this video Glyn Dewis demonstrates how he gets his ‘Invisible Black Background’ effect when taking a portraits which will allow you to take a low key atmospheric portrait with a black background anywhere – even outdoors as he does in this video.

To get the shot Glyn just uses his DSLR, a single Speedlight Flash, a cheap umbrella and a PocketWizard to trigger the flash (although you can do this with any method of triggering a remote flash that you have).

Want to see some more examples of what can be done with this effect – check out Glyn’s blog posts on the topic here and here.

Post originally from: Digital Photography Tips.

Check out our more Photography Tips at Photography Tips for Beginners, Portrait Photography Tips and Wedding Photography Tips.

Get an Invisible Black Background to Your Portraits – Shooting Anywhere [VIDEO]


Digital Photography School

 
Comments Off on Get an Invisible Black Background to Your Portraits – Shooting Anywhere [VIDEO]

Posted in Photography