RSS
 

Posts Tagged ‘Anchor’

Review: Peak Design Anchor Links System for Camera Straps

02 Jul

I’ve had all sorts of camera straps and carrying implements over the years. From traditional neck straps that come with most cameras to sling-style attachments to simple wrist straps and even, on occasion, daring to go out into the world with no camera strap at all.

My main issue with most camera straps is that while a lot of them are designed for specific situations such as portraits, sports, travel, or hanging out with friends I haven’t yet found one that works for every occasion. That’s where the Peak Design Anchor Links system comes into the picture and solves this problem once and for all.

Mostly.

Review: Peak Design Anchor Links

The issue with camera straps

Choosing a camera strap feels more like a marriage than a dating relationship. Most aren’t easy to attach and remove without twisting some screws, threading some nylon through impossibly small holes, or making your fingernails bleed while wrestling with a key ring-style securement device.

As a result, when I buy a camera strap it usually stays on my camera permanently but often gets in the way when I want to take pictures in a scenario that the strap just wasn’t meant for.

Peak Design Anchor Links System – the solution?

The Peak Design Anchor Links system helps remedy this issue but in a bit of an odd way. Anchor Links don’t really do much on their own, and they’re not even camera straps at all.

What they are is a way for you to add a huge degree of flexibility to whatever you are currently using to help carry your cameras. They give you a great deal of choice and freedom when it comes to picking a strap that’s right for any given occasion.

Review: Peak Design Anchor Links - Fuji camera and a wrist strap

Sometimes I like to use wrist straps, and sometimes I prefer larger over-the-shoulder straps.

How it works

Using Peak’s Anchor Links is pretty simple and involves two basic parts: the strap loop and the connector. The strap loops are small red and black circular tabs with about an inch of cord sticking out. These are what you attach to things you want to carry. The most obvious items are cameras but you can use them on virtually anything that needs to be carted around from pouches to lens cases to accessory bags and more.

The anchors are small connectors that attach to your camera strap, wrist strap, shoulder handle, or anything that you use to actually carry around your gear. There is no special magic to these anchors. You just thread your existing camera strap through the slot on one end of an Anchor just like you would thread a strap through the attachment point on your camera.

It takes just about a minute to get up and running with the Anchor Link system and if you’re like me, you’ll soon wonder what you did without them.

Review: Peak Design Anchor Links - camera with a neck strap

It took less than 9 seconds for me to switch from a wrist strap to a neck strap thanks to the Peak Design Anchor Link system.

So what’s the big deal?

When I first got the Anchor Link system I didn’t really see what the big deal was. How could a set of anchors and connectors really help me with my photography?

What I realized over months of using this system, is that simply having the ability to attach and detach camera straps at a moment’s notice has freed me to focus on other things that really matter. These won’t help you get better photos, and won’t teach you about composition and lighting. But you might find yourself bringing your camera more places than usual simply because you have so much more flexibility with how you carry it.

When I’m out with my family I can clip a traditional neck strap on in about three seconds flat. If I need to go handheld I can attach a wrist strap in no time. Then when I want to move a strap from one camera to another, it’s done in mere moments.

On a recent maternity session, I was able to pack my cameras and lenses securely and put all my various straps in a separate bag. Way better than trying to wrestle everything into a single container while dealing with unwieldy lengths of padded nylon.

Review: Peak Design Anchor Links

Anchor Links can be attached to other items such as bags and pouches, or even key rings.

In the field

In terms of durability, I have had no issues whatsoever with the Anchor Link system and have trusted some very heavy camera/lens combinations to these tiny little cords without any problems. Peak Design claims each anchor link can support over 200lbs and while I don’t know if I would go that far personally, it is nice to know they’re rated for far more than my camera gear actually weighs.

It seems weird to trust a $ 20 attachment to hold a $ 4000 camera/lens combination, but it’s fair to say that the weakest link in the system would probably be whatever strap you are using and not these anchors.

Drawbacks

There are a few drawbacks to the system, namely that the more you use them the more you end up with button-sized anchor disks hanging from your camera gear. Also for some wrist straps, the attachment that secures to the anchor disk can seem a bit large. But I use the system daily with a wrist strap on my Fuji X100F and it has never been a major issue.

These are minor quibbles though, are almost not worth mentioning for something that is so immensely practical.

Review: Peak Design Anchor Links on a Fuji camera

The strap loops are small and don’t really get in the way, and Peak Design claims they are made out of a durable plastic that won’t scratch your cameras when hanging loose.

Conclusion

Finally, it’s worth mentioning that Peak Design has recently re-designed the system to be thinner and easier to use. I currently use the older system and they have never felt clunky or unwieldy, so I would imagine the revised version is just as good and probably even better.

Overall it’s hard not to recommend the Anchor Links to just about any photographer whether casual, professional or anywhere in between. A basic set with four anchor links and two attachments costs about $ 25 and can give you a huge amount of flexibility and freedom no matter what type of photography you do.

The post Review: Peak Design Anchor Links System for Camera Straps appeared first on Digital Photography School.

Digital Photography School

 
Comments Off on Review: Peak Design Anchor Links System for Camera Straps

Posted in Photography


Peak Design acknowledges flaw with its Anchor connectors, is offering free replacements

06 Jun

For the fourth time since Peak Design launched its first camera strap system, the San Francisco-based camera bag and accessory manufacturer is changing its Anchor connectors—the little pieces that attach to your gear and snap into its camera straps.

The change comes after Peak Design realized its third version of the dyneema Anchor connectors, which were originally made to accommodate a larger variety of camera systems with smaller eyelets, are prematurely wearing out and failing.

According to Peak Design, there have only been seven reported failures of Anchor connectors of the more than one million sold since August 2017. That means only one in every 17,000 customers have been affected. But Peak Design said that’s still too high of a failure rate.

As seen in the above comparison image, Peak Design is fixing the issue by making the Anchor connector cord thicker once again.

Peak Design says it’s notified all customers who’ve purchased version three of its Anchor connectors, be it standalone or in a package with a camera strap. If you’re afraid you missed the email or otherwise want to double-check, Peak Design has created an Anchor update survey to help you see if you qualify. Also, as of May 22nd, 2018, all camera straps purchased through Peak Design’s website will come with a free Anchor Update Kit. According to a post on its support page, Peak Design said ‘eventually’ all Peak Design camera straps will contain version four Anchor connectors.

Articles: Digital Photography Review (dpreview.com)

 
Comments Off on Peak Design acknowledges flaw with its Anchor connectors, is offering free replacements

Posted in Uncategorized


The Importance of an Anchor – Why Foreground Matters

13 Mar

Most everyone is familiar with the concept of an anchor in the nautical sense. The anchor keeps the vessel from drifting away, due to current or wind. It fixes the vessel to a certain position. While this is easily understood, fewer people are aware of the need for a similar concept in photography.

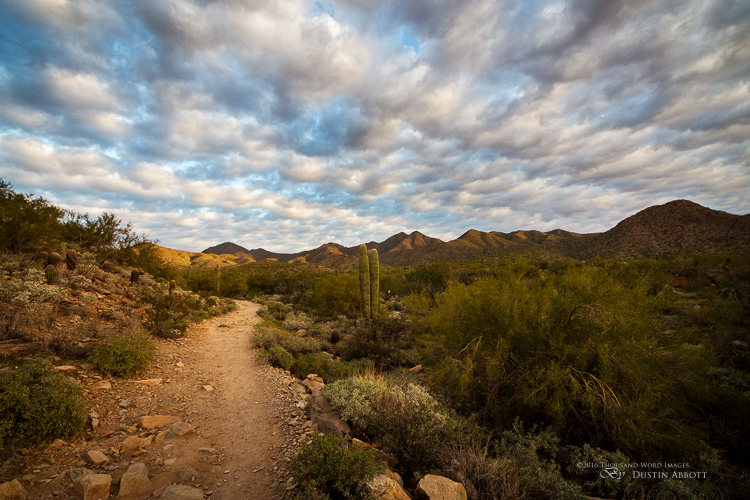
I enjoy using wide angle lenses for landscape photography, but I also recognize that a wider focal length brings additional compositional challenges. While a wide focal length can produce visually exciting images, it can also produce really boring, empty feeling images. The nature of wide angle lenses is that they create the feeling of space, of distance. That distance can really disconnect the viewer from your subject, if you are not careful. When using a wide focal length, it becomes incredibly important to anchor your image with a strong foreground.

Trailhead

The trailhead in the foreground of this image, leads you into the grander scene.

The nature of a wide angle means that it distorts the perspective of the objects, closest to the camera. There is a feeling of distance from your background, so the eye needs something closer to engage it, before moving on to the grander scene beyond. I’m sure you’ve seen visually stunning images of famous mountain ranges, sunsets, waterfalls, or wild natural scenes. I’m willing to be that your favorites all feature a small scale object in the foreground. Patterns in the ice or snow, wildflowers, rocks, or fallen autumn leaves. These serve as the visual anchors of the scene. Without them the image becomes much more boring, and far less grand.

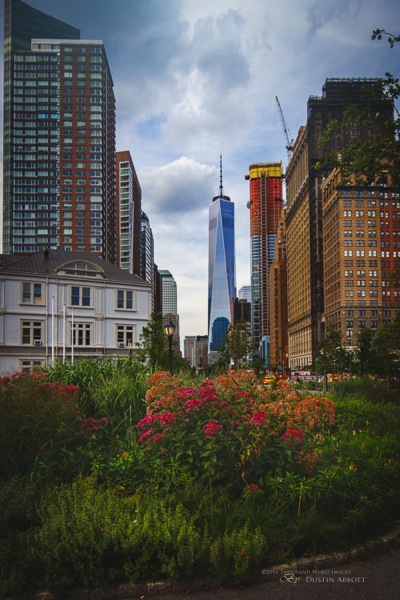
There are many beautiful places on our planet, but photography, much like everything else, is very trendy. It is rare that you have an opportunity to capture something that has never been photographed before. The challenge then, is to find a way to set your work apart from the crowd. Anchoring your image through something unique is one of the key ways to accomplish this. Take for example, the new One World Trade Center in New York City. It has an incredible amount of emotional capital invested in it, because of the events of September 11th, 2001. So, it’s been photographed hundreds of thousands of times already since its completion. I wanted something different, and I saw the opportunity while in Battery Park further up Manhattan Island. Green space is at a premium in the big city, so when I saw an opportunity to shoot the tower, with the anchor of some flowers in the park in the foreground, I jumped on it, and am happy to have a different perspective on a familiar sight (image below).

The City

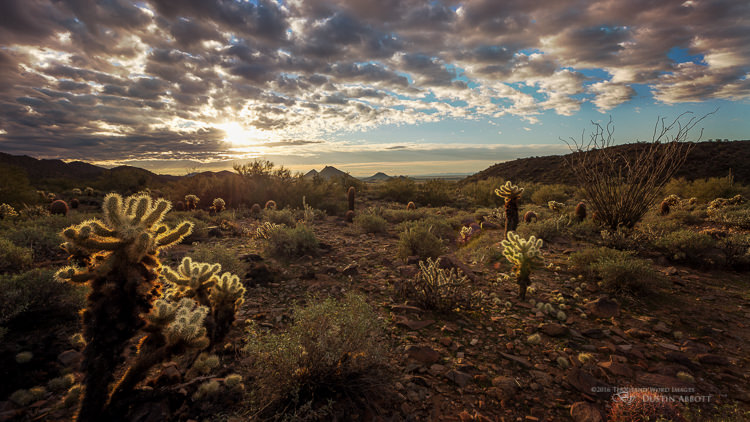
The sunrises and sunsets of Arizona, in the American Southwest, are breathtaking, but can be challenge to capture because of the scale of the wide open spaces. This particular morning brought a gorgeous sunrise with a great, nuanced sky. I composed with a 15mm lens that could capture a lot of the context, but to keep it visually interesting I got about as close as I could to a clump of cholla cacti, that was catching the directional morning light. That grabs your attention first, and as your eyes move on through the scene, you have a great sense of depth of the wide open space because you are already visually anchored to the scene.

Cholla

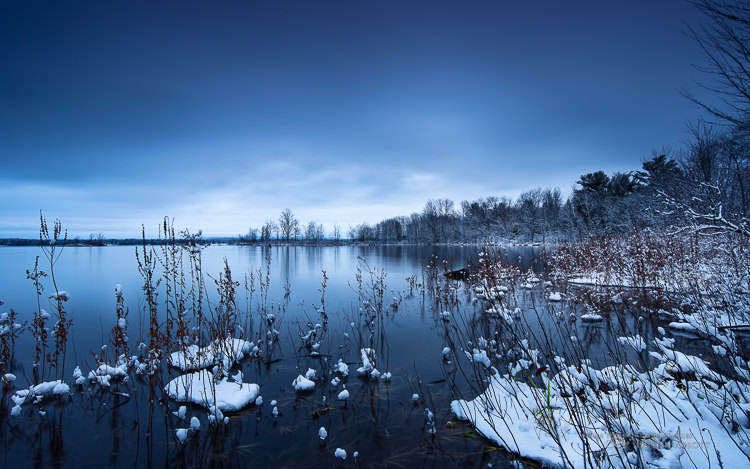
Here’s another example from Ontario, Canada. This was the first snow of the winter, and the rivers and lakes were still not frozen. I shot a long exposure, that has a lot of subtleties in the sky and vibrant blue, wintry tones. But it’s made special by the patches of snow, caught amongst the plants, on the water’s edge in the foreground. These anchor the image, and give depth to it, along with providing some bright points in an otherwise dark scene.

Snow

Your anchor can also help to lead you into the scene. In this snowy scene on a cold, clear, winter day, the footprints featured in the foreground help lead your eye through the scene below.

Snow Footprints

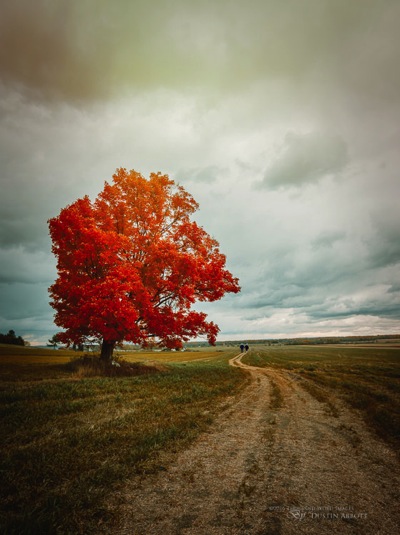
Finally, the path that anchors this beautiful autumn image, eventually leads you to the elderly couple walking hand in hand. The name of this image is “Seasons of Life”, and the use of the anchor to lead the eye through the scene has helped me tell a story, and provide some emotional resonance.

Path

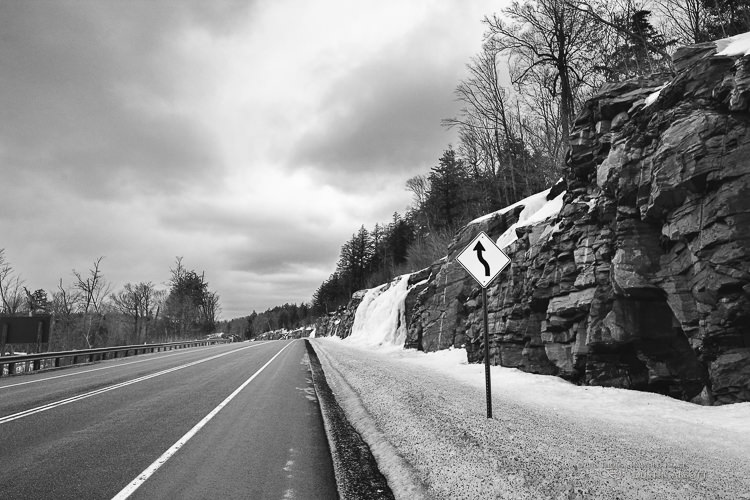
Another purpose of the anchor is to make a scene more visually engaging. Use the wide angle distortion to your advantage. I was driving through Ontario, Canada’s famous Algonquin Provincial Park, and noted the cool frozen cascades along the road. I wanted to include a road sign for more visual interest. Note how this first image, while not distorted, is not particularly interesting.

Less Interesting

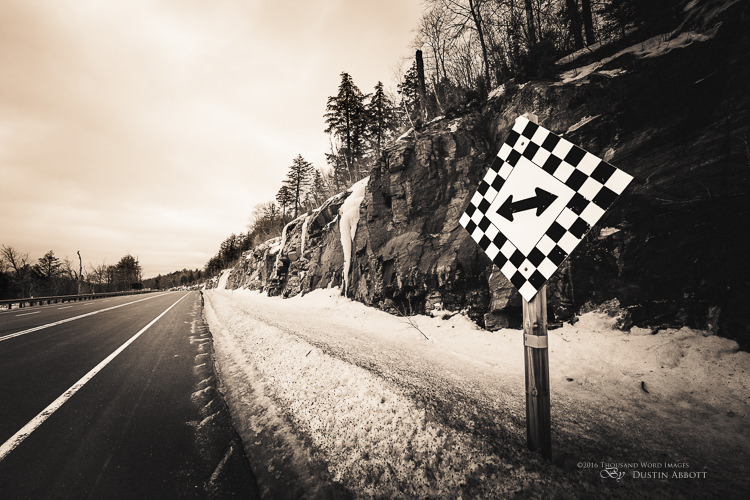
In this second image, however, I got close enough to this sign that the wide angle lens I was using, distorted it. Distortion sounds bad, but the end result here is a more visually interesting image, where the sign helps point the eye into the scene, where you can see the frozen cascades along the road.

Sign

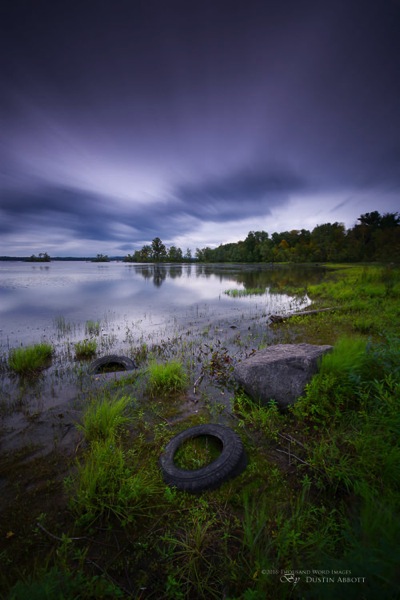
You can also use this to tell your story. I shot a visually lush scene, but wanted my anchor to tell the story of people “Dumping in Paradise”. By getting close to the old tire it becomes unnaturally prominent, but by shooting it with a wide angle lens I’m also able to give the larger context in one shot. I’ve suddenly got an image with a cause attached to it, because of the anchor. Shooting a closer shot of the tire stuck in mud wouldn’t have had the same visual impact.

Dumping in Paradise

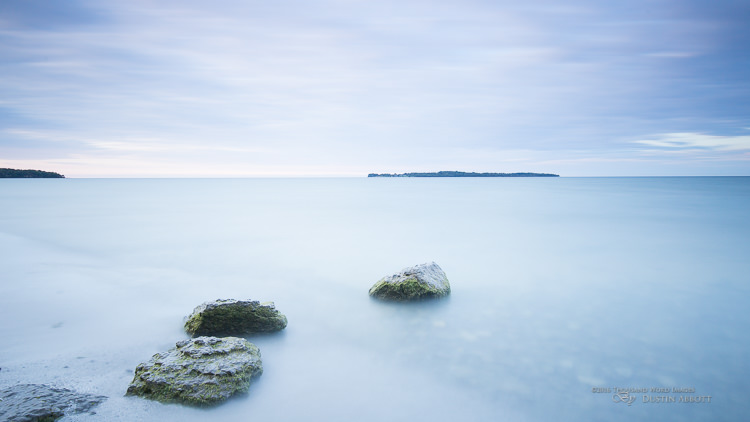
One final way that an anchor is important, is to prevent a scene from feeling empty. The way that long exposures blur water is very cool, of course, but this image would have felt very empty with nothing but blurred water. It would have lacked any true feature. But the foreground rocks that I’ve included in the composition, give the eye something to look at, and that in turn causes the brain to appreciate the image more as a whole. The rocks also point you toward the island in the distance, creating some tension between the little rocks in the foreground, and the big rock beyond.

Zen

These are but a few examples to help you understand the relationship between the foreground and background of an image. The foreground is your anchor, and without that anchor there is a good chance the image is going to, well, drift. A good anchor will help build strong, visually appealing images that will help to set your work apart – and isn’t that what we are all looking for?

Do you use anchors in your wide angle landscape photography? Share your ideas in the comments below.

googletag.cmd.push(function() {
tablet_slots.push( googletag.defineSlot( “/1005424/_dPSv4_tab-all-article-bottom_(300×250)”, [300, 250], “pb-ad-78623” ).addService( googletag.pubads() ) ); } );

googletag.cmd.push(function() {
mobile_slots.push( googletag.defineSlot( “/1005424/_dPSv4_mob-all-article-bottom_(300×250)”, [300, 250], “pb-ad-78158” ).addService( googletag.pubads() ) ); } );

The post The Importance of an Anchor – Why Foreground Matters by Dustin Abbott appeared first on Digital Photography School.

Digital Photography School

 
Comments Off on The Importance of an Anchor – Why Foreground Matters

Posted in Photography


How to Use Anchor Colours to Challenge Your Photographic Eye

24 Jan

It is a good thing to break from the norm once in a while, and do something different to challenge your personal photography. Limiting yourself to a few rules could help with this and encourages you to learn something new.

One new thing to try, is to use anchor colours in your photography. An anchor colour could be any colour that does one or more of the following:

  • Dominates the picture
  • Makes the picture interesting
  • Draws the viewer to explore elements in your picture in more depth
  • Emphasizes the subject of your picture

Set yourself a challenge. Perhaps on a family day out, ask your kids to choose a colour each, and get them to point out things with their colour choice for you to take photos of. This gets them involved in the activity, and at the same time challenges you to come up with a creative way to photograph the subject matter.

0dominantcolour

You can always decide on the colours yourself too, or ask a couple of friends to choose the colour for you, so it becomes more of a challenge, and there is no initial bias on your part. This will stretch your imagination and push you to look out for things you would otherwise not notice immediately.

You can limit yourself to one or two colours, and do a series on each colour, or you can choose many colours. However, make sure each picture you take only has one anchor colour in it.

It is important however, to add some limitations to this challenge, such as time, or location, or both. Take one day, or a few hours, to really focus your mind on anchor colours for this exercise, so there are boundaries and limitations to your options, which will force you to think and see more creatively than usual. The photos on this article were taken on a single day within a three or four hour span.

1fillframe1

Fill the frame

It is easy enough to find an object of the colour choice and snap a picture of it. But that doesn’t mean your picture comes out creative, or any better than the average snapshot. To further hone your photographic eye, make it your aim to capture interesting images, and use your anchor colour to enhance your image within this context.

Here are some tips on how to use anchor colour in an interesting way. With your anchor colour firmly in mind.

1 – Symmetry

Use symmetry, or asymmetry, be that with patterns, or arrangement of objects, to draw focus to your subject. Better yet break the rules and fill the frame with the subject matter.

6symmetry

Symmetry in action

5assymetry

Assymmetry in play

2fillframe3

Fill the frame

2 Rule of thirds

Use compositional elements like the rule of thirds, centred, and off-centred subjects. Adhering to the rule of thirds often gives a sense of balance to the picture, and is a very widely used composition practice. Centred compositions give an imposing and authoritative feeling to the picture. Sometimes it can take away any mystery from the image. Off-centred composition adds tension and can sometimes make for an unnerving image.

7ruleofthirds

9ruleofthirds2

3 – Crop creatively

Cropping creatively is a really fun tool that helps you engage with the viewer, or elicit some kind of a response from them. The main thing to remember when cropping an image of a person, is not to crop at the joints. Other than that use your visual and creative instinct.

10creativecrop1

11creativecrop2

4 – Leading lines and perspective

Even when the picture is full of colours, if you compose your picture so that the lines lead to the main colour you want to emphasize, or frame your picture so that the anchor colour is on the converging lines of the rule of thirds, then they will draw the eye and dominate the image.

13leadinglines1

14perspective

5 – Framing

Looking through an object so there is a foreground element to your picture – having a foreground frames your subject matter and directs focus to it. The foreground is closer to the camera, and therefore often appears blurry. This also creates a feeling that you are an indirect observer and evokes mystery, like you have just uncovered something new.

Finding a good foreground is as easy as standing behind an object, so that the object stands between you and the subject matter, or hold something up in front of the edges of your lens. I use this technique a lot when shooting portraits. You can use a leaf, a magazine, a piece of fabric – anything that you can hold just ever so slightly within your lens’ view to add a sense of looking through something.

15lookingthru

A really good thing to use is a prism or plastic jewel because that reflects light or flare onto the lens so you get a light effect too.

Have you used anchor colours in your images? Share them here in the comments below.

googletag.cmd.push(function() {
tablet_slots.push( googletag.defineSlot( “/1005424/_dPSv4_tab-all-article-bottom_(300×250)”, [300, 250], “pb-ad-78623” ).addService( googletag.pubads() ) ); } );

googletag.cmd.push(function() {
mobile_slots.push( googletag.defineSlot( “/1005424/_dPSv4_mob-all-article-bottom_(300×250)”, [300, 250], “pb-ad-78158” ).addService( googletag.pubads() ) ); } );

The post How to Use Anchor Colours to Challenge Your Photographic Eye by Lily Sawyer appeared first on Digital Photography School.

Digital Photography School

 
Comments Off on How to Use Anchor Colours to Challenge Your Photographic Eye

Posted in Photography