RSS
 

Posts Tagged ‘Alternative’

Free Lightroom alternative Darktable is now available on Windows

28 Dec

Free Lightroom alternative Darktable was recently updated to version 2.4.0, an update that is joined by a new milestone for the open source software: for the very first time, it has been ported to Windows. The Windows port is incomplete at the moment, lacking a few features like printing support, but the team said in a blog post that, “we are confident that it’s quite usable already and hope you will enjoy it.”

Darktable is an open source “virtual lighttable and darkroom for photographers,” and one that frequently pops up on “free Adobe alternative” lists online; however, until now, it had only been available for Linux and Mac. Version 2.4 brings numerous changes and some new features, including: tweaks to design elements, support for the basic import of Lightroom 7 settings, removal of the 51200 ISO limit, some usability improvements such as the ability to make new module instances using the middle mouse button, and a new haze removal module (among others).

The update also applies numerous bug fixes, adds new camera, noise profiles, and white balance preset support, changes some dependencies, and adds new software translations.

As for the Windows port, Darktable says this version currently has “a few limitations,” such as needing special drivers to tether. It also has some bugs, one of which is apparently a lack of non-ASCII character file name support when exporting and importing TIFF files. Still, the Windows version gives PC users something to play around with until the next update… and the one after that. Before long, Darktable for Windows might become a very popular Adobe alternative that will cost you 0 dollars and 0 cents.

Darktable 2.4.0 can be downloaded now from GitHub. The full version changelog can be found in the team’s announcement post.

Articles: Digital Photography Review (dpreview.com)

 
Comments Off on Free Lightroom alternative Darktable is now available on Windows

Posted in Uncategorized


AI-powered Pholio hard drive is an offline alternative to Google Photos

19 Oct

If you feel uncomfortable with your images being stored on cloud servers the Pholio device is a new offline alternative that offers many of the features we are used to from cloud services like Google Photos.

Once connected to a PC, Mac, tablet or smartphone, Pholio automatically searches through the device storage and backs up all images and videos, either at full size or smaller ‘optimized’ versions. If you choose the latter Pholio provides a link to the full size-version.

Pholio comes as a standard version with a 500GB capacity or as a ‘Pro’ variant that offers 2TB of storage. 20,000 built-in descriptors allow for automatic tagging and easy searching, but the system is capable of learning if you want to add your own keywords. Face detection allows to find images and create albums for a specific person and the software is even capable of finding still shots within a video clip. The Pholio makers say an update will expand the backup services and include encryption.

You can now reserve a 500GB Pholio by pledging £200 (approximately $ 260) on the project’s Kickstarter page. If the funding goal is reached delivery is expected for January 2018.

Articles: Digital Photography Review (dpreview.com)

 
Comments Off on AI-powered Pholio hard drive is an offline alternative to Google Photos

Posted in Uncategorized


Photo Editing Alternative – An Overview of ACDSee Ultimate 10

07 Jul

As more and more people take up digital photography and want to get started editing, many are asking the question, are Adobe’s Lightroom and Photoshop my only options? ­­­At ACD Systems, they have their own editing software called ACDSee Ultimate 10, which allows you to do many of the same functions as the former.

Adobe’s subscription model—membership and monthly payments—is a big turn off to many, particularly because if the price becomes too high, it will become unattainable, and then they will be left with nothing. We have already seen some price hikes recently. ACDSee Ultimate 10 could be perfect for those looking for an alternative to what Adobe offers.

ACDSee Ultimate 10

Starting Up ACDSee Ultimate 10

Without a doubt, you will scratch your head as you try to work out how to do things in ACDSee Ultimate 10, but this can be said for any new software you try. If you have used Lightroom, then much of it should be easy to work out, and there are a lot of similarities. If you have not used it or any other photo editing programs, then you will find a wide range of videos on their website to take you through how to use ACDSee Ultimate 10 and understand it.

One of the biggest problems with Lightroom is how you must import your photos into it. With Ultimate 10, there is no need to import your photos as they are read directly off of your hard drive and displayed in the exact same folder structure you see in Windows Explorer (or Mac Finder). This saves you one step altogether, however, there is also an import function available, which you can use to apply some batch functions, such as renaming while extracting the photos off of your device.

ACDSee Ultimate 10

What Manage Mode first looks like when you open ACDSee Ultimate 10.

Parametric Processing

As you work your way through the videos, you will hear a lot about parametric processing. If you are like me, you have never heard the term before. It is another way of saying non-destructive, or in easy terms, you can save all your layers so you can go back to it and work on it some more, later.

Using ACDSee Ultimate 10

There are obvious differences between ACDSee Ultimate 10 and Lightroom, but you are also going to find a lot that is similar—perhaps even better. When you open it up, you can see in the top right corner the different modes that are available: Manage, Photos, View, Develop, and Edit. We will take a look at each mode and see how they compare with Lightroom and a little of Photoshop.

It is fair to say that Photoshop does offer a lot more than this program. However, as many people prefer using Lightroom, this could be a really good alternative for them. You can certainly do all the same edits that you can do with Lightroom. However, it’s when you start getting into the more advanced image manipulating where you would normally use Photoshop that you may find limitations withACDSee Ultimate 10.

See a feature comparison between Lightroom and ACDSee Ultimate here.

Manage Mode

The Manage Mode is very similar to the first window you find when you open Lightroom, the Library Module. On the left, you see a column with all of the folders on your computer. It displays the folder structure you have on your hard drive, so there is no searching through unfamiliar territory. The way Lightroom does this can be confusing and it can be hard to find directories.

ACDSee Ultimate 10 - manage mode

Taking a look around to see what is in Manage Mode.

Underneath the above, you will find details about the selected image, such as the camera model, the size of the image, and what your settings were. Then under that, you will find a histogram of the image.

The middle section is where you see the contents of the selected folder and any subdirectories that may be in it. Each thumbnail indicates what type of file it is, RAW, PSD, etc. It is still possible to put ratings and labels and such on your images. There are categories and keywords that Lightroom users will be familiar with, which can be used the same way in Ultimate 10. This section works like a proofing sheet, which allows you to see all of the images in the folder.

In Lightroom, you can get a preview of the image by pressing the spacebar, however, in Ultimate 10 you use View mode to get a larger view of your images. To get there you can double click or press enter with the desired image selected. In the right-hand column, all the EXIF data that is available in the image is found there. There is the same additional information that you find available in Lightroom.

Photos Mode

In this mode, you will get a small preview of every image that you have on your computer. It is almost like a list, in order. The images will be sorted by the date they were taken, and you can do rearrange to sort by day, month, or year. It is a great way to help you find photos when you can’t remember where you put them, especially if you’re like me and don’t use categories or keywords.

04-leannecole-acdsee-software-review

How Photo Mode appears.

In Lightroom, you could only do this with the photos that you have imported. In Ultimate 10, it doesn’t matter; it will show every image that is on your computer.

View Mode

In View Mode, you will get a larger view of the selected image. Underneath the image, there is a filmstrip with all the photos in the selected folder so that you can navigate between them. There are also some basic functions you can apply to the image if you want to make some changes. However, this mode is more for viewing your photos and figuring out which ones you might want to work on.

ACDSee Ultimate 10

Opening View Mode.

In this mode, you can add ratings, labels, and set your categories. To rate an image, click Ctrl/Cmd plus the number you want to assign to it, or to label an image press Alt/Option then the number according to the color you want to apply. You can do many other things to the image as well. There is a small menu on the left just above the filmstrip, or you can right-click on the image to get options as well.

06-leannecole-acdsee-software-review

Some of the functions you can do in View Mode.

Develop Mode

This is the mode that seems to most resemble Lightroom and is your workspace. It is laid out differently and you will find all the adjustments in the left-hand column. Many of them are the same, though to get to each of the sections you will find these modes; Tune, Detail, Geometry, and Repair near the top that you click for various adjustments. Each one of those modes have different tools you can use to make the various changes to your images.

ACDSee Ultimate 10

Opening an image in Develop Mode.

A lot of the processes are set out differently, but they often have the same names. There are titles for each one which, like Lightroom, are menus and when you click on them new adjustments can be accessed. The plus sign means it is closed and when it’s opened, it turns into to a minus sign.

ACDSee Ultimate 10

Looking around Develop Mode and the Tune Mode.

ACDSee Ultimate 10

What is available in Detail Mode.

ACDSee Ultimate 10

What you can do in Geometry Mode.

ACDSee Ultimate 10

A quick look at Repair Mode.

Develop Presets

In ACDSee Ultimate 10, you can save your develop settings as presets, either globally by mode (Tune, Detail, Geometry, Repair) or by tool group.  You can then apply saved presets to a single image, or a batch of images in Manage Mode.

Develop Brush, Linear Gradient, and Radial Gradient

These three tools similar to Lightroom’s Adjustment Brush, Graduated Filter, and Radial Filter. They can seem a little strange at first if you are used to Lightroom. The Develop Brush doesn’t have an erase button, so how do you remove the parts you did by mistake? By right clicking and going over the part you no longer want. This is actually much better, and makes your workflow much faster.

In Lightroom, when you want to use the Graduated and Radial filters, you click on them and then draw a line on your image. With Ultimate 10, once you click the Gradient button, the Gradient will appear on your image, and then you move it, enlarge or shrink it, or rotate it to where you want. There are specific places on the gradient to do that. The cross in the middle is used to move it, the hook from the cross rotates it, and the squares on the dotted lines are used to resize it. It is different but doesn’t take long to get used to. If you want more than one gradient, you will find a section with the icon and a blank square above it. To apply another brush, just enable the next checkbox.

ACDSee Ultimate 10

How the Graduated Filter works.

ACDSee Ultimate 10

How the Radial Filter works.

To make them disappear once you are done, click on the icon for the tool and the program will unselect it.

Edit Mode

Edit Mode is very similar to Photoshop, however, again, it is set out a bit differently. In this mode, you can do a lot of fine-tuning. You can use layers and make adjustments.

The tools are along the top under the menu bar, and the edits that are available are down the left side. On the right, you will find your layers panel, and the layered adjustments are down the bottom of that panel. Underneath those, you will find where you can add new layers, masks, or duplicate layers.

ACDSee Ultimate 10

Opening up into Edit Mode.

When you have different layers, you will also find the rubbish (trash) button will appear there. Highlight the layer you want to delete, and press the button. Though you could simply press delete on your keyboard as well.

The feathering option is different and you don’t set how much you want to feather until you have added the mask. You press the mask button and the settings for it will appear at the bottom of the layers panel.

ACDSee Ultimate 10

Adding layers in Edit Mode.

Edit Presets/Actions

While you can also save presets in Edit mode, perhaps even more useful is the tool they developed to address the general limitations of batch editing. ACDSee Actions allow you to “record” any and all adjustments you make in Edit mode, and then to apply them to other images, (individually or to a batch), by “playing” them back (like Actions in Photoshop). It’s as simple as pressing a Record button before you start editing, pressing Stop when you’re done, and then choosing a name to save the action under.

If you forgot to begin recording before you started editing, you can simply use the Undo button, press Record, and then press the Redo button. You can even preview the effect that an action is going to have on an image before applying it. This really speeds things up and ensures that you can apply anything in a batch.

ACDSee Ultimate 10

Using Actions.

Overall Impressions of ACDSee Ultimate 10

Without a doubt, ACDSee Ultimate 10 is a good alternative to Lightroom. It has a lot of similar functions, and many of the things that you do in the first, you can do in the second. How you use it is always going to be different and finding your way around the settings and functions will take time, but that is the same with any software.

If you are someone that doesn’t use Photoshop but you would like to start working with layers, then Ultimate 10 could be a good way to start.

ACDSee Ultimate 10

The final image.

Owning or Renting

With the latest release of Lightroom, everyone was told that it would be the final one that you would be able to buy outright. All future releases will come under the Creative Cloud subscription plans. This has made a lot of people nervous. Meanwhile, many are frustrated that while they have purchased it, there are still functions that are only available if you subscribe to Adobe.

At ACD Systems, they understand this frustration, and you can buy all their products so you own them. Or, if you want the benefit of getting updates and having the latest version, you can also subscribe. The choice is yours.

If you are unsure of what to do, their Live Chat is available, along with email and phone numbers for you to call as well. To take a look at the Ultimate 10 follow this link, ACDSee Ultimate 10.

ACDSee Ultimate 10

A quick look at the website where you can find videos.

Finally

ACDSee Ultimate 10 is a great program for anyone who wants to get into photo editing. While there is a learning curve, that is true for any other editing software that is available. For most photographers, Ultimate 10 will have everything they need to do the image adjustments they would like. Give it a try and tell us what you think.

Disclaimer: ACD Systems is a paid partner of dPS

The post Photo Editing Alternative – An Overview of ACDSee Ultimate 10 by Leanne Cole appeared first on Digital Photography School.


Digital Photography School

 
Comments Off on Photo Editing Alternative – An Overview of ACDSee Ultimate 10

Posted in Photography


CamFi is an alternative wireless controller for your Nikon or Canon DSLR

05 Jan

CamFi is a new option for those photographers looking to control their Nikon or Canon DSLR wirelessly. The device mounts on the hot shoe of compatible DSLRs and creates a Wi-Fi network that you can connect to using a PC or Mac as well as Android and iOS mobile devices. At $ 130 CamFi is priced well below manufacturer-provided options for high-end DSLRs. Read more

Articles: Digital Photography Review (dpreview.com)

 
Comments Off on CamFi is an alternative wireless controller for your Nikon or Canon DSLR

Posted in Uncategorized


Photoshop alternative Affinity Photo now available in Mac App Store

10 Jul

In February, Serif launched a beta version of its image editing application Affinity Photo. The software is a Photoshop alternative designed specifically for Mac OS X, and the beta has been updated several times since the February launch. Serif has just taken the software out of beta and officially launched it in the Mac App Store. Read more

Articles: Digital Photography Review (dpreview.com)

 
Comments Off on Photoshop alternative Affinity Photo now available in Mac App Store

Posted in Uncategorized


Serif launches Affinity Photo, a Photoshop alternative for Mac

11 Feb

Serif has launched Affinity Photo software, an alternative to Adobe Photoshop for Mac users. The company touches on a couple different notable selling points: its software is considerably cheaper than Photoshop, but no less robust, and comes with the added benefit of silky-smooth operation, at least according to its maker. Additionally, because it is newly created for the latest hardware, Serif says Affinity Photo offers performance that Photoshop struggles to match. Read more

Articles: Digital Photography Review (dpreview.com)

 
Comments Off on Serif launches Affinity Photo, a Photoshop alternative for Mac

Posted in Uncategorized


Is ‘Leonardo’ a Photoshop alternative for mobile?

08 Aug

TS250x0~cms_posts-2880506722-histogram_photo.PNG

The recently-launched Leonardo is a full-featured image-editing app for iOS that offers tools you won’t find on too many other comparable apps. Containing options familiar from high-end PC applications like Photoshop, Leonardo allows you to make selections using lasso and ‘magic wand’ tools, and create layer masks, gradients and much more. For more details head over to our sister site connect.dpreview.com. 

News: Digital Photography Review (dpreview.com)

 
Comments Off on Is ‘Leonardo’ a Photoshop alternative for mobile?

Posted in Uncategorized


An Alternative Rule-of-Thirds

25 Jun

An alternative rule-of-thirds

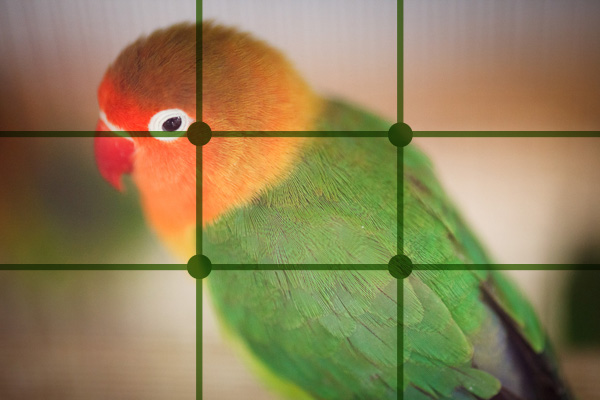
Most of you will be familiar with the rule-of-thirds: the idea that you can improve composition by placing the main subject a third of the way in from the side of the frame. For those of you who haven’t heard of this, here’s a diagram showing how it works:

An alternative rule-of-thirds

The lines show the ‘thirds’. The four points where the thirds intersect are said to be good spots to position the most important parts of the image. In this photo, the bird’s eye is close to one of the intersecting points, and we can say it is composed according to the traditional rule-of-thirds.

Regardless of how much faith you place in the rule-of-thirds (there are plenty of photographers who will tell you that it is nonsense), subject placement is only part of the story when it comes to composition and creating strong images. One danger with concepts like the rule-of-thirds is that you might fail to look beyond its application towards the other factors that contribute to the creation of successful images.

Alternative #1

I rather like Cole Thompson’s version of the rule-of-thirds:

“A great image is comprised of 1/3 vision, 1/3 the shot and 1/3 processing.”

What does this mean, exactly? Statements like this are open to interpretation, but here’s my take:

Vision: This is an understanding of the fundamentals of composition, combined with an appreciation of beautiful light and an eye for an interesting subject. These come together along with world view and the sum of the photographer’s life experiences to form a personal style and a way of visually interpreting the world.

The Shot: This is where Henri Cartier-Bresson’s ‘decisive moment’ and the photographer’s craft skills come together to capture an image that realises the photographer’s creative vision. It’s where the technical and creative sides of photography meet. You have vision and style on one hand, and the technical knowledge required to achieve that vision on the other. It’s about understanding which focal length lens to use, which aperture, ISO and shutter speed settings are required, how to obtain the optimum exposure and so on.

Processing: This is the work you do on your images in post-processing. It’s where you take the original Raw file and adjust the colour, contrast and tonal values to create a finished image that expresses what your creative eye originally saw. Post-processing has taken the place of traditional darkroom work and printing skills for many photographers

I encourage you to read Cole’s article on this topic. You might also like to read an interview I carried out with Cole last year.

Alternative #2

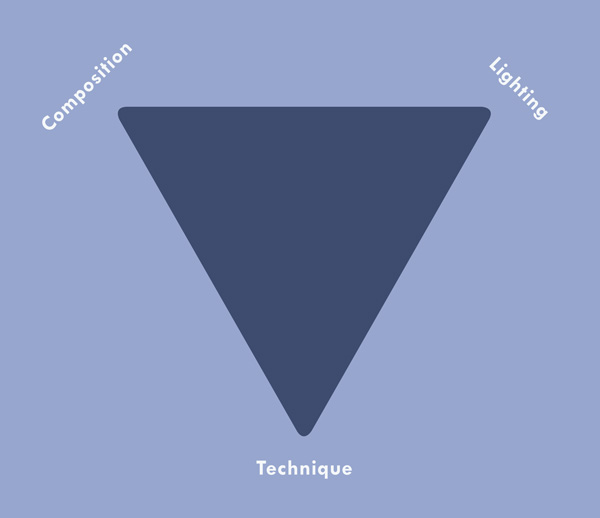
I have my own version of the rule-of-thirds, though I tend to present it in the form of a triangle:

An alternative rule-of-thirds

Let’s paraphrase Cole:

“A great image is comprised of 1/3 composition, 1/3 lighting and 1/3 technique.”

Composition: This is understanding the best way to arrange the elements of the scene within the frame to produce a pleasing result. It goes beyond the rule-of-thirds and includes concepts such as tonal contrast, colour contrast, simplicity, negative space and use of line (I’ll go into these topics in depth in future articles).

Lighting: Great photographers demand beautiful light. Anything less than that is a compromise. If something is worth photographing, it is worth doing so when the light is at its most beautiful. There are exceptions (photojournalists can hardly ask their subjects to return when the light is better, for example) but it’s a principle I place high value on.

Technique: This is the craft side of photography. It’s knowing which lens to use, which aperture to set, how to obtain the optimum exposure and how to process your Raw files to get the best possible results. This is the technical side of the craft. It may seem complex at times but it’s essential to master.

Putting it all together

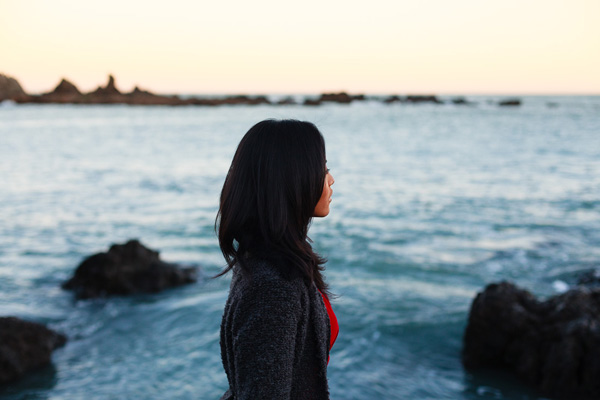
Let’s take a fresh look at the opening photo and see how these ideas tie together:

An alternative rule-of-thirds

Vision: I wanted to take a portrait of a friend of mine looking out to sea at sunset. I’m familiar with the location as it’s close to my home and I’ve visited it many times. This was the starting concept for the image.

The Shot: I directed my model to look out to sea and used an 85mm lens with the aperture set to f2.8 to defocus the background.

The Processing: I used a warm colour temperature to capture the rich tones of the setting sun and darkened the edges to guide the viewer’s eye towards my model.

Composition: The horizon line is placed on a third and my model is more or less central. This composition ‘felt’ right to me – I often operate on instinct rather than try and place my subject in a specific part of the frame, such as a third. The dark rocks either side of my model provide balance.

Lighting: We shot close to sunset to capture the deep warm colours of the late afternoon sun. Light is essential to the ‘feel’ of the photo. If we had shot earlier in the day, the mood would have been very different.

Technique: I used a portrait lens set to a wide aperture to throw the background out of focus. I deliberately used natural light, rather than portable flash, to create ambience.

Mastering Photography

An alternative rule-of-thirds

My latest ebook, Mastering Photography: A Beginner’s Guide to Using Digital Cameras discusses the creative triangle and other concepts in more detail.

Post originally from: Digital Photography Tips.

Check out our more Photography Tips at Photography Tips for Beginners, Portrait Photography Tips and Wedding Photography Tips.

An Alternative Rule-of-Thirds


Digital Photography School

 
Comments Off on An Alternative Rule-of-Thirds

Posted in Photography


Alternative Landmarks: 12 Monuments As They Almost Were

20 May

[ By Steph in Architecture & Public & Institutional. ]


Alternative Monuments Main

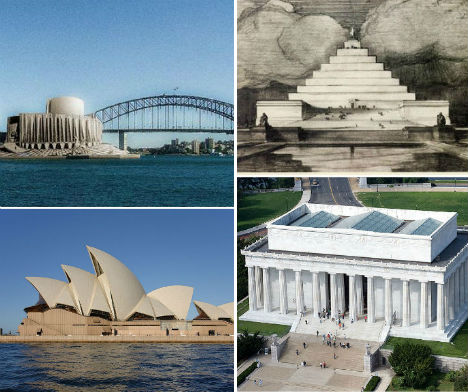
The Sydney Opera House might have been little more than a squat concrete building resembling a factory, and a visit to the statue of Abraham Lincoln at the Lincoln Memorial could have required scaling a massive stepped pyramid. Ranging from close second-place finishes in design competitions to proposals that were little more than pipe dreams, these alternative designs for 12 major iconic landmarks around the world represent radical departures from the monuments we’re accustomed to.

Sydney Opera House

Alternative Monuments Sydney Opera House

(images via: new world wonders, wikimedia commons)

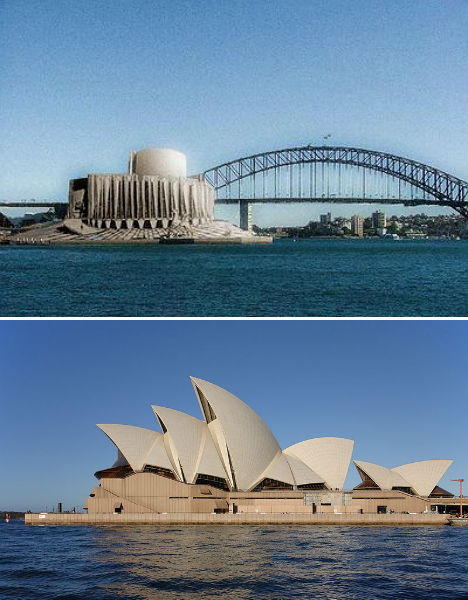
The Sydney Opera House is one of the most recognizable buildings in the world, with a dramatic series of vaults rising from the ground along Sydney Harbour. But Danish architect Jørn Utzon’s now-iconic design was controversial when it was first proposed in 1957, and the design that came in second place may have been more palatable to the public. American architect Joseph Marzella’s design was rather industrial in its appearance, but didn’t seem quite so out there.  It’s hard to imagine the magnificent performing arts venue looking so squat and dull.

Triumphal Elephant in Place of Paris’ Arc de Triomphe

Alternative Monuments elephant 2

Alternative Monuments Arc de Triomphe Real

Alternative Monuments Elephant 1

(images via: wikimedia commons)

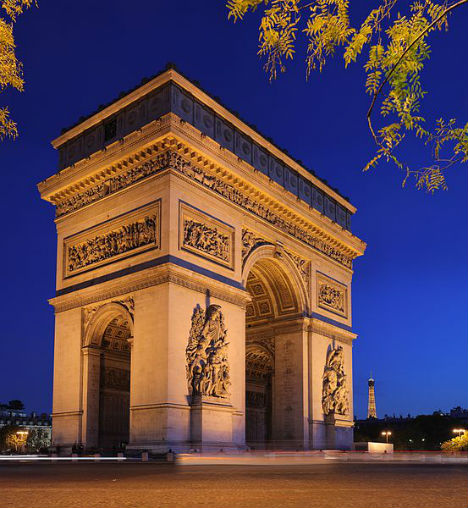
In place of one of Paris’ most famous monuments, the Arc de Triomphe, could have been a three-story elephant monument with a spiral staircase in the underbelly leading to the pinnacle. 18th century architect Charles Ribart offered this monument for the Champs Élysées, complete with a cross-sectional drawing showing the intricate rooms within, but was turned down by the French government.

This isn’t even the only massive, ridiculous elephant statue envisioned for Paris. Originally conceived by Napoleon, the imposing Elephant of the Bastille (third photo) was meant to be cast of bronze and placed in Paris’ Place de la Bastille on the site of the old Bastille prison, which was the birthplace of the French Revolution. A stairway set into the legs would give access to the top, and the base would be surrounded by a fountain. However, only a plaster model was built, as memorialized by Victor Hugo in the novel Les Miserables, and eventually the July Column took its place.

Unbuilt Design for the Golden Gate Bridge

Alternative Monuments Golden Gate Bridge

(images via: pbs newshour, wikimedia commons)

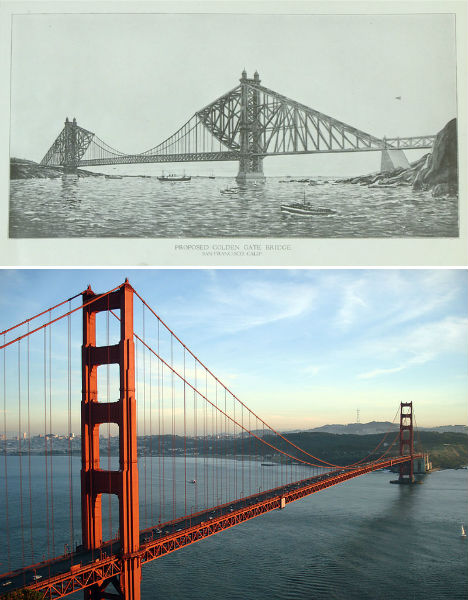
Now 76 years old, the Golden Gate Bridge is an iconic symbol of San Francisco, coated in literally millions of gallons of orange paint. The Art Deco-style bridge is one of the longest suspension bridges in the world, beating many experts’ predictions that it wouldn’t last against gale-force winds in the straight where the San Francisco Bay opens to the Pacific Ocean. But this wasn’t engineer Joseph Strauss’ first design. The original proposal is markedly different, with a heavier look combining cantilevered and suspension designs. It was rejected by the planning committee.

Lincoln Memorial Pyramid

Alternative Monuments Lincoln Memorial

(images via: i own the world, wikimedia commons)

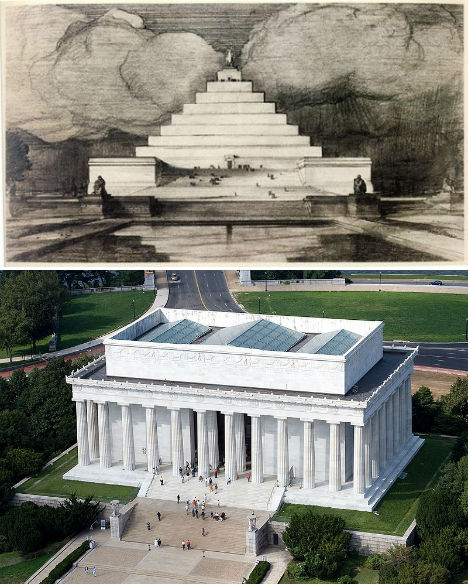
Highlighted at Unbuilt Washington, an exhibition at the National Building Museum in Washington D.C., John Russell Pope’s Lincoln Memorial Proposal replaces the columned rectangular building honoring the 16th president with a pyramid. Anyone who wanted to get up close to Abraham Lincoln’s statue would have had to climb that entire thing to reach it. Some historians believe that this proposal was ridiculous on purpose; Pope wasn’t a fan of the swampy location chosen for the memorial, and may have created this and other absurd designs in an effort to encourage the committee to seek a new setting. Pope went on to successfully design the Jefferson Memorial.

Pyramid Necropolis for London’s Primrose Hill

Alternative Monuments Primrose Hill Necropolis

Alternative Monuments Primrose Hill Real

(images via: andrew gough, wikimedia commons)

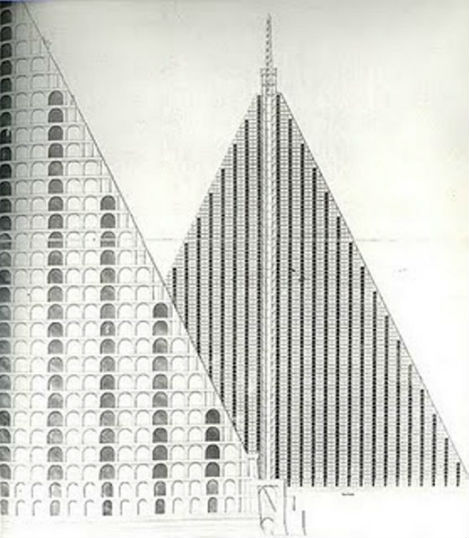
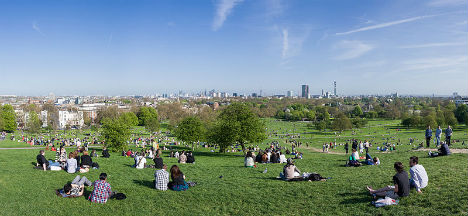
Infused in the Victorian preoccupation with melancholy and inspired by the Egyptian spoils of traveler and tomb-raider Giovanni Battista Belzoni, London architect Thomas Wilson proposed a massive, 15-acre pyramid-shaped necropolis for the city’s Primrose Hill. The granite pyramid would have towered into the air with 94 tiers of tombs in honeycomb shapes and a base measuring 18 acres, casting a gargantuan shadow over the hill many Londoners use for picnics and looking out over the city. Churchyards were so crowded at the time, that graves were bursting out of the ground – but concerns about what to do with London’s dead weren’t enough to convince the public that a necropolis was a good idea.

White House Alterations for President Harrison

Alternative Monuments White House

Alternative Monuments White House Real

(images via: loc.gov, wikimedia commons)

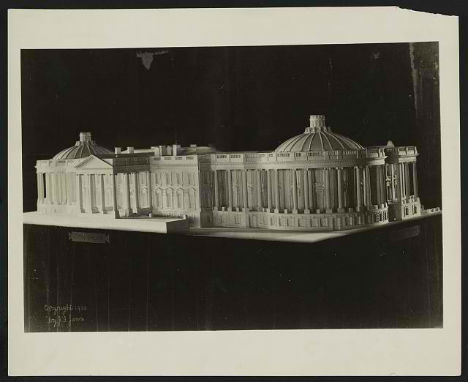
While he’s not nearly as forgettable as his grandfather, ninth United States President William Henry Harrison – who died after just 32 days in office – many Americans will struggle to recall any of twenty-third President Benjamin Harrison’s achievements during his tenure in the White House. However, Harrison could have made quite a mark. The first President to reside in the White House after it was wired for electricity, Harrison and his First Lady, Caroline Harrison, proposed significant changes to the complex that were never carried out. However, ten years later, Theodore Roosevelt made plenty of changes of his own, including the addition of the West Wing.

Next Page:
Alternative Landmarks 12 Monuments As They Almost Were

Share on Facebook


[ By Steph in Architecture & Public & Institutional. ]

[ WebUrbanist | Archives | Galleries | Privacy | TOS ]


WebUrbanist

 
Comments Off on Alternative Landmarks: 12 Monuments As They Almost Were

Posted in Creativity


GIMP: Free Alternative to Photoshop

20 May

Hello, this is Blue Steel of Pollyticks.com. GIMP is a great open source program to edit and retouch your digital photos and other images, but the key thing to remember is that it’s completely free. In features it compares well to the pricetag Adobe sticks on Photoshop Elements 5.0. In this beginner’s hands-on look at GIMP, I highlight some of its features and walk you through retouching a digital photo. I use GIMP, along with other programs like ComicLife and Flash, to produce the political cartoons and artwork on Pollyticks.com. www.pollyticks.com
Video Rating: 4 / 5