RSS
 

Posts Tagged ‘Advantages’

Landscape photography with a drone: the advantages – part 3

06 Oct

In the previous articles in this series, I elaborated about the advantages of the drone, specifically that the drone offers more compositional opportunities, is cheap to run, portable, available anywhere and able to hover in place.

In this article I’d like to conclude the discussion of the drone’s advantages by mentioning its ability to hover in place and its most fun facet: its fearlessness in the face of danger.

Ability to hover

The ability to effortlessly hover in place is unique to the drone. True, good helicopter pilots can hover efficiently, but neither with the same GPS-controlled accuracy as the drone, nor with its ability to go near the subject. In terms of stability, a drone can only be compared to a tripod in the sky, which in turn means that it allows three things: relatively long exposures, parking abilities and immaculate precision.

Long exposures can be useful when the photographer wants to convey a sense of motion in an image. For example, an exposure of half a second or more can smear moving water, creating pleasing lines and a clear feel in an image. Under sufficiently still weather, a modern drone can shoot sharp images at half a second, a second or even more. Multiple attempts can result in a sharp shot even when shooting a several second long exposure – an unprecedented achievement for any aerial shooing (that doesn’t use a heavy, expensive gyro-stabilizer).

A long exposure of Fossa waterfall, Faroe Islands. If I had an ND filter handy, I could’ve extended the exposure even more.
DJI Mavic II Pro, 1/2 sec, F11, ISO 100.

I’ll explain and demonstrate what I mean by ‘parking abilities’ with an image I took earlier this year. I was shooting the total solar eclipse over lake Cuesta Del Viento, in the San Juan province of Argentina. Totality lasted for a mere 2 minutes (which seemed more like 45 seconds), during which I tried to shoot a wide-angle focus-stack, a telephoto closeup of the corona, and an aerial of the eclipse reflecting in the lake above the badlands. Naturally, I had set up my wide angle and telephoto compositions beforehand, but the point here is that the drone allowed me to set up my aerial composition as well.

A wide angle focus-stack of the eclipse above the badlands A telephoto closeup of the corona

I composed the shot about 5 or 10 minutes before the totality, and left the drone hovering in place. Once I was done with the two DSLR shots, I took the remote to find the aerial composition exactly how I had left it. This saved me precious time and allowed me to take all three shots in a very narrow time frame. The drone reflection shot, more than anything, is a true once-in-a-lifetime shot.

The drone aerial I took after the two DSLR shots.
DJI Mavic II Pro, 1/10 sec, F2.8, ISO 100. Lago Cuesta Del Viento, San Juan Province, Argentina

Finally, the controls of a modern drone allow for unprecedented precision. The drone can move very delicately (some drones offer a ‘tripod mode’ for extra delicate movement) and enables the photographer to create and capture a balanced image. This is especially important when shooting in close distances to certain subjects.

The window of showing the boat in the middle of the arch was very small. Delicate movements of the drone allowed me to get the shot with ease.
DJI Phantom 4 Pro, 1/40 sec, F5.6, ISO 200. Disko Bay, Greenland

Fearlessness in the face of danger

A major advantage of the drone is the fact that you can endanger it with little consequence. As a nature photographer who lives and breathes extreme environments, I can’t stress enough how overwhelming it is.

A drone doesn’t care about breathing toxic gases. A drone doesn’t care about being uncomfortable, hot, cold, breathless or tired. A drone is a robot, a slave to your will and it will go wherever you tell it to go. It will scream if the battery is about to run out, it will quietly protest if you try to fly in windy weather, its sensors will avoid contact with close-by objects, it won’t let you fly near airports (thank goodness). But other than that, it will obey the commands of its master, however stupid or dangerous… which gives the photographer a perfect opportunity to be as daring as he wishes.

This shot is hazy because it’s taken from within a caldera filled with toxic gasses.
DJI Mavic II Pro, 1/25 sec, F6.3, ISO 100. Kawah Ijen, East Java, Indonesia

Please note that I’m only legitimizing risking the drone, not people’s health. I will cover drone etiquette in a future article, but for now, let me stress that I’m talking about flying both legally and (even more importantly) morally, where there are no chances of people or the environment being harmed by the drone. Luckily, as a nature photographer, it’s easy to stay on the right side of legality and morality, simply because I do most of my shooting alone in the wild, without people or buildings around me. The worst thing that can happen to me is losing the drone (that has happened, of course, a tale which will be told in the future).

No person, and no manned aircraft for that matter, would dream of flying meters above an active volcano. Only uninformed people would go near an ice-arch, which can collapse at any moment with tragic consequences. But a drone can, and will do so happily. This fact opens a myriad of options which simply aren’t there without a drone. Let’s see some examples and explore the dangerous side of landscape photography.

Lava flows in the shape of a double-headed dragon. During this shoot I flew my drone so close to the lava that the camera was molten (!). Needless to say, I wouldn’t get this close myself.
DJI Phantom 4 Pro, 1/8 sec, F6.3, ISO 400. Taken outside of Volcanoes NP, Island of Hawaii.

I wrote extensively about my Hawaii volcano photography in a previous article, but I’ll mention here that it was an amazing shoot during which I flew my drone very close to the lava, closer than I’d ever venture myself. The red-hot lava was so hot that it melted my drone camera, the perfect example of the drone going where no man would, and coming back in one piece (if damaged).

The shoot was more than worth losing the drone, both financially (the images and videos sold for many times what I paid to fix the drone) and in the images I got from it. It was a once-in-a-lifetime event, and I risked the drone knowing very well I could lose it at any moment. Actually, it was the very fact that I melted the drone camera, rather than the unique images I got, that made this series go viral, and got me a front-page National Geographic website feature and interview.

The point where the lava burst out of the mountain side was extremely hot.
DJI Phantom 4 Pro, 1/100 sec, f/6.3, ISO 400. Taken outside of Volcanoes NP, Island of Hawaii.

From lava to ice. It is well known that large icebergs can be extremely dangerous. They can not only collapse catastrophically, but they can flip over, and both these scenarios involve dislocation of a huge amount of ice and water, creating high waves and endangering everyone sailing within a substantial radius. But again, a drone doesn’t care. It will fly under close-to-collapsing arches, hover meters away from gigantic icebergs and go where no man would dare.

To get the composition I wanted with the faraway iceberg and lenticular clouds framed inside the hole in the closer iceberg, I had to get very close to the ice. Needless to say, this would have been impossible in any other way, as I wouldn’t step on this iceberg, and no manned aircraft would fly this close to it.
DJI Mavic II Pro, 1/30 sec, f/8, ISO 200, vertical stitch. Uummannaq, Greenland

There are even more advantages to using a drone. The more you use it, the easier it is to use and the more freedom it gives you. Other points I won’t elaborate on are:

  • The drone, unlike a manned aircraft, doesn’t pose any obstacle to shooting. Manned aircraft have rotors (in helicopters), wings or beams blocking your view. The windows in light planes can also limit your range of motion.
  • Your carbon footprint is significantly lower with a drone compared to manned aircraft.
  • It’s a good conversation starter.
  • It’s so much fun to fly.

In the next article in the series, I’ll discuss the other side of things: the disadvantages and limitations of the drone.


Erez Marom is a professional nature photographer, photography guide and traveler based in Israel. You can follow Erez’s work on Instagram and Facebook, and subscribe to his mailing list for updates.

If you’d like to experience and shoot some of the world’s most fascinating landscapes with Erez as your guide, take a look at his unique photography workshops in The Lofoten Islands, Greenland, Namibia, the Argentinean Puna, the Faroe Islands and Ethiopia.

Erez offers video tutorials discussing his images and explaining how he achieved them.

More in This Series:

  • Landscape Photography with a Drone – Part 1: Forward / What is a Drone?
  • Landscape Photography with a Drone – Part 2: Advantages of the Drone (i)
  • Landscape Photography with a Drone – Part 3: Advantages of the Drone (ii)

Selected Articles by Erez Marom:

  • Parallelism in Landscape Photography
  • Winds of Change: Shooting changing landscapes
  • Behind the Shot: Dark Matter
  • On the Importance of Naming Images
  • On Causality in Landscape Photography
  • Shooting K?lauea Volcano, Part 1: How to melt a drone
  • The Art of the Unforeground
  • Whatever it Doesn’t Take
  • Almost human: photographing critically endangered mountain gorillas

Articles: Digital Photography Review (dpreview.com)

 
Comments Off on Landscape photography with a drone: the advantages – part 3

Posted in Uncategorized


Landscape photography with a drone: the advantages – part 2

29 Sep

In the previous article in this series, I elaborated on the compositional advantages of the drone compared to land-based shooting. I claimed that the drone offers infinitely more compositional opportunities, which results from the fact that the photographer isn’t bound to the ground. This allows better perspectives and separation of the compositional elements.

In this article I’d like to talk about two more advantages of shooting with a drone, which particularly relate to the comparison with manned-aircraft based shooting: the drone’s availability and its ability to take off and land anywhere.

The Springs of Ojos Del Campo, Argentina. The only way of seeing this scene from the air is using a drone. DJI Mavic II Pro, 1/400 sec, F8, ISO 100. Puna De Argentina

Availability and Running Costs

I would be remiss if I neglected to state that in tandem with its ability to fly, the drone’s availability is the very thing that made the drone change the world of photography forever.

Today’s drones are amazing machines. An idiot-proof, tiny, light, foldable quad-copter can easily fit in your photo bag with several spare batteries and the remote control, while leaving room for a your entire DSLR and lens arsenal. Each of these batteries can last for up to half an hour (!) of flight. Under favorable conditions, you can send the drones 5 kilometers or more away and 500 meters high while maintaining connection (in theory, that is, as it’s illegal in most countries to fly higher than 120m and out of sight).

An aerial perspective exposes the beautiful contour and layers of the shore of the Dead Sea.
DJI Mavic II Pro, 1/20 sec, F4, ISO 200. Ein Gedi, Israel

You can bring a drone with you to any shoot, fly it in any terrain and in harsher weather that you think. You can fly it while sitting comfortably inside a heated car, with the spare batteries charging quickly as you fly. It’s portable enough to hike or even climb with. For the experienced drone user, it can take less than 3 minutes to set up and be airborne, when time is of the essence.

This light on the top of a huge iceberg was disappearing and reappearing with the horizon clouds obscuring the sun to the north west. With the drone, I had the choice of when exactly to fly to optimize my photography and get the best light.
DJI Mavic II Pro, 1/30 sec, F7.1, ISO 100. Kangia Fjord, Greenland

Needless to say, a manned aircraft is not always available. Some natural landscapes one wishes to shoot are far in the back country with no airport or heliport nearby. With a drone, you are free from these worries. An hour of flight in a Cessna can cost hundreds of dollars, and yours truly has once been given a quote of $ 4200 per hour (Or $ 70 per minute. Yes, that’s right) for a helicopter flight. Flying a drone is virtually free.

This river of lava burst out of the mountain side before my eyes. After picking up my jaw from the floor, I grabbed my drone and sent it right to the source of the flow.
DJI Phantom 4 Pro, 1/100 sec, F6.3, ISO 400. Kilauea Volcano, Island of Hawaii

Ability to take off and land anywhere

This ability is a particular aspect of the drone’s unmatched availability. Due to the drone’s minuscule size, it is not only possible to fit it in a camera bag, take it out and have it airborne within minutes. It is actually possible to do so without the need for a helipad – or any kind of takeoff/landing surface whatsoever – after a bit of training, takeoff and landing can be done from the pilot’s hand. This often neglected fact can make a world of difference when the area a photographer is based in is something like a small boat, a place with uneven ground (for example a lava-field or snowy earth) or a roofed area such as a cave.

A typical Targa speed boat in Greenland. There’s no really comfortable place to take off or land, but there’s plenty of space to do so from the pilot’s (or someone else’s) hand.

Taking off from a boat isn’t easy, especially when the open area is crowded or too small. Boats often are loaded with antennas, which makes takeoff from the roof problematic. But the photographer can launch the drone from his hand while standing in the front or back of the boat, thus giving the drone the necessary space for a safe takeoff.

Hand-landing on a boat is a bit more challenging, to say the least. The pilot needs to direct the drone slowly and carefully toward the boat’s open space, then catch the drone in midair by hand. This can be difficult in a number of ways. Firstly, boats tend to sway side to side, and the drone is ideally fixed in its aerial position, thus its course relative to the boat is chaotic. Secondly, the drone’s sensors tend to block it from getting too close the pilot’s hand. Luckily, the sensors can be disabled.

This boat had a much more comfortable open space to take off and land, but it was challenging nevertheless.

Personally, I’ve had more than my share of less-than-pleasant experiences when hand-landing a drone on boats. While the DJI Phantom series has handle-like landing gear which makes it very easy to catch the drone, the Mavic series does not, and a lot can go wrong when trying to maneuver and catch the drone while standing on a swaying boat. The propellers can cut and bruise your fingers or cut through your clothes, and a wrong movement or failure to catch the drone can result in it hitting the boat or worse – taking a nosedive into the water.

A gigantic arched iceberg dwarfs our boat in Disko Bay, Greenland.
DJI Mavic II Pro, 1/30 sec, F8, ISO 100

There’s not much that can be done about this other than practice taking off and landing the drone from your hand. Remember that while a drone can be lost at any moment, images last forever.

For a bit more about flying from a boat, check out my friend Ian’s video about our trip to Greenland earlier this year. Ian suffered a brutal attack by his drone, but survived to tell the tale! Yours truly had plenty of drone fails as well, and the shenanigans meter was on the high side throughout the trip.

In the next article I will conclude the discussion of the drone’s advantages with perhaps the most exciting of its traits: the ability to remain totally fearless in the face of danger!


Erez Marom is a professional nature photographer, photography guide and traveler based in Israel. You can follow Erez’s work on Instagram and Facebook, and subscribe to his mailing list for updates.

If you’d like to experience and shoot some of the world’s most fascinating landscapes with Erez as your guide, take a look at his unique photography workshops in The Lofoten Islands, Greenland, Namibia, the Argentinean Puna, the Faroe Islands and Ethiopia.

Erez offers video tutorials discussing his images and explaining how he achieved them.

More in This Series:

  • Landscape Photography with a Drone – Part 1: Forward / What is a Drone?
  • Landscape Photography with a Drone – Part 2: Advantages of the Drone (i)

Selected Articles by Erez Marom:

  • Parallelism in Landscape Photography
  • Winds of Change: Shooting changing landscapes
  • Behind the Shot: Dark Matter
  • On the Importance of Naming Images
  • On Causality in Landscape Photography
  • Shooting K?lauea Volcano, Part 1: How to melt a drone
  • The Art of the Unforeground
  • Whatever it Doesn’t Take
  • Almost human: photographing critically endangered mountain gorillas

Articles: Digital Photography Review (dpreview.com)

 
Comments Off on Landscape photography with a drone: the advantages – part 2

Posted in Uncategorized


Landscape photography with a drone: the advantages – part 1

22 Sep

In the first article of this series I explained what drones are, how they are built and controlled by the user. The next question to naturally arise is “Why does one need a drone?” What is a drone good for, and why should you get one?

The answer to this question is long and complicated, but could be summed up by saying that a drone gives the photographer opportunities for shots not achievable in any other way. That’s quite the statement, but I stand firmly behind it, and I intend to explain this position in depth in this article and in the ones to follow.

The first order of business would be to compare the drone to the ubiquitous tool of the photographer: the DSLR, or any hand-held camera for that matter. Indeed, I have written extensively about the advantages of aerial photography in a previous series, but that was in the context of hand-held shooting from an aircraft, and in any case, these advantages need to be presented here if this series is to be self-contained. I’ll rephrase them shortly in a way that better relates to droning.

What the drone offers compared to ground-based shooting is as follows: you have a miniature friggin’ helicopter in your hands, and it allows you to shoot aerials, get the shots from any angle, get there quickly and safely, all without any real danger to your body (caveats to that coming in the future).

Need to separate compositional elements that overlap from the ground? No problemo – take the drone higher and viola – objects are separated. Want to shoot flowing lava without burning your ears off? The drone feels no pain. Can’t walk on water? Can’t breathe toxic fumes? Can’t fly? Too lazy to hike? Send the drone. You get the idea, let’s explore some examples.

Infinite Perspectives

Landscape photography is all about composition – the base layer to any image. Good light and colors are nice, but without an underlying arrangement of objects that’s appealing to the eye, you have nothing. An aerial perspective and the choice over the height, angle and distance from which an image is taken allow for an unprecedented degree of control over composition.

The towers of this ice-castle fit perfectly in the dents in the cloud-cover. I took the drone up to a height which would show this concordance, yet allow separation of the elements.
DJI Mavic II Pro, 1/30 sec, F8, ISO 100. Disko Bay, Greenland

Natural elements often look totally different from the ground level and from the air, but it’s also true that different aerial angles also result in completely distinct compositions. The two images below are the same exact iceberg. Both were taken from the air during one shoot. Would you have guessed? This goes to show the extent of diversity offered by shooting from the air.

More examples: Mount Zinn is a beautiful mesa erosion-mountain in Israel. Taking the drone around it during morning twilight and sunrise resulted in several distinct compositions.

Hidden parts of the photographed natural elements can be discovered and conveyed to the viewer in a visually pleasing way when shooting them from the air. It’s sometimes unbelievable how many phenomenal features are hidden in plain sight, simply because we lack the aerial perspective.

This amazing whirlpool was hiding about 10-20 meters from where I was standing. There was no way I could’ve detected or shot it without the drone.
DJI Mavic II Pro, 1/80 sec, F4, ISO 100. Haukland Beach, the Lofoten Islands, Arctic Norway

Top-down shooting, albeit sometimes over-done, can also be a good creative tool for imagery. It doesn’t always work, though – bear that in mind when trying it.

Amazing natural colors and patterns in the Argentinean high-altitude desert. Shooting this top-down gave the image a painting-like appearance.
DJI Mavic II Pro, 1/240 sec, F9, ISO 100. Puna De Argentina
Lava surface-flows in Kilauea Volcano, Hawaii. A top-down perspective resulted in a deliberate lack of depth, which in turn allowed me to concentrate the viewer on the shape of the flows.
DJI Phantom 4 Pro, 1/25 sec, F6.3, ISO 400. Taken outside of Volcanoes NP, Island of Hawaii.

Separation

A specific aspect of composition is the separation between the different compositional elements. Separation serves to make the composition more appealing. Not having subjects obscured by others is satisfying for the eye, and helps the image have a cleaner, more ordered feel.

A gigantic iceberg floating in Disko Bay, Greenland. The position of the iceberg meant is was impossible to get separation of its two parts when still showing the light passing through the arch and hitting the back segment from the water level. Another clear advantage is the fact that the submerged part of the iceberg is beautifully showing, in addition to debris from a recent collapse in the arch.
DJI Mavic II Pro, vertical stitch, 1/40 sec, F6.3, ISO 100

Separation is especially important where the photographer struggles to convey the grandeur of a location. When shooting Cono Arita (see below) from the ground, it’s impossible to convey the cone’s true shape or its place in the salt flat, not to mention separate it from other elements.

Cono Arita is a sandstone hill in the middle of the Arizaro salt flat in the Argentinean Puna (high-altitude desert). When morning light strikes, the beautiful shadow is cast upon the plain. Taking the drone up allowed me to show this, while creating separation between the cone, its shadow and the surrounding hills and mountains.
DJI Mavic II Pro, 1/60 sec, F8, ISO 100. Salar De Arizaro, Argentina

Just as a ground-based photographer tries to separate his or her foreground and background, the aerial photographer has the same exact considerations – only many more options, as the height constraint is relaxed. See, for example, the near-far composition below.

The drone allowed me to separate the five volcanoes visible in this image: in the bottom of the frame is Ijen crater. To its left, the lush, green Gurung Ranti. Then farther away, from left to right: Pendil, Raung and Suket. There was even room for the shadow (bottom-left to mid-right) cast by Gurung Merapi, just behind the camera.
DJI Mavic II Pro, F8, 1/25 sec, ISO 100. Kawah Ijen, Indonesia

Separation doesn’t always mean the subjects aren’t touching – it can mean a subtler expansion of the distances between the subjects, to create a more pleasant arrangement.

I used the aerial perspective to expand the distances between these interlacing hills and their shadows at sundown.
DJI Mavic II Pro, 1/60 sec, F10, ISO 100. Desierto Del Labirinto, Puna De Argentina

In the next article, I will continue discussing the advantages of the drone, specifically its availability.


Erez Marom is a professional nature photographer, photography guide and traveler based in Israel. You can follow Erez’s work on Instagram and Facebook, and subscribe to his mailing list for updates.

If you’d like to experience and shoot some of the world’s most fascinating landscapes with Erez as your guide, take a look at his unique photography workshops in The Lofoten Islands, Greenland, Namibia, the Argentinean Puna, the Faroe Islands and Ethiopia.

Erez offers video tutorials discussing his images and explaining how he achieved them.

More in This Series:

  • Landscape Photography with a Drone – Part 1: Forward / What is a Drone?

Selected Articles by Erez Marom:

  • Parallelism in Landscape Photography
  • Winds of Change: Shooting changing landscapes
  • Behind the Shot: Dark Matter
  • On the Importance of Naming Images
  • On Causality in Landscape Photography
  • Shooting K?lauea Volcano, Part 1: How to melt a drone
  • The Art of the Unforeground
  • Whatever it Doesn’t Take
  • Almost human: photographing critically endangered mountain gorillas

Articles: Digital Photography Review (dpreview.com)

 
Comments Off on Landscape photography with a drone: the advantages – part 1

Posted in Uncategorized


6 Advantages of Using a Tripod in Your Photography

10 May

The post 6 Advantages of Using a Tripod in Your Photography appeared first on Digital Photography School. It was authored by Jeremy Flint.

Tripods are a wonderful accessory to have and can assist you greatly with your photography. There are a large variety of tripods available on the market at present in different shapes and sizes, ranging from compact to full-size devices. Tripods are available to suit all kinds of budgets and come in a range of materials from aluminium to carbon fibre.

With the high ISO functionality and faster shutter speed capabilities of modern cameras, you may be asking why do I even need a tripod? Depending on your genre of photography, tripods can be a versatile and beneficial support. If you don’t already have one, and are considering adding one to your photography kit bag, here are 6 reasons why a tripod can be beneficial to your photography.

1. Ability to photograph in low light

Tripod 01

The Giant’s Causeway, Northern Ireland © Jeremy Flint

Whatever your preferred type of photography, a tripod is an essential tool for photography, particularly in low light. In these situations, there comes a time where you can no longer hold the camera steady in your hand. Using a tripod will greatly assist you.

2. Ability to photograph long exposures

A tripod allows you to capture a longer exposure by using a slower shutter speed of up to several seconds. This helps to minimise the risk of any movement. While capturing a long exposure the use of a tripod will allow much more light to enter the camera than would be possible if you were taking a picture hand held.

Tripod 02

Guernsey © Jeremy Flint

This way you are also capable of capturing movement in your images which would not be possible if you are holding the camera in your hands. Examples of which include movement in cloud formations or light trails.

3. Better stability

One of the most beneficial reasons for using a tripod is that it provides stability to the camera. It also avoids camera shake by the operator, especially in those situations where longer exposure times are necessary. If you are shooting anything from a sunset to starry nights, fireworks or the moon, you will need the stability that a tripod provides, particularly to keep the camera in position.

Tripod 03

The Lake District © Jeremy Flint

A tripod can also be advantageous in extreme weathers such as heavy winds. By having your camera mounted on a tripod, you can achieve a steadier shot as the tripod provides much needed stability in blustery conditions.

4. Sharper images

Tripods are a great bit of kit to help you get sharper images. One of the biggest mistakes I see newbie photographers make when shooting in low light is that they try to take too many shots hand held and end up with blurry images. A tripod will assist you in achieving more accurate mages.

5. More time to create shots

Tripod 04

Corfe Castle, UK © Jeremy Flint

The whole photography process takes a lot longer when you are using a tripod. Instead of taking instant handheld shots, the process of setting up a tripod and placing your camera on it slows you down and effectively allows you more time when taking pictures.

Using a tripod in photography forces you to take your time when setting up a shot and subsequently gives you more time to compose your image. The additional time spent on getting your tripod ready can be an investment as it helps you to focus more on your image-taking. This can, in turn, result in better pictures.

6. Ability to frame and adjust shots with ease

Once the camera is mounted on the tripod, you will find you can make subtle changes to your framing with ease. When doing this, by moving the camera in any direction, up and down or left and right, there will also be limited movement.

Tripod 05

Ljubljana, Slovenia © Jeremy Flint

In addition to these camera related benefits, another blessing with having a tripod is that the weight of the camera is literally lifted off your shoulders when placed on one. As well as holding your camera, a tripod can also double up as a stand for lights or reflectors if required.

Whether or not a tripod is right for you depends on what type of photography you do and your photographic needs. If you enjoy taking pictures of landscapes and architecture, a tripod is a must-have accessory. If you find tripods are generally too heavy to carry around or don’t necessarily need them for low light photography, a monopod is a great substitute that is lighter and can also be used as a walking stick.

Conclusion

In summary, tripods are a wonderful addition to our camera equipment and should be used to your advantage in low light and when photographing longer exposures.

They will help you by providing more stability, slowing you down when taking pictures and facilitating minimal movement when framing and capturing your shots.


The post 6 Advantages of Using a Tripod in Your Photography appeared first on Digital Photography School. It was authored by Jeremy Flint.


Digital Photography School

 
Comments Off on 6 Advantages of Using a Tripod in Your Photography

Posted in Photography


Advantages DSLRs Have Over Smartphones, and Why They’ll Always Have Them

22 Nov

I love watching the annual press events of Apple, Google, Samsung and others where they show off their latest high-tech gadgets, including mobile phones. With each new iPhone, Pixel, and Galaxy they seem to repeat a common refrain: “And the camera is the best one ever in a smartphone”.

Are DSLRs fading away with modern advances in smartphone camera technology? Or are they primed and ready for an entirely new life?

Mobile phone cameras are mind-blowing marvels of modern technology. With some of the tech showcased in the recent Pixel 3 announcement, you might be wondering if traditional DSLRs and mirrorless cameras are even relevant anymore.

The answer is more complicated than you might think.

Before you get too deep into this post, I want to make one thing abundantly clear. No-one can tell you which camera is best for you. If you have a 3-megapixel point-and-shoot that does what you want, then, by all means, keep using it and don’t let anyone stop you. Also, if your smartphone takes selfies and Instagram-worthy photos of your morning coffee, then keep snapping away.

In this article, I’ll be looking at some advantages traditional cameras have over smartphones. However, I won’t be telling you which one to buy, and I certainly won’t be telling you to stop using the camera you already have. Too often, the point is missed entirely when people get caught up in silly arguments on internet forums and message boards about whether such-and-such camera is better.

It’s important to know the advantages and disadvantages of different cameras, so you have enough information to choose one that best suits you and your needs. However, please don’t think I’m trying to tell you what you should or shouldn’t buy.

In almost every way I can think of, modern smartphones can take incredible images compared to those from just a few years ago. These days they have real-time HDR, depth mapping, background separation, multiple lenses, machine learning, portrait mode, selective bokeh adjustment, and even computer-assisted sub-pixel digital zooming. It’s enough to make even the most staunch DSLR owner feel a tad envious.

Still, don’t toss out your Canon or Pentax just yet. DSLRs and other traditional cameras have a treasure trove of advantages no current smartphone can match, and some features they may never be able to achieve.

Lens Selection

What’s the essential advantage of DSLRs over smartphones? I couldn’t tell you, but lens selection would undoubtedly be near the top of the list. Despite all the advances in smartphone photography in recent years, some laws of physics and photons are only overcome when switching lenses like a traditional camera. Most mobile phones have lenses roughly equivalent to a 28mm lens on a full-frame DSLR, although some dual-camera models roughly mimic a 50mm field of view to try and recreate professional-style portraits. Even though you can get adapters (such as the Olloclip) that let you do some creative experimentation, they rarely hold up to dedicated lenses mounted on interchangeable-lens cameras.

By comparison, DLSRs can use hundreds of different lenses, each designed for specific photography needs and situations. No matter what you need from a DSLR, there’s a lens that does it – from wide-angle primes and telephoto zooms to basic kit lenses, tilt-shift, and specialized macro lenses.

A photo like this, which requires a telephoto lens with a wide aperture, isn’t currently possible on any smartphone (and may never be).

The AI-powered tricks and computational somersaults modern cell phones are capable of can work wonders for different photographic situations. But when it comes to choosing the perfect lens for the job, smartphones simply can’t compete. If you want to shoot close-up images, far-away wildlife, fast-moving sports or pleasing group portraits, your mobile phone will probably come up short. Sure, you can’t install apps on most DSLRs. But you can change out lenses which, when it comes to photography, is infinitely more useful.

The portrait mode on mobile phones is amazing. But it doesn’t come close to what you can achieve with a portrait lens on a DSLR or mirrorless camera.

Customizable Settings

While phones can produce amazing photographs in lots of different conditions, you’re fairly limited in terms of settings. You usually can’t change the aperture or focal length (and no, digital cropping is not the same as changing focal lengths). All you can really control are the ISO and shutter speed, and the native camera apps rarely even let you do that much.

When you press the button to take a picture on your phone, you’re letting the computer do most of the thinking it terms of white balance, shutter speed, ISO, and even which part of the image should be properly exposed.

One of the biggest selling points of DSLRs and other dedicated cameras is that (while they have auto modes that do much of the heavy lifting) they have manual modes that let you choose everything – aperture, shutter speed, ISO, and even the focal length if you’re using a zoom lens. Admittedly, not everyone wants that much control, and you can choose to shoot in auto or semi-auto if you want. But having such fine-grain control is a huge advantage over smartphones.

I could choose a slow shutter speed to get this shot on my Fuji X100F, whereas most mobile phones would have used a much faster shutter speed resulting in a vastly different image.

Smartphones and the software that powers them are so advanced and sophisticated that people are perfectly happy letting them make the decisions and do most of the heavy lifting. But if you want more control you won’t get it on a mobile phone. Even the dedicated camera apps run up against physical limitations such as focal lengths that can’t be changed.

There are times when the photo you want to take isn’t the photo your camera wants to take. In those situations, a dedicated camera will let you change aperture, shutter speed, and ISO to get the exact photo you want.

I shot this image at 200mm, f/2.8, ISO 100, and 1/4000 second, which is impossible for any mobile phone.

Low-Light Shooting

DSLRs will always have the advantage over mobile phones in low light due to the way camera sensors collect light. Larger sensors mean larger photosensitive sites, which means they can capture more information about incoming light when there isn’t a lot of it.

At Google’s recent Pixel 3 announcement they demonstrated a feature that vastly improves its low-light shooting. But it only works with still subjects. It also runs into the same limitations all mobile phones have such as fixed focal length and limited options for changing settings.

I took this deep under the earth in Mammoth Cave National Park, 23mm, f/2.0, 1/20 second, ISO 6400. While some phones could have taken a shot similar to this they would have needed much longer shutter speeds, which would make the people a blurry mess.

Try it for yourself to see what I mean. Even with the best night-mode options on the newest mobile phone, you’ll still struggle to get clear shots of moving subjects. It’s great if you only require pictures of static compositions such as buildings or parked cars. But if you want to capture shots of kids, animals or anything that moves around, your mobile phone will probably leave you wanting more.

As the technology advances, low-light photography on mobile phones will improve. But there will always be physical limitations inherent in the platform that DSLRs and mirrorless cameras simply don’t have to deal with. Much of it stems from their larger image sensors, which collect much more light data per pixel. But the fact cameras let you specify the ISO value you need to get the image you want is also a big advantage.

Model train in a dim basement, shot at 50mm, f/2.8, 1/60 second, ISO 3200.

Not Quite There… Yet

I’m a big believer in the promise of computational photography in mobile phones. If the best camera is the one you have with you, then for hundreds of millions of people around the world their mobile phone is the ideal choice. But even with all the rapid advances in technology, there are still plenty of reasons to own a traditional camera.

If you have one that’s been relegated to a dark closet or dusty shelf and replaced by a high-tech mobile phone, get it out and see what it can do. The results may surprise you and have you wanting to use it more and explore the possibilities it offers.

What about you? What are the advantages of using traditional cameras that keep you coming back to them time after time? I’d also like to hear your thoughts about mobile phones and the technology they offer photographers.

One thing is clear. No matter where you stand on this issue, we certainly live in exciting times for photography.

The post Advantages DSLRs Have Over Smartphones, and Why They’ll Always Have Them appeared first on Digital Photography School.


Digital Photography School

 
Comments Off on Advantages DSLRs Have Over Smartphones, and Why They’ll Always Have Them

Posted in Photography


Which are the Advantages of Satellite Online Over DSL World wide web?

16 Mar

Considered one of the primary concerns questioned by anybody who is organizing to established up a web relationship in his property or office is this: internet satelit which are the benefits of satellite web more than DSL world-wide-web?

Without a doubt, satellite and DSL companies are classified as the two major ISP platforms encouraged by most people nowadays. They both equally deliver fantastic add and download speed. These are both available. And they are both of those simple to set up.

But just one is naturally improved compared to the other, as well as the distinct winner with this contest is satellite company.

Beneath, I will cite five components which make a satellite service better than the usual DSL world wide web connection.

one. Satellite services is just not tied in which has a mobile phone or cable support. Compared with DSL internet, satellite doesn’t involve you to subscribe to an auxiliary services for example a mobile phone line or maybe a cable Tv set membership. You can purchase a satellite online subscription by by itself, impartial from every other company that a DSL web subscription will require.

two. All factors regarded as, a satellite online subscription is typically additional reasonably priced than a DSL web subscription. While the basic satellite world-wide-web membership is more expensive than the expense of DSL, you will be capable to save lots of much more dollars, from the long run, using this type of kind of internet deal simply because you will not should pay back for that other auxiliary subscriptions that often occur normal which has a DSL internet service.

3. Satellite internet is just not dependent on any “area of protection.” Essentially, on account of the easy setup included having a satellite net subscription (you simply need to connect a satellite modem to the satellite dish, that will transmit and get information to and from the satellite hovering earlier mentioned the earth) it is possible to established up satellite internet access anywhere you wish, even in distant spots which can be not covered by mobile phone and cable organizations. DSL online is proscribed into the provider’s location of coverage. Satellite is just not.

four. Increased bandwidth. For lots of, this is actually the number one remedy for the question “what are classified as the advantages of satellite world wide web more than DSL web?” Satellite provides the highest bandwidth allowance among the current technology of ISP platforms. Exactly what does this imply? More and more people can share a satellite internet relationship without suffering pace reduction. This final results in the a lot more pleasurable on the net encounter. DSL web has minimal bandwidth. Frequently, when much more than 5 consumers share the connection simultaneously, intense velocity reduction is skilled. For companies that need an online relationship for multiple simultaneous users, a satellite membership is the ideal possibility.

5. Fewer susceptible to company outages. As long as the realm involving the satellite dish and the satellite is obvious – which is frequently the situation as there’s commonly only vacant area concerning them – you might appreciate an uninterrupted internet connection, aside from the uncommon cases if the satellite by itself suffers some concerns. This cannot be explained for DSL world-wide-web connections which might be generally susceptible to difficulties such as downed cable towers, damaged lines, and other problems because of mechanical malfunctions or pure gatherings for instance thunderstorms and earthquakes.

When it’s sensible to ask the query, “what are classified as the benefits of satellite above DSL” ahead of subscribing to any unique ISP, the solution, in the majority of locations, will bring on the conclusion that satellite world wide web could be the better selection.

The post Which are the Advantages of Satellite Online Over DSL World wide web? appeared first on Photonovice.

Photonovice

 
Comments Off on Which are the Advantages of Satellite Online Over DSL World wide web?

Posted in Equipment


A Further Insight In to the Advantages of On the internet Searching

14 Mar

We reside in the engineering period and over the past a number of a long time, more and more far more customers have turned to on the net buying – and for the superior motive, specified the many gains related with this modern type of browsing! Right now, much more than ever right before in the historical past of the World wide web, folks are obtaining a myriad of items and providers on-line. From sneakers to residences and even yachts, men and women full a wide array of transactions within the Internet. That staying mentioned,guess here’s a further insight to the most notable great things about on the internet searching:

Shopping on the web Is a snap And Practical!

This can be undoubtedly the most notable gain of buying products or services on the World wide web, as opposed to brick and mortar suppliers. To put it simply, on-line outlets grant you access for their services at any time with the day or of the night – you are able to position an buy on a 24/7 basis, no matter your locale in the entire world.

The ideal point is that you are able to place an purchase with only various clicks on the mouse, which factor is especially critical for many who have very small time at their disposal and who basically can not afford the luxury of shelling out hrs on the shopping mall. Regardless of when you have a tiresome operating plan, should you be a mom with young children otherwise you are only home-bound and you simply cannot go shop in a very classic brick and mortar shop, online buying will definitely come to the rescue!

You could Conveniently Examine Selling prices

When you are a budget-conscious individual and you simply choose to make sure that you receive the most effective worth for the funds, then there is no greater strategy to try this than as a result of on the internet searching. Simply put, purchasing for objects online enables you to definitely evaluate charges before making your option. The vast majority of websites feature cost comparison engines, but when they are doing not, you can normally use serps to check costs from different suppliers. Not just will this help you conserve a major sum of money, nonetheless it may even provide you gratification, figuring out you have paid for one thing that’s truly worth the revenue!

Generally speaking, on the web suppliers offer reduced rates compared to the typical brick and mortar retailers, primarily due to the fact Internet-based outlets only have to pay for your internet hosting services, that happen to be drastically less costly than shelling out the lease for your real-life business room. In addition to this, the majority of the online business entrepreneurs reduce their gain margin and also the price tag of their things simply to attract additional prospects, as they are completely informed on the proven fact that most (otherwise all!) in their customers have turned to online shopping as a result of the price-related gains. Furthermore, the net ecosystem is understood to be an extremely aggressive space with regards to online stores, that is why enterprise entrepreneurs will struggle to supply the very best price-quality ratio!

The chances Are Countless

In regards to on the internet buying, sky is the limit – practically! The chances are endless, instead of the typical are living retailers where the shelf room is proscribed. Quite simply, the possibilities are that an internet store will exhibit noticeably much more goods than the usual brick and mortar retail store, so furnishing you with a big range of solutions. Browsing by distinctive things has never been a lot easier, given that Web browsing is simply numerous clicks away!

Much less Promoting Stunts To deal with

One more essential profit of buying goods on the internet is usually that not like brick and mortar outlets, who aim to lure clients into buying as several things as feasible (be it via interesting price tag discounts, revenue messages, posters or good product placements), on-line stores have fewer “purchasing traps”, so to talk.

Basically, on line retailers are considerably more unlikely to try persuading you into purchasing other items that you neither require nor want, as well as all those you are established on purchasing. The advertising and marketing ways of on line suppliers are likely for being extra discreet and fewer bothersome, in contrast to all those of brick and mortar shops which is one of the various causes why potential buyers have chose to give on-line procuring so much credit rating recently.

You are able to Examine A product Before Buying It

A further notable advantage of online searching – 1 that only Net procuring has – is always that you can essentially browse many consumer opinions and testimonies before you decide to commit your hard-earned cash inside a products or service. People are frequently a lot more than ready to offer you an genuine and unbiased evaluation so that you can assist foreseeable future consumers, just due to the fact these are wanting forward to looking through other reviews and evaluations themselves. You can now make knowledgeable purchases!

The post A Further Insight In to the Advantages of On the internet Searching appeared first on Photonovice.

Photonovice

 
Comments Off on A Further Insight In to the Advantages of On the internet Searching

Posted in Equipment


Four Advantages of Using Lightroom Collections

29 Jan

In this article, I will explain Lightroom Collections, a very powerful cataloging feature. We’ll focus on how using Lightroom Collections and Collection Sets can help you build a significant portfolio of your best work. Then we’ll move on to the difference between Standard and Smart Previews and how combining Smart Previews with Collections makes it even easier to review and process your best work. Next, we’ll learn how Lightroom Mobile dovetails with Collections and finish up with a few tips on using both of them to share your images. It’s a lot of info (it’s a long one) so buckle up.
Four Advantages Lightroom Collections

A little background first

A year ago at a photography conference run by a consortium of local camera clubs, I had the pleasure of introducing Lightroom expert Tim Grey to the audience. After I introduced him, I sat in on his seminar. He asked everyone to raise their hands if they organize their image files chronologically by date. Knowing that most experts agree this is a terrible way to organize your files, very few attendees admitted to organizing this way. I raised my hand because of course, I do. It just makes my brain happy to be chronological. Mr. Gray asked me how I could ever keep track of or find images by date, so I explained how I also used Lightroom Collection Sets and Collections. He laughed at me and told me to put my hand down. He felt I didn’t really organize things chronologically at all.

Use Lightroom Collections to Build Your Portfolios

The main goal of Lightroom Collections is to create cohesive groupings of your best images. Naming and how you sort and organize your images is up to you, based on how and what you shoot. The key to building a portfolio using Collections is to include only your absolute best images. If you shoot 10,000 images on a two-week photo trip, the images you put in your Collections are the top 1%, the best-of-the-best. These are the ones you share online, upload to sell as stock images, prepare an exhibit or your work, or make some prints for your own walls.

How to Create Collections and Collection Sets

You can find Collections in the Develop Module, on the left-hand panel between Folders and Publish Services. To create a new Collection or Collection Set, click the + (plus sign).
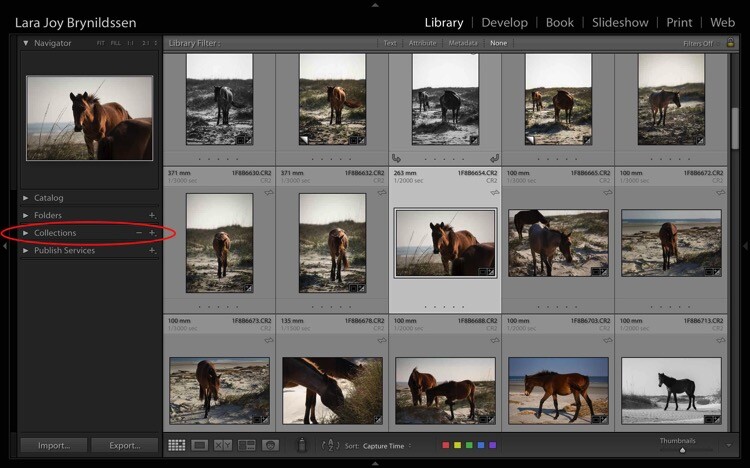
Four Advantages Lightroom Collections 1

Once you click the + (plus sign), a dialog box pops up. Click Collection Sets to create a container that will hold multiple, related Collections. Or, if you just have one group of images that isn’t related to anything else, click Collections.
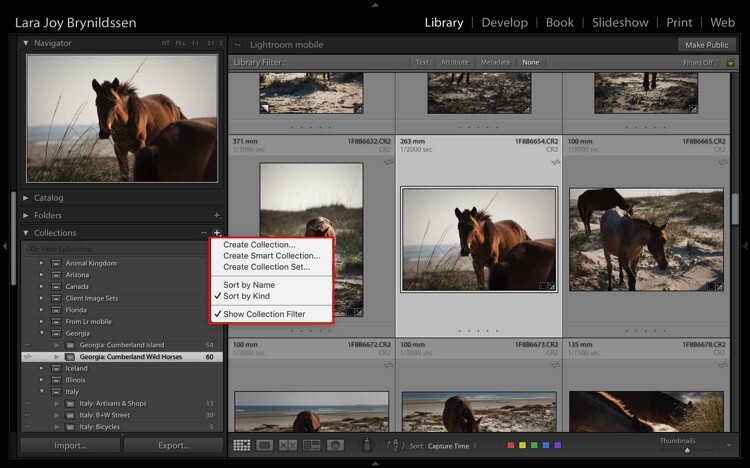
Four Advantages Lightroom Collections

NOTE: In this article, we’re focusing on Collections, not Smart Collections, which work a bit differently. Read this for more on that topic: How to Create and Use Smart Collections in Lightroom.

Collections Versus Collection Sets
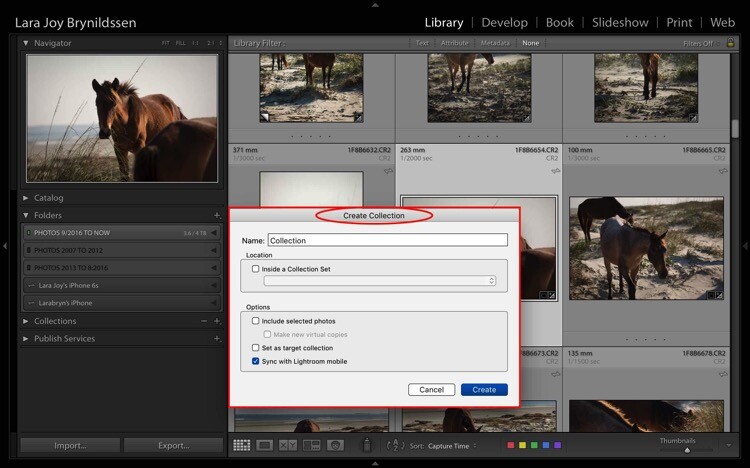
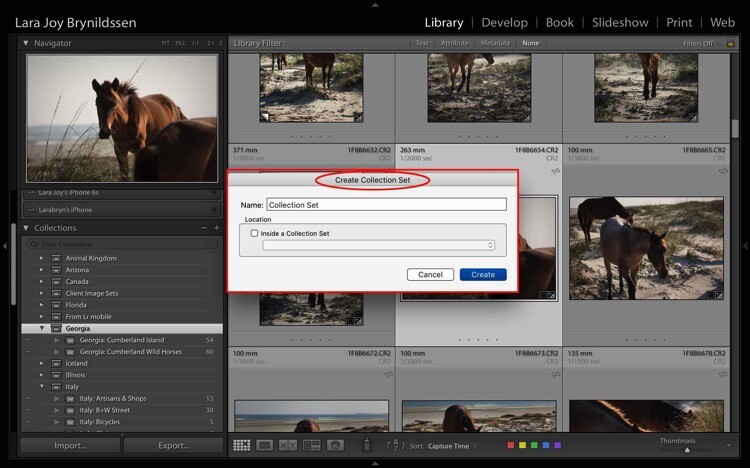
Four Advantages Lightroom Collections 1 2

This is the dialog box for creating a Collection.
Four Advantages Lightroom Collections 1 3

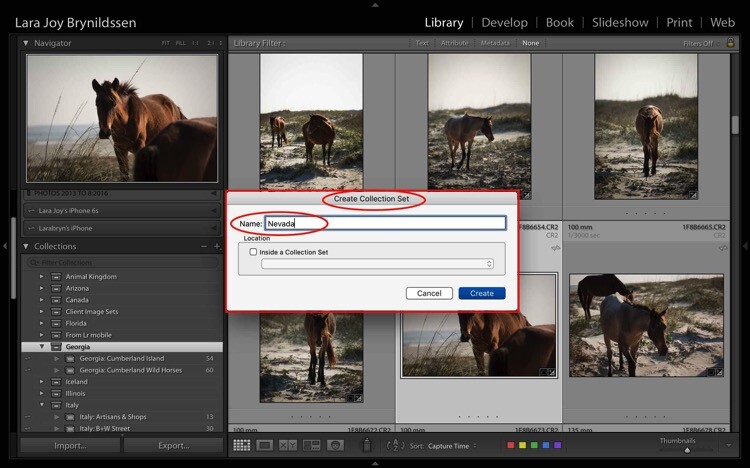
This is the dialog box for creating a Collection Set.
Four Advantages Lightroom Collections 1 4

I’m headed to Nevada soon so I created a new Collection Set for Nevada. To do this, type the title of your Collection Set in the 1st box and click Create.
Four Advantages Lightroom Collections 1 5

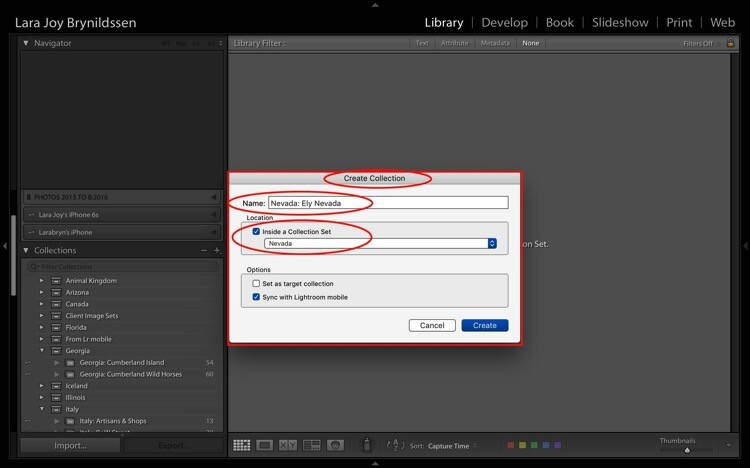
When I’m in Nevada, I’ll be staying in Ely so I created a Collection within my Nevada Collection Set for Ely.

To do this, first, check the box indicating that this Collection sits inside the Nevada Collection Set. When titling Collections, repeat the title of your Collection Set (e.g. Nevada: Ely Nevada). This is important because it helps maintain the file structure in Lightroom Mobile. (More details on that in a few paragraphs.) Make sure you also check the box to Sync with Lightroom Mobile.
Four Advantages Lightroom Collections 1 6

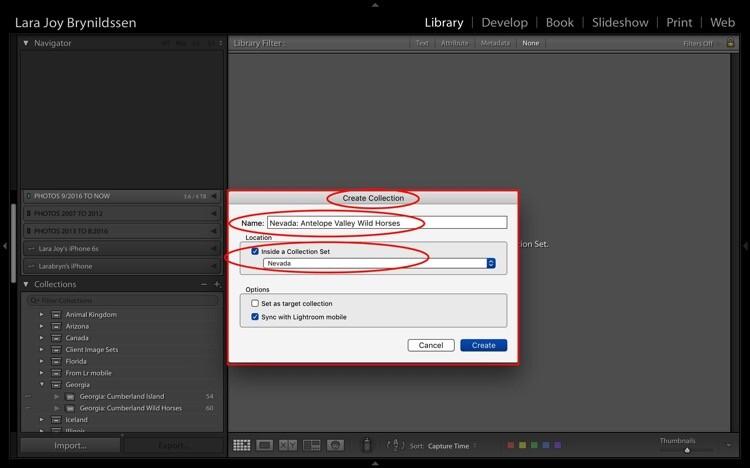
Second Collection for wild horse images.

I’ll also be photographing the wild horses in the Antelope Valley HMA, so I created a second Collection within my Nevada Collection Set for that called – Nevada: Antelope Valley Wild Horses (as shown above).

Now you can see the new Nevada Collection Set within the Collections tab on the left panel (below). Note that the icon for the Collection Set is like a large file box. The icons for the two collections inside of it are smaller, like file folders. Both say that they contain zero images because I haven’t added anything to them yet.
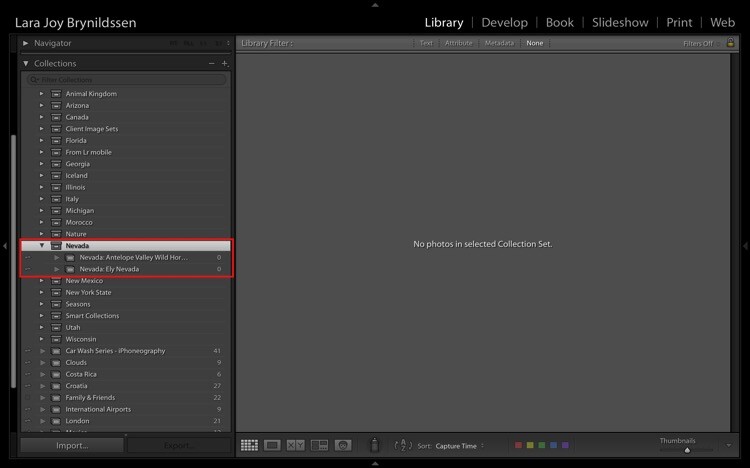
Four Advantages Lightroom Collections 1 7

How to Name Your Collections Sets and Collections

As you can see, I most frequently organize based on location. My Collection Sets are often names of countries or American states. That works for me since I travel a lot to make my images and I often go back to the same places over and over again. When I create a collection of my best images of Italy, I’m not interested in whether I made the image in 2013, 2014, 2015 or 2016. I’m interested in whether it’s the best image I’ve ever made in that region of that subject.

If you’re a macro flower photographer, it might make more sense for you to name your images by flower type and color. E.g., your Collection Set could be called Peonies, and your Collection names would be Peonies: Pink, Peonies: White, Peonies: Purple.

You would be able to continue that naming structure across all flower types that you photograph: Zinnias, Dahlias, Daisies, etc. By naming this way, if you get a request for an image of a pink peony, you know exactly where to find it. Click your Peonies Collection Set and scroll down to the Collection called Peonies: Pink.

If you want to have more comprehensive portfolio-like collections, you can have a Collection Set called “Best of”. Your Collections can be called Best of: Peonies, Best of: Zinnias, etc. You can even have a Collection called Best of: All Flowers, which would be the most superlative macro flower images you have ever made.

Collections Add a Second Level of Organization to Your Files

Basically, Collections are a secondary organization structure for your images. The first (for me) is chronological organization. Think of those folders as archives. All images live there. Collections are a second tool to harness the best of those images and make them easier to find. How you name them doesn’t matter as much as consistency. By consistently naming your Collections, you’ll be able to take the most advantage of their features and quickly locate your portfolio-worthy images.

Think of a Collection like a bookmark. Each time you create a Collection, you’re basically bookmarking the images inside of it so that you can quickly and easily find them by clicking on that Collection. You can bookmark each image as many different ways as you want by adding them to multiple Collections. A flower image could be in your Collection called Peony: Pink. It can also be in Best of: Peonies and Best of: All Flowers.

The main purpose is always to include your best work. You never want to scramble to find that great image you think you took two years ago in in Italy but you’re not sure exactly when? Or what town? By using Collections, you’ll always know exactly how to find that awesome image which is worth its weight in gold.

Adding Images to Collections
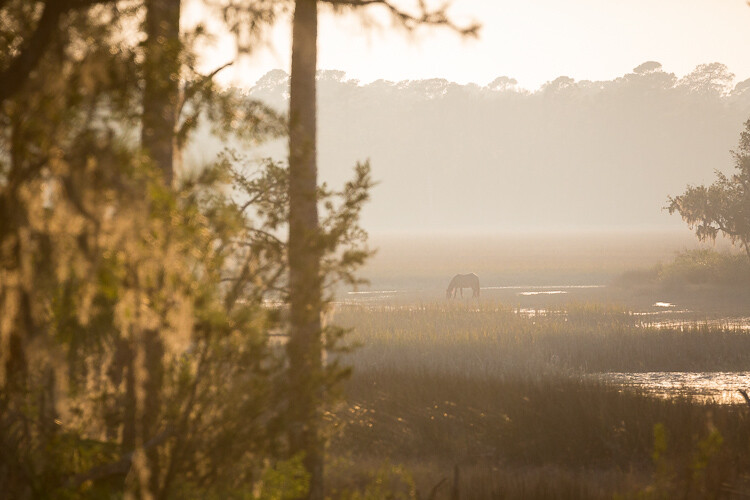
Four Advantages Lightroom Collections 1 7 3

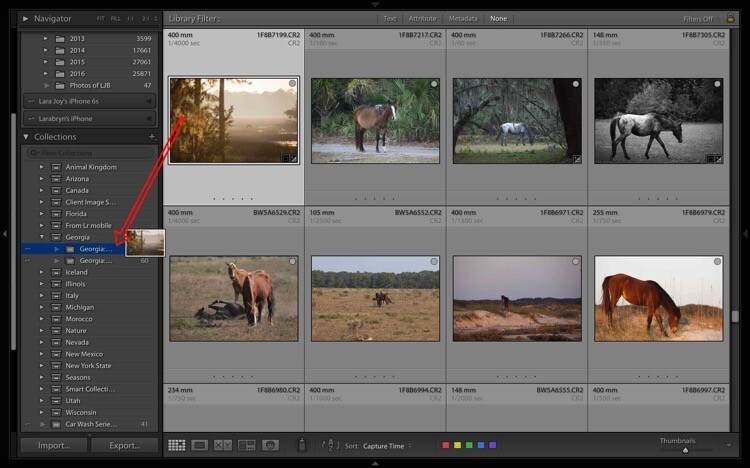
Now that you know how to create and name Collections, and why they’re useful, YOU need to add some images to them. First, select an image. The one above is from a group of images I made on a recent trip to Georgia (USA). I like it and have processed it, so now I select and drag the thumbnail to the Georgia: Cumberland Island Wild Horses Collection. Once the Collection name is highlighted, just release the image and it will drop into the Collection.
Four Advantages Lightroom Collections 1 7 1

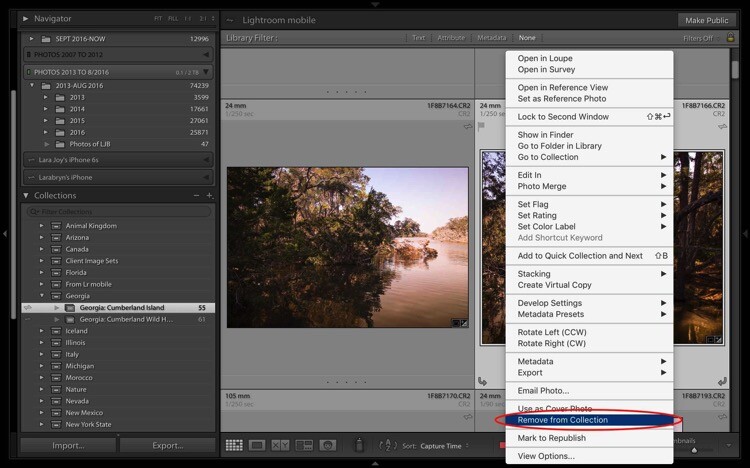
To remove an image from a Collection, first select it. You can see it’s highlighted in pale gray, which means it’s been selected. Right-click and when the menu pops up, scroll to the bottom and select Remove from Collection. Voila! The image will be removed from the Lightroom Mobile Collection too.
Four Advantages Lightroom Collections 1 7 2

Bonus Feature That Makes Collections Even More Useful

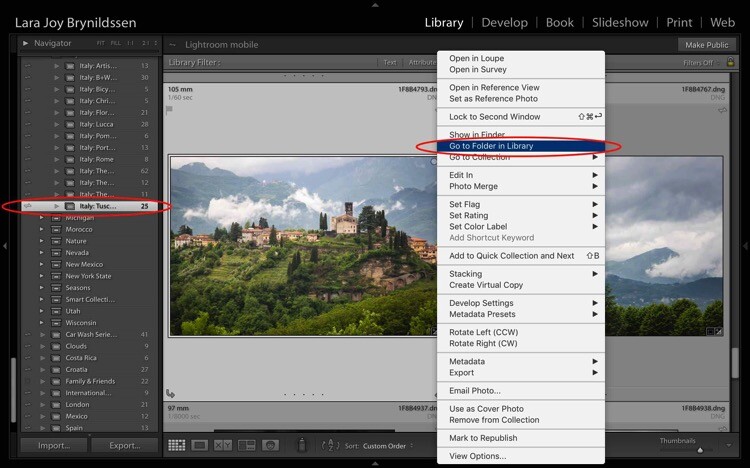
If you are looking through your Collections and find the perfect image, but wish it was shot in vertical rather than landscape format, you need to be able to find the original folder where your image file lives. Luckily, Lightroom builds in a neat little trick to help you to quickly jump to that folder.
Four Advantages Lightroom Collections 1 8

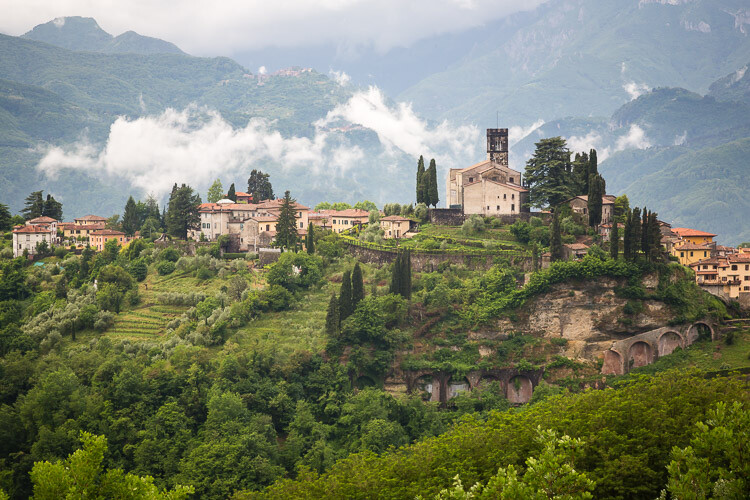
For example, in the Italy: Tuscany Collection, there is a beautiful landscape looking over Barga with lush green grass and heavy clouds sitting on the mountains above the village. To check whether this image is available in a vertical orientation, select the image and right-click to bring up a menu. Scroll to the top of the menu and click; Go to Folder in Library.
Four Advantages Lightroom Collections 1 9

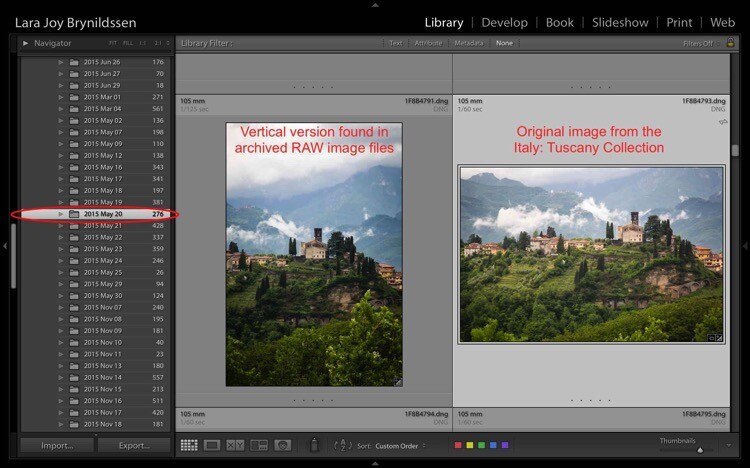
Lightroom takes us from the Italy: Tuscany Collection to the main folder where all of the RAW images taken that same day actually live on the hard drive. You can see in the left side panel we’re now in the 2015 May 20 folder. I think of these folders as archives. They contain all the RAW images I shoot, even the so-so ones or the ones that are near duplicates of other, better images. And – good news – there is a very similar image in a vertical orientation.

Standard Previews Versus Smart Previews

Whenever you upload images using Lightroom, Lightroom creates a small Standard Preview. This preview is like a tiny little jpeg allowing the program to quickly show you your image. If you want to edit that image, Lightroom usually needs to be able to access the original image file.

If you have just a few images, you can keep the files on your computer’s hard drive but since you’re an avid photographer, you probably have your images saved on external drives. The more images you take, the more external hard drives you probably have containing all of your images. If you’re looking for your best Italy images from the last 10 years, you might have to look through images on four hard drives. That can get a little unwieldy. To solve this problem, create Smart Previews for all of the images that you have organized in your Collections.

Creating a Smart Preview

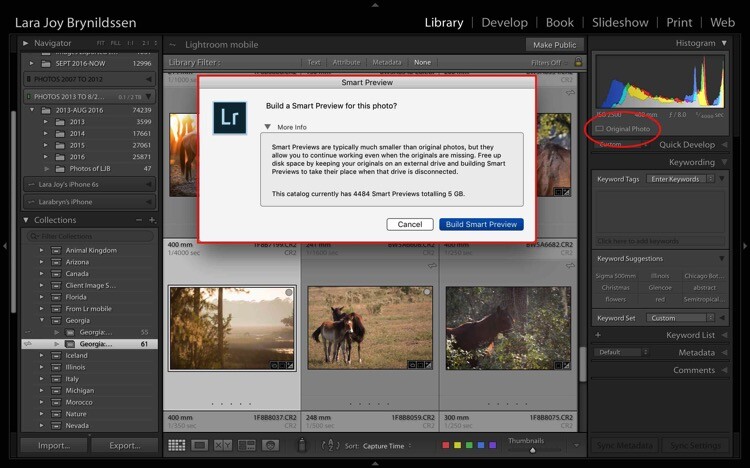
To create a Smart Preview, click on the icon next to where it says Original Photo in the right side panel. A dialog box will pop up. Click Build Smart Preview.
Four Advantages Lightroom Collections 1 10

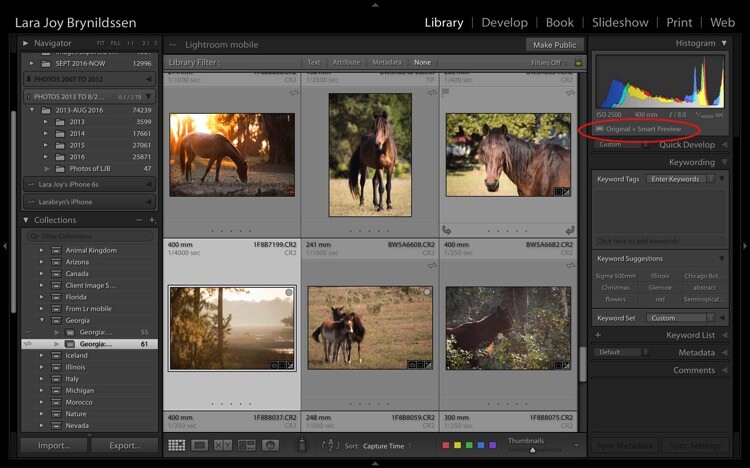
Now in the right side panel, you can see that the icon has changed and the text now reads Original + Smart Preview.
Four Advantages Lightroom Collections 2

A Smart Preview is a larger jpeg than the Standard Preview. The advantage is that it lives on your computer with your Lightroom Catalog files. A Smart Preview takes up far less space than an actual image file but it still contains plenty of information available in it for you to increase the size of the image on your screen, to magnify the details, and even to process it within the Lightroom Develop Module. Any changes you make to the Smart Preview will carry over to your original image once you connect your hard drive too.
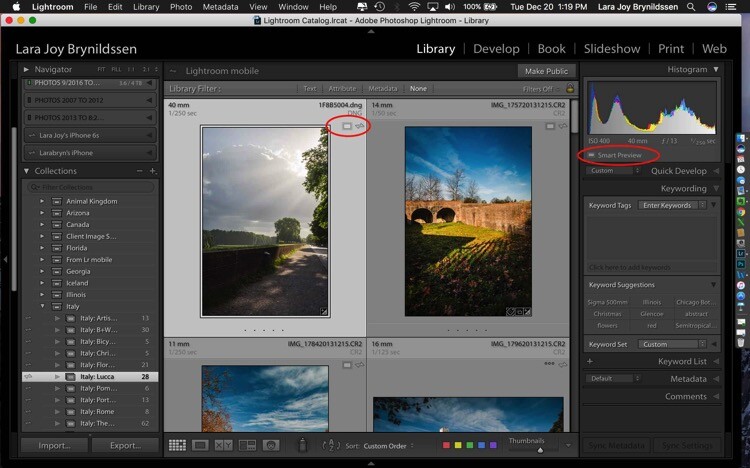
Four Advantages Lightroom Collections 2 1

This file is a Smart Preview. You can see the icon on the image and also in the side panel on the right.

If you click on that icon, Lightroom shows a dialog box letting you know the image isn’t available but that Lightroom knows where it should be. In this case, if I attach the external hard drive and click Locate, Lightroom will find the image for me. Note that LR is also telling me that I can process the image without the original which is exactly what I want.
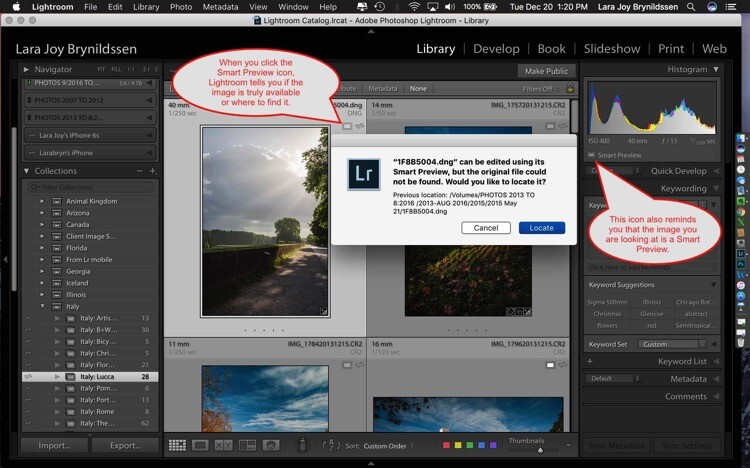
Four Advantages Lightroom Collections 2 2

NOTE: You cannot export an image if you are only working from a Smart Preview. You also cannot edit it outside of Lightroom (e.g., like Edit in Photoshop).

Here you can see that since the external hard drive for this image is attached to the computer, the full image file is available. Lightroom doesn’t show the Smart Preview icon in the Grid View since you’re working with the actual file. In the side panel on the right, LR does show you that this image has a Smart Preview available.
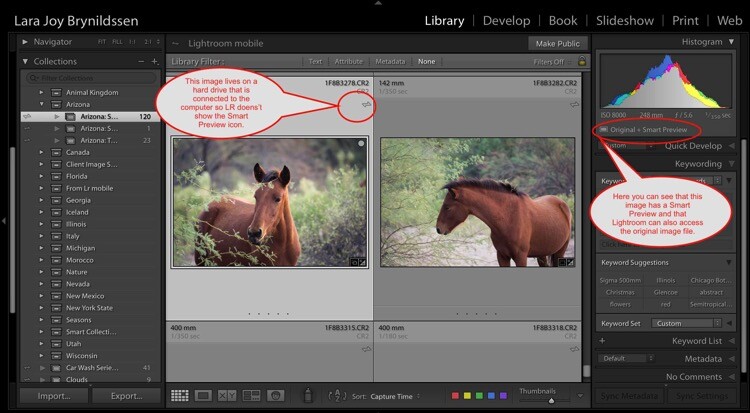
Four Advantages Lightroom Collections 2 3

How are Smart Previews Helpful?

Let’s say you’re printing images for a solo exhibition, and want to showcase your images of Italy. There’s no need for you to slog through the 25,000 images on your miscellaneous external hard drives. All you need to do is open Lightroom, click on Collections, and scroll down to your Italy Collection Set.

Because you’ve made Smart Previews for all your images, you don’t even need to have the hard drives which contain the actual images connected to your computer. This is the key to pairing Smart Previews with Collections. Even if your external hard drives are at home and you only have five minutes before you head back to work, you can begin selecting exhibition images on your laptop. Once you get home and can connect to your external hard drives, you can finish the selection and start printing.

How Lightroom Mobile Dovetails with the Collections Feature

If you are an Adobe Creative Cloud member you are getting so many more features than constant updates to Photoshop and Lightroom. One of those features is Lightroom Mobile. The mobile app doesn’t have the processing power of the full version but I don’t typically use it to edit images so that’s not an issue for me. I use it mainly to have my best images at my fingertips all the time.

Sync with Lightroom Mobile

To Sync with Lightroom Mobile, you need to be logged in to your Adobe CC (Creative Cloud) account and you have Sync turned on. Click your nameplate in the upper left corner to ensure you are logged in and Sync is on. My nameplate has been customized, yours might simply say Lightroom. Here you can see that Face Detection and Address Lookup are off but that Sync is on. If you’re ever confused about the on and off positions, just hover your cursor over the box or triangle. A dialog box will pop up letting you know if that feature is on or off.
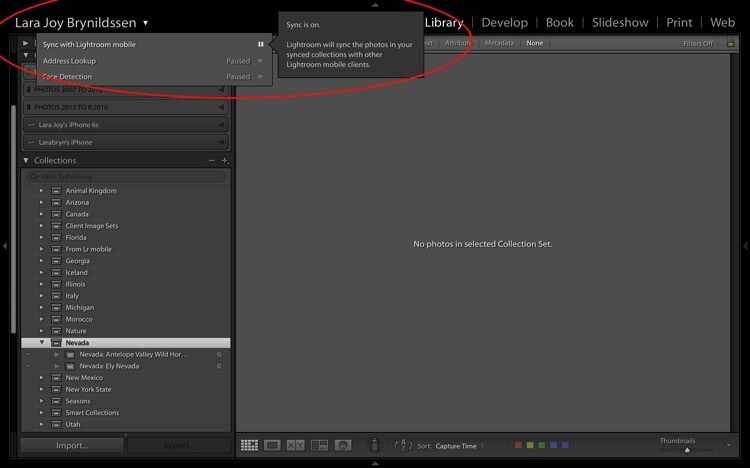
Four Advantages Lightroom Collections 3

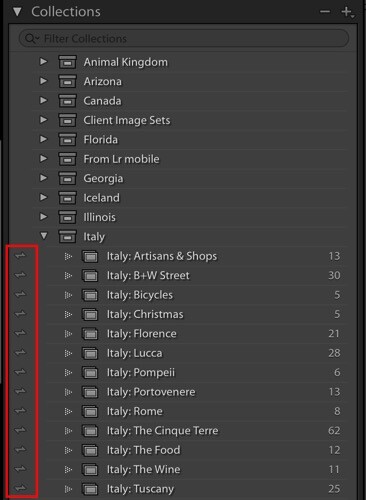
On the left of each collection is a double-sided arrow (see below). This indicates that these Collections are being synced with Lightroom Mobile.
Four Advantages Lightroom Collections 3 1

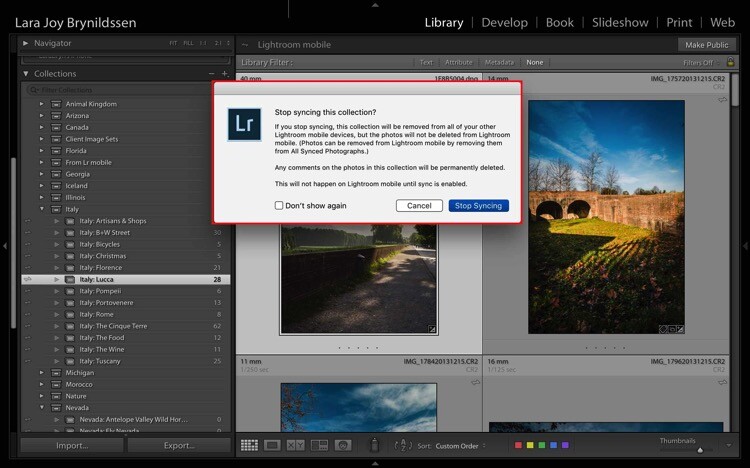
You can toggle Sync with Lightroom Mobile on and off by clicking this arrow. When you turn syncing off, Lightroom will double check with you and let you know that it will remove these images from Lightroom Mobile too.
Four Advantages Lightroom Collections 3 2

If you leave Sync with Lightroom Mobile on, Lightroom will sync the images in your Collections to the mobile app. This is a good time to install the app on your phone and tablet if you haven’t already. Now that you’ve installed the mobile app and logged in, your phone or tablet will be busy grabbing copies of those collections.

While Lightroom Mobile is working, you’ll see the cloud icon in the upper left-hand corner will have three moving dots. When the dots stop moving, the mobile app should be synced with your desktop or PC.

Four Advantages Lightroom Collections 3 3

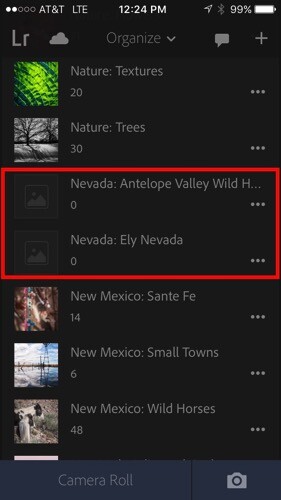
Remember earlier when we created a Nevada Collection Set? And then created a Nevada: Ely Nevada Collection and a Nevada: Antelope Valley Wild Horses Collection? Here they are in Lightroom Mobile.
Four Advantages Lightroom Collections 3 4

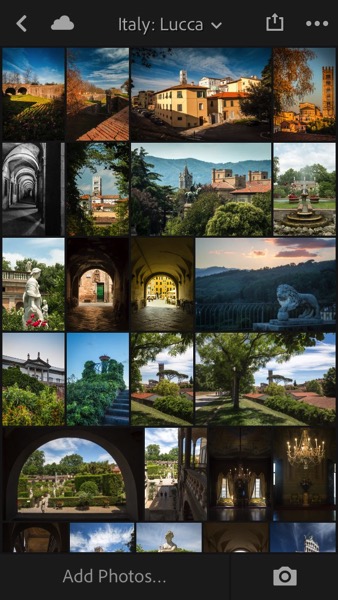
We’ve been working a lot with the Italy Collection Set too and you can see all of those folders here on the mobile app.

Four Advantages Lightroom Collections 3 5

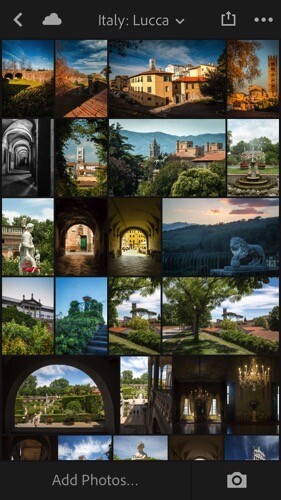
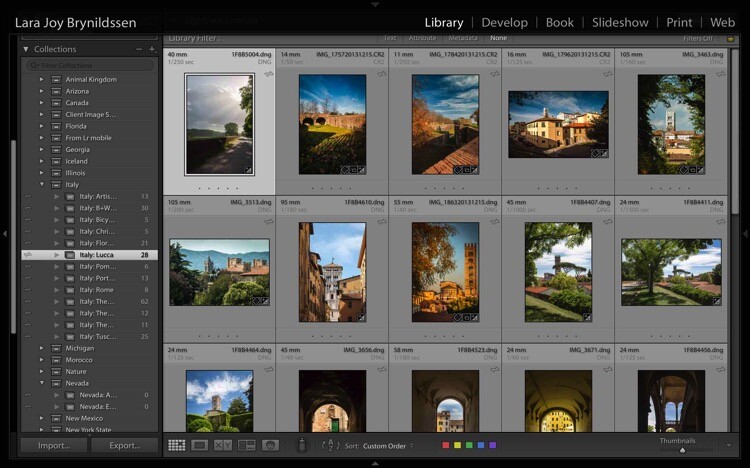
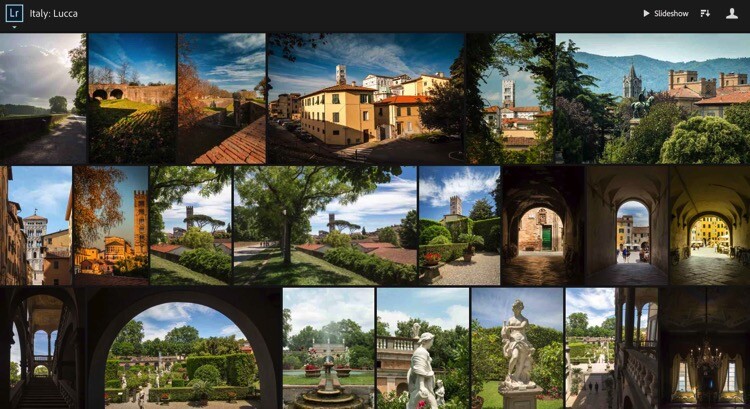
When you click on one of the folders – for example, Italy: Lucca – you’ll see that the images are exactly the same as they are on the desktop version.
Four Advantages Lightroom Collections 3 6

Four Advantages Lightroom Collections 3 7

Why Collection Names are Important in Lightroom Mobile

Remember back when we were setting up our Collection Sets and Collections on the desktop version? We repeated the name of the Collection Set in each Collection. It seems a little clunky to do it that way but hopefully now that we’re in Lightroom Mobile, you can see why we’ve chosen to name things that way. Lightroom Mobile doesn’t have Collection Sets. Instead, the mobile app organizes everything alphabetically by title.

If we hadn’t repeated the name of the Collection Set when we named our Collections, the names wouldn’t be specific enough. For example, I might not know what images are in a file called Artisan Shops if I don’t know those shops are in Italy. Now, by adhering to this slightly clunky naming structure, if someone (i.e. a publisher, client, gallery owner, friend or fellow photographer) wants to see your Italy images, you can open the app on your phone, scroll down the alphabet to Italy and show them the most important group of images.

NOTE: You can actually change the organization method in Lightroom Mobile by clicking the Organize menu. For our purpose of building portfolios of your best work, it’s best to stick with the default, Alphabetize by Title.

Using Collections to Share Images from the Desktop Version of LR

For many of us, sharing our images is the very heart of why we do what we do. Lightroom has built some handy features right into Collections to make it as easy as possible to share our portfolios.

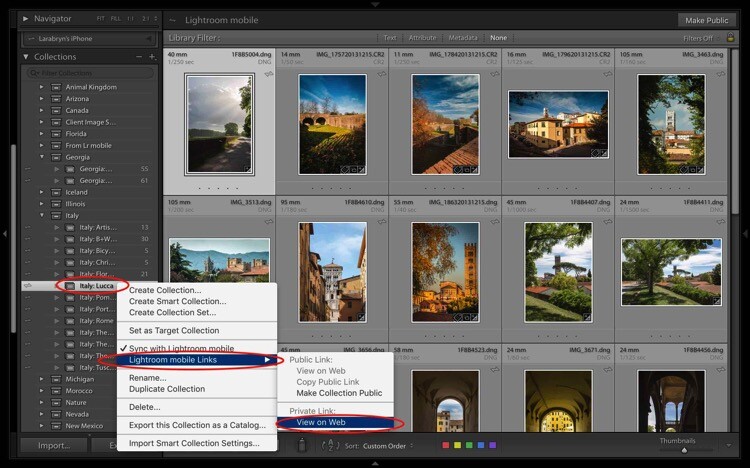
Let’s start with the desktop or full version of Lightroom. The first way we can share a Collection or portfolio of images is by right-clicking on a Collection. Let’s click on Italy: Lucca. A dialog box pops up. Click on Lightroom Mobile Links. Then, in the second dialog box, under Private Link, click on View on Web.
Four Advantages Lightroom Collections 4

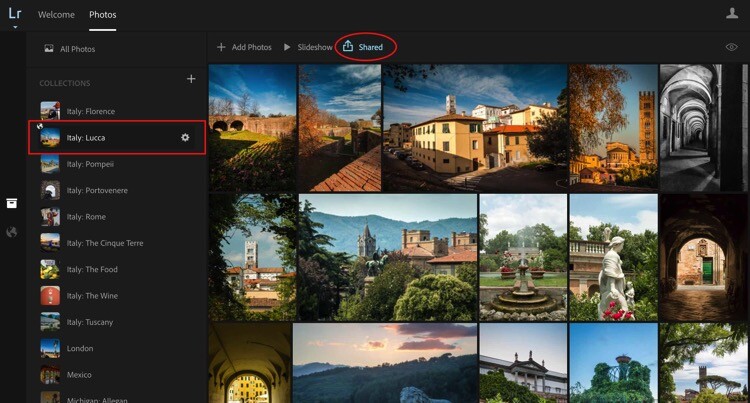
That takes us online to Adobe.com. If you’re not signed in, you’ll need to sign in now. You can see that once again, we’re in the same collection where we started. It’s titled the same and the images are in the same order. You can easily share by clicking on the Shared icon that is a box with an arrow sticking out of it.
Four Advantages Lightroom Collections 4 1

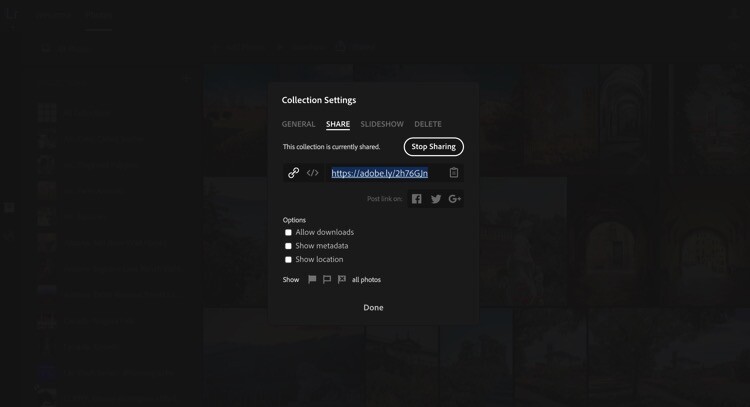
Once you click that icon, another dialog pops up. This dialog gives you a link to share. Here’s the link to my Italy: Lucca Collection. https://adobe.ly/2h76GJn. There are also a few options you can choose to specify how much about your images you want to share.
Four Advantages Lightroom Collections 4 2

Depending on where you’re sharing your Collection and why the only box I would suggest you almost never check is Allow Downloads. If you prefer to be credited for your work and to be paid, do NOT check this box or allow anyone to download your images.
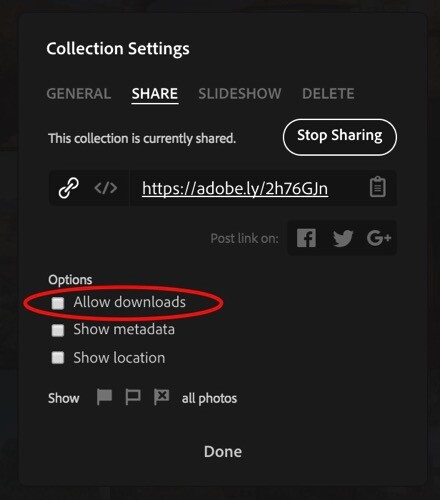
Four Advantages Lightroom Collections 4 2 1

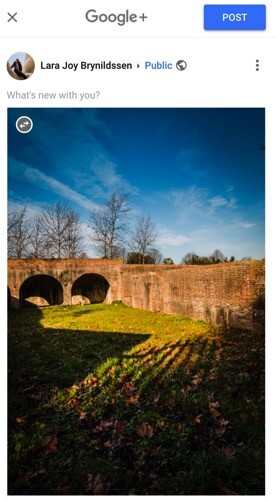
You can share your entire Collection on Facebook, Google+, or Twitter too. Tap the icon for your favorite social media site and follow the prompts. Lightroom will post the link to your entire Collection.
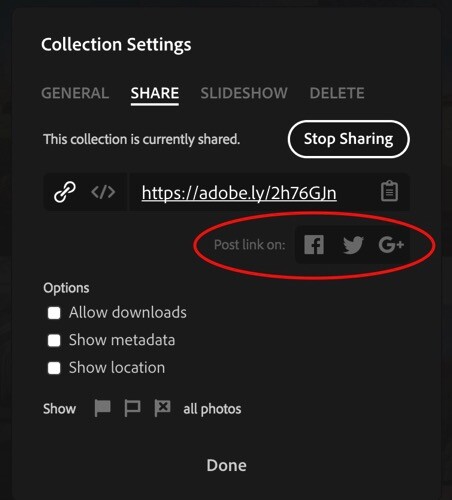
Four Advantages Lightroom Collections 4 2 2

Four Advantages Lightroom Collections 4 3

Four Advantages Lightroom Collections 4 4

Four Advantages Lightroom Collections 4 5

Another way you can share your images from the desktop or full version of Lightroom is to click the Make Public button in the top right corner.

Four Advantages Lightroom Collections 4 6

Once you click that link, Lightroom will generate a public link.

Four Advantages Lightroom Collections 4 7

When you click a public link, Lightroom again takes you to Adobe.com only this time, you’re not the only one who can see it. Anyone online can see your public Collection as a web gallery. To make the Collection private again, just click the button that says Make Private.
Four Advantages Lightroom Collections 4 8

Using Collections to Share Images from Lightroom Mobile

You can also share from the Lightroom Mobile in almost exactly the same way, with the same options.

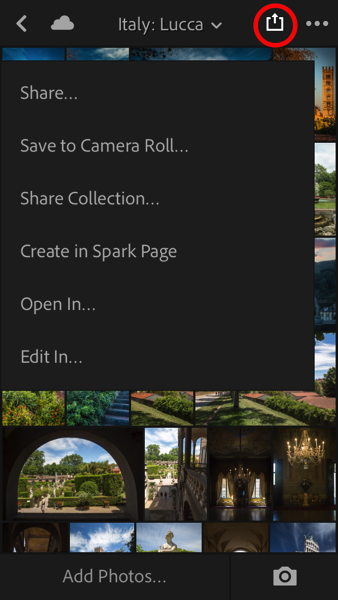
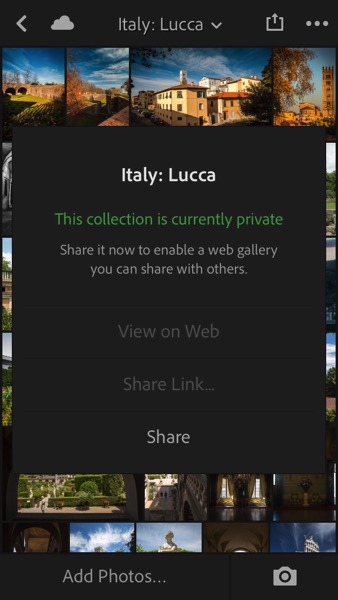
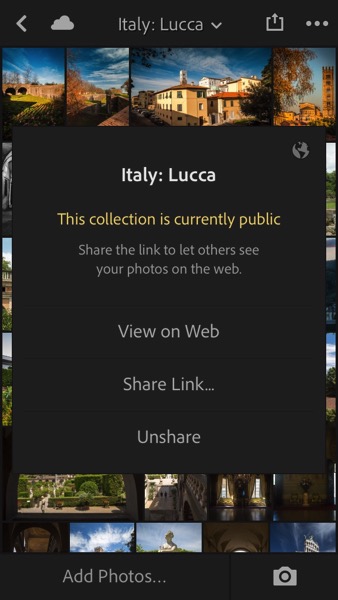
Here we have the Italy: Lucca Collection. When you tap the Share button (the box with the arrow sticking out of it), you pull up a dialog. Tap Share Collection. Another dialog box pops up giving you the option to make the Collection Public by tapping Share at the bottom of the dialog. If you change your mind, tap Unshare.

Four Advantages Lightroom Collections 4 9 Four Advantages Lightroom Collections 4 10
Four Advantages Lightroom Collections 4 11 Four Advantages Lightroom Collections 4 12

Why do you even need these links?

You might be thinking at this point that while it’s pretty cool to have shareable links to your Collections, you don’t really need them. That brings us back to the idea of building a portfolio. Regardless of whether you are an amateur photographer hoping to go pro someday, or whether you are a very serious enthusiast, building a portfolio is going to help you improve your photography.

More than that, sharing your portfolio enables you to get feedback on what you think are your best images. If you have a trusted mentor, you can share a link to one of your Collections with her, she can view the images, comment, and you can use her feedback to improve.

These links can also be used to share the image files from your shoot if you are a pro and work with clients. If you’re looking to sell your travel images, you can share a link with a local tourism bureau or to a travel magazine when you pitch a story. Or, if you were in Italy with friends and want them to see why exactly you always carry 30 pounds of camera gear with you when you travel, send them a link to one of your Italy Collections. They’ll re-live the trip as they scroll through your images and maybe even offer to carry some of your gear the next time you travel together.

Sharing to Instagram from Lightroom Mobile

Your sharing options from Lightroom Mobile are similar to the sharing options from the full desktop version and also include Facebook, Twitter, and email. One of the best ways to use the Lightroom Mobile app is to share to Instagram. Since uploads to Instagram can only be done from your phone, if you want to share images from your DSLR, it’s always a bit of a trick getting them over to your phone in a quick, easy way. Lightroom Mobile is the perfect solution.

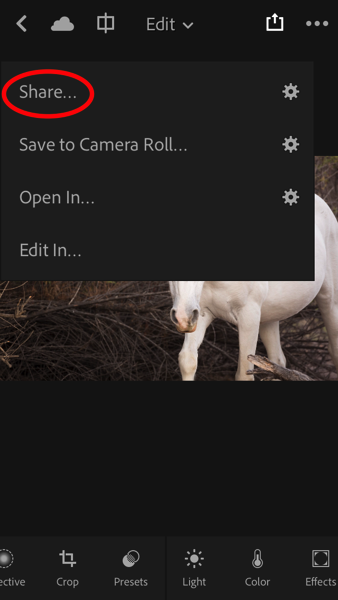
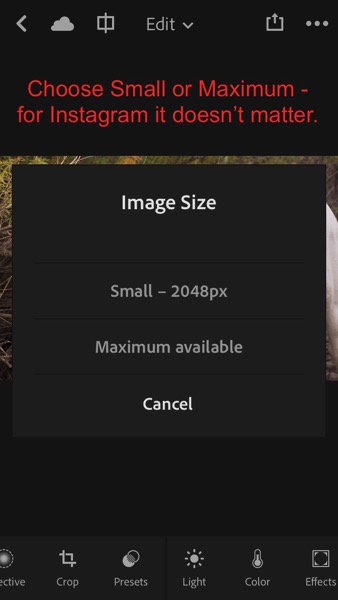
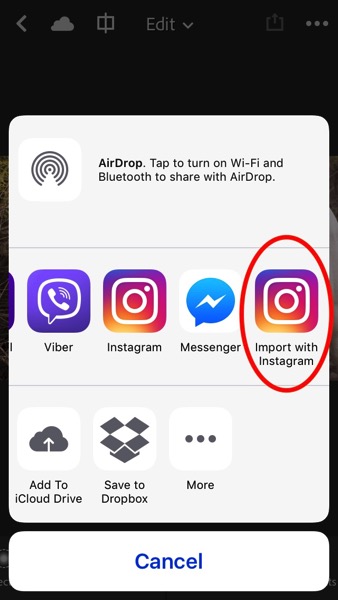
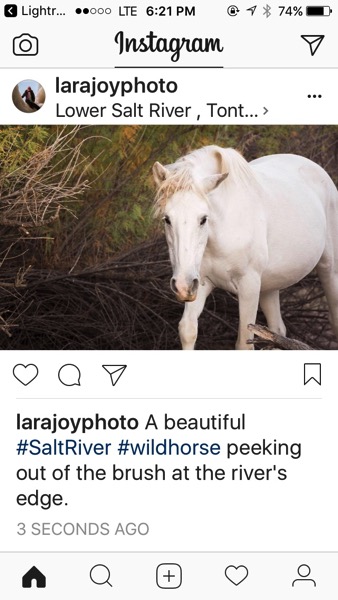
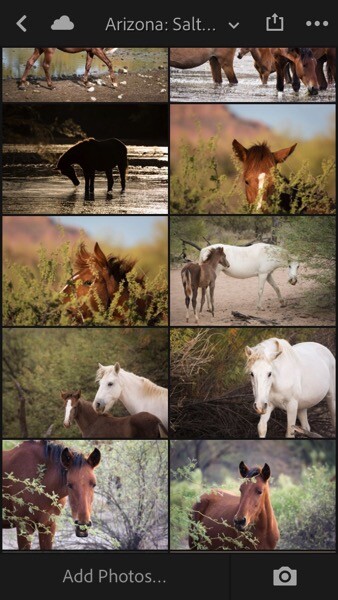
My Instagram feed is only images of horses so let’s jump to Arizona: Salt River Wild Horses Collection. Click on the image you want to share. Tap the Share button (the box with the arrow sticking out of it). In the dialog box that opens, tap Share…. Then, in the Image Size dialog box that opens, tap either one (it doesn’t matter so much for Instagram). Finally, in the next box that opens, click the icon that says Import with Instagram.
Four Advantages Lightroom Collections 5

Four Advantages Lightroom Collections 5 1 Four Advantages Lightroom Collections 5 2
Four Advantages Lightroom Collections 5 3 Four Advantages Lightroom Collections 5 4
Four Advantages Lightroom Collections 5 5 Four Advantages Lightroom Collections 5 6

You might also see an icon that just says Instagram. I don’t use that one because it gives fewer options. The Import with Instagram button takes you right into the app with all the native options to Instagram. Now you’re all set. Caption and hashtag as you normally would and go on your merry way.

NOTE: I’ve really just posted that image to Instagram. Go find it and give it some love so I can give you bonus points for reading all the way through this very long article.
Four Advantages Lightroom Collections 5 7

As long as you consistently sync to Lightroom Mobile, you can easily share your images to Instagram on a daily basis and eventually, your feed will be a living portfolio of your best images.

How do you use Lightroom Collections Sets and Collections?

The goal with this article was to show you how to set up and use Lightroom Collections to build your portfolio, to demonstrate the utility of Smart Previews, to clarify how to sync with Lightroom Mobile, plus a few tips on using Collections to share your images.

Do you use Lightroom Collections? Do these ideas work for you?

Share with me in the Comments below. I’d love to know how you build and share your portfolios.

googletag.cmd.push(function() {
tablet_slots.push( googletag.defineSlot( “/1005424/_dPSv4_tab-all-article-bottom_(300×250)”, [300, 250], “pb-ad-78623” ).addService( googletag.pubads() ) ); } );

googletag.cmd.push(function() {
mobile_slots.push( googletag.defineSlot( “/1005424/_dPSv4_mob-all-article-bottom_(300×250)”, [300, 250], “pb-ad-78158” ).addService( googletag.pubads() ) ); } );

The post Four Advantages of Using Lightroom Collections by Lara Joy Brynildssen appeared first on Digital Photography School.


Digital Photography School

 
Comments Off on Four Advantages of Using Lightroom Collections

Posted in Photography


5 Advantages of Using a Fully Manual Lens

17 May

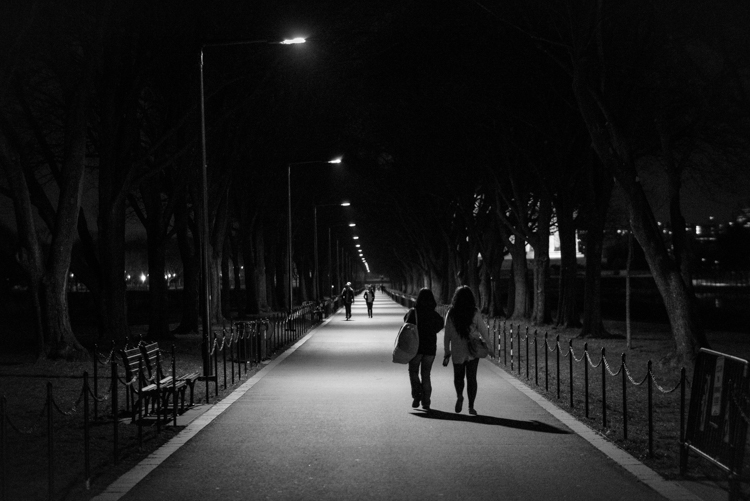
A Stroll in the Night DPS

Shooting with a manual lens centers your attention on the precise image you want to produce. Once you get the hang of shooting manual (here are two prior dPS tutorials: Tips for Using Legacy Lenses and Shooting in Full Manual and Why Every Photographer Should Use a Manual Focus Lens), you learn how to produce some pretty cool images that are easier to manage, than if you leave autofocus on, and that can make for some fun photography.

With all of the computing that’s in a modern autofocus lens, the camera and the lens often take the photo for you. Further, autofocus and shake reduction can actually work against your art. If you shoot frequently on autofocus, then you know the camera can easily focus on the wrong subject. This is particularly true in situations where the light varies greatly.

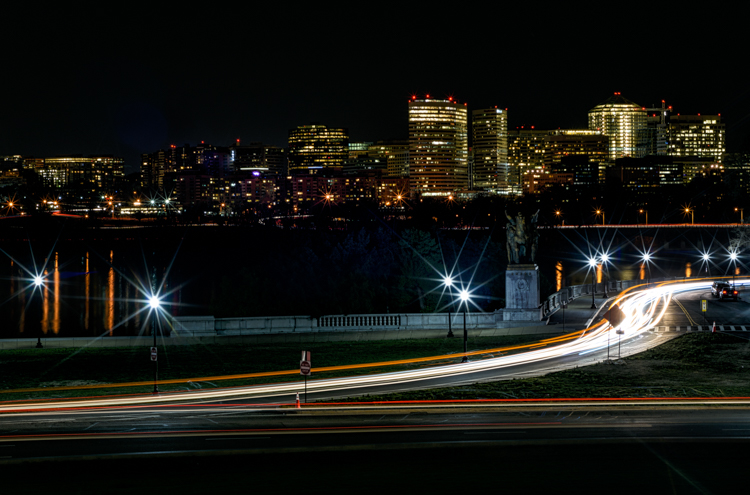
Potomac at Night DPS

Even when you turn off autofocus and go manual, the modern computer-driven lens can be cumbersome. It’s like turning off an automatic mode in a car and using paddles to shift gears. The experience is just not the same, things don’t work right. You want to step on the clutch, and shift through gears, feeling the engine with your right hand as you accelerate.

That’s how I feel about shooting manual. Your eye and hand drive the photo, rather the camera telling you how to drive.

Here are some of the cooler shots I’ve taken while photographing with manual lenses. They are listed from easiest to hardest. I hope you’ll enjoy some of these, too .

1) Nature shots that feature lots of bokeh

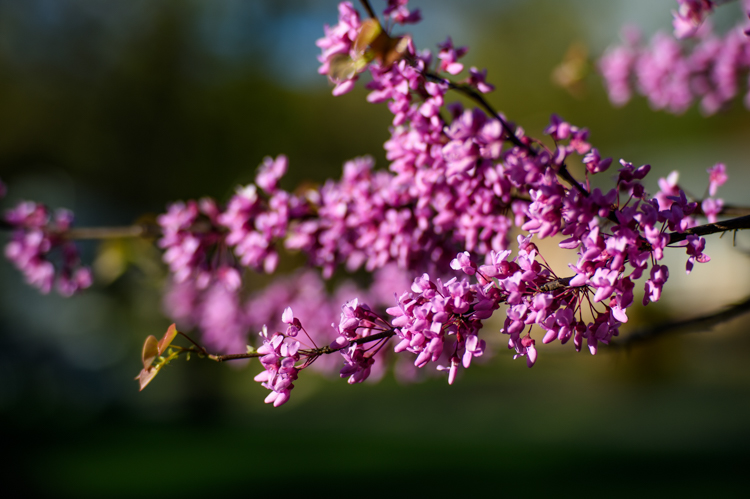
Purple Blossoms DPS

It’s spring and that means the world is filled with lots of colorful flowers, and blossoms to admire. Who doesn’t love photographing these beautiful subjects?

Because I live in a populous city, I shoot flowers with a wide-open aperture to create maximum bokeh. It allows me to blur many unwelcome background objects like cars, bikes, telephone polls, people, and even some buildings.

Manual is ideal for this kind of shot, as it is simplistic. I focus as closely as the lens permits, and set the aperture as wide as possible. I calibrate shutter speed to accommodate light and shadow differentials. The rest is easy as could be. I move myself and the camera to a position that frames the relatively still flower (wind not included) and capture the frame. The above crabtree blossoms shot is a classic example of this technique.

2) Spot focus street shots

Don t Fall Down DPS

Street photographers like to capture candid moments of human nature. Capturing cool street shots is hard. Personally, when I do shoot street photography, I tend to find a setting that I like, frame the shot, set my camera, then wait for the right person to come along. So perhaps I cheat a bit if you are a pure zen street photographer.

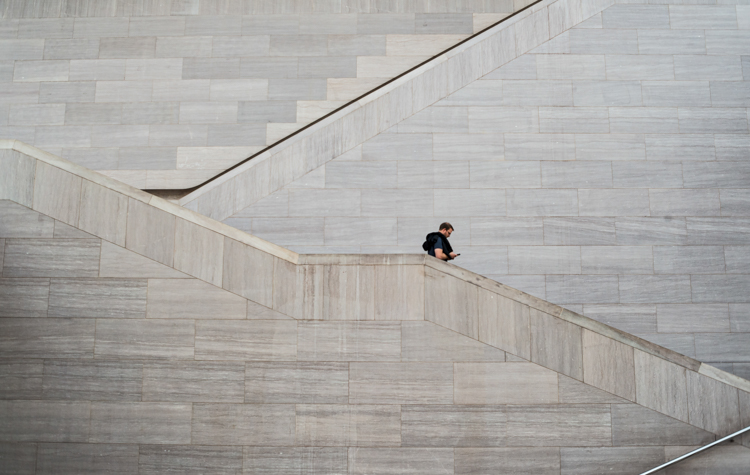
However, to get that shot, I love manual focus. I can set the focus based on the distance between the camera, and where I anticipate the subject will be. Autofocus often latches on to an object, and frankly sometimes the object is a little off from the spot I want to shoot. So I prefer to use manual focus, on the spot where I anticipate the subject will be.

This shot taken at the National Gallery of Art took about 10 minutes. I focused on the middle stair well and waited for the right person to come through. Unfortunately for me, a bus load of secondary school kids were there at first, but once they cleared out, things happened quickly.

3) Bright night shots

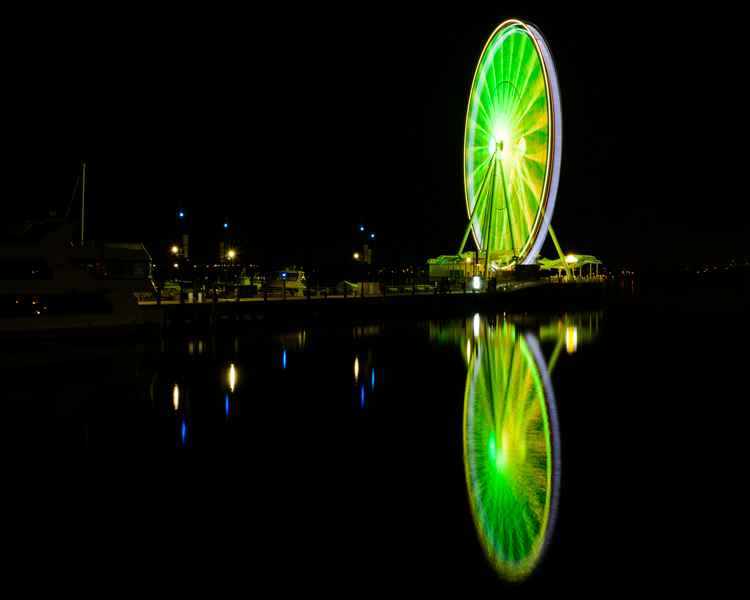
Ferris Wheel DPS

Some objects are brighter at night than others. The moon is a great example. So are ferris wheels, because they shed an enormous amount of light, often rendering all other light sources as dull or non-existent.

For some reason, in darker situations like this, the light meter in my Nikon D810 and the autofocus on some of my lenses, don’t synch well. At times autofocus doesn’t catch the subject at all, or worse, it focuses on the wrong object, like a street light in the background. So I almost always calibrate both focus and aperture manually, to get the sharpness and light just right.

Back to the ferris wheel in the image above. The image was shot with a Figmentum 35mm lens. Focus was easy, as the distance from the subject let me simply set the lens on infinity. But, the aperture required some manipulation, as I started off too bright, and had to close the aperture slightly. I actually shot this at ISO 100for 30 seconds at f5.6, which turned the water reflection into a crazy bokeh as it came closer to me.

4) Panning

Good Catch Panning DPS

Panning is one of the most difficult forms of photography, literally catching an object in motion, at a slower shutter speed. This creates fantastic blur behind the subject, while at the same time keeps the object in focus.

You pretty much need to shoot manual to pan well. Sure, you can lock in your moving target with autofocus and then pan, but really there’s so much that most cameras get wrong with autofocus. When I pan, I like to spot focus with manual. I understand where my subject will be from a distance perspective. I focus, then keep my hands on the focus dial to sharpen as necessary.

In the case of this photo with my dog, I shot it with an 85mm lens, so I set the focus on infinity and planted myself in the middle of a dog park. This fine pup was playing catch with her Dad and was quite happy about it. I caught this shot on her sixth catch.

5) Shutter drag

Shutter Drag DPS

Instagram Rock Star DPS

If you think manual panning produces some cool shots, try dragging the shutter. This is for low light situations where you basically have the same technique as panning, but now use a flash to freeze your subject in motion.

Generally speaking if you are in a low light situation, autofocus may be suspect anyway. That’s why I prefer shooting manually. I’ll confess. If there is an autofocus lens on my body, then I’ll use it to get the camera focused on or close to the subject, then go manual to finish the job.

This shot was also taken at the National Gallery of Art, and features the LED light tunnel between the East and West wings. If you are on Flickr or 500 Pixels, you see a great photo of this every week or two. I decided to play double jeopardy with this shot and rode the conveyer belt while I shot the pic, so not only were the lights and the subject moving, but I was also moving at the same speed as the belt. The exposure was 1/4 of a second, with on-camera flash.

What are your favorite manual shots?

googletag.cmd.push(function() {
tablet_slots.push( googletag.defineSlot( “/1005424/_dPSv4_tab-all-article-bottom_(300×250)”, [300, 250], “pb-ad-78623” ).addService( googletag.pubads() ) ); } );

googletag.cmd.push(function() {
mobile_slots.push( googletag.defineSlot( “/1005424/_dPSv4_mob-all-article-bottom_(300×250)”, [300, 250], “pb-ad-78158” ).addService( googletag.pubads() ) ); } );

The post 5 Advantages of Using a Fully Manual Lens by Geoff Livingston appeared first on Digital Photography School.


Digital Photography School

 
Comments Off on 5 Advantages of Using a Fully Manual Lens

Posted in Photography


The Advantages of Renting Photographic Gear Before you Buy

22 Apr

We have all heard the expression “The gear does not make the photo. The photographer makes the photo.” That being said, the gear does certainly help in perfecting the art of photography.

If you are a professional photographer or even a serious amateur, you know that photography is quite an expensive profession/hobby. Good equipment can be expensive and by the time you build your day-to-day gear bag, it can set you back several thousands of dollars. Just when you think you have the perfect setup,  you hear about the latest camera or a faster lens than what you have just being released for pre-order. Gear lust is very real among photographers!

Kenichi Nobusue

By kenichi nobusue

This is where renting gear or even borrowing becomes a viable option for many professional as well as serious amateurs.

Benefits of renting photo gear

There are several advantages to renting photographic equipment.

  • The cost of renting is typically much lower than cost of buying the gear. This becomes more relevant if it is not something you are going to use too often (like a mega telephoto lens, fish-eye, or tilt-shift lens).

    Jon Fingas

    By Jon Fingas

  • Ability to try out the equipment and see if it suits your style of photography. Once you know you like a piece of gear, you can make the investment and know you’re making the right choice.
  • Using a rental as a backup system for assignments especially events like weddings or concerts.
  • Traveling light and having gear shipped directly to your hotel is an option many photographers mention as a plus for renting. This also eliminates travel-related anxiety around lost luggage and excess baggage charges.
  • Using a rental when your main gear is out for repair. This let’s you keep working while you wait for repairs to be completed.
  • Eliminating buyer’s remorse. It is true that not every piece of gear works for everyone. Often times we buy gear because a certain photographer that we admire has the same equipment, only to be disappointed that our pictures are no where like theirs.

Renting – online versus local stores

Richard Fisher

By Richard Fisher

There are many different options for renting photographic gear. You can do so from local stores in your area or online vendors. In the US, big camera chain stores like CalumetPhotographic and AdoramaRentals sell as well as rent photo gear. CalumetPhoto, one of the local camera retailers in my area, also has local stores where you can go to pick up and drop off rental equipment. They tend to have a wide variety of equipment but definitely recommend reserving gear, especially if you want it for a specific event like weddings, to ensure you get what you want.

There are online stores like Borrowlens and Lensprotogo that also offer a wide variety of lens, cameras and other equipment for rent. You order online and have the gear shipped to your home or location of your choice. Once you are done, you ship it back to them. There is definitely more flexibility in renting gear online but there is the added cost of shipping and insurance, as well as a slight risk that the gear might not arrive in time (any unforeseen circumstances like extreme weather).

Benefits of borrowing photo gear

Giyu (Velvia)

By Giyu (Velvia)

Sometimes you get lucky and have other photographer friends who let you borrow their equipment for a photoshoot, or just to test out – definitely one of the more cost effective ways of trying out photographic gear. However, for those of us who don’t have such awesome friends, there is another method of renting temporary gear that is starting to become popular.

Online companies like CameraLends provide access to a lending community where you can rent cameras directly from local photographers and film makers. On the CameraLends website, they offer a peer-to-peer lending community for photographers and videographers. Owners post unused gear to rent out to other photographers and you can rent gear directly from local photographers, faster and cheaper than traditional means. But this service is somewhat dependent on the market you are in. Not every market will have every piece of equipment available for rent.

Screen Shot 2015-04-15 at 10.51.13 AM

Regardless of what method you choose to borrow or rent camera equipment, definitely try out gear before you make the investment to purchase it. The last thing you want to happen is buying equipment you think you want or need, only to find that it is really not benefiting your particular style of photography.

googletag.cmd.push(function() {
tablet_slots.push( googletag.defineSlot( “/1005424/_dPSv4_tab-all-article-bottom_(300×250)”, [300, 250], “pb-ad-78623” ).addService( googletag.pubads() ) ); } );

googletag.cmd.push(function() {
mobile_slots.push( googletag.defineSlot( “/1005424/_dPSv4_mob-all-article-bottom_(300×250)”, [300, 250], “pb-ad-78158” ).addService( googletag.pubads() ) ); } );

The post The Advantages of Renting Photographic Gear Before you Buy by Karthika Gupta appeared first on Digital Photography School.


Digital Photography School

 
Comments Off on The Advantages of Renting Photographic Gear Before you Buy

Posted in Photography