RSS
 

Posts Tagged ‘Adjusting’

Setting The Mood By Adjusting Your White Balance

04 Sep
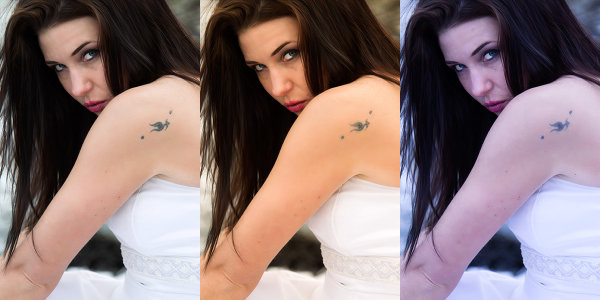
This set of images was taken from a RAW file, with the white balance adjusted using Kelvin white balance in Adobe Camera Raw. The first image was set to Auto in camera. The middle shot was warmed up by setting the white balance to 7500°K, and the third shot was cooled off by setting the white balance to 4000°K. EOS-1D Mark IV with EF 24-105 f/4L IS. 1/200, ISO 100, f/4.

This set of images was taken from a RAW file, with the white balance adjusted using Kelvin white balance in Adobe Camera Raw. The first image was set to Auto in camera. The middle shot was warmed up by setting the white balance to 7500°K, and the third shot was cooled off by setting the white balance to 4000°K. EOS-1D Mark IV with EF 24-105 f/4L IS. 1/200, ISO 100, f/4.

Photographers often deal with a variety of light sources, each of which has it’s own color cast.  When compared to daylight in the middle of the day, tungsten lighting, like that which comes from traditional incandescent bulbs, looks yellow.  Standard fluorescent lighting looks green.  Light in shade, or on a cloudy day will have a bluish cast compared to midday sun.  These color casts are referred to as the color temperature of the light.  Color temperature is measured in degrees Kelvin.  To beginners, color temperature will appear to be a bit backwards.  From 2000°K to about 3000°K are warm tones, and above 5000°K are cooler tones, getting progressively more bluish as the color temperature goes higher.  Midday sun tends to be at around 5500°K – 6000°K, while the sun at the horizon is warmer, at about 5000°K. Overcast daylight will be around 6500°K, and shaded daylight will be around 7000°K.

In this landscape shot, The first shot was processed using the Auto white balance setting, which chose 7500°K.  The second shot was processed to a much cooler tone at 4500°K, and the last shot was processed setting the Kelvin white balance at 11250°K.  EOS-1D X, EF 14mm f/2.8L II. Exposure: 0.5", f/16, ISO 200.

In this landscape shot, The first shot was processed using the Auto white balance setting, which chose 7500°K. The second shot was processed to a much cooler tone at 4500°K, and the last shot was processed setting the Kelvin white balance at 11250°K. EOS-1D X, EF 14mm f/2.8L II. Exposure: 0.5″, f/16, ISO 200.

Thankfully, today’s digital cameras have a tool to correct for the different color casts created by the various light sources we encounter.  For beginners, using the Auto White Balance setting is an excellent start. The camera will try to neutralize the color cast caused by different light sources and give the image a pleasing balance. However, while a neutral color balance is often desirable, there are times when as artists, we may want to use the white balance tool to creative effect.

You can choose what kind of mood you want to set before shooting if you like, by choosing a preset white balance. Most cameras offer Auto, Daylight, Cloudy, Shade, Fluorescent, Tungsten, Flash, Custom, and Kelvin temperature white balance settings.  These settings will neutralize the color cast from the light source they are designed for. For instance, Fluorescent neutralizes the greenish cast given off by fluorescent light.  Custom white balance is a user defined setting where you tell the camera what in the scene should be white, and the camera corrects to make it so. Finally, the Kelvin white balance setting allows you to choose the color temperature of the light source you are shooting in.  If you choose to use the presets in lighting other than what they are designed for, your image will be warmer or cooler, depending on your setting and the available light.

For all of those settings, the camera is simply looking to make white look white.  While that may be what you want, by intentionally setting a different white balance, you can add to the mood.  Choosing  Shady or Cloudy white balance will warm up your image, and choosing tungsten will cool your image. This type of thing is done constantly in movies and television shows to help set the mood.  Photographers as well choose their white balance to set the mood.  A cooler color cast gives the image a colder, harsher feel, while a warm color cast is generally seen as inviting.

If you shoot only JPEG, you’ll be stuck with whatever white balance you had selected at the time of shooting, so if you want to change the mood by adjusting your white balance, you’ll have to choose to do this beforehand.  However, if you shoot RAW, the white balance can be adjusted after the fact, using whichever RAW converter you choose.  You’ll be able to choose from the presets that are loaded in the camera, click in the image to determine what color should actually be white, or you can simply select Kelvin white balance, and using a slider, adjust the white balance in degrees Kelvin and see what the different color temperatures look like.

By taking control of the white balance, you give yourself another tool that can alter the mood of your images and allow you to better communicate what you want to say with your image.  Not every image will benefit by shifting the white balance setting, and there will be some photographers who will be adamant that you should always shoot to the “correct” white balance.  As the artist, this is your time to exercise your creative license and do what feels right to you.

Post originally from: Digital Photography Tips.

Check out our more Photography Tips at Photography Tips for Beginners, Portrait Photography Tips and Wedding Photography Tips.

Setting The Mood By Adjusting Your White Balance


Digital Photography School

 
Comments Off on Setting The Mood By Adjusting Your White Balance
Posted in Photography


Software technique: Photoshop Gradient Tool: Part 2 – Adjusting Images

27 May

CompositeWithAdjustments_2.jpg

In the second, concluding article of his 2-part tutorial explaining Photoshop’s Gradient tool, Jean Miele explains how to use linear, reflected and radial gradients in layer masks to improve your digital photographs. In this article Jean takes us through four clear, easy steps, and also includes more tips for making the most out of gradients in both Photoshop and Lightroom. Click through for links to the article. 

News: Digital Photography Review (dpreview.com)

 
Comments Off on Software technique: Photoshop Gradient Tool: Part 2 – Adjusting Images

Posted in Uncategorized


Adjusting White Balance in Lightroom

12 Apr

Lightroom white balance opener

Lightroom has a set of tools that you can use to adjust white balance in your images. To see these at work open an image in the Develop module. At the top of your Basic panel are the white balance adjustment tools.

White Balance Options

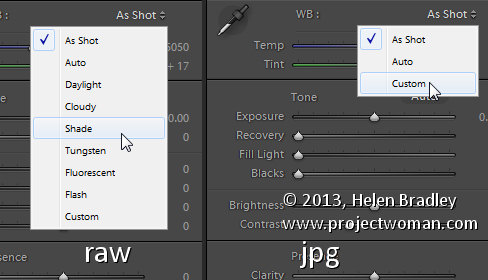
The dropdown list will show you some options for adjusting white balance – what is shown here will vary depending on how your images are captured. If you capture in raw then the white balance dropdown list will contain the same options as you have on your camera for setting white balance. If you’re capturing jpg images then there are fewer options – As Shot, Auto and Custom.

Lightroom white balance 1

On the left are the options for a raw image and on the right those for a jpeg image.

The Temperature and Tint sliders also have different units of measure depending on whether you’re working with jpgs or raw images. For jpg images both the sliders range from +100 to -100. If you’re working on a raw image then the Temperature slider shows degrees Kelvin from 2000 – 50,000 and the Tint slider ranges between + 150 and – 150.

Kelvin is a measurement of the color of light – daylight is around 5,500 degrees Kelvin. Lights we consider to be warm or pink/orange in color including tungsten globes are around 3,000 degrees Kelvin and cool lights which are blue in color such as overcast daylight are around 7,000 degrees Kelvin and higher.

Adjust White Balance

To adjust the white balance in the selected image you can select an option from the White Balance dropdown list to use to fix the image or you can use it as a starting point and then fine tune the result.

You can also manually adjust the Temp slider to add warmth or remove it from the image. Drag the sider to the left to add a blue tint to the image (to cool it down), or to the right to add a yellow tint to it to warm the image.

Use the Tint slider to balance out any excess magenta or green in the image. Drag towards the right to add magenta to the image cancelling out any green tint and drag to the left to add a green tint cancelling out any unwanted magenta.

White Balance Selector

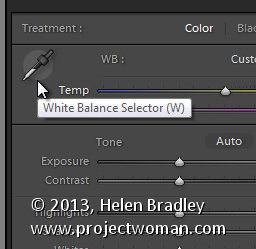
You can also use the White Balance Selector to adjust white balance. You can select the tool by clicking on it or press W.

Lightroom white balance 2

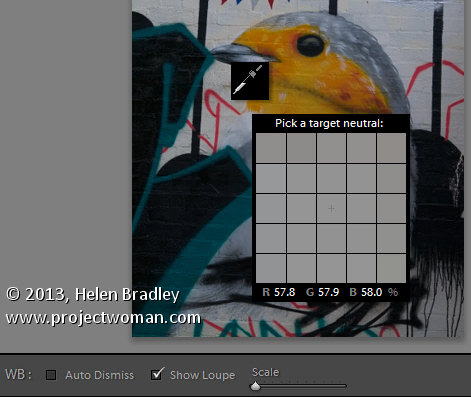
From the White Balance toolbar under the image you can select options that make the White Balance tool easier to use. I suggest you deselect Auto Dismiss as you can then click on the image in various places to attempt to fix it. If you have Auto Dismiss enabled you’ll only be able to click once before the selector is dismissed so, if that fix isn’t perfect then you’ll need to select the tool again to attempt another fix. This is a cumbersome way to work so I prefer to disable Auto Dismiss and put the tool away only when I am done with it.

If you click the Show Loupe checkbox then you’ll see a 5 by 5 pixel grid beside the mouse cursor. The center point in the grid is the pixel that you are currently targeting and which will be used to adjust the image if you click. This grid makes it easier for you to pick the correct point in the image to adjust to. The scale itself can be increased or decreased using the Scale option on the toolbar.

At the bottom of the loupe itself are the RGB percentage values of the pixel under the cursor. These values tell you if the pixel is neutral or not. If it is neutral then the percentages of R, G and B will all be equal – if they are not equal then there is color in that pixel.

Lightroom white balance 3

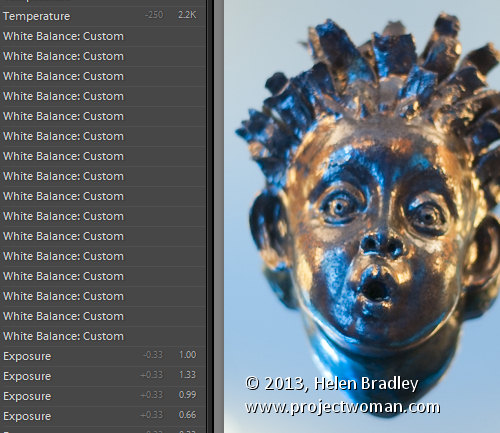
To balance the image using the White Balance selector, click on a pixel that should be neutral grey – not white or black. When you do so, Lightroom will adjust the image so that the selected pixel is a neutral grey and, as a result, all the color in the image will change. At the same time Lightroom adds an entry to the image History for that adjustment. This means that you can wind back the history to return to an earlier white balance fix, if desired.

Lightroom white balance 4

You should be aware that adjusting image white balance is to an extent a subjective assessment – so there is no one value that is “correct”. There are, instead, a myriad of different results that can be achieved so look for one that is it pleasing to you. In most cases viewers prefer to see some warmth in photos as they are more pleasing to the eye if they are warmer rather than cool.

I find that a good approach to take is to experiment with the white balance selector to see the effect on the image by selecting different pixels to adjust to. Then choose the most aesthetically pleasing result.

Post originally from: Digital Photography Tips.

Check out our more Photography Tips at Photography Tips for Beginners, Portrait Photography Tips and Wedding Photography Tips.

Adjusting White Balance in Lightroom


Digital Photography School

 
Comments Off on Adjusting White Balance in Lightroom

Posted in Photography


Adjusting DIstorted Photos in Photoshop

04 Nov

Using Photoshop CS3’s Lens Correction Filter to improve distorted photos
Video Rating: 0 / 5

 
Comments Off on Adjusting DIstorted Photos in Photoshop

Posted in Retouching in Photoshop


Adjusting Color with the Selective Color Tool in Photoshop

28 Oct

Doing dramatic edits with only two fairly simple tools in Photoshop.

DOWNLOAD HERE bit.ly Professional Photoshop Actions, for a perfect Grayscale conversion These Adobe Photoshop Actions are realized to suit almost every photography. ” Through a combination of tested post processing corrections, we realized these Actions to save time, and convert any image into a perfect black & white photo, in a matter of seconds. Also 3 Unique Sharpener Actions are included.” Watch the Video Tutorial to see how to use these Actions, and how to achieve a perfect black and white photo depending on how you use these Actions. Create perfect Black and White photo effects, with no skills What you get in this item: Detailed Instructions Suggestions and tricks about how to work with these Actions 3 Sharpener Actions wich enhance details, using the same process 3 Pro Black & White Actions, to make perfect Greyscale conversions DOWNLOAD HERE bit.ly
Video Rating: 5 / 5

 
Comments Off on Adjusting Color with the Selective Color Tool in Photoshop

Posted in Retouching in Photoshop