RSS
 

Posts Tagged ‘Actions’

Whitney Museum cancels ‘Collective Actions’ exhibit after backlash

26 Aug

The Whitney Museum in New York is cancelling its planned ‘Collective Actions’ exhibit, which was scheduled to begin September 17th, after an online backlash. Farris Wahbeh, the curator, sent out a letter of apology and confirmed that the museum will not show works it acquired at discount prices at a recent ‘See in Black’ charity auction.

‘My sincere hope in collecting them was to build on a historical record of how artists directly engage the important issues of their time. Going forward, we will study and consider further how we can better collect and exhibit artworks and related material that are made and distributed through these channels,’ Wahbeh explains.

The museum attracted criticism for purchasing prints from a recent See in Black auction. 100% of the proceeds from sales went directly to various social justice organizations. The museum paid $ 100 for each print – a deep discount compared to what the artists typically charge, with the intention of placing them in the upcoming ‘Collective Actions’ exhibit. Wahbeh did not initially ask the photographers involved for permission to display their work. Instead, the following message was sent out as revealed by Women Photograph:

Greetings from the Whitney and I hope this message finds you in good health and spirits.

I’m writing to let you know that I have acquired your work…from the project See in Black for the Whitney’s special collections. Your work is incredibly important and speaks to our time, and I’m so honored that the Whitney was able to acquire this work.

Alongside the acquisition, I’m also working on an exhibition comprised largely of works from our Special Collections holdings titled Collective Actions: Artist Interventions in a Time of Change that will feature work by artists involved with collective projects that were organized in response to COVID-19 and Black Lives Matter.

The exhibition will open in September in our 3rd floor exhibition space in the Museum and am excited to share that I plan to include your work as part of this project, work that I believe aptly demonstrates what you have done both individually and as part of a collective.

We are planning to reopen on September 3 following new safety and health protocols and city guidelines. In the meantime, we will install the exhibition so that it will open on September 17.

In recognition and appreciation of your inclusion in the Whitney’s program, I’m happy to note that you will receive an Artist Lifetime Pass which allows you and a guest free entry to the museum as well as other benefits. If you can please provide me with your full contact information (address, email, and phone) to send that Pass to you, I would be most appreciative.

One of the artists involved in See in Black’s print sale took to Twitter to express his outrage:

As of June 2016, the Whitney Museum’s endowment has grown to an estimated $ 308 million. This is why See in Black, and the artists involved, were put off by an Artist Lifetime Pass as compensation. Clearly, the museum has the means to compensate each artist monetarily. See in Black released the following public statement today:

‘We started See in Black as a way to invest in black imagery and permanence through the sale of black–made photography. It has always been our objective to promote ownership, autonomy, and respect for black creatives in an effort to shift the current paradigm upheld by white supremacy.

With that said, the Whitney’s use of the works acquired through the See in Black print sale at significantly discounted prices – the proceeds of which were 100% donated to charity – constitutes unauthorized use of the works to which the artists do not consent and for which the artists were not compensated. Furthermore, See in Black is not affiliated with the Whitney’s exhibition.

The Whitney Museum’s Director recently posted a statement on racial equality to their website. It includes a pledge to ‘re-examine our exhibitions and programs to ensure they continue to address the art and experiences of people of color, especially Black communities.’

Articles: Digital Photography Review (dpreview.com)

 
Comments Off on Whitney Museum cancels ‘Collective Actions’ exhibit after backlash

Posted in Uncategorized


5 Genuinely Useful Photoshop Actions

06 Jun

I use Lightroom for basic editing and raw conversions, but I still like to tweak my photos in Photoshop. Mostly, that’s just about familiarity. I’m a Photoshop addict. Technically, it makes sense to do as much editing in the raw convertor as possible—perhaps all of it—but I like the blank canvas that is Photoshop more than the frog-marched workflow of raw convertors. Besides, there are still things you can see and do in Photoshop that aren’t possible in Lightroom.

Although I might spend a fair while in Photoshop doing labor-intensive things, for the most part, I’m looking to edit photos quickly and naturally so they might be broadly acceptable for publication. I want my pictures to look good without going down the path of fancy effects, which would often narrow their salability.

Create photoshop actions

One way I can quickly tweak photos in Photoshop CC is to have a collection of Actions available. This article will show you five useful Photoshop Actions (available for download at the end of the article) curated and/or adapted by me that have nothing to do with 1970s summery film effects, light leak effects, or anything like that. Those are for another day.

Make Buttons for your Actions

Before we get down to the Actions, consider putting your Actions window into “Button Mode” once you’ve recorded or downloaded them. This makes actions more usable since it avoids you having to scroll down to find them. Nothing is faster than single clicks to get your images looking good, even if you have to back up sometimes.

You can customize the colors of your Action buttons if you want, perhaps assigning a different color to each type of edit.

Photoshop actions button mode

Observe and Adapt

One of the purposes of this article is to show you some neat tricks in Photoshop that you can incorporate into Actions. You’ll be able to see what’s happening and use the same tools to achieve different or better things. These Actions also make use of channel masks, which enable precise, flawlessly nuanced selections of color and tone for different types of edits.

Channels selections, Alpha channel, Photoshop CC

These Actions make heavy use of channels, selections, and layer masks.

Action #1 Saturation Boost

Ever since “vibrancy” was introduced, the use of saturation masks has diminished. The purpose of a saturation mask is to gradually mask the most or least saturated areas of an image, depending on whether you invert the selection or not. We can still use such a mask to create a saturation boost Action. It is made using Photoshop’s HSB/HSL filter.

HSB/HSL filter

The HSB/HSL filter has a psychedelic effect on the image.

An inverse saturation mask addresses the least saturated areas of the image more strongly, but there’s still an outside chance of clipping the RGB channels with it (i.e. overexposing or underexposing them and losing detail). In this Action, a “blend if” blending option has been added to give extra protection to shadows and highlights.

Method

  1. Create a duplicate layer (Cmd/Ctrl + J).
  2. Apply an HSB/HSL filter (RGB & HSB settings) to the duplicate layer – it will turn a weird color.
  3. Invert the colors of the layer (Ctrl/Cmd + I).
  4. Select the green channel under “channels”, right-click and create a duplicate channel (label it “Sat Mask”).
  5. Go back to layers and delete the duplicate layer.
  6. Back in channels, Ctrl/Cmd + click on the “Sat Mask” channel you just created (you should see marching ants on your open photo at this point).
  7. In layers, create a hue/saturation adjustment layer.
  8. Add +25 of saturation in the hue/saturation dialogue box (or any value that might be useful).
  9. Go to Layer > Layer Style > Blending Options.
  10. Under Blend If > This Layer, move the sliders inwards to 245 and 10 (or in that vicinity).
  11. Hold down the Alt key to split these sliders into two, moving the inner halves to values of 70 and 160. This feathers the selection to avoid harsh transitions in tone. Click “OK”.
  12. Delete the “Sat Mask” channel.
  13. Ctrl/Cmd + E to merge all layers.

50-50 view of HSB/HSL filter and regular photo.

If the effect of the Action is too strong or weak for your liking, you can hit Ctrl/Cmd + Z to unblend the layers and alter the saturation value. Then simply blend again. This action is much the same as using the vibrancy slider only in fast button form.

Action #2 Mid-Tone Contrast +50

This relatively simple action injects contrast into the mid-tone to highlight areas of an image and leaves shadow areas untouched. Adding contrast in this way also intensifies the color. It’s akin to a curves adjustment, leaving the lower part of the curve untouched.

Photoshop contrast

Although it’s hard to appreciate in a side-by-side comparison, perhaps you can see the snappier highlights and slightly increased mid-tone saturation to the left side of this image. Shadows remain untouched.

Method

  1. Go to the channels palette and click on the RGB channel while holding down the Ctrl/Cmd key. This creates a selection on your background layer.
  2. Switch to your layers palette and hit Ctrl/Cmd + J keys, which will paste your masked selection onto a new layer.
  3. Go to blending modes (top left of the layers palette), and select Soft Light. Contrast is added to the mid-tone/highlight portions of your picture.
  4. Adjust the layer opacity to taste (set at 50% in the supplied Action).
  5. Ctrl/Cmd + E to merge down the layers.

Action #3 Refined Clarity

This Photoshop Action is similar to the previous one in that it’s a type of contrast adjustment which protects the shadows. The main difference is that this one uses Clarity, which it borrows from ACR.

In terms of appearance, this Action reveals more textural detail than a straight contrast adjustment by emphasizing edges and small changes in tone. It affects the saturation less.

Clarity slider, clarity settings

The image on the left has some Clarity applied to it, but the shadows are protected to avoid the kind of crunchy look that occurs with a similar amount is applied in a raw converter (right).

(The Clarity slider gives much the same effect as “high radius, low amount” Unsharp Mask sharpening, which was a thing about 10 years ago.)

If you want to give flat images extra pop with a greater impression of depth and detail, this Photoshop Action works well. Once again, it uses a Blend If modifications to refine the result, avoiding the grunge that often makes excessive Clarity unsightly. By tapering the result from shadows to highlights, it does most of its work in the mid to high tones.

Method

  1. Create a duplicate layer (Ctrl/Cmd + J).
  2. Label the layer “Clarity”.
  3. Open ACR by clicking on Filter > Camera Raw Filter.
  4. Drag the Clarity slider to 100% (ignore the harsh result).
  5. Click OK and be returned to Photoshop.
  6. Open the blending options (Layer Style > Blending Options or double-click to the right of the layer name).
  7. Go to Blend If > Underlying Layer. Hold down the Alt key and drag the right-hand side of the shadow triangle on the left all the way to the far right.
  8. Click OK.
  9. Adjust the layer opacity to taste (the supplied Action is set to 60%).
  10. Ctrl/Cmd + E to merge layers.

Action #4 Shadow Noise

In recent years, the Auto button in Lightroom and ACR has improved to such an extent that I sometimes click on it as an alternative starting point. The result is akin to a mild HDR effect. In particular, it tends to cut out the high contrast in images.

Photos that are intended for sale (however optimistically) don’t generally benefit from being loaded with hard-to-see, blocky detail.

In an image such as this one, I might hit Auto in the raw converter to unblock some of the shadows (as is the case in the top section of the picture: notice the railings, man’s coat, and architectural details).

Of course, the problem with bringing out shadow detail is that it invites noise. Depending on your camera and its settings, it might invite a lot of noise. If we create a Noise Reduction Action using a channel mask, we can target the darkest areas of an image. What’s more, the mask is perfectly feathered, so it will seamlessly apply more or less noise reduction according to the tones of the image.

On the right side of this image, you’ll note that the brighter areas are masked off (redder areas) and thus excluded from noise reduction.

The downside of creating a Photoshop Action for noise reduction is that normally you’d adjust the settings according to the properties of each photo. However, there’s nothing to stop you creating several noise reduction actions for different picture profiles. As well, you could integrate a noise reduction plugin that assesses each picture individually.

Method

  1. Create a duplicate layer and name it “Reduce Noise”.
  2. Apply noise reduction to the duplicate layer.
  3. Go to channels and Ctrl/Cmd + Click on the RGB channel, creating a selection.
  4. Hit Shift + Ctrl/Cmd + I to invert the selection.
  5. Click on “Save Selection as a Channel”.
  6. With the selection visible (marching ants) go back to layers and add a mask to your duplicate “Reduce Noise” layer.
  7. Delete the remaining extra channel (“Alpha 1” if you didn’t rename it).
  8. Ctrl/Cmd + E to merge the layers.

Action #5 Web Sharpen

Sharpening is a contrast adjustment, where adjacent edges are made brighter and darker according to their tone to create the illusion of sharpness. The aim is to emphasize these edges without overdoing it and creating haloes.

One way you can control sharpening is with a luminosity mask, which automatically modifies the amount of edge contrast applied depending on how bright or dark it is. The beauty of this is that it’s subjective. Like other channel masks, it fades the effect of your edit based purely on the content of the image. The only control you have to think about is opacity, which might be greater or smaller depending on the size of the image.

channels mask, luminosity mask, Photoshop

By applying a luminosity mask, sharpening is proportionately reduced in the darker parts of the image (shown as deep red). This ensures that less attention is given to any noisy shadow areas, which we don’t want to sharpen. The Action also shields bright highlights from sharpening using a Blend If setting.

I find that this Action at 10% opacity works well on web images of between 800 and 1200 pixels wide.

Method

  1. Create a duplicate layer and name it “Sharpen”.
  2. Open channels, hold down the  Ctrl/Cmd key and click on the RGB channel, creating a selection.
  3. Click on the “Save selection as channel” icon at the bottom of the channels palette. A new channel will appear called “Alpha 1”.
  4. Deselect it by hitting Ctrl/Cmd + D or by clicking Select > Deselect.
  5. Click on your “Sharpen” layer to make it live.
  6. Go to Filter > Unsharp Mask and select a high value of 400-500, a radius of around 0.8 to 1.2, and a value of 0.
  7. Ctrl/Cmd + click on the “Alpha 1” channel in the channels palette (the selection will reappear as marching ants).
  8. Go back to the layers palette and with your “Sharpen” layer selected, click on the “Add layer mask” icon. This modifies the sharpening effect.
  9. Click on Layer> Layer Style > Blending Options.
  10. Move the right-hand slider under “This Layer” to 245.
  11. Holding down the Alt key, split the left-hand side of this slider and move it to around 220.
  12. Click OK.
  13. Adjust the layer opacity to taste (the download action is set at 10%).
  14. Delete Alpha 1 channel.
  15. Ctrl/Cmd + E to merge layers.

Photoshop Action Crashes

Occasionally, for reasons unclear to me, Photoshop Actions seem to crash and will not thereafter work without a Photoshop restart. A sure sign that this has happened, aside from inaction and error messages, is that the button in “button mode” changes color.

Download the Set

Download these actions here for free. To install: open the download directly into Photoshop or load from within Actions.

Finally

If an Action doesn’t improve the photo as you’d hoped, you can delete or add elements as you wish, perhaps with different settings or to refine the result. I hope this article inspires you to experiment with some of Photoshop’s more powerful tools. Good luck!

The post 5 Genuinely Useful Photoshop Actions appeared first on Digital Photography School.


Digital Photography School

 
Comments Off on 5 Genuinely Useful Photoshop Actions

Posted in Photography


Working with Overlays and Actions

25 May

Since my childhood, I’ve been dreaming about inventing two things.  The first is a teleporter.  Yes, you read it right, but please imagine teleporting from the ‘Star Trek’ movie not from the horror movie ‘The Fly’!   With teleport, people could forget about long queues, tedious trips and expensive taxis.  The second thing I have been dreaming about is a Continue Reading

The post Working with Overlays and Actions appeared first on Photodoto.


Photodoto

 
Comments Off on Working with Overlays and Actions

Posted in Photography


How to use Photoshop Droplets and Actions to Automate Your Workflow

22 Apr

Most photographers who do any kind of event photography (including corporate or weddings) need to find ways to automate aspects of their photographic workflow. This is because events usually generate a lot of images. There are many ways to automate your workflow. This article will describe a technique for speeding up your workflow using Photoshop Droplets and Actions (rather than Lightroom).

To understand this method you need to grasp a couple of Photoshop concepts: Actions and Droplets.

Droplet Processing

Created using an Action and the Droplet we’ll make below.

Photoshop Actions

What is a Photoshop Action? An Action is a powerful tool in Photoshop which is essentially is a recorded sequence of steps. By recording the repetitive individual steps as a group, the entire sequence can be repeated. Actions are really intended for global edits and not for image specific local edits.

Conceptually, as you develop your editing skills as a photographer, regardless of whether you are using Lightroom or Photoshop, you will eventually develop a style or procedure that you like to do when you process your images. Using Actions will help automate these procedural edits.

Beyond your own types of global edits, Photoshop comes with a small set of pre-configured Actions that are included in the installation of Photoshop.  In addition, there are many Photoshop Actions available either for free or for purchase on the internet.

Many photographers try to engage their followers by selling Actions to achieve particular looks. Anyone purchasing Actions should know that they are just pre-recorded sequences that anyone can do within Photoshop to achieve the same look (they do take time to set up though). Regardless, Actions automate repetitive steps in Photoshop.

Droplets

Droplets are a great way to automate the use of Actions with Photoshop. Droplets are similar to Actions but can be used on many files and activated from outside of Photoshop. There are other ways to do batch processing, but Droplets are a neat and simple way to allow actions to be performed on multiple images.

Sound confusing? Here it is in a nutshell: a Droplet is a small executable file that allows you to drop a folder full of images onto a file on your desktop that will run an action set and create final image results that are stored in another folder.

Why do this?

By using a Droplet, you can take a folder full of images and process them without having to open each one individually. It allows you to perform a long series of repetitive steps on images simply and cleanly. Just drop the folder on the Droplet and walk away to allow your computer to do all the work while you do something more fun, like make a sandwich or watch a Netflix show.

Why not do all of this with batch processing in Lightroom? Lightroom allows for batch processing of images with Presets. But some Actions are too complex for Lightroom and Actions for Photoshop don’t work in Lightroom unless they are specifically built for Lightroom. Any event photographer or any photographer that has to take and process a lot of images needs to find a way to simplify their process to get images finalized.

So how do you set up a Droplet?

First, you need to either decide on an Action or sequence of Actions (you can use more than one) and decide where you want to put the edited files when they are done. To show how to use a Droplet, let’s create a simple action and then set it up as a Droplet.

Step 1: Open an image

Droplet Batch Processing Before - How to use Photoshop Droplets and Actions to Automate Your Workflow

Image before processing

Let’s make a simple action to apply the appearance of motion to an image by applying a radial blur.

The first step is to open an image in Photoshop. You need to start with an image in order to be able to go through all the steps to save the Action and create the Droplet. You can use a pre-existing Action but to create the Droplet you need to modify the Action and that can get complicated.

For this example, you are going to create an Action first, make sure it works, and then use it to create the Droplet.

Droplet-Creating the Action - How to use Photoshop Droplets and Actions to Automate Your Workflow

Launch the image into Photoshop

Step 2: Create the Action

Create an Action - How to use Photoshop Droplets and Actions to Automate Your Workflow

Dialogue box for creating a new Action in Photoshop.

If you already have an Action that you want to run, you can skip the process of recording a new one, but for this example, we are creating a new Action. First, you need to open the Actions panel. If yours is not visible, go to Window > Actions from the top menu.

Once the Actions panel is open, you need to make sure you are not in button mode (button mode has colorful boxes).  If the list in the Actions panel is grey staggered boxes, you are in the right mode. At the top right corner, there is a small wing menu. Open that and choose New Action. You will then see the panel above.

For this Action, we are creating a motion effect using a radial blur. Call the Action dPS Radial Blur (or whatever makes sense to you) and then press the Record button to start recording the Action. You are on your way and you should see a red dot at the bottom of the Actions panel.

Step 3: Create the Radial Blur

Duplicate the image by selecting Duplicate Layer from the pull-down menu at the top of the layer panel (or use the keyboard shortcut Cmd/Ctrl+J).

Duplicate the image - How to use Photoshop Droplets and Actions to Automate Your Workflow

Create a duplicate layer.

The name of the duplicate layer is not important, but this is the layer to which you are going to apply the radial blur. Now, with the new layer selected go to the menu bar select Filter > Blur > Radial Blur. This will open the following dialogue box.

Radial Blur Dialogue - How to use Photoshop Droplets and Actions to Automate Your Workflow

Apply the radial blur.

The default method is spin and the default quality is good. Change these to zoom and best (as seen above). You need to apply a fair bit of blur for this effect, so anything higher than 70% will work. Your dialogue box should look like the image above.

Step 4: Create the Mask

For this effect, you will only be applying it to the outside edges of the image. To do this you are going to use a layer mask. To create the mask, select the layer you just applied the radial blur effect to and then click on the icon with the white rectangle with a dark circle in the center (third from the bottom left). This should create a white square next to the thumbnail of your active layer, that is your mask. The white mask means that your effect is still being applied or showing across the entire image.

Create the Mask - How to use Photoshop Droplets and Actions to Automate Your Workflow

Create a layer mask on the layer with the blur effect you just created.

Once you have created the mask you need to paint on it with black to selectively hide parts of the effect on this layer. Select the Brush Tool and choose a large brush with a soft edge to modify the mask. The size of the brush should be pretty big so that it covers a large portion of the center of your image. Use a really soft brush (hardness of about 15%).

Paint on the mask with black (make sure the mask is selected not the layer itself – square white brackets should be around the mask) over the center of the image to reveal the sharp part you want showing. Use the softness of the brush to make the transition from blur to sharpness gradual. Your mask should now look mostly white with a black dot in the middle.

The finished image - How to use Photoshop Droplets and Actions to Automate Your Workflow

This is the image after the steps have been completed.

Your image should look something like this effect. Your Actions panel has been recording all these steps in the background. Save your image in the format you want (JPG, PSD, TIF, etc.), the location should be your destination folder.

Step 5: Finish recording the Action

Go to your Actions panel and press the square box (stop button) at the bottom of the panel next to the red dot.

Action panel still recording - How to use Photoshop Droplets and Actions to Automate Your Workflow

Finishing the Action, press stop (square) next to the red dot

This stops the action from taking further steps. Your Action is now complete. If you delete the layer with the blur on it, you can test your action on the same image.

Simply go back to the Layer panel, delete the top layer with the mask.  Go to the Actions panel and find the new Action with the label dPS Radial Blur, highlight it, and click the triangle pointing to the right on the bottom line of the panel. This will activate or run the action. If you have done it correctly you will get the same image again. Yeah!

Step 6: Making the Droplet

Okay, we are almost ready to create the Droplet, there are only a couple more steps involved. To make sure the Action works properly you need a fresh instance of Photoshop. So the first thing to do is to close Photoshop and relaunch it.

The steps to make the Droplet from this point on are quite simple. To create the Droplet, go to the menu bar to File > Automate > Create Droplet.

Creating the Droplet - How to use Photoshop Droplets and Actions to Automate Your Workflow

The Droplet dialogue box.

This is the last set of steps but they are important. First, pick a good location for your Droplet. Usually, a great spot is on your desktop. Click the “Choose…” button, select the desktop and a name for your Droplet (give it a meaningful name for you).

Under the Play heading, uncheck all the boxes (these will stop your droplet from processing) and select your new Action from the pull-down list. Set the destination as Folder and choose a destination for your images (it is usually convenient to put the folder on the desktop as well). Uncheck the Override Action “Save As” command.Press OK.   The last thing to do is to create an empty folder (this will be the source folder where you put your images to be processed) in the same location as you put your Droplet (e.g. the desktop). Close and exit Photoshop.

I like having the source folder, Droplet and destination directory close to each other on the desktop. My arrangement looks like this:

Source folder, Droplet and destination folder

A typical layout for a Droplet on my desktop.

Step 7: Using your Droplet

You are now ready to use your Droplet. Simply put your images to be processed (try only a couple to test first) into the source folder (in this case it’s called To Be Processed). The images should be in the same format you chose previously. Make sure Photoshop is not running (sometimes this causes communication errors). From the desktop, highlight the source folder and drag it onto the Droplet.

Here’s what should happen: the Droplet launches, Photoshop starts, runs your action, and saves your images in the destination folder. Using the test image, it should look like this.

The finaished image

The finished test image after processing

Conclusion

Sometimes droplets are finicky to set up but once they work, they work really well. Each image is processed separately one at a time, so you can take a number of images, put them in your source folder and then just drop the folder on the droplet. This allows you to walk away from your computer for a while, grab a coffee, update your Facebook status (#Workinghard!), have a short nap and come back to a finished set of images.

Droplets can really help to simplify your workflow. The only word of caution is that if you are processing a large number of images with an Action that causes the finished image to get significantly larger, make sure you have sufficient hard disk space for the finished images. I have found if you run out of disk space, Photoshop will crash during a droplet operation.

Happy workflow! If you have used Droplets before please share your experience in the comments below, as well as if you have any questions.

The post How to use Photoshop Droplets and Actions to Automate Your Workflow appeared first on Digital Photography School.


Digital Photography School

 
Comments Off on How to use Photoshop Droplets and Actions to Automate Your Workflow

Posted in Photography


Working with Overlays and Actions

21 Mar

Since my childhood, I’ve been dreaming about inventing two things.  The first is a teleporter.  Yes, you read it right, but please imagine teleporting from the ‘Star Trek’ movie not from the horror movie ‘The Fly’!   With teleport, people could forget about long queues, tedious trips and expensive taxis.  The second thing I have been dreaming about is a Continue Reading

The post Working with Overlays and Actions appeared first on Photodoto.


Photodoto

 
Comments Off on Working with Overlays and Actions

Posted in Photography


Save 60% off with these Professional Photoshop Actions & Lightroom Presets

21 Dec

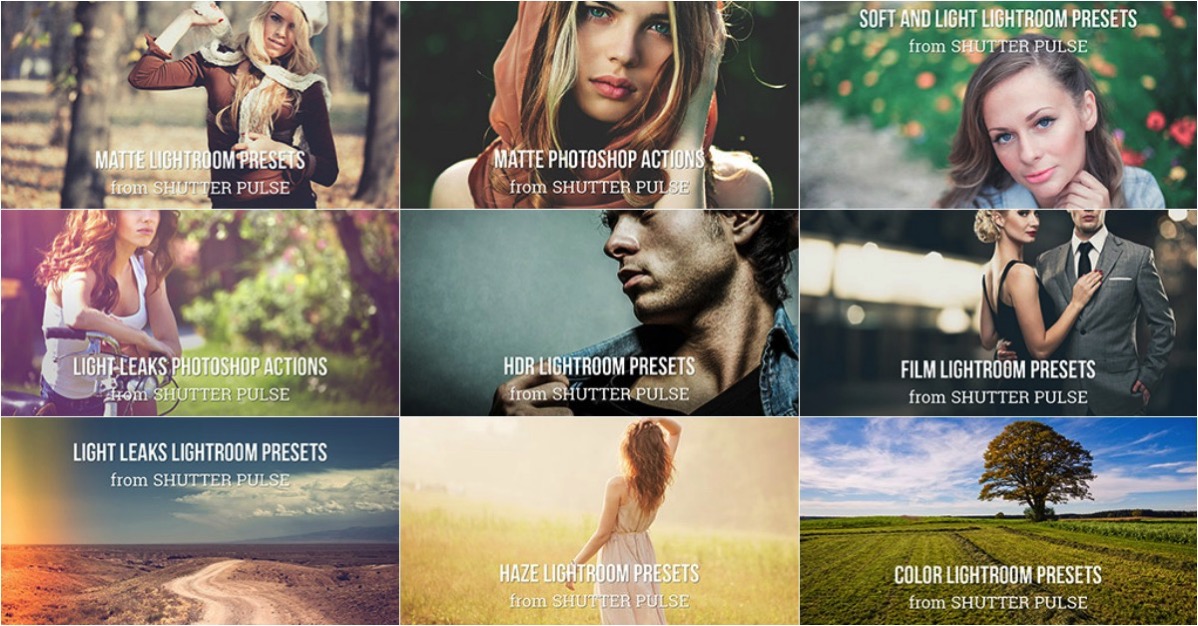
It’s Day 5 of our 12 Days of Christmas sale and today our friends over at Shutter PulseShutterPlus are offering an exclusive 60% off to dPS subscribers.

Shutter pulse

Today you can save 60% on their Professional Photoshop Actions and Lightroom Presets.

Quality Photoshop Actions and Lightroom Presets allow you to save a massive amount of time during post processing, and they can also help you to achieve impressive looks and effects with ease.

Today you have the option to pick up the following ShutterPlus Packs:

  • 300+ Photoshop Actions Bundle – Just $ 29, normally $ 39
  • 330+ Lightroom Presets Bundle – Just $ 29, normally $ 59
  • OR… get Both Bundles for an even bigger saving of just $ 39, normally $ 98!

These Bundles Include 100’s of effects including:

  • Stunning HDR Effects
  • Vintage Effects
  • Cinema-Inspired Effects
  • Film-Inspired Effects
  • Matte and Haze Effects

Pick up your bundle before it’s gone!

P.S. You’ll need a copy of Adobe Lightroom and/or Photoshop to use Presets or Actions.

P.P.S These presets are completely different to the dPS presets on sale yesterday, so here’s your chance to build up your preset collection so you have the right look for every occasion!

googletag.cmd.push(function() {
tablet_slots.push( googletag.defineSlot( “/1005424/_dPSv4_tab-all-article-bottom_(300×250)”, [300, 250], “pb-ad-78623” ).addService( googletag.pubads() ) ); } );

googletag.cmd.push(function() {
mobile_slots.push( googletag.defineSlot( “/1005424/_dPSv4_mob-all-article-bottom_(300×250)”, [300, 250], “pb-ad-78158” ).addService( googletag.pubads() ) ); } );

The post Save 60% off with these Professional Photoshop Actions & Lightroom Presets by Darren Rowse appeared first on Digital Photography School.


Digital Photography School

 
Comments Off on Save 60% off with these Professional Photoshop Actions & Lightroom Presets

Posted in Photography


Make it Snow with Pure Photoshop Actions Winter Wonderland Set

18 Nov

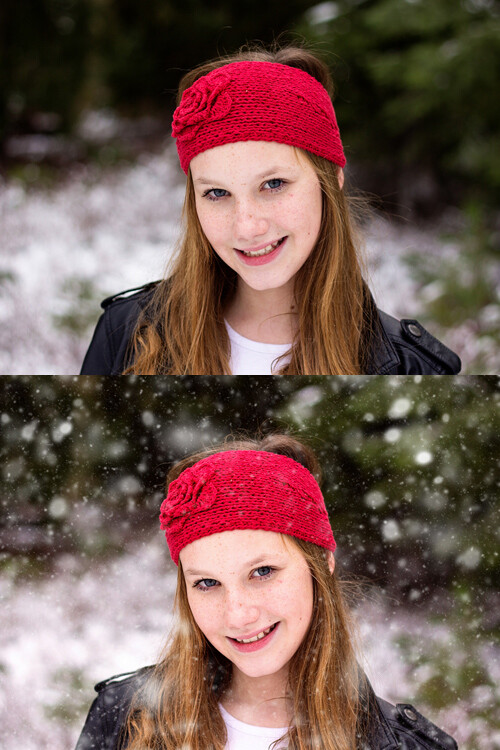
winter-wonderland-action-1

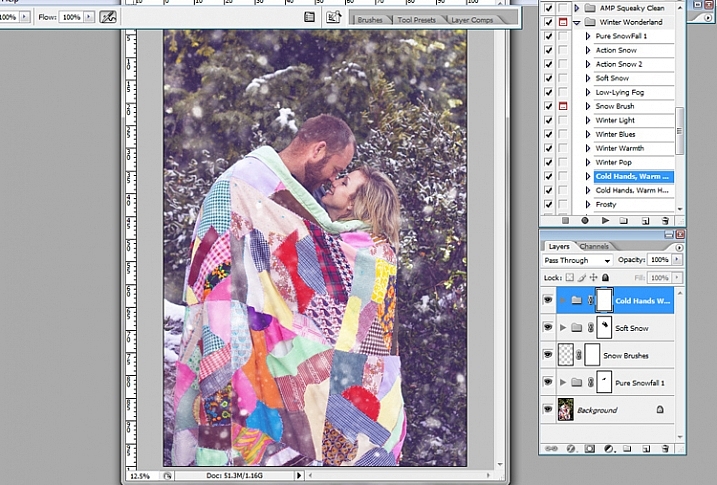
When it comes to post-processing, photographers definitely have opinions about Photoshop Action sets. Some photographers love them, others consider them cheating. For me personally, Actions are most valuable when they either (a) make the editing that I would do by hand more efficient and/or (b) offer something unique and fun that may be outside my normal editing style, but fits a particular session.

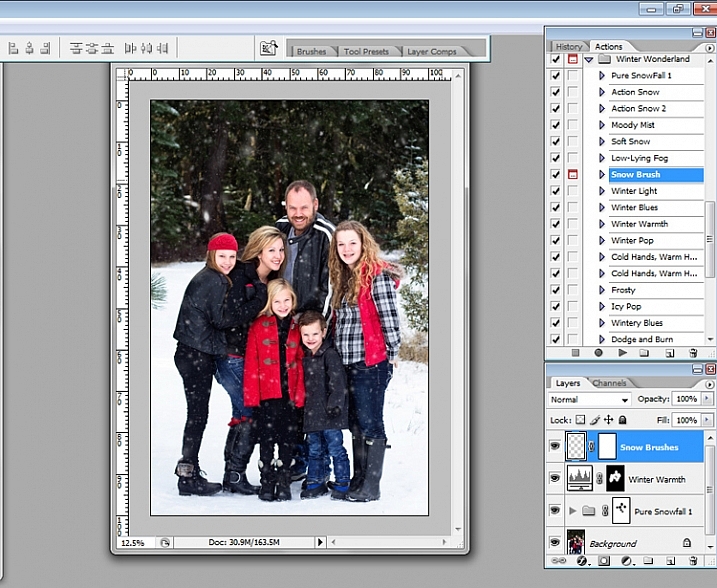
In this case, the Winter Wonderland Action Set by Pure Photoshop Actions (available for Photoshop CS and above, and Elements 6-11 for $ 25 regular price) fits a bit of both those criteria. It’s not something that I use every day, but it really is a fun action set to have on hand during the winter months!

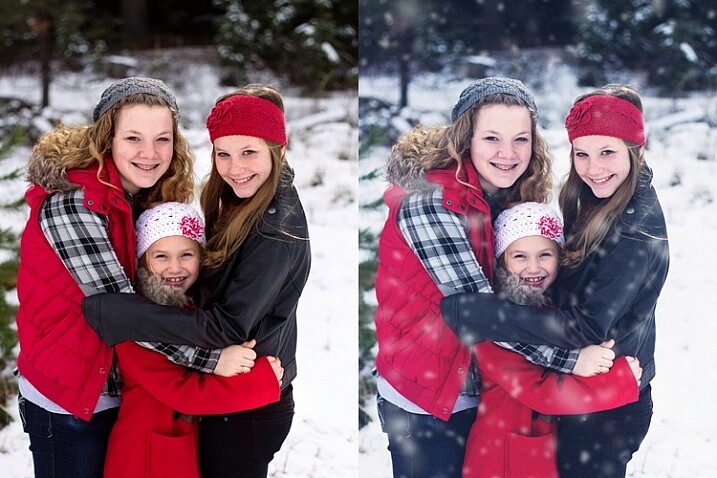
Essentially, the Winter Wonderland Action Set allows you to add snow with one click during post-processing. It includes several different kinds of snow, fog, and mist that can add a little something extra to your winter images. It also offers some tints and adjustments that allow you to tweak the final images towards your normal style of editing, whether you lean towards natural and clean, or a faded vintage look.

winter-wonderland-action-2

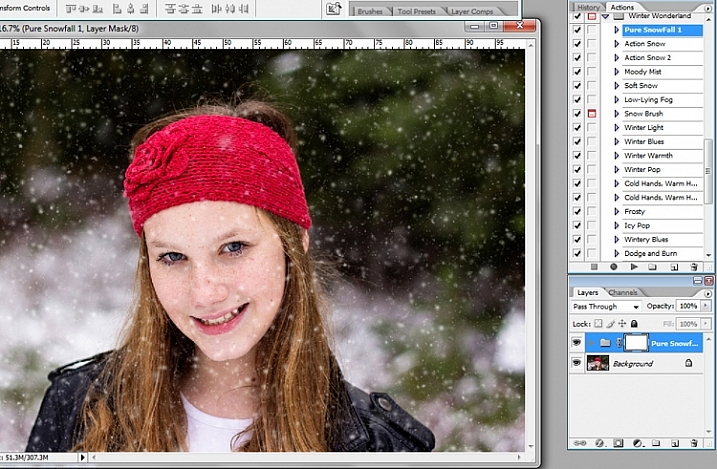
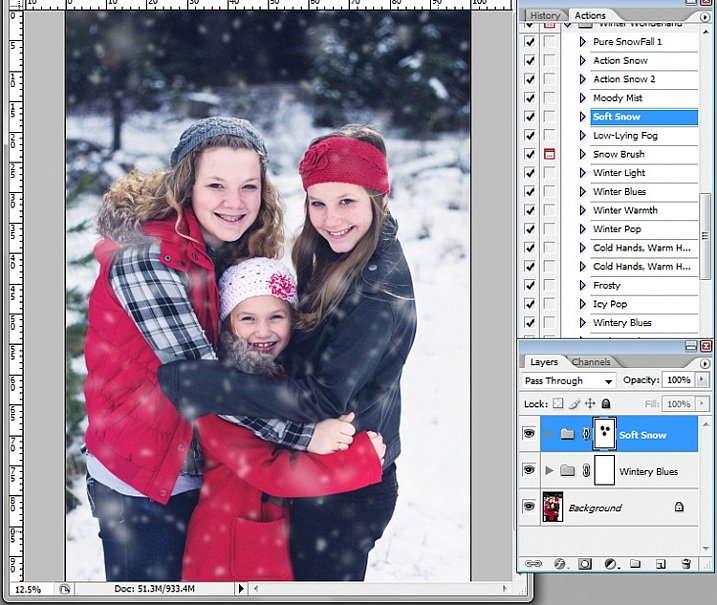
The first thing that I should mention, right off the bat, is that some of these actions run very slowly. The “Pure Snowfall 1” action in particular always seems to take several minutes to run. On the other hand, the “Soft Snow” action runs quickly every time. That said, even with “Pure Snowfall 1” taking several minutes to run, it’s still much faster than adding in individual snowflakes by hand, so it’s a win in my book.

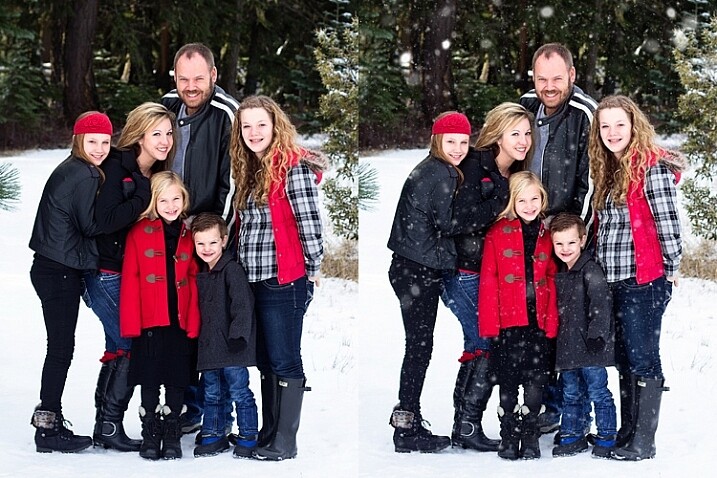
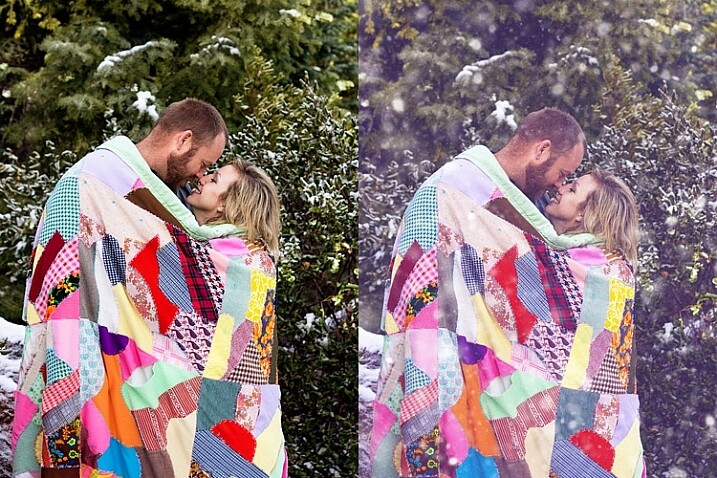
Original image on the left, final image using PPA Winter Wonderland on the right.

Original image on the left, final image using PPA Winter Wonderland on the right.

As with most action sets, you should be prepared to tweak Winter Wonderland to fit your particular image. Winter Wonderland adds masks to most of the actions after they’ve run, and I find that I use them quite often. The most common tweak that I make to the Winter Wonderland set is to remove the added snowflakes from the subject’s eyes, nose, and mouth. I prefer the “snow” to look as natural as possible, so I do tend to leave the snowflakes around the hairline, and sometimes even on the cheeks.

winter-wonderland-action-4

The actions in this set tend to do a pretty good job of varying the size of the snowflakes in order to give a more realistic foreground and background, but there is also a snowflake brush included with the set, which allows you to pick the overall size of snowflake you want, and then scatters additional snowflakes in that size randomly over the image.

Original image on top, final image edited with PPA Winter Wonderland on the bottom.

Original image on top, final image edited with PPA Winter Wonderland on the bottom.

My editing style tends to be pretty clean, so that is about where I usually stop with this action set. However, the set also includes a number of actions that allow you to achieve a subtle vintage feel to your final images, and I’ve also enjoyed testing those options out as well.

winter-wonderland-action-6

Original image on the left, final image edited with PPA Winter Wonderland on the right.

Original image on the left, final image edited with PPA Winter Wonderland on the right.

When I use the Winter Wonderland action set, my ultimate goal is that if I were to post the image on Facebook, the majority of my client pool would not readily be able to tell that the snow was added in post-processing. Of course, some of my photographer friends are likely to be familiar with this particular action set, and others may be familiar enough with Photoshop to know that something’s up, but my hope is to create images that look natural enough that they could easily pass as being real. So, in order to accomplish that goal, one of the key pieces is to only use images in which your model is dressed appropriately for snow, and there could feasibly actually be snow in that location.

This particular set of images is my favorite set that I’ve ever edited with Winter Wonderland, and I think that’s due in large part to the fact that there was actually snow on the ground during our session. So, it’s not too much of a leap for a casual viewer to see snow on the ground, and find it feasible that snow could be falling at the same time. On the other hand, if I were to run this same action set on an image taken at sunset during the summer months, it would likely look ridiculous…which would really only work if you’re going for a super campy “Christmas in July” themed session.

winter-wonderland-action-9

winter-wonderland-action-10

Original image on the left, final edited image with PPA Winter Wonderland on the right.

Although I’ve seen Winter Wonderland marketed almost exclusively towards photographers doing portraits or family photography, don’t underestimate this set for landscape and nature images as well. As long as the content, and coloring of your landscape or nature image, would be appropriate for a photograph taken in the winter, there’s no reason not to give it a try!

winter-wonderland-action-8

Just for the record, I purchased the Winter Wonderland Action Set on my own, and Pure Photoshop Actions has no idea that I’m writing this article. I have just enjoyed the Winter Wonderland set quite a bit, and thought that it was worth sharing (and reasonable price at $ 25) as we head into the winter months in the northern hemisphere.

Have you tried the Winter Wonderland Action Set? If so, what did you think? If not, is there an image you’re eager to try it on?

googletag.cmd.push(function() {
tablet_slots.push( googletag.defineSlot( “/1005424/_dPSv4_tab-all-article-bottom_(300×250)”, [300, 250], “pb-ad-78623” ).addService( googletag.pubads() ) ); } );

googletag.cmd.push(function() {
mobile_slots.push( googletag.defineSlot( “/1005424/_dPSv4_mob-all-article-bottom_(300×250)”, [300, 250], “pb-ad-78158” ).addService( googletag.pubads() ) ); } );

The post Make it Snow with Pure Photoshop Actions Winter Wonderland Set by Meredith Clark appeared first on Digital Photography School.


Digital Photography School

 
Comments Off on Make it Snow with Pure Photoshop Actions Winter Wonderland Set

Posted in Photography


20+ Fantastic Free Photoshop Actions for Your Photography Toolkit

11 Feb

Photoshop actions are an amazing tool that can help you to automate your workflow and to add creativity to your photo library. Using actions, you can apply a photo effect to one or many images from your collection. It’s extremely useful when you need to edit a lot of images from the wedding photo shoot, for example, and make them Continue Reading

The post 20+ Fantastic Free Photoshop Actions for Your Photography Toolkit appeared first on Photodoto.


Photodoto

 
Comments Off on 20+ Fantastic Free Photoshop Actions for Your Photography Toolkit

Posted in Photography


3…2…1…Actions!! A Guide to Using Photoshop Actions to Speed-Up Your Workflow

06 Jan

Do you find yourself doing the same processes in Photoshop over and over again? Do you wish you knew a way to quickly do amazing things to your photos without going through a bunch of steps? If you haven’t entered the world of ACTIONS yet, let me be your guide! I’m going to teach you how to install Photoshop Actions that you purchase or download on the web, and even better, how to create your very own Actions.

197

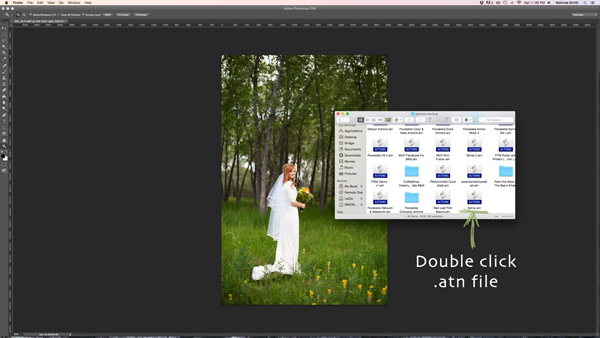
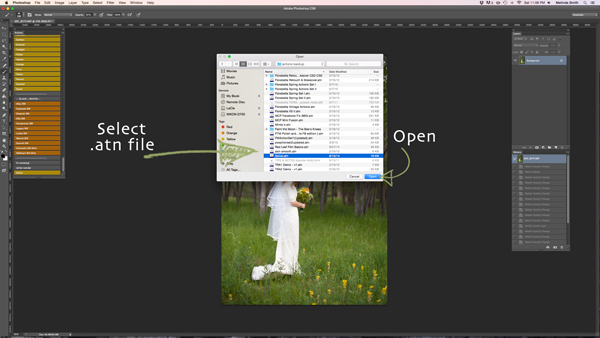
Find the “.atn” file and double-click it.

There are tons of places to find Actions on the web. Some cost a lot, some are free. There are a lot of great ones, and a lot that aren’t really worth using. I look for Actions that fit my style, and are fully adjustable. Which means that I can turn every layer off or on, adjust the opacity of each layer, and customize to fit my style and each individual photo.

Installing Photoshop Actions

Once you’ve purchased and downloaded your Action, make a backup file somewhere, just in case. Then, open the folder, find your Action (it will be a file with .atn extension), and double click it.

(You do not need to have a photo of a gorgeous bride open in Photoshop as you do this, but it never hurts!)

198

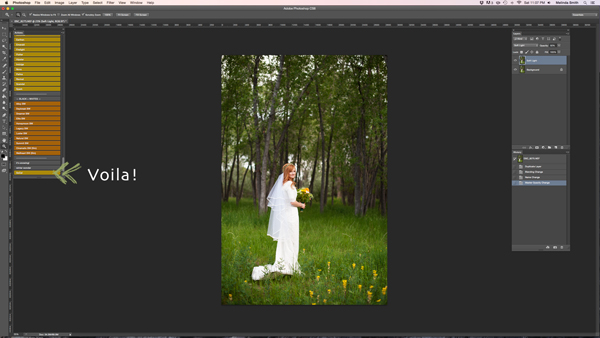
This might seem too easy to be true, but most of the time this works. It’s automatically installed into Photoshop when you double click. Easy as that! If for some reason that doesn’t work, or you like to do things the hard way, you can use the following method.

199

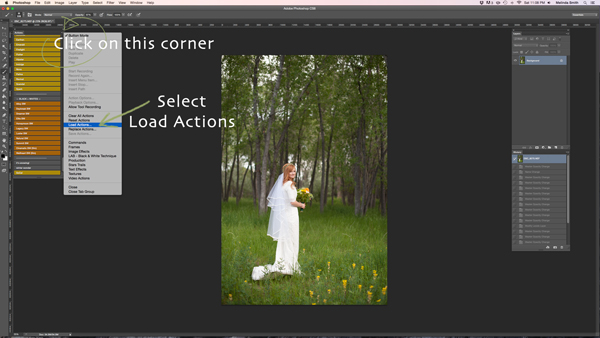
Make sure your Actions Palette is open. You can do this by clicking “Window” at the top of Photoshop, and making sure the check mark next to “Actions” is on. If you don’t see a check mark, just click on “Actions” and your Action Window will appear.

Click on the upper right hand corner of your Actions palette, and a drop down menu will appear. Select “Load Actions”.

200

Then, you’ll navigate to find and select that .atn file, click “Open”, and it will be installed. Now your Action is ready to be used. All you have to do is open a photo, click on your Action, and it will run through a bunch of steps in a very short amount of time (running times may vary based on the number of steps in the Action and the speed of your computer). Be aware that not every Action will look great on every photo, and many times Actions need to be adjusted before they look right. Be careful not to overuse Actions. They are great tools, but can ruin a photo quickly if you don’t practice adjusting and learning what Actions work with different types of photos.

How to create Photoshop Actions

Now that you know how to install someone else’s Actions, I want to teach you how to be a Photoshop rock star and create an Action of your own. You can create Actions for so many different things, from a simple sharpening Action, to a complex multi-step stylized Action.

184

For this demonstration I’m going to show you how to make a simple “soft light” layer to add a boost to your photos. Go ahead and open Photoshop and make this Action along with me. Once you see how the steps work, you can experiment with making more Actions for all the things that you find yourself doing over and over again. You will need to have a photo open when creating your Action, so choose a beautiful bride, or any photo you’d like.

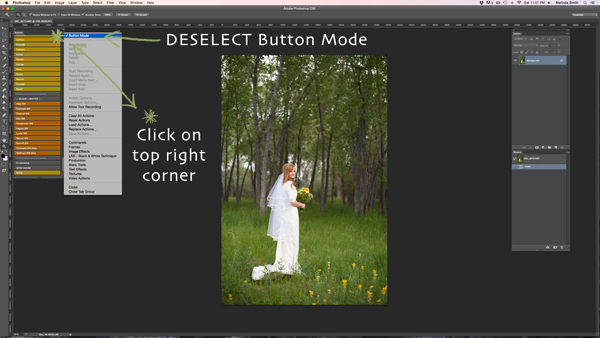
Your Actions palette may be in button mode, or it may not. I like mine in button mode for normal use, but you have to change out of button mode to create Actions. Click on the top right corner in your Actions palette, and make sure that the check mark next to “Button Mode” is deselected.

185

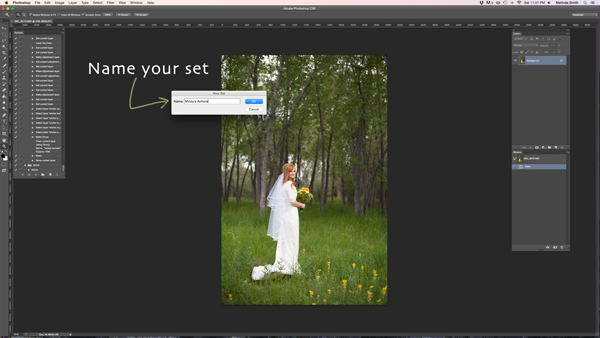
Before you create an Action, you will want to make your own Action folder set, so that everything stays organized. Select “New Set” from your drop-down menu.

186

You can name your set anything you’d like. A great set to start with would be a simple “My Actions”, so you will know which ones you created. Later you can divide them into multiple categories if you’d like.

187

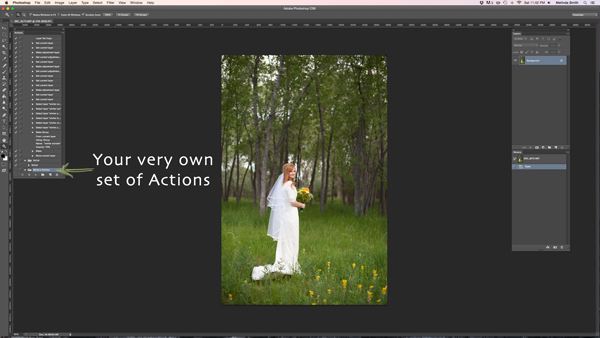
Right in the Actions palette is your very own set of Actions. You are now that much closer to Photoshop rock star status! Make sure your set is selected for the next step. If it’s highlighted, you’re ready to go.

188

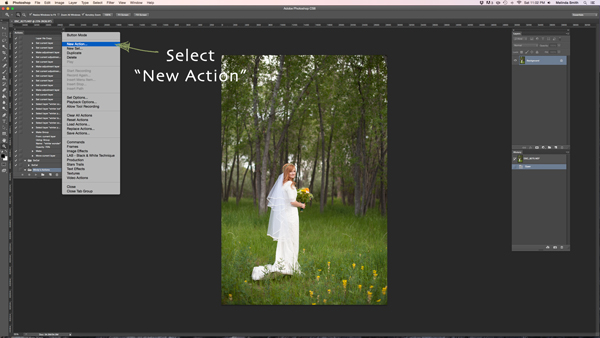
Select “New Action” from the menu. We are going to create an Action inside your Action set.

189

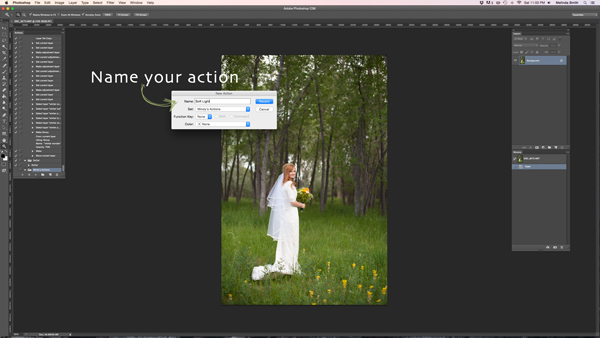
Now you’re going to name your Action. It’s good to pick a name that lets you know exactly what it does, or describes the results of the Action well, so you won’t be wondering later. Since this Action will be a “Soft Light” layer, I just named it “Soft Light”.

190

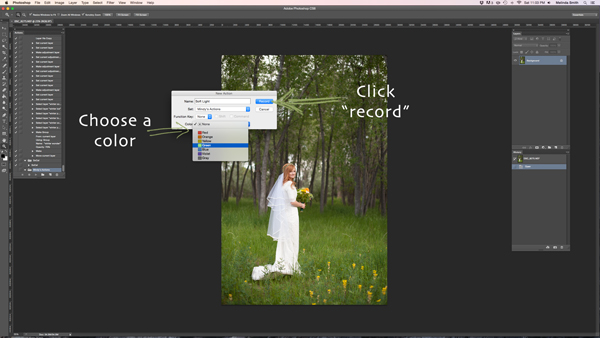
If you’d like to, you can also choose a color for your Action, this only applies if you are in Button Mode. This helps with Action organization. You can make all of your Actions within your set the same color, so you can easily find different sets of Actions, or you could only choose a color for your frequently used actions, so they are quick to find. Now you’re ready to start recording. Just click record. Don’t worry, you can go as slow as you need to. It just records the process that you are going through, but doesn’t record the time it takes you to do it. It will play much faster than it takes you to record it.

191

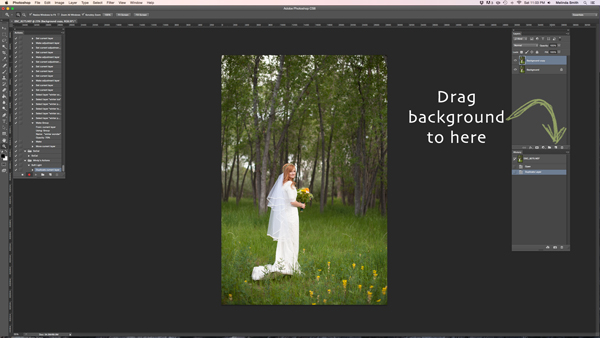
We are going through the steps of making a Soft Light layer right now. It’s super simple, but it’s a great one to make for your very first Action. Just drag your background to the “create a new layer” icon (the square with a corner folded over), and it will make a duplicate of your background.

192

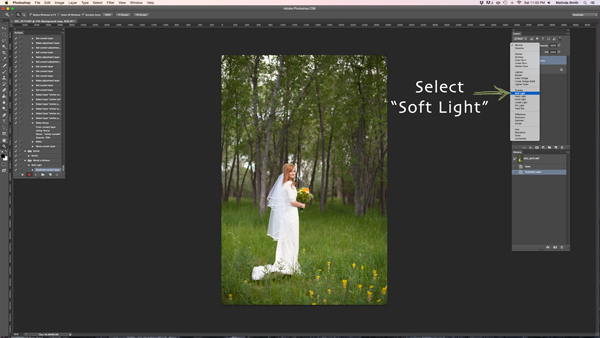
Make sure your “background copy” layer is selected, then click on the Blending Mode menu. (It will say “normal” on the button. It’s at the top left of your Layers Palette.) Find “Soft Light” and select that blending mode.

193

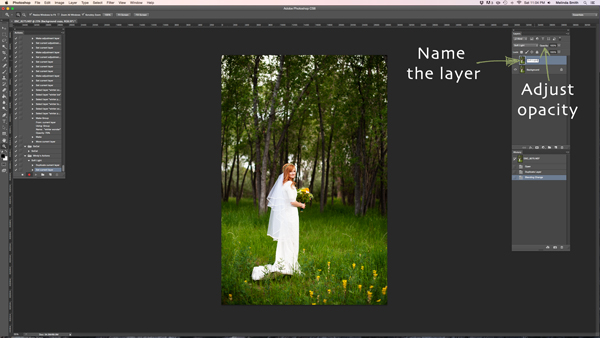
I like to name the layer when I make Actions, so that I can easily know what each layer does when I run the Action later. Just double click on the name of that background copy and type in a new name for that layer. I went with “Soft Light” because I’m very original and creative.

I also adjusted the opacity to around 50%, just because I know that on most photos I won’t want it 100% strong (adjust to your own taste and style). When you run the Action, you can always adjust the opacity to suit the individual photo, but I suggest you put the opacity at a level that you use most, because often that will save a step when you run it later.

194

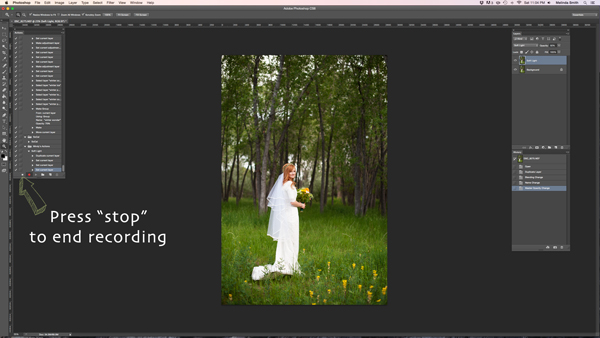
Now we are done with our Action and we just need to press “stop” to end the recording. It is the square just to the left of the red recording button.

195

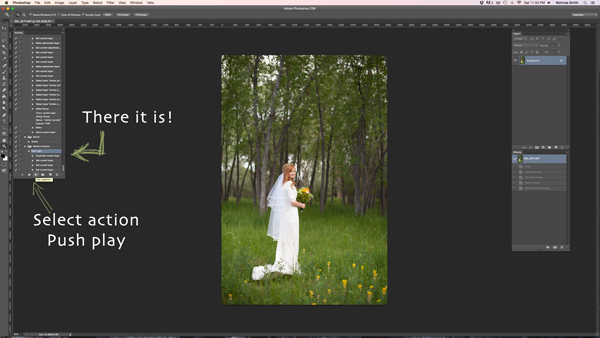
There’s your Action. Pretty exciting, isn’t it? You can try it out by making sure your Action is selected, and pushing “play” at the bottom of the actions palette. You’ll be amazed how quickly your “soft light” action goes through those steps. It doesn’t take long to do all those steps without an Action, but it’s almost instantaneous with one. Once you get a lot of your regular go-to steps turned into Actions, you’ll find that it takes a lot less time to edit each photo.

196

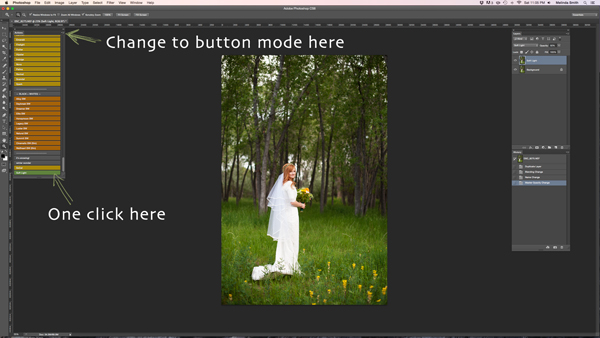
If you want to change back to button mode, it will really streamline things. All you have to do is click once on the Action. You don’t have to push play, or scroll a lot through open steps to find your Action. Give it a try.

Let me know how you did creating your first Action along with me. If you’re an Action-creating enthusiast, I’d love to hear what Actions you have made, and which Actions have been most helpful to your workflow.

googletag.cmd.push(function() {
tablet_slots.push( googletag.defineSlot( “/1005424/_dPSv4_tab-all-article-bottom_(300×250)”, [300, 250], “pb-ad-78623” ).addService( googletag.pubads() ) ); } );

googletag.cmd.push(function() {
mobile_slots.push( googletag.defineSlot( “/1005424/_dPSv4_mob-all-article-bottom_(300×250)”, [300, 250], “pb-ad-78158” ).addService( googletag.pubads() ) ); } );

The post 3…2…1…Actions!! A Guide to Using Photoshop Actions to Speed-Up Your Workflow by Melinda Smith appeared first on Digital Photography School.


Digital Photography School

 
Comments Off on 3…2…1…Actions!! A Guide to Using Photoshop Actions to Speed-Up Your Workflow

Posted in Photography


Easy Peasy Photoshop Actions – 71 Super Premium Actions for Only $24

18 Dec

You have heard of Inky Deals which is one of the leading deals websites in the design community, with an extended family of more than 300,000 design enthusiasts. They’re the only ones who offer a 200% money back guarantee on every product. This means that if you’re not happy with it, you get your money back and you also get Continue Reading

The post Easy Peasy Photoshop Actions – 71 Super Premium Actions for Only $ 24 appeared first on Photodoto.


Photodoto

 
Comments Off on Easy Peasy Photoshop Actions – 71 Super Premium Actions for Only $24

Posted in Photography