a Guest Contribution by John Davenport from Phogropathy
Have you ever opened up Lightroom (or any other professional level editing program) and said, “Oh my – where do I start?” If so then this post is probably right up your alley.
Today I’m going to show you how to take the process out of processing photos and how you can get some great results simply by learning how a handful of sliders work. After you learn these basics you can start to dig deeper into the program and learn how to bring out even more of the hidden details in your photographs.

The Seven Lightroom Sliders to Master First
Lightroom is filled with all sorts of options from drop down menus to sliders and all this can make get started for the first time overwhelming, especially if you’ve had no editing experience in the past, so today we are going to look at the very basics of Lightroom.
When you break it down there are five key parts of almost every photo that you’re going to want to adjust and those are as follows: mid-tones, shadows, highlights, sharpness and white balance. We will tackle all of these areas by using just a handful of sliders in the basic tab of Lightroom. To get here simply click on “Develop” and then if it isn’t opened already click on the “Basic” tab.
Now let’s get started!
Exposure
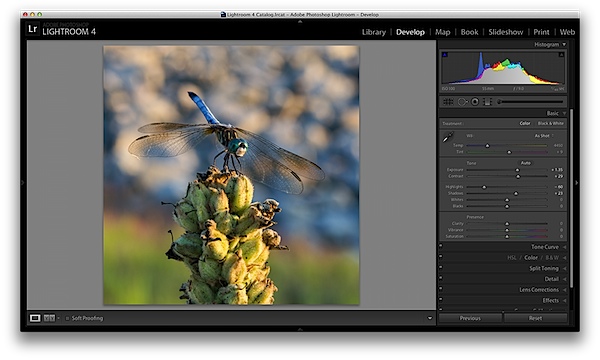
When I process photos I like to start with the exposure slider, as it’s a good overall adjustment to get started. It is designed to adjust the mid-tones of the photo and therefore will help to add or reduce to the overall brightness of the scene. To lighten an underexposed photo simply slide the exposure slider to the right – if you’d like to reduce the brightness then slide it to the left.
Watch your histogram and you’ll start to see the data shift from side to side as you make the changes. In the photo below I added just a small bit to the exposure to brighten it up slightly.

Contrast
Next up is the contrast slider, which will help to define the areas of lightness and darkness. In the vast majority of my photographs I’ll end up increasing the contrast slightly as it tends to help bring out details and make the photo “pop” a bit more.
As you watch the histogram you’ll notice that the data will either get stretched out or be pushed together depending on which way you go. The more contrast you apply the more defined the difference between lights and darks will get which can be observed in the stretching of the histogram.
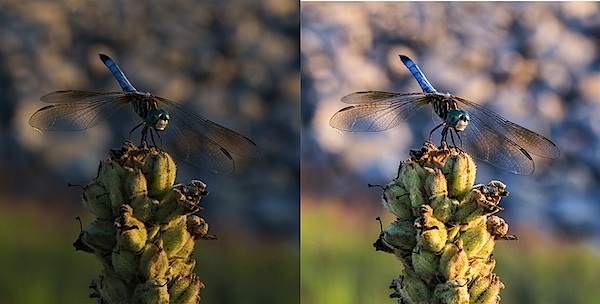
In my dragonfly photo I pushed the contrast up slightly which helps to get the subject separated from the background a bit more and adds a bit more crispness to the photo.

Shadows/Highlights
One of the best features in Lightroom 4 are the Shadows and Highlights sliders. (Note: if you’re using an older version of Lightroom you’ll do something similar with the Fill Light and Recovery sliders, but they’re not nearly as powerful).
These two sliders work in opposite directions. The more detail you want in your highlights the lower you’ll drop the slider, for more detail in the shadows you’ll increase the slider. Make sure you’re aware that these do come at costs and you’re not going to be able to get detail out of blown out or completely black areas of your photo – there must be data there to recover for these to work.
Again as you watch the histogram when you make the changes you’ll notice that the shadows slider has an effect on the data towards the left side of the mid-tones and the highlights slider will work on an area to the right. The black and white sliders (which we aren’t talking about today) will have an effect on the very edges of the histogram in much the same manor.

Clarity
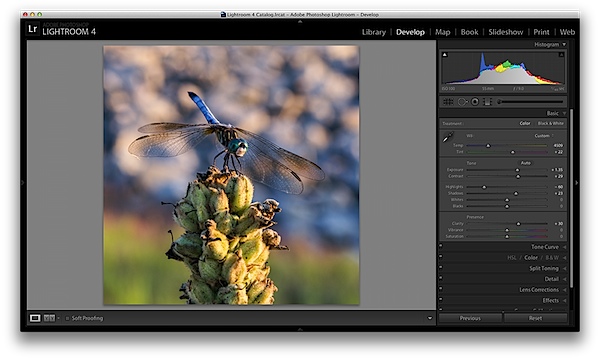
There is an entire area of Lightroom dedicated to sharpening your images, but the clarity slider is a good place to start with if you’re trying to keep things simple. You won’t have as fine of control over the process, but you will be able to help crisp up your images a bit by using one simple slider.
As you’ll notice when you start moving this slider around it works in much the same way as the contrast slider, just on a finer detailed level. Again, in the vast majority of my photos I’ll be adding a bit of clarity to give the photo the punch it needs, but often times in portraits you might end up toning down the clarity to give that soft look to your subject’s face.

White Balance
Finally the temperature and tint sliders control the white balance of your photo. For the time being I’d suggest just using the Lightroom presets as they do a decent job of getting into the ballpark and make it a lot easier to deal with than trying to figure out the right amount of warmth and tint to add or subtract.
However, if you want that little extra control in your hand then use the “Temp” slider to adjust the color temperature of your photo. Moves to the right will produce a warmer scene and to left will cool your scene off.
The “Tint” slider is used more for minor adjustments to remove or add unwanted green or magenta colors from the scene and will often be used to get skin tones correct. However, there are people who use this slider for more artistic purposes (play with it and you’ll see what I mean).

One Small Note
If you’re photographing in RAW you’ll see more options available to you and have more control over the final outcome of your image, if you’re a JPEG shooter some options I talked about today will be limited as a result of the smaller file sizes and the compression that has already taken place in your camera. You can read more about RAW photography here.
A Few More Before and Afters
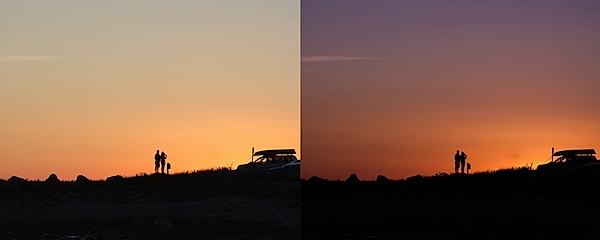
Here are a few more before and after images that I processed in a similar manner using only the techniques talked about in this post. It’s truly amazing how much just a few minor tweaks can change your photo and just imagine what can be done once you dig a bit deeper. If you’d like more tips on Lightroom editing feel free to subscribe to my YouTube channel.


John Davenport is an avid photographer and blogger who shares his photography on his Facebook page and runs a weekly video series on how to edit photos in Lightroom.
Post originally from: Digital Photography Tips.
Check out our more Photography Tips at Photography Tips for Beginners, Portrait Photography Tips and Wedding Photography Tips.
Master These Five Lightroom Sliders and Your Photos Will Pop