by Sarah Hipwell

What is compositing? Simply, it means to combine two or more images to make a single picture.
As a photographer, I’m constantly coming up with different concepts that I feel might make a good photo. But it is not always possible to get the perfect shot in one session. There have been numerous occasions while on a shoot where the light was not bright enough for the particular shot that I had in mind. On other occasions the background was too distracting. This is where the ability to create composite imagery in Photoshop is a huge advantage.
To produce a composite image in Photoshop, you need to isolate the subjects from the background of your various source photos. When I started out, I used the pen tool to help isolate my subjects. Now, I use the ‘quick selection’ and ‘refine edge’ tools which are superb and are a much faster way of doing extractions, especially for isolating hair!
But for this tutorial, I’m going to use the pen tool to create a path which I then save this as an alpha channel selection. I believe the pen tool should never be overlooked as an excellent way for beginners to increase their proficiency level with Photoshop. If you are new to using the pen tool, it does take a bit of getting used to but after time, you will pick up speed and accuracy. The big plus side to creating paths in this way is that they are re-editable and non-destructive.
I have highlighted three key features:
- Selection. Good selections are critical for compository work
- Composition.
- Uniform color balance and light.
Here’s the method:
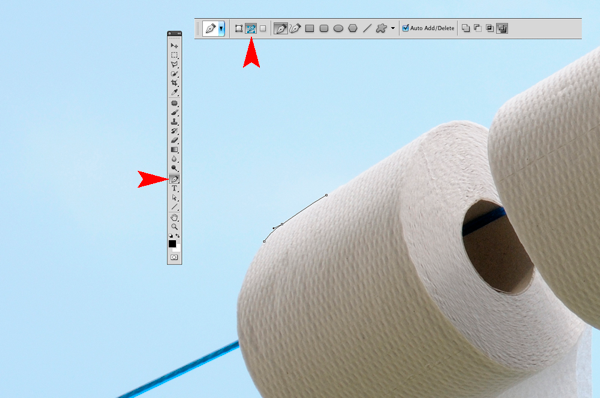
- The Pen Tool – With the Pen Tool selected in the toolbar, choose a starting point on the photo, click and drag around the area to be selected. This will create a path outline to be saved in the Paths Palette.
- Place the images – When I want to bring other images into a composite, I prefer to Place them into the file. What this means is that the image is brought into your psd file on a separate layer as a Smart Object. The photo can be moved into position, made larger or smaller without affecting the quality.
- Match Color – When all the elements of the photo are edited and in place, I use Match Color tool as an effective way to balance the color between the two images.

I took the photo above for a concept shot titled ‘Recycled toilet paper’. I wanted a bright blue sky with white fluffy clouds as the background. The above shot did not have the background that I wanted. So I waited a couple of days and I got the shot I wanted. See below:

I made my selection using the pen tool to isolate the toilet rolls and clothesline. Zoom in up to 300 – 400% to get a good outline, as shown below.

Holding down the Alt/Ctrl key enables you to move anchor points and direction lines and again make any edits to your lines and curves.
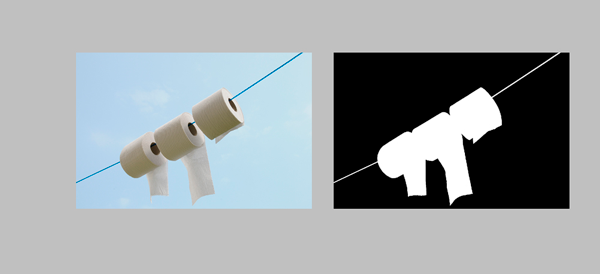
When you have finished plotting your anchor points, you can then save this outline in the Paths Palette. This selection can then be added as a layer mask. It should resemble the black and white image on the right below.

I imported the new sky background by going to the File menu and select Place. The image then appeared as a Smart Object and on a separate layer. I had to reduce the size but the quality of the image was maintained.
When I was happy with the position of the new sky background, I merged all the layers onto one. I used a keyboard shortcut (Cmd/Ctrl+Alt+Shift+E) to achieve this. The reason for this is that the next adjustment isn’t non-destructive so that if I want to redo this edit, I would have to delete the layer and repeat the above step again.
The final adjustment was to go to Image menu and select Match Color to make sure the color is balanced between the two images. Using Image>Adjustments>Match Color I played with the two sliders to get the color of the image more uniform in appearance. See the link below where I uploaded the final composite image to iStockphoto.com
http://www.istockphoto.com/stock-photo-6231026-recycling-toilet-paper.php?st=faf18be
See more of Sarah Hipwell’s work at her website – SarahHipwell.com
Post originally from: Digital Photography Tips.
Check out our more Photography Tips at Photography Tips for Beginners, Portrait Photography Tips and Wedding Photography Tips.
An Introduction to Photoshop Compositing for Beginners