RSS
 

Posts Tagged ‘Shooting’

10 Tips How to Avoid Blurry Pictures when Shooting from a Kayak

28 Mar

Pentax Optio WG3 waterproof camera 
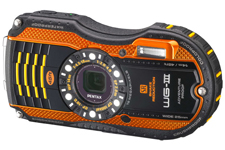
Compact waterproof digital cameras like Pentax Optio W-series or Olympus Tough series are popular among paddlers. They may not offer the highest image quality among point-and-shoot cameras, but they still produce decent pictures. Most importantly, you can photograph in conditions where other cameras are better kept in a dry case or box.

However, new camera owners are often getting pretty bad, blurry pictures and are really disappointed with a purchase. Shooting on water from a kayak or canoe requires some extra efforts and practice from a paddling photographer. Here are a few tips which may help. This is an update of my old post written 5 years ago. Cameras are getting better, but, I believe, the tips below are still valid. I have been using Pentax Optio waterproof cameras starting from the original model WP, then W10, W30, and, currently, WG2 is attached to my life jacket.

1. Use the automatic mode

I do not have any special settings for my camera. On water I use exclusively the P (program) mode. Of course, in addition to the P mode I use the movie mode and interval drive mode quite often.

You can program the green button to do useful adjustments without a need to go through a setup menu. I am using two functions assigned to the green button: exposure correction and, much less often, white balance setups. Typically, I underexpose my shots to avoid overexposed areas with wash out details. Coincidentally, it shortens the exposure time which helps to avoid blurry pictures, but this is not a main purpose of this adjustment.

2. Keep the camera steady

This is the most important tip. However, it is not so easy when paddling, especially, when water is not calm. Ideally, you should hold the camera in both hands. In addition, it is quite easy to shake the light and small camera just by pressing a shutter button.

3. Use a paddle shaft to stabilize the camera

Here is a short video clip demonstrating how I am doing it.

This technique really helped me when I was starting to paddle a tippy Sisson Nucleus kayak. You can achieve two goals: to stabilize the camera and to stabilize your kayak. You have your paddle ready for bracing. This technique does not work with strong, gusty winds.

You can go further with this idea and attach or mount your the camera more permanently to your paddle – see a camera cradle by Mark Sanders.

4. Use a self timer

The 2 second selftimer available in Pentax Optio is very useful to avoid shaking the camera when pressing the shutter button. I recommend it, especially, when you are holding the camera with one hand (shooting on an extended arm or from some unusual angles).

5. Keep your lens clean of condensation, water drops, water residue

I keep my camera in a small neoprene pouch attached to my life jacket and usually do not have problems with water or dirt on my lens. The camera is always on a tether. Shooting with a camera mounted on a deck and exposed to splashes is another story.

6. Pay attention to light and sun position

Try to shade you camera lens from a direct sunlight to avoid a lens flare. Do not shoot against the sun.

It is possible, at least for Pentax, to glue (epoxy) some step-up rings and to attach lens hood to your camera. I am using much simpler solution: an improvised lens hood attached with an electric tape to the camera.

You can expect the best “sweet” light for shooting when the sun is low, so after the sunrise and before sunset. Do not expect too much from this camera in low light conditions, but do not give up with shooting as soon as the sun is down. Consider shooting some silhouettes or water reflections then.

7. Use flash

Sometimes, I use flash to add light to objects in my fore plan. Usually, a soft flash option works better for a kayak deck. Be aware of any reflective tape on your kayak or gear.

8. Shoot multiple frames

Don’t limit yourself to a single shot for a given scene. Repeat the shot. Try different angles, horizontal and vertical format. You will increase your chances to get that great shot. Digital memory is cheap. You can always erase unsuccessful pictures later.
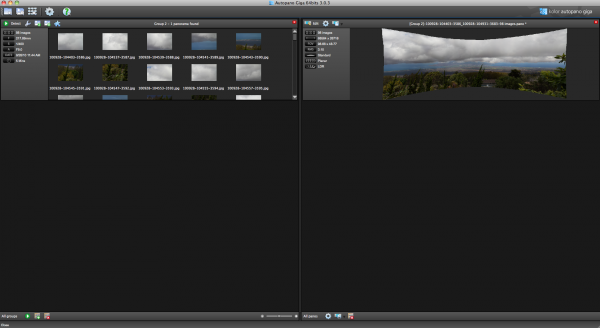
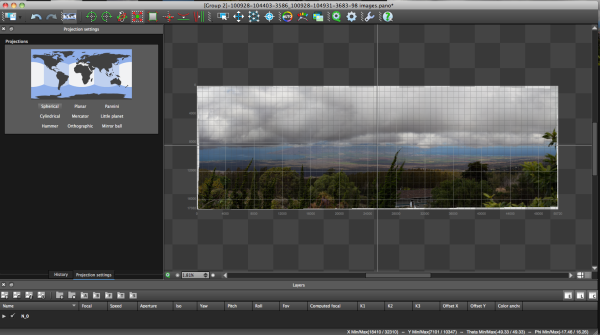
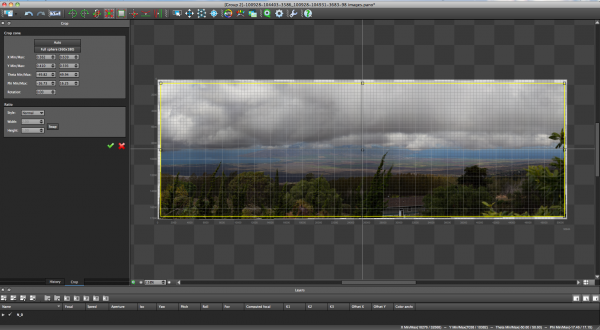
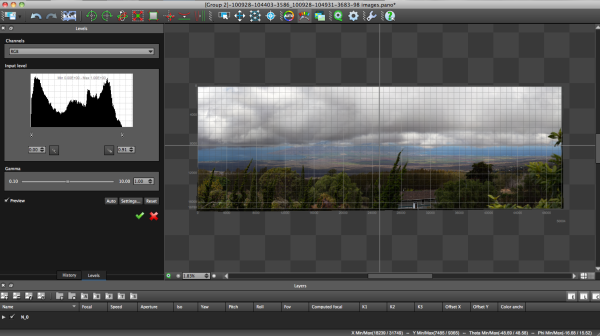
9. Photoshop …

Downloading pictures from the camera to your computer is not the end of your work as a photographer.
Use Photoshop or other image editing software to post process your pictures. Most often, I rotate my pictures to make horizon horizontal, adjust the exposure with levels, crop and resize them, and, finally, apply some sharpening. You cannot save completely blurred pictures in Photoshop, but you can improve most of them.

10. Practise

There are no reasons not to take and use the camera wherever you go. It is small and waterproof. Experiment and have fun.

Time to to time it is useful to browse through the camera manual. You may find something new and exciting in a jungle of all these options and settings.

More tips?

Could you share tips from your experience with a kayak or canoe photography? Are your on water pictures worse than these shot on land?

Some related articles where I am sharing my experience from paddling and shooting with Pentax Optio WP, W10 and W30 cameras:

  • Pentax Optio W20 Waterproof Camera Review, Tips, and Sample Photos
  • Kayak Photography: Using Your Paddle to Stabilize the Camera – Video Clip
  • 7 Tips on Kayak Photography: How Did You Shoot It?
  • No Viewfinder? 10 Tips on Shooting Pictures without Viewfinder
  • Is Pentax Optio W10/W20 the Paddler’s Camera? Many Boats, Many Cameras …
  • Kayak Photography Links – Tips and Hints for Paddling Photographers


paddling with a camera

 
Comments Off on 10 Tips How to Avoid Blurry Pictures when Shooting from a Kayak

Posted in Photography


HDSLR 101 #1: Intro to shooting video on a HDSLR

09 Feb

Download the entire HDSLR 101 series plus a BONUS EPISODE on our store site: store.nextwavedv.com Find more training resources on our website: nextwavedv.com Join our Facebook community facebook.nextwavedv.com Follow us on Twitter twitter.com In Episode 1 of HDSLR 101, we discuss how DSLRs first got video, sensor sizes and how they affect the look of video, and the pros and cons of shooting video on HDSLRs.
Video Rating: 4 / 5


Glowing Silverware Ep 320: You Keep Shooting with Bryan Peterson: Adorama Photography TV

05 Feb

www.adorama.com AdoramaTV presents You Keep Shooting with Bryan Peterson. Join Bryan in Peggy’s Cove, Nova Scotia as he explores an abandoned house for interesting photo opportunities. With an old box of silverware, a colorful buoy, available light, and some creativity, watch as Bryan makes a unique and fiery portrait. AdoramaTV features talented hosts including Mark Wallace, Gavin Hoey, Joe McNally, Joe DiMaggio, Tamara Lackey, Bryan Peterson, and Rich Harrington. Related Products Featured items from this episode adr.ma AdoramaTV related episodes adr.ma To learn more from the Adorama Learning Center adr.ma Understanding Flash Photography www.adorama.com Understanding Photography Field Guide by Bryan Peterson www.adoramacom Nikon D800 Digital SLR Camera www.adorama.com Nikon 105mm f/2.8G ED-IF AF-S VR Micro-Nikkor Lens www.adorama.com Nikon 105mm f/2.8G ED-IF AF-S VR Micro Nikkor Lens www.adorama.com Nikon D90 Digital SLR Camera Kit www.adorama.com If you have questions, share them with us at: adotv@adorama.com

Part 2 of 3 – Reuters photographer Anthony Bolante demonstrates how he packs his equipment into the Think Tank Modular Belt System and Change Up belt pack for the Amgen Tour of California. Anthony uses the Modular Belt System on “Photo Moto” (shooting photos while riding on the back of a motorcycle) and switches to the Change Up belt pack as his “every day” working photo bag. To see more of Anthony Bolante’s photography work, please link to www.sportsshooter.com


Using AutoPano Giga To Create Panoramas With Gigapan Heads Or Freehand Shooting Grids

04 Feb

I know, it’s a long title but I want to show how easy it can be to assemble panoramas with either a Gigapan head or by shooting freehand, gridded panoramas. AutoPano Giga has been my panorama product of choice after starting with huggin, a free option that does quite well it its own right.

One ability AutoPano Giga excels at is the ability to take images and information from a number of automated shooting heads, such as Kolor’s own PanoGear or even other brands, such as the GigaPan EPIC Pro, which I reviewed for DPS two years ago. I noted in that post that Gigapan’s software was in its first stages and was quite basic and while the software has been upgrade over the intervening two years, it’s still not as robust as Kolor’s AutoPano Giga. Plus, it can not handle freehand panoramas

Utilizing AutoPano Giga to produce stunning panoramas shot with Gigapan’s heads (mine were shot with the EPIC Pro) is fairly simple.

Shoot

Shooting with the Gigapan EPIC Pro is explained in the previously mentioned post. That much hasn’t changed.

Import

Bringing images into your computer is no different than your normal shooting method. The nice thing about AutpoPano Giga is it will understand your RAW files no problem, so there is no need to convert (but you can if you are impatient and want smaller file sizes). I have found it handy to shoot panoramas, especially large ones, on a separate memory card reserved just for panoramas. That makes finding the files all the easier.

With all your panorama files in one location, it is time to use the stitching wizard in AutoPano Giga.

Wizard

The first step in the wizard is to pick the device that was used, in this case we select Gigapan.

The next screen asks for input. If your shot went off without a hitch and you have a nice grid of images, AutoPano should know this. For instance, when I select the 98 images from my demonstration shot from Maui, Hawaii at the Ali’i Kula Lavender Farms, AutoPano knows this shot was 7 rows and 14 columns. The nice thing about this method is there is no need to import a control file that explains the grid to the software. This is also why, with careful execution, freehand panoramas can be imported.

With a straightforward shot like this, there is little else for me to do, but let me show you what the other screens do, if you are curious.

The next screen allows for changing of the panorama shooting direction. One thing I wish this screen had is the ability to pick a grid shot top to bottom, then back up the next column, down the next, and so on, for those times when I shoot a panorama freehand, such as this 2.2 gigapixel image of the Taj Mahal (shot without a tripod and head because they are restricted).

After that screen, custom overlap or forcing a 360 degree view can be selected.

The last two screens deal with control points and that can be left on auto unless you have a particularly good reason to change them. This software works quite well on auto (with some manual tweaks to come).

Press “Finish” and AutoPano takes you to the main screen and starts detecting and stitching. I like that, while I can tell the program the pattern of a shoot and the amount of overlay, it will still automatically detect control points and I can even set this number to 200 by default, to ensure the best matching.

Output

Things aren’t always perfect right out of the box because the software doesn’t know which type of projection you want. Below you will see the resultant output on the right, which has a planar projection.

This is easily changed in the Edit screen, where a number of adjustments can be made if desired. I decided on a spherical projection to keep my sides straight.

From there, the only change I saw that needed to be made was to crop the image, which is dead easy: click on the crop tool and it automatically selects the crop dimensions. Changes are made by dragging corners or sides and rotations can be made (in case your tripod wasn’t level when shooting).

The last bit of editing I tend to do in the program is to set the levels, which is as easy as setting them in Photoshop or other programs.

Before being completely done, we need to get the resultant image out of AutoPano Giga and that is done by clicking on the gear in the main screen in order to render the image. Settings on this screen allow for the resizing of the image once rendered (handy if you are sending this out as a JPEG as the max dimension for those is 30,000 pixels) as well as file type, compression, color depth and more.

What Else Can Be Done?

AutoPano Giga is a robust panoramic creation and editing program. This post is not intended to be a complete review of all the features as that list is rather long. Some of the highlights include:

  • Ability to handle HDR bracketed shots (it is available in the first screen of the wizard and is labeled Nb image per location (bracketing)
  • Manual removal of ghosts via masking(although the automatic option works well)
  • Saving results in a variety of file types, including .PSB and .TIFF
  • Batch processing
  • Editing vanishing points and pitch, roll and yaw

Results

How did it come out? Great! But…unfortunately DPS isn’t set up to show case large panoramas but I have hosted the resulting image on my blog. The final image is 43MB large and will take a little time to download with the amount of traffic DPS typically sees.

Click here to be taken to the image. Zoom in and use Full Screen mode for the best experience. Can you spot the airplane taking off? What about people surfing?

For references sake, the panorama was made with a Canon 7D and 28-300mm L lens. It was composed of 98 images shot in Manual Mode at ISO 100, 135mm, f/9, 1/400. The Gigapan EPIC Pro was lent to me from Borrowlenses.com.

AutoPano Giga is available for free trial download here.

Post originally from: Digital Photography Tips.

Check out our more Photography Tips at Photography Tips for Beginners, Portrait Photography Tips and Wedding Photography Tips.

Using AutoPano Giga To Create Panoramas With Gigapan Heads Or Freehand Shooting Grids


Digital Photography School

 
Comments Off on Using AutoPano Giga To Create Panoramas With Gigapan Heads Or Freehand Shooting Grids

Posted in Photography


Free Tethered Shooting Script for Nikon

29 Jan

*NOTE* This describes a very out of date version. View the blog to see the latest with ISO, WB, A, S and other controls including time lapse. How to use my script from www.diyphotobits.com to shoot a Nikon camera tethered to your PC for instant on-screen viewing of images as you shoot them.
Video Rating: 5 / 5


Showing Speed: Using Panning When Shooting Action

23 Jan

Panning is a great way to capture children at play. Exposure is 1/15, f/13, ISO 100. Canon EOS 5D Mark II with EF 24-105 f/4L IS at 84mm.

For the most part, photography is all about freezing a moment in time, stopping the action in front of you. But there are times when freezing the action fails to show the full story.  People move.  Often, at high speeds. Sometimes freezing the action fails to pay homage to the speed on display on the field, or the track.  Showing speed or motion is less important when shooting individual people in action, because a person in motion flexes muscles, contorts their expressions, creating a compelling image.  However, when photographing vehicles, such as in auto racing, the ability to show that speed is paramount.  If you use a fast shutter speed to stop the action, a car will simply appear as if it’s parked on the track.

Panning is a simple technique for showing speed, but it requires some practice, and a willingness to experiement a little.  First of all, you’ll want to slow your shutter speed way down.  Easy enough in poor light, but on a bright sunny day, it becomes a problem.  There are a few ways to handle this.  First off, lower the ISO on your camera to ISO 100.  For panning, I like to set the camera to Shutter Priority mode.  This allows me to choose the shutter speed I want, and the camera will then set the proper aperture.If stopping down the aperture and lowering the ISO still don’t give you a slow enough shutter speed,  try using a polarizing filter on the lens. A polarizer will lower your exposure by two stops.  Another option would be a neutral density filter, which can be found in greater than 2-stop densities when necessary.

A wide angle lens requires a slower shutter speed to create a dramatic panning effect, but with cars moving as fast as those at a NASCAR race, it doesn't have to be THAT slow! Exposure: 1/40, f/22, ISO 100. EOS 5D Mark II, EF 16-35L II at 35mm.

Your shutter speed will vary dependent on the subject and the speed at which it moves. For an athlete running, it could be as low as 1/15 or 1/20.  When shooting auto racing, your shutter speed could be as fast as 1/125.  The slower the shutter speed, the greater the illusion of speed will be.  You’ll have to match the speed of your subject with your speed of panning the camera as the subject passes.  This can take some practice. The best way to practice that I’ve found is to stand on the sidewalk of a busy street and photograph passing cars at various speeds.  Set your drive to Continuous shooting and hold the shutter button down to take several exposures of your subject as it passes.

It takes some practice, but try to pay attention to composition when positioning the subject in the frame.  When panning, it becomes very easy to focus solely on keeping pace with the subject, to the point that you end up simply placing it in the center of the frame.  Use the compositional aids in your camera to help you.  If your camera has a grid focusing screen, use that. If not, use the AF points that are etched in the viewfinder.

Lens choice also impacts the way the pan looks.  A telephoto lens that compresses perspective will create more dramatic effect than a wide angle will, which means the wide angle lens will require a longer shutter speed to create the same effect as a telephoto. Experiment a bit with both to create different effects.

Add panning to your action repertoire for a different take on motion in your photos!

Exposure: 1/60, f/16, ISO 100. EOS-1D Mark IV, EF 100-400mm f/4-5.6L IS at 210mm.

Post originally from: Digital Photography Tips.

Check out our more Photography Tips at Photography Tips for Beginners, Portrait Photography Tips and Wedding Photography Tips.

Showing Speed: Using Panning When Shooting Action


Digital Photography School

 
Comments Off on Showing Speed: Using Panning When Shooting Action

Posted in Photography


Shooting in the Twilight Zone

15 Jan

For most photographers, the best time to shoot is during the golden hours – those times right around sunrise or sunset when the sky is full of drama.

For me though, the best time to shoot is a little while after all that drama happens and all the other photographers have packed up and gone home – twilight – when the skies become calm and peaceful.

Half Dome, Yosemite National Park, California

Half Dome, Yosemite National Park, California

The length of twilight varies dramatically depending on the time of year and your position on earth. At the poles twilight can last as long as 2 weeks! But generally speaking, twilight usually starts shortly after the sun drops below the horizon and continues for another 40-60 minutes or so before the sky is completely dark.

During this time the sky still has plenty of rich colour but there is no longer any direct light. You might be surprised how much colour there really is in the sky during twilight since a camera’s sensor can pick up more light than we are able to see with our eyes.

The images in this post demonstrate how different the sky can look between the early stages of twilight to the end of twilight.

Driftwood Beach, Jekyll Island, Georgia

Driftwood Beach, Jekyll Island, Georgia

I prefer to shoot twilight after sunset, but of course it happens in reverse order in the morning too!

Assuming you are shooting after sunset, the first stage of twilight is when the subtle pinks begin to show in the sky. Slowly the blues will begin to appear. I love to shoot landscapes during this early stage when there is still a lot of ambient light so the land is not entirely dark.

Basin Head, Prince Edward Island, Canada

Basin Head, Prince Edward Island, Canada

During this early stage the sky is often much brighter than your subject which makes exposure difficult. It’s a great time to use high dynamic range (HDR) photography and blend multiple exposures to maintain detail in the landscape. Or, depending on the type of scene you are photographing, you can use graduated neutral density filters to even out the exposure.

Soon the sky will begin to get darker and the pinks and blues will deepen. The exposure will even out so that neither HDR nor graduated neutral density filters are needed.

Mule Ears, Bid Bend National Park, Texas

Mule Ears, Bid Bend National Park, Texas

During the later stages of twilight the pinks will fade and the blues will intensify to a dark cobalt shade. This is a great time to photograph cityscapes. The combination of natural light in the sky and artificial city lights is magical.

Seattle, Washington

Seattle, Washington

To make the most of the limited amount of time you have to shoot during twilight, scout out your location before hand. Twilight doesn’t last long so you need to be prepared. If you can’t make a separate scouting trip at least go an hour or two early so you have plenty of time to explore before deciding what to shoot.

Find a subject with a distinct shape and take some test shots to figure out the best composition and perspective. Keep your eye out for good foreground elements and any artificial light sources that might be present later.

Tips:

  • Use a low ISO to reduce the amount of noise in the image.
  • Long shutter speeds will allow the camera to pick up lots of colour.
  • If there are city lights in your image use a small aperture, like f/22, to turn the lights into star bursts.
  • A tripod is an absolute requirement if you want a low ISO, long shutter speed, and small aperture.
  • You may need a polarizing filter and/or a graduated neutral density filter for the early stages of twilight.
  • Use a cable release and/or a 2 second timer so you do not introduce camera shake.
  • Use your mirror lock-up feature so the movement of the mirror does not introduce camera shake.
  • Your camera’s auto-focus may not work in low light conditions. If you set up ahead of time, you can use your auto-focus while there is still light in the sky and then turn auto-focus off to prevent your camera from attempting to refocus when it is is darker outside. Otherwise you will need to focus manually.
  • Use your histogram to ensure you are getting a good exposure.
  • Bring a flashlight so you can find your way home.
  • Wear or bring bug spray so the little bugs don’t ruin your good time.
  • Bring warm clothes! Don’t miss the perfect shot because you got cold and left too early.

Shooting at twilight can sometimes take a little preparation and planning but the rewards are definitely worth it.

Post originally from: Digital Photography Tips.

Check out our more Photography Tips at Photography Tips for Beginners, Portrait Photography Tips and Wedding Photography Tips.

Shooting in the Twilight Zone


Digital Photography School

 
Comments Off on Shooting in the Twilight Zone

Posted in Photography


Photography Tutorials/Lessons for Beginners EP3-Expert Shooting Modes?7d,t3i/600d,t2i/550d,t1i/500d

05 Jan

CLICK HERE TO SIGN UP FOR MY MONTHLY NEWS LETTER: eepurl.com Pick up an “OH SNAP” T-Shirt! kreativevuetv.spreadshirt.com Follow me on these social outlets: www.un-WIREDTV.com http www.twitter.com www.instagram.com KreativeTechLA.blogspot.com http ================================================= In this episode I’ll show you all the different expert shooting modes available on your DSLR camera. Although each camera manufacturer may display these expert shooting modes slightly differently, they all function the exact same way. If you currently own or just purchased a DSLR, you have probably at one point thought to use these expert shooting modes, but just stayed away from them from a lack of understanding. DON’T WORRY! By the end of this tutorial, you will have a complete understanding of what each expert shooting mode does and when to use it.

Just some of my many pictures from iceland with my Nikon D3000 camera. Feel free to comment or suggest ways for me to take better pictures! I am just a novice and hoping to get a little more into photography so please no hate! If you subscribe i can make more videos! Song is Coldplay – Hardest Part I used both 18-55mm and 55-200mm lens.
Video Rating: 5 / 5


Eye-Fi Mobile X2 Card Shooting Wirelessly to iPad 2 in Direct Mode

31 Dec

Terry White demos the Eye-Fi Mobile X2 card shooting wirelessly from a Nikon D7000 to an iPad 2 in the NEW Direct Mode without the need of a wireless hotspot.

 
Comments Off on Eye-Fi Mobile X2 Card Shooting Wirelessly to iPad 2 in Direct Mode

Posted in Nikon Videos


Creating Your Own Sunlight: You Keep Shooting with Bryan Peterson: Adorama Photography TV

29 Dec

www.adorama.com Adorama Photography TV Presents You Keep Shooting with Bryan Peterson. Join Bryan as he demonstrates how to overcompensate for when nature does not cooperate. Sometimes when you plan an outdoor photo shoot, mother nature may not be on the same schedule. Join Bryan as he overcomes a cloudy day and demonstrates how to create his own sunlight for his photo. AdoramaTV features talented hosts including Mark Wallace, Gavin Hoey, Joe McNally, Joe DiMaggio, Tamara Lackey, Bryan Peterson, and Rich Harrington. Related Products: Understanding Flash Photography, by Bryan Peterson www.adorama.com Understanding Photography Field Guide, by Bryan Peterson www.adorama.com Understanding Exposure by Bryan Peterson www.adorama.com Nikon SB-900 TTL AF Shoe Mount Speedlight www.adorama.com Harbor Digital Quick Spot Small 1/8″ Honeycomb Grid with Adapter and 6 Colored Gels for Nikon SB-900 Flash Model www.adorama.com Pocket-Wizard Plus II www.adorama.com If you have questions, share them with us at: adotv@adorama.com
Video Rating: 4 / 5