RSS
 

Posts Tagged ‘Shooting’

6 Tricks for Shooting Steady Shots Without a Tripod

22 Dec

Once upon a time, every photographer needed a tripod. Early cameras were too bulky and heavy to hold by hand. Later, it was absolutely essential to have a tripod in order to get a steady shot. Indeed, tripods can help achieve sharp, crisp shots with your DSLR camera. However, tripods aren’t without fault. They can be expensive. Tripods can also Continue Reading

The post 6 Tricks for Shooting Steady Shots Without a Tripod appeared first on Photodoto.


Photodoto

 
Comments Off on 6 Tricks for Shooting Steady Shots Without a Tripod

Posted in Photography


Curiosity and Creativity: Ep. 135: You Keep Shooting: Adorama Photography TV

15 Dec

AdoramaTV Presents You Keep Shooting with Bryan Peterson. Join Bryan as he discusses curiosity and its role in creativity. Watch as Bryan uses his unique artistic eye to to make visually exciting discoveries. Related Products: Nikon D300S 12.3 Megapixels SLR Digital Camera Body with 3″ LCD, CF and SD/SDHC Card Slot www.adorama.com Nikon 105mm f/2.8G ED-IF AF-S VR Micro-Nikkor Autofocus Telephoto Lens – with 5 Year USA Warranty www.adorama.com Flashpoint L100 3 Section Aluminum Tripod, Ball Head & case www.adorama.com Learning to See Creatively by Bryan F. Peterson www.adorama.com Understanding Closeup Photography by Bryan Peterson, Soft Covered Book www.adorama.com Visit www.adorama.com for more photography videos!
Video Rating: 4 / 5

photographyequipment.yolasite.com (Budget Equipment) razzi.me www.facebook.com twitter.com In this video I compare the two most popular types of umbrellas, shoot through and reflective umbrella. Shoot through umbrellas are translucent which allows the light to pass. They give you more wrap around light in your portraits. With reflective umbrella, it’s still wrap around light BUT it becomes a bit directional and may cast a little bit of shadow compared to shoot through. Which umbrella should you choose? Well, they are so cheap that everyone who does studio portraits or outdoor strobist photography should simply own both. Equipment used in the video. DSLR: Nikon D3s and Nikon D700 Lens: Nikkor 70-200 f2.8 VRII and Nikon 50mm 1.8G AFS lens Umbrellas – Lastolite trifold umbrella and cowboy studio reflective umbrella
Video Rating: 4 / 5


Connect Review: Shooting with the Galaxy Camera

14 Dec

samsung_galaxycamera4g.png

The Samsung Galaxy Camera is the the most serious attempt anyone’s yet made to build a truly connected camera. It’s essentially a hybrid of the company’s WB850F compact superzoom and its Galaxy SIII smartphone – combining the zoom range and larger sensor of the camera with the powerful processor, touch screen and Android operating system of the ‘phone. But how much extra capability does this bring? Mobile photographer Oliver Lang takes a look.

News: Digital Photography Review (dpreview.com)

 
Comments Off on Connect Review: Shooting with the Galaxy Camera

Posted in Uncategorized


Stormy Skies Ep 308: You Keep Shooting with Bryan Peterson: Adorama Photography TV

11 Dec

www.adorama.com AdoramaTV Presents You Keep Shooting, with Bryan Peterson. Join Bryan in the lavender fields of Valensole, France where he shares his technique for creating a dramatic photo by manipulating the ambient light of a dark, stormy sky, while using a flash for contrast. If you have a chance to capture a great photo of a setting that has inclement weather, try using different lighting techniques to bring out the foreground while capturing the visually rich background. This will give you the perfect contrast for a powerful-looking image. AdoramaTV features talented hosts including Mark Wallace, Gavin Hoey, Joe McNally, Joe DiMaggio, Tamara Lackey, Bryan Peterson, and Rich Harrington. Related Products Understanding Flash Photography www.adorama.com Understanding Photography Field Guide by Bryan Peterson www.adorama.com Understanding Exposure by Bryan Peterson www.adorama.com Canon Speedlite 600EX-RT www.adorama.com Sigma EF-610 DG ST Shoe Mount Flash for Nikon iTTL Digital SLR’s www.adorama.com Nikon 70-300mm f/4-5.6G AF Telephoto Zoom-Nikkor Lens with HB-26 Hood – Black Finish – 5 Year Nikon USA Warranty www.adorama.com Nikon 70-300mm f/4.5 – 5.6G ED-IF AF-S VR (Vibration Reduction) Zoom Nikkor Lens – with 5 Year USA Warranty www.adorama.com Nikon D800 Digital SLR Camera www.adorama.com Featured items from this episode bit.ly AdoramaTV related episodes bit.ly Learn More from the Adorama Learning Center bit.ly If you have questions, share them with us at: Adotv

 
Comments Off on Stormy Skies Ep 308: You Keep Shooting with Bryan Peterson: Adorama Photography TV

Posted in Photography Videos


Fashion Makeup shooting

25 Nov

Special shooting with makeup session & hair style, call us for appointment. Model: Sara Makeup Artist & Hair Style: AMAL AL.SAAD Makeup: 50215152 Studio: 66383666 N-Studio Official website: www.n-studio.com.kw YouTube Channel: www.youtube.com FaceBook: www.facebook.com Mobile: +965 66 383 666 E-Mail: N_Studio@Live.Com —————————————————— Gear: NIKON D3x
Video Rating: 5 / 5

 
Comments Off on Fashion Makeup shooting

Posted in Nikon Videos


Digital Photography 1 on 1: Episode 48: HDSLR Pt.1: Shooting Video W/ a DSLR: Adorama Photography TV

21 Nov

Adorama Photography TV presents: This week is the first episode in a series about HDSLR. In this episode, Mark will go over the principles of shooting video with a DSLR. In the coming weeks, he will also go over lighting, audio, basic editing techniques as well as compressing for the web- so stay tuned! For related articles and videos at the Adorama Learning Center, go here: www.adorama.com Purchase the gear in this episode at Adorama.com: Manfrotto 501HDV Pro Video Fluid Head with QR, 755XB Black Anodized Aluminum Video Tripod Legs www.adorama.com Nikon D3S Body Only www.adorama.com Nikon 70-200mm f/2.8G AF-S VR II Zoom-Nikkor ED-IF Lens www.adorama.com Lowel Pro-light, Focusing Multi-voltage Quartz Halogen Light www.adorama.com Arri 650/3 Compact Fresnel Kit www.adorama.com Canon 5D Mark II www.adorama.com Canon EF 85mm f/1.2L II USM AutoFocus Telephoto Lens www.adorama.com Zacuto Z-DPM Peacemaker DSLR Tripod Kit www.adorama.com Visit www.adorama.com for more photography videos! Send your questions to: AskMark@Adorama.com

Yakkima Rally 2012 Lahdenpohya, Karelia gp-mag.ru www.facebook.com 27.01.2012 music – Yppah – Never Mess With Sunday www.youtube.com camera: Canon 600D, Soligor 85-205 3.8, Nikkor 17-35mm f/2.8, 17-55 kit. filmed by: Nalivaev Nikita edit: adobe premiere CS5, after effects CS5
Video Rating: 4 / 5

 
Comments Off on Digital Photography 1 on 1: Episode 48: HDSLR Pt.1: Shooting Video W/ a DSLR: Adorama Photography TV

Posted in Nikon Videos


Why Speedlight not studio Lights for Shooting? (by Dom Bower)

13 Nov

dombowerphoto.blogspot.com In this video I answer another question about flash. this time Why do i use nikon speedlights and not studio lights for my shoots” well here is the answer If you enjoy my videos please post them on your Facebook page and let others know about this channel, please subscribe and share on Facebook and twitter. Also check out the links below. If you really like my work please feel free to check out or buy a copy of the my PHOTOGRAPHY BOOK: Getting There With Photography: By Dom Bower www.blurb.com FACEBOOK Critique/advice GROUP www.facebook.com FACEBOOK PAGE www.facebook.com TWITTER page twitter.com WEBSITE www.dombower.com PHOTOGRAPHY CLOTHING Point and destroy clothing http For my AZ of Weightloss Tips check out: dombowerexercise.blogspot.co.uk And to donate to The Cancer Charity that I am doing a Trek for please visit www.justgiving.com
Video Rating: 4 / 5

 
Comments Off on Why Speedlight not studio Lights for Shooting? (by Dom Bower)

Posted in Nikon Videos


Should you be shooting RAW?

07 Nov

You can find many articles online discussing the benefits of shooting in RAW and probably an equal number full of counter arguments stating that it is possible to obtain equally good results shooting in JPEG.  Whilst that is definitely true, I want to discuss the reasons that pushed me to exclusively use RAW in the hope that it can persuade others to do the same.

I liken RAW processing to taking the camera off ‘auto’ and shooting in ‘manual’ mode.  When people are starting out in digital photography, it can seem like another area full of technical jargon that forms a barrier preventing its uptake.  However, once you have an small understanding of the processes involved and how different settings can impact your results, you will find that letting your camera do the processing can be the limiting factor in achieving your photographic vision.

What is RAW?

A RAW file is an uncompressed image file that records the data from the sensor ‘as is’, with minimal processing.  Depending on your camera, this file will most likely contain either 12-bit or 14-bit data.  When shooting in JPEG, the camera will take the RAW file, process it with a number of generic actions (typically contrast/saturation adjustments, correcting for white balance and sharpening) before compressing the image down to an 8-bit JPEG file.

That difference in ‘bit depth’ is the key here.  The 12-bit image will contain 2^12=4096 tones per channel.  Given that there are three channels per pixel (red, green and blue), that equates to 4096x4096x4096= 69 billion possible tones per pixel.  If we compare that to the other bit depths, you will see the difference:

Bit depth

Tones per channel

Possible tones per pixel

8-bit

2^8 = 256

16.8 million

12-bit

2^12 = 4096

68.7 billion

14-bit

2^14 = 16384

4.4 trillion

Now those numbers are almost too large to comprehend, however it is quite simple to consider in context.  When you take a JPEG file from your camera into Photoshop to process, there are only 256 possible tones to define the colour for each red, green or blue channel, which means that when you start apply changes to contrast or brightness, there are a very limited number of possible tones for each pixel, which can result in obvious image degradation if pushed too far.  With a RAW image, the number of possible tones is that much greater that more significant changes to can be made without any impact on the final image quality.

This doesn’t come without a cost though.  Due to the increased bit depth of RAW files, they are anywhere from 2-6 times larger than the corresponding JPEG when recorded in camera.  This will make your vast memory card seem very limited.  Additionally, where as a JPEG is typically printer-ready straight out of the camera, a RAW file will need to be manually processed in your digital darkroom.  So, to answer the obvious question of ‘is it worth it?’, lets consider the benefits…

The benefits of RAW

As mentioned above, when shooting JPEG, the camera processes the image internally, before compressing it to a lower bit depth.  The processing applied by the camera is generic, and uniform across the entire image.  In contrast, when you capture RAW images, you have full control over how much processing is applied to an image, and where in that image you apply it.

Given the increased bit depth of the RAW files, any image you capture is much more forgiving than the corresponding JPEG would be.  For example, if you didn’t nail your exposure, and you over-exposed the sky of a landscape photograph, leaving it nearly white, you will be able to recover much more tonal data in the RAW file and potentially save what, otherwise, may be an image destined for the recycle bin.  Similarly for shadow data, much more information is retained meaning under-exposed regions of an image can be recovered to show detail that would otherwise have been lost.

Shadow detail recovery when shooting RAW

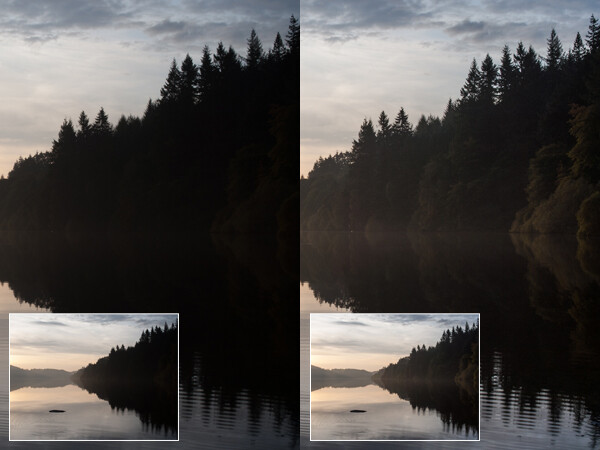
On the left is the image presented straight out of camera. Exposing to contain the bright sky caused the trees to be under-exposed, and appear and a dense block of dark colour. The image on the right shows the same image processed to boost the shadows to reveal detail that may otherwise have been lost

Similarly, one image can contain enough tonal detail to create an HDR-style image from one file.  The exposure of the image can be increased/decreased during post processing to give 3 images, as if bracketed, and can be combined to give that effect of increased dynamic range, but all from just one image.

When shooting in RAW, you no longer need to set your white balance in camera.  The increased bit depth of RAW files means that the white balance can be defined, by precise colour temperature (in Kelvin), during post processing rather than by a limited number of defined presets in camera before the shutter is pressed.  Due to the increased bit depth, significant white balance shifts do not have a negative impact on the final image quality.  No longer do you fire off a few frames before remembering that you left the white balance on ‘incandescent’ even though you are now outdoors.

Colour temperature correction from RAW

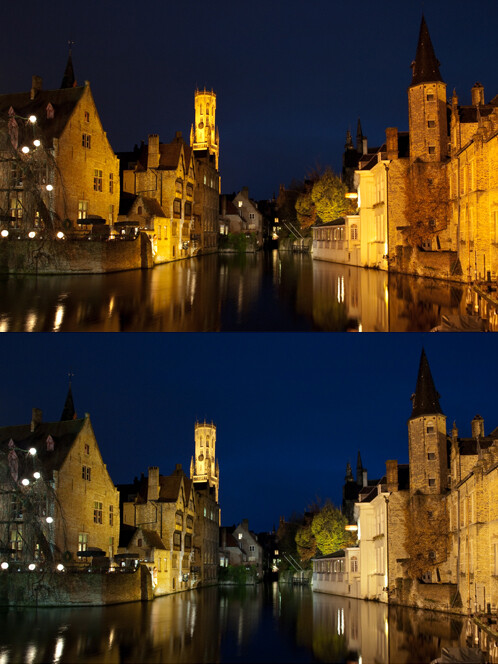
The top image shows Bruges, captured at night, straight out of camera. The white balance of the bottom image has been processed to reduce the colour temperature in order to give a more realistic representation for the colour of the stone buildings, without any impact on the image quality.

Sharpening can be applied as much as you want and even where you want, without over-sharpening a pre-sharpened JPEG image.  This can be used to emphasise details in one section of an image, or just generally give you control over the final image output.

Selective sharpening of an image

This image on the left shows a cheetah that has undergone some sharpening to increase detail. The image on the right is the mask applied to the sharpening effect. Imagine that black and white image superimposed over the top of the cheetah; the area of white represents the portion of the image to which the sharpening effect has been applied and the area of black represents the portion of the image to which the sharpening effect is not applied. Therefore, in this instance, the sharpening has been applied only to the eyes/nose of the big cat, to further emphasise the sharp focus in this area, and increase the impact of the close portrait.

The added bonus

As if the above points weren’t enough, what has to be one of my favourite reasons for shooting in RAW is that all image editing is non-destructive.  Unlike a JPEG file, where any changes made to the image are permanent, all changes made to a RAW image are stored in a metadata file associated with the RAW file, leaving the original file untouched.  This means you can never irreparably ruin an image by saving some mistaken changes and also you can go back to an image a few weeks, months or years later and reprocess it, from the original RAW, as your processing skills improve.

Now, I would be lying if I said there was not a learning curve associated with RAW processing.  You will need dedicated RAW processing software to manipulate your images, but typically cameras that support shooting in RAW should ship with the manufacturers own software for doing so.  There are also a large number of alternative free programs out there, as well as software packages from well know image editing giants, such as Adobe.  With a little bit of research, you will see how easy it is to squeeze the most out of your images, and you will soon wonder why you weren’t shooting in RAW sooner.

Given that most cameras should give the option of shooting in ‘RAW+JPEG’, where the camera records both the RAW file and processed JPEG file to the memory card, you haven’t got an excuse to not give it a go the next time you are out with your camera.

Post originally from: Digital Photography Tips.

Check out our more Photography Tips at Photography Tips for Beginners, Portrait Photography Tips and Wedding Photography Tips.

Should you be shooting RAW?


Digital Photography School

 
Comments Off on Should you be shooting RAW?

Posted in Photography


The Reality Of Shooting In National Parks

03 Nov

You’ve seen them.

The beautiful pictures, often repeats of other beautiful pictures. Here, let me give you an example.

PeterWestCarey-Utah2012-1022-7461

This is Mesa Arch in Canyonlands National Park, Utah. You may have seen this type of shot before or one much like it. Some people wait until the sun is blocked by the arch and the underside of the arch is glowing red, as in this picture.

Calm. Serene. You can almost hear the light breeze and the whisper of time held still.

Now let me show you what is missing in this frame on that day.

PeterWestCarey-Utah2012-1022-6857

And

PeterWestCarey-Utah2012-1022-7347

This is the reality behind the lens and something not often mentioned.

For this shoot, I was meeting up with fellow photographer Michael Riffle who has been to this location before. He said we needed to meet early….real early. “How early?” I asked. With a sunrise at 7:30, he guessed about 5:30am. That should get us to the park and in position around 6:30am.

Evidently that was not early enough.

We were bested by two workshop groups who had arrived even earlier. I took up a position to the far right while Michael managed to use his charm to gain front row access, but not as close as he had planned. In all, there were over 17 people shooting the arch that day, the crowd getting ruckus when one gentleman decided to walk on top and pose for his workshop group. This brought yells to get off and threats that his act was illegal (for reference sake, we asked a park ranger at the trailhead and were told it is not illegal to walk the arch. “It’s not a very smart thing to do, though.” Were his words).

The atmosphere is not what the illusion of the first image portrays, but that’s ok, because that’s photography. An illusion of what really was, malleable any way we, as artists, please.

Now, let’s contrast that experience with our shoot the next morning in neighboring Arches National Park. It was my idea to head to Delicate Arch for sunrise. This icon is so popular, it even adorns most license plates in Utah.

First, a shot of the classic arch.

PeterWestCarey-Utah2012-1023-7847

You may notice this is not the normal shot people take. That shot is near sunset when the face is lit up. We decided to go early for a different view of the classic and it paid off as this is the crowd we faced:

PeterWestCarey-Utah2012-1023-7852

No one. For an hour and a half we set up, tested, shot and waited. After an hour and a half, one person showed up for about 20 minutes and then left.

In my book, it doesn’t get any better than that. I’ve been to this location at sunset and so had Michael. We exchanged horror stories of tourists being tourists and exploring the arch, much to the consternation of the multiple photographers lined up (to the right in the image above) to get their copy of a classic. I didn’t want to spend half a day trying to edit out tourists (yes, I am one of them too) who, “got in my shot!”

This is a shot of such crowds by Matt Leher on Flickr.

1805543877_305a65baf9_z

The valley view just off the road in Yosemite Valley. Old Faithful. Mt. Rushmore.

The list goes on and on. Classic shots that leave behind the reality of a crowded scene to get a classic shot.

Crowds are not bad nor evil. I’m not saying you shouldn’t get those classic shots. They are beautiful and help people gain interest in our National Parks.

I want you to be aware; when you plan that ultimate shoot to capture a well worn icon for your own portfolio, realize you may have company.

On the other hand, we spoke with a local Utah photographer who visits Mesa Arch often and he pointed out winter is a great time to shoot and crowds are usually less. But he also said it can’t be predicted as he has been there in bad weather, expecting to have the place to himself, only to find a crowd. The flipside also being true.

What can you do?

  • Scout first, during the day or day before. Look for a spot when the light is harsh and there are less visitors to contend with. You can do some of this online before leaving to see what others have shot and figure out angles you might want to try.
  • Arrive super early. Not early; super early.
  • Be patient. All the others are wanting what you want and it’s not because they hate you. It’s because you all likely appreciate the same beauty.
  • Be friendly. With the crowd at Mesa Arch, I joked around with a couple of people near me who were lighthearted enough to enjoy the morning even with the crowd.
  • Bring a second camera. This will allow you to stake a claim to a spot and still take other images.
  • Enjoy what you came to enjoy.

Despite the crowds I have found at popular shooting locations, I have always enjoyed the experience. Sure, my expectations of a deserted vista were dashed, but once I dropped that expectation and the disappointment that came with it, my mood and shooting improved.

Good luck! And good shooting!

Post originally from: Digital Photography Tips.

Check out our more Photography Tips at Photography Tips for Beginners, Portrait Photography Tips and Wedding Photography Tips.

The Reality Of Shooting In National Parks


Digital Photography School

 
Comments Off on The Reality Of Shooting In National Parks

Posted in Photography


Digital Photography 1 on 1: Episode 56: Shooting with the Nifty 50: Adorama Photography TV

30 Oct

Adorama Photography TV presents: In this episode Mark will show us how to get photos with that really shallow depth of field and typically overexposed to really blow out the detail in the background, just like some of the photographers that we feature on “How’d They Do That?”. To see Mark’s results with each of the different cameras, visit the AdoramaTV flickr page here: www.flickr.com Learn more about 50mm lenses and the photographers who use them here: www.adorama.com Buy the following products in this episode at Adorama.com: Cannon 50mm f/1.4 www.adorama.com Nikon 50mm f/1.4 www.adorama.com Photoflex Litedisc 52″ Circular Collapsable Disc Reflector, Silver / Gold www.adorama.com Visit www.adorama.com for more photography videos! Send your questions to: AskMark@Adorama.com
Video Rating: 4 / 5

This fascinating 1958 documentary titled “How film is made”, that documents the production process and birth of photographic and cinematic film, was initially uncovered as part of a heritage in the Netherlands. Although its exact source and purpose are as of yet still unknown, it may have been an instructional film for new employees at Kodak’s factories world wide, and was probably used as a promotional film for the general public as well.
Video Rating: 4 / 5

 
Comments Off on Digital Photography 1 on 1: Episode 56: Shooting with the Nifty 50: Adorama Photography TV

Posted in Nikon Videos