RSS
 

Posts Tagged ‘Shooting’

TetherTools – Shooting Tethered and other Fun Things..

07 Jul

We had a look at the AERO from Tether Tools a while back (Read that review here) well, I’ve been in touch with the photographer who did that review for us, London based commercial photographer, Nathan Pask. He was on his way out to a shoot and did indeed have his Aero with him – Nathan snapped a couple of shots for me of the Aero in action and had this to say when asked “are you still using that Tether Table?” (I love a review that actually has a few months of use and a recap! Two weeks to get a proper feel for a product is a bit silly, really)

“Sure do mate. All the time! I get a lot of admirers ask about it. I like that its light. It does have a little bit of flex, but I have the big one because of the 17″ lappy so I guess that’s to be expected. I never feel like its going to topple though. So I mostly attach it to my carbon sticks and it becomes a really nice lightweight option when I’m on location particularly as myself or my Digi-op can easily pick it up and move to the next spot without too much fuss and the strap over the laptop keeps it pretty secure. Can’t recall ever having a scary moment that the table has been responsible for. It is quite expensive for what it is, but there isn’t a product I’ve seen that can compare, so they kinda have the market sewn up currently.”

Tether-Tools-Nathan-Pask-Photographer-London

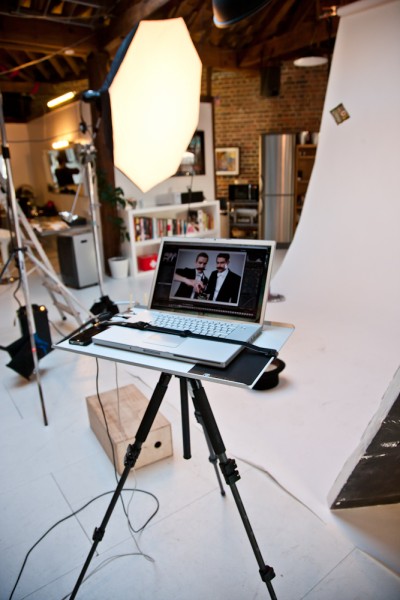
Nathan Pask on a shoot using the Tether Tools Aero Master

Since getting hold of my own Aero, I’ve been using her for a lot more than simply shooting tethered on a set or in the studio – the Tether Tools Aero has become a second desk space when I need a little more space – as you can see below, the option for pretty much anything else besides my frequent cups of coffee isn’t really an option. It takes me about 45 seconds to set up a tripod and my tether table to use as an extra desk.

simon_pollock_melbourne_based_photographer

Since our last look at Tether Tools, their quiver of gear has expanded to include a desk full of extra handy stuff that is set to make your life easier, from iPad holding gizmos to cup holders (I’m not even joking) – I wanted to bring some of it to your attention, perchance you’re struggling and these will bring a smile to your face and a bit of extra speed and security to your workflow. I went across to visit the terribly attractive team at Kayell in Melbourne and picked up the “essentials kit” it has Jerk Stopper and the super handy USB light in a little case, as well as a couple of the TetherPro cables – I got them in orange as, on a darker set, they’re “less easy” to trip over… (I’m a clutz ok..!)

For those of you still unfamiliar with exactly what tethering is, here… check this out!

I’m using the Aero Master and an Aero XDC to run my external “on location” disc underneath the Aero.. This way, as Mark mentioned in the video, I can shoot straight to my laptop and have a copy load into my external disk via folder actions. I also have the CF in the camera with a copy on should something go horribly wrong. Some other examples of where I’ve used my Aero – most of which you may find a little amusing – include a coffee table (yes, with a tablecloth over it) as a work desk to use my Macbook Air on when I’m sitting outside working while watching my 3 year old ride his bike around and around… I’ve used it on a 3LeggedThing “Keith” as a tabletop recipe book holder AND I’ve also used it as a flag to block light on a shoot. (I usually use a NastyFlag or similar if I’m simply shaping light to shoot a product, but hey – I needed something bigger!)

simon_pollock_tether_tools_3leggedthing_photographer

The bottom line I guess is that the Aero has sooo many other uses than simply being a great, portable tethering accessory and workbench.

I’d like to close todays proceedings with a couple of actual photographs from the set Nathan was working on, you can see his Aero with a thinkTank Pixel Sunscreen on top, combining these two means you have a stable work surface and a non-glare option to make sure you’re shooting and getting exactly what you need. I agree that the Aero may not be for everyone, but if you’re a semi-pro or pro that is continually moving that annoying coffee table around to rest your laptop on, well, it may just be for you….

NN_IFX 0671

NN_IFX 0673

The Tether Tools Aero is a great bit of kit, though as Nathan mentioned, it is towards the pricier end of the scale, but I’d say for a working pro that does a lot of tethered work on location, the Aero is invaluable. (And my mum always said “buy well, buy once)

~Sime


Post originally from: Digital Photography Tips.

Check out our more Photography Tips at Photography Tips for Beginners, Portrait Photography Tips and Wedding Photography Tips.

TetherTools – Shooting Tethered and other Fun Things..


Digital Photography School

 
Comments Off on TetherTools – Shooting Tethered and other Fun Things..

Posted in Photography


Play Ball! Covering Your Bases Shooting Baseball

05 Jul
Shooting the pitcher from behind can give this kind of a dramatic shot. Using the continuous drive setting to shoot many frames throughout the motion will help you ensure that you get the best part of the motion.

Shooting the pitcher from behind can give this kind of a dramatic shot. Using the continuous drive setting to shoot many frames throughout the motion will help you ensure that you get the best part of the motion.

Baseball can be among the most maddening of sports to photograph. Entire games can be played with very little action at all, while other games will be chock full of great fielding plays and other images waiting to be captured. As with all sports, knowing the game is as important as knowing how to make a photo.  Knowing what plays will happen on different areas on the baseball diamond helps you be ready when those situations arise.  Before we get to those situations, some basic settings. As always when shooting sports, I tend to shoot nearly wide open, usually at f/2.8 or f/4. I then set my ISO high enough to give me a shutter speed of at least 1/500 and more likely, 1/1000.  Which lens I use depends almost entirely on what level of baseball I’m shooting.  When shooting little leaguers, a 70-200 or 70-300 will probably be pretty adequate, while for high school and above you may need something with a focal length of 400mm or more.  My drive speed is always set to continuous high when shooting sports, so I can fire continuously during peak action. This helps ensure that I will get the peak action.

Shooting from behind the plate provides a great angle on shooting the pitcher's delivery.  Just watch out for wild throws!

Shooting from behind the plate provides a great angle on shooting the pitcher’s delivery. Just watch out for wild throws!

Baseball games lend themselves to a lot of different types of images.  The opportunities start long before the game on the field starts.  Batting practice presents some great portrait opportunities, as well as candid moments among players, so it’s always worthwhile to get to the game early. You’ll see players stretching, horsing around amongst themselves, taking batting practice, and fielding practice.  If possible, and if you can get on the field, it’s always a good idea to become familiar with the players, and to let them become familiar with you.  You’re more likely to get good images when their guard is down.  This is a great time to get moments between coaches and players, players on opposing teams, and teammates in a more relaxed atmosphere.

Once the game starts, the portrait ops don’t stop, but they take on a much different air.  Players expressions will be all business for the most part. Since you generally can’t be on the field during the game, you’ll need a longer lens to capture these images.

As for the action, the game starts with pitching, so you’ll want to be sure you get some shots of the pitchers.  Depending on where you are, There are several ways to do this. Start with a full length shot that gets the pitcher’s entire body in the shot. Then move on to tighter shots. If the pitcher’s back is to you, you can get a nice shot of his arm raring back ready to fire a fastball, with his name and number emblazoned on the back of his jersey. If allowed, a shooting position behind the pitcher is ideal for a shot of the pitching motion coming right at you. Usually this can be done during warm-ups if you clear it ahead of time.  In the pro’s some teams allow this between innings while others do not. Find the team’s photographer and check with them.  One other fun shot to try is to pan the pitcher’s motion using a slow shutter speed.  This shot will depend both on your ability to keep the panning speed steady, as well as the pitcher’s motion.  Some pitchers move their heads around a lot.  Others, the motion is all in the arms and legs.  Those that keep their heads steadier tend to be better subjects for this type of shot.

The other end of the pitch is of course, the batter.  Generally, right-handed batters are best shot from the first base side, while left-handed batters are best photographed from the third base side. However, from the opposite base, hitters’ follow-through can be captured beautifully.   If a hitter puts the ball in play, it can be difficult to try and find the fielder if you were initially focused on the batter.  If

Batters are best captured from the opposite side of the plate they hit from, so right handed batters are best photographed from the first base side, and left handers from third.

Batters are best captured from the opposite side of the plate they hit from, so right handed batters are best photographed from the first base side, and left handers from third.

you want photos of fielders, it’s much better to know the batter’s tendencies and try to predict where he will hit the ball.

If a batter reaches base, this sets up situations with plays at the bases- particularly second base.  A runner at first could attempt to steal second, which makes a great play at second base. This will always look better from the first base side, but can also be captured from third base.  Knowing which runners have a tendency to try and steal will help with anticipating the shot.  In addition, a runner on first base with less than two out sets up the possibility of a double play. If trying to anticipate a play at second, it’s a good idea to prefocus on second base.  If the play happens in that general area it will be much easier to achieve focus since the fielder will be right in the place you’ve prefocused on.

Capturing outfielders will be hit or miss if you’ll pardon the pun. There is generally enough time to swing the lens to the outfield and find focus when the ball is hit there, but often the action could be beyond the reach of the lens.  It never hurts to try.

Baseball can be a lot of fun to shoot, but it takes some patience, and a little bit of study and understanding of the game to get really good shots.

Panning on the pitcher's motion can make for a unique image.

Panning on the pitcher’s motion can make for a unique image.

When possible, looking for unique angles, such as this one from above can make for some different shots.

When possible, looking for unique angles, such as this one from above can make for some different shots.

Batters waiting on deck can provide some great portrait opportunities.

Batters waiting on deck can provide some great portrait opportunities.


Post originally from: Digital Photography Tips.

Check out our more Photography Tips at Photography Tips for Beginners, Portrait Photography Tips and Wedding Photography Tips.

Play Ball! Covering Your Bases Shooting Baseball


Digital Photography School

 
Comments Off on Play Ball! Covering Your Bases Shooting Baseball

Posted in Photography


A Guide to Shooting Outdoors in Low Light Conditions

22 Jun

A Guest Post by James Farley.

1

Shooting in low light as for many other forms of photography requires a bit of thought beforehand in order to get the most from the time you have, first and foremost will be making sure you have the right equipment with you.

Besides your camera and lenses, top of the list of things you will need will be a tripod, sturdier the better as exposures can get up to 30 seconds and sometimes even longer which is where even the slightest vibration or movement of the camera can ruin a shot.

2

Other items that you can get by without but if you have them will be very helpful include:

  • Remote release, these come in many forms, infra-red/wired/wireless, I’ve used all of them at some point or another and would now always opt for a wireless trigger, can be inexpensive and give you a good mix of reliability and range.
  • ?There are now also apps that you can use on your smartphone with a suitable cable that act as a release and can offer some great features above and beyond being a simple trigger, one I’ve used that is worth a look is called TriggerTrap

  • A torch – trying to get your camera to autofocus in very low light can be a right headache at times, shining a torch on your desired area of focus will allow it to lock on quickly (but remember to switch to manual focus when it has!)
  • ?Also useful for changing settings on camera and just generally seeing your way around!

  • ND Grad filters – by no means essential, but if still a bit of colour in the sky these can be helpful to ensure things in foreground are correctly exposed, particularly if already in shadow when beginning to shoot.
  • Warm clothes! Depending on where you are in the world, it can get very cold very quickly as it goes dark, nothing worse than standing round shivering as your 60 second exposure ticks very slowly by!

3

Personal safety is also very important to mention if you are out to shoot in limited light conditions, ideally take someone along with you, not least to give you someone to talk to, can get very boring waiting for long exposures to finish!, or at least tell someone where you plan to go and what time you expect to return. Carry a mobile phone and try not to make it obvious you have valuable equipment with you where possible.
You will probably already have locations in mind that are suitable for low light photography, I tend to find that cities offer the best opportunities and will set out with the intention of shooting specific buildings from various viewpoints, and then improvise as the night progresses and other things present themselves.

4

Artificial lighting can greatly enhance a dark scene, and if you use a narrow aperture, f/16 for example you should capture lights with a starburst effect to add some drama to the image.

Once you have found the composition you like the look of, set your tripod up ensuring it’s not in the way of others, if it has a bag hook as some do then hang your camera bag from it to give you a bit more stability.

Compose the scene in your viewfinder and use the torch as mentioned if needed to focus, then switch to manual focus which will stop the lens from ‘focus hunting’. At this point I will wait for any moving light sources such as vehicles to leave the composition so I can check the settings selected by the camera before then plugging these into the cameras manual mode to ensure they do not change when shutter is triggered.

5

If the scene is very dark, it may be the case that your camera cannot meter it sufficiently well to give a correct exposure (DSLR’s generally will not automatically select an exposure longer than 30 seconds), if this is the case, you will need to go into manual mode, choose your aperture and then select the cameras ‘Bulb’ mode which will open the shutter when you use the remote release, and keep it open until you press it again, this is where guesswork comes into it, you will need to try out some exposure times until the image is sufficiently exposed, use the histogram on back of camera to give you some idea of how far under/over your exposure is.

Longer exposures can also produce ‘noise’ within an image, similar to when using higher ISO’s, to reduce this most DSLR’s will have some sort of ‘long exposure noise reduction’ setting somewhere within the menu system, if you turn this on when you have taken your image, the camera will then close the shutter and take a similar length exposure. You won’t see this second exposure and it doesn’t get saved to your memory card, but the camera will use it to subtract any hot pixels showing from your original image which can greatly reduce noise, can get annoying though as every exposure will then take double the time to capture!

White balance can be tricky in low light with all kinds of artificial light spilling across your scene, for this reason I would suggest shooting in RAW to give you the flexibility to adjust this later, plus it will capture more detail in the image which can sometimes be an issue in very dark areas.

Don’t let rain put you off either, wet surfaces can look brilliant as light bounces off them!

And if you are feeling really creative, timelapse sequences can look fantastic as the light slowly disappears, this clip was made from about 140 photographs taken on Tower Bridge in London.

Now just grab your coat and get out there!, love to see what you get if you’d like to share some links in the comments below.

James Farley is a semi professional photographer in the UK covering a wide range of genres, recently including wedding photography, and a self confessed ‘kit geek’.
More of his work can be found on Facebook and at www.jamesfarley.co.uk

Post originally from: Digital Photography Tips.

Check out our more Photography Tips at Photography Tips for Beginners, Portrait Photography Tips and Wedding Photography Tips.

A Guide to Shooting Outdoors in Low Light Conditions


Digital Photography School

 
Comments Off on A Guide to Shooting Outdoors in Low Light Conditions

Posted in Photography


Get an Invisible Black Background to Your Portraits – Shooting Anywhere [VIDEO]

14 Jun

In this video Glyn Dewis demonstrates how he gets his ‘Invisible Black Background’ effect when taking a portraits which will allow you to take a low key atmospheric portrait with a black background anywhere – even outdoors as he does in this video.

To get the shot Glyn just uses his DSLR, a single Speedlight Flash, a cheap umbrella and a PocketWizard to trigger the flash (although you can do this with any method of triggering a remote flash that you have).

Want to see some more examples of what can be done with this effect – check out Glyn’s blog posts on the topic here and here.

Post originally from: Digital Photography Tips.

Check out our more Photography Tips at Photography Tips for Beginners, Portrait Photography Tips and Wedding Photography Tips.

Get an Invisible Black Background to Your Portraits – Shooting Anywhere [VIDEO]


Digital Photography School

 
Comments Off on Get an Invisible Black Background to Your Portraits – Shooting Anywhere [VIDEO]

Posted in Photography


First impressions shooting with the Sigma 18-35mm F1.8 DC HSM

10 Jun

Cover2.jpg

We’ve just published our first impressions of shooting with the Sigma 18-35mm F1.8 EX DC lens. We’ve tried to express just why we’re so excited about this lens, which offers APS-C DSLR users access to some of the depth-of-field and low-light capabilities that full-frame shooters get from their F2.8 zooms. We’re hoping to hear about pricing and availability soon so, in the meantime and in the light of our first impressions, what would you expect to pay for this lens?

News: Digital Photography Review (dpreview.com)

 
Comments Off on First impressions shooting with the Sigma 18-35mm F1.8 DC HSM

Posted in Uncategorized


Shooting Locally

28 May
This shot was taken at Fire Island National Seashore in New York, about 20 minutes from where I live, making it easy to get to whenever I feel the need to make an image. This image was taken on a cold early spring day. EOS 5D Mark III, EF 8-15mm f/4L Fisheye Zoom. 1/60 @ f/16.

This shot was taken at Fire Island National Seashore in New York, about 20 minutes from where I live, making it easy to get to whenever I feel the need to make an image. This image was taken on a cold early spring day. EOS 5D Mark III, EF 8-15mm f/4L Fisheye Zoom. 1/60 @ f/16.

As an avid landscape photographer, I often hear the call of faraway places of natural beauty- Yosemite, Denali, the Canadian Rockies- you get the idea. But like most people, I don’t have unlimited funds allowing me to travel, so when the itch to make some photos strikes, I must try to find an inspiring vista nearby. It can be easy to get bored at the same old locations, but these familiar locations offer opportunities that the more exotic and sought-after locations don’t.

These stones sit in the bay on the north side of Fire Island. During the summer, thunderclouds move across the bay almost daily, giving nice dramatic skies. ISO 1600, f/11, 120 seconds. EOS 5D Mark III with EF 17-40mm f/4L.

These stones sit in the bay on the north side of Fire Island. During the summer, thunderclouds move across the bay almost daily, giving nice dramatic skies. ISO 1600, f/11, 120 seconds. EOS 5D Mark III with EF 17-40mm f/4L.

First of all, because these locations are local, they are not a “once in a lifetime” experience. This removes a lot of pressure to be sure you get “the shot”, and instead, allow for experimenting without the fear of coming away with nothing to show for your efforts.  You can always go back, since it’s nearby, giving you the opportunity to perfect new techniques so that when are on that once in a lifetime trip, you are ready to just make images without fear of messing it up. In addition to experimenting, local shooting locations present the opportunity to document the location at different times throughout the year. I’ve found that even my most visited places will present new looks as the seasons change, and even from day to day.

On the south side of Fire Island, you've got the ocean beaches with jetties and crashing waves, presenting more great opportunities.  Canon EOS-1D Mark III, EF 24-105 f/4L.  1/3 sec., f/22, ISO 50.

On the south side of Fire Island, you’ve got the ocean beaches with jetties and crashing waves, presenting more great opportunities. Canon EOS-1D Mark III, EF 24-105 f/4L. 1/3 sec., f/22, ISO 50.

For me, it’s about how far I’m willing to drive in the time I have. Generally, it’s an hour or two if I have the whole day free. If the whole day isn’t free, it could be somewhere close by, maybe 15 or 20 minutes away.  Once I’ve decided how far I’m willing to drive, I have my choices- local parks, state parks, New York City (an hour drive for me), or many other locations.  No matter where you live, there are places local to you that you can go back to over and over again.

When I'm feeling like something more local, this park just a mile from my home is a great place for sunsets. EOS 5D Mark III w/ EF 17-40mm f/4L. 1/30, f/16, ISO 100.

When I’m feeling like something more local, this park just a mile from my home is a great place for sunsets. EOS 5D Mark III w/ EF 17-40mm f/4L. 1/30, f/16, ISO 100.

For me, my favorite location is Fire Island National Seashore, here on Long Island, NY. It’s a 20 minute drive, a great place for both sunrise and sunset, and offers a variety of photo opportunities each time I’m there.  There’s a lighthouse, jetties, the beach, the ocean, a bay, and plenty of wildlife.  It’s also a place that changes depending on the time of year, making it a place I can go back to over and over and never see it look the same way twice. In many ways, it’s become my muse.

These local places are not glamorous, but they present a perfect opportunity to hone your craft, and still come away with great images.


Post originally from: Digital Photography Tips.

Check out our more Photography Tips at Photography Tips for Beginners, Portrait Photography Tips and Wedding Photography Tips.

Shooting Locally


Digital Photography School

 
Comments Off on Shooting Locally

Posted in Photography


Book Review: Shooting in Sh*tty Light

21 May

cover.jpg

Lindsay Adler and Erik Valind, both working professionals and educators, have written a beginner’s guide to photographic lighting with an unusual conceit at its core. By structuring a book around a list of common challenges – what they call the ‘top ten worst situations’ – they’ve created a digestible, useful ‘lighting 101’ guide. In this short review, Adam Koplan takes a look at their book ‘Shooting in Sh**ty Light: The Top Ten Worst Photography Lighting Situations and How to Conquer Them’.

News: Digital Photography Review (dpreview.com)

 
Comments Off on Book Review: Shooting in Sh*tty Light

Posted in Uncategorized


Tips for Shooting Landscapes with a Telephoto Lens

10 Apr

Landscape photography is often synonymous with wide-angle lenses, strategically placed foreground elements and all encompassing vistas that stretch from the very near to the very far.  There is no doubt that using that approach can create wonderful images that lead the viewer through a grand landscape however there is also merit in taking a different approach and using a telephoto lens.

Telephoto Landscape - Rolling Farmland

This rolling farmland was isolated using a focal length equivalent to 280mm, f/13, 1/200s, ISO 200, using a tripod

Often, when photographing a landscape, there is a particular element of the scene that has caught your eye and made you want to capture the image.  With a telephoto lens, it is possible to isolate that key element and bring it to the fore of the composition, rather than let it get lost amongst the other distractions introduced when shooting with a wide angle.  You will find that a telephoto lens will also compress the perspective of the landscape, brining distant objects much closer, giving a different sense of scale to when using a wide-angle lens.

The approach taken to shoot landscapes with a telephoto lens is similar to when using a wide-angle lens, though there are some additional considerations.  Here are a few tips to help you along the way:

1. Composition: Look for a strong feature of the landscape and try to isolate it within the frame, leaving out unnecessary elements that detract from the composition, for example, the sky – we often feel the need to include the sky within landscape images, however if it doesn’t add significant interest, or would detract from the main element, why not leave it out?

2. Sturdy support: You will want to use a sturdy tripod to ensure you can shoot without suffering from camera shake.  Telephoto lenses are very sensitive to the slightest movement so a solid support is key to capturing sharp images.  If shooting handheld, a good rule of thumb is to aim for a shutter speed quicker than ‘1/focal length’ to avoid camera shake however depending on the available light that is not always possible, hence the recommendation for a tripod.

3. Camera shake: Utilise ‘mirror lock-up’ or a remote shutter release (even both) to further reduce the chances of vibrations.  When the shutter is pressed, the movement of the mirror can introduce vibrations that can cause loss of sharpness, so the ‘mirror lock-up’ feature (found within the menus of most DSLRs) introduces a small delay between lifting the mirror and opening the shutter.

4. Image Stabilisation: Switch off any image stabilisation features on the lens or within the camera body.  That feature that you rely on when shooting handheld can actually introduce camera shake if left on when your camera is mounted on a tripod, and when using a telephoto lens, those movements will be exaggerated and result in a softer image.

Telephoto Landscapes - Tuscan Sunset

A Tuscan landscape captured using a focal length equivalent to 120 mm

5. Aperture selection: Be aware of the optimum aperture required to capture the scene in sharp focus.  When the subject is distant, a large depth of field can be easily achieved (even with a telephoto lens) so consider using apertures within the ‘sweet spot’ of your lens (typically f/8 to f/11).

6. Filters: If you do chose to incorporate the sky within a telephoto landscape you may find that the dynamic range of the scene is greater than your camera can capture in one shot.  Typically, you may use graduated neutral density filters to overcome this, however it is more than likely that the diameter of your wide-angle lens will differ to your telephoto lens, meaning you may not have the appropriate filter ring size to use with your telephoto lens.  Adapter rings are fairly cheap to buy and keep in your camera bag just in case, otherwise think about capturing bracketed exposures (exposed correctly for the sky and land) in order to blend them together later on.

Telephoto Landscapes - Panorama

A panorama stitched from 7 images taken at a focal length equivalent to 100 mm.

7. Panoramas: Telephotos lenses are great for capturing panoramas as there is very little distortion due to focal length.  This means you can zoom in even further on a feature within the landscape and capture a number of images to stitch together into one panoramic image (even though the final field of view may not actually be that wide).

Seeing compositions that work with a telephoto lens may be challenging initially, however it won’t be long before you start isolating elements of the landscape in your minds eye.  A good exercise is to go out and challenge yourself to shoot landscapes with only your telephoto lens.  You will find that the change of focal length may be refreshing as even local landscapes can be transformed to something unfamiliar when seen through a telephoto lens.

Post originally from: Digital Photography Tips.

Check out our more Photography Tips at Photography Tips for Beginners, Portrait Photography Tips and Wedding Photography Tips.

Tips for Shooting Landscapes with a Telephoto Lens


Digital Photography School

 
Comments Off on Tips for Shooting Landscapes with a Telephoto Lens

Posted in Photography


Blackmagic Design creates Pocket Cinema Camera with raw 1080 shooting

09 Apr

Blackmagic.png

Blackmagic Design has announced a pocket-sized 1080p movie camera capable of 422 ProRes capture with promises of lossless CinemaDNG to be added via firmware. The Blackmagic Pocket Cinema Camera uses a Super 16 crop (around 12.5 x 7.4mm), of the sensor used in its existing camera, and an ‘active’ Micro Four Thirds lens mount, giving full aperture control of native lenses. The camera can capture footage in Apple’s 10-bit 4:2:2 ProRes format Blackmagic promising to add the open, lossless CinemaDNG Raw standard later. The company has said this will cost just $ 995 and be available from July.

News: Digital Photography Review (dpreview.com)

 
Comments Off on Blackmagic Design creates Pocket Cinema Camera with raw 1080 shooting

Posted in Uncategorized


8 Places For Shooting You Have To Master Before Taking Your Camera Elsewhere

03 Apr

It happens to all of us. Regardless of experience or skill level, at some point, we’ve all thought, “I have no idea where to take pictures!”. We’ve run out of new, fresh ideas and are seriously considering abandoning any photography this weekend. Of course, we know that we haven’t literally run out of locations to shoot, we just aren’t thinking Continue Reading

The post 8 Places For Shooting You Have To Master Before Taking Your Camera Elsewhere appeared first on Photodoto.


Photodoto

 
Comments Off on 8 Places For Shooting You Have To Master Before Taking Your Camera Elsewhere

Posted in Photography