My brother Liam and I have been shooting weddings without flash for over eight years. The flash equipment is safely in the car boot just in case of an absolute emergency but for the last four years we haven’t had the need to bring out the flash gun at all! We like to let the […]
dslrBlog
Posts Tagged ‘Shooting’
Shooting in The Dark by Dominique Shaw
10
Dec
Shooting with the Sony Alpha 7 and Alpha 7R
15
Nov

We’ve been shooting with Sony’s Alpha 7 and Alpha 7R over the past few weeks to get an insight into how the compact full-frame twins behave. While the two models are twins, they’re by no means identical, with each sibling very quickly showing its own, distinct personality. We’ll be publishing more in the coming weeks as we move towards completing our review, but we wanted to share our perspective, now we’ve had some experience to informed our opinion.
News: Digital Photography Review (dpreview.com)
Nat Geo photographer takes the iPhone 5S out shooting (and likes it)
09
Oct

When National Geographic photographer Jim Richardson ditched his usual DSLR kit and took an iPhone 5S out to the Scottish highlands, he wasn’t sure he was going to get great shots. In the end though, he was surprised by how capable the smartphone’s 8MP camera is. He shared his experiences (and some of his images) at National Geographic’s ‘Proof’ blog and we’ve published extracts over at connect.dpreview.com.
News: Digital Photography Review (dpreview.com)
Wedding Photography: Shooting The Rings
12
Sep

This bride and groom are both serving in the army, and both are gun enthusiasts. I asked the groom if he had their guns handy, and a bullet, and came up with this shot as one of the ring shots. This shot was taken in available light, under a tent outdoors. EOS 5D Mark III with EF 100mm f/2.8L IS; ISO 2500, f/16, 1/125.
In my career in photography, I’ve chosen not to focus on weddings as a business model, and shoot only a few every year. I try to avoid being “traditional” in my approach to weddings, mixing traditional shots or types of shots with my own approach- which may or may not have been borrowed from other photographers I have worked with.
One such shot is the ring shot. It is what’s known as a detail shot, and while this may not be the most important shot of the wedding, it is one of the shots that helps sets the tone of an album, and can allow for a lot of creativity if you have the time. If the shot fails, it will definitely be noticed.

The bride and groom in this wedding had a special affinity for the beach, and brought a beach theme to their wedding. Shells were scattered about the tables. I selected a few and quickly shot the rings on a table. The room was brightly lit with daylight pouring in the windows nearby, and I set my flash to bounce off the ceiling to add just a touch more light. . EOS-1D X, EF 100mm f/2.8L IS. ISO 800, 1/250, f/5.6.
There are many ways to go about these types of shots, some more cliche than others. The one that always comes to mind is a shot of the rings resting on the invitation, or the rings casting a shadow of a heart on a Bible opened to 1st Corinthians. My preference is to find something personal that connects the rings to the bride and groom, or else I’ll pull something from the theme of the day. It may take some digging with your clients to find that personal connection- maybe a story about how they met, or something they share together, but once you find it, it can make shooting the ring shot a lot more fun. If I can’t find a personal connection, I’ll use flowers, the bouquet, or a even a champagne cork. Be creative. There are a lot of ways to photograph wedding rings that will make them stand out.

There was no overriding theme at this wedding, and as a second shooter I didn’t have time to get to know the bride and groom. I found a flower arrangement and played with several arrangements before settling on this one. EOS 5D Mark III, EF 100mm f/2.8L IS. I bounced the flash off the ceiling for this shot. ISO 800, f/8, 1/200.
Technically, while a macro lens is helpful, it’s not absolutely necessary. You can highlight the rings in whatever setting you choose, but be careful not to let them get lost in the setting. Typically I use a Canon EF 100mm f/2.8L IS macro lens, but any lens that will let you get fairly close will work, depending on your composition. Ideally, I would use off-camera flash every time, but weddings tend to me fast moving events, and there isn’t always time to do it the way you’d prefer. In this case, I’ll set up a small reflector or bounce card to bounce the flash and give a better quality light. I will often try several angles to get different looks. Outdoor weddings during the day are a bit easier. I’ll look for a shaded area and shoot the rings in the available light.
Ring shots are often my most fun shot of the day. There’s no one stressing about their hair or makeup, and no one trying to pull their attention in a different direction. So use the ring shot as your moment of peace on an otherwise busy day, and have some fun with it.

This shot was also from the military wedding. The bride and groom are knife enthusiasts as well. The groom gave me one of his knives and I played with a few arrangements before shooting this one. EOS 5D Mark III, EF 100mm f/2.8L IS. ISO 3200, f/9, 1/125.
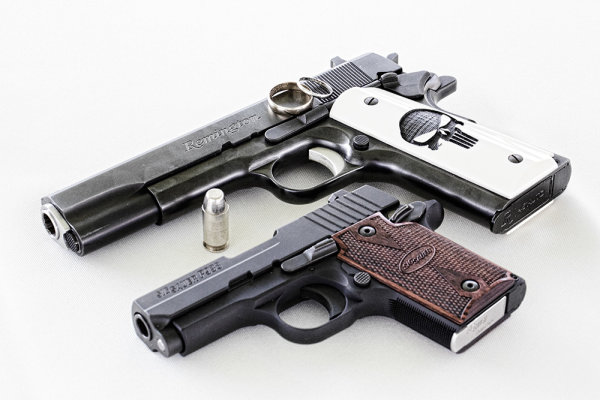
This is another set up from the military wedding. His ‘n’ hers .45′s. This shot doesn’t require a macro lens, though I used the EF 100mm f/2.8L. EOS 5D Mark II, Ef 100mm f/2.8L IS. ISO 3200, f/16, 1/160.
Post originally from: Digital Photography Tips.
Check out our more Photography Tips at Photography Tips for Beginners, Portrait Photography Tips and Wedding Photography Tips.
Wedding Photography: Shooting The Rings
Shooting With Intent
23
Aug
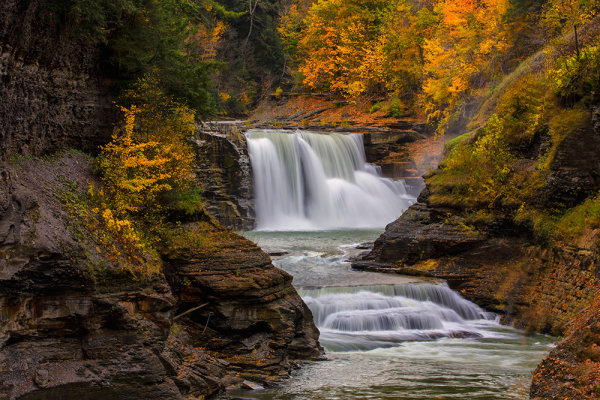
For this image of Lower Falls in Letchworth State Park in New York, I knew I wanted a creamy look to the falls. They were flowing well so I knew a moderately slow shutter speed would give me what I wanted. I also knew as I composed it that I wanted the falls framed by some of the gorgeous colors of the fall foliage. I set my exposure based on two things- I wanted a slow shutter speed and I wanted deep depth of field. EOS 5D Mark III, EF 70-300 f/4-5.6L, ISO 100, f/25, .3″.
A good friend of mine is passionate about photography, and she recently acquired a reminder of the way she approaches photography. A tattoo that wraps around her bicep that states simply “Shoot With Intent”. This is one of the biggest lessons a beginning photographer can learn. It’s very easy to go out with a camera, set it on AUTO, and come back with some nice, perhaps even great images. Today’s cameras make that fairly easy, even without shooting on full auto. If you’re using aperture priority or shutter priority, just allowing the camera to come up with an correct exposure, you can still great images without considering all aspects of the exposure. However, without considering all aspects of the exposure and allowing the camera to make decisions for you, you’re not really shooting with intent.
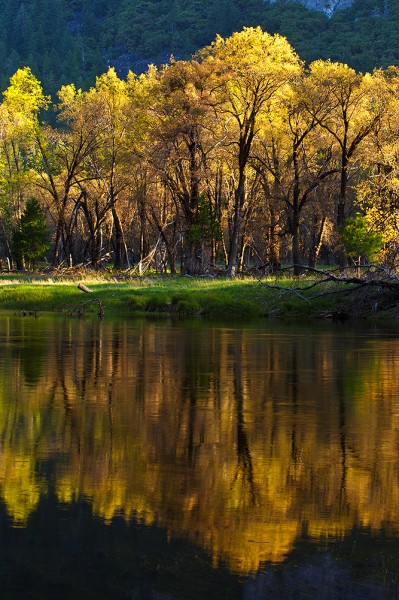
I wanted to capture this image of trees reflected in the Merced, but the water was undulating just enough to cause problems with the reflection. A slower shutter speed helped smooth the ripples and give me a better reflection. EOS 5D Mark III, EF 70-300 f/4-5.6L, ISO 100, f/16, .3″.
Shooting with intent means you take into consideration all aspects of the image you’re creating. It starts with the lens you choose to put on your DSLR and carries all the way from subject and composition, to shutter speed, ISO, and aperture, you think through every aspect of the shot, and how those variables will affect the image. Let’s assume you’ve chosen a lens, a subject, and decided how you want to compose the image, since those are the two most basic aspects of creating an image. You look through the viewfinder, or on the LCD screen, and you decide where things should go in the frame. That’s about half of the decisions you need to make right there.
Next, you need to consider the three aspects of exposure- aperture, shutter speed, and ISO. This is a balancing act where you need to prioritize what’s most important to you. Take your aperture. Let’s say you’ve decided you want everything in focus. You’ll want to select a smaller aperture, say, f/11 or even f/16 to provide the greatest depth of field. But then what about your shutter speed? If you’re in Aperture Priority mode, the camera will figure that out for you. But if there’s something moving in the shot- trees blowing in the wind, a waterfall, or waves on the ocean, or even people- is that something you want to just leave to the camera?
You can still be in Aperture Priority and pay attention to your shutter speed. Let’s assume you’re shooting a water feature. If you want smooth, misty water, you’ll know you need a slower shutter speed. But how slow? That depends on what the water is doing, and on how you want the water to look. That’s where your INTENT comes in. If you still want some definition in the water, you’ll want a slightly faster shutter speed that allows for that. How fast depends on how fast the water is moving. If you want that milky look to the water, you’ll want a slower shutter speed. Again, how slow depends on the water’s movement.
The point is, before just allowing the camera to set the shutter speed, or the aperture, or anything else, regardless of what mode you’re in, figure out what it is you really want out of this capture. Decide what your intent is, and double check what the camera is doing to be sure that your intent is carried through. And if it isn’t? Change it.
Make sure your images say what you meant to say. Be sure your intent is clear.
Post originally from: Digital Photography Tips.
Check out our more Photography Tips at Photography Tips for Beginners, Portrait Photography Tips and Wedding Photography Tips.
Shooting With Intent
10 Things I Learnt from Daily Shooting
02
Aug
A Guest Post by David Powell from Shoot Tokyo
 Here are a few lessons I have learnt from daily shooting… I hope you enjoy.
1. “Do or Do Not…. There is no Try”
A lot of people shoot daily as they are lucky enough to have a career in photography. Others embark on a 365 project while others just take photos all the time. I decided after I started ShootTokyo that I wanted to shoot daily as a way to try and rapidly improve my photography.
Shooting daily isn’t hard. It does require dedication, creatively and planning. It actually gets significantly easier with time as well. When I first started I would rack my brain for something interesting to photography but now you can put me just about anywhere for 10 minutes and I can find lots of ways to photograph it.
2. Bring your Camera Everywhere
To capture great images you need to have your camera with you. People always ask me where I find the time to shoot. Honestly I shoot whatever is in front of me where ever I am going. Most of the great shots you will take aren’t planned or set up. Events or situations unfold and you capture them.
Having my camera with me allowed me to capture the events of the March 11th Earthquake in Japan as I was experiencing it and share it with my family, friends and ultimately strangers worried about their loved ones in Tokyo.

Having a camera allowed me to capture this woman checking the news about the earthquakes while on a break.

3. Take Pictures of People
One of the most interesting pictures you can take is of people. I’ll let you in on a secret. Most people love having their photograph taken. Many photographers are very shy about asking people if they can take their photo so they end up trying to sneak a shot. This is just something you have to get over. While most people like having their photo taken, they also like to know it is happening. I have found that 9 out of 10 people will say sure and give you a big smile or pose of whatever you are looking for when asked. The approach I have taken that seems to work is being genuine and I simple ask ‘Do you mind if I take your photo?’. Often I will ask them to continue doing whatever they are doing and I take my shot. I also carry these business cards that I call ‘photography cards’ that I give people and let them know they can email me and I will happily send them a high resolution photo for their troubles. Probably 10% actually email me but giving them a card makes the interaction more ‘legitimate’ and puts people at ease.

I have learnt to not be shy about asking if I can take someone’s photo and I am so pleased with the results I can get now… Check out this hip chick at Shibuya’s Hachiko…

This beautiful girl passing through Shibuya Station…

and dogs…

4. The Less Gear you Carry the More Photos you take
This is a lesson I learnt the hard way after dragging excessive amounts of camera gear across Tokyo and when I was traveling. Typically I would leave the house with my Canon 5DMKII. I wanted to ensure I would catch any shot so I will make sure to bring a good assortment of lenses; 16-35mm, 24-70mm, 50mm, 135mm and maybe my 70-200mm. I would also have an assortment of filters, a flash or two and other odds and ends. At the end of the day, I spend all of my energy lugging gear around that I didn’t spend nearly as much time shooting. The reality is you can make great photographs with whatever gear you have granted you know how to use it.
Now more often than not, I leave the house with a single prime (fixed focal length) lens. This allows me to focus on taking pictures and bringing out my creativity to capture the shot I need with the only focal length I have. I carry the most minimal of accessories; extra card, extra battery, an ND filter and a cloth to wipe the lens. That’s it.
Do I miss some shots due to my limited gear? Sure, but what I missed is easily made up by all of the other shots I get.

5. Force Yourself to Shoot one Lens for a Week
A big part of making #4 work is knowing how to use your gear. I realized I would often carry multiple lenses as I didn’t know how to get a shot or the shot I wanted with the tools I had. I would feel like I was limited with a 50mm so I would want to make sure I had a 70-200mm if it was far away, and a 24-70mm in case I needed to zoom to capture what I needed, or maybe a 16-35mm in case I needed to capture it wide. I now shoot almost exclusively prime lenses. With my Leica M9 I shoot a 21mm f/1.4 Summilux, a 35mm f/1.4 Summilux and a 50mm f/0.95 Noctilux.

The reality is you can capture a great shot with probably any lens you have with you provided you understand how to use the gear you have. What I mean by this is what shots work for a given lens. What angle or distance do you need to be at for this particular focal length to give you the perspective you want. I was great at shooting my 50mm lens but I really struggle with my 35mm and had just purchased a 21mm and did not really understand how to get the most out of it. I forced myself into a lens rotation where I shot a single lens for a week. I’ll be honest, it was incredibly frustrating for me. At times I wanted to just switch to a different lens as it was impossible to get the shot I wanted or needed but after a few days it became much easier to get the shots I was looking for and soon I was able to pre-visualize the shots before I even lifted the camera to my eye. Now I can walk the streets at ease with any of my prime lens and come home with a card full of shots that I am happy with.


6. Develop a Personal Style
There is no right or wrong with photography. Some people love flashes. Others just shooting with their iPhones. Some love to photoshop their pictures for hours. Do what you love doing. One thing shooting daily has helped me to do is develop a personal style of shooting. When I first started I was always watching people and trying to see if I could shoot like ‘them’. This was helpful to get me to learn to use my gear but once you know how to use your camera, you need to develop a style that is yours. I don’t have a name for my style but I like a lot of selective focus and clean, natural pictures. I do next to no post processing on the photos. The most I will do is clean up any dust spots, crop a little, or adjust exposure but for me photoshop on my Mac is to correct little imperfections but not for making pictures.
I like to use very narrow depth of fields to tell my stories. There are no hard and fast rules to what you can and can’t do, should or shouldn’t do. Learn the basics and then decide how you choose to apply them.

I love to use a narrow depth of field and throw primary colors out of focus.

I’ve learnt to love photographing people once I got over the initial fear of asking people if I can take their photo.

I love combining shallow depth of field with lots of contrast like in this picture of ‘Dark Shibuya’…

7. Shoot out of Airplane Windows
I have never been one of those people who shoot out of airplane windows. I have flown probably close to 1,000,000 miles in my career and can’t believe all of the subjects I have missed; Alaska, Mt Fuji, the slums of Mumbai, Chicago skyline, arrivals in Boston. This is something that I started doing this year and I have been so pleased with the results.

8. Try new Things
Try different types of photography as you are trying to learn what it is you like. I was surprised to find out how much I enjoyed photographing the moon, how easy it is and that I already had all of the things I needed. If you want to learn how to photograph the moon, read THIS. (link to: http://shoottokyo.com/photograph-moon/ )

I also developed a love for HDR. This is the only time I am using software to modify my images. HDR can easily be overdone so I need to be careful but I found I really enjoyed it. My inaugural post on Shoot Tokyo was on HDR. You can read it HERE.

Panning is a great way to bring motion and movement to your photos to make them come alive. If you don’t know how, read THIS.

9. Shoot at Night
I do the majority of my shooting at night. I am surprised how many people stop shooting when the sun goes down. What you need is a tripod, a low ISO and some practice. There is so much to photograph when the sun goes down.
Like light trails…

Evening construction sites…

Cities

10. Backup Everything
I can’t stress this point enough. I had a serious run of bad luck with Macs last winter and this spring. I actually had 5 complete hard drives failures on my Mac(s). Each time I was able to get Apple to do a complete replacement of my machine but it kept happening. They were never able to root cause the problem but I am running safe and sound on a Mac outfitted with Solid State Flash Drives. I am very paranoid by nature so I was fortunate enough not to lose a single photograph throughout these issues. This experience just reinforced what I already know; backup everything, often and to multiple locations. I have friends and know fellow photographers that have lost their hard drives without backup. I can’t imagine the feeling of losing all of my photos but I am do my best to ensure this never happens to me.

Currently I backup using Apple’s Time Machine to Western Digital drives connected with FireWire. I do this as I travel often and the backup drive comes with me. A lot of people stop backups while traveling is when you can run into an issue such as losing a drive, downloading a virus, or having a laptop stolen. When I pull the data off cards and onto my Mac it is backed up before I delete the data off of the cards. I also have several additional drives that I rotate copying my entire ‘pictures’ folder to once a month as an additional backup.
I hope you found this useful!
Dave Powell is a blogger and photographer based in Tokyo, Japan. He writes Shoot Tokyo photography blog. You can see more of his work at www.shoottokyo.com or follow him on Twitter and Google +.
Post originally from: Digital Photography Tips.
Check out our more Photography Tips at Photography Tips for Beginners, Portrait Photography Tips and Wedding Photography Tips.
10 Things I Learnt from Daily Shooting
Bursting the Burst Mode Myth: [What I Learned from Shooting with Film]
29
Jul
Over the next week we’ll be featuring a mini-series of posts from Rachel Devine (author of our kids photography eBook) in which she’ll be talking about five reasons learning photography on film cameras made her the digital photographer that she is today.
Here’s today’s on Busting the Burst Mode Myth.

no burst mode here
There are a few things I hear as top advice for budding children’s photographers and parents who want to take better photos of their children. I think that setting the camera to burst mode and holding the shutter down while taking photos is the one I hear most often and makes me cringe hardest. Called the “spray and pray” method, lots of digital photographers rely on taking hundreds of images (I have actually heard of thousands of frames shot for one portrait session) at a sitting to get a handful of good shots.
When keen new photographers ask for advice on how to get better photos of kids (their own or for a client) and are told, “It is digital, it will not cost you anything, just put the camera in burst mode and take as many as you can and you are bound to get a good one in there” they are being fed bad advice…or rather non-advice.
I started my photography career on film 16 years ago and when I did, those who swear by the spray and pray method may be shocked to learn that there were lots of other kid and family photographers who had to get the entire session worth of images for their clients on just a few rolls of film. And they did…every time.
Here is why shooting in burst mode not best for everyone and what I think is better advice for those really wanting to get better at taking photos of kids.
Burst Mode does actually cost something
Time:: It takes time on your end to weed through those hundreds of resulting shots. Culling images is a time sucking and soul zapping process where you will be tied to your computer for hours sorting, comparing and slitting hairs. It may be fun the first few times you go through your images, but it will wear on you over time and if you get into the habit of having to shoot this way, you will also have to allow time for sorting and editing all of those images.
Not learning to see:: If you do have to resort to shooting in burst mode, then things really are on auto. Burst mode does not allow for the photographer to make changes to the image and exposure settings while they are taking the shots. With single images taken thoughtfully, the photographer can fine tune the exposure settings and compose carefully. Learn to recognize what makes a great image and then set out to purposefully shoot that.

no burst mode here
Missing Details:: When the camera is set to burst mode, the focus is on quantity and quality tends to take a back seat. People tend to forget to scan the shot for details and end up with an entire series of cute expressions on a child who seemingly has a tree growing out of the top of their head. That photographer can now tack extra time onto their post processing routine to edit that sucker out. I have seen tags left on clothes, dirty faces, cars parked prominently in the background. Things get missed easily in the rapid fire fury.
Connection with the subject:: Finally, I have heard an argument in favor of burst mode that it helps avoid missing any special moments. Really, the wham-bam-thank you ma’am approach to photography may seem like a good idea for kids because they are fast and have short attention spans, but getting them involved in the whole experience is so much more enriching for both photographer and subject. These are not wild animals on safari, but tiny human beings who can and should bring personality to the table when they are active participants in your sessions, not just being shot at. This is especially true for people who enjoy documenting their own children over and over again. Slow down, take a moment to breathe, observe and photograph and then breathe again…it is then when you will not only be photographing the special moments, but also participating in them.
If that all does not speak to you, let’s talk cash…
Shutter actuations:: Your camera does have a shelf life and it really is not determined by when the latest and greatest new model is released, but more by how many times the shutter has actually clicked. While the total end number can vary by camera model and may seem really quite high, it will be reached faster if you are taking hundreds of images each time you go to use your camera.
Where burst mode does come in handy
")
no burst mode here
Shooting big group portraits :: Great for getting extra shots of the same scene (especially when mounted on a tripod) where you may need to do a head swap because someone closed their eyes.
Sports :: That is pretty much why it is called Sports Mode
Portraits with a point and shoot camera :: The shutter lag present in point and shoot cameras (the time it takes the camera to actually capture the shot from when you press the shutter button is called shutter lag and is very apparent in point and shoot cameras) can cause you to miss the moment even when you are shooting carefully and are ready for it. Setting the little compact cameras to sports mode can help overcome this technical hurdle.
Back in the days of film, we were limited by budget as we had to pay cash money for the film and processing. That made it necessary to shoot mindfully. We ended up with more images that we loved and fewer wasted frames. Today with digital, the costs are hidden, but there are still costs. Take the time to set up the sessions, meter the light, compose and be present while you are photographing your little subjects. Practice shooting digital with the discipline of film. You just may find that you enjoy the act of photographing kids even more than you thought possible.
For more on the topic of Kids Photogrpahy – Check out Rachel’s eBook Click! How to Take Gorgeous Photos of Your Kids.

Post originally from: Digital Photography Tips.
Check out our more Photography Tips at Photography Tips for Beginners, Portrait Photography Tips and Wedding Photography Tips.
Bursting the Burst Mode Myth: [What I Learned from Shooting with Film]
Dog Days of Summer: Tips for Shooting in the Midday Sun
26
Jul
 Extra photos for bloggers: 1, 2, 3  |
|||
Whoever said “If you can’t take the heat, get out of the kitchen” probably wasn’t aware we would be making such a liberal interpretation of the saying.
Heat comes from sun. Summer sun is bright. Bright light is tricky to photograph.
It’s no secret that bright midday sun is one of the more challenging types of light to expose properly. We’re talking blown out highlights, harsh shadows, squinty subjects… oh my!
Don’t sweat it, friends. This guide will show you how to get the best shots in the midday sun.
We can wrangle those top-down rays with quick easy fixes to soften harsh light, resolving your bright light issues before you even have time to hashtag them.
How else are you going to document that tan you’ve been working on all summer?
Pro Tips for Midday Shooting
p.s. We’re hiring for an amazing opening at Photojojo. We’re looking to re-invent what/how/where we publish online, and we’re seeking one amazing somebody to lead the charge. Learn more and apply for our Editorial & Community Lead.
p.p.s. Tell friends!
Why It’s Cool

Summer is a great season for shutterbugs… between the golden mornings and evenings we’ve got, like, 2 extra hours of daylight to bask and snap in. And nothing says summer like bright, colorful, high-contrast photos! So why are you spending this extra shooting time inside?
Light is everything to photographers, so take the camera outside and stop actin’ like it’s not. It’s always high noon somewhere, so you might as well turn down those ISO settings and learn how to beat the heat.
Use these tips and tools to improve your lighting skills by shaping, bouncing, blocking, and even adding it back afterwards. You’ll perfect your sharp shootin’ so you can keep exposing when bright light is unavoidable, anytime of year.
Ingredients:

- Any kind of camera
- Lens filters – polarized, neutral density (ND), or your own DIY
- Fill light – a reflector, foam board, or flash
- Shade
- Photo editing software or app
- A friend or model
SLAP A FILTER ON IT

Think of lens filters like a sweet pair of shades for your camera. They come in all shapes and sizes (including phone sized), so no man or machine will be left squinting in the sun.
Generally – exposing for bright daylight requires some combination of small aperture setting and high shutter speed. Your camera’s sunnies… or, er… filters are one of the easiest ways to reduce the amount of light entering the lens and re-gain creative control in harsh lighting conditions.
Yep. That means shallow depth of field and slow shutter speeds are no longer out of the question! Since they’ll reduce your exposure by a few stops – neutral density (ND), polarized, or DIY filters will be your best bets for softening a case of the midday brights.
Need a FILTER hack? Try using your own sunglasses as a filter on your phone, point & shoot, or DSLR (depending on the size of your lens). Play with the composition a little and use your glasses as a frame within your photos.
ARE YOU FILL-IN’ THE HEAT YET?

There are two great ways to fill in and break up harsh shadows caused by overhead light: Bouncing light and flashing it.
Yeah… we said “flash”. Sure, the concept of fighting light with more light may sound like an idea from another galaxy, but it’s actually necessary to get the right exposure on a backlit subject. Oh, and diffusing said flash will help to produce a more flattering end result!
Similarly, a reflector or white foam board will bounce the light, filling in shadows caused by an overhead light source (like that giant one we call “the sun”.) Pretty much any flat, white object can bounce light. You could even use a pocket-sized version in your phoneography.
Need a FILL hack? Look down! Lightly colored surfaces (like sand or concrete) will bounce a nice glow on your subjects. Scout out a spot near one of these bright patches when you’re lacking the extra arms to hold a reflector in place.
SHADY BUSINESS

When you’re getting scorched or just plain fed up, scour the area for a patch of shade. It can be manmade or au naturale, just watch out for spotty light! Buildings and trees are a good place to start your quest.
When there’s no shade to be sought, there are a couple easy ways to create your own. Keep an umbrella or a sheet on hand for such occasions. Not only will you soften that pesky light, you may even earn yourself a cool nickname like “MacGyver of the Shadows”.
Once your shade is in check, position your subject in front of an equally shaded background (near the edge of the shadow they’re under). Now when you shoot you’re getting the best of the shade AND the light. Like a boss.
Need a SHADE hack? Try using a bed sheet as a scrim. Throw it over something tall and place your subject beneath it. Or have a photoshoot while your beach towel is hanging out to dry!
EDITABLE INSURANCE
 Kinda like a bad sunburn – there’s not much you can do after the fact to fix it an overexposed picture. No… not even with aloe vera.
It’s much easier to recover underexposed areas of a picture using photo editing software. That’s like photography SPF, dude.
To underexpose photos on your phone, tap the screen to focus on a bright area of your shot before hitting the shutter. Snapseed and VSCOcam are great apps that will help you edit your photo. You can change your exposure, adjust fill, and fix your photo’s highlights all from the comfort of your palm.
When shooting from your camera, play it safe by bracketing for exposure, underexposing back-lit subjects, and shooting RAW.
Two great ways editing software can help recover a photo taken in tricky bright light are:
1) Adjusting the levels to take back the shadows in the foreground of your photo, and
2) Using layers and masking tools to combine 2 images of a correctly exposed foreground (with an overexposed background), and vice versa.
Taking It Further

- When you salvage important details (like eyes), deliberate overexposure can give your photos a surreal, dreamy look.
- When your background is interesting and noteworthy, silhouettes are a great way to add drama and tell a story.
- Some filters can reduce your exposure enough stops to create a really long exposures… wait for it… in the DAYTIME. Check it these out and give it a go!
Jenny Sathngam is a tutorial writer/photographer for Photojojo. She is based in Austin, TX – where cloudless, triple-digit summers last most of the year and shooting in the midday sun is more practice than theory. (Model: Sanetra Stewart)
Related posts:
- Pro-Tips for Shooting Better Instagram Videos Extra vids for bloggers: 1, 2, 3 “Well that’s weird,”…
- Summer Guide: Keep in Touch with Friends via Photo Apps! Extra photos for bloggers: 1, 2, 3 Prom, graduation, senior…
- Halloween Photo Tips — Our Ghoulish Guide to Scary Snaps How can you not love a holiday that encourages you…
Shooting Goðafoss: Erez Marom takes us behind the picture
13
Jul

In the second in a series of articles, landscape photographer Erez Marom takes us through the process of getting his striking shot of Goðafoss – the ‘waterfall of the gods’ in Northern Iceland. As well as gear choices, Marom explains his compositional approach, and the software techniques that he used to get the final result. Click through for the full story.
News: Digital Photography Review (dpreview.com)
Pro-Tips for Shooting Better Instagram Videos
13
Jul
 Extra vids for bloggers: 1, 2, 3 |
|||
“Well that’s weird,” you thought. “My Instagram photos are moving.”
What you thought might be the coolest side effect of downing too much coffee turned out to be Instagram’s latest major app update — Instagram video!
Just when you were totally kicking butt on Vine, Instagram video showed up with its 15 filters, extra long video length and the fact that you get to share your videos with all your friends on Instagram.
Now is the time to put your cinematographic moves into high gear, which is why we’re here to bestow on you, dear readers, a heap of Instagram video pro-tips.
Learn how to edit your shots, get better sound, and make your friends say “ooooh” at the creative ways you’ll be playing with video, all in the confines of 15 seconds.
Now you can sip your coffee with ease ’cause all you need is a tap to focus.
Photojojo’s Guide to Instagram Video
p.s. We’re hiring for an amazing opening at Photojojo. We’re looking to re-invent what/how/where we publish online, and we’re seeking one amazing somebody to lead the charge. Learn more and apply for our Editorial & Community Lead.
p.p.s. Tell friends!
Basics You Need to Know
What is it? It’s the Instagram you know and love, only now you can shoot and share videos, too. Videos show up in your stream the same as photos, and they load as you go. You can shoot videos that are three seconds minimum, 15 seconds max, and the format is square.
How is this different from Vine? Four main things make Instagram video stand apart. 1) Filters, 15 to be exact. 2) The ability to go back and delete or add scenes after you’ve shot some of your video. 3) Longer videos. Vine caps videos at six seconds. 4) No looping.
Featured in video: The Macro Lens Band.
How do you shoot a video? Tap the camera button to go into photo shooting mode. You’ll see an icon of a video camera on the bottom right. Tap it, and you’re now in video shooting mode. To shoot video, hold the big video button down. For as long as you’re holding it, it’ll shoot video! This means you can shoot one long stream or shoot a series of clips to make a mini movie.
Can you upload old videos? No, actually! We kinda like it that way, though. That way, you know everyone’s videos were shot right at that moment, and it also gives you a fun challenge.
What’s this thumbnail business? When you go to upload, you’ll see the option to pick a thumbnail. This is the image that will show up on your stream. Take time to pick the best frame! This’ll make it more likely that your followers will take out the time to watch it.
What’s that camera icon with parentheses around it? That’s the shake reduction icon, and you’ll only see it if you’re using an iPhone 4S or 5. After you’ve shot some video and hit next, it pops up. Watch your video with it on and off (just tap it to turn it on and off). You’ll notice if the video is shaky, it’ll lessen it.
Pro-Tips to Make Your Vids Stand Out
- Edit as you go.
One of the coolest things that sets Instagram video apart from Vine is that you can view your video (with filters on it even!) and then go back and delete or add shots. See the video to the right for how to delete a shot from your video.
The stage to do this is before you’ve uploaded the video and when you’re ready to add filters. To delete a shot, go back to video shooting mode, tap the “x” button on the bottom left. It’ll highlight the last shot in red. Tap the button again to confirm that you want to delete that shot. Now you can keep adding new shots or leave it as is!
- PSA: Stabilization crops your video.
Here’s something to keep in mind. That neato stabilization feature we talked about above crops your video frame. That means your video will look a little zoomed in. View it with stabilization and without (by tapping the stabilization icon) and decide if you want to go with it or not.
- Adjust exposure as you shoot.
To adjust how light or dark your video is, tap around your screen when you’re in shooting mode. You’ll notice if you tap a dark spot, the entire image will brighten, and if you tap a light spot, the entire image will get darker. Since exposure and focus go hand-in-hand, this also means the spot you’re tapping will be the part of your video that’s in focus.
- Lighting = Better vids.
When you don’t have enough light, you’ll notice your video will end up looking pret-ty grainy. The more well-lit your video is, the sharper, more contrasty and vibrant it’ll look! (You want that.) To get more light, simply go near a window, use something to bounce light like a wall or a reflector, or nab yourself an external light made for phones (like the Pocket Spotlight or Kick seen in the vid on the right).
- Prevent those weird video pulsations.
When playing back one of your videos, you’ll notice sometimes it’ll pulsate seemingly out of nowhere. Totally odd. But it’s not that odd when you think about it. Your camera’s focus and exposure are trying to keep up with the changes happening in your frame.
Maybe something super close suddenly shows up in the video or something super bright pops up. Your camera might take a second to adjust and thus pulsates. It can also be caused by your phone shaking. To prevent it, keep your phone steady with a hand-held stabilizer or a tripod. (Check out the stabilizer in the vid below.)
- Think about sound.
If you’re talking over your video, one way to get better sound is to use your headphones since it has a built-in mic. Smart, eh? If you don’t want any sound at all, turn off anything in the background, close windows, or tell the people near you to stay quiet for the next 15 seconds (pretty plz!). You can even leave a note in your caption simply instructing to listen with or without sound.
- Upload a video later in time.
You can’t technically upload an old video, but you can shoot a video and keep it on Instagram to upload at a later time. Do this by –
1) Shooting the video.
2) Turning on Airplane Mode in your phone’s settings.
3) Going back into Instagram and trying to upload the video. Since you’re not connected to the internet, your upload will fail. It’ll stay in your Instagram stream as a failed upload with a button next to it to retry the upload.
4) Upload it anytime after that by tapping the retry button. Keep in mind, the video might disappear if you turn off your phone or “x” the app. - Save your videos to your phone.
Your video will save to your phone every time you upload one to your stream. To make sure your phone does this, go into your Instagram settings and turn the “Save Original Photos” to “On.”
- Pause and play.
Say you’re in the middle of watching a super enthralling Instagram video, but you have to step away for a second. You can pause the video by tapping it. You can also replay a video by tapping it after it’s ended, so that adorb-as-heck vid of your baby niece can last 45 seconds instead of just 15!
- Embed your videos into a website.
Just a couple days ago, Instagram introduced embedding, which lets you put an Instagram video into a webpage. Go to your Instagram page on the web, which would be “instagram.com/[your screenname here]“. Click on the video you want to embed, then click on the arrow icon to the right of it. The embed code will pop up, and you just copy and paste it into your blog or Tumblr post. NEAT!
Creative Ways to Play with IG Video
- Get cool FX with phone lenses.
So you know how you can switch out lenses on your DSLR to get different effects? You can do the same on your phone with phone lenses.
A macro lens will give you a crazy super close-up view of whatever you point it at to get all the tiny detail you wouldn’t normally be able to see. A fisheye lens gives you that 180-degree view that you’ve seen in some of your favorite skate or music videos. A telephoto lens will give you a zoomed in view! We used these three phone lenses in the video to the right!
- Tell a story by making transitions.
What’s rad with Instagram video is that you can get pretty savvy about editing together various scenes. You can make your video less choppy and weave a story by creating visual transitions. One way is to cover the lens, so that all you see is black. When you take the cover away, the image will slowly come into view (try it!). Another way to transition is to blur the scene with something like plastic or a glass bottle. Or pan from one end of the room to the next, where your main subject is. Get creative!
- Take your video places!
Like *amazing* places. You can shoot underwater or in the snow with waterproof cases or strap your phone to your bike with a bike phone mount. (BTW! The underwater vid to the right was shot with this waterproof case.)
- Use a hashtag to link a series of videos.
Let’s say you get really serious about your movie-making and want to tell a longer story with your videos. Or maybe you came up with a sweet theme that you want to keep shooting around. You can link your series of videos together by coming up with a unique hashtag. That way your friends can follow along with your mini series!
- Make a stop-motion.
Stop-motions might seem like a really challenging project to take on, but you can totally do it! You just need a tripod or a place to keep your phone still, a few props, and a good idea. Here’s how to shoot a stop-motion: shoot a second of video, move your prop, then shoot another second of video, and so on, until you have a few seconds of movement. That’s it!
- Get crazy smooth panning. (Like in the movies!)
Remember how the cameras dramatically panned across Gatsby’s estate? You can get dramatic panning fx, too! Maybe not at a Gatsby scale, but a slow smooth pan across a scene can make for some rad shots that look right out of a movie. We used a camera table dolly for our pan in the vid to the right!
- Make a moving photo.
If you’ve ever seen cinemagraphs, you’ll know what we mean by moving photos. The idea behind a moving photo is to pick a scene that is has only one or two moving parts in it. When you shoot your video, you won’t move the frame. The frame stays the same, while a small part of the image moves.The Instagram blog also had an official moving photo hashtag for a weekend — check out some rad vids.
Related posts:
- Re-Animation: Turn Found Photos into Mesmerizing Videos Did you know you can make an animated video without…
- FlipClips — Print Your Short Videos into Magical Flipbooks If you bought your digital camera in the past few…
- The Ultimate Guide to Vine: Pro-Tips, Awesome Ideas, and Who to Follow! It’s easy to forget about the video function built into…
You must be logged in to post a comment.