RSS
 

Posts Tagged ‘Shooting’

Versatility – Your Guide to Shooting Great Travel Photography

05 May

Professional travel photographers realize that the key to their business is versatility: to be able to shoot all styles of photography, and to consistently capture great shots even under very trying conditions. To be a strong assignment photographer you must identify your weakness and then work on it.

Instead of concentrating on what you shoot well why not break out of your comfort zone and try something more challenging? Some of the most experienced photographers from The WideAngle network give us their insights into a few of the specialized fields of travel photography.

DPS1 DALE MORRIS

Image by Dale Morris

PHOTOGRAPHING WILDLIFE

British born wildlife photographer Dale Morris has built a reputation as one of the most widely published photographers in South Africa. His background as a trained naturalist allows him to capture aspects of the natural world that many photographers would miss.

I’m a firm follower of the philosophy that wildlife photography is not only about getting a great image but equally about taking time out to observe, and more importantly, really enjoy the experience of being in the company of wild animals. It helps to understand that every animal stands at the center of its own concentric set of invisible circles and if something unusual (a photographer for example) steps across the outermost boundary, the animal will react (usually by becoming more alert to your presence). Move across the next circle in the set too soon and an imaginary alarm is triggered. You are now running the risk of eliciting a flight or fight response. An animal’s rear end vanishing post-haste over the horizon rarely makes for a good photo, nor does a trampled and gored camera. Move slowly and in a non-threatening manner. The secret to wildlife photography is patience, empathy, awe and a true appreciation for your subject matter.

SHOOTING MOVEMENT

Craig Pusey is a dedicated motoring and expedition photographer, who’s never scared to go the extra mile for a shot. You might see him scaling an Indonesian volcano or lying face down in an Andean stream just to get the perfect angle.

DPS2 CRAIG PUSEY

Image by Craig Pusey

The perfect panning shot takes practice. For people and animals moving perpendicular to you, aim to keep your shutter speed between 1/15th and 1/90th of a second to get a bit of blur. For faster things, like cars or galloping horses, set a speed of between 1/60th to 1/125th. Try to focus just ahead of the moving object and if you have the opportunity shoot a trial pan before your subject even arrives. (This will check exposure and focus but also make sure that no obstacles are going to get in the way of your pan…it also limbers you up!).

It’s best to start with a higher shutter-speed and then work down, but it’s also dependant on distance from you to the subject. The farther away, the lower your shutter speed will need to be to show the effect of panning. With practice you can shoot slower, and will be better be able to judge the object’s speed.

SHOOTING ARCHITECTURE

Laurence Garçon is an experienced Parisian artist, publisher and assignment photographer. She has travelled widely but has retained an unshakeable love affair with her hometown and is recognized as one of the city’s most visionary photographers.

DPS3 Laurence Garcon Misty Morning

Image by Laurence Garçon

Firstly, be aware of the highlights. Play with the speed and the aperture of your camera to avoid over-exposing sunlit walls, etc. Secondly, try to frame a composition that will best display the building. Be prepared to wait a while for something to happen (a passer-by, a vehicle): this could be the element that will be capture the soul of the quarter. Be aware that, in some countries you may need specific permission to photograph some particular buildings (especially airports, military buildings, ministries, embassies, sometimes even bridges). If you plan to publish your photograph of a single (isolated) contemporary building, try to always mention the name of the architect.

PHOTOGRAPHING INDIGENOUS PEOPLE

Axel Fassio left his home in Italy to travel the world (everywhere from Antarctica to Iceland) on assignments. In 2013 he won a first prize at PX3 Prix de la Photograhie Awards in Paris and a 3rd at the International Photographic Awards. He’s currently based in Nairobi.

DPS4 Axel Fassio

Image by Axel Fassio

Ideally, if time allows you should approach a community without a camera and hangout a bit, getting to know the elders and playing with the children. The last thing you would want to do is have to rush to take pictures. Resulting images would lack of spontaneity. A few hours are enough to create a basic ‘relationship’ within the community and the resulting images will benefit hugely.

If your time is limited, always contact the elders and ask permission to take photos. A money arrangement is common when time is tight but it’s not desirable. Negotiating to pay for each images tends only to produce aggressiveness among the people, bad memories for you and usually this shows in the shots.

Longer zoom lenses can be used to “steal” candid portraits and a wide-angle held at waist level often has the effect of bringing the viewer more intimately into the scene. It is always better to avoid clearly aiming at a person unless he/she is very comfortable and is agreeable to being photographed. In this case, a medium-length zoom is perfect for portraits.

DPS5 Wylie Maercklein

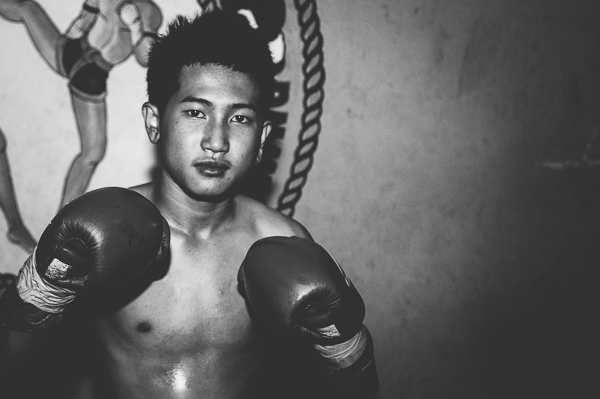
Image by Wylie Maercklein

SHOOTING PORTRAITS

Wylie Maercklein is an experienced Texas-based photographer and videographer with a specific talent for powerful portraits.

Portraits are similar to other action shots to me, in that you’re just waiting for the right moment. With a group, that moment is something larger – an externalized emotion. An action. With an individual portrait, it’s an internalized thing – it’s the moment when their defences drop just a little and you see something living behind their eyes.

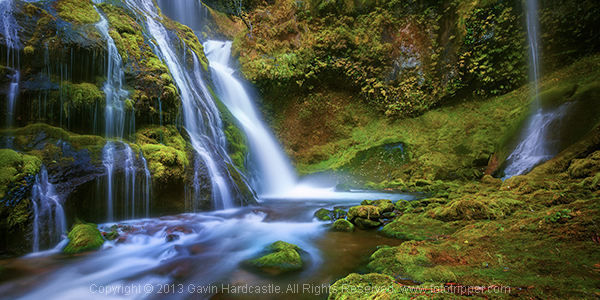
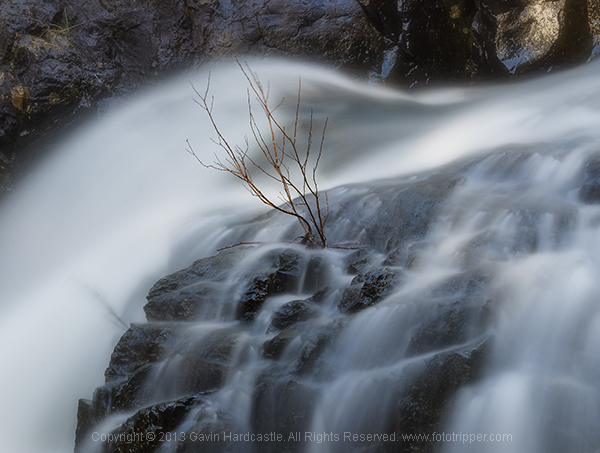
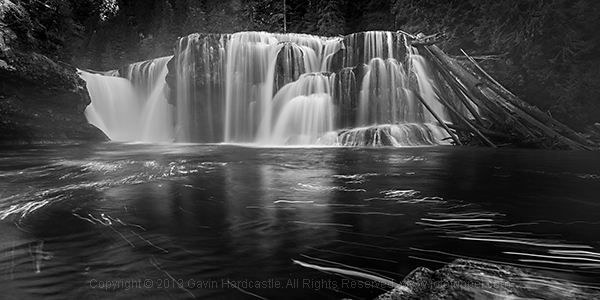
LOW LIGHT AND NIGHT PHOTOGRAPHY

British photographer Jonathan Perugia has built a reputation as one of the most prodigiously published assignment photographers in the business. In addition to his freelance work he leads photography holidays with Authentic Adventures.

I love the way cities look after sunset, so I shoot a lot in low light. If you want to really explore this kind of photography, then adding a fast prime lens to your collection (if you use a DSLR) is invaluable. I use the Canon 50mm f/1.4, which is pretty good value. Another invaluable bit of kit is a tripod. Go for something as sturdy, but as light, as you can afford. Carbon fibre is ideal. Try to avoid anything flimsy. There are some good mini tripod options too, with bendy legs that will hook around a handrail at a push. Generally I avoid using flash, so I’m often at high ISOs. I recommend testing or researching your camera to see how high it will go without too much noise.

DPS6 Jonathan Perugia

Image by Jonathan Perugia

For cityscapes, the best time to shoot is the period after sunset but before dark, when there is still colour in the sky. On a clear night you can get fantastic electric blue skies with all the city lights illuminated. Note that the brighter electric lights will start to blow out as the sky gets darker, so you may want to choose your frame accordingly. If there are no bright lights in the shot, you can use longer shutter speeds to get colour out of a sky that appears dark to the naked eye. Cloudy skies reflect street lights and can look quite surreal. This is the perfect time to do classic long exposure traffic shots with streams of light from the car lights. Smaller apertures give points of light a kind of starburst effect that looks more natural than starburst filters. You’ll notice that you can start shooting into doorways, shops, windows that wouldn’t work in daylight when the light outside is much brighter than inside.

Experiment and enjoy the different effects and colour casts you get after dark – even ‘painting with light’ with long shutter speeds and no tripod. Look for pools of light from street lamps, windows, street stalls.

SHOOTING LOCAL CEREMONIES

Ingetje Tadros is a Dutch-born photographer who emigrated to Western Australia. She spends much of each year on assignment in various parts of Asia.

DPS7 Ingetje Tadros

Image by Ingetje Tadros

While shooting ceremonies pay close attention to your choice of lens. Personally I like the 35mm prime as I like to be close and look for little moments. But, I also find it important that people feel comfortable with my presence and you need to be aware of personal space. When rituals are taking place it’s important to be aware what the rules are and specifically to know where you should and shouldn’t stand. Take your time and don’t just go in snapping. Try to limit use of flash to an absolute minimum as you should be as unobtrusive as possible.

Do you have any tips on versatility? How do you approach travel photography? Please share in the comments below.

The post Versatility – Your Guide to Shooting Great Travel Photography by Mark Eveleigh appeared first on Digital Photography School.


Digital Photography School

 
Comments Off on Versatility – Your Guide to Shooting Great Travel Photography

Posted in Photography


Greater Storytelling Images by Shooting Collections

01 May

IMG_5794.jpg

You hit the export button and now your shot is ready for your website, blog, Facebook photography page, or an email attachment to a client. Be honest with yourself. Why is it a great image? Many photographers fall into the trap of thinking an image is stellar because of its textbook perfection. Beware. “Regular Joe” isn’t as interested in technical precision as they are the story in the frame.

Many photographers concentrate on leaving a shoot with that one glorious image. However, it is rare that a single picture is powerful enough to tell a larger story. Regardless of the technical expertise of a photograph, most people find storytelling images more captivating. Viewers want to attach themselves to a photograph and invest in a greater narrative. Considering this, you would be wise to ease up on the quest for the “money shot” and begin to devote energy to the search of multiple frames that can be pieced into a collection that relates a much more interesting overview of your subject.

In his article “Telling Stories With Photos” Digital Photography School founder Darren Rowse likens a captivating image to a short story. If you are like me, you would rather use your time for reading a whole novel, than to flirt with a short story. When your single image isn’t potent enough or you fail to capture the impressive shot you initially intended to get, shoot variations of a scene and present them as a cohesive collection. Similarly, learn to view each shoot or location as an opportunity to create a visual essay that presents a grander tale.

Possible Variations in a Collection

The following are common types of photographs included in a multiple image collection. While it is not necessary to have each type of photo in your compilation, it is important that your variations have a logical sequence and rhythm.

Setting the Scene

This is the image that creates a sense of place. The scene setter is typically a great opener for your collection. It identifies location and introduces subject matter to your audience.

IMG 6039

Mid-Range Shots

Pull back a bit and give more information to the viewer. Using a wider focal length includes some of the larger scene. By doing so, the collection starts to take shape and you have prepared your audience for the action of your story.

IMG 6054

Portraits

Most collections will have a human element. The reason why portraiture is so popular is because, as viewers of photography, we personally connect in some way to every other human. People identify with others and by including a portrait in your collection, your audience can emotionally leap into your narrative.

IMG 5794

Detail Shots

There is small detail in every scene that most overlook. Whether it is the trampled confetti on a dance floor or the untied lace of a child’s shoe, the magic is often captured in the minutia. Detail shots also make great transitions in a multiple image collection.

IMG 6208

Differentiation Shots – get outside the box

Have you ever been to a tourist hotspot and seen a clump of photographers pointing their 70-200mm lenses in the same direction, from the same height? Even after the individual photographers edit, I am willing to bet that photographs taken from the “clumps” are, you guessed it, the same. To make your photography stand out and to improve the interest of your collection, shoot variations that other photographers fail to notice.

IMG 6015

IMG 6235

Action Shots

Action shots are a great way to identify what is commonly thought to be the crux of any story. However, the action shots are just the gravy on the mashed potatoes. The real story lies in the elements surrounding the action. Think about a wedding. The pinnacle of action of a wedding involves the words “I do” and a kiss. However, the best shots are captured before and after that moment. Many photographers concentrate on the action shot and are left without time or energy for anything else. My advice is to shoot every other variation first so that there is the scaffolding on which to build a larger story.

IMG 5931

IMG 5997

Closing Shots

How does your story end? To finalize a collection, think about what lasting image you would like to leave with your audience. Make sure that the concluding shot offers your audience a sense of closure.

IMG 6381

The Greater Story

When you pack your gear for a shoot, remind yourself that a single stellar image is not always the greater story. There is photographic gold to be mined if you give yourself time and allow yourself to break from the paralyzing tunnel vision that plagues most photographers. The next time you hit the export button, make sure that you are telling a greater story by producing variations and presenting them as a collection.

Gear tip: quite often, a scene unfolds rather quickly. Whether it a sporting event, party or field trip, photographers should be at the ready to capture the larger story quickly. While many telephoto zoom lenses do not have the character of their prime lens counterparts, they are extremely useful when attempting to create a collection in a short amount of time. Try a 24-105mm (or comparable) lens to capture both the wide and tight elements needed in an effective storytelling collection.

For more on creating storytelling images read these: 

  • Documentary Photography – Six Tips for Creating a Legacy
  • The Secret of Creating a Strong Image – 5 Tips for Creating a Story in Your Image
  • Interview with Jim Mortram – Small Town Inertia
  • 8 Photo Projects in Your Own Backyard

The post Greater Storytelling Images by Shooting Collections by Andrew Faulk appeared first on Digital Photography School.


Digital Photography School

 
Comments Off on Greater Storytelling Images by Shooting Collections

Posted in Photography


9 Top Tips for Shooting Waterfalls, Creeks and Streams

28 Apr

Waterfalls, creeks and streams are something of a photographic specialty for me. Aside from the fact that there are thousands of them at my Vancouver Island Headquarters, they’re also really easy to photograph and often result in magical images that stand the test of time. Whether it’s a moss speckled trickle or a colossal roaring deluge, moving water seems to be irresistible to photographers and when it’s done well, can be utterly gorgeous. Let me share with you my top tips on how to shoot waterfalls, creeks and streams.

Learn how to shoot waterfalls and creeks

1 – Shoot in all weather

I’ll shoot in any kind of weather except for sideways rain. With waterfalls, creaks and streams I have a silly little motto ‘The Wetter the Better’. When everything is drenched you’ll find that your shadows are nicely saturated to deliver powerful blacks. I also prefer the look of wet leaves over dry ones because they looks so much more vibrant and rich.

Rainy or overcast days will also give you softer light with lower contrast, meaning you won’t usually need to bracket in order to capture the dynamic range. If you’re lucky enough to get a cold spell and things get icy you’ll find your local waterfall turns into an enchanted winter wonderland overnight, just watch your footing.

bowen-park-nanaimo-gavin-hardcastle

2 – Don’t always choose a slow shutter speed

Sure, it’s nice to get those silky water shots and capture the motion blur of moving water, but there are times when it’s nice to also capture a frozen moment of action. I’ll usually take two exposures with different shutter speeds and then blend them in Photoshop to create a good mixture of frozen and blurred motion. A four second shutter speed will usually be enough for silky water shots and you can achieve that easily with just a polarizer and a narrow aperture like f/16, unless your scene is in harsh, direct sunlight.

For a quicker exposure that has less motion blur I’ll try and keep the shutter speed under one second by using a slightly wider aperture of f/11 and rotating the polarizer to allow in more light. It’s rare that I’ll require the use of an ND filter. My shot below is a single exposure of about a half second during a rainy day. I tried longer exposures but preferred this one because you can still see some individual water drops in motion instead of just a mushy blur.

How to shoot waterfalls

3 – Explore dark canyons

Don’t just explore those sun dappled streams that catch the light beautifully, that’s just too easy. Often it’s the darker, sun starved slot canyons that yield the most beautiful scenes. Armed with a study tripod you can shoot anything you want without caring about direct sunlight illuminating the scene. This opens up a new world of photo opportunities if you’re only used to shooting handheld.

4 – Bubbles turn into spirals

Whenever you see a river that produces a current of bubbles on the surface of the water, you’re in for a treat. With a shutter speed of four to six seconds (depending on water speed) those bubbles will create beautiful spirals in your long exposures. Be careful not to slow things down too much though as a ten second shutter speed will probably blur the motion too much to capture any definition. Here’s an example I shot last fall in Nanaimo, Vancouver island.

How to photograph waterfalls, creeks and streams

5 – Slap that polarizer on

I know I harp on about this all the time as you’ve no doubt read in my ‘Why You Must Use a Polarizer‘ article, but it really does make a huge difference when you’re dealing with wet rocks and reflections caused by water. Your polarizer will allow you to use longer shutter speeds, reduce reflections and make your colours POP!

6 – Avoid the sky

Do you really need a white triangle at the top of your image? Didn’t think so. Almost all of my workshop students suffer from some compulsion that dictates all images must have sky. I think I did the same thing when I was starting out. By omitting the sky completely, you’ll create a more intimate scene that dedicates the entire frame to what matters most and eliminates the triangle of pointlessness.

How to Photograph streams and rivers

7 – Go abstract

This is where you will have an advantage if you don’t have a full frame sensor camera. Rather than trying to fit the entire scene into your frame, it often pays to hone in on a smaller area of a waterfall or creek which removes the viewers sense of scale and direction.

Instead of a river flowing over some rocks and tree stumps, you’ll create an abstract scene of natural beauty that hypnotizes the viewer with an atmospheric study in motion and colour. Just like removing the sky, omitting the top and bottom of a waterfall from our frame leaves room for imagination.

gavin-hardcastle-abstract-waterfall-photography

8 – Perfect the “shoot ‘n swipe” technique

I’m not going to lie to you, shooting waterfalls, creeks and streams WILL result in a wet lens. When dealing with the spray from waterfalls, you’ll need to practice and perfect the “Shoot ‘n Swipe” method that requires a measure of patience. To do this well you’ll need a ball head with just ONE position clamp. If you’re rocking one of those ‘many handled’ tripods that look more like a tower crane control panel, forget it. Here’s how it works.

  1. Compose your shot and dial in all your camera settings to capture the shot. By now your lens will be well coated in spray from the airborne water particles of your waterfall.
  2. With everything perfectly in place and all setup, unwind the ball heads position clamp and point your camera to the floor, being careful only to allow vertical movement.
  3. Using a good quality lens cloth, wipe the lens thoroughly to remove the spray. If you have a filter in place be sure to rub in the opposite direction to the filter thread of you’ll be picking that filter up off the floor.
  4. Once dried, unwind the position clamp on the ball head, lift up the camera back into its previous position for your composition, tighten the clamp and take the shot. You’ll only get a few seconds before you’ll be all fogged up again.

Repeat this procedure until you get a shot that doesn’t have a fogged or water splattered lens. You have now perfected the “Shoot ‘n Swipe” technique (Patent Pending)

9 – Processing – go monochrome

Sometimes it’s nice to convert images of moving water to black and white because often they feature a lot of white. If you find that your waterfall, river or stream shot is lacking punch because of boring light and a lack of colour in the scene, try converting it to black and white then get freaky with the Curves slider in Adobe Camera Raw to pop the contrast. Nice.

Black & White Landscape Photography

So there you have it, all you need to get out there and capture some lovely images of waterfalls, creeks, rivers and streams. Get creative and don’t be afraid of wet weather, just be careful on those slippery rocks.


The post 9 Top Tips for Shooting Waterfalls, Creeks and Streams by Gavin Hardcastle appeared first on Digital Photography School.


Digital Photography School

 
Comments Off on 9 Top Tips for Shooting Waterfalls, Creeks and Streams

Posted in Photography


Sony a6000 shooting experience and samples gallery

24 Apr

a6000.jpg

The Sony a6000 features a 24MP APS-C sensor that includes phase detection AF points across 92% of the frame and 11 fps continuous shooting with subject-tracking. It’s the first E-mount camera of its style not to be branded ‘NEX’. As we work toward a full review, read our shooting experience report and check out our real-world samples gallery to find out if the a6000 is more than a refreshed NEX-6 by another name. Learn more and see gallery

News: Digital Photography Review (dpreview.com)

 
Comments Off on Sony a6000 shooting experience and samples gallery

Posted in Uncategorized


Shooting with the Samsung NX30

12 Apr

beautyshot.jpg

The Samsung NX30’s launch got rather drowned-out by the other launches around CES. We’ve been shooting with it over the past few weeks and have written about our experiences. The NX series boasts a strong range of lenses, one of the more advanced Wi-Fi systems and the innovative i-Function system. What impact do these have on how we used the camera? Learn more 

News: Digital Photography Review (dpreview.com)

 
Comments Off on Shooting with the Samsung NX30

Posted in Uncategorized


Nikon 1 V3 offers improved AF system and faster continuous shooting

13 Mar

V3_10_30_PD_front.png

Nikon has announced the Nikon 1 V3, the latest addition to the company’s mirrorless lineup. The V3 sports a new 18.4MP 1″-type CMOS sensor that lacks an AA filter, but has on-chip phase detection that covers nearly 100% of the frame. The V3 can now shoot at 20 fps with continuous AF, and 60 fps with single AF. Other features include twin dial control, a tilting 3-inch touchscreen LCD, manual exposure control, 1080/60p video, and built-in Wi-Fi. Something that’s disappeared since the V2 is an electronic viewfinder, which is now an optional extra (depending on region). Read more about the V3.

News: Digital Photography Review (dpreview.com)

 
Comments Off on Nikon 1 V3 offers improved AF system and faster continuous shooting

Posted in Uncategorized


Olympus OM-D E-M10 shooting experience and studio tests published

28 Feb

em10.jpg

The Olympus OM-D E-M10 was announced about a month ago, the third addition to the digital revival of the OM line. It lacks the weather sealing of its siblings but inherits a number of excellent features from the existing OM-D models. Sound enticing? We’ve gotten familiar with the E-M10 over the past few weeks. The full review is on the way but for now, read our shooter’s report, and compare the E-M10 to a growing list of cameras in our new studio test scene. 

News: Digital Photography Review (dpreview.com)

 
Comments Off on Olympus OM-D E-M10 shooting experience and studio tests published

Posted in Uncategorized


A camera for all weather? Shooting with the Fujifilm X-T1 + Japan gallery

26 Feb

decrapped.jpeg

We first laid our hands on the Fujifilm X-T1 about a month ago when it was announced. Now that we’ve had some time to shoot with it, we’ve gathered our thoughts on using Fujifilm’s latest X-Series camera. The X-T1 offers much of what the X-E2 does, including a 16 megapixel APS-C sensor with on-chip phase detection, but  more than that, it offers an SLR-style sculpted handgrip and weather-resistant sealing. Find out what the X-T1 is like to use in the field. 

News: Digital Photography Review (dpreview.com)

 
Comments Off on A camera for all weather? Shooting with the Fujifilm X-T1 + Japan gallery

Posted in Uncategorized


Shooting Raw with the Nokia Lumia 1020

24 Feb

nokia10202.jpg

The Nokia Lumia 1020 comes with one of the best smartphone cameras we have tested. After installing the Nokia “Black” firmware update you can now also capture images in DNG Raw format. Just how much more detail can you squeeze out of it? Find out on connect.dpreview.com

News: Digital Photography Review (dpreview.com)

 
Comments Off on Shooting Raw with the Nokia Lumia 1020

Posted in Uncategorized


Good to go: Living and shooting with the Fujifilm X-E2

05 Feb

Vaction-SM.jpg

As part of our forthcoming review, we’ve been shooting extensively with the Fujifilm X-E2. Reviews Editor Richard Butler used the camera on his recent vacation and has written about his experience living with it during that time. It’s a small camera that offers a high level of direct control, but does that make it the perfect traveling companion? Read our Fujifilm X-E2 shooting experience to find out

News: Digital Photography Review (dpreview.com)

 
Comments Off on Good to go: Living and shooting with the Fujifilm X-E2

Posted in Uncategorized