RSS
 

Posts Tagged ‘Effect’

The Sabattier Effect

25 Sep

I have a rule when it comes to Photoshop, Lightroom, and post-processing in general. I have always felt that image manipulation should be a tool, not a crutch. Photoshop can make a good photo better, but a bad photo is just a bad photo. I strive to get it right in the camera. When people look at my work I want them to say, “That’s a great photo.” I don’t want them saying, “Hey, you’re really good with Photoshop.” As my friend Zack Arias is fond of saying, “If you ever hear yourself saying ‘I’ll fix it later in Photoshop,’ you need to immediately stop whatever you’re doing and slap yourself as hard as you can.” I’m not saying that I don’t edit– or “finish” as I like to say. I don’t judge photographers who like to dive deeper into their editing, but for me it’s usually a matter of a contrast bump, a white balance tweak,  a little bit of skin smoothing, maybe a little sharpening. Hopefully, that’s it. Get it right in the camera. That’s the rule.

Except for when it’s not.

Every once in a while you need to break out of the day-to-day and try something different. That’s not to say that my portrait style is going to be changing any time soon, but photography is art and sometimes you need to evolve as an artist. This was my thinking when I recently came across something called the Sabattier Effect.

What Is it?

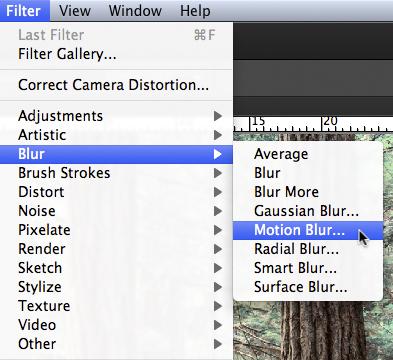
It gets a little technical, but let’s see if we can get into it without getting lost in the science. If you’ve spent any time exploring your way through the Photoshop filters menu, you may already be familiar with the solarization filter. When a partially developed negative or print is briefly exposed to white light, some of the tone values are reversed. Dark areas appear light and light areas appear dark. French scientist and doctor Armand Sabattier (1834-1910) described the process as “pseudo-solarization.” Over time, the “pseudo” has been dropped, but the effect is the same– the reversal of image tones due to extreme overexposure. Run an image through the solarization filter and you’ll see what I mean. In the days of film, the effect manifested itself one of two ways. The first would be an extreme overexposure of the negative in the camera. In the darkroom, it could have been something as simple as turning the lights on and off while processing the negatives.

The Sabattier Effect takes solarization a bit further. In addition to the overall tone reversal, the Sabattier Effect includes a narrow band or rim of low density, which is formed at the edges between adjacent highlight and shadow areas. This white band, or Mackie Line, appears around areas of high contrast. It was a popular darkroom technique for a while, but became increasingly less popular due to the combination of long hours in the darkroom and unpredictable results.

Creating the Effect in Photoshop

The first thing to keep in mind is that the effect can be drastic, so not every image is going to be a prime or even suitable candidate. The best images for the effect will be black and white photos with simple outlines and bold shapes. Color images can work also, particularly when the coloring is only slight. The results will show partially reversed hues and tones.

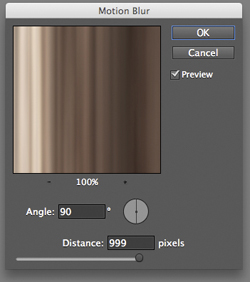
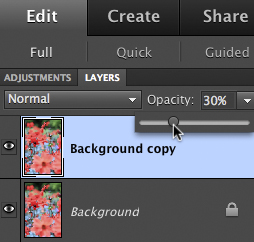
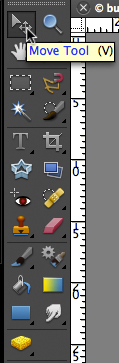
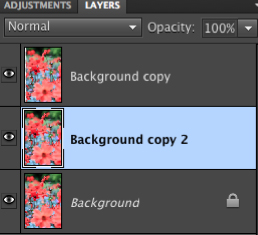
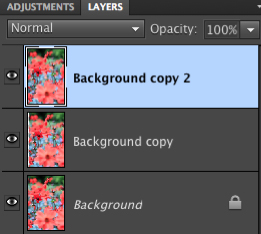
After you have selected an image and opened it in Photoshop, convert it to black and white. Next, duplicate the background layer (Ctrl/Command-J) and set the blending mode to Exclusion. The initial results will be obvious and immediate. You can then adjust the effect with either the Levels or Curves adjustments. Levels allows you to tweak the black, white, and mid-points in the image. Playing with the sliders will either lighten or darken the effect. Curves allows you to adjust the same values as Levels, but also gives you control over the contrast and specific tones of the image. While both Levels and Curves can achieve the intended results, I prefer the precision of Curves, which allows me to select individual points along the curve and adjust targeted areas of the image.

Creating a valley-shaped curve like the one on the left or a sharp angle curve like the one on the left create some of the best examples of the Sebattier Effect.

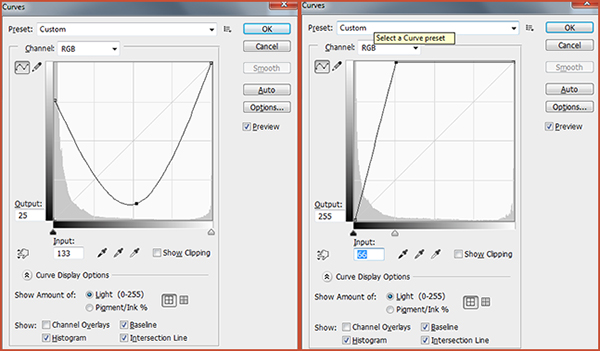
Creating a valley-shaped curve like the one on the left or a sharp angle curve like the one on the right create some of the best examples of the Sabattier Effect.

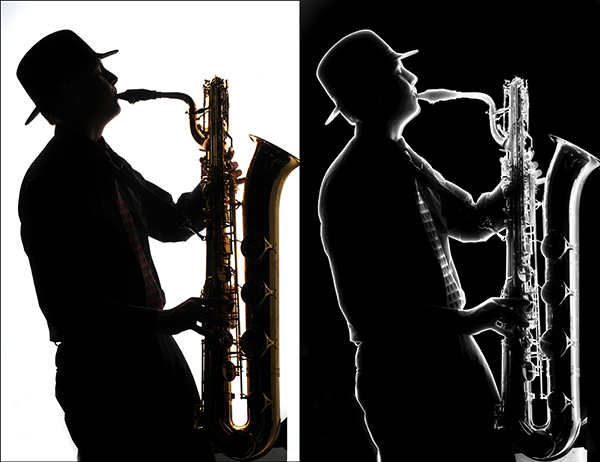
In this first example, a mostly black & white photo of a musician forms the basis for the effect. We clearly see the white Mackie Line around the subject and the saxophone, marking the edges between highlights and darker areas of the image.

Sabattier-002-dPS

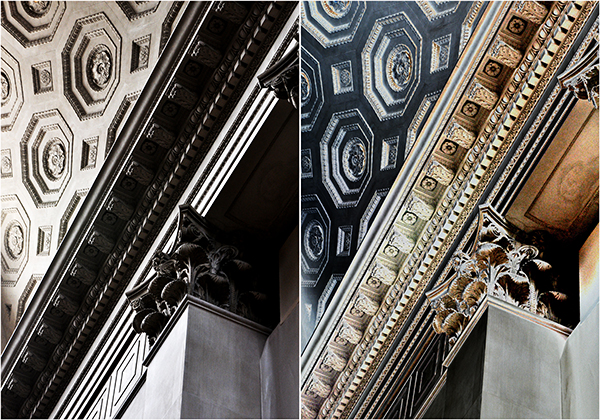
This second image, taken in the lobby of the New York Museum of Natural History, would not ordinarily make for a good example of this effect, due to some of the more intricate details.  I think it works, however, due to the simple, leading lines, as well as the fairly even tones. With the exception of opening up the dark shadows, the lower half of the image is tonally similar in both the before and after.

Sabattier-001-dPS

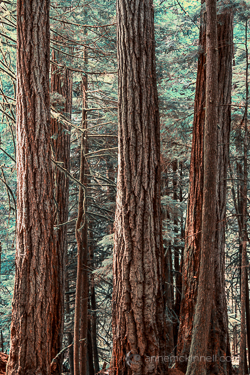
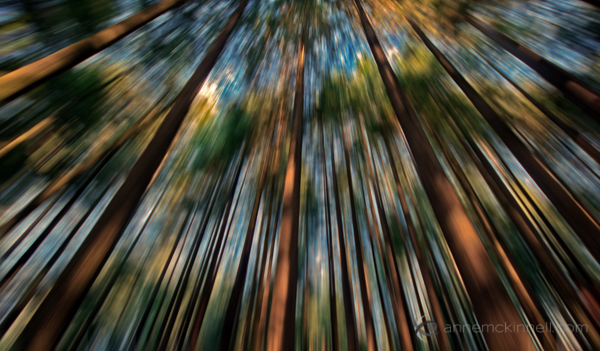
So far, both examples have been fairly “traditional” attempts at the Sabattier Effect. I’ve used mostly black & white images with simple lines. For this last example, I decided to throw out the “rules” and go with color and some of the most complicated lines I’ve ever photographed. I’ve photographed “Lonely Tree” in all four seasons, but seemingly lifeless in the middle of winter is by far the most interesting of the set. A rather large canvas print hangs in my office, so I’m intimately familiar with the details of this photo. While I doubt I would ever display the Sabattier-ized version, I think it makes a great example of what happens when the effect is applied to a color image with a mix of simple and complicated lines.

Sabattier-003-sPS

The beauty of this effect is that there are no right or wrong results– just personal preferences. It’s obviously not natural-looking, so you have much more room with which to experiment. A common mantra in my classroom is, “I don’t care if you break the rules as long as I know that you know them.” For the Sabattier Effect there are no rules to break, just suggestions to either follow or ignore. Either way, you’re bound to get interesting results.

Post originally from: Digital Photography Tips.

Check out our more Photography Tips at Photography Tips for Beginners, Portrait Photography Tips and Wedding Photography Tips.

The Sabattier Effect


Digital Photography School

 
Comments Off on The Sabattier Effect

Posted in Photography


SunTimes/DarkTimes blog highlights effect of Chicago Sun-Times layoffs

29 Jun

iphonecompared.jpg

A new Tumblr blog, SunTimes/DarkTimes is documenting the effects of the recent layoffs at the photo department of the Chicago Sun-Times. The blog is posting comparisons highlighting the difference between photo coverage in the Sun-Times to that of the Chicago Tribune. The results certainly seem to reinforce the views of many commentators who warned that the Sun-Times’ photo coverage would suffer as a result of the cost-cutting. Click through for some images and a link to the SunTimes/DarkTimes Tumblr.

News: Digital Photography Review (dpreview.com)

 
Comments Off on SunTimes/DarkTimes blog highlights effect of Chicago Sun-Times layoffs

Posted in Uncategorized


Nikon D7100 preview updated with a look at effect of OLPF omission

05 Apr

D7100_18_105_front.png

In the course of preparing our in-depth review of the Nikon D7100, we’re exploring the potential image quality advantages of Nikon’s decision to forgo an optical low pass filter (OLPF). As part of this process, we compared the D7100 alongside the Nikon D5200, which also uses a 24MP APS-C sensor, but includes an OLPF and have just added the results to our hands-on preview. Does the D7100’s lack of OLPF really make a difference? Click through to read what we’ve found.

News: Digital Photography Review (dpreview.com)

 
Comments Off on Nikon D7100 preview updated with a look at effect of OLPF omission

Posted in Uncategorized


The Google Glass effect: How wearable camera tech will change everything

29 Mar

glass9.png

As Google Glass and other wearable cameras look to become the latest tech trend, some futurists are raising the red flag of caution. If everyone is wearing a constantly recording, super subtle camera, what are the implications for personal privacy, the law and our own safety? We look at some interesting implications of this new technology and the ways it could change our society at connect.dpreview.com.

News: Digital Photography Review (dpreview.com)

 
Comments Off on The Google Glass effect: How wearable camera tech will change everything

Posted in Uncategorized


Filmmaker shoots with fifteen GoPro’s for a Matrix-like bullet time effect

19 Mar

gopro_15cams.png

Amateur filmmaker Marc Donahue of Permagrin Films recently shot a video with an array of fifteen GoPro action cameras to achieve Matrix-like bullet time special effects. The arc-shaped rig allowed him to shoot simultaneously from all cameras. In post, Donahue added the freeze frame and slow motion effects. Click through to watch the video. (via Mashable)

News: Digital Photography Review (dpreview.com)

 
Comments Off on Filmmaker shoots with fifteen GoPro’s for a Matrix-like bullet time effect

Posted in Uncategorized


How To Create a Motion Blur Effect in Photoshop

06 Jan

Motion Blur Original

The original image before the motion blur is applied

Motion Blur Filter

For the first technique I am going to start with this rather boring and cluttered image I made in a forest on Vancouver Island, British Columbia, Canada.

Maybe it wouldn’t be so boring if there was anything to show the scale of these enormous trees but it’s pretty hard to get away from cluttered in the dense forest there.

I decided to mimic the effect of in-camera panning by using the motion blur filter in photoshop to blur the image in the same direction as the strong lines of the trees.

Try this technique on your own forest scene or another scene with strong lines by following these steps. I am using Photoshop Elements but you can also do it in Gimp and some other photo editors.

1. Select Filter > Blur > Motion Blur

Photoshop Motion Blur Filter

2. Set the direction of the blur to match your image and amount of the blur to your taste. For my image I made the blur vertical and the amount maximum.

If you have a photo editor that supports layers, make a copy of the background layer and apply the filter to the new layer. This will allow you do have some fun in step #4 below.

Photoshop Motion Blur Filter Options

Motion Blur Applied

Image after motion blur is applied


3. Crop the tell-tale edges out of the image.

I find that you can always tell when the blur is done in photoshop, as opposed to in-camera, because the edges of the image don’t blur evenly. Why they don’t blur evenly I don’t know! But they don’t so I always crop the edges out.

See the 100% zoom of a portion of my image below where you will see how the edges of the image don’t look right.

Motion Blur Artifacts

4. To add a little something extra try revealing a part of the original image without the blur.

If you applied the blur to a copy of the background layer as I mentioned in step #2 above you can try this. Either using a layer mask or simply using the eraser tool, remove the blur effect from a portion of the image.

This is the final version:

Motion Blur Revealed

Here is a video I made that shows all the steps I took to make the final image using Photoshop Elements.

Zoom Blur Original

Original image before zoom blur is applied

Zoom Blur Filter

This technique is very similar to the motion blur effect but with a little bit of a twist.

As you can see the original image has a few problems. The trees are mottled with light and shadow and there are blown out highlights in the sky for a start. But I like the composition of the trees the way the wide-angle lens made them appear to lean in towards the centre of the frame.

I decided to try a zoom blur effect to emphasize the composition and even out some of the colours.

Try this technique on your own image by following these steps:

1. Duplicate the background layer (Layer > Duplicate Layer)

Duplicate Background Layer

2. Rename the layer to “blur” or something else that makes sense to you

3. In photoshop, select Filter > Blur > Radial Blur

Photoshop Radial Blur Filter

4. Change the option from “spin” to “zoom” and, in the section of the window named “blur center”, drag the centre of the zoom from the middle to the top of the frame to match the composition of the original image

Photoshop Zoom Blur Filter Options

5. Crop out the blown out highlights in the resulting image

Zoom Blur Final

Here is a video I made that shows all the steps I took to make the final image using Photoshop Elements.

Post originally from: Digital Photography Tips.

Check out our more Photography Tips at Photography Tips for Beginners, Portrait Photography Tips and Wedding Photography Tips.

How To Create a Motion Blur Effect in Photoshop


Digital Photography School

 
Comments Off on How To Create a Motion Blur Effect in Photoshop

Posted in Photography


How To Create A Multiple Exposure Effect In Post

23 Dec

Using this technique you can create a stippled effect common to impressionist painters by blending multiple layers of a single image.

To do this technique, you will need to use a photo editor that supports layers. I use Photoshop Elements but you can also use Gimp, which is free, and many other photo editors.

Don’t let the layers thing scare you away, ok? In fact, if you are leery of layers trying this technique should, ironically, make it all become clear.

Pick an image to start. I particularly like this effect on flowers and foliage but it works for other subjects too. Here is the image I will use to start.

Red Flowers Original

Follow these steps:
1. Duplicate the background layer (Layer>Duplicate Layer)
Duplicate Background Layer


2. Reduce the opacity of the new layer to 30%
Reduce Layer Opacity


3. Use the move tool (usually an arrow) and move the layer slightly in any direction
Move Tool


4. Duplicate the background layer again (it’s on the bottom of the layer list)
5. Drag the new layer to the top of the layers list
Layer List 1Layer List 2


6. Reduce the opacity of the new layer to 30%
7. Use the move tool to move the layer slightly in a different direction
8. Repeat steps 4-7 any number of times
9. When you are happy with the result, use the crop tool to crop the edges of the image where you can see the borders of the moved layers.
Crop Tool

Here’s a little video that shows me performing these steps.

And the final image:

Red Flowers with Multiple Exposure Effect

There are many different ways you can accomplish a particular effect in photoshop (or your photo editor of choice). I try to use the simplest methods I can find to keep it simple.

Post originally from: Digital Photography Tips.

Check out our more Photography Tips at Photography Tips for Beginners, Portrait Photography Tips and Wedding Photography Tips.

How To Create A Multiple Exposure Effect In Post


Digital Photography School

 
Comments Off on How To Create A Multiple Exposure Effect In Post

Posted in Photography


Photoshop tutorial – Fracture photo effect – splatter brushes (english subtitle)

19 Dec

www.flashstudioimmagine.com 220 tutorial inediti www.youtube.com Visita il mio canale youtube labottegadellafotografia.blogspot.it IL mio blog Download brushes:myphotoshopbrushes.com You can perform this process using splatter brushes. In this tutorial I explain step by step how to dissolve a photo and spread it like splashes of paint. Powered by Luciano Boschetti, photographer.
Video Rating: 4 / 5


Gimp Tutorial (3D effect, coming out of tv) by Dom Bwer

18 Dec

Blog www.dombowerphoto.blogspot.com In this video i show you how to work a bit more with layers. using 3 photos taken in my livingroom then with a bit of cutting and pasting i then make it look like i am coming or reaching out of the tv. the software used is free GIMP and it is just like adobe photoshop but…. free. hope this helps regards dom bower www.dombower.com
Video Rating: 5 / 5


The Overview Effect: Awe and It’s Lifelong Impact

11 Dec

Imagine being so far above the Earth that you see it in entirety. Odds are unless you’re an astronaut you’ve experienced this view as I have through photos from the Apollo missions of the 60′s and 70′s (ex. Earthrise) or through more recent images taken aboard the Space Shuttle & International Space Station. For those lucky enough to experience this view first hand it is understandably life changing. Author Frank White termed this impact the “Overview Effect“. The Planetary Collective put together 19 minute short documentary interviewing numerous astronauts describing this effect and its impact on their lives. I highly recommend checking it out. After viewing it I am incredibly grateful that I haven’t had to fly into space to understand and appreciate the interconnectivity we all share and the fragility of our floating island in space we call home. It’s that core aspect of the “Overview Effect” that keeps me focused on highlighting the special quality of our home in my nature and landscape work.

OVERVIEW from Planetary Collective on Vimeo.

Also note if you missed it the other week NASA released a high resolution image of the Earth at night, the Black Marble. The light sensitivity of the image was great enough to see a single boat in the ocean. Amazing to see.

Copyright Jim M. Goldstein, All Rights Reserved

The Overview Effect: Awe and It’s Lifelong Impact

The post The Overview Effect: Awe and It’s Lifelong Impact appeared first on JMG-Galleries – Jim M. Goldstein Photography.


JMG-Galleries – Jim M. Goldstein Photography

 
Comments Off on The Overview Effect: Awe and It’s Lifelong Impact

Posted in Equipment