A wet day doesn’t stop photography expert Gavin Hoey www.gavtrain.com from taking and making a cross processed style of image.
A wet day doesn’t stop photography expert Gavin Hoey www.gavtrain.com from taking and making a cross processed style of image.

This is the first half of the Mass Effect 3 Demo in stereoscopic 3d at 1080p.
Video Rating: 4 / 5
3D wreck diving movie made with GoPro 3D Hero System. Shot by Ian Watson at HMAS Adelaide – Scuttled to make an artificial reef at Avoca NSW. Featuring Shamus Baker & Greg Bellis Please choose 3D viewing method from 3D Icon located bottom right of player window. subscribe or visit my channel “NeilSurry” for many more 3D videos.
Video Rating: 5 / 5
Check out this informative tutorial : labottegadellafotografia.noiblogger.com In this tutorial I explain how to add a sunset in a photo. Produced by Luciano Boschetti, photographer 2011 trustseo.com Web Designs in Miami Thanks to the premire uploader of this video was ellebi62
Video Rating: 1 / 5
Thanks for the support on the previous tutorials. This is a tutorial showing you how to achieve a powerful sun rays through the trees effect. I add a ‘sun’ to an image and add a few rays from it breaking through the trees. Hope you enjoyed, please rate, comment and subscribe. Let me know what you want to see! Music ‘Take ‘Em On’ by OfficialRandolph: www.youtube.com-user-OfficialRandolph
Video Rating: 3 / 5
Not far from my home is the residence of one of the best teachers of photography in Canada, if not the planet. Freeman Patterson has that incredible ability to not only implant a contagious passion within his student he does so in a way that demands they push their limits. Thankfully for us he has penned no less than 12 books, including four of the absolute best instructional volumes available. His sense of design and use of space have influenced many, many photographers that stand behind a camera today, myself included.
On the opposite Canadian coast, in British Columbia, Michael Orton is one of a very few photographers who has created an effect that has endured both the film and digital ages. Some photographers have re-named the technique for their own purposes, but the fact remains it was Orton who mastered the technique.
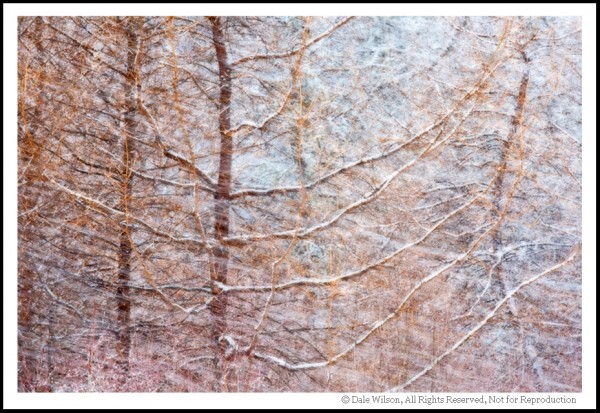
In the early 1980’s Orton started experimenting with sandwiching two slides to create a final image. This in and of itself is not unique; many photographers had been doing this for years. What Orton did, however, through his experimentation was to purposefully over-expose the two slides – one by two f/stops and the other by one f/stop. To add his own personal touch he would throw the two f/stop over-exposed image out of focus and thus came the “Orton Effect.”
For the last 30 years this “Dreamscape” style of image has been appearing in camera club competitions, on greeting cards and calendars. We can call the technique what we will, but I am a firm believer in providing credit where due – Michael Orton.
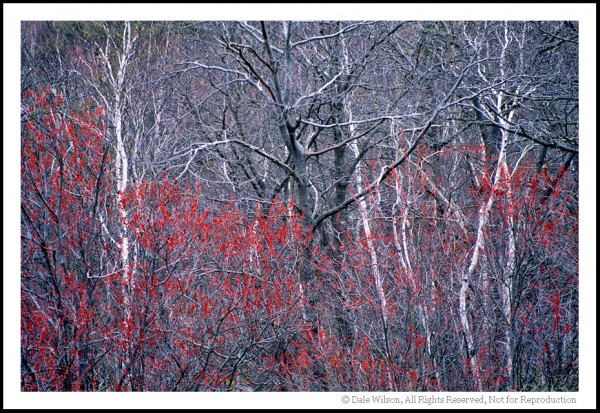
Once digital capture became the norm and film was relegated to disposal at yard sales, many photographers were left trying to discover ways to replicate in Photoshop those techniques that had previously taken considerable practice to master. It took some time for me to develop the recipe that “worked” and closely mimicked what I was able to capture on film. I have tweaked this many times and have yet to acquire that same “feel” as film, but will attribute this to the fact that digital capture simply is different than film.
Please feel free to adjust and season to taste, but this technique should be included in every recipe book. I will not use shortcut keystrokes or use the command or control key function of Mac versus PC platforms. I will assume the reader can understand where, when and how to substitute these keystrokes.
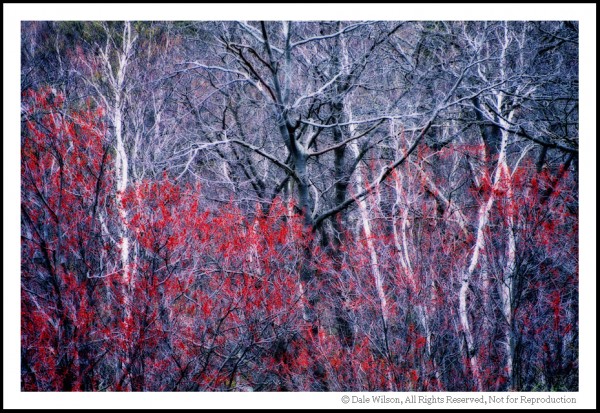
Depending on your own taste you might find the blacks have become blocked-up. To adjust for this there are several usual techniques, most often it is easiest to create a curves adjustment layer and simply open those shadows until you begin to see a hint of detail.
Like all cookbooks you adjust the recipe and season to taste.
While there are many photographers utilizing variations of this technique today, it is always refreshing to review the works of the original craftsmen. Study Patterson for his approach to design and how to utilize space, in so doing it his style of image that loans itself best to the Orton Effect; and, review Orton’s work to see how it is possible to move an image from the documentary “I was there” type of picture to a well crafted and intended piece of art that captures the flavour of the place.
Post originally from: Digital Photography Tips.
Check out our more Photography Tips at Photography Tips for Beginners, Portrait Photography Tips and Wedding Photography Tips.
Pulling Dreamscapes via Orton Effect
Enjoy! sup.im This is a visual tutorial of the written out tutorial at this website: graphicssoft.about.com I am NOT the owner of that website, but I have permission to use it’s content for my video To try out this effect before doing it on one of your own photos, click this link for a test photo: z.about.com For more information or questions, please leave a comment, and if I cannot answer your comment, then I would refer you to this site graphicssoft.about.com for complete written out instructions, this video is mainly just for visual purposes.
Video Rating: 4 / 5
Adding cigarette smoke effect in Photoshop
Video Rating: 5 / 5
In this video i will show you how to edit and improve your portrait photographs to look like magazine images. I show you how to remove blemishes, Change the eye colour, to change lip colour and add eye lash make-up! I hope you enjoy this video, Feel free to ask questions and if you wish you can rate! Also watch out for my upcoming videos on photoshop!
Video Rating: 3 / 5
Can you donate and help our appeal? Do a good thing today. www.indiegogo.com Photoshop CS3 The Easy Way!!!…. Just a little video to show you how to make text look like its on fire looks hot 😛 Want the font? (Bleeding? Cowboys) www.youtube.com
More to come! Don’t forget to share with your friends and request new tutorials! I’m running out of ideas lately, so that would help a lot. And ask me how to donate Bitcoins! I will love some of those! Peace.
www.youtube.com Check out my new channel! Smoke.. that’s what we are going to focus on the tutorial. In this tutorial we are going to make a nice smoke effect. I’m going to show you some gradient overlay effect and an alternative text effect. www.youtube.com Info: Font: AvantGarde Bk BT Music: Outasight Leaving Home, Outasight Dizzy
i dont own the song 😀 the song is DON`T FORGET BY DEMI LOVATO 😀 this is a tut how to put fake contact lens or color of thaa eyes 😀 love ti or hate it!
Here is a great little effect that adds a whole lot of “mood” to an image by softening and increasing contrast and also features a vignette around the focal point of your choosing. The beauty of this technique is that by using adjustment layers we have full control over the final effect’s strength and color. This one is a great tip for Photographers of any type. If you enjoy the video please rate, comment, and subscribe! Check out www.tutvid.com for more great video tutorials! Check out the blog @ http Check this video out in Hi-Res here: www.tutvid.com
You must be logged in to post a comment.