RSS
 

Posts Tagged ‘Control’

Using a perspective control lens for wedding photography

16 Mar

Fstoppers-Tilt-Shift-Lens.jpg

Arizona-based wedding photographer, Trevor Dayley, is taking a unique approach to his portraiture by using a perspective control lens, the Canon TS-E 90mm F2.8. In an article he wrote for FStoppers, he explains why it has become his favorite lens and discusses the challenges and rewards of adding a tilt-shift lens to his arsenal. (via FStoppers)

News: Digital Photography Review (dpreview.com)

 
Comments Off on Using a perspective control lens for wedding photography

Posted in Uncategorized


Spiral Out of Control: Guggenheim Museum Extension Idea

25 Feb

[ By WebUrbanist in Architecture & Public & Institutional. ]

guggenheim addition

The Guggenheim Museum in New York may be the most iconic work of American architect Frank Lloyd Wright – as such, any addition to it will invariably be the center of much debate … but this one (despite being more concept than call for change) could stir more discussion than most.

guggenheim artistic extension concept

A typical disjunctive approach to adding to or around classic architecture would involve setting the new elements apart from the old, to make the distinction clear. This conjunctive one by OIIO Architecture embraces the existing form, and builds dramatically upon it.

guggenheim floor plan addition

The design involves tripling the existing floor space by winding the outward-wrapping spiral that forms of gallery core up even higher and wider. The existing roof would be removed and re-added to the new top.

guggenheim current versus proposed

Critics will be quick to point out that though the form is maintained, the proportions are thrown for a loop, so to speak – and tapers the inner cone down to a small point. For all kinds of reasons, it is unlikely such a proposal would ever make its way into reality – still, as an experiment, it is quite beautiful.

Share on Facebook


[ By WebUrbanist in Architecture & Public & Institutional. ]

[ WebUrbanist | Archives | Galleries | Privacy | TOS ]


WebUrbanist

 
Comments Off on Spiral Out of Control: Guggenheim Museum Extension Idea

Posted in Creativity


Nikon announces advanced WR-1 radio remote control

21 Feb

WR1leading2.png

Alongside the D7100, Nikon announced the WR-1 Transceiver, a unique radio-frequency wireless remote control. Able to remotely control multiple cameras capturing stills and videos, and even time-lapse sequences, the Nikon WR-1 Transceiver mounts on the camera’s hot shoe, but communicates via a cable attached to the master camera. Expected to retail for £649.99 in the UK, the WR-1 will ship in March 2013 (US pricing has yet to be announced).

News: Digital Photography Review (dpreview.com)

 
Comments Off on Nikon announces advanced WR-1 radio remote control

Posted in Uncategorized


CamRanger offers DSLR control from your iPad

05 Feb

camranger.jpeg

Developer Dave Pawlowski and his wife Melissa have announced the CamRanger that lets users wirelessly control Canon and Nikon DSLRs to Apple’s iPad, iPhone or iPod touch. The standalone device connects the cameras with a USB cable and creates an ad-hoc WiFi network for the Apple devices. It allows live live view control and playback of images and videos. Head over to connect.dpreview.com for more details.

News: Digital Photography Review (dpreview.com)

 
Comments Off on CamRanger offers DSLR control from your iPad

Posted in Uncategorized


How to Control Aperture on Canon Pro/Semi-Pro Bodies

25 Jan

A follow up video tutorial of the “Aperture” article from DSLRBook.net on how to control the aperture on Canon Pro/Semi-Pro d-slrs. To view the full article on how to control aperture, visit the D-SLR Book site: www.dslrbook.net
Video Rating: 5 / 5


Halo Combat Evolved: Walkthrough – Part 12 [Mission 5] Assault on The Control Room

24 Jan

Halo Combat Evolved Walkthrough: Assault on the Control Room – Mission 5 Part 12 of my Let’s Play series from Halo Combat Evolved This is the last Part I’m going to be uploading off this series for a couple of days, but expect a ton of uploads from this series starting Monday next week as I hope to conclude this fairly soon. As always I would really appreciate if you guys could rate this video what you feel it deserves as a rating either way goes a long way! Follow me on Twitter – www.twitter.com Playlist – www.youtube.com


Wireless Flash control with the Canon 60D

18 Jan

Controlling your remote Canon flashes with the Canon 60D Popup Flash


Tartar Control – Jesus Is Love

15 Dec

Click here to watch DIABOLICAL youtu.be Now watching: Jesus is LOVE Robert, Sean & Robot sing a very special song for all their friends! If YOU have a question for us, just go to: www.tartarcontrolisyourfriend.com Written and Performed by: Tartar Control Directed by: Sean Hart, Robert Selander and Mark Schwartz Directer of Photography: Megan Richardson Editor: Sean Hart Lighting: Dyron Pacheco Assistant Director: Patty Courtland Production Assistant: Jessica Talmadge Production Assistant: Joseph Larkin Jesus: Anthony DeVries Surly Male Bar Patron: Lizard Boy Surly Female Bar Patron: Annah Foard-Barish Female Bartender: Meghan Parks Male Bartender: Ceasar ViaLobos Man Who Loses Arm: Jeremy Alsup Woman Who Slaps Man Who Loses Arm: Bodhi LaVey Bouncer: Mac McGarvey Special thanks to The Doll Hut, everyone who performed in this video as well as those who donated the money to make it possible! Buy the song on iTunes – itunes.apple.com Or buy other merchandise on Tartar Control’s website – www.tartarcontrolisyourfriend.com FOR MORE TARTAR CONTROL HILARITY, GO TO: www.youtube.com FOR THE BEST OF ALL THINGS EPIC, GO TO: www.youtube.com FOR JUST PLAIN FUNNY, GO TO: www.youtube.com FOR ALL THAT IS LEGENDARY, GO TO: www.youtube.com FOR GREAT SCI-FI, GO TO: www.youtube.com FOR MORE XOMBIES, GO TO: www.youtube.com FOR MORE ZOMBIES aka Bite Me, GO TO: www.youtube.com FOR MORE VAMPIRES, GO TO: www.youtube.com FOR MORE GHOULISH COMEDY, GO TO: www.youtube.com FOR KEEN GAMING ADVICE, GO TO

??? Enjoy the video? Subscribe! bit.ly ??? (?°?°??? ??? ???? CLICK HERE! ????? READ DESCRIPTION!! ???? I DID upload videos the past 2 days, just late. Go check em out!! —– Thanks for watching!! I appreciate all your support! Stay up to date! Follow us!! ? Watch us LIVE! at eposvox or twitch.tv ? ? Twitter @EposVox twitter.com ? ? Twitter @Chu__ twitter.com ? ? Our UNBOXINGS & TECH Videos! youtube.com ? ? CobraWolf81 – SUB HIM NOW youtube.com ? ? Photography & GFX d3m0l1sh3r.deviantart.com ? ? Let’s Play Together, Epos & Chu Channel youtube.com ? ? Chu’s Channel youtube.com ? Minecraft server hosting provided by: rackflux.com —– Royalty Free Music by audiomicro.com Sound Effects by audiomicro.com —– The Bros: mVito: www.youtube.com EposVox: www.youtube.com Ditty: www.youtube.com BBK DRAGOON: www.youtube.com Mr. Random: www.youtube.com ????? SUBSCRIBE TO ALL!! ????? —– Special thanks to Catghost for doing the art for our faces! Check her out! catghost.deviantart.com midorea.com —– If you want 10% off any KontrolFreek product, be sure to use my link or promo code “EposVox”!!!! www.kontrolfreek.com Want me to do some vocal work for you? Have an indie game you’d like featured? Interested in working on some graphics, audio, etc., for me? Co-Op map suggestions? CONTACT ME at: eposvox [at] gmail [dot] com . Tweet me @EposVox —–
Video Rating: 5 / 5


Take control sharpening in Photoshop

25 Nov

Most people who have experimented in Photoshop, especially those who shoot in raw, will have some experience of trying to sharpen an image.  Sharpening increases the contrast between neighbouring pixels resulting in the visual effect of a crisper image.  It is typically the last processing step that should be performed on an image and is often used to enhance already well-focussed images or in desperation to try and rescue elements of a photograph that weren’t captured in-focus when the shutter was pressed.

There are numerous ways to sharpen images in Photoshop, so much so that there is a whole sub-menu of filters dedicated to sharpening, each offering a different amount of control and different levels of success.  However, one of the most overlooked filters that can help you achieve better results with more control isn’t found in the Sharpen sub-menu, but is in fact found in the, usefully named, Filter -> Other menu: the high pass filter.

I’ll take you through a step-by-step guide to using high pass filter and hopefully show you how simple and effective image sharpening can be.

Step 1

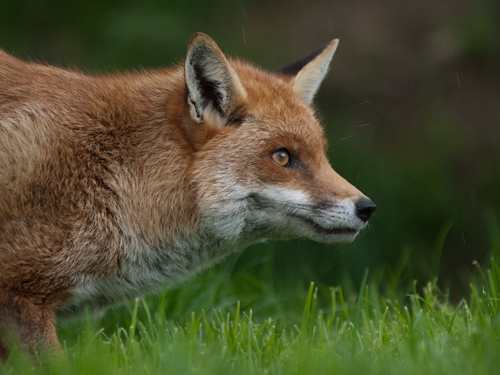
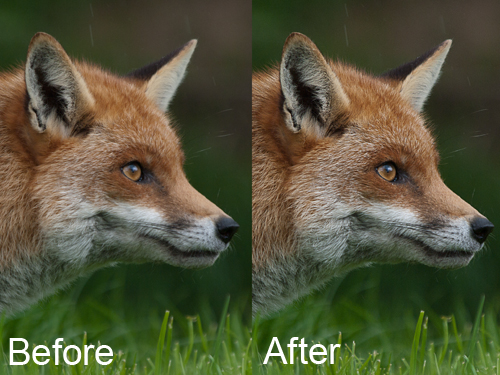
Start by opening the image that you want to sharpen – ideally, the image will have come from a raw file so not to over-sharpen an ‘out-of-camera JPEG’.   Make sure that you have completed all other processing steps that you wish to perform.  Here I’ll use this image of a fox to illustrate the process (feathers and fur often react well to a bit of sharpening).

HIgh pass sharpening step 1

Step 2

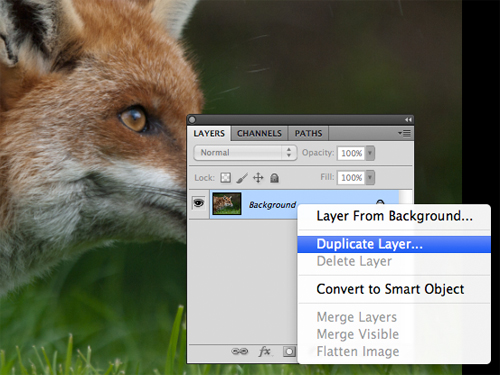
In the layers palette, right click the Background layer, select Duplicate and click OK.  This creates a copy of the original layer and is a key step for the application of the high pass filter.

High pass sharpening, step 2

Step 3

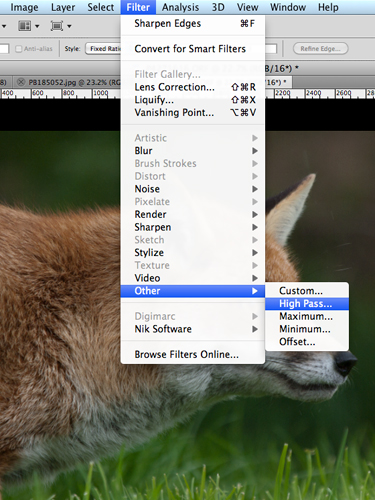
With the duplicate layer selected, select Filter -> Other -> High Pass

High pass filter, step 3

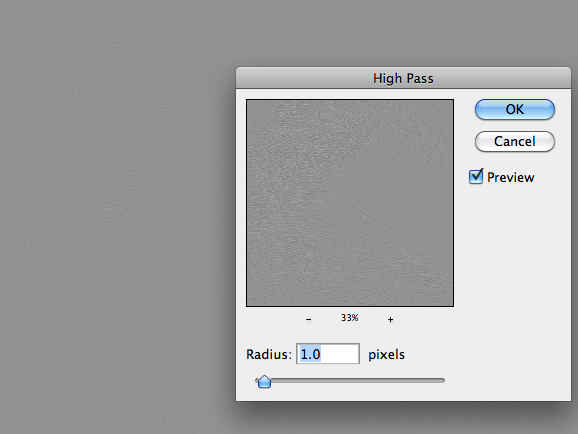
This will bring up a high pass window with a small preview of the results and a Radius control.  If you can see the whole image behind this window, you will notice that the Duplicate layer has turned grey – don’t panic, it’s supposed to.

High pass sharpening, step 3

Step 4

Set the Radius value and click OK.  The higher the Radius, the more sharpening will be applied to the image.  If you play around with the Radius slider, you will notice that at low values, e.g. 1.0 pixels, only high-contrast edges are visible in the grey layer, whereas if you move the Radius slider up to 10 pixels, you will notice that more edges within the image will be highlighted.

HIgh pass sharpening, step 4

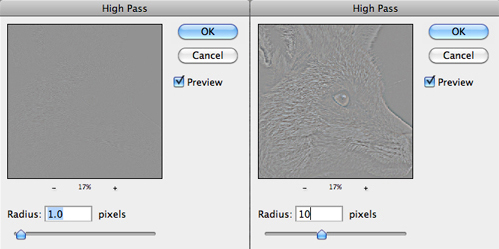
The precise Radius value that will result in optimal sharpening will be image dependant, but somewhere in the range 1.0 to 5.0 pixels will suffice.  Generally, 5.0 pixels will be too much, but given that we are performing this action on a duplicate layer gives us the flexibility to be heavy handed with the high pass filter, I’ll explain more shortly.

Step 5

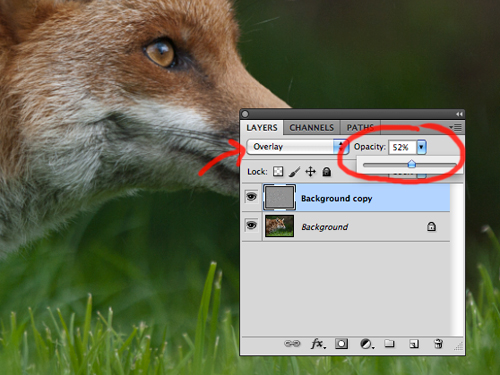
In the layers palette, set the blending mode of the duplicate layer to Overlay.

The Overlay mode ‘multiplies’ the blacks and ‘screens’ the whites of the layer below – that is, makes the dark areas darker, and the light areas lighter.  Up on application of the high pass filter, our image was turned grey (neutral grey in fact), and when setting the Radius value, edges were picked out in light/darker shades of grey.  Therefore, when the blending mode is set to Overlay, the neutral grey areas of the image have no effect, yet the lighter/darker edges screen/multiply the edges of the layer below, increasing the contrast, resulting in a sharper image.

High pass sharpening, step 6

Step 6

Change the Opacity of the duplicate layer to achieve the desired sharpness.  I mentioned that you can be heavy handed with the high pass filter – that is because you can tone back any over sharpening using the Opacity slider.  It is often a good idea to set the Opacity to zero and work your way up to an acceptable level of sharpness so not to over sharpen and introduce artefacts.

Step 7

It is advisable to try and print off a section of your image, at the same scale as you intend to print the full photograph, to get a feel for how much sharpening an individual image requires and adjust the Opacity slider as appropriate.

And that’s it, image sharpened!

High pass sharpening, before and after

The benefit of using this method to sharpen your images is that the sharpening effect is applied in a non-destructive fashion, on a duplicate layer, with a very simple to understand parameter (in the Radius value) that controls the magnitude of the sharpening, as well as giving you the ability to fine tune the final effect using the Opacity slider.

In addition, given that the sharpening is entirely controlled by the duplicate layer, you can have further control for where the sharpening is applied within the image by applying a layer mask to the duplicate layer.

So there you have it, a quick yet effective method for sharpening your images that gives you full control.

Post originally from: Digital Photography Tips.

Check out our more Photography Tips at Photography Tips for Beginners, Portrait Photography Tips and Wedding Photography Tips.

Take control sharpening in Photoshop


Digital Photography School

 
Comments Off on Take control sharpening in Photoshop

Posted in Photography


Triggertrap mobile app adds Wi-Fi control for remote smart camera triggering

13 Nov

TT.png

App-based smart camera trigger system ‘Triggertrap’ can now be used remotely if the user has two smart devices. The latest version of the mobile app, which allows a wide range of cameras to be triggered in response to a range of events or with sophisticated time-lapse functions, features a Wi-Fi mode. In Wi-Fi mode, a remote ‘master’ iOS device can be used to remotely configure and trigger a camera that is connected to a Tirggertrap mobile dongle and a second smart device (either an iOS or Android phone or tablet).

News: Digital Photography Review (dpreview.com)

 
Comments Off on Triggertrap mobile app adds Wi-Fi control for remote smart camera triggering

Posted in Uncategorized