Game Clip
Video Rating: 0 / 5

This is an update to my previous video, which is posted as a video response. I made a higher quality version of this one because my older video was nominated to be a Youtube Partner video (yay!) but I can’t use it because of the Kingdom Hearts footage for my intro and the Breaking Benjamin music in the background. Anyways, same video, just higher quality and slightly more detailed. Enjoy! 😀 A foolproof and 100% working method on how to get any Pokemon in any of the Pokemon DS games. If you are using Diamond, Pearl, Platinum, HG or SS, follow the same exact instructions as that in the video. If you are having problems seeing the video, here’s a tutorial: 1) Go to www.pokegts.us (for non Black and white users, go to www.pokegts.us 2) Select the category you want (All Pokemon is recommended) 3) Select a Sub Catagory (Generation 1 = FireRed and LeafGreen, Generation 2 = Gold and Silver/HeartGold and SoulSilver, Generation 3 = Ruby, Sapphire and Emerald, Generation 4 = Diamond, Pearl and Platinum, XD is Pokemon XD Gale of Darkness, Colosseum is Pokemon Colosseum, Generation 5 is Pokemon Black and White [All the names will be in Japanese]) 4) Select the individual Pokemon you want 5) Customize the Pokemon in any way you desire (except Nature) 6) Go to the bottom and hit Submit Custom Stats DO NOT CLOSE THE WINDOW AFTER HITTING THAT! 1) Go to your DS and load the Game. 2) After pressing start, scroll down until you see Nintendo WFC Settings 3) Click the big blue button 4) Click …
Video Rating: 4 / 5
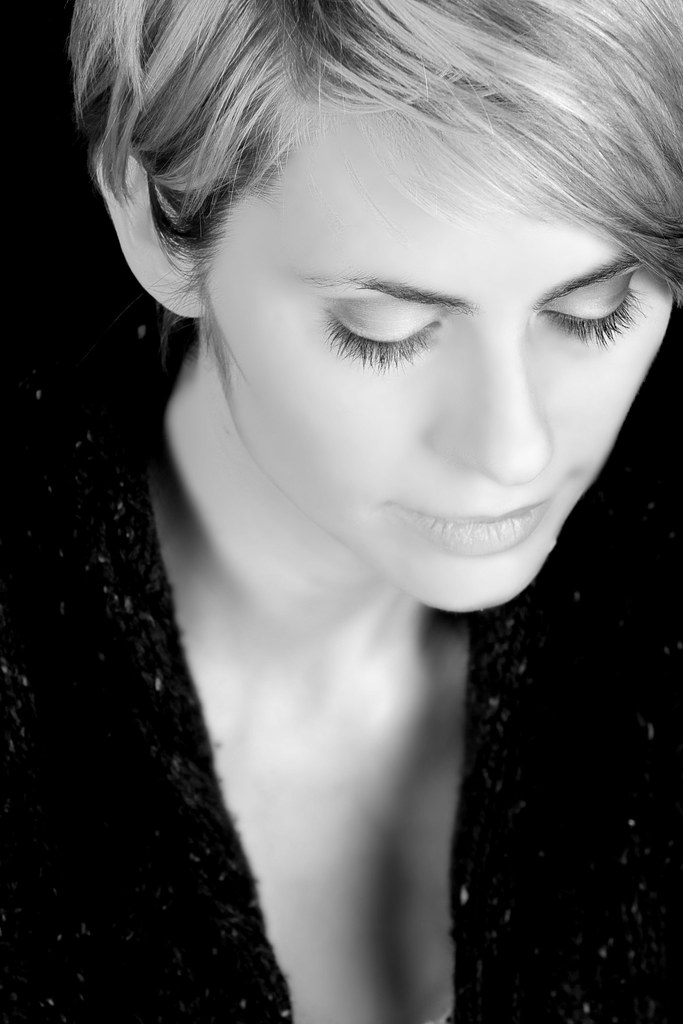
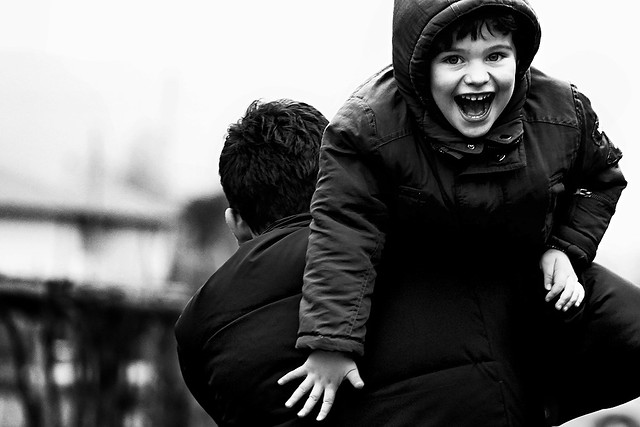
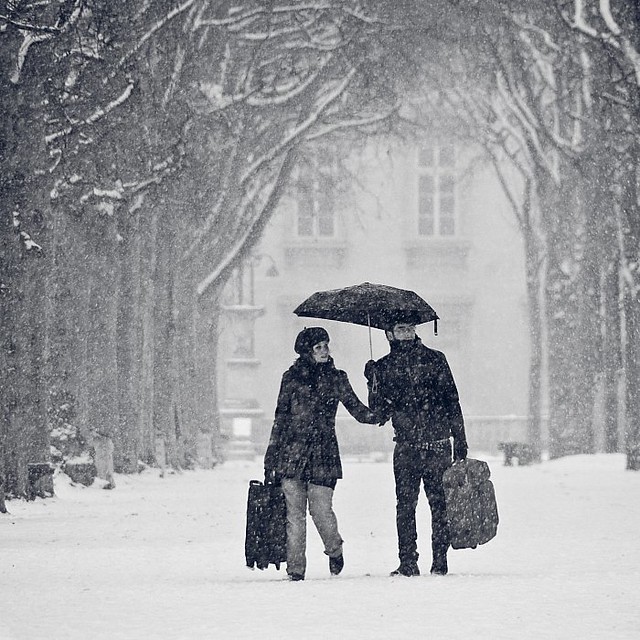
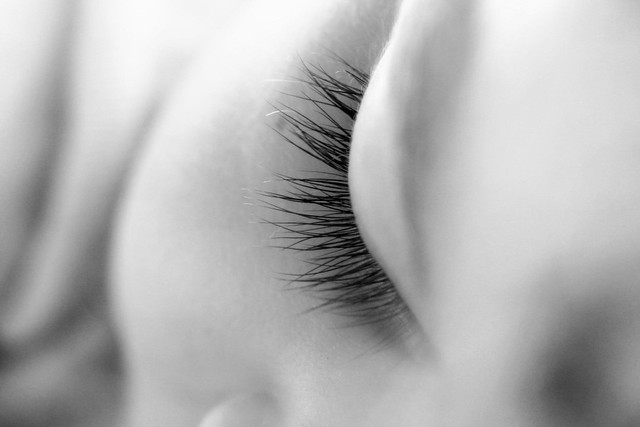
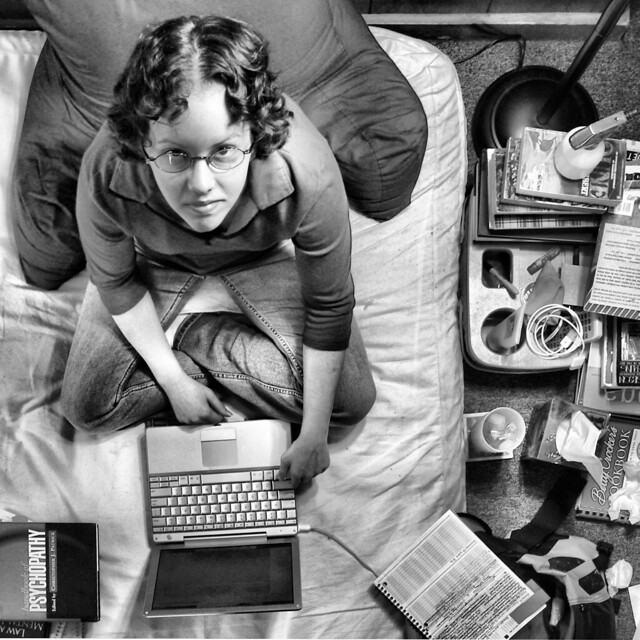
Following are 27 beautiful black and white portraits to inspire you to take some portraits this week – enjoy!
Click on images to learn more about it and the photographer behind it on their Flickr page.


Post originally from: Digital Photography Tips.
Check out our more Photography Tips at Photography Tips for Beginners, Portrait Photography Tips and Wedding Photography Tips.
27 Beautiful Black and White Portraits
Ever wondered how the professional photographers get those dreamy black and white or sepia toned images? Wonder why yours come out looking dull and flat looking? I’m going to give you 3 tips to help you do better black and white conversions using Adobe Lightroom, and solve that problem!
Today’s cameras are pretty smart, and many of them offer a black and white setting or shooting mode. I recommend using those to start, especially if you’ve never done any black and white (B&W) or if you are not currently doing any post processing or image editing on your files. BUT, if you have some experience with b/w photography, and you are processing your images, I recommend doing the conversion yourself as you have more control over the look of the final image. I’m going to show you a few ways of converting them into B&W using Lightroom.
Note: for the most part these tips will work in Photoshop as well, using the Adobe Camera Raw features and sliders.
First a quick note about my background. Back when I took my photography degree (dare I say, in 1987-88, and date myself) I spent the entire first year shooting black & white only, using a 4×5 view camera no less. I processed my own film and made my own prints. I spent a lot of time in a black & white darkroom, so I’m pretty well versed in how it works and how to control it to my advantage.
To grab some info from those film days, it’s important to note and understand that your camera sees light and colours differently than does the human eye. Black and white film sees blue tones much lighter than our eyes, for example. Coloured filters were used to shift how the B&W film “saw” and rendered the scene. Using a red filter would lighten anything red in the image and darken blue tones. So if you were a landscape photographer you’d often use a red filter to darken the sky and make it less washed out. A green filter would lighten green and blue tones and darken red and orange. So photographers used the appropriate filter to capture the scene as they envisioned it.
In Lightroom and ACR (Adobe Camera Raw) in Photoshop you have the same tools at your disposal! So without the use of filters, you can adjust how the scene is rendered in B&W. That brings me to the first tip.
In Lightroom’s Develop module (and ACR) there are a few ways that you can convert your images into B&W. You can just pull the saturation slider all the way to left to -100. You can also do similar with the Vibrance slider, but it may not give you a 100% B&W image, depending on the image. Both of those options will give you a black & white result. However, they give you no control over how the colours render into the various shades of grey. A better choice, in my opinion, is to use the B&W mix, located on the third panel down on the right in Develop – see below.
Black and white mix panel in Lightroom Develop module
Let’s take a look at an example using the same image.
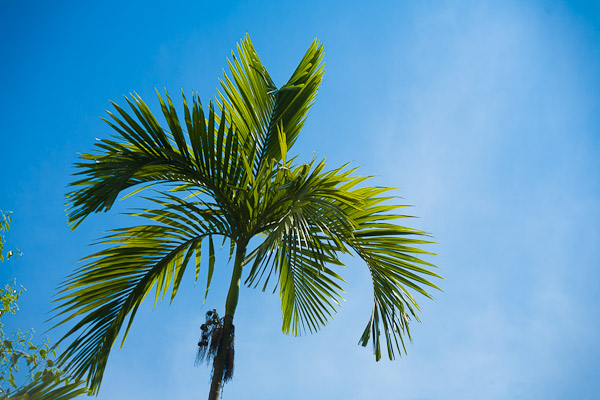
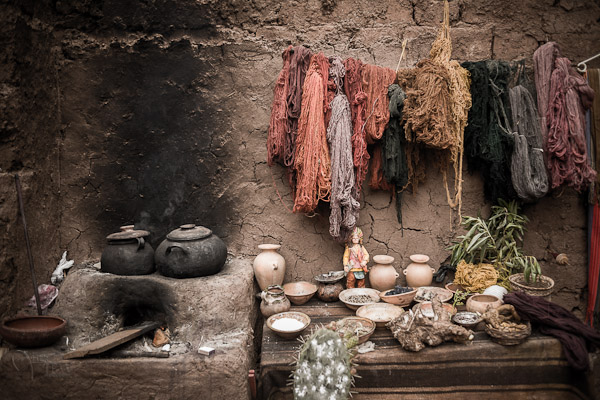
Original colour image
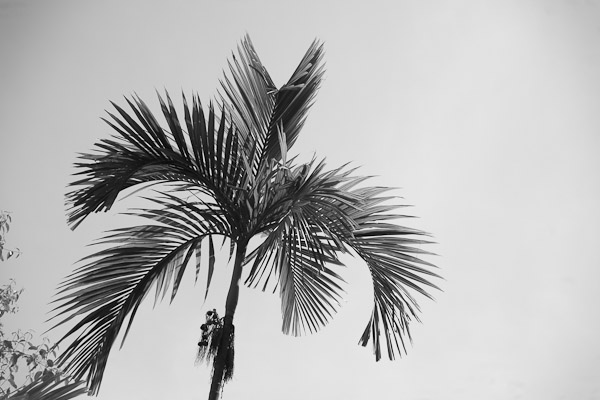
B&W conversion done using the Saturation slider at -100
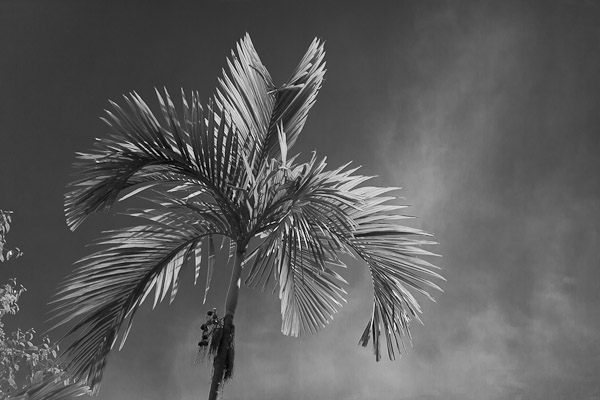
B&W conversion done using the B&W mix in LR
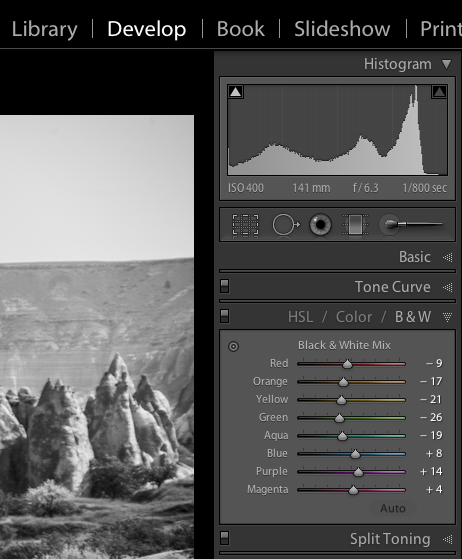
In the images above, notice how the blue sky went really light using the desaturate method? This is often the case when you have a lot of blue sky in an image, as I explained above. Using the B&W mix and pulling a few of the sliders I was able to get very different tones. This is what my sliders in the B&W Mix panel look like on the third image:
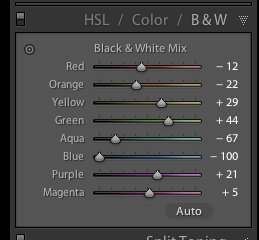
Notice the blue slider is pulled all the way to the left to -100. That is what is darkening my sky. Also worth noting is the green and yellow sliders are moved in the opposite or plus direction. This lightens both yellows and greens (most grass and trees are often a mix of green and yellow, sometimes more yellow than green). I have not done any selective adjustments to darken the sky here, just the sliders you see to the right! How very different this image is from the desaturated one, and so simple to do using this method!
Also on this panel notice there is an “Auto” button. Clicking it will allow Lightroom to apply a predetermined B&W mix for you. You can also set up in your Lightroom preferences to apply that for you when B&W mix is selected, then you can just fine tune from there. Otherwise all the sliders will start at “0″.
Another little known trick for using these sliders is the funny looking little double circle thing on the top left. As you move the mouse over it, you will see this:
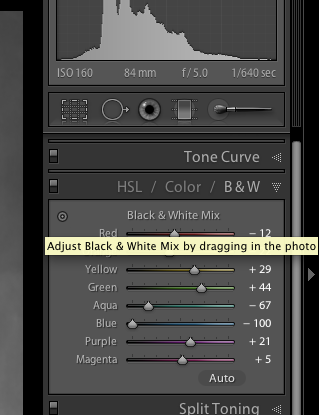
Adjust Black & White Mix by dragging in photo. So what on earth does that mean, you may wonder?! If you click on the little circle your mouse pointer will now have little up and down arrows, as well as your cursor showing the same icon as you hover over the image. Click anywhere on the image, hold and drag, and it will adjust ONLY the colours that you’ve clicked on. Drag up to move the sliders to the right (+) and drag down to move them to the left (-). How cool is that?!
This is very helpful if you do not know which sliders to adjust. Just select the area of your image you’d like to adjust the tones on and drag away!
Sometimes even using the B&W mix sliders the resulting image still looks a bit flat and dull looking. Take it up a notch by adding some punch to your image. I do the following to most of my B&W images:
Occasionally after making these contrast adjustments it will affect the overall image and you may want to go back and rework the B&W sliders a bit too. It’s a dance, play them back and forth until you get a mix you like. Here’s the final version of the image above, with contrast and punch adjustments applied.
Notice how much more snap it has, while still maintaining that nice rich, dark sky!

Black! That’s it. Make sure you actually have some black, and some white in your image. Check the histogram and use my little tip on seeing the clipped bits. Add contrast or increase the blacks, whites, or both to get a full range of tones. No matter what the subject is in the photograph, having enough contrast to have pure white, and pure black is key to having a stunning B&W image. Otherwise you’re just left with a bunch of grey mud.
There are a couple ways to make selectively coloured images, and also to create that faded look that is really popular. Once again you can use the Vibrance and Saturation sliders in the Basic panel, however they will affect colours in the entire image the same. You can also use the Adjustment Brush and paint in a lower saturation onto parts of your image where you want to fade out the colour. I use that method quite often, even on full colour images, to do tone control on items in the background that are distracting.
Lastly you can use the sliders in the HSL panel. By sliding selected colours to the left you can desaturate only those colours. You can also use the little Click and Drag tool we used earlier to do the B&W Mix to click on your image and pick the areas to fade. Here’s an example using each of these methods. None is right or wrong, just give you a different look and some have more control than others. Choose the one that works for you on in individual image basis.
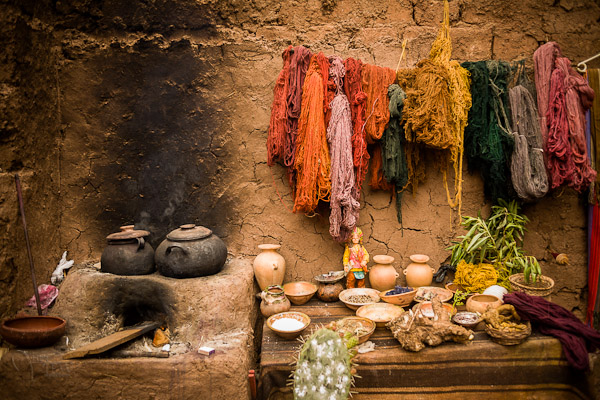
Original colour image
Vibrance slider set to -75

Saturation slider set to -75

Adjustment brush used to paint in saturation at -75 to the whole image except for the wool
HSL sliders used to desaturate by separate colours
A little extra bonus tip for you. Adobe has made it super easy to create a really nice duotone (just means two tones, go figure!) image, which includes Sepia. Just go to the Split Toning panel after you’ve done your B&W conversion, it’s the fourth one down.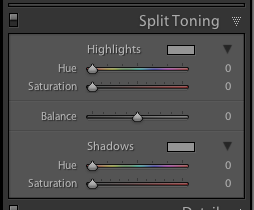
You will see sliders for both Highlights, and Shadows. My personal tip on how to keep a nice clean sepia or toned image is to use ONLY the Shadows sliders and do not touch Highlights. That will leave you with clean, crisp white highlights even after you’ve applied the toning.
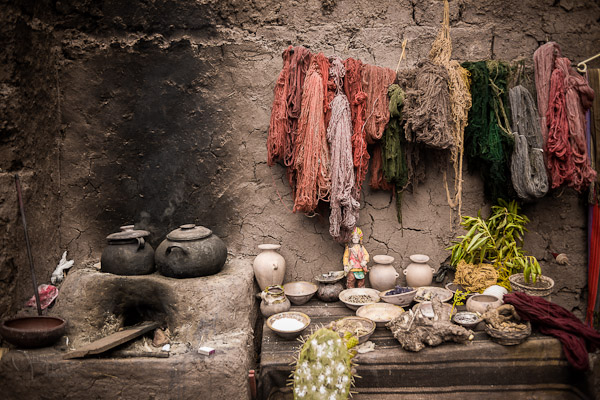
First start by choosing the Hue slider (for Shadows). If you want a nice brown colour, start with it around 40-45. Each image tones slightly differently, so start there and adjust to your taste and style. You may notice that nothing happened, right? That is because you need to increase the Saturation slider before the tone will show up. The more you increase saturation, the deeper and more vibrant the colour tone will become. Again, there is no right or wrong, it’s all about preference. For a subtle, dark, chocolate brown try 10-20. For a deeper colour go higher with saturation (NOTE: make sure the “balance” slider is set to zero)
If you want a different tone just move the Hue slider. You can create some really neat affects this way including Blue Tone or a true Duotone.
For this final example I’ll show all the steps we’ve just covered using a portrait. This is applicable to any people photos, you don’t need to make portraits to use this information.
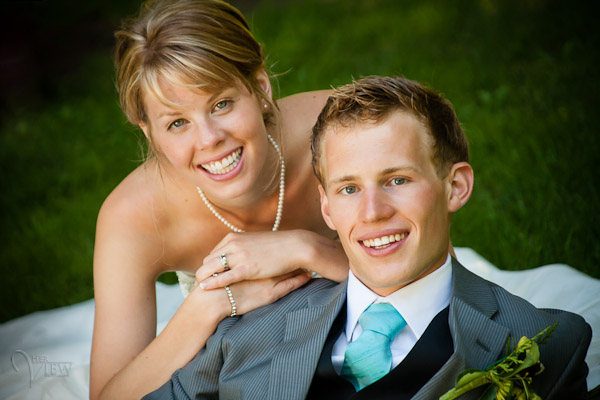
Original colour image
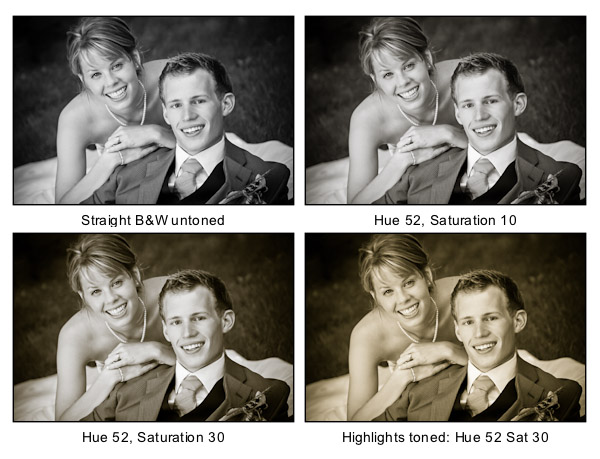
Notice the last image where I’ve added in colour to the Highlights and how it completely changes the look of the image. The whites have a yellow tint now instead of a nice clean look. I personally prefer the third one but there are times I do use this option. Do what feels right for your image, you’ll know what to do.
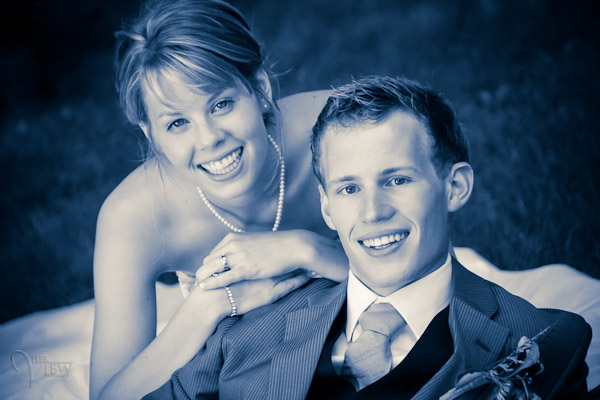
A "duo" tone using different colours for the Highlights and Shadows. Shadow settings: Hue 232, Sat 70 – Highlight settings: Hue 52, Sat 37. I did move Balance to -27 to skew the colours more towards the Shadows as well.
As always I encourage experimentation. If you have another way that you like better, that’s awesome! Please share it with us if you will. Another way to do some really quick B&W inside Lightroom is to find some good presets. There are literally tens of thousands of Lightroom Develop presets available for free on the internet. Try a Google search for: Free lightroom b&w presets. Then just pick the ones you like and install them.
Now get out there and go make some images and let’s see what you can do in Black & White!
Post originally from: Digital Photography Tips.
Check out our more Photography Tips at Photography Tips for Beginners, Portrait Photography Tips and Wedding Photography Tips.
3 Tips for Better Black and White Conversion using Lightroom

A little ways back, LumoPro approached me about doing photos of their product line. That's a lot of gear, and the whole project was more than I would have time to take on.
But I do enjoy shooting this kinda stuff. So we compromised in that I would shoot some of their more popular items now and the photos could be used as a template for anyone who might be shooting the other items later.
Here's the thing. Shooting shiny black objects is one of those cases where your incident meter may be very accurate, but in practice it's no help at all. Because properly exposed, a black object is, well, black… Read more »
Strobist

Professional Photographer, Craig Golding, talks about Black & White Photography (or Monochrome Photography) as well as his EOS Photo5 2010 brief and gives great tips for creative photography. Join in, find the inspiration for your photography and share at www.canon.com.au/worldofeos
Here’s an update video for my MBK – Maximus. Haven’t uploaded one of him in a while and this was specifically requested by youtube user: mutantflamerobotics… so here’s some new footage shot during the halftime of the BCS championship game. This video was shot using a Nikon D90 and also includes slow-motion strike footage. Hope you enjoy it.
Create that old time hollywood lighting effect. www.elitevideo.com has made it simple and easy with instructional videos for lighting called Digital Lighting Magic. This segment is just one of many from the 3 DVD set. Check out more at www.elitevideo.com
Video Rating: 4 / 5

Aaron tries to find a way to pay for his Call of Duty: Black Ops 2 Care Package… Directed By: Jason Schnell Written By: Jason Schnell & Lindsey Reckis Produced By: Eric Pumphrey Starring: Eric Pumphrey Lynsey Bartilson Tommy Savas Travis Case Brandon Bell Carmen Faulkner Chaffee Graham Director of Photography: Clark Huff Website: bit.ly Main Channel: bit.ly Gaming Channel: bit.ly Behind the Scenes: bit.ly Merch Store: www.cafepress.com THIS VIDEO CAN NOT BE RE-UPLOADED OR USED IN ANY WAY WITHOUT WRITTEN PERMISSION FROM RECKLESS TORTUGA PRODS.
Video Rating: 4 / 5
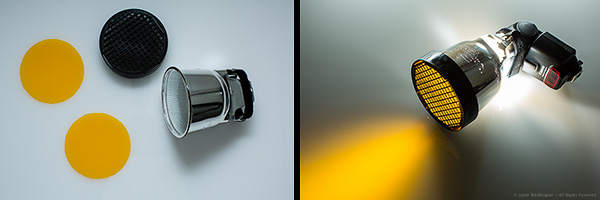
In my last post, I talked about using a DIY blue gel to add interest to a portrait by lighting the background. This time I’ve added a DIY orange gel, and used the same Gary Fong Powersnoot for some product photography. This is a three-light setup.
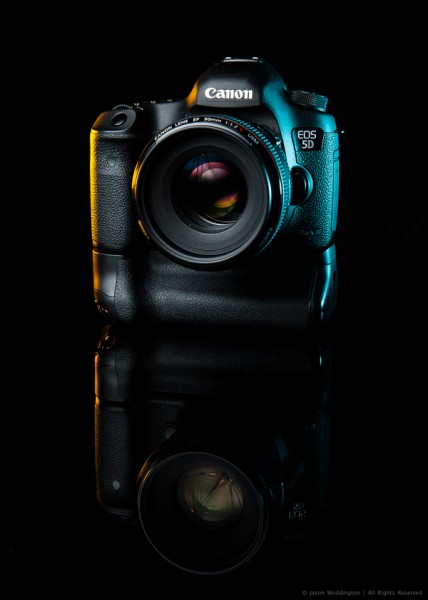
Exposure: 1/200, f/14, ISO 100
Camera: Canon EOS 5D MkII
Lens: Canon EF24-70mm f/2.8L @ 60mm
When shooting a dark colored object against a dark background, one challenge is that the edges of the object tend to get lost in the background. Here are two ways to deal with this:
1. Light the background to add separation. This it the technique I used in my last post.
2. Use rim lighting to clearly define the edges of the object, as shown in the photo above.
The key to this kind of rim lighting is hard, directional light, so that the light goes exactly where you want it, and nowhere else. Good lighting is often about what not to light, as much as it is about what to light.
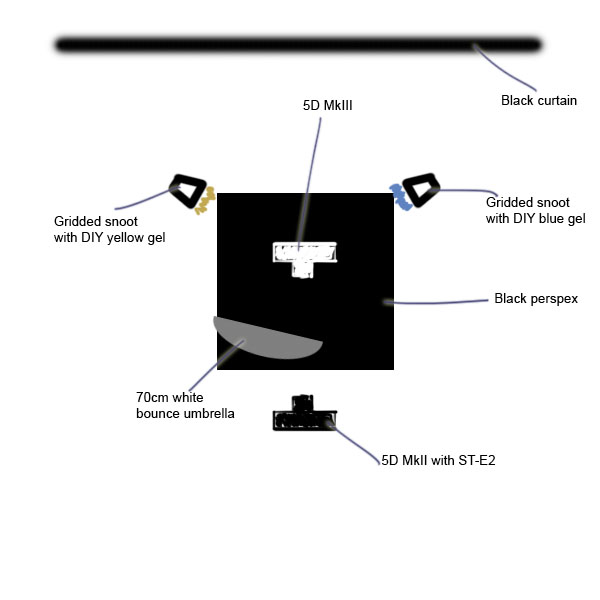
Main Light: Canon 430EX II @ 1/2 power into 70cm white bounce umbrella just outside the frame to camera left
Rim Lights: 2 x Canon 430EX II @ 1/2 power into Gary Fong Powersnoots with grids a back left and right
I triggered the flashes with the Canon ST-E2.
Background: Black curtain about 1.5 meters behind the camera. The distance is important. If the background is too close, it will pick up some light from the main source and not appear totally black. Get your background cloth as far away as possible if you’re going for a pure black background.
The camera is sitting on a small square of black plexiglass (aka perspex) that I picked up at a local home improvement store.
To get the orange and blue highlights and the reflection right, I started with the gridded snoots. I shot a few frames and made small adjustments until I was happy with the look. Then I added the main light. It helps to build your lighting set up piece by piece.
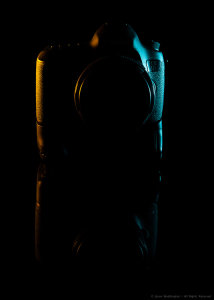
Once I was happy with the rim lighting, I added the main flash, in the 70cm umbrella. Here I was looking for two things. First I wanted a nice catchlight on the lens. Second, I wanted enough light on the 5D logo on the top right side of the camera body. The umbrella is located just outside the frame on the left side, a little above, and angled down toward the 5D MkIII.
You don’t need a lot of space for a shot like this – I made this photo in my living room. The perspex is sitting on the coffee table, and the black curtain is draped over our TV.
I hope this article has given you a few useful ideas for lighting black objects against black backgrounds. I’d love you hear your comments, and as always, feel free to contact me on Facebook or Google+.
Post originally from: Digital Photography Tips.
Check out our more Photography Tips at Photography Tips for Beginners, Portrait Photography Tips and Wedding Photography Tips.
How to shoot Black Objects on Black Backgrounds
You must be logged in to post a comment.