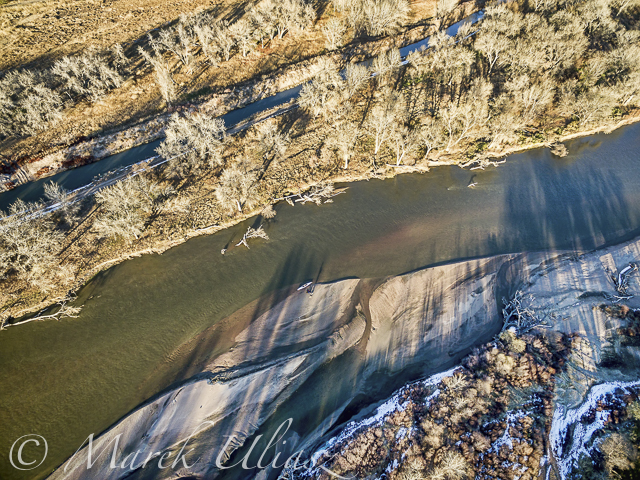
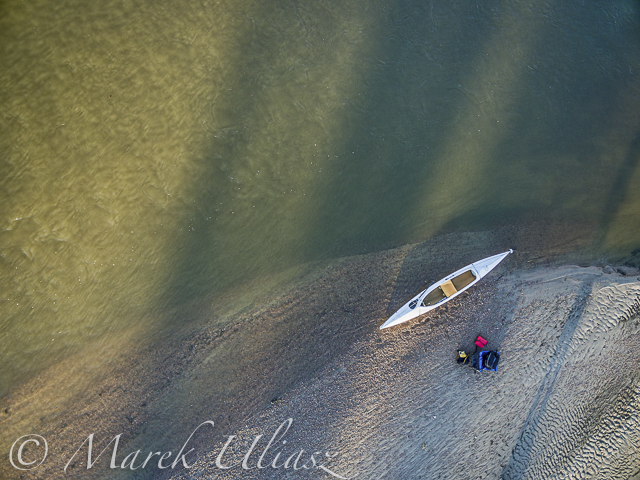
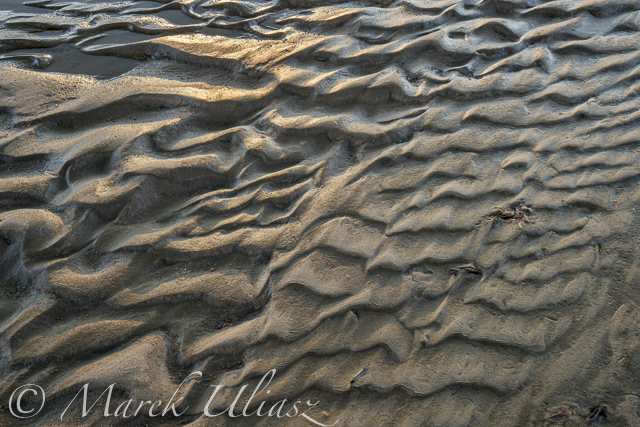
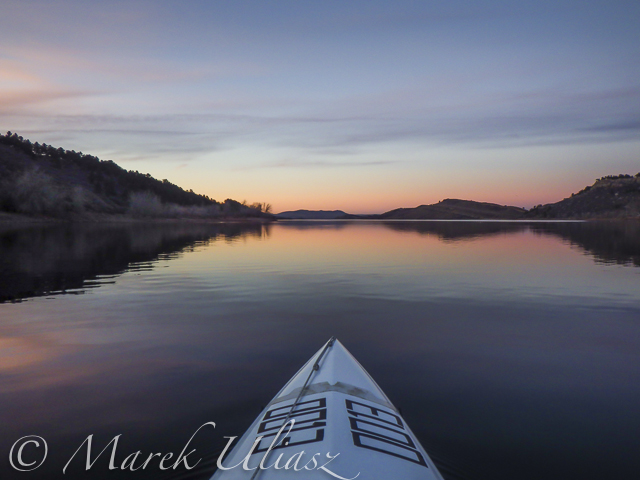
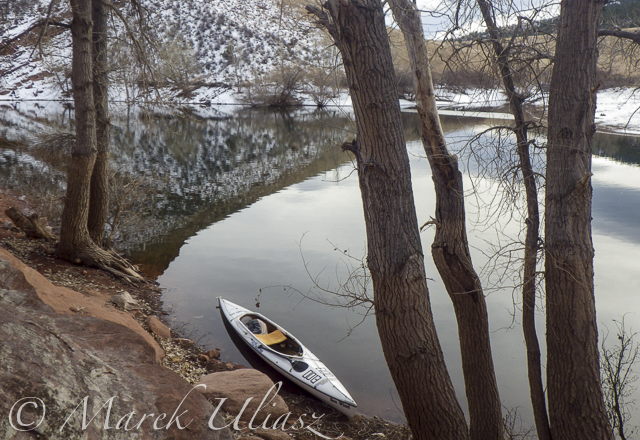
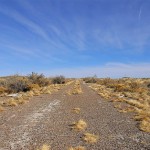
February 11, 2016. I did some scouting and a little bit of paddling on the lover St Vrain Creek. First, I checked some potential launching spots, i.e., bridges, below I-25 highway. Then, I ended up paddling upstream from the county […]
paddling with a camera
Posts Tagged ‘Winter’
Winter Kayaking on the Lower St Vrain Creek
22
Feb
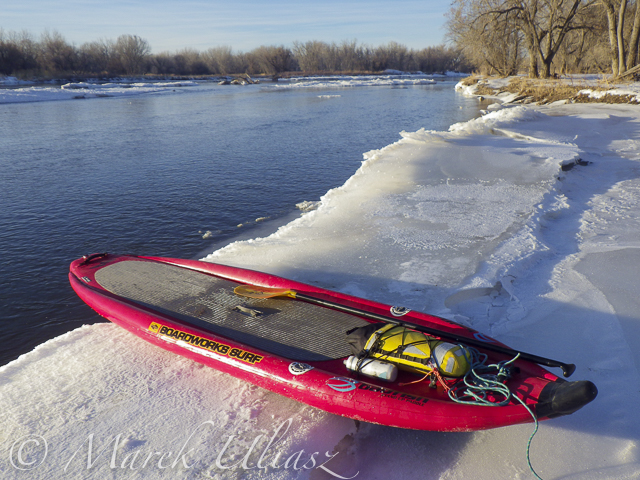
10 Winter Miles of Stand Up Paddling on South Platte River
09
Jan
January 3, 2016. First SUP paddle of the year with Rob Bean. We paddled 10 miles on the South Platte River from highway 58 to Kuner. Great weather, river flow ~900 cfs at Kersey, several bald eagles and hundreds of ducks. There are no portages on this river section since we started just below the Plumb Ditch Dam (the second diversion dam if you paddle from Evans).
We started from a gravel bar under the new bridge on highway 58 – a right river shore with parking on a wide shoulder, a shorter, steeper route with barbed wire fence on the upstream bridge site. Downstream bridge site may be more convenient without the fence, but with a little longer walk. You can reach the bridge by turning into the new highway 49 at traffic lights from Colorado highway 34 between Evans and Kersey.
Rob posted his pictures on facebook. They actually show much better our launching site.
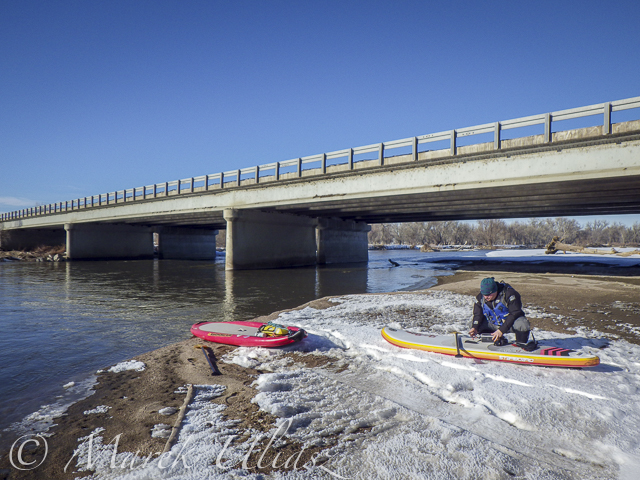
Start at gravel bar under the new highway 58 bridge
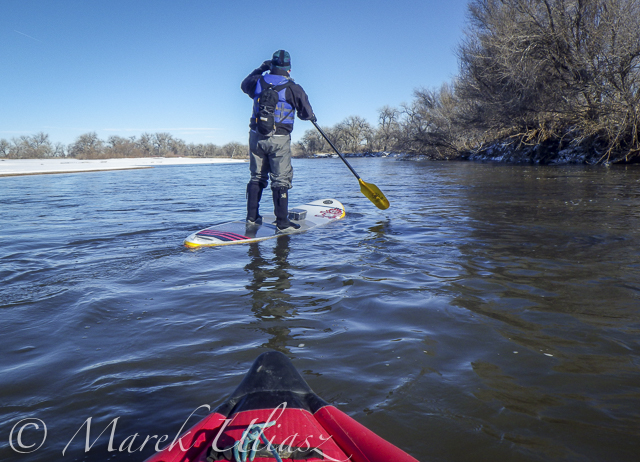
Somewhere on the river around Kersey
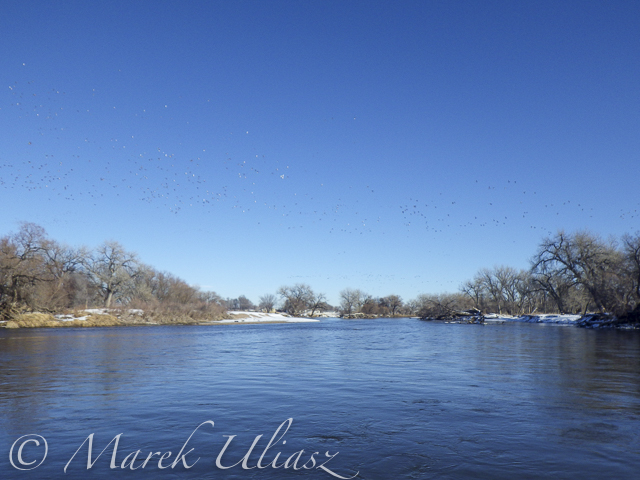
Ducks, ducks, and more ducks. Hundreds of them.
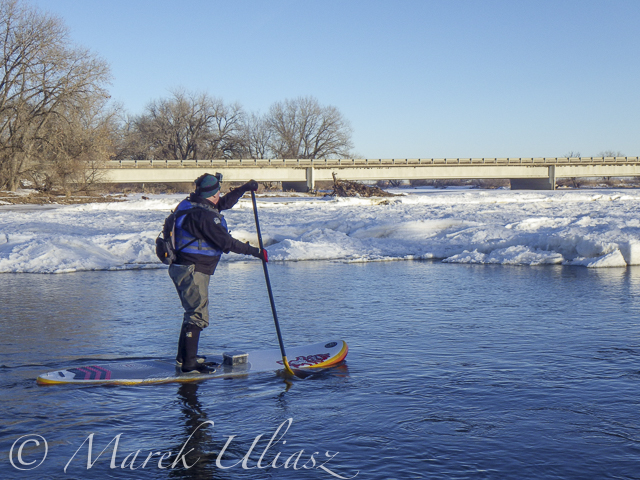
Finishing 10 mile trip at Kuner
A little bit icy landing at Kuner (left shore upstream of the bridge)
Related posts:
South Platte River below Denver – river guide
Starting 2015/16 Winter Paddling Season on South Platte River
Paddling SUP on South Platte River from Kersey to Kuner
South Platte River from Wildcat to Evans by SUP
South Platte River below Denver – river guide
Starting 2015/16 Winter Paddling Season on South Platte River
Paddling SUP on South Platte River from Kersey to Kuner
South Platte River from Wildcat to Evans by SUP
10 Tips for Taking Stunning Winter Portraits of Your Kids
03
Dec
Just because it’s winter doesn’t mean we can only shoot indoors. It may be cold (and rainy if you’re in London) most days, but when the winter sun shows its face, it fills the earth with a beautiful warm glow, especially late in the day. This bring us to what is known as the golden hour – typically about an hour before sunset. The further you are from the equator, the more time you would need, in my case about 1 – 1.5 hours, before sunset.

Here are my 10 top tips on how to get stunning winter portraits of your own kids:
#1 Choose the right day and time
Choose a sunny day and plan to get to your shooting location a good hour or so before sunset.
#2 Dress them warmly and make it fun
Wrap your children up nice and toasty so they won’t complain. Tell them you are taking them out for one hour to the park or the playground (or your chosen location) but that you would like to take a few photos of them before you get to the actual promised site. The easiest for us was the playground, as we have to walk about 10 minutes from the entrance to the park to get to there. It is a good idea to choose a halfway point to stop.

#3 Have warm beverages during or after the session
Either bring a snack or warm drinks in a thermos (keep it light and simple though), promise to take them for a nice warm drink in a nearby cafe after your little trip to the playground, or make them hot chocolates when you get home (whatever works for you).
#4 Find the good light and start shooting
Halfway to the playground, your kids would already have been having fun running and chasing each other. Remind them of the photos you want to take, and show them the light is so beautiful and perfect. Ask for their suggestions where you could stop and take some nice picture. Make sure there is light coming from one side, but that they are fully in the shade of a tree (open shade) to avoid hotspots and mottled faces.

#5 Be fast
Keep it quick! Kids get bored if you take too long so just aim for a few portraits. Ask them to stand, cuddle and tickle, or make each other laugh, swap places, do their own poses and click away like nobody’s business.
Techie tips: If shooting in semi-automatic mode, choose a wide aperture or set it to Aperture Priority (and choose a large aperture, small f-number) so you get the blurry background effect. Always focus on the child’s eyes if possible.

#6 Use backlight to your advantage
Shoot with the kids backlit. The best time to do this is during the golden hour. The sun is low, the sky is a reddish blue and the light is softer, more diffused, and indirect.
Shooting backlit is really quite a difficult technique which requires some mastering. This is when the sun or light source is in front of your camera, and behind your subject. The late sun gives stunning soft light, that illuminates your child’s hair or clothing like it has just been kissed by the sun.

You would also need either a really wide aperture, a flash, or a reflector to bring light back into your child’s face. A reflector can be a large white/silver/gold sheet that you angle towards their face, to bounce the light back into it. Or, you can choose a location with a natural reflector such as a white, or light coloured wall, facing the sunset and position your child in front of it, at an angle, so that part of their face gets the reflected light. I suggest a wide aperture for portraits as that helps give a nice glow to the skin, spot metered, and focused on the eyes.
#7 Go for lens flare
This is really quite difficult as you don’t want to be looking straight at the sun. When you see the sun’s rays streaming through the viewfinder of your camera, that’s a sure sign that you are capturing flare. Flare floods your camera with light and everything else becomes a muddy, hazy silhouette. So try to get only a very small bit of flare right at the top or side of the viewfinder, and you will still get some good details, rather than a completely hazy image, devoid of any definition or detail.

#8 Embrace the imperfections
From personal experience, my imperfections, mistakes, and lack of skills fuel creativity. So don’t be afraid to make mistakes and have imperfections; they are a blessing. Use them and learn from them.

#9 Capture some scene details after the portraits are done
When the portraits are done, capture some contextual details such as the sky, trees, plants, grass, flowers, etc. Years down the line, when you look back at these photographs, details will help you remember the mood, the time, and the emotions of that day. Now that there’s no need to rush and the kids are playing, take your time and choose which details grab you, and take your breath away.
Techie tips: Don’t forget to change your aperture when shooting the sky and trees to a much smaller one, in this case around f/5.6 or smaller. I find that while you can shoot wide opened it is more prone to have chromatic aberration than if you shoot at a smaller aperture. Really, it’s personal preference, but this is what I recommend.

#10 Last but definitely not least, reward and celebrate
Promise your kids not just the playground, but extra treats like snacks and hot drinks, and even a small surprise. It reinforces having a photoshoot as a positive experience, and ends it on a happy note. Then top it with a movie night at home!
Have you done any winter portraits of your kids? Please share your images and any other tips you have in the comments below.
googletag.cmd.push(function() {
tablet_slots.push( googletag.defineSlot( “/1005424/_dPSv4_tab-all-article-bottom_(300×250)”, [300, 250], “pb-ad-78623” ).addService( googletag.pubads() ) ); } );
googletag.cmd.push(function() {
mobile_slots.push( googletag.defineSlot( “/1005424/_dPSv4_mob-all-article-bottom_(300×250)”, [300, 250], “pb-ad-78158” ).addService( googletag.pubads() ) ); } );
The post 10 Tips for Taking Stunning Winter Portraits of Your Kids by Lily Sawyer appeared first on Digital Photography School.
Vallerret Photography Gloves are designed for outdoor winter shooting
03
Dec
 |
Vallerret, a Norway-based startup, is looking for funding on Kickstarter for some cold weather photography gloves. Currently in prototype form, the Vallerret Photography Gloves are designed for adventurous photographers who shoot outside in cold temperatures, aiming to eliminate the hassle that comes with bulky, cumbersome gloves while protecting hands from snow and ice.
Vallerret’s gloves are made with ‘flip-tech’ finger caps that can be peeled back when it is time to adjust dials and change settings. The knuckles and cuff are made of neoprene, the interior features a merino wool liner and the palm and inner fingers are coated with a non-slip grip, though there’s no mention of capacitive touch screen capability, which is increasingly common. Catering specifically to photographers, the design includes an SD card pocket just above the cuff and a microfiber strip for cleaning a lens. Vallerret has partnered with a ski glove manufacturer, hoping to tailor the gloves to active photographers who might also wear them snowboarding.
The campaign has raised more than half its funding goal, and offers a pair of Vallerret Photography Gloves for a pledge of 550 kroner, or about $ 64. Shipping is estimated to start in March 2016, assuming the campaign and manufacturing progress as planned.
Articles: Digital Photography Review (dpreview.com)
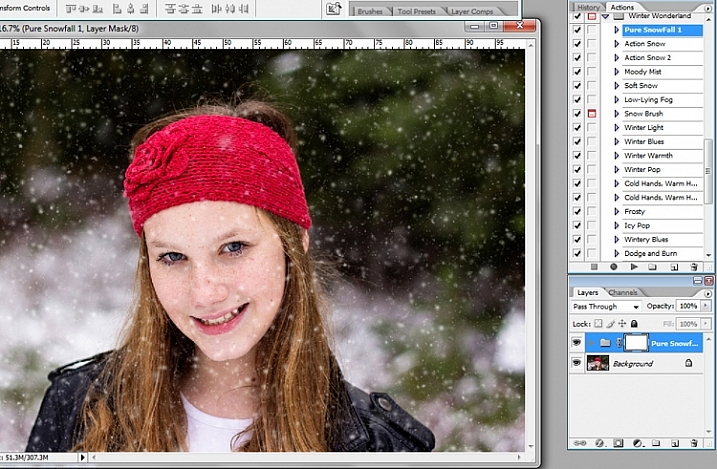
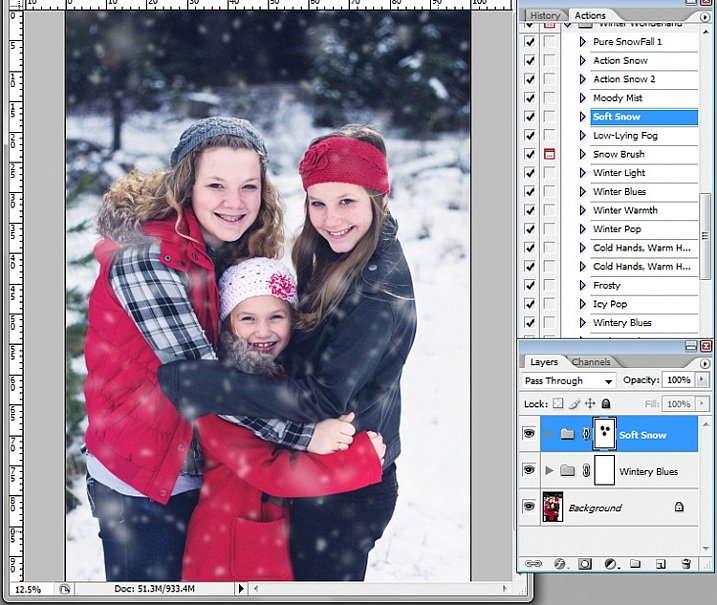
Make it Snow with Pure Photoshop Actions Winter Wonderland Set
18
Nov
When it comes to post-processing, photographers definitely have opinions about Photoshop Action sets. Some photographers love them, others consider them cheating. For me personally, Actions are most valuable when they either (a) make the editing that I would do by hand more efficient and/or (b) offer something unique and fun that may be outside my normal editing style, but fits a particular session.
In this case, the Winter Wonderland Action Set by Pure Photoshop Actions (available for Photoshop CS and above, and Elements 6-11 for $ 25 regular price) fits a bit of both those criteria. It’s not something that I use every day, but it really is a fun action set to have on hand during the winter months!
Essentially, the Winter Wonderland Action Set allows you to add snow with one click during post-processing. It includes several different kinds of snow, fog, and mist that can add a little something extra to your winter images. It also offers some tints and adjustments that allow you to tweak the final images towards your normal style of editing, whether you lean towards natural and clean, or a faded vintage look.
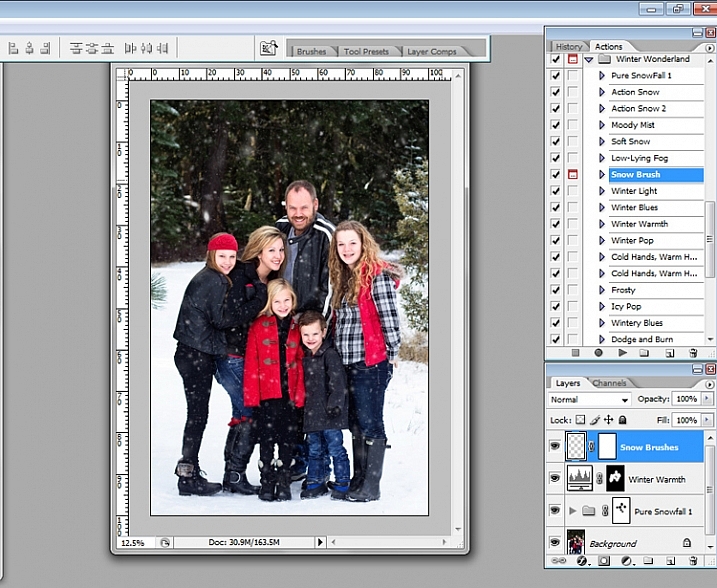
The first thing that I should mention, right off the bat, is that some of these actions run very slowly. The “Pure Snowfall 1” action in particular always seems to take several minutes to run. On the other hand, the “Soft Snow” action runs quickly every time. That said, even with “Pure Snowfall 1” taking several minutes to run, it’s still much faster than adding in individual snowflakes by hand, so it’s a win in my book.
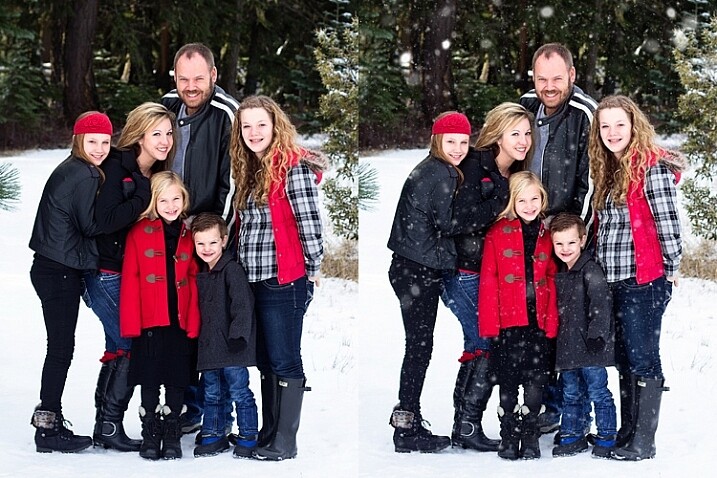
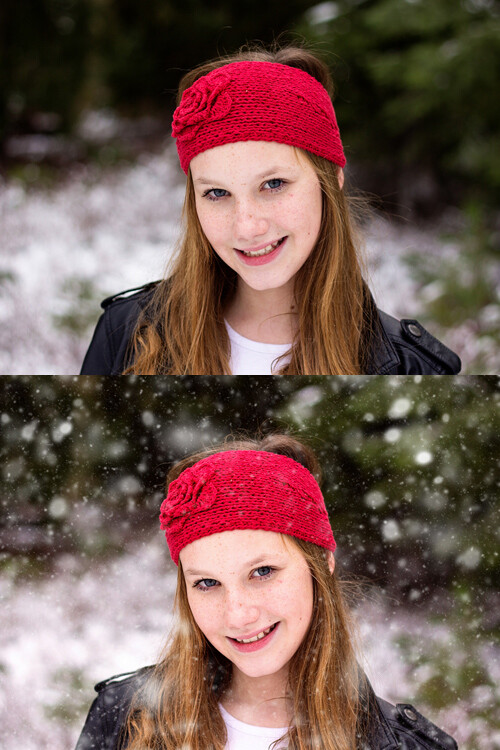
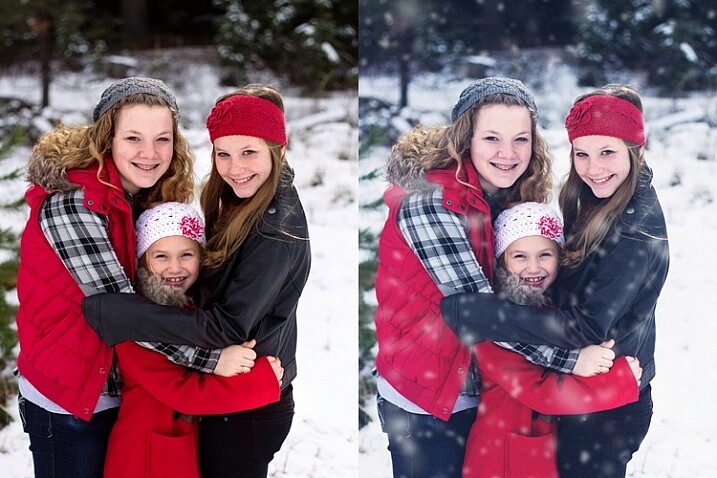
Original image on the left, final image using PPA Winter Wonderland on the right.
As with most action sets, you should be prepared to tweak Winter Wonderland to fit your particular image. Winter Wonderland adds masks to most of the actions after they’ve run, and I find that I use them quite often. The most common tweak that I make to the Winter Wonderland set is to remove the added snowflakes from the subject’s eyes, nose, and mouth. I prefer the “snow” to look as natural as possible, so I do tend to leave the snowflakes around the hairline, and sometimes even on the cheeks.
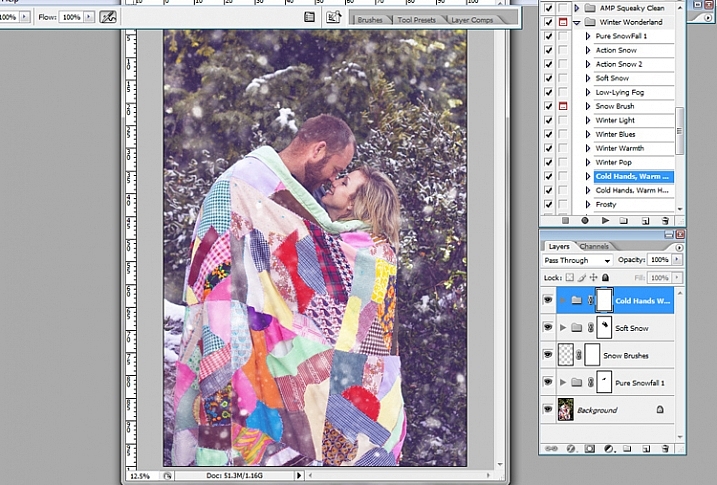
The actions in this set tend to do a pretty good job of varying the size of the snowflakes in order to give a more realistic foreground and background, but there is also a snowflake brush included with the set, which allows you to pick the overall size of snowflake you want, and then scatters additional snowflakes in that size randomly over the image.
Original image on top, final image edited with PPA Winter Wonderland on the bottom.
My editing style tends to be pretty clean, so that is about where I usually stop with this action set. However, the set also includes a number of actions that allow you to achieve a subtle vintage feel to your final images, and I’ve also enjoyed testing those options out as well.
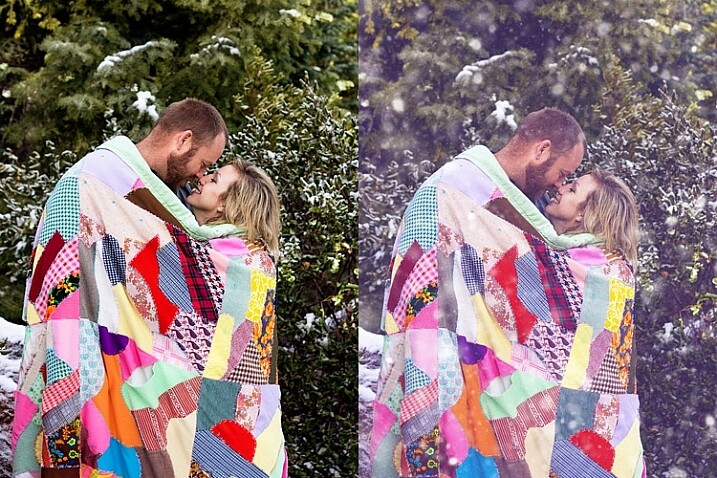
Original image on the left, final image edited with PPA Winter Wonderland on the right.
When I use the Winter Wonderland action set, my ultimate goal is that if I were to post the image on Facebook, the majority of my client pool would not readily be able to tell that the snow was added in post-processing. Of course, some of my photographer friends are likely to be familiar with this particular action set, and others may be familiar enough with Photoshop to know that something’s up, but my hope is to create images that look natural enough that they could easily pass as being real. So, in order to accomplish that goal, one of the key pieces is to only use images in which your model is dressed appropriately for snow, and there could feasibly actually be snow in that location.
This particular set of images is my favorite set that I’ve ever edited with Winter Wonderland, and I think that’s due in large part to the fact that there was actually snow on the ground during our session. So, it’s not too much of a leap for a casual viewer to see snow on the ground, and find it feasible that snow could be falling at the same time. On the other hand, if I were to run this same action set on an image taken at sunset during the summer months, it would likely look ridiculous…which would really only work if you’re going for a super campy “Christmas in July” themed session.
Original image on the left, final edited image with PPA Winter Wonderland on the right.
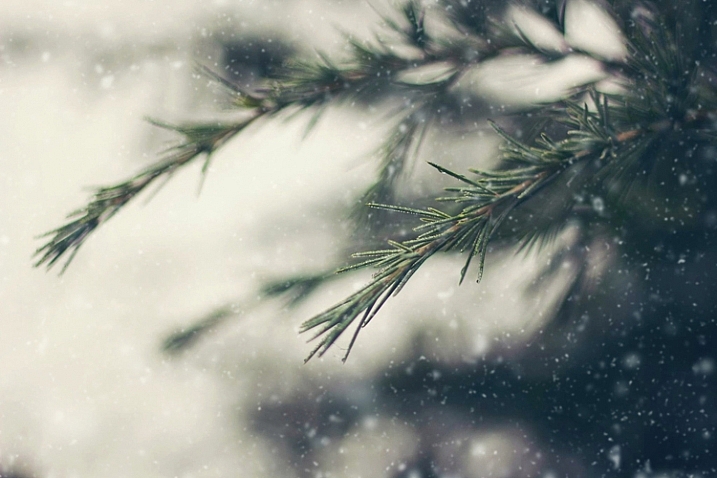
Although I’ve seen Winter Wonderland marketed almost exclusively towards photographers doing portraits or family photography, don’t underestimate this set for landscape and nature images as well. As long as the content, and coloring of your landscape or nature image, would be appropriate for a photograph taken in the winter, there’s no reason not to give it a try!
Just for the record, I purchased the Winter Wonderland Action Set on my own, and Pure Photoshop Actions has no idea that I’m writing this article. I have just enjoyed the Winter Wonderland set quite a bit, and thought that it was worth sharing (and reasonable price at $ 25) as we head into the winter months in the northern hemisphere.
Have you tried the Winter Wonderland Action Set? If so, what did you think? If not, is there an image you’re eager to try it on?
googletag.cmd.push(function() {
tablet_slots.push( googletag.defineSlot( “/1005424/_dPSv4_tab-all-article-bottom_(300×250)”, [300, 250], “pb-ad-78623” ).addService( googletag.pubads() ) ); } );
googletag.cmd.push(function() {
mobile_slots.push( googletag.defineSlot( “/1005424/_dPSv4_mob-all-article-bottom_(300×250)”, [300, 250], “pb-ad-78158” ).addService( googletag.pubads() ) ); } );
The post Make it Snow with Pure Photoshop Actions Winter Wonderland Set by Meredith Clark appeared first on Digital Photography School.
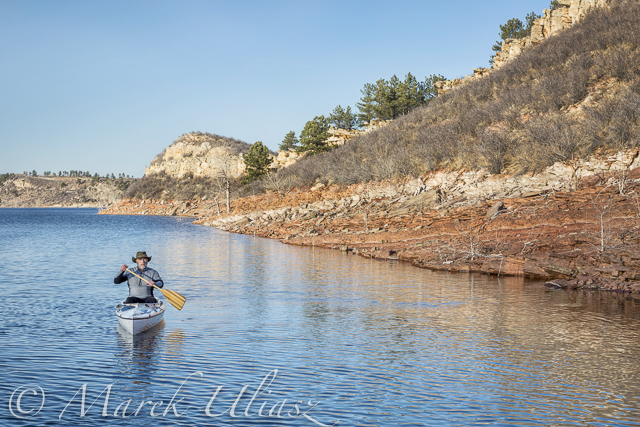
Starting 2015/16 Winter Paddling Season on South Platte River
16
Nov
A middle of November. It’s time to start my winter paddling season. Of course, Horsetooth and other local lakes in Fort Collins are still open, so I can continue my summer style paddling. Nevertheless, I took the Sea Wind canoe, Pixel (aka water Corgi) and went for the first fall/winter paddling on the South Platte River.
We went to Masters and started to paddling upstream. However the dam just above Master bridge was closed and diverting water to Jackson Reservoir, so we paddled a couple miles downriver instead. Beautiful weather and a good flow of ~900cfs @ Weldona. Actually, I spent more time photographing than paddling.
I am hoping to do more paddling on different sections of the South Platte River during the incoming winter season and, finally, update my river guide. Would you like to join me? The South Platte with a typical winter flow is just a wading river and suitable for safe paddling with any boat – kayak, canoe or SUP. Well, a paddleboard would require some experience and a short fin due to possible shallows. I don’t think that you need to dress for immersion, but I always take extra clothes for change.
I am still sorting my blogs after migrating to a new server. If you encounter any problem or missing links please let me know.
South Platte River in eastern Colorado below Masters with Jackson Reservoir ditch, looking downstream
Looking down from Phantom 3 drone. Can you see the Sea Wind canoe, me and Pixel?
Let’s look a little closer
and, even closer
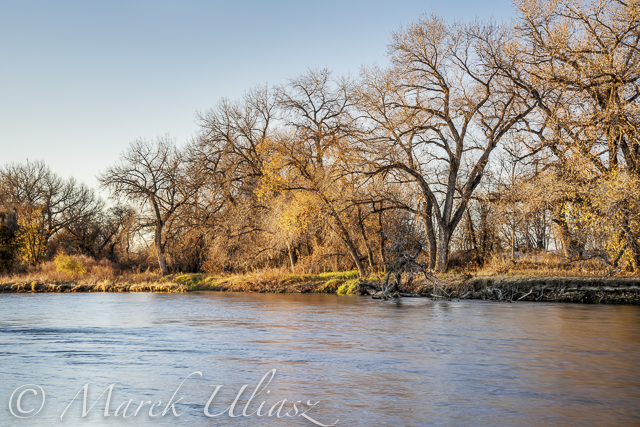
A typical fall or winter scenery on the South Platte lit by the low setting sun
7 Uncommon Tips for Winter Sunrise Photos Near Water
26
Feb

There are few things in photography that people love more than dreamy sunrise shots full of bold oranges, big suns, washing waters, and burnt horizons. The dawn of a new day is a spiritually significant event as our past misdeeds of yesterday are forgotten under the promise of fresh beginnings. Sunrise also affords us some of the best light to work with in photography.
However, if you live near the coast and you plan to get up early to take some sunrise shots that involve you being in or around rocks on the water’s edge, there are some key things you must remember, especially in the cold, winter months.
1. Set the alarm earlier than you think.
This is stage one. You’ve calculated that the sun rises at 6:00 a.m., you want to get there by 5:30 to set up, it takes you 10 minutes to get there, so you set the alarm for 5:10. But be honest, it never works like this does it? The alarm goes off at 5:10, it’s cold, you’re snug in bed, it’s dark outside, you were in the midst of a dream, and you roll back over. Missed sunrise. How often do you ever jump straight out of bed at 5:10 to take photos, in the midst of winter? By learning this mistake, I set the alarm for 4:40 then give myself three hits on the snooze button to take me to 5:10. It never fails (unless it’s cloudy!!)
2. Make sure you have shoes with spikes on the bottom.
Think about it – you’re an avid photographer who has set up a kit to your liking with lenses, filters, batteries and your camera. You put it in your bag, put your shoes on, head to the wet, rocky location then bammo, you fall over on the freezing, slippery moss. Either you or your bag gets wet, and neither is a desired result. There’s nothing scarier than trying to keep your bag on your back and out of the water as you slip around the rocks on ill-equipped shoes.
I have fisherman’s boots that cost $ 40. They have small metal spikes on the sole, perfect for getting across the rocks, and for scurrying to new locations quickly. They’re waterproof too. Alternatively, you could try the little clamp-ons that hikers use in icy conditions. They work well too, but your shoes will get cold and wet.
3. Use a head torch (headlamp).
The first time I brought mine I felt utterly ridiculous, like I was a miner heading down into the pits. Now, I wouldn’t dream of not having one. The convenience of having both hands free to see where you’re going, to open and close your bag, and set your camera up in the dark is without comparison. Especially if you are trying to get filters and holders attached to the ends of lenses.

4. Have at least two lens cloths and other lens cleaners or pens.
Imagine this scenario: you are changing your lens out on the rocks and you put your cleaning cloth down to free your hands. There is a little bit of residue on the rocks so when you pick up your cloth and started wiping the lens, it gets coated in a film of goo. You may be able to clean the lens with different parts of the cloth (depending on the type of rock goo!) but it will likely leave most of the cloth dirty. Therefore, you will be unable to clean other lenses later on when they inevitably get hit by sea-spray.
How can I picture such a scenario? Sadly, I have lived it, and there is nothing worse than getting up early to a prime location, only to have your single cleaning cloth ruined before your shooting appetite has been satisfied, leaving you unable to do anything with other lenses that need cleaning. Now I always carry at least three cleaning implements in my bag.
5. Study the tides.
Ideally, you should know exactly what you want to shoot, so you can frame the shot before you go and know where the water will be. This is not always possible, but at least you should know what the tide will be at sunrise. You might go somewhere the day before and see a perfect shot in your head, only to return at dawn the next day and find those beautiful rocks covered in two metres of water. There’s no point setting the alarm for 4:40am if the subject you want in your shot is submerged like a sunken ship.

6. Know where the sun rises. This may seem ridiculous – east you say! Well yeah, the sun rises in the east, but exactly where on the horizon will it rise for you? The angle changes every day. I once woke at 4:00 a.m. to get a shot in at sunrise only to realize after setting up that even my Sigma 10-20mm couldn’t get the sun and subject in my frame. East isn’t just east. Know exactly where the sun rises on the horizon in order to frame the shot you want.

7. Mittens not gloves.
In the wintertime, near the coast, you need something to cover your hands. But not gloves. Mittens are those cute, little gloves that have all the tops of the fingers cut off. The very reason you need mittens is to keep the tips of your fingers free to play with the camera and to get everything set up. This is very difficult with padded, woolly gloves on. Also, don’t make the mistake of buying woollen gloves, then cutting the tops off yourself. This leaves threads hanging that get longer and longer every day, and more and more annoying.

The joy of getting those early morning shots makes a perfect start to the day. Follow these tips and all you’ll have to worry about is framing that perfect shot.
googletag.cmd.push(function() {
tablet_slots.push( googletag.defineSlot( “/1005424/_dPSv4_tab-all-article-bottom_(300×250)”, [300, 250], “pb-ad-78623” ).addService( googletag.pubads() ) ); } );
googletag.cmd.push(function() {
mobile_slots.push( googletag.defineSlot( “/1005424/_dPSv4_mob-all-article-bottom_(300×250)”, [300, 250], “pb-ad-78158” ).addService( googletag.pubads() ) ); } );
The post 7 Uncommon Tips for Winter Sunrise Photos Near Water by Iain Stanley appeared first on Digital Photography School.
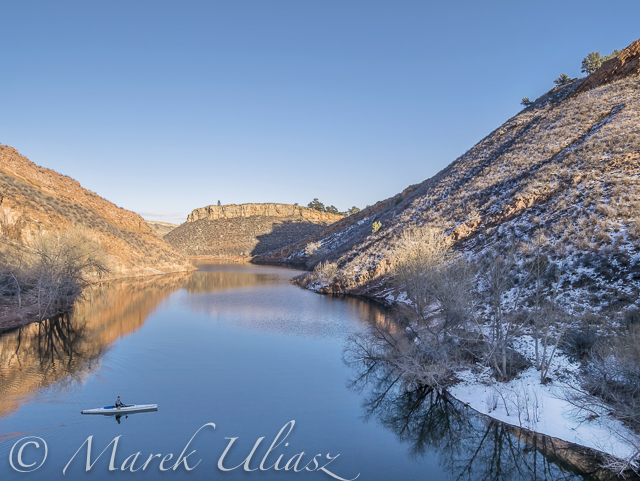
Winter Season Paddling on Horsetooth Reservoir with Sea Wind Canoe
21
Feb
In a typical winter all lakes in northern Colorado are frozen, so I am paddling on the South Platte River. However, this winter I have not been on the river yet. All time I am paddling Sea Wind canoe on the Horsetooth Reservoir just west of Fort Collins. I didn’t paddle in January when the lake was partially frozen and there was no good access to open water.
The ice on Horsetooth is usually starting from its southern end. So, if the South Bay is covered by ice it my be still possible to launch in the north at Satanka Cove from a boat ramp or rocky tip next to the Horsetooth Dam. Sunrise Area on the eastern side would be perfect for winter launching, but is closed for a cold season. You would have to use a cart to transport boats from a parking lot down to the water or execute a pretty long portage.
Pictures below cover all my paddling from late November 2014 till late February 2015.

November 27, 2014 – Eltuck Cove
December 9, 2014: A quiet evening near Inlet Bay.

December 20, 2014 – Exploring Inlet Bay and Hansen Feeder Canal supporting water to Horsetooth Reservoir from the Colorado River through the Big Thompson Project (map)

December 27, 2014 – Quarry Cove in winter scenery, my last paddling in 2014.
February 4, 2015: Quarry Cove, a month later. My first paddling in 2015.
February 13, 2015. Eltuck Cove. Testing a new remote control for my Canon camera – CamRanger with iPod touch.

February 13, 2015: Sunset over Horsetooth Dam seen from the ELtuck Cove. Springtime weather.

February 16, 2015: Back to winter weather. It was snowing. Old sandstone quarry in Satanka Cove.
February 18. 2015: Quarry Cove. Some serious multitasking: paddling canoe, flying a drone and shooting selfie.
And, winter is not over yet …
Most of the pictures displayed in this post are included in my stock photography portfolio and are available for license and download as royalty free images. Some of them can also be purchased as prints, posters, cards and other art products.
Related posts:
Icy Horsetooth Reservoir – Opening Lake Paddling Season
Winter Paddling with Sea Wind Canoe on Horsetooth Reservoir – movie
First Snow Paddling with JKK Multisport Supernova Kayak
Freezeways: Using Bike Paths as Winter Ice Skating Corridors
11
Feb
[ By WebUrbanist in Architecture & Cities & Urbanism. ]

Proposed by a landscape architect from Edmonton, Alberta, this 7-mile urban project may not be as far fetched as it first sounds – in many regards it is simply a linear extension of an ice skating rink or more pragmatic variant of for-fun skateways found in Holland and Russia.


For the many cities in the United States, Canada, Northern Europe and elsewhere that are only warm (and thawed) enough for comfortable biking half of the year, designs like The Freezeway by Matt Gibbs could provide a means to modify extant bike pathways to get exercise, have fun and commute to work during colder months. The process is not as simple as pouring ice on existing paths – issues of grade, embankments and connections would need to be addressed – but the concept is gaining momentum and these problems all have solutions.

The idea has local appeal for places like its architect’s hometown, which is ice cold for much of the year and dark to boot, providing an excuse to get outdoors as well as a way to move about the city. It also has potential international appeal as a tourist attraction and urban icon akin to the High Line in New York, Garden Bridge coming to London, Sea Wall in Vancouver and other one-of-a-kind landscape projects around the world.

More details from the designer: “By shovelling a mapped out route, the space between snow banks could be flooded, perhaps by a fire hydrant at first (though it’s not ideal), creating a web of trails to explore on skates, requiring minimal expenditure …. This space could eventually be animated by lights and music. If popular, it could incrementally expanded every year.”

More on the advantages for and beyond commuting: “This project is not meant to be a tax payer’s burden. The Freezeway is meant upgrade city infrastructure for a multitude of uses, potentially doing wonders for the redeveloping City’s core, our international reputation, as well as attract investment into the City. The proposed route exists entirely on existing City infrastructure; the land is already secured. The numerous character areas along the route could be developed in phases, lending themselves well to private funding/sponsorship, like Calgary’s GlobalFest, or Vancouver’s Festival of Light fireworks shows, funded by donations of over 1 million dollars annually. The design team is currently exploring numbers.”
Want More? Click for Great Related Content on WebUrbanist:

The Under Line: Derelict London Tube Tunnels as Public Paths
Transforming unused sections of the London Underground, this bold proposal envisions a network of subterranean paths for pedestrians and cyclists as well …
Click Here to Read More »»

London Approves Europe’s First City-Spanning Bike Superhighway
Catering to some of the 170,000 cyclists that ride across London every day, this segregated bicycle lane will stretch from west to east, pass through the heart …
Click Here to Read More »»
16 Abandoned Cars, Trucks, Buses, Tanks, Roads & Paths
We’ve all seen an abandoned car or truck, a deserted bus or road … but stop to admire them? Abandoned vehicles are more than just an eyesore; they can be …
Click Here to Read More »»
![]()


[ By WebUrbanist in Architecture & Cities & Urbanism. ]
[ WebUrbanist | Archives | Galleries | Privacy | TOS ]
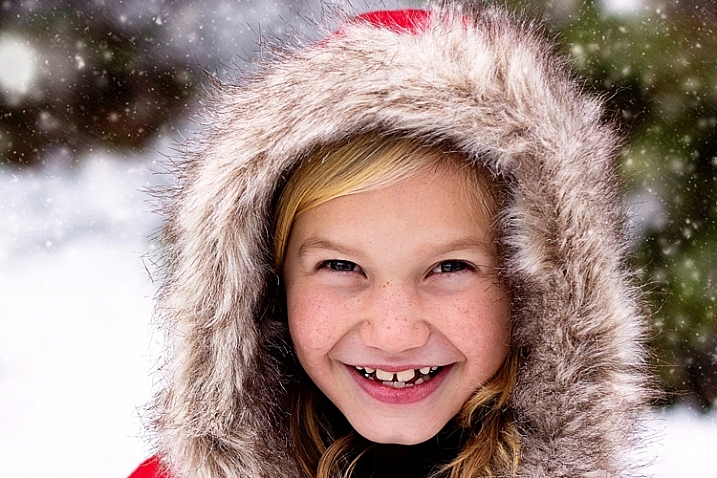
Shooting Winter Wonderland: How to Take Great Snow Images
14
Jan
Shoot what you love. The Amazing Images Will Follow. That’s my motto. Above, you can see a shot of my daughters, Zoe and Tenley, on their first day of snow ever. Zoe wanted to hold the snow in her hands and blow it, Tenley agreed, and just as Zoe was blowing, Tenley reached up and whitewashed her face with the Continue Reading
The post Shooting Winter Wonderland: How to Take Great Snow Images appeared first on Photodoto.
You must be logged in to post a comment.