RSS
 

Posts Tagged ‘wide’

ZEISS goes wide with Loxia 21mm F2.8 for Sony E-mount

13 Oct

ZEISS has introduced the 21mm F2.8 to its Loxia lineup for full-frame Sony E-mount cameras, joining the 35mm F2 and 50mm F2. Like its siblings, the 2.8/21 allows the user to de-click the aperture ring for video recording. Read more

Articles: Digital Photography Review (dpreview.com)

 
Comments Off on ZEISS goes wide with Loxia 21mm F2.8 for Sony E-mount

Posted in Uncategorized


Olympus expands wide angle offerings with 7-14mm F2.8 and 8mm F1.8 ‘Pro’ lenses

12 May

Olympus has announced two additions to its Micro Four Thirds ‘Pro’ lens series, the M.Zuiko Digital ED 7-14mm F2.8 and 8mm F1.8 Fisheye PRO. Both are weather and dust resistant and lighter than their competitors, according to the company, and both are slated to become available in June. Read more

Articles: Digital Photography Review (dpreview.com)

 
Comments Off on Olympus expands wide angle offerings with 7-14mm F2.8 and 8mm F1.8 ‘Pro’ lenses

Posted in Uncategorized


How to Correct Lens Distortion with the Adaptive Wide Angle Filter in Photoshop

11 Mar

The issue

When photographing subjects with a wide-angle lens, it’s pretty common for perspective problems to present themselves in the form of lines that should be straight, but appear curved and distorted. This is commonly referred to as barrel distortion, which occurs mostly in wide-angle lenses because the magnification of the image decreases the farther the subject is from the optical axis of the lens. In plain speech, it means that when looking through a wide-angle lens, anything that is at the edge of the frame will be prone to appearing curved.

BEFORE-Adaptive Wide Angle

Some lenses such as fisheyes take full advantage of barrel distortion by purposely capturing images that are heavily curved and spherical. However, there are times when other wide-angle lenses such as the Canon 16-35mm, or even mid-range zooms like the 24-70mm, might produce unwanted barrel distortion effects.

The solution

Perhaps the two easiest ways to correct this problem are to either use a tilt-shift lens or to change your perspective and zoom magnification while photographing the subject. But tilt-shift lenses are expensive, and sometimes, such as when photographing a large building, there aren’t a ton of different perspective options. In these cases, the easiest solution to correct correct lens distortion is to do so in post-processing using a unique tool in Photoshop known as the Adaptive Wide Angle filter.

Introduced in PhotoShop CS6, the Adaptive Wide Angle filter removes lens distortions in one of two ways: it either automatically detects the camera and lens model using pre-programmed details to straighten the images, or you can manually set constraints to tell the it which areas of the photo need to be straightened. In this tutorial, I’ll walk you through the manual use of the Adaptive Wide Angle filter.

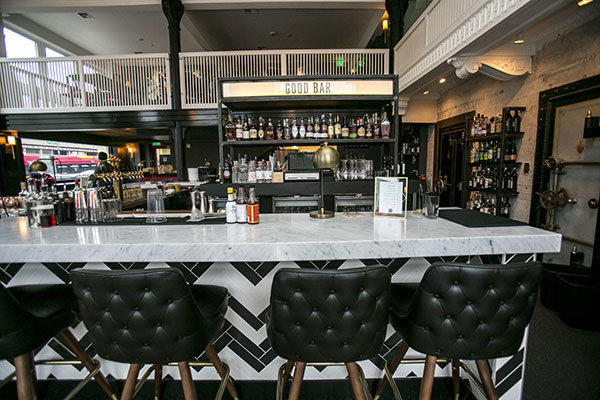
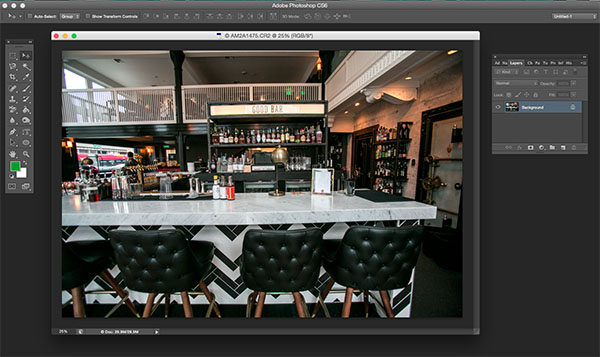
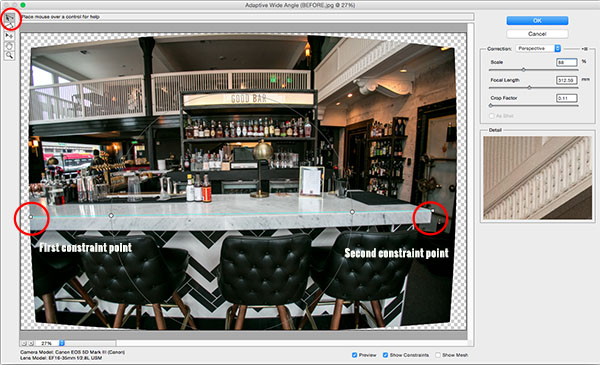
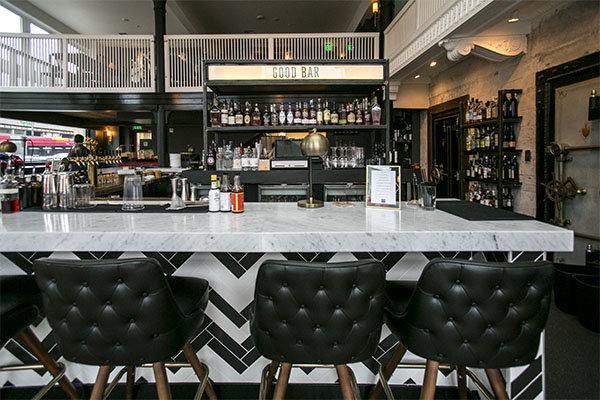
The example below was photographed in a beautiful brand new bar and restaurant using a Canon 16-35mm f/2.8 at a focal length of 16mm. It was a tight space, so there wasn’t room to back up or shoot the bar from a higher angle, so the resulting image sees quite a few horizontal lines such as the upstairs white railings and granite countertop that clearly should be straight, but aren’t.

Photoshop Adaptive wide angle filter correction

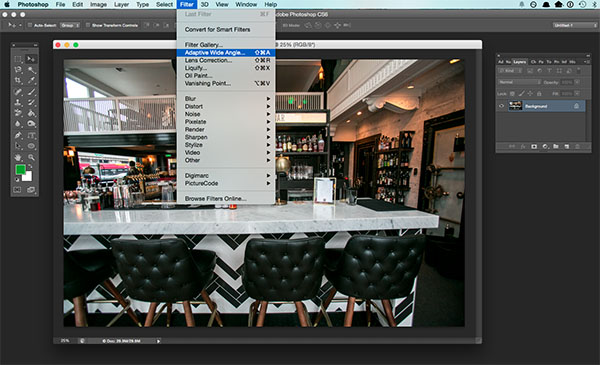
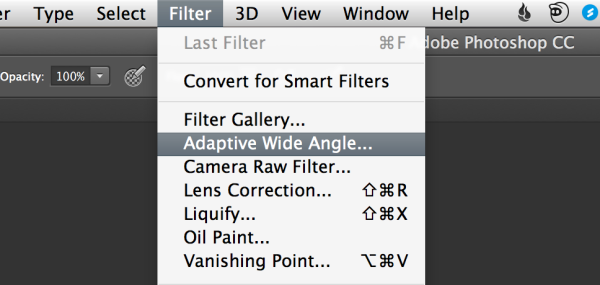
To begin correcting these distortions, click on Filter in the upper drop down menu and select Adaptive Wide Angle Filter.

Photoshop Adaptive wide angle filter correction

Screen Shot 2015-02-25 at 5.18.00 PM

A large dialogue box will then appear with a host of options (see below).

Photoshop Adaptive wide angle filter correction

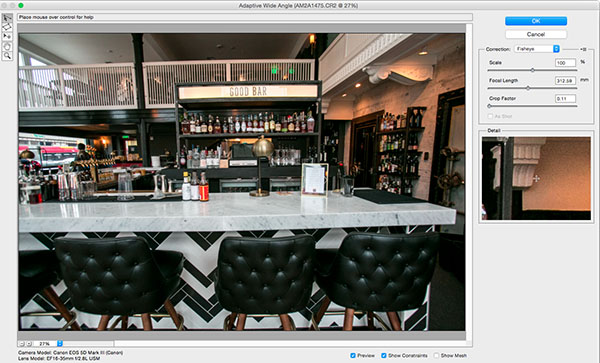
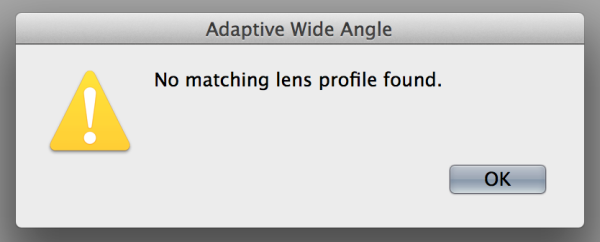
Begin with the right hand panel and choose a correction type from the drop down menu. Typically, I start with Auto, which will attempt for an automatic correction based on lens detection.

Photoshop Adaptive wide angle filter correction

In this case, when I select Auto, another pop up window appears saying, “No matching lens profile found.” This means I need to manually adjust the image. Hit the OK button and turn your attention back to the box in the right hand corner.

Screen Shot 2015-02-25 at 5.24.27 PM

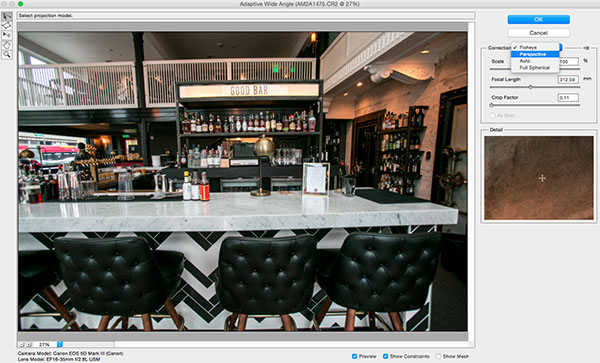
Besides Auto, the drop-down menu has three other options to choose from. If Auto doesn’t work, I’ll typically choose Perspective as my next correction type.

  • Fisheye will correct the aforementioned extreme curves that fisheye lenses purposely cause.
  • Perspective will target converging lines typically causes by the tilt and angle of the camera.
  • Panorama corrects for distortions caused by photo merging for panos.
  • Full Spherical corrects distortions in 360 panoramas shot with a 2:1 aspect ratio.

Screen Shot 2015-02-25 at 5.20.23 PM

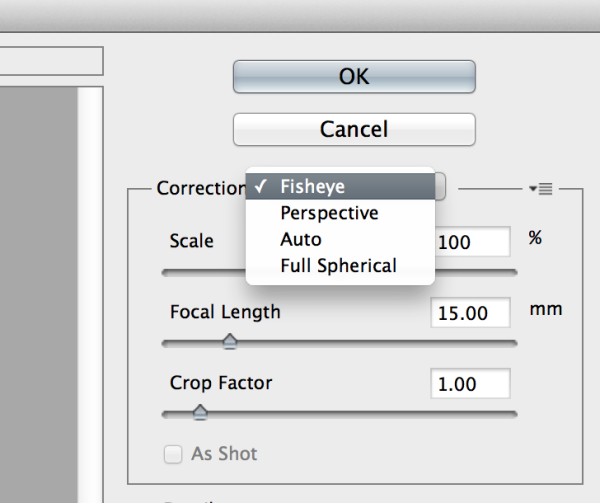
Other options below the drop down menu include more settings that you can fiddle with to help correct distortions.

  • Scale: A value entered here will scale the image to best minimize the blank spots that may be present after the wide angle filter is applied.
  • Focal Length: Specify the focal length of the lens that created the image.
  • Crop Factor: This can be used in combination with Scale to minimize and compensate for blank areas produced by the filter.
  • As Shot: This box can be checked if your lens profile can be detected; if not, this option will be greyed out and you will need to manually specify the values of Scale, Focal Length, and Crop Factor.

Next, turn your attention to the little vertical toolbar in the top left corner. These are the tools you’ll use to define the constraints that indicate which lines in your image ought to be straight. The primary tools to be familiar with are the first two:

Screen Shot 2015-02-25 at 5.27.14 PM

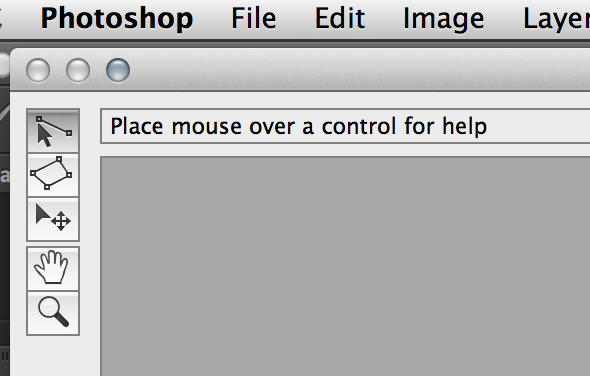
  • Constraint Tool: This tool is used to draw lines over the areas of the image that you wish to straighten. Simply click once to establish a desired starting point, and click again to close the line, holding down the shift key as well if you wish to add a constraint with a vertical or horizontal orientation.
  • Polygon Constraint Tool: This tool functions in the same way as the regular Constraint Tool except it allows you to draw a polygon instead of a single line.

For example, let’s look at the horizontal line of the granite countertop in the image below.

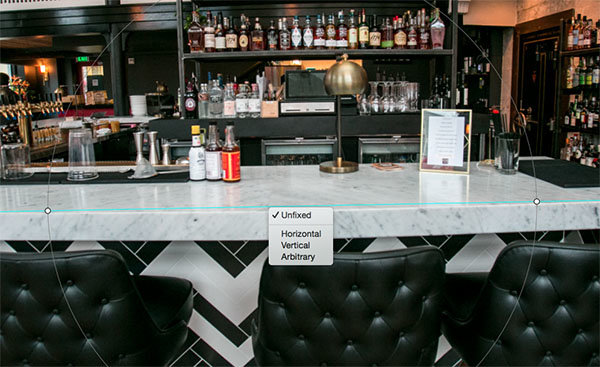
Begin by clicking once on the left end of the line to set one constraint point, then click once on the right end of the countertop to close it. After you set the line, right-click on it and you’ll see a small menu appear allowing you to assign either a Horizontal, Vertical, or Arbitrary constraint to the line. The default constraint is Unfixed, but in this case we want to assign a Horizontal constraint to straighten the line width-wise. In order to automatically assign a constraint to a line, hold down the shift key while in the process of creating the line. In between the two constraint points, there will be a yellow line (if you held down the shift key) or a blue one if you didn’t, indicating where the straightening occurred.

Photoshop adaptive wide angle filter

Constraints Explanation

You can set as many constraint lines as needed until your image is corrected to your satisfaction. Constraint lines typically should be vertical and/or horizontal. Some other tools in the toolbar that can help with this are the Move, Hand, and Zoom tools that allow you move the image around to make the adjustments needed. Additionally, there is the Magnification of the preview in the lower left corner that allows you to zoom in and help you see where to plant constraints.

Photoshop Adaptive wide angle filter correction

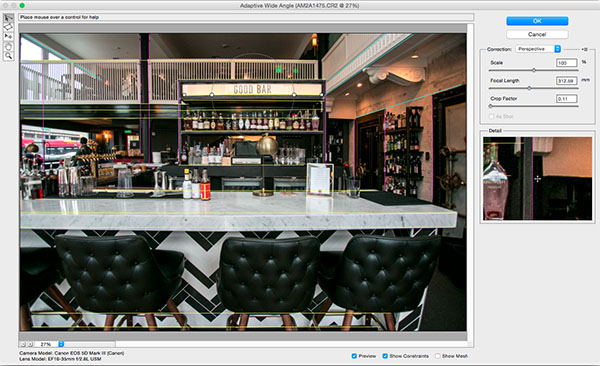
After you have corrected the image to your liking, hit the blue OK button to apply the filter.

Photoshop adaptive wide angle filter

BEFORE-Adaptive Wide Angle

BEFORE

After

AFTER

How do you correct distortion for your wide-angle images? Share in the comments section below.

googletag.cmd.push(function() {
tablet_slots.push( googletag.defineSlot( “/1005424/_dPSv4_tab-all-article-bottom_(300×250)”, [300, 250], “pb-ad-78623” ).addService( googletag.pubads() ) ); } );

googletag.cmd.push(function() {
mobile_slots.push( googletag.defineSlot( “/1005424/_dPSv4_mob-all-article-bottom_(300×250)”, [300, 250], “pb-ad-78158” ).addService( googletag.pubads() ) ); } );

The post How to Correct Lens Distortion with the Adaptive Wide Angle Filter in Photoshop by Suzi Pratt appeared first on Digital Photography School.


Digital Photography School

 
Comments Off on How to Correct Lens Distortion with the Adaptive Wide Angle Filter in Photoshop

Posted in Photography


Weekly Photography Challenge – Wide Opened

21 Feb

This week’s challenge is all about using a large aperture, shooting wide opened. You can see some examples of this technique using shallow depth of field here.

Aperture is one side of the exposure triangle and understanding it, and truly mastering it is so important to taking your photography to the next level. This is your chance to practice.

Evan Leeson

By Evan Leeson

Even if you do not have a lens that has f/1.4 or even f/2.8 you can still achieve a shallow depth of field. It also has to do with distance to subject, and focal length. So throw on a long lens and use the largest aperture you’ve got and just go do your best.

Here are a few examples using wide open apertures:

Premier-photo.com

By premier-photo.com

Mark Strozier

By Mark Strozier

Janet Ramsden

By Janet Ramsden

Alex

By Alex

Susana Fernandez

By Susana Fernandez

Share your wide opened images here:

Simply upload your shot into the comment field (look for the little camera icon in the Disqus comments section) and they’ll get embedded for us all to see or if you’d prefer upload them to your favourite photo sharing site and leave the link to them. Show me your best images in this week’s challenge. Sometimes it takes a while for an image to appear so be patient and try not to post the same image twice.

googletag.cmd.push(function() {
tablet_slots.push( googletag.defineSlot( “/1005424/_dPSv4_tab-all-article-bottom_(300×250)”, [300, 250], “pb-ad-78623” ).addService( googletag.pubads() ) ); } );

googletag.cmd.push(function() {
mobile_slots.push( googletag.defineSlot( “/1005424/_dPSv4_mob-all-article-bottom_(300×250)”, [300, 250], “pb-ad-78158” ).addService( googletag.pubads() ) ); } );

The post Weekly Photography Challenge – Wide Opened by Darlene Hildebrandt appeared first on Digital Photography School.


Digital Photography School

 
Comments Off on Weekly Photography Challenge – Wide Opened

Posted in Photography


Sigma goes wide with 24mm F1.4 DG HSM Art lens

10 Feb

With the CP+ tradeshow in Japan about to kick off, Sigma has unveiled a 24mm F1.4 DG HSM wide angle prime lens, joining its ‘Art’ series of premium glass. Designed to cover a full-frame sensor, it will be offered in Canon, Nikon and Sigma mounts with availability and pricing yet to be announced. Read more

Articles: Digital Photography Review (dpreview.com)

 
Comments Off on Sigma goes wide with 24mm F1.4 DG HSM Art lens

Posted in Uncategorized


Wide and Telephoto Lenses – What is the Difference?

09 Feb

In this Adorama TV video Joe McNally goes over some of the key differences between wide angle and long or telephoto lenses.

The lenses Joe mentioned in the video:

  • Nikon 20mm f/1.8
  • Nikon 200-400mm f/4
  • 600mm f/4

Of course there are Canon and other brand equivalents also.

Other dPS articles about lenses:

  • Writer’s Favorite Lens – the Canon 40mm Pancake Lens
  • Going Wide With the Tokina 11-16mm f/2.8
  • Lens Review Canon 300mm f4 Lens for Sports Photography
  • Lens Review Tamron SP 150-600mm f/5-6.3 Di VC USD

googletag.cmd.push(function() {
tablet_slots.push( googletag.defineSlot( “/1005424/_dPSv4_tab-all-article-bottom_(300×250)”, [300, 250], “pb-ad-78623” ).addService( googletag.pubads() ) ); } );

googletag.cmd.push(function() {
mobile_slots.push( googletag.defineSlot( “/1005424/_dPSv4_mob-all-article-bottom_(300×250)”, [300, 250], “pb-ad-78158” ).addService( googletag.pubads() ) ); } );

The post Wide and Telephoto Lenses – What is the Difference? by Darlene Hildebrandt appeared first on Digital Photography School.


Digital Photography School

 
Comments Off on Wide and Telephoto Lenses – What is the Difference?

Posted in Photography


Canon introduces 11-24mm f/4L USM wide angle zoom

07 Feb

Canon has added a new ultra-wide zoom to its EF lineup – the EF 11-24mm f/4L USM. The new lens offers the widest angle of view ever provided in a rectilinear full-frame DSLR lens, and uses 16 elements in 11 groups with a total of four aspherical elements for distortion control. Read more

Articles: Digital Photography Review (dpreview.com)

 
Comments Off on Canon introduces 11-24mm f/4L USM wide angle zoom

Posted in Uncategorized


Go wide! Hands-on with Canon’s 11-24mm F4 L

06 Feb

Canon’s new 11-24mm F4 L wideangle zoom lens has been a long time coming. Canon’s widest ever rectilinear zoom by some margin, the new 11-24mm may also challenge Nikon’s venerable 14-24mm F2.8 as the tool of choice for landscape, property and architectural photographers. We got our hands on a prototype recently at Canon’s US headquarters. Click through for a closer look

Articles: Digital Photography Review (dpreview.com)

 
Comments Off on Go wide! Hands-on with Canon’s 11-24mm F4 L

Posted in Uncategorized


Olympus Stylus 1 firmware update adds wide angle converter compatibility and interval shooting

16 Jan

Olympus has released v2.0 firmware for its OM-D styled premium compact camera, the Stylus 1, which will enable users to fit a wide angle converter to the lens. The update also introduces useful features like focus peaking, 35mm equiv. step zoom, interval shooting and time lapse modes. Read more

Articles: Digital Photography Review (dpreview.com)

 
Comments Off on Olympus Stylus 1 firmware update adds wide angle converter compatibility and interval shooting

Posted in Uncategorized


The Instax Wide 300, Big Bold Prints Instantly

12 Jan

Extra photos for bloggers: 1, 2, 3

Your bright smile and flashy style means making friends is easy, but you need a camera that can keep up.

Introduce your crew to the Instax Wide 300, a smart and classy cam ready to snap pics anytime and share real prints instantly!

Whether you’re out on an adventure, meeting new friends, or throwing a big ol’ party, the Instax Wide 300 will capture the moment and give you instant memories to print.

Easily load your camera with film, adjust lighting on the fly, snap pics, print and share!

With this fun new instant camera in tow, you’ll just need to make sure that you can keep up.

Imagine the Print-abilities
$ 129 at the Photojojo Shop


© Britta for Photojojo, 2015. |
Permalink |
No comment |
Add to
del.icio.us

Post tags:


Photojojo

 
Comments Off on The Instax Wide 300, Big Bold Prints Instantly

Posted in Equipment