RSS
 

Posts Tagged ‘wide’

Wider than wide: A landscape photographer’s thoughts on the Canon 11-24mm

06 May
The Canon EF 11-24mm F4L USM is a super wideangle zoom lens for Canon’s full-frame DSLRs, which can also be adapted for use on Sony Alpha a7 and a9-series full-frame mirrorless cameras.

Even though I’ve been writing for DPReview for over 4 years, I’ve never written any equipment reviews. And why should I? There are far better equipment experts, technical fanatics, pixel-peepers (I mean that in a good way!) and gear enthusiasts out there than me. My fields of expertise are different, and my writing consists mostly of photographic vision, composition, the philosophical aspects of photography and so on. I intend to stick to this line of writing, and for the most part, I’m happy to leave the equipment reviews to the experts.

That said, after shooting with the Canon 11-24mm F4L for a few months, it has proven to be such a game-changer that it has altered how I think about composition. And in a more general sense, it has changed my ability to take control over what is included in an image, and how these elements are arranged.

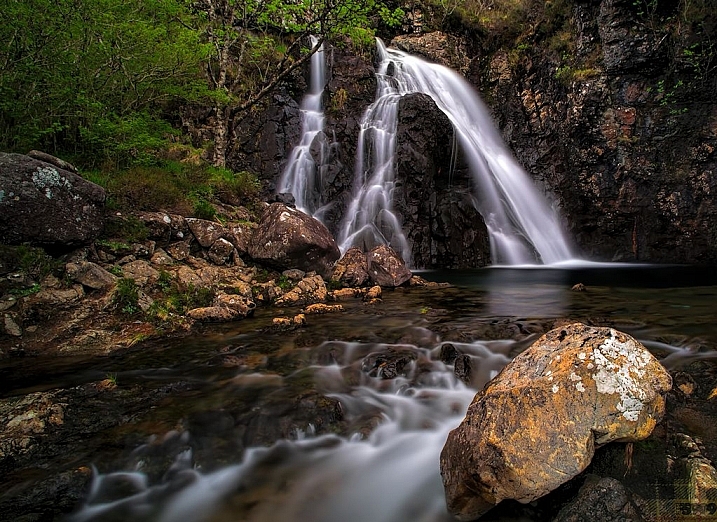
Goðafoss, Iceland at 13mm. The extra width allowed me to get closer to the edge and get a wider view while keeping all the elements I needed in the image, framing the waterfall, with enough space around them to avoid a crowded feel.

Canon EOS 5D Mark IV, Canon 11-24mm F4L
Nisi Filters 180mm ND + GND
F14, 13sec, ISO100

This will not be your regular gear review. I won’t be discussing sharpness (although trust me that this lens is very sharp), chromatic aberrations or barrel distortion. I will only be talking about composition, which is, in my opinion, the single most important ingredient to a successful photograph. I will present some images and explain what about the 11-24mm made them possible. I’ll also talk a bit about the downsides of this lens and the solutions to the problems it presents. 

So why? Why does a landscape photographer need an 11-24mm? Isn’t it just too darn wide? Is 11mm worth the size and the monstrous weight? Is it worth the hefty price tag? I have to admit that before shooting with it, I was in serious doubt. I was sure I’d leave it in the bag most of the time, taking it only on rare occasions when 16mm wasn’t wide enough. I thought that 16mm would be wide enough for 90% of my images, after all, I’ve been producing satisfactory shots until now – what good could a wider lens be?

I knew that when going wider, background subjects shrink significantly in size, which can hurt the composition. Moreover, in cases where 16mm wasn’t enough, I had a 14mm F2.8 which was excellent for night photography and for shooting in confined spaces. 

It turns out that I was wrong. The extra width proved to be extremely useful, much more than I had imagined. It allowed me to have much more control, to include more sky when I wanted to, to get closer to the foreground, to reveal more detail and create a greater sense of depth and more dramatic imagery. Let’s look at some examples.

An ice cave in Breiðamerkurjökull glacier, Iceland. Getting this composition in one shot with a narrower lens would have been impossible.

Canon EOS 5D Mark IV, Canon 11-24mm F4L
Focus stacked from 3 images at 11mm, F13, 15sec, ISO800.

The ice cave pictured above was magnificent, but it was also very cramped. I couldn’t walk upright in most of the spots I shot, and this stream was very small. The ice-crusted rock in the middle was tiny, and its details were so beautiful, I needed to get close in order to expose their intricacies. On the other hand, I needed to frame the different elements well, and in a balanced way that makes visual sense.

The cave’s ceiling is extremely important, since it’s the only subject of the frame which is part of the glacier, which basically IS the ice cave. It also contains wonderful melting patterns, and black, volcanic earth which gives extra texture and detail. 
On the bottom of the frame, there are two important elements: the ice-crusted rock in the middle of the stream, which is most definitely the centerpiece, but equally importantly the ice crusted banks on the bottom right. These serve to create the frame to the blurred water and to compositionally counterbalance the rock and the left-running stream.

In addition to the compositional aspect, I strongly feel that including all these elements serves to give the viewer a better sense of being in this incredible cave. This might be the strongest advantage of utilizing such a wide angle of view.

Without a super wide lens, I could still have included all of these elements. I could have achieved this in one of several ways.

Firstly, I could have moved back a little. This would indeed allow me to include all the different desired elements in the frame, but going backward would change the perspective significantly, shrinking the most important elements in the process, namely the ice crusted rock and the stream itself. That would hurt the composition a great deal.

Alternatively, I could have shot a panorama, using a tilt/shift lens or by moving the camera and lens. This would make the job much, much harder, since (a) it would require multiple stitching in addition to the already-challenging focus stacking and (b) shooting so close to the stream meant I constantly needed to wipe the lens dry, and the extra shooting time would mean much more wiping, Photoshop work and general headache.

The 11-24mm allowed me to shoot this as close to the rock as I needed to, in order to include all the detail I wanted to show while still framing the shot as I desired, all with only three shots to focus stack. I simply wouldn’t have been able to do that before I bought this lens. 

Let’s see another example from my Arctic trip earlier this year.

The amazing black and white sand patterns of Skagsanden Beach, Lofoten, Arctic Norway.

Canon EOS 5D Mark IV, Canon 11-24mm F4L
Nisi Filters 180mm ND + GND
Stacked from 4 images at 11mm, 0.8 sec, F13, ISO100

Again, this image would’ve been almost impossible without the 11-24mm, which allowed me to get very close and personal with the tree-like sand patterns, while being wide enough to shrink the background and include the whole mountain range in the frame. 

The Lofoten Islands are full of fjords with towering mountains rising out of them. Some mountains are so close to a water body, it’s extremely hard to include the entire thing in the frame without a truly wide lens. This is even more so when trying to include reflections.

Mount Stortinden reflecting in the calm Flakstad Fjord, Lofoten. I was standing about 1 km from this 850m tall mountain. Being so close, I couldn’t have included both the mountain and the reflection with a 16mm. It was easily done, however, with the 11-24mm.

Canon EOS 5D Mark IV, Canon 11-24mm F4L
Nisi Filters 180mm ND + GND
11mm, F11, 0.5 sec, ISO100

Last but not least, the 11-24 is an almost perfect tool for night photography. The maximum aperture of F4 is a limit, but then again, it’s easier having the foreground in focus at F4, plus the monstrous angle of view allows one to expose marginally longer without getting the stars or Northern Lights blurred.

Let’s see an example from an incredible night of Aurora in Lofoten. The super wide angle allowed me to include a huge chunk of the sky, showing the wonderful patterns and lines in addition to the mountains and the moving waves. I could also expose for 8 seconds, which is considered a bit long for this kind of strong Auroral activity. To be honest, the lights blew up a few seconds before I took this shot, and I should’ve exposed for less time, but the amount of blur is not a big issue and the Aurora is still well defined.

Beautiful Aurora in Skagsanden Beach, Lofoten, Arctic Norway.
Canon EOS 5D Mark IV
Canon 11-24mm F4L
11mm, F4, 8sec, ISO1600

Here are a few more examples of Aurora shot with the 11-24mm.

Stacked from 2 images at 11mm, F4, 8sec, ISO3200 Stacked from 2 images at 11mm, F4, 13sec, ISO3200
11mm, F4, 5sec, ISO1600 11mm, F4, 8sec, ISO3200

I hope you’re convinced of this lens’ advantages. What about the downsides?
For me, the greatest disadvantage is the inability to fit regular filters in front of the huge front element. I’m used to popping my 100mm system out of the bag and putting it in front of any lens. Not this one.

The only solution I currently know of which covers the whole width of this monster is the Nisi Filters 180mm system (proper disclosure: Nisi gave me the holder and some filters to try out). These filters are not cheap, but they are well made and have superb optical quality. The problem is that together with the mounting system, they are big and heavy, and don’t allow a photographer to be as spontaneous as with a 100mm system. I still like the system very much and I’ve achieved good images with it. If you’re into using filters with the 11-24, I highly recommend it.

As to the size, weight and price – simply put, it is what it is. If you need this type of lens, or if you can extract any type of value out of it, there is not much choice, is there? You need to weigh the advantages and the disadvantages and make up your own mind. You can also leave the lens at home if it’s not really necessary or if the weight is too much for a specific project (for example, on my recent Patagonia hiking trip, I chose not to lug it around due to the weight, and opted for the lighter 16-35mm). In my opinion, the answer is clear: if you’re an avid landscape photographer, don’t wait – get this lens, you won’t regret it.


Erez Marom is a professional nature photographer, photography guide and traveler based in Israel. You can follow Erez’s work on Instagram, Facebook and 500px, and subscribe to his mailing list for updates.

If you’d like to experience and shoot some of the most fascinating landscapes on earth with Erez as your guide, you’re welcome to take a look at his unique photography workshops around the world:

Land of Ice – Southern Iceland
Winter Paradise – Northern Iceland
Northern Spirits – The Lofoten Islands
Giants of the Andes and Fitz Roy Hiking Annex – Patagonia
Tales of Arctic Nights – Greenland
Saga of the Seas and The Far Reaches Annex – The Faroe Islands
Desert Storm – Namibia

Selected Articles by Erez Marom:

  • Parallelism in Landscape Photography
  • Behind the Shot: Dark Matter
  • Mountain Magic: Shooting in the Lofoten Islands
  • Behind the Shot: Nautilus
  • Behind the Shot: Lost in Space
  • Behind the Shot: Spot the Shark
  • Quick Look: The Art of the Unforeground
  • Whatever it Doesn’t Take
  • Winds of Change: Shooting changing landscapes
  • On the Importance of Naming Images
  • On Causality in Landscape Photography

Articles: Digital Photography Review (dpreview.com)

 
Comments Off on Wider than wide: A landscape photographer’s thoughts on the Canon 11-24mm

Posted in Uncategorized


Lensrentals proposes ‘Roger’s Law of Wide Zoom Relativity’

31 Mar
Trippy stuff – this is MTF data from nine copies of the Canon EF 16-35mm F2.8L II, at 16mm. Nice and sharp in the center, less so at the edges. That said, all nine of these lenses test as ‘good’ samples. 

Arch lens nerd Roger Cicala has probably handled more lenses this week than an average photographer might use in a lifetime. And recently, he’s been busy testing multiple copies of several popular wideangle zooms to try and prove what he calls ‘Roger’s Law of Wide Zoom Relativity’.

Simply stated, Roger’s ‘law’ states that wideangle zoom lenses are virtually always sharpest at the wide end of their zoom range, softening as the lens is zoomed. Although many of us have often wondered whether this is the case, Roger’s exhaustive testing proves that it holds true over multiple copies of several modern lens designs, all the way from Nikon’s 14-24mm F2.8 to Canon’s stunning new 16-35mm F2.8L III.

Averaged MFT charts for nine copies of Nikon’s 24-70mm F2.8VR on the left, and data from the older 27-70mm F2.8 on the right. Advances in lens design are obvious from increased sharpness and better consistency across the zoom range. 

What does this mean for the average enthusiast photographer? Just that if you’re the kind of shopper that obsessively tests and returns lenses which aren’t up to your requirements (cough, cough – Rishi…) you can save a lot of time by only testing the wide end. 

Also of interest is just how good some modern lens designs are. Compared to its predecessor, the new Canon 16-35mm F2.8L III’s MTF charts are extraordinary. Likewise Nikon’s 24-70mm F2.8 VR, compared to the lens it replaced.

Thanks as always, Roger, for testing nine copies of everything so that we don’t have to.

Read Roger Cicala’s full blog post at LensRentals.com

Articles: Digital Photography Review (dpreview.com)

 
Comments Off on Lensrentals proposes ‘Roger’s Law of Wide Zoom Relativity’

Posted in Uncategorized


Rokinon 20mm F1.8 and Cine DS 20mm T1.9 Full Frame Super Wide Angle lenses now available

30 Dec

Rokinon has announced the launch of its new Rokinon Digital Photo 20mm F1.8 and Cine DS 20mm T1.9 Full Frame Super Wide Angle lenses. Both lenses are made from high-strength aluminum alloy and feature a super-wide 94.8-degree view, a non-rotating 77mm filter mount, Rokinon’s Ultra Multi-Coating, and a quiet, smooth focusing control.

These prime lenses, say Rokinon, offer both fast aperture and ‘the full frame perspective of 20mm,’ offering a solution that falls between the maker’s similar 14mm and 24mm models. These 20mm lenses have a 7.9in / 0.20m minimum focusing distance, 13 elements in 12 groups, three extra-low dispersion elements, and a pair of aspherical elements.

In addition to the ‘common’ features shared between the lenses, the Cine DS lens features geared aperture and controls, a de-clicked aperture control ring, and dual right/left side distance and t-stop scales. 

The Digital Photo lens is available for Canon, Nikon AE, Sony E, Micro Four Thirds, Pentax K, and Fuji X mounts (MSRP $ 599), while the Cine DS lens ($ 799 on B&H Photo) is available for Canon, Nikon, Sony E, and Micro Four Thirds mounts.

Articles: Digital Photography Review (dpreview.com)

 
Comments Off on Rokinon 20mm F1.8 and Cine DS 20mm T1.9 Full Frame Super Wide Angle lenses now available

Posted in Uncategorized


Going wide: Irix 15mm F2.4 sample gallery

02 Oct

Swiss company Irix recently released two versions of their 15mm F2.4 prime to the consumer market. The Irix 15mm is offered in two varieties: ‘Blackstone’ and the ‘Firefly.’ The Irix Blackstone features a magnesium and aluminum body able to withstand ‘extreme conditions,’ while the Irix Firefly model is, according to the company, the lightest lens in its class. Both versions of the lens are available in Canon EF-, Nikon F- and Pentax K-mount. 

The lens is composed of 15 elements in 11 groups and produces a really nice sunstar and some, well, very interesting lens flare. Interestingly enough although the lens states its widest aperture is F2.4, the best we could do on the Canon 5DS R was F2.5. In any case we put the lens to the test over a few weeks of shooting and here are the results. 

Irix 15mm F2.4 real-world sample gallery

Articles: Digital Photography Review (dpreview.com)

 
Comments Off on Going wide: Irix 15mm F2.4 sample gallery

Posted in Uncategorized


Weekly Photography Challenge – Wide Angle

13 Aug

Shooting with a wide angle can be challenging – to create an image that is engaging and has a good focal point. Check out these examples.

Magnus Wrenninge

By Magnus Wrenninge

Aotaro

By aotaro

Weekly Photography Challenge – Wide Angle

Here is some help for you if you need ideas:

  • Wide Angle Versus Telephoto Lenses for Beautiful Landscape Photography
  • How to Use a Wide-angle Lens with Wildlife for a New Perspective
  • How to Create Compelling Wide-Angle Portraits Using One Off-Camera Flash
  • 10 Tips for Photographing Wide-Angle Landscapes
  • How to Use a Wide-Angle Lens for People Photography
Lee

By lee

Mariusz Kluzniak

By mariusz kluzniak

Giuseppe Milo

By Giuseppe Milo

Share your images below:

Simply upload your shot into the comment field (look for the little camera icon in the Disqus comments section) and they’ll get embedded for us all to see or if you’d prefer upload them to your favourite photo sharing site and leave the link to them. Show me your best images in this week’s challenge. Sometimes it takes a while for an image to appear so be patient and try not to post the same image twice.

Share in the dPS Facebook Group

You can also share your images on the dPS Facebook group as the challenge is posted there each week as well.

googletag.cmd.push(function() {
tablet_slots.push( googletag.defineSlot( “/1005424/_dPSv4_tab-all-article-bottom_(300×250)”, [300, 250], “pb-ad-78623” ).addService( googletag.pubads() ) ); } );

googletag.cmd.push(function() {
mobile_slots.push( googletag.defineSlot( “/1005424/_dPSv4_mob-all-article-bottom_(300×250)”, [300, 250], “pb-ad-78158” ).addService( googletag.pubads() ) ); } );

The post Weekly Photography Challenge – Wide Angle by Darlene Hildebrandt appeared first on Digital Photography School.


Digital Photography School

 
Comments Off on Weekly Photography Challenge – Wide Angle

Posted in Photography


15 Expansive Wide Angle Images

12 Aug

Wide angle lenses provide a very different view of the world than what your eye sees. They are inclusive, meaning the viewer feels like they are included in the image – like they could step into it.

These photographers have used the wide angle optics to great advantage – see if you enjoy them as much as I did:

Dave Wild

By Dave Wild

Stròlic Furlàn - Davide Gabino

By Stròlic Furlàn – Davide Gabino

Indigo Skies Photography

By Indigo Skies Photography

Meg

By meg

David Tomic

By David Tomic

Mark Iocchelli

By Mark Iocchelli

Giuseppe Milo

By Giuseppe Milo

Stròlic Furlàn - Davide Gabino

By Stròlic Furlàn – Davide Gabino

Pablo Fernández

By Pablo Fernández

Guillaume DELEBARRE (Guigui-Lille)

By Guillaume DELEBARRE (Guigui-Lille)

Paulo Valdivieso

By Paulo Valdivieso

Lenny K Photography

By Lenny K Photography

Fs999

By fs999

Fs999

By fs999

Emmanuel Huybrechts

By Emmanuel Huybrechts

googletag.cmd.push(function() {
tablet_slots.push( googletag.defineSlot( “/1005424/_dPSv4_tab-all-article-bottom_(300×250)”, [300, 250], “pb-ad-78623” ).addService( googletag.pubads() ) ); } );

googletag.cmd.push(function() {
mobile_slots.push( googletag.defineSlot( “/1005424/_dPSv4_mob-all-article-bottom_(300×250)”, [300, 250], “pb-ad-78158” ).addService( googletag.pubads() ) ); } );

The post 15 Expansive Wide Angle Images by Darlene Hildebrandt appeared first on Digital Photography School.


Digital Photography School

 
Comments Off on 15 Expansive Wide Angle Images

Posted in Photography


Tokina AT-X 11-16 Pro DX II Review: Best Value from Wide Angle

29 Jun

Tokina 11-16mm f2.8 is an ultra wide angle lens for crop sensor camera bodies (DX) with a moderately fast constant aperture of f2.8. It is Tokina’s top of the line lens (AT-X) with an internal focusing (IF) and Super-low Dispersion glass (SD). It is available in Canon, Nikon and Sony A mounts. Due to its focal length and fast aperture, Continue Reading

The post Tokina AT-X 11-16 Pro DX II Review: Best Value from Wide Angle appeared first on Photodoto.


Photodoto

 
Comments Off on Tokina AT-X 11-16 Pro DX II Review: Best Value from Wide Angle

Posted in Photography


Tokina AT-X 11-16 Pro DX II Review: Best Value from Wide Angle

09 Jun

Tokina 11-16mm f2.8 is an ultra wide angle lens for crop sensor camera bodies (DX) with a moderately fast constant aperture of f2.8. It is Tokina’s top of the line lens (AT-X) with an internal focusing (IF) and Super-low Dispersion glass (SD). It is available in Canon, Nikon and Sony A mounts. Due to its focal length and fast aperture, Continue Reading

The post Tokina AT-X 11-16 Pro DX II Review: Best Value from Wide Angle appeared first on Photodoto.


Photodoto

 
Comments Off on Tokina AT-X 11-16 Pro DX II Review: Best Value from Wide Angle

Posted in Photography


Fast Glass: Tips for Working With Wide Aperture Lenses

29 May

As photographers, many of us become infatuated with new gear, such as a new flash, tripod, or lens. We scrimp and save our money, and go off to the camera store to purchase that new lens we’ve had our eye on, most times satisfied with whatever new piece of kit has found its way into our bag. Sometimes, though, it happens that for some reason that new gear we’ve spent our hard-earned money on doesn’t live up to our expectations.

Shallow depth of field

Fast lenses enable the photographer to use shallow depth of field creatively. A 24mm f/1.4 lens, shot at f/1.4 was used for this image.

It may be that it was overhyped, or it doesn’t suit your workflow. There are occasions, however, when a piece of gear has a learning curve attached to it that needs to be solved before you can fully enjoy it. One such item that seems to have that learning curve attached, is a fast lens (one with large maximum aperture).

At some point, we all begin dreaming of fast (large aperture) lenses. For the purpose of this article, I’m going to define fast lenses as ones with maximum apertures wider than f/4.

Fast lenses are great for a lot of things, shooting in low light being one of the major advantages, because the wider aperture allows more light into the imaging sensor, which in turn allows you to use a faster shutter speed. This is why lenses like the 70-200mm f/2.8 are such a workhorse in a photojournalist’s camera bag. Another advantage to the wider aperture is the ability to create shallow depth of field in your image, which can make your subject really stand out from the background. The 85mm f/1.4 is one of my go-to lenses for almost any portrait situation for just that ability.

Focus on the eye

When photographing portraits, focusing on the closest eye is ideal when using shallow depth of field.

That all sounds great, right? But it’s that last point regarding shallow depth of field which seems to create the biggest problems for most photographers, who are new to using a fast lens. I often hear of photographers complaining about a lack of sharpness in their lenses, and more often than not, the issue crops up when the photographer is using a fast lens.

It may be a portrait photographer trying to use an 85mm f/1.8 wide open, or someone doing street photography with a 35mm f/1.4, and for some reason there’s a lack of sharpness to the image that will invariably be blamed on the lens. In my 20 years in photography, I’ve owned and worked with a lot of gear – 0ver a dozen different camera bodies, and several dozen lenses I’ve used at one point or another. I can honestly say that I have never once had one come straight out of the box brand new, and not be in perfect working order, so treat that option (that the lens is faulty) as a last resort for now.

Understanding Depth of Field

In addition to their low light capabilities, many photographers purchase fast lenses simply because of the ability to shoot with a shallow depth of field. When used creatively, a lens with a large aperture used wide open, allows you to be very selective in what you show the viewer, and what you hide in soft out of focus areas, known as bokeh.

However, it’s very important to understand that depth of field works differently dependent on the lens you are using. For instance, a lens such as the Nikon 85mm f/1.4 will have paper thin depth of field when used at f/1.4, at close distances to the subject. As the subject moves further away from the camera, that depth of field becomes a little greater. But at the minimum focusing distance, you could focus on an eyelash on your subject, and still have the eyeball be out of focus, despite the fact it’s only half an inch behind the eyelash. Assuming you don’t want to back up and change the framing on your subject, the best way to ensure sharp focus on the eye, is to choose a focus point on the eye and be careful it does not accidentally focus on an eyelash.

If you are willing to sacrifice a bit of that shallow depth of field, simply stop down a bit to give yourself some leeway on where you focus. While at f/1.4 or f/1.8 you may not be able to get both the eyelash and the eye in focus, but at f/2.2 or f/2.8, you’ll likely have enough depth of field to achieve sharp focus on both.

hyperfocal distance

Using a 24mm f/1.4 lens wide open, setting the focus distance to the hyperfocal distance, allows you to get greater depth of field even when photographing wide open.

Even on wide angle lenses, such as a 24mm f/1.4 or 35mm f/1.4, which have inherently (seemingly) greater depth of field due to the nature of wide angle lenses, you’ll still notice some issues arising due to the use of a wide open aperture. If you can step back from the subject, you can increase the perceived depth of field since you’ll be focusing further away. You can calculate how far away you need to be by using a hyperfocal distance calculator.

The hyperfocal distance is the closest distance at which a lens can be focused, while still keeping objects at infinity acceptably sharp. In the shot of the upended bus at night, knowing the bus was about 30 feet away, I calculated the near limit of focus for the lens I was using at about 18 feet and the far limit was 91 feet, meaning anything past that distance would still be out of focus at f/1.4. By focusing at the hyperfocal distance of 44 feet, I knew the bus would fall into the area of sharp focus, while still keeping the stars in sharp focus. This is true because the hyperfocal distance is where everything from that distance to infinity falls within your depth of field, and everything from the hyperfocal distance to the point halfway between the camera and that distance, also falls within your depth of field.

Unfortunately, it’s not always possible to focus at the hyperfocal distance. For instance, photographing at a party in a dimly lit room, you may notice some areas out of focus due to the shallow depth of field. The fix here is to  stop down a bit if you can. If you need more light, consider using a flash if appropriate, and stopping down the lens to give greater depth of field. Another option is to raise the ISO a bit to allow you to stop down the aperture more.

You may find yourself saying, “I didn’t purchase a fast lens to use it at a smaller aperture!” While that may be true, if you find yourself unable to capture sharp images due to the shallow depth of field, stopping down is the best solution. Please keep in mind, I’m not talking about a lens that just isn’t sharp. I’m talking about a lens that, due to its fast aperture, isn’t capable of capturing the depth of field needed to keep everything that you want sharp in focus.

Choosing Your Focus Point

choose a focus point

When it is critical to focus on a specific area in the image, choosing the correct focus point will ensure sharp focus where you want it, even when using a wide aperture with shallow depth of field.

One of the best things you can do when using a fast lens, is to ensure you’re focusing precisely where you think you are focusing. You want to be sure your camera is set to allow you to manually choose a focus point. By manually selecting a focus point, you can ensure the camera focuses on what you think it should. Most cameras default focus point selection method is automatic. In this mode, the camera will generally try to focus on the nearest object with detail that is covered by one of the focus points. Allowing the camera to choose can be a recipe for disaster, since quite often, the nearest object with detail is not what you want to focus on.

One of the best things you can do as a photographer is take control of where your camera is focusing by selecting the focus point that you want, and ensuring that the focus point you choose is on the subject you want to be sharp. Cameras today have multiple focus points, with some having as many as 61 AF points. While it’s true that generally speaking the center point will be the most accurate of those points, technological advances have made the points along the outer edge much more accurate than in the past. This means that you can choose those outer focus points with confidence when composing your image.

Focus on the eyes

Using shallow depth of field on a portrait allows the photographer to focus on the eyes, and lets the rest of the body fall out of focus. An 85mm f/1.2 lens was used here.

Another related problem to the camera choosing the wrong AF point, is photographers employing a technique known as focus and recompose. This technique came about back when cameras only had a few AF points bunched around the center of the viewfinder. In many situations, it’s not a problem, as long as you are using an aperture that will provide adequate depth of field to maintain focus on the object or person you’ve focused on.

However, when using a fast lens, at a wide open aperture, focusing and then recomposing your shot becomes a real problem. This is because when using a fast lens at a wide aperture, the depth of field is so thin, that recomposing the shot will actually shift the plane of sharp focus away from the subject you initially focused on. So while you may have focused on the correct subject, using the center AF point, in adjusting your composition you knocked your subject right out of focus again. The solution for this issue is the same as above: manually select an AF point that you can place right on top of your subject, without recomposing your shot.

Embrace the Bokeh

shallow depth of field

Shallow depth of field can be used to create interesting effects and force your viewers to look where you want them. This image was made with a 70-200mm lens at f/2.8.

Lastly, in answer to those who bought fast glass to shoot it wide open, I say – embrace the bokeh! Bokeh is defined as the visual quality of the out of focus areas of an image, and each lens renders these areas a bit differently. Fast lenses typically have beautifully smooth bokeh.

Compose your shots so that the shallow depth of field is used creatively. To do this, you’ll need to understand what you can and can’t do when shooting wide open. Knowing that you will have a shallow depth of field, you’ll want to avoid stacking subjects at different distances. Create compositions that contrast sharp areas, with out of focus areas. Use that contrast to highlight certain objects within your frame, and by the same token, hide other objects by causing them to be drastically out of focus.

Highlight an object using shallow depth of field

Using shallow depth of field allows you to highlight one object in sharp focus against a blurry background. This image was made with an 85mm f/1.2 lens.

Images created using shallow depth of field force your viewers to look where you want them to, because the eye is naturally drawn to areas of sharp focus. By using proper focusing techniques, you can ensure the image you see in your mind is the one you capture, and by understanding how the lens will handle depth of field, you can ensure that you’ll know to stop down when you need to for added depth of field, avoiding the mistake of having an important part of your image out of focus.

What’s your favorite fast lens to work with and why?

googletag.cmd.push(function() {
tablet_slots.push( googletag.defineSlot( “/1005424/_dPSv4_tab-all-article-bottom_(300×250)”, [300, 250], “pb-ad-78623” ).addService( googletag.pubads() ) ); } );

googletag.cmd.push(function() {
mobile_slots.push( googletag.defineSlot( “/1005424/_dPSv4_mob-all-article-bottom_(300×250)”, [300, 250], “pb-ad-78158” ).addService( googletag.pubads() ) ); } );

The post Fast Glass: Tips for Working With Wide Aperture Lenses by Rick Berk appeared first on Digital Photography School.


Digital Photography School

 
Comments Off on Fast Glass: Tips for Working With Wide Aperture Lenses

Posted in Photography


Go wide or go home: Voigtlander 15mm Super-Wide-Heliar lens gallery

18 May

Sony shooters took note in October when Voigtlander announced it would release three ultra-wide-angle primes for full-frame E-mount cameras. When we managed to borrow a 15mm F4.5 Super-Wide-Heliar for a few days, we handed it right over to DPR staffer and veteran landscape photographer Chris Williams. Read some quick impressions on the lens and take a look at a small selection of his images.


As a professional landscape photographer I’ve shot a number of wide-angle lenses and to say that I was impressed by the Voigtlander 15mm prime is a bit of an understatement. The lens excels in sharpness throughout the frame and maintains a high level of performance across nearly every aperture. Being that it is a super wide prime, it does suffer from barrel distortion (as most ultra and super wides do) but the amount of lens that you get for the money is impressive.

Chromatic aberration really only becomes apparent wide open where the corners also tend to soften up a bit. Overall the lens performed very well, so well in fact that I may pick one up for myself at some point.

The other really nice thing about the Voigtlander 15mm is that it accepts traditional screw on filters. The Tokina 16-28mm F2.8, Nikon 14-24mm F2.8 and the Canon 11-24mm F4L all require external filter systems like those designed by Fotodiox. The Voigtlander accepts standard 58mm threaded filters, which is rare for a prime (or even a zoom) this wide.

Articles: Digital Photography Review (dpreview.com)

 
Comments Off on Go wide or go home: Voigtlander 15mm Super-Wide-Heliar lens gallery

Posted in Uncategorized