RSS
 

Posts Tagged ‘Ways’

5 Ways to Strengthen the Message and Story of Your Photographs

12 Jul

A Guest Post by Sergey Sus/

Photographers decide what is in the frame and what is not. We cant always control every single item the frame. We can however, control of position relative to the subject and when we press the shutter button. Here are 5 ways to to improve our photographs.

Obvious Subject

Ways 1

Our brains analyze what the eye sees instantly. The subject and story of a photograph must be identified quickly by the viewer. If the viewer cant figure out what the subject is…. all interest is lost.

Brightest

Our depth perception of a photograph creates a 3D effect. The brighter objects appear nearer, darker objects recede further back. If the subject is ‘near’ to the viewer it has to be brighter then the rest of the frame. Dodging in post processing accentuates the subject while burning recedes.

Sharpness

Ways 2

Human brain focuses on sharp items in a photograph next. Photos with shallow depth of field are so pleasing to our eyes – we dont need to search for a subject as its the only sharpest part of the photo.

Size

The largest item in a photo – and our eyes go straight to it as we begin to ‘digest’ the photo. It is possible to have the subject as the smallest item in the picture, what then? Make it the sharpest and brightest!

Color

Ways 3

The 3 primary colors Red, Green and Blue – the colors which are noticed first. When photographing people outside in a park – get as little of the 3 primary colors in the frame. Sounds easy? Well, when in a park green and blue are unavoidable. If those colors are minimized and then desaturated in post the subject will stand out more in the final photograph.

Sergey Sus is a Los Angeles based photographer telling telling real stories, individual, professional and family. Problem solver, artist and teacher. His work can be found on http://www.sergeys.us/.

Post originally from: Digital Photography Tips.

Check out our more Photography Tips at Photography Tips for Beginners, Portrait Photography Tips and Wedding Photography Tips.

5 Ways to Strengthen the Message and Story of Your Photographs


Digital Photography School

 
Comments Off on 5 Ways to Strengthen the Message and Story of Your Photographs

Posted in Photography


Five Ways to Get In with the Photo Community

21 Jun

[Today’s guide comes from rad photographer and Photojojo buddy, Helena Price!]

If you’re a photographer or aspiring photographer-to-be, building community with other photogs is an essential part of getting your work noticed and building your name in the photo world.

Before being a full-time freelance photographer, I built communities for companies and products for a living, and I’ve been an active part of communities ranging from tech to food to photography.

I’ve distilled down everything I’ve learned over the years into the five fundamental ways to start building and connecting with a photo community.

What is the “photo community,” you ask? It’s however you define it. It’s a big social web of photographers, both online and offline, who know each other, inspire each other, and help each other make the best work they possibly can.

You should most definitely be a part of it, and here’s how.

How to Connect with the Photo Community

p.s. Wanna boost your creativity? Our pals at Maine Media are offering some way cool photography and filmmaking workshops designed for just that.

1) Do some research.

before There are many kinds of photo communities out there, big and small. It’s up to you to decide what part of the photo community you’d like to surround yourself with and why. Is it pro photogs with big fancy cameras? Is it Instagrammers? Is it people in your own town? People who love photographing food, or skateboarding, or music? Go after whatever interests you the most, and see where it takes you.

2) Find your inspiration.

beforeThe easiest way to do this is on the interwebs. Follow folks who create work that inspires you. How to find them, you ask? There are many ways, ranging from googling “awesome food photographers,” to browsing Tumblr’s photographer spotlight or Instagram’s suggested user list. Subscribe to their feeds, watch the way they create and post their work, and take good notes.

3) Go make some stuff.

before For every moment you spend networking, you need to spend double the moments making things. Your photo inspirations are who they are because of the work they’ve created, so go take that inspiration and make some work of your own. By constantly improving and sharing your craft, you’re constantly increasing the likelihood that other people will find and like your work too.

4) Support others.

beforePhoto karma is real. In all communities, what you put in will often dictate what you receive down the line. Go like people’s work. Leave genuine, attentive, supportive comments. Don’t post asking for likes or follows, because that’s not what this is all about (and if you haven’t realized by now, people really hate that). Help people spread the word about their projects and exhibitions. If you’re a supportive member of the community and making great work of your own, people will notice you and you’ll soon find support coming back your way.

5) Reach out and say hi.

beforeThe easiest way to connect with people in the photo community is to simply send them a note. Find three (or more!) people whose work you love, send them an email/message/comment, and tell them you dig their work. But not in a “I love you FOLLOW ME CHECK OUT MY GALLERY” kind of way. In a genuine, I’m-not-asking-anything-in-return kind of way. You will not only make the recipient’s day, but that person will likely remember your name for a long time to come.

Have any other tips to add? Tweet them at us at @photojojo!

Related posts:

  1. 10+ Awesome Ways to Upcycle Vintage Photo Gear Extra photos for bloggers: 1, 2 They say one man’s…
  2. Two Great Ways to Publish Your Own Magazine June’s Photojojo made possible by… ~Have a cool photo product…
  3. Ten Ways To Look Fabulous in Pictures Photojojo is hiring! We’re hiring!Photojojo is looking for a creative,…


Photojojo

 
Comments Off on Five Ways to Get In with the Photo Community

Posted in Equipment


10 Easy Ways To Take Candid Photos of Kids

14 Jun

Catching kids behaving in their most natural manner and playing with other kids almost guarantees a great photograph. However, one thing you should never let happen while shooting your kids is the children looking at the camera as it will spoil the whole atmosphere. You only want to capture the innocence, warmth, silliness and sweetness of them and it is Continue Reading

The post 10 Easy Ways To Take Candid Photos of Kids appeared first on Photodoto.


Photodoto

 
Comments Off on 10 Easy Ways To Take Candid Photos of Kids

Posted in Photography


Unposed Posing: A few Tried and True Tips for Photographing Families in Natural and Fun Ways

03 Jun

by Lynsey Peterson.

Pose

verb: to present oneself insincerely
noun: a deliberate pretense or exaggerated display

I’m not a fan of posed portraits. I’m not even a fan of the word. Insincere exaggerated pretense is not how I want my images to look. I want honest responses, full-body laughter, and spills of emotion. A posed portrait maybe has a place in this world, but I am banking on my client’s children and my own children wanting to look back at pictures from their childhood and see their real reactions and meaningful expressions. You can’t get that in a pose. But you can get it in a set-up.

I use a couple tried and true set-ups every time I do a family shoot. I used to worry that all of my work would start looking the same and I would be known as the photographer that always takes pictures that look like this or that and nothing more. What I have realized though is when the ingredients are different, the end result never looks the same. Families bring their own energy to a shoot and even if I do the same “pose”, if I do it well and give it my all, it will never look the same as another family doing the same thing. To best illustrate this I am showing three different families doing the very same set-up.

Secrets don’t make Friends

SECRETS1 1

SECRETS2 1

SECRETS3  

But they do make for good pictures. The Set-Up: ask anyone in the picture to tell anyone else a secret. Honestly it doesn’t matter who because often it isn’t the secret shot itself that you are going for, but rather the reaction of said secret. Every once in a while I get a kiddo that doesn’t understand what a secret is or how to do it and when this happens I just tell them to lick their brother/sister/moms ear. Which would totally gross me out personally, but usually gets met with fits of hysterical laughter and there ain’t nothing bad about photographing that instead.

Line ‘Em Up

LINE1 1

LINE2

LINE3 1[LINE1]

Like crows on a clothesline. The Set-Up: with a younger family, I get away with asking everyone to hold hands. Once kids get a little older, I just have everyone get on the same level. This takes on a different direction every time: a running contest, a stadium-style wave, a monkey swing. The goal is always interaction. And if that isn’t happening on it’s own, I find it’s never a bad idea to bust into song. Everyone likes a serenade. 

Surprise Attack

SURPRISE1 1

SURPRISE2 1

SURPRISE3 1

Kids take great delight in getting to run up behind their unknowing big people and surprise hug/tackle them. The Set-Up: if kids are too young to understand this or too old for it to work without being awkward, reverse it and have parents do the sneak attack. I usually save this for the end of a shoot because sometimes it can get a little crazy. Though my photography business has still never caused an emergency room visit. That I know of.

Kid Sandwich

SANDWICH1 1

SANDWICH2 1

SANDWICH3 1

Grown-ups are bread, kids are peanut butter and jelly. Or, pickles and prosciutto. (I’ve photographed some very sophisticated young folks.) The Set-Up: Depending on size and age of kids, have parents bookend the little people and either pick-up kids and smash everyone together, or just get low enough to make it work. If there are more kids than adults, this can get really funny but it’s quick. Be ready and consider being a bit lower than you usually would, as the pull of gravity is heavy here because the kids likely are too.

Giant Hug

HUG1 1

HUG2 1

HUG3 1

Now is probably a good time to mention that I get laughed at a lot. Usually 95% of what I ask people to do for photos is met with a sweet but certain: “I absolutely will not do that.” I just ignore that. Because they always do in the end. No one has ever flat-out refused and told me no when it comes down to it. Which may be something I should factor into my personal relationship issues, but that’s a different article. The Set-Up: This typically works best when you ask a grown-up to have REALLY BIG ARMS and hug everyone at the same time. Sometimes this requires encouragement and you have to think of yourself as a little hugging cheerleader. When I have to do this, I am just grateful that there is no one videoing my crazy hand motions and the way my voice gets squeaky.

Randomness

RANDOM1 1

RANDOM2

RANDOM3

My goal for each shoot is to do something random that I have never done before. When doing this, don’t over think it. It will work or it won’t; those are the only two options. If it works, great! You have a new idea. If it doesn’t work, great!

Now you know to never try that again and hopefully no one was sent to the emergency room in the process. The Set-Up: This is a good time to really shoot for the moon, knowing that it’s nothing more than a bonus. It honestly could be anything. Be brave and ask for something new—you’ll know pretty quickly if it’s going to work and there is nothing wrong with it not working—just know to move on.

These ideas, as with any type of lifestyle photography posing are about the reaction, not the concept itself. Shooting digitally allows us the ability to shoot constantly; keep the expectation open and allow the moment to play for itself. And have a funny song in your back pocket just in case.

Check out more of Lynsey Peterson’s work on her website.

Post originally from: Digital Photography Tips.

Check out our more Photography Tips at Photography Tips for Beginners, Portrait Photography Tips and Wedding Photography Tips.

Unposed Posing: A few Tried and True Tips for Photographing Families in Natural and Fun Ways


Digital Photography School

 
Comments Off on Unposed Posing: A few Tried and True Tips for Photographing Families in Natural and Fun Ways

Posted in Photography


Top 10 Ways to Get the Most Out of the New Flickr

25 May

Earlier this week, Flickr rolled out the most significant changes to their service since purchased by Yahoo back in 2005.

In addition to a major web redesign and a new Android app, Flickr also changed the basic fee structure of their account types and storage limits.

Former Pro users are being allowed to retain their $ 24.99 year fee structure for unlimited, ad free service. If you are a Pro account user, nothing changes if you want to keep it.

Free account users were all given 1 terabyte of free high res photo storage. Free accounts are still ad supported, as they have been in the past, but now you are no longer limited to only viewing your 200 most recent uploads to the site.

Despite the typical torch and pitchfork mob rage emanating from the Flickr Help Forum*, (a group of super negative Flickr users representing less than .01% of all Flickr users), I’ve found over the past week that engagement on my own photos is up dramatically. More specifically, based on my Flickr stats page, engagement (as measured by comments and favorites) is up approximately 294% on my own photos since the new release.

*Dear Marissa Mayer, PLEASE, give us the ability to block users on Flickr, it would make it a much nicer place for those of us who want to enjoy it. :)

I have no way of knowing, more broadly speaking, if the stats numbers look this good for Flickr in general, but if they do, I suspect that they are very happy indeed with the success of this week’s new features.

This post is not meant to be a debate about the new changes; this post is for those of you who are ok with the site design and are now looking for ways to get the most out of it.

On with the list.

Tip #1, Make The Last Photo You Upload in a Batch Count

1. Consider a strategy for uploading your batches of photos. I upload two batches of photos to Flickr a day — one in the morning and one in the evening. Your upload strategy and the ordering of your batch uploads matters. With the new Flickr redesign, photos on the flickr.com homepage are really, really, big. Big photos get far more engagement. However, the only photo that gets shown ginormous on the flickr.com homepage is the very last one that you upload. The 5 before that are shown as small thumbnails there.

So, if you are uploading a batch of photos to Flickr, make sure the one that is uploaded last is the best of the batch. Also, landscape oriented and square photos show up much larger on the flickr homepage than portrait oriented crops. So, all other things being equal, consider making sure your last photo uploaded in a batch to Flickr is one of your strongest square or landscape oriented photographs.

Tip #2, Flickr is Your New Cloud Photo Back Up

2. Anyone who ever complains about losing photos on a crashed hard drive again is just dumb. While you, of course, should not depend on Flickr as your sole backup strategy, everyone now has a free 1TB drive in the sky for photos.

Even if you don’t want to share certain photos, or you only want to share them with your very close friends and family, upload them to Flickr anyways and mark them private or friends/family only. If nothing else, you will have a backup of last resort if you need to go get those photos later. I don’t know of anyplace else on the web where you can get 1TB of free storage. Take advantage of that not only for the photos you want to share publicly, but all your photos.

Hunt Peck

3. This is not necessarily a tip new to the new Flickr, but it’s one everyone ought to know about — keyboard commands..

On Flickr you can use the F key to fave a photo, the C key to comment on a photo, the G key to add a photo to a group, and the T key to tag a photo. This will make your Flickr experience much faster. For those complaining that, with larger photos, they now have to scroll down the page to comment, no you don’t — simply press the C key and you will jump right there, with your cursor right in place and ready to type.

Tip #4, More

4. … = MORE! This is a universal symbol on the internet for more. Anytime you see … anywhere, this means that there are things hidden underneath the … that you may want to find. It’s a good way for a site to de-clutter. I’ve seen many people ask where their favorite lesser used Flickr feature went (EXIF data, gallery functionality, all sizes, etc.). Just click on the … and you’ll find it all there.

Tip #5, Make Sure Your Sets Are in the Order You Want Them In

5. Make the most out of your sets. By default, Flickr puts your sets in the order created. Your most recent sets are shown first, and older sets are shown last. This may not be the best way to present your sets though. One of my most viewed sets is one of my oldest, my 10 faves or more set. If I didn’t manually move this to the top of my sets page, it would be buried in the over 1,800 sets I have on Flickr. Go to the Flickr organizer page here and make sure that your sets are in the order that you want them in.

If you have a lot of sets and find it cumbersome to move them around in the organizer (like I do). Shrink your browser view to super small and it will make more and more thumbnails in the organizer that are easier to move around.

Make sure your sets page shows your best sets on the first page. This will give people a great first impression of what your albums are all about.

Consider making a few “best of” sets on Flickr. If you use Jeremy Brooks’ SuprSetr app it will automatically tag all of your photos that have been favorited 10 times or more fav10. It can then build an album for you of just these popular photos of yours that you can highlight on your sets page.

Just Re-Upped for 2 More Years of Flickr PRO!!!

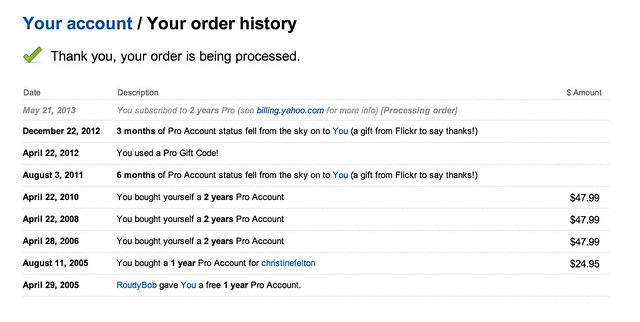
6. If you have a Flickr Pro account, do NOT let that expire. Your Flickr Pro account is worth more than it’s ever been worth in the past. It’s pure gold. Getting unlimited, high res, ad-free photos was the deal of a lifetime. Although Flickr is no longer offering this extraordinary deal anymore, if you have it, you get to keep it.

Go here to check on the status of your Flickr Pro and I’d recommend both renewing it now AND making sure you are set up as a recurring Pro so it automatically charges your credit card in the future. Don’t lose this awesome benefit.

Tip #7, Reupload Your Avatar

7. Make sure you reupload your Flickr avatar on the new Flickr. The old Flickr used a smaller version of your avatar, so you might notice that you have sort of this weird small avatar over a larger, dimmed out version of your old avatar on your Flickr page. You can reupload a better sized version of your avatar which will override this and make your new, larger avatar look much better.

Tip #8, Make Sure to Personalize Your Cover Photo

8. Change your cover photo. Flickr added a number of new cover photos by default with the new page design. Go to your page and change your cover photo to something new. Find a photo of yours (or a portion of a photo of yours) that uses an extreme landscape crop and will fit there and work well. I used a mosaic strip of photos for mine.

Tip #9, Review Who Calls You a Contact

9. Make sure to review your “who calls you a contact” page. This is a page that shows everyone on Flickr who has contacted you. You may be surprised that some of your friends have contacted you that you are not aware of. Review this list to see if you’ve missed any old or new friends on Flickr and add them back if you want.

Tip #10, Mobile

10. Make the most out of mobile. Although 95% of my own personal Flickr time is spent on the web version, don’t forget about mobile. Earlier this week, Flickr rolled out their Android app, which is every bit as good as their previous iPhone app and probably even better.

One of the easy things to do with this app is to favorite photos by your friends. Simply pull up your contacts photostream on the app and tap/tap to fave a photo. You can scroll down and see different friend’s photos or you can scroll sideways and see more photos from a single friend. When you have down time on the bus, or are waiting for your table at Bob’s Big Boy or wherever, use that time to favorite photos of your friends. They will see that and favorite your photos back most likely. :)

Ok Glass, Get Dogfood

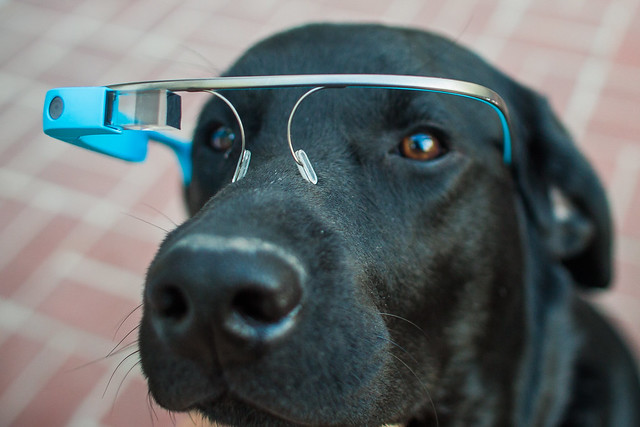
Bonus tip: Get the new Flickr app for Google Glass. It’s awesome! ;) Just kidding. There’s no new Flickr app for Google Glass…

…yet.

You can find me on Flickr here.


Thomas Hawk Digital Connection

 
Comments Off on Top 10 Ways to Get the Most Out of the New Flickr

Posted in Photography


6 Winning Ways to Work Wide

20 May

Today Joe Decker shares some tips on wide angle photography.

One of the first lens purchases aspiring landscape photographers typically made is a wide or super-wide lens, anything (in full-frame 35mm terms) from 24mm on down, and with good reason, wides offer photographers the ability to capture the sweeping vistas of the natural landscape. But they can also be a challenge to use effectively, it’s all to easy to end up with a wide-angle shot that lacks the power and grandeur we felt when we were shooting. In this article, I’ll explain why that’s so often the case, and provide a few tips for working around those challenges, showing you how to use wide-angle lenses to create dramatic, effective images.

Nordenskjöld Lake, Torres Del Paine National Park, Chile. Image Copyright Joe Decker

Nordenskjöld Lake, Torres Del Paine National Park, Chile. Image Copyright Joe Decker

1. Get Close!

Because wide-angle lenses take in a bigger angle-of-view than other lenses, using a wide-angle lens at the same distance from your subject will render that subject smaller than it would otherwise. To compensate for this, you’ll have to move closer to your subject. Don’t be bashful about getting close, particularly with super-wides&mash;it’s almost impossible to get “too close” to your subject with a 14mm lens. This emphasis in size that wide-angle lenses give nearby objects means that …

2. It’s All about the Foreground

Contrary to what you might expect, this means that the most important element of your wide-angle landscapes is the foreground. While wide-angle lenses do capture the wider landscape, they also (almost inevitably, because of their wide field-of-view) capture quite a bit of foreground as well, and this foreground is emphasized by the wide-angle perspective. As a result, if your foreground isn’t interesting, your photograph won’t be interesting. This leads us naturally to the Josef Muench idea of the near-far composition, an image which uses a wide-angle lens to not only show a broad vista, but also to show one detail of that landscape in an up-close, intimate way. When you’re photographing wide, be sure to spend some time looking for the most interesting foreground available to combine with your grand vista.  (If there isn’t an interesting foreground, you might want to consider using a longer lens to leave out that less interesting foreground.)

 Fallen Redwoods, Stout Grove, Jedediah Smith State Park, California.  Image Copyright Joe Decker

Fallen Redwoods, Stout Grove, Jedediah Smith State Park, California. Image Copyright Joe Decker

3. Watch those Verticals!

Wide-angle lenses tend to bend and distort verticals, as you can see in the tree trunks near the top of Fallen Redwoods. Now, you might decide you like that effect, or that you hate it, but it’s important to be aware of it and to make a conscious decision about it. For some images it’s fun to embrace, but more often I find myself having to work to avoid it or correct it later.  Avoiding it can be as simple a matter as composing so that there’s only a single obvious vertical (and that that’s vertical), alternatively, using shift movements with a tilt-shift lens can correct some of this distortion in-camera. Post-exposure, Photoshop’s “Lens Distort” filter can also save the day.

4. Leading Lines

Compositionally, lines (such as streams or railway tracks) leading from the bottom corners of an image towards the center often have a particular magic for guiding the viewers eye through the picture, making for strong images, and this is particularly the case for wide-angle images. Hot Stream is a great example of this, the viewers eye tends to wander from the corner  back through the image along the stream. As the stream moves back into the image, the stream gets smaller (in terms of inches on the printed page) quickly due the wide perspective. This quick fade (in width) into the distance creates a real sense of depth in the image.

Hot Stream, Húsavík, Iceland.   Image Copyright Joe Decker

Hot Stream, Húsavík, Iceland. Image Copyright Joe Decker

5. Filter Woes

Shooting wide creates two problems for those of us who use filters. Polarizers are a specific problem, the effect of a polarizer on a blue sky varies across the sky so greatly that wide-angle images including the sky are left horribly unnatural, so leave off the polarizer unless you know there’s no blue sky in your scene. Screw-in filters are a separate problem, it’s all too easy for the filter edges, particularly if you’re stacking more than one filter on the same lens. Filter systems, such Cokin’s P-series filters (with the wide-angle filter holder), can help you avoid these problems if you must use filters.

Dwarf Arctic Birch, C. Hofmann Peninusla, Greenland.  Image Copyright Joe Decker

Dwarf Arctic Birch, C. Hofmann Peninusla, Greenland. Image Copyright Joe Decker

6. Focusing

One of the things I enjoy most about working with wide-angle lenses is the ease of focusing them. As you move to wider and wider focal lengths, the depth-of-field at a particular aperture gets deeper and deeper. This allows you to make great use of the concept of hyperfocal distance, that is, the nearest distance you can focus a particular lens at a particular aperture and get “good focus”. At 24mm, by focusing about six feet out from the camera you’ll capture everything from about three feet to infinity in focus—even at f/11. At 17mm, focusing at the right point at f/11 will get you everything from infinity down to 17 inches away. Find (using a web site like this or any of a number of other sites, software tools or printed tables) and write down the hyperfocal distance for a couple of your widest lenses at a couple of your favorite apertures, and you’ll have an easy way of bringing the entire scene of near-far compositions into critical focus.

Using wide-angle lenses can certainly be tricky, but I love them all the same. Used well they can allow the photographer to create images that immerse us in a world with both small, intimate details and bold, dramatic vistas.

Joe Decker is a professional nature photographer and writer for Photocrati’s Photography Blog He also offers nature photography workshops and coaching around the western United States.

Post originally from: Digital Photography Tips.

Check out our more Photography Tips at Photography Tips for Beginners, Portrait Photography Tips and Wedding Photography Tips.

6 Winning Ways to Work Wide


Digital Photography School

 
Comments Off on 6 Winning Ways to Work Wide

Posted in Photography


6 Free Ways to Improve Your Photography [Get More out of dPS]

30 Apr

Over the last few years dPS has grown from being a personal blog where I shared tips for friends about how to get the most out of their cameras into something beyond what I ever expected.

Our readership is now in the millions of visitors a month and to keep it all running we have a number of part time staff, 30+ semi-regular writers and some fantastic forum moderators.

One of the most common questions I get from readers is ‘how can I best get the new stuff you publish?

Over the years we’ve added a number of ways to get our fresh content including:

1. Newsletter

Every Thursday we send a free email to over 700,000 subscribers to our newsletter. It contains a summary of our new posts as well as anything else happening on the site.

To subscribe simply put your email address in the field below:

2. Facebook

We publish links to any new posts that we publish as well as running a few polls and discussions each week on our Facebook page. There’s also some great discussion happening between our 140,000+ Facebook Followers.

3. Twitter

Every time we publish a new post we tweet a link to it on our Twitter Account

4. Pinterest

We use our Pinterest account to not only share our content but also to share links to other photography related tips and tutorials being published around the web – Join over 15,000 other followers here.

5. RSS Feed

If you use an RSS reader (we recommend Feedly) you can add our RSS feed link to it to get updates every time we publish something new (note, if you subscribe via Google Reader please note that Google Reader will stop working in the coming months – it’s time to find another feed reader!)

6. Forum

Our forum area is another great place to connect with other dPS readers – it has over 240,000 members and is a great place to share your photos, ask for and give critique, ask and answer questions and just talk photography. Join our Forum here.

Post originally from: Digital Photography Tips.

Check out our more Photography Tips at Photography Tips for Beginners, Portrait Photography Tips and Wedding Photography Tips.

6 Free Ways to Improve Your Photography [Get More out of dPS]


Digital Photography School

 
Comments Off on 6 Free Ways to Improve Your Photography [Get More out of dPS]

Posted in Photography


6 Easy Ways to Give your Photographs a Compelling Narrative

10 Apr

Everybody loves a good story. Knowing this fact is what separates a good photographer, from an exceptional one. With this knowledge, a photographer has a whole breath of tools at their command to trap the viewer, and cause them to be spellbound! Below I have listed 6 of the best ways to give your photographic approach the artistic edge of Continue Reading

The post 6 Easy Ways to Give your Photographs a Compelling Narrative appeared first on Photodoto.


Photodoto

 
Comments Off on 6 Easy Ways to Give your Photographs a Compelling Narrative

Posted in Photography


3 Ways to get Better Control of Autofocus

27 Mar

In this post, Steve Berardi from PhotoNaturalist talks about three ways to get better control of autofocus.

auto-focus.jpgSometimes autofocus can be really annoying. For some shots it’ll focus on the right part of your subject, but then the very next shot it may choose to focus on something far and away into the background.

Sure, you could avoid this problem by always using manual focus, but autofocus is great when you need to focus quickly or when you’re photographing a landscape and you need to focus on a certain spot in the scene.

Well, autofocus doesn’t have to be annoying anymore, because here are three ways to get better control of it:

#1 – Press your shutter button half-way to activate autofocus and then recompose

Set your autofocus point to the center spot, then point this spot where you want to focus and press your shutter button half-way (don’t press it completely yet) to initiate autofocus. Then, while still holding down the button half-way, recompose your shot and press the button completely down to snap the photo.

#2 – Switch to manual focus after autofocusing

Use autofocus as you normally do, but once it focuses on the right spot, just switch off autofocus on your lens to manual focus. Your lens will keep the current focus when you do this. This method works well when your camera is on a tripod and you’re taking multiple exposures from the same spot, like when photographing a landscape.

#3 – Use back-button autofocusing

Normally, your camera will autofocus when you press the shutter button, but with back-button autofocusing, you have to press a button on the back of the camera instead, giving you complete control of when autofocus is initiated.

With back-button autofocusing, you can just set the autofocus point to the center spot, then point that where you want to focus, and finally press the back button to automatically focus on that point. Now for all the shots you take from that position, that focus will be maintained (the camera won’t randomly focus into the background anymore).

You can do the same thing without this back-button autofocusing by switching to manual focus after the camera focuses properly, but using the back button saves time and this way you don’t have to constantly switch back and forth between manual and autofocus (which can inadvertently move the camera sometimes).

Back-button focusing is especially helpful for photographing moving subjects, like birds in flight or other wildlife: just switch on the continuous focusing mode, set the autofocus point to the center spot, and hold down that back button. Now you don’t have to worry about accidentally hitting the shutter button while you’re tracking the subject in your viewfinder.

How to enable back-button autofocusing: Unfortunately, this feature is called something different on each camera, so you’ll probably have to do some digging around in your camera’s manual and “custom functions” to find it. If it’s not labelled clearly on your camera, try changing the settings of the different buttons on the back of your camera (like the AE lock button).

steve.jpgAbout the Author: Steve Berardi is a naturalist, photographer, and computer scientist. You can usually find him hiking in the beautiful mountains and deserts of Southern California. Read more of his articles on nature photography at the PhotoNaturalist and follow him on Twitter.

Post originally from: Digital Photography Tips.

Check out our more Photography Tips at Photography Tips for Beginners, Portrait Photography Tips and Wedding Photography Tips.

3 Ways to get Better Control of Autofocus


Digital Photography School

 
Comments Off on 3 Ways to get Better Control of Autofocus

Posted in Photography


5 Quick Ways to Improve your Beach Photography

26 Mar

According to NOAA, over 50% of the American population live within 50 miles of a coastline.  Which means more than half of us are only a day-trip away from the beach.  For photographers, this presents a ton of great photo ops. Living half a mile from one of the top-rated beaches in the country myself, I’ve spent plenty of time Continue Reading

The post 5 Quick Ways to Improve your Beach Photography appeared first on Photodoto.


Photodoto

 
Comments Off on 5 Quick Ways to Improve your Beach Photography

Posted in Photography