RSS
 

Posts Tagged ‘Ways’

5 Ways To Break Out of a Creative Photography Rut

17 Jun

Ironside-1500px-2482

I’m a full time photographer that concentrates on shooting restaurant and bar interiors, food, and cocktails. After strictly shooting that subject matter for long time I found myself uninspired, so I decided to do something about it.

I’m going to share four tips I’ve used over the years to get back on track creatively, hopefully they will help you get out of your photography rut too.

1. Get out of your comfort zone – physically

Lake-Cayumaca-600px-5582

I find that I loose inspiration when I’ve been in the same area too long. When things become familiar they become less exciting. If this happens to you there is only one thing to do: leave!

There is huge value in leaving your area, city, or even state for a day or two. The process of traveling to an unfamiliar place jumpstarts the creative process.

Lake-Cayumaca-600px-5430

My photography was becoming stagnant so I left downtown San Diego and took an hour drive to Lake Cayumaca. Being in a totally different geographic area afforded me new opportunities to shoot things I don’t see every day in downtown San Diego.

Lake-Cayumaca-split

2. Learn something totally new and uncomfortable

A few years ago I had gotten in a photography rut while shooting a ton of portraits. I decided I needed to learn something new so I decided to learn how to photograph water drops.

blue-crown

I read a tutorial online and set up a little station in my garage. I didn’t have any experience with macro photography but was excited to try. Check out the setup below:

blue-drop-setup

It took me a while to start getting decent results but I found myself loving the learning process. I had a great time and came away with a new skill set and a revived creativity.

blue-teeball

If you find yourself in a rut, learn something new that is unfamiliar. While there are people who put my water drop photos to shame I’m still proud of these images and the rut they helped me get out of.

blue-point

3. Try a new style of shooting

A few years ago I was starting to learn about rear curtain sync on my flash. I had a few friends who shot really cool light trails in their nightlife photography. I felt a renewed surge of inspiration to try this during a rock concert.

rear-curtain-sync

I plugged an Alien Bees flash trigger into my speed light and put the receiver onto my camera’s hot shoe. This enabled me to hold the flash up, and to the left, with my left hand while holding the camera with my right hand.

Jimmy-Loves-600px-80

I put my camera and flash on manual. I used a one-second-long shutter speed and set the flash power to properly expose the musicians a few feet in front of me.

Jimmy-Loves-600px-82

I clicked the shutter to start the exposure and immediately tilted my camera around in circles or side to side. Moving the camera while the shutter was open captured all the lights in the concert hall in different shapes. In rear curtain sync the flash pops at the end of the exposure and the shutter closes.

This combination of using a long exposure and rear curtain sync to create light trails taught me a new skill that I was excited to keep using in future shoots. It is important to master new skills to keep your creativity up.

4. Start an ongoing project

How ironic that my initial rut that was caused by shooting the same subject matter would become a source of inspiration. After half a year of shooting tons of bars and restaurants I looked back on my photos and noticed my favorite photos from those shoots were the corner bar shots.

Common Theory corner bar 600px-6605

After realizing this I got really excited to get back out there to start a project and shoot more bars and restaurants to add to my collection.

Modern Times corner bar 600px-6250

I’m really excited about this now!  I’m already thinking about my next trip and what bars I’ll stop at to add to my project.

puesto-restaurant-interiors-5084

Getting in a rut happens to us all at one point or another. What ways have you guys found to kickstart your creativity? I’d love to hear your suggestions in the comments below.

The post 5 Ways To Break Out of a Creative Photography Rut by Mike Newton appeared first on Digital Photography School.


Digital Photography School

 
Comments Off on 5 Ways To Break Out of a Creative Photography Rut

Posted in Photography


3 Ways to Get Killer Portraits Using a Tripod

21 Apr

As photographers, you’re all looking to “wow” the people we’re taking pictures of, whether they’re clients or just friends. When you show final images, there’s that sense of anticipation, excitement and nervousness as you gauge reactions. And when you hear the words “amazing” or “I love them,” it’s truly a great feeling. So how do you get the “wow” and avoid the “just okay?” Well that’s not always easy. With so many good photographers out there and so much of their work getting exposure via social networks, expectations for good photography is as high as it’s ever been.

shutter-drag-wedding-photography

Here are three ways to achieve killer portraits with the use of a tripod that we use in our studio. These include the following, all of which we’ll show you – keep reading:

  1. Shutter Drags
  2. Composites
  3. HDRs

Required Equipment

  • Sturdy tripod – that old hand-me-down tripod might not be stable enough, as any movement will show in the images
  • Shutter release – using a cable release will help you avoid touching the camera and causing movement
  • Wide angle lens – as you can see from the images in this article, a wider lens is going to bring out many of the “wow” elements like the clouds, the ocean, the streaking lights, and more
  • Camera – as with any type of photography, the camera is only as good as the photographer. You can get amazing results with both entry level DSLRs and full frame cameras.

1. Shutter Drags (Long Exposure Photography)

Dragging the shutter refers to using slower shutter speeds to capture movement. This captures motion of anything in your frame that is moving, while keeping the static objects in the scene nice and crisp. If you can get your couple to hold still, you have the opportunity to create awesome effects with moving people, cars or waves like you see in the image below. Additional saturation and contrast is added in post production using some Lightroom Presets.

wedding-photography-los-angeles

Shutter Drag Quick Tips:

  • How slow do you go? – well that depends entirely on how fast the other elements in the scene are moving. If cars are zooming by, you can get away with faster shutter speeds like 1/60 or 1/30, but if you are capturing moving people and they are slowly strolling, you may have to drop it even lower like 1/10th or even lower. For water, like the shots above, we are generally around 1/2 to 1 second.
  • Ensure that your subjects are holding really still – instruct your subjects to hold very still, avoid blinking during the shot or sequence of shots, and even hold their breath.
  • Utilize static poses –  posing for these types of photos will have to be static. Dips, jumps, and walks will add too much motion in the scene and result in blurry photos. However, static does not have to mean boring. You can still have them in flattering, romantic poses.
  • Snap a few extra shots to ensure you have one crisp photo – take a few extra shots because a photo may look crisp on the back of your camera, only to show noticeable motion blur as it’s taken into post production.

2. Composites

wedding-photography-composites-1

Compositing multiple photographs into one is sometimes the best solution when it’s unreasonable to have your couple hold still for as long as you need to achieve the desired effect. For example, if you’re looking to capture the beautiful stars in a night sky or if you’re looking combine multiple streaks of passing car lights –  the five, ten, or even 30 second exposure time is much too long to expect any live subject to be still. Below is an example where our couple would have had to hold still for around 15 seconds as we spin flaming steel wool just behind them.

wedding-photography

Composite Tips:

The tips for capturing composites are actually very similar as the tips for capturing shutter drags. For example, you still need a sturdy tripod and a shutter release; and you should certainly snap a few extras to make sure you have enough choices to work with in post-production. In addition, here are some more quick tips for capturing composite photos.

  • Expose for the couple’s skin tones first – your lighting can be anything from flash to constant lights; but the most important thing is to focus primarily on the subject.
  • Have the subjects exit the scene – after you’re sure you have a shot with a good pose and good lighting, you can have them exit the scene.
  • Then adjust your settings as needed to expose for the background and create your desired effects. For example, if you’re looking to capture the streaking lights, adjust your shutter speed down and wait for the cars to pass.
  • If you can keep the overall exposures identical between shots, compositing will be incredibly simple. Just layer the images in Photoshop, and then mask in and out elements on each layer. However, if the exposures and look of each image varies, then it will require quite a bit more advanced compositing work which would be beyond the scope of this article.

3. Try HDR Portrait Photography

hdr-wedding-photography-1

While HDR Photography gets a bad rap sometimes for being gaudy and fake, when done correctly, you have the opportunity to create memorable, distinct photography. This is especially true with outdoor scenes on a cloudy day. Grab your tripod, pose your couple in a static pose, dial in the right settings, and shoot away. What are the right settings? Well start with ISO 100 and a decent aperture (f/4 and up). From there, the shutter will vary depending on the brightness of the scene. For more information, feel free to check out some of these HDR tips on dPS.

hdr-architecture-wedding-photography

HDR Quick Tips:

Here are a few more things to keep in mind.

  • Study how to bracket exposures on your specific camera. Almost all cameras have the AEB (Auto Exposure Bracketing) feature, but you will need to know how to access it to dial in the correct settings.
  • Keep your minimum shutter speed at 1/200 or higher. Any movement in the couple or background can cause unnatural “ghosting,” so keeping the shutter speed high will really help you save time in post production.
  • Avoid strong and overpowering flares. If you’re shooting into the sun, strong flares can desaturate your image and create a loss of sharpness. If you are shooting into the sun for compositional purposes, choose an angle where the flare isn’t going to distract from the subject.
  • Choose the right time of day. Sunrise and sunset are still going to one of best times to shoot, as you are most likely to have amazing color in the sky during that time. Remember that the same general photography rules still apply when shooting HDR, we simply are using the HDR process to bring out more detail.
  • Watch the weather report. Partly cloudy days are great times to shoot HDR photography. Capturing all of the contrast and interest in the clouds, as you see in the sample images in this article, really add the “wow” factor.

Conclusion

intimate-hdr-poses

By no means are these three techniques enough for a solid session. In fact, the majority of the photos you take during any portrait session should revolve around candid posing, story-telling, and emotion. For us, we use these dramatic environmental shots to “set the stage” in a final album, canvas mural or other print medium. They are the big grand images that sets the scene, and they are followed by the close up candid images showing the couple interact in said scene and environment.

These techniques are also wonderful in creating “wow” shots, i.e. the shots they share on Facebook and the shots they end up printing on a canvas at their wedding. The shots that make everyone else go, “how’d they do that!?”

Do you have any other killer tips you’d like to share? Please do so in the comment section below.

sunset-hdr-wedding-photography

The post 3 Ways to Get Killer Portraits Using a Tripod by Post Production Pye appeared first on Digital Photography School.


Digital Photography School

 
Comments Off on 3 Ways to Get Killer Portraits Using a Tripod

Posted in Photography


Four Ways to Improve Your Photos With the Clarity Slider in Lightroom

05 Apr

Using the Clarity slider in Lightroom

Andrew S. Gibson is the author of Mastering Lightroom: Book 2 – The Develop Module. There’s a special deal on now at Snapndeals, get 40% off for a limited time only.

The Clarity slider is one of the most useful in Lightroom when it comes to giving your images extra punch and impact. Today I’m going to show you several ways you can use it to improve your photos. But first, let’s take a look at exactly what the Clarity slider does, and how it differs from its cousin the Contrast slider.

This photo is ideal to demonstrate the difference:

Using the Clarity slider in Lightroom

Using the Clarity slider in Lightroom

It was taken on an overcast day and the light was very flat. This is confirmed by the histogram, which has gaps on both the left and right-hand sides (screen capture image to the right).

Now let’s see what happens when we set the Contrast slider, and then the Clarity slider, to their maximum settings of +100:

Using the Clarity slider in Lightroom

The most obvious difference at this scale is that the Contrast slider has a more far reaching effect. It makes both the shadows darker and the highlights brighter, stretching the histogram in the process.

The Clarity slider works differently. It increases contrast, but in the mid-tones only. The highlights aren’t affected, and if anything the photo becomes darker as the Clarity slider has a greater effect on dark tones than the Contrast slider.

Here’s a close-up of both images so you can see the effect in more detail. Look closely and you’ll see that the Clarity slider brings out more texture than increasing Contrast.

Using the Clarity slider in Lightroom

That’s the key to using this slider successfully. Increasing mid-tone contrast brings out texture and detail, increasing the tactility and apparent sharpness of the image. That’s what the Clarity slider is designed to do. Now I’m going to show you some practical applications.

1. Emphasizing texture

The Clarity slider in the Basic panel is a  global adjustment – meaning that, moving this slider affects the entire image. A small but subtle boost to Clarity can lift just about any image. Photos with more texture, such as the one below, may benefit from a larger increase in Clarity to bring out the texture and detail. This technique is especially effective in black and white. Plus, there’s nothing to stop you increasing contrast as well, especially in black and white, which usually benefits from higher contrast than colour images.

Using the Clarity slider in Lightroom

2. Emphasising texture locally

There is a theory in photography called visual mass that states that certain elements pull the viewer’s eye more than others (you read more about it in my article Composition, Balance and Visual Mass). One of these elements is sharpness. The eye goes to sharp parts of the image before it goes to unsharp, or out of focus areas.

You can use this to your advantage by making local adjustments to Clarity rather than global ones. In the example below, I wanted the white stones to be the centre of attention. The principle of tonal contrast ensures that they are, and I emphasixed it here by placing Radial filters over the stones and setting Contrast to +100 in each one.

Using the Clarity slider in Lightroom

Note: The Radial filter is new to Lightroom 5. If you have an older version of Lightroom you can use the Adjustment Brush tool instead.

3. Emphasize the eyes in a portrait

There’s another area where increasing Clarity locally can make a huge difference and that’s in portraiture. Use either the Radial filter or Adjustment Brush to increase the Clarity of your model’s eyes. Again, it’s a subtle, but often effective change. You can also do the same with your model’s mouth to emphasize the lips. Remember that as Clarity tends to make things darker, you’ll probably need to increase Exposure a little as well.

Using the Clarity slider in Lightroom

4. Soften skin

So far we’ve just looked at what happens when you increase Clarity, but you can also go the opposite way and decrease it in order to obscure detail, or soften part of the photo. You do have to be careful with this as the result can look a little false. A light touch is essential.

You can use negative Clarity as a kind soft focus effect in portraits. The most effective way is to increase Sharpness at the same time that you decrease Clarity. This helps retain realistic looking texture in the skin and avoids the false effect I spoke of earlier.

Lightroom has a built-in Adjustment Brush preset called Soften Skin which does exactly that. You can see the effect here. It’s subtle, look at the area under the model’s eyes if you’re not sure what the difference is:

Using the Clarity slider in Lightroom

To use the Soften Skin preset, start by activating the Adjustment Brush and paint in the area you want to apply the preset to (shown in red below). Leave the eyes, eyebrows, mouth and tip of the nose alone as you don’t want to soften those areas.

Using the Clarity slider in Lightroom

Select Soften Skin from the Effects menu. Lightroom sets Clarity to -100 and Sharpness to +25.

Using the Clarity slider in Lightroom

Using the Clarity slider in Lightroom

This is the strongest Soften Skin preset. If it’s too strong, you can reduce it by hovering the mouse over the Adjustment Brush pin until the double arrow icon (left) appears. When you see it, hold the left mouse button down and move the mouse left. Lightroom reduces the Clarity and Sharpness settings proportionally. Moving the mouse left, reduces the settings, moving it right increases them. Let go when it looks good to your eye. (You can also adjust the sliders manually)

Your turn

How do you use the Clarity slider? I’m curious to see what applications you have come up with for it.

Let us know in the comments, and feel free to share your photos so we can see what you have done.


Mastering Lightroom: Book Two

Mastering Lightroom: Book Two – The Develop Module ebookMy new ebook Mastering Lightroom: Book Two – The Develop Module teaches you how to process your Raw files in Lightroom for spectacular results. Written for Lightroom 4 & 5 it takes you through every panel in the Develop module and shows you how to creatively edit your photos. It’s now 40% off at Snapndeals for a limited time only.

The post Four Ways to Improve Your Photos With the Clarity Slider in Lightroom by Andrew S. Gibson appeared first on Digital Photography School.


Digital Photography School

 
Comments Off on Four Ways to Improve Your Photos With the Clarity Slider in Lightroom

Posted in Photography


10 Ways Photography Makes You a Better Parent

01 Apr

When I began my journey down the wonderful path of becoming a photographer, I never realized how this camera of mine would totally transform my world.

Better parent photographer 02

I picked up a camera before becoming a mom, not because of burning passion, but because I knew how important it was to document our life. I felt like taking pictures was an essential part of remembering all of the details of growing our family.

What I’ve realized over the years though, is that photography isn’t simply about the technical details of achieving the perfect white balance, using the best gear and accessories, or researching perfect posing and staging techniques. It’s about the surprising and hidden benefits you’ll receive from the camera in rediscovering yourself and igniting a new passion; helping you become a better person in the process.

Below are 10 ways I’ve found photography has made me a better mom. The points I make are quite ‘mom focused’, but I’m sure these would apply to dads, grandparents, aunts, uncles, or anyone else who has a love of capturing their family as well.

10 Ways Photography Makes You a Better Parent

1) Keeps your adult brain working

Photography is way to keep the ‘adult’ side of your brain actively learning and growing, as you conquer the technical side of what makes the camera work.

When I became a mom, I quickly became overwhelmed with all the ‘kid stuff’ in my life. Cartoons, arts and crafts, Play Doh ©, Legos ©, dolls, action figures, books. As a lifetime lover of school and learning, I needed something that would allow my brain to continue stretching and growing alongside my child’s.

Better parent photographer 01

2) Allows you to practice self-care

Photography is a creative outlet that that allows you to be an active participant in self-care while raising kids.

Getting out for even a quick 10 minute walk and capturing your surroundings is sometimes all you need as a mental reset on particularly long or hectic days.

3) Connect with other like-minded parents

It’s is a hobby that allows moms to connect with other moms who are passionate about memory making. It can be so hard meeting other moms who have similar interests once you become one yourself. Photography provides a place to start finding common ground as you search for new friends.

Better parent photographer 05

4) More family activities to new places

You’ll be excited to plan more activities as a family because you’ll want to document fun adventures together.

Never one to enjoy taking photos in the same place twice, I’m always on the hunt for new places to go see, and explore with our family to make the experience of documenting new and exciting every time. We’ve been to the zoo, the park, apple picking, the local alpaca farm, the pool, the playground, etc.

5) You document important childhood details

Better parent photographer 07

Photography allows you to become more mindful about documenting childhood details that are too easily forgotten.

You may think you’ll always remember how tiny they are, the first time they smile, or how cute they looked in that amazing outfit from grandma. But, unfortunately if there isn’t photographic evidence those memories can quickly fade away. A photography project can help you sharpen your skills and preserve these memories.

6) Provides you a way to relax after bedtimes

Looking through photos is a way to rest and unwind at the end of a long tiring day. After the kids are in bed it’s such a confidence booster to look over your work, pick the best shots, edit a few to really make them pop, or order a few prints to frame and hang in your home.

7) Helps you ‘play’ with the kids more

Taking pictures can be accomplished in small chunks of time without a whole lot of resources or equipment required.

Settling into creative play with my kiddo doesn’t always flow naturally for me. In order to make play time activities more fun for us all, I’ll often participate for a little while, and then have the camera nearby so I can switch away from participating and snap a few photos when I start getting antsy.

Better parent photographer 06

8) You are creating a family legacy that will be treasured

You are giving your children a precious gift of memories that they’ll cherish for a lifetime. Every time I snap a ‘keeper’ I always think about how much our daughter will appreciate that shot when we’re all older.

Better parent photographer 03

9) Looking over family photos creates great bonding time

Sitting down and looking at old photos is the perfect way to earn some extra snuggle time with the kids. Looking through photo albums is a favorite activity for our family and is also one of the only times we get some snuggly bonding time with our preschooler which is always a treat.

10) It helps you be a better role model

Better parent photographer 04

Kids will see an empowered and confident role model as their mom (or dad) embraces a hobby she loves. Children are sponges and will mimic parents’ actions. By showing your children that you are willing to make time for your own fulfillment by embracing hobbies and passions you love, you’re granting them permission to do the same in their own life.

How many of these can you relate to? Has photography always been a passion for you? Or has parenthood taken your love of photography to an entirely new and more passionate realm as it has done for me? I’d love to hear about your photography story in the comments.

The post 10 Ways Photography Makes You a Better Parent by Beryl Young appeared first on Digital Photography School.


Digital Photography School

 
Comments Off on 10 Ways Photography Makes You a Better Parent

Posted in Photography


10 Ways to Improve your Vacation Photos

09 Mar

dPS-Detail

This has probably happened to all of us. We’ve just come back from an exciting trip and want to share all the wonderful moments with our friends and family. But after a brief moment we seem to be the only ones still enjoying the picture-show. Everyone else has quickly lost interest.

So what can we do to stop putting people to sleep with our vacation photos?

Here are some tips to help you take vacation photos that everybody will love. It’s easier than you might think, and it definitely doesn’t require expensive equipment. Keeping in mind some basic rules, you can take stunning images even with your mobile phone.

Let me take you to Paris and show you how with these 10 ways to improve your vacation photos:

#1 – Don’t rush – take your time

It often happens that you get to a beautiful place and start photographing right away. But wait. Unless it’s a sunset or fast moving group of people, nothing is going to run away from you. Instead take your time to wander around a little bit sucking up the atmosphere.

Here’s an example. Last month I went to Paris. When I got off the metro and the Eiffel Tower appeared, I was immediately tempted to take a picture. Actually everybody around me started shooting right away.

I decided to stroll around first. In my mind I was framing, but I left my camera in the bag. This slow approach helped me to get a feeling for the place and to figure out what it was that I wanted to capture.

#2 – Reflections

Avoid the obvious. When everybody is looking in one direction, look the other way. You may be surprised what you’ll find: impressive reflections, for example.

This is a great way to show a familiar sight in a new light – such as the Eiffel Tower. The giant monument can be seen from almost every point in downtown Paris. It is reflected in car windows or in water puddles at night.

The distortions add a sense of humour or even mysteriousness. Those viewing the image can quickly identify what’s in the photo, yet the unfamiliar perspective puzzles them.

DPS Reflection 2

#3 – Tilt your camera

When taking a picture of a sunset, the horizon should be straight. But when it comes to buildings, it’s perfectly all right to tilt your camera to create a new angle. Don’t be afraid, not everything has to be placed perfectly aligned in the center of the frame.

Just don’t do it part way. If you opt for an uncommon perspective, do it all the way. That is to say let the observer understand that you tilted the camera on purpose, and that the building is not accidentally inclined either to the left or right.

dPS-Tilted-Camera

#4 – Incorporate the surroundings

dPS-Surroundings

When sightseeing we are never alone. There will always be other tourists around. Thus getting a clear shot with no one in the picture is often impossible. What you can do instead is to incorporate other people into your composition.

It’s actually quite a lot of fun to photograph other people taking pictures. You add another story and layer to your images: a picture within a picture.

#5 – Frame within a frame

Holes, doorways or windows are perfect elements to use as other frames within the frame of your camera. This way you can add another dimension and more depth to your images making them appear almost three-dimensional.

But, that’s not all. Light shining through a window with its reflections and shadows is visually pleasant. And peaking through a window subconsciously suggests some mystery and being able to witness something from a hidden point of view that maybe wasn’t meant for our eyes to see.

DPS Frame 1

#6 – Geometry

Look out for lines and patterns that can be used to lead the eye of the observer and make your picture more dynamic, like this winding staircase (below), for example. The eye gets hooked on the left top corner and follows the stair railing as it curls towards the center on the right.

DPS Geometry

Lines are a simple, yet very powerful tool, of photographic composition that make images more interesting and engaging.

#7 – Light

Photography is painting with light. So the quality of light is very important. Bright sunlight at noon, with its harsh shadows, is different from the soft tones of a sunset. Be aware of the different emotions that can be evoked by light and use it as a tool to create strong effects.

With backlighting you can create interesting silhouettes, for example, as can be observed in this image of a monument (below). The foreground is heavily underexposed. There are no details in the monument or the tree. Everything is stripped down to its basic shape and form, yet still allowing you to identify at first glimpse what kind of scenery is documented in the image.

DPS Light

#8 – Clean frames

One common mistake is to incorporate too many elements in one frame. A panoramic shot is great to give an overview of a place. But in general it’s more effective to clean up your photos. Keep it simple.

Simplicity of the frame helps the human mind to better process the information – faster and more efficient than if the observer is confronted with an overloaded image.

Ask yourself: What do I want to say with this picture? Then throw out all the elements that are not important to the statement you wish to express.

dPS-Clean-Framing-2

#9 – Details

Zoom in. Sometimes it’s difficult to capture everything that’s unfolding in front of you. When I was standing in front of the castle of Versailles I was overwhelmed by its pure magnitude. The big courtyard leading up to the main entrance, and the impressive long stretched building in the back. What to make of a situation like that photographically?

A good way to resolve a panorama like that is to focus on details. As hard as I tried I couldn’t get a clean shot of the golden gate and the castle. There were either some other tourists taking picture or all the elements were overlapping each other.

DPS Detail

#10 – Be playful

How many pictures do you have standing rigid in front of an important building, or beautiful landscape? There’s nothing wrong with the typical “I-have-been-there” shot. But it’s more fun to spice it up a little bit.

Interact with your surroundings, create unusual perspectives and use your imagination. Not just you, but your friends and family back home will also enjoy looking at your next vacation pictures.

DPS Playful

Do you have other tips for better vacation photos? If so please share in the comments below.

Want more travel photography tips? Look here:

  • How to Capture the Essence of a Place – Travel Photography Tips
  • Transcending Travel a dPS ebook
  • 6 Tips for Photographing People When Travelling

The post 10 Ways to Improve your Vacation Photos by Kai Behrmann appeared first on Digital Photography School.


Digital Photography School

 
Comments Off on 10 Ways to Improve your Vacation Photos

Posted in Photography


10 Ways to Improve Your Travel Photography Portraits

05 Mar

Last year I travelled all across South East Asia – a trip which not only expanded my personal horizon, but also helped to immensely improve my photography. At the beginning of my trip, my biggest struggle was taking good portraits. The problem wasn’t the lack of opportunities; I encountered incredible and the utmost photogenic scenes around almost every corner. Instead, it was that I just felt too shy or not confident enough to get close to my subject.

I had lots of excuses which might sound familiar to you: “I don’t want to disturb the moment”, “I don’t want to intrude on people’s privacy” or “It’s just a game of luck and chance anyhow”. It was frustrating and I knew that, despite all of the excuses, this was something I really had to work on. By lots or trial and error, and the help of some amazing photographers I met on the way, I gained some important insights on how to bring my people photography to a whole new level. I want to share these and hopefully help you overcome that awkward feeling and false reservation you have when photographing people.

Travel Photography Portraits 01

10 Ways to Improve Your Travel Photography Portraits

#1 Be ready

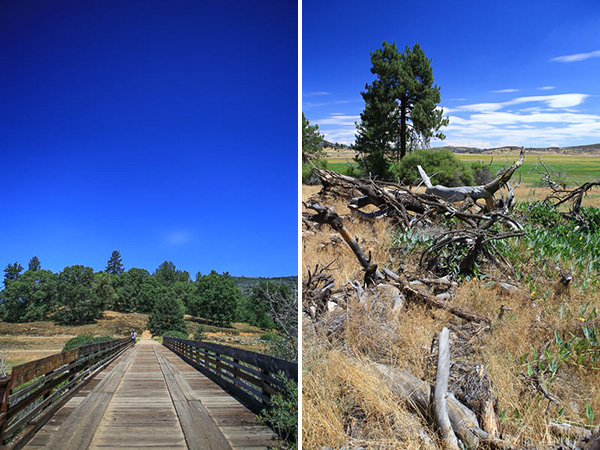
This is very basic and obvious, but so important. People photography is about brief moments, a glimpse which is normally not replicable. You are not doing landscape photography which leaves you with all the time you need. So have your lens cap off, have your camera switched on, be prepared to adjust settings and BE READY.

Travel Photography Portraits 06

Being ready to capture that one, special moment

#2 Get close

If you are unhappy with your portraits or if they looks boring, it is probably because you are too far away. I know it feels awkward to get really close to someone you don’t know, especially in a foreign country. It seems so much easier to break out your big lens, zoom in and just click away, hoping that your subject won’t notice you. Unfortunately this won’t work.

If you want to have crisp, sharp and extraordinary images which tell a story and leave your audience in astonishment, you have to overcome your shyness and get close. This will help to add more details on your subject’s face, increase sharpness and focus on only one or two elements. The viewer will automatically understand more about your image. Moreover, getting close will put you in control of things: the lighting, the background, the composition and the depth of field. These factors are so vital for a good portrait and so much easier to adjust when you are close to your subject.

Travel Photography Portraits escapology 11

Get close to your subject to control your image

#3 Practice approaching people

Travel Photography Portraits escapology 01

Learning to approach people with the right attitude – the secret of good portraits

You might think “That sounds great, but how do I get close to people?” This leads us to the biggest challenge in people photography, which has nothing to do with photography itself: dealing with people. Are you comfortable walking up to strangers, making small talk, then asking, “Can I take your picture?”

If not, the good news is, it’s something you can practice just like everything else in photography. It is all about your attitude and how you approach people. Get in contact, have a positive attitude, talk, and most importantly smile. Don’t be afraid of intruding on people’s privacy. Particularly in South East Asia the concept of privacy is totally different from ours in the West. Approaching strangers and asking very personal questions is considered perfectly normal. Open yourself and people naturally respond in the same manner. In short, don’t be shy, adapt to the local culture, get to know people, make friends and you will take better pictures.

#4 Learn the basics of the local language

How do you approach people if you don’t speak their language? I will let you in on a secret. It’s actually even easier to approach people if you DON’T speak the same language. It’s a great place to start since it is then not so much about WHAT you speak, but HOW you speak and the energy you give off. Learning a few words and phrases in the local language will go a long way to helping you approach people, and it doesn’t take much effort to learn. From my personal experience the six most important phrases you should learn beforehand are:

  • Hello, how are you?
  • My name is …?
  • I am from …?
  • What is your name?
  • Thank you!
  • Beautiful!

The last one will put a big smile on people’s faces after you have taken that nice portrait and show it to them. Get a small phrasebook. You can look up phrases when you need them or practice on longer bus rides. Ask your receptionist, taxi driver or local travel agent how to pronounce words. Don’t be afraid to make mistakes. It’s fun and will not only help to approach people, but also make your whole travel experience so much more worthwhile.

Travel Photography Portraits escapology 12

Knowing a few phrases in the local language can go a long way

#5 Smile – smile a lot!

Even if you don’t know any words or phrases, make sure to smile. A smile can go such a long way. If you are grumpy and angry because you are not getting your shots right, it will put people off and no one will want to go near you, and definitely won’t want to get their picture taken by you. When you come home from a photo walk, your mouth and cheeks should hurt from all the smiling.

Travel Photography Portraits 05

A smile can go a long way

#6 Take your time

Once you have made contact and established a good vibe, it is time to take your picture. Take advantage of all the “work” you have put in and take your time. It would be a shame to just hectically click away once or twice now. Be calm, think about the light, about what you want to emphasize (the eyes, the hands or the person itself) and about the background.

Since you are close to your subject now, you can control all of these things. Take a deep breath and try a couple of shots, maybe switch angles and try different things. By doing this, you will notice that your subject will also become more relaxed and get used to the camera. There is no need to rush. A rushed photo is usually never a good one.

Travel Photography Portraits 04

Waiting for the right moment is usually worth it

#7 Get moving

Reality can be quiet boring. There might be things in your scene that are boring or disturbing. We already talked about taking your time. Make use of it and arrange the scene to your needs, change angles, get moving. Don’t be lazy. You can eliminate things or include things just by moving around a little bit. Don’t just rely on the zoom.

Travel Photography Portraits 07

Move to create the image you had in mind

#8 Get a 50mm lens

What helped me to counter my laziness and actually get moving was the purchase of a 50mm prime lens. If you don’t have one in your bag yet, buy one. It is the one piece of equipment that boosted my creativity and the quality of my images almost instantly. You will not only learn to move more but also open your eye for new perspectives.

Travel Photography Portraits escapology 03

A 50mm lens to boost your creativity – give it a try

#9 Start with kids and people that are doing something

If you feel shy but are still willing to practice approaching people and getting close, start off with photographing kids and people that are doing something. Kids are easy to photograph. They usually love getting their picture taken, posing and never get bored doing so. I found it very rewarding in Asia but would suggest taking a more cautious approach in Western societies. Please always ask the parents first.

Shoot in busy areas or settings. People that are doing nothing will surely be looking at you. People that are doing something, can’t be bothered to look at you. When they are busy with their task, they will not care about you taking pictures. Look for traditional workshops or handicraft businesses. They usually make for great picture taking opportunities.

Travel Photography Portraits escapology 15

Occupied with traditional crafts – great picture opportunities

#10 Get out of the touristy areas

The touristic hubs are usually far from the country’s reality. At the same, time getting off the beaten track is usually not so difficult. Sometimes it just takes 15 minutes to find yourself in a small, local village. This is where you want to be as a photographer. You will meet real people who aren’t out to sell things. You will have more chances to interact, to practice your newly acquired language skills and take more authentic photographs. At the same time it will make for a much better travel experience than sticking to the “Lonely Planet Path”.

Travel Photography Portraits escapology 09

Hosted by monks in a monastery in Myanmar. No tour, no guide

All of this takes a little getting used to and practicing along the way. But it’s worth it. Please don’t just jam your camera in people’s faces when traveling abroad. It’s not nice and the pictures won’t be either. Take your time to interact with people, open up, get close and don’t forget to smile. This will make for great experiences, unforgettable memories and even better pictures.

Please share some of your favourite people photos with us in the comments and if you have another tips for photographing people, we’d love to hear them.

For more articles on travel and people photography check out these:

  • 6 Tips for Photographing People When Travelling
  • 5 Reasons Why Having People in Your Photos is a Good Thing
  • The Rewards of Photographing People When You Travel

The post 10 Ways to Improve Your Travel Photography Portraits by Philipp Dukatz appeared first on Digital Photography School.


Digital Photography School

 
Comments Off on 10 Ways to Improve Your Travel Photography Portraits

Posted in Photography


Top 10 Ways to Sabotage your Professional Photography Aspirations

07 Jan

Through the various classes and workshops I teach, I inevitably run into a number of students with professional photography aspirations.  More than a few of them however, seem doggedly determined to do everything they can to make their dream of professional photography impossible.

I’m nothing, if not a helper.  So if you really want to sabotage your pro photography aspirations, here, presented in traditional count-down order, are 10 ways to make sure you’ll never turn your dream into a profession.

© Paul Burwell Photography | www.bsop.ca

Red Fox Kits playing outside their den

In no particular order how to sabotage your professional photography aspirations

1. Don’t show your work to anyone other than family or friends

  • Family and friends are great for moral support, and can really help pick you up when you’re down, but do they really know what makes a great picture and what sort of stuff is going to sell?
  • You need to get professional opinions about your work if you want to know if it is good, or what you might need to work on improving.

2. Design your web site so that it’s impossible for a photo buyer to do business with you

  • Through fear of protecting their images from being “stolen” from their web site, many photographers make it so you can’t right-click to save a picture or use flash web sites that make it almost impossible to easily save images to a local hard drive.
  • While none of these methods truly protect the images from “theft” they are a really great deterrent to the editor or photo buyer looking for images.  They can’t easily save them to run past other people, and they’ll usually just move onto the next web site.
  • While we’re at it, don’t put those huge ugly copyright notices over the center of the photo.  If you need to add a copyright watermark, add it to somewhere where it intrudes on the photograph’s story as little as possible.
© Paul Burwell Photography | www.bsop.ca

Juvenile Merlin perched on an old fence

3. Only post your “second-tier” images on your web site

  • Many folks operate under the mistaken belief that they should save their “good” stuff for when they get that National Geographic offer.  Sorry, but that isn’t going to happen until people can see the sort of great photos you can produce.

4. Bring only your best images to an image critique

  • During my photography workshops I always set aside time for people to bring some images for myself and the rest of the group to comment on.  Many folks only bring their best stuff.  I guess it’s fun to hear for the umpteenth time what a great image that is, but wouldn’t it be more useful to bring some images that you’re not sure are great?  An image you haven’t already been told 10 or 100 times that it’s a great image?  Take a risk and learn a bit.

5. Just do photography

  • I hear from some of the long-time professional nature photographers how they used to be able to make a living out of just selling images.  I wish my life were so simple.
  • The most likely way someone starting out is going to sell an image, is along with some writing.  So, you’ll want to learn how to put some words together that can support the images you’ve got.  While you’re at it, you might want to take some business management and marketing courses along the way.
© Paul Burwell Photography | www.bsop.ca

Hexagonal Plate Snowflake

6. Stop learning

  • Unfortunately, some folks figure that they’ve learned it all, they’ve got it all figured out.
  • Sorry, but in today’s digital world that just isn’t possible.  New techniques, software and equipment are constantly being developed.  You need to devote a significant portion of your time into educating yourself and keeping current.

7. Don’t look at other people’s images

  • I’ve run into a few people who can’t seem to appreciate any photos other than those they’ve created.  Holy narcissism batman!
  • If you don’t look at what your contemporaries are doing, you’re really short-changing yourself and sabotaging your aspirations.  Look around at what sells (because if you’re a pro, you NEED to care about what sells) and hang some of that on your wall.  Learn why it sells and try to use that within your own photography.

8. Don’t treat your photography like a business

  • If you want to remain an amateur, that’s great.  But if you want to be professional photographer, you have to start thinking like a professional.  Covering a subject as a pro is totally different than just going out and shooting a few snap shots.  You need to prepare in advance and have your gear and attitude ready to go.  When you start shooting, you work it until you get what you need.
  • If you’re under the mistaken impression that you need to be a great, or “one of the best” photographers in your area of interest to be a professional, get over it.  At least as important as the photography skills are your business and self-marketing skills.  Make sure you work on those non-photography skills at least as much as you do on your photography skills.

9.  Just take photos, don’t tell stories

  • For me, a great photo is one that tells a story.  If someone were to ask you about a photo and you couldn’t immediately come up with the story being told, I would argue that it isn’t a great photo.
  • Use image compositional techniques to make your photos tell great stories.

10. Treat ethics as an inconvenience to be avoided

  • While ethics are a personal matter and we all have to determine what is, and isn’t ethical for ourselves, the surest path to disaster is to have others view you as unethical.
  • Treat people the way you expect to be treated.  Be above board in all your business dealings.  Your clients should never experience negative surprises.  Follow through on your promises.

So, if you’re an aspiring pro, and bound and determined to stymie your chances of making it, I think I’ve outlined a pretty clear road map for you.

Do you have some comments or additional items to add to the list?  We’d all love to hear from you.

The post Top 10 Ways to Sabotage your Professional Photography Aspirations by Paul Burwell appeared first on Digital Photography School.


Digital Photography School

 
Comments Off on Top 10 Ways to Sabotage your Professional Photography Aspirations

Posted in Photography


5 Ways to Create Detail Photos

06 Jan

Want more creative photography tips and insight? Download Dan’s entire photography ebook bundle and get four titles for only $ 29. Dan’s 3-eBook bundle: Going Fast With Light, How to Become a PRO, Making the Image is on sale now for only $ 29 at SnapnDeals!

Like any form of art, compelling photography is not simply about reproducing your subject, it’s about representing your subject with visual hints and clues that suggest the larger scene. Accuracy isn’t what’s going to excite your viewer and draw them into your image, it’s feel, style and message.

details-photography-01.jpgWhen composing your photos, you don’t just want to show your audience what they can already see when they look at things in real life. Instead, you want to give them an abbreviated version of the scene that will make them try to visualize what lies beyond the borders of your frame. Your goal is to make a creative depiction of the world that invokes the imagination and emotions of your viewer. If you can activate not just their eyes, but also their brains, you’ll go further towards holding their attention with your shot.

One way to shoot abbreviated scenes is to accentuate details that your viewers might not notice as they speed through life. These kinds of shots often make for powerful photographs because it’s an easy way to fire up your viewer’s imagination. Let’s explore a few different examples of how you might approach shooting these kinds of detail photos.

5 Ways to shoot detail photos

1. The single detail

Sometimes can show a single aspect of the scene without giving away any other information about the rest of the scene, other than what is clearly apparent in your image. Just about every type of subject lends itself to this type of photograph: architecture, travel, environmental features, landscapes and even action.

When shooting the single detail, make sure you focus on creating a simple yet powerful image. Since your subject matter will be limited, the strength of your image will depend on a good composition and the strong use of light, colour and form. (see photos above and below as example)

Details photography 02

2. Details that give a sense of place

Including more elements in your shot often hints about how the subject relates with its surroundings. This can really add depth to your shot, because it starts to imply reference and narrative, instead of just being about a single thing. You’ll want to include enough information in the image that suggests a greater story about the scene to your viewers, without giving away too much information or weighing down your photograph.

Details photography 03 Details photography 04

3. Larger details

Detail shots don’t always have to be photographs of smaller objects and they don’t always have to be taken up close. There is enough detail of different sizes in the world that you can focus on nearly anything, as long as you can accentuate that particular subject matter in a visually appealing way.

This is where long lenses really shine. I love shooting long, suggestive shots, of distant subjects with my telephoto zoom lens. The narrow angle of view lets me focus on just two or three elements, and the shallow depth of field creates a soft background that doesn’t distract from the main subjects.

Details photography 05

Details photography 06

4. Lines and textures

Sometimes your shot will be more about simple graphic form and texture, instead of a physical object. When done right, you can still tell a powerful visual story with limited subject matter. Experiment with lines, shapes, colours, patterns and other abstract subject matter that appeals to you. Shadows can be powerful compositional elements because they suggest how your subject relates with other tangible objects around them.

Details photography 07

Details photography 08

5. Human details

People often make for the most powerful subjects, because as humans, we all relate with and respond to each other on some level. There is an unending variety of details that you can capture when shooting humans and their actions. Try focusing on elements such as interaction, motion, emotion and their association with others and with the world in general.

Details photography 09

Details photography 10

Less is more

Remember, you don’t always have to show the whole thing. Sometimes even a single abbreviated detail can be a powerful image. Experiment with cropping and zooming in on your subjects, to show the minimum amount of visual information needed to make a good photograph. You might be surprised at how little you need to show in order to create a compelling image.

As I like to say, any time you can invoke your viewer’s imagination, you’ve gone a long way towards creating a successful image. Strive for simplicity with your photography and see how far you can take this concept to its fullest potential.

What is your message?

Accuracy isn’t what’s going to excite your viewer and draw them into your image, it’s feel, style and message.


Want more creative photography tips and insight? Download my entire photography ebook bundle and get four titles for only $ 29 right now at SnapnDeals.

The post 5 Ways to Create Detail Photos by Dan Bailey appeared first on Digital Photography School.


Digital Photography School

 
Comments Off on 5 Ways to Create Detail Photos

Posted in Photography


7 Ways of Marketing Your Photography to Get People to Notice You

01 Jan

Irony is hard at work in photography: Taking pictures appears to be the easiest aspect of working in the industry, yet the business side of photography is what confounds many a photographer. What’s going on here? Surely, not every photographer has mastered taking good shots, so how can he find that easy while finding it hard to take a business Continue Reading

The post 7 Ways of Marketing Your Photography to Get People to Notice You appeared first on Photodoto.


Photodoto

 
Comments Off on 7 Ways of Marketing Your Photography to Get People to Notice You

Posted in Photography


6 Alternate Ways Newbie Photographers Can Try to Boost Income

23 Dec

Photography is an interesting profession, but then there are too many professionals in this field and most of them are freelancers. Therefore, it is hard to determine the real price for your work. Unless you are associated with a very famous studio or have published your pictures in reputed magazines, you can’t convince clients to pay you what you deserve. Continue Reading

The post 6 Alternate Ways Newbie Photographers Can Try to Boost Income appeared first on Photodoto.


Photodoto

 
Comments Off on 6 Alternate Ways Newbie Photographers Can Try to Boost Income

Posted in Photography