RSS
 

Posts Tagged ‘View’

Pentax K1 firmware update adds electronic shutter in live view mode

04 Oct

Pentax has released new firmware for its flagship K1 full frame camera that includes the ability for users to select electronic shutter shooting for the first time. Firmware version 1.3 adds a live view Electronic Shutter option to the menu system that the company says avoids the vibrations caused by mechanical shutter actions immediately prior to the exposure of the sensor. There are some limitations however, as the shake reduction system can’t operate during electronic shutter exposures, HDR mode won’t work, external flash units won’t be triggered and the drive is limited to single shot or multiple exposure modes.

Other functions added by this update include the ability to shoot square images and to record only two frames (Off and Type 2) when using the anti-aliasing filter simulation bracketing feature. Previously, three frames had to be recorded in a sequence that included Type 1 as well. A general ‘bracketing cancel’ Off option has also been added to the camera menu under the BKT function.

Pentax says that other more general stability issues are fixed too with this update. To read more and to download the firmware see the Pentax website.

Release information:

Release of the function expand Firmware version 1.30 for PENTAX K-1

RICOH IMAGING COMPANY, LTD. is pleased to announce the release of the function expanding Firmware version 1.30 for PENTAX K-1 digital SLR camera (launched on April, 2016) on September 29, 2016.

The function expand firmware is to add new function or increase number of setting for currently used PENTAX K-1 camera, so that improve the function, easy handling and update to the latest function.

New Enhanced Functions

*The Electronic Shutter at Live View mode
The Electronic Shutter can be selected at the Menu to reduce camera shake from the mechanical shutter when shooting with Live View mode.

*Add the [1:1] format at the Crop mode
Added and selectable [Square format (1:1)] size at the Crop mode.

*Add [2 frames bracketing] for the [AA Filter Simulator bracketing]
Addition to the current [3 frames bracketing (OFF, TYPE1, TYPE2)], the [2 frames bracketing (OFF, TYPE2)] is added and selectable for the [AA Filter Simulator bracketing]

*Smart Function
At the [BKT] setting, the bracketing range [±0 (=single frame)] can be selected.

[Others]
*Improved stability for general performance.

Articles: Digital Photography Review (dpreview.com)

 
Comments Off on Pentax K1 firmware update adds electronic shutter in live view mode

Posted in Uncategorized


4 Tips for Using for Live View to Get Sharper and More Creative Images

02 Sep

Live View versus optical viewfinder on your DSLR, pros and cons?

Pascal

By Pascal

If you shoot with a DSLR you probably use the same method for taking pictures that most people do, holding the camera up to your eye and looking through the viewfinder before snapping the shutter button.

This tried-and-true method has several benefits, including letting you see precisely what you are going to take a picture of before you click the button. Also, allowing you to track fast-moving subjects without any lag time, and even stabilizing the camera due to the fact that it’s being held up against your face instead of away from your body.

Getting this shot using the optical viewfinder wouldn't have been impossible, but it would have been much more difficult.

Getting this shot using the optical viewfinder wouldn’t have been impossible, but it would have been much more difficult.

However, the Live View function that is built into most DSLR cameras has a few tricks up its sleeve that can greatly benefit you as well. While not useful in ever single photographic situation, Live View certainly is worth a second look if you are the type of person who normally casts it aside in favor of the traditional viewfinder.

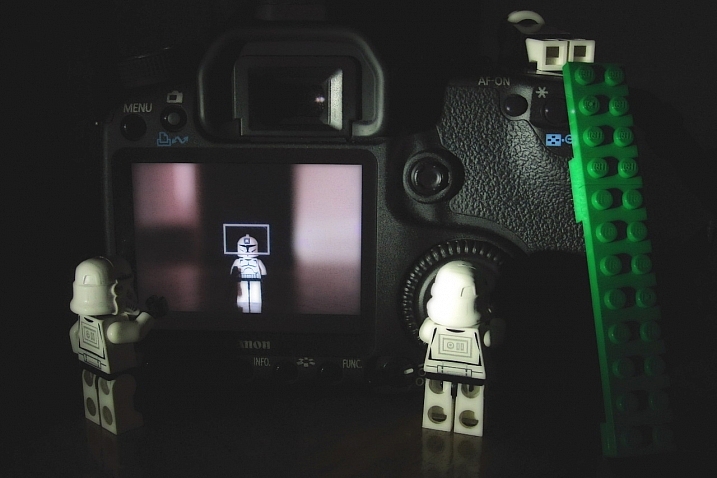
#1 Make sure your subject is perfectly focused

When you look through the optical viewfinder on your camera, you will see an array of rectangles or dots which each represent points on which your camera can focus. This is a result of your camera’s phase detect focusing system which is present in nearly every DSLR. While it usually works just fine, there are situations in which it can present a bit of a problem.

For one, the subject on which you are focusing can sometimes be outside the boundary of your focusing points, which makes it quite difficult to get it tack sharp even with something like the focus-and-recompose technique. Also, even with using the built-in focusing points it’s not always a guarantee that your subject will be completely in focus, especially if it is very far away like when shooting landscapes or scenic vistas.

Live View helped me get this flower focused just how I wanted, and instead of laying in the mud I used the flip-out screen to help me compose the picture.

Live View helped me get this flower focused just how I wanted, and instead of laying in the mud I used the flip-out screen to help me compose the picture.

Zoom-in on Live View

Live View is the magic bullet in these situations, as you can use it not just to frame your shot, but to zoom in close on a specific area to make sure it is focused. Think of this as though you were holding a magnifying glass up to your camera’s viewfinder when focusing on your subject, and using that as the basis for judging whether it is tack sharp or just a bit fuzzy. This obviously works best if your camera is firmly attached to a tripod, but even if you just set it on a solid surface such as a shelf, rock, post, or other object, you should be fine.

Live View can be a good way to make sure your subjects are tack sharp and perfectly focused.

Live View can be a good way to make sure your subjects are tack sharp and perfectly focused.

Each camera handles the zoom-in function a bit differently, but for most DSLRs there will be an option in one of the menus to enable a button on your camera to zoom in during Live View, and even set the percentage of zoom which tells you how much it will magnify the image. If your subject is not moving, and neither is your camera, this technique is one of the best possible ways to make sure everything is tack sharp precisely how you want it to be (using manual focus in this instance can be helpful also).

#2 See previews of camera effects in realtime

One fun trick that many DSLR manufacturers have added to their cameras is the ability to do various types of effects like selective coloring, miniature, and black-and-white, among many others. Think of them as though you are adding Instagram filters, but in realtime, as you are taking your pictures instead of on your phone afterwards.

Using Live View as you activate various scene modes is a fun way to experiment with different types of creative image effects. It also has the added bonus of allowing you to play around and see how the options affect your photography before you even click the shutter.

A common camera effect is "miniature," which mimics a tilt-shift lens. It's fun to play around with these built-in effects using Live View which shows you a preview of what the final image will look like as you compose it.

A common camera effect is “miniature,” which mimics a tilt-shift lens. It’s fun to play around with these built-in effects using Live View, which shows you a preview of what the final image will look like as you compose it.

Some photographers frown on this type of creative expression, and prefer to leave these effects and scene modes to Photoshop, where things can be endlessly controlled, changed, and tweaked to perfection (often ad nauseam). But, my own personal stance is, if you’re making pictures you enjoy by using simple in-camera effects, then why not keep doing it?

Some of the built-in modes are a little cheesier than others, and you usually can’t shoot in RAW format. But using Live View to preview the different sorts of photography effects you can explore, is a great way to try something new and add a little spark back to your creative juices at the same time.

#3 Depth of Field preview

This one piggybacks pretty well off of the previous item, but I wanted to list it separately because it is so useful on its own. When you change the aperture and focal length of your lens, you are also changing the depth of field, or area that is in focus. It’s a difficult concept to understand since it involves several different variables, including how close you are to your subject and how far away is the background.

This confusion can be compounded by the fact that your optical viewfinder doesn’t really show you what to expect when you click the shutter button. Some DSLR cameras have a Depth of Field Preview button that allows you to close down the aperture and see what it will look like when you take a photo (it also gets dark if you use a small aperture), but another way to do this is by using Live View.

It really helped to see a preview of the depth of field by using Live View when composing this image.

It really helped to see a preview of the depth of field by using Live View when composing this image.

How it works

When you look through the viewfinder on a DSLR camera you are seeing through the lens while it is opened to its widest possible value. But, when you click over into Live View the aperture blades close down to the value you’ve specified, or that which the camera thinks is appropriate, depending on the shooting mode you are using.

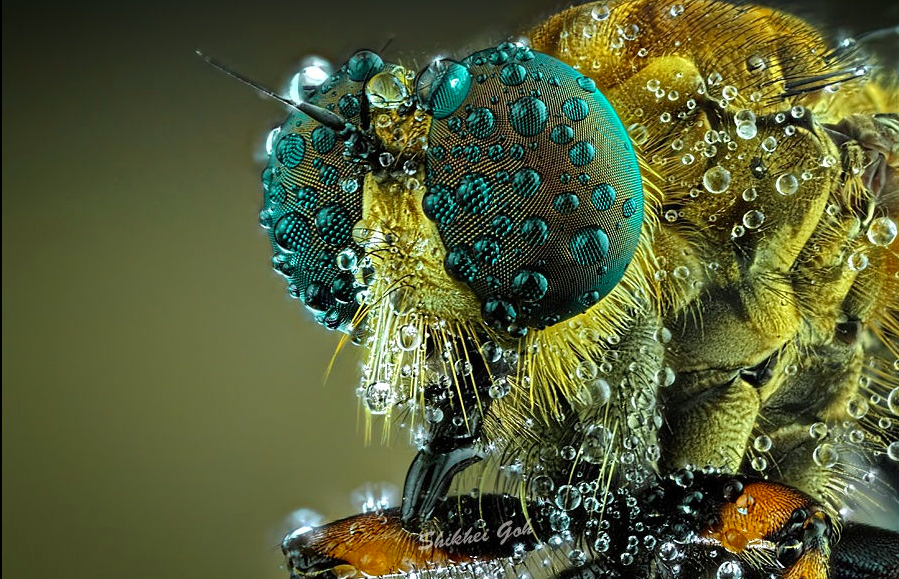
This makes it possible to see precisely what the picture will look like when you press the shutter button. So, if you focus on an object while in Live View, you will see a more accurate representation of the depth of field than looking through the viewfinder. This is incredibly useful when shooting macro photos, because it’s difficult to understand just what is in focus and what is not unless you can see it yourself using Live View.

Depth of field can be extraordinarily thin when shooting macro pictures, and using Live View to see a preview of the final result is a good way to get the photo to show up just how you want.

Depth of field can be extraordinarily thin when shooting macro pictures, and using Live View to see a preview of the final result is a good way to get the photo to show up just how you want.

#4 Tap to focus

One final trick that Live View offers, is the ability to actually use it for the act of focusing itself. As more cameras start implementing touch screens, manufacturers like Canon have started allowing users to tap on the screen itself to actually focus the camera, much in the same way you do on your mobile phone.

While this feature is not available on all DSLR cameras, and though some with touch screens don’t have focusing enabled, if you do have a camera that allows you to tap-to-focus you might find it incredibly useful and well-worth your time. This won’t do you any good if you are shooting sports, action, or wedding photos, since the touch-based focusing isn’t as quick. But if you are out shooting casually it’s something you might really enjoy trying.

It even has some advantages over traditional viewfinder-based focusing if you are shooting at extreme angles, such as very low to the ground. More and more cameras are offering flip-out screens so you can swivel it, instead of crouching down, and then tap it to lock focus.

If you have a touchscreen, using Live View can be a great way to make sure your subject is focused exactly how you want by simply tapping the area you want to be in focus.

If you have a touchscreen, using Live View can be a great way to make sure your subject is focused exactly how you want by simply tapping the area you want to be in focus.

Summary

These are just a few of the options available to you if you use Live View on a DSLR. If you are more of a traditional shooter who prefers the optical viewfinder I hope you at least give Live View a chance. It’s not going to be the best option in every situation, but you may find it to be more compelling and useful than you realize.

If you do like shooting in Live View and have your own tips to share, please leave your thoughts in the comments below!

googletag.cmd.push(function() {
tablet_slots.push( googletag.defineSlot( “/1005424/_dPSv4_tab-all-article-bottom_(300×250)”, [300, 250], “pb-ad-78623” ).addService( googletag.pubads() ) ); } );

googletag.cmd.push(function() {
mobile_slots.push( googletag.defineSlot( “/1005424/_dPSv4_mob-all-article-bottom_(300×250)”, [300, 250], “pb-ad-78158” ).addService( googletag.pubads() ) ); } );

The post 4 Tips for Using for Live View to Get Sharper and More Creative Images by Simon Ringsmuth appeared first on Digital Photography School.


Digital Photography School

 
Comments Off on 4 Tips for Using for Live View to Get Sharper and More Creative Images

Posted in Photography


Glitch Cities: Buildings Mysteriously Deleted from Chinese ‘Street View’

10 Aug

[ By WebUrbanist in Art & Photography & Video. ]

deleted buildings

All kinds of architecture is being inexplicably erased from the Baidu Total View image database (analogous to Google Street View) … and whoever is behind it is doing an oddly haphazard job of removing things.

810 (4)

Freelance photographer Jonathan Browning encountered this mystery a few years ago. He was searching for locations on Total View and discovered a half-erased bridge near some sooty factories and industrial complexes.

810

A resident of Shanghai, Browning dug deeper and found government buildings, prisons and other municipal infrastructure. These semi-deleted structures were all over, partially hidden in hundreds of Chinese cities viewed by hundreds of millions of monthly Total View users.

810 (2)

In some cases, the partial deletions seem intentional – a building might remain with its sign and smoke stacks gone. In other instances, at least some attempt has been made to erase the entire structure. Often, aftereffects of cloning tools and other basic Photoshop-style manipulations are easy to spot in the picture. Since some of these structures are high, many of them have to be edited in dozens of surrounding views, too. Even normal-sized, street-facing buildings often show up in a few different shots.

810 (1)

Like Google Street view, the images found on Baidu are assembled from shots taken from cars (or persons) with mounted cameras. Also like their international counterpart, Total View removes some sensitive details, but the removals in this case don’t add up in terms of privacy or national security. If anything, they leave traces and thus highlight areas that people like Browning might find worth exploring.

810 (3)

Of course, Browning had to be careful when driving around and photographing places that someone (corporate or governmental) had decided shouldn’t be on publicly-accessible image maps. In the end, no one seems quite sure what these attempted deletions are all about, and the Chinese government, as usual, isn’t saying a thing (via BldgBlog and Wired).

Share on Facebook


[ By WebUrbanist in Art & Photography & Video. ]

[ WebUrbanist | Archives | Galleries | Privacy | TOS ]


WebUrbanist

 
Comments Off on Glitch Cities: Buildings Mysteriously Deleted from Chinese ‘Street View’

Posted in Creativity


India says no to Google Street View, citing security concerns

13 Jun
Launched in 2007, Google’s Street View service uses imagery captured by cameras mounted on cars, backpacks, bicycles and snowmobiles. Today, the service covers locations all over the globe.

Indian officials have told the BBC that the country has rejected Google’s plans to image its towns and cities as part of its expanding Street View service. Citing security concerns around ‘sensitive defense installations,’ officials point out that planning for the 2008 Mumbai attacks was believed to have involved photographic reconnaissance. As such, the country believes, Street View could compromise national security.

This isn’t the first time that Google’s Street View service has attracted concerns. Several countries have at one time or other raised privacy and security worries. The Czech government has banned the company from taking any new imagery (current Street View images of Prague are frozen at 2014), and in 2010, almost 250,000 Germans requested that Google blur images of their homes.

Articles: Digital Photography Review (dpreview.com)

 
Comments Off on India says no to Google Street View, citing security concerns

Posted in Uncategorized


A New View: 65+ Illuminating Larger-Than-Life Macro Images

02 May

[ By Steph in Art & Photography & Video. ]

Screen Shot 2016-05-01 at 3.04.12 PM

Few of us would ever get a glimpse of the tiniest rope-like iridescent quills on a peacock’s feather, the scales on a moth’s wing, dew droplets on a spider’s eyes or the planetary patterns on a bubble of soap if not for the macro photographers who carefully document details too small for the naked eye to see. It’s almost as if we’ve shrunk small enough to stare an arachnid in the face, or put ourselves in danger of being trapped by a carnivorous plant.

Spiders by Jimmy Kong
macro spider 1

macro spider 2

macro spider 3

macro spider 4

Six to eight spider eyes stare back at you, reflecting the image of a camera lens, the human holding it, and sometimes a light. Photographer Jimmy Kong captures images of all sorts of creatures, but his spiders seem to have so much personality, watching curiously as he gets close enough to spot the tiny hairs on their legs.

Butterfly and Moth Wings by Linden Gledhill
macro butterfly wings 1

macro butterfly wings 2

macro butterfly wings 3

macro butterfly wings 4

Tiny overlapping scales reminiscent of flower petals reveal the smallest details of their shapes and vivid colors in a series of macro butterfly and moth wings by Linden Gledhill, a biochemist by training.

Coral & Other Sea Life by Daniel Stoupin
macro coral 1

macro coral 2

macro coral 3

150,000 shots went into this video documenting the secret lives of ‘slow’ marine animals like coral and sponges, their movements being too small to be seen without a time lapse. Says Bioquest Studios, “Why so many? Because macro photography involves shallow depth of field. To extend it, we used focus tacking and deconvolution algorithms. Each frame of the video is actually a stack that consists of 3-12 shots. just the intro and last scene are regular real-time footage.”

Peacock Feathers by Waldo Nell
macro peacock 1

macro peacock 2

macro peacock 3

macro peacock 4

Go closer and closer and closer to a peacock feather, and the level of detail and color variation only gets more intense, with the smallest parts revealing themselves to be tiny ropes. Photographer Waldo Nell used an Olympus BX 53 microscope to take hundreds of individual shots, combining them to get the images seen here to get the depth of field that is typically lost in this kind of photography.

Carnivorous Plants by Joni Niemelä
macro carnivorous 1

macro carnivorous 2

macro carnivorous 3

macro carnivorous 4

The sticky insect-baiting appendages of carnivorous plants get a good inspection in all their alien beauty in this series by Joni Niemelä. Each photo offers a different view of the Drosera plant, commonly known as the ‘sundew.’

Next Page – Click Below to Read More:
A New View 65 Illuminating Larger Than Life Macro Images

Share on Facebook


[ By Steph in Art & Photography & Video. ]

[ WebUrbanist | Archives | Galleries | Privacy | TOS ]


WebUrbanist

 
Comments Off on A New View: 65+ Illuminating Larger-Than-Life Macro Images

Posted in Creativity


Frame by frame: ‘live view’ continuous shooting with the Sony a6300

13 Apr

One of the features we were excited by when the a6300 was announced was the promise of ‘live view’ while shooting continuous bursts of shots. Now we’ve used and tested it, what do we think?

What’s the big deal?

Autofocus systems on mirrorless cameras have been getting better and better with each generation of cameras, to the point that the best of them match (and in some circumstances, exceed) the performance we expect from similarly priced DSLRs.

However, many models still lag behind DSLRs in their ability to show you what’s going on while in continuous shooting mode. The common trick of showing a playback of the last captured image makes it hard to keep up with a moving subject, especially if it moves unpredictably, so that you can’t just compensate for the lag.

The a6300 isn’t the first mirrorless camera to try to offer a live view while continuous shooting (several Nikon 1 models, which use comparatively small sensors to allow fast read-out, even manage to give an uninterrupted feed), but it’s still a rare enough feature to make it worth investigating.

What did we find?

We shot the a6300 side-by-side with the Canon EOS 7D (a DSLR that offers the same 8 fps frame rate as the Sony) and found something interesting. The a6300 has a shorter blackout period than the Canon but turns out to only be showing a single updated frame between each capture. At lower, 5 fps shooting rate, we saw two or three frames on display between captures.

That sounds terrible. It sounds like cheating. but it’s not quite the end of the story. Watch the beginning of the video again – the real-time playback – it looks pretty convincing, doesn’t it?

The fact that it looks so convincing left us wondering: why does the screen ever black out? Why doesn’t the camera just continue to show the ‘live’ image until the next one is available? We think we know the answer.

Note the way that the image doesn’t just cut to black – it fades to black then abruptly cuts to the next update. We believe this is trying to achieve something like the ‘black frame insertion’ technology used in some modern TVs: inserting a black frame prompts your brain to imagine what’s happened between the two frames it’s seen, rather than being distracted by the contradiction between perceiving a sense of movement but seeing static images.

Does it work?

In real-world shooting this is pretty convincing: we only discovered the camera was just showing single images when we recorded it at 240 fps, and even then it took us a while to convince ourselves that we weren’t looking at an error stemming from a clash in display and capture frequencies (temporal aliasing).

So, while the display is only showing you eight frames per second (one between each capture), it’s doing so in a way that gives your brain a convincing sense of motion. The question we wanted to answer was: ‘if the blackout between frames is short enough, and the motion looks fairly convincing, is it as easy to follow action as with a DSLR?’

We spent some time trying to shoot rugby with the a6300 to see how easy it was to follow the game’s fast and unpredictable action. The results were mixed – the camera gave enough information for you to be able to follow the action to a reasonable degree, but not as much as you might want.

The a6300’s live view provided enough information to let us follow the action, but not as much as a high-end DSLR, which meant we reacted more slowly to anything unexpected.

Alongside the a6300 we were also shooting with the Nikon D5, not as direct comparison but because we also need to shoot sports with it. As you might expect, the $ 1000 mass-market a6300 wasn’t as good as Nikon’s $ 6500 professional sports-oriented camera, but it’s the way that it fell short that was interesting.

Although the video further up the page shows that the a6300’s live view looks a lot like real motion and its blackout is shorter than the EOS 7D’s, in use it becomes clear that your brain actually can make use of the extra information the 7D gives you about the subject’s movement.

For example, at the rugby we found that we could keep pace with the action when shooting with the Sony but it would take us longer to react if we made the mistake of believing a player’s dummy-pass and started moving in the wrong direction. With the DSLR we’d spot our mistake sooner and turn back to the real action faster. 

At set pieces, where you have a good idea of what’s going to happen next, the a6300 could shoot with confidence.

Having looked at what the camera’s doing and then put to real-world use, we’d conclude that the a6300’s continuous shooting live view more successful than its single frame update makes it sound. It’s convincing enough to let you keep up with fast action, but there’s still room for improvement as soon as anything unexpected happens.

Articles: Digital Photography Review (dpreview.com)

 
Comments Off on Frame by frame: ‘live view’ continuous shooting with the Sony a6300

Posted in Uncategorized


How to Critique Your Images Objectively: Ask for Other Points of View

08 Apr

What happens when you ask 150 people to look at the same photos and pick their favourites? The answer is simple: a pattern emerges. But which pattern emerges can be very surprising, as I found out recently.

Last year I decided to self-publish a photo book on Spain. I’d been wanting to do it for years. When the crowd-funding website Kickstarter announced it was opening up shop in Spain, where I live, I took it as a sign and made sure my project was uploaded the day they opened.

Alhambra palace ranked number 1

#1 ranked image by my crowd-fund book supporters.

But I wanted to do something different with the book. Then it hit me – I could get supporters to be a part of the process by choosing which photos would go in the book. I thought of it as crowd-funding meets crowdsourcing. I wanted everyone to play a role in my book. So I uploaded 240 images onto a private webpage, and gave everybody a password and a mission; chose your favourite 80 images. After the voting period was over, I tallied up the results and the top 80 images went into the book.

I was blown away by the results. Some of my personal favourites didn’t even make it in, and some other images that I didn’t think were particularly strong, ended up being extremely popular. It was very instructive. The one that stands out for me is of cows in a field beside a church in the mountains of northern Spain. I almost didn’t even include it in the original batch of 240 images. But not only did it make it into the top 80, it was the 6th most popular image!

Cows ranked 6

On the other hand, here’s a shot of a beach in the south of Spain that I quite like. But it didn’t make the cut – not even close. It ranked a mere 223rd. Fascinating!

Beach ranked 223

I think there are a number of things at play here. For one, the photographer often attaches a value to a photograph that the viewer doesn’t. If an image took repeated attempts to achieve, or was somehow difficult to get in another way — perhaps finding the right angle took hours, or maybe there was some fantastic luck involved that would be impossible for the viewer to appreciate — then it’s natural for the photographer to place a greater value on it. But the final image is what counts, and should be judged on its merits alone, which is sometimes hard for the photographer to do without bias.

Wild horse roundup ranked 133

Ranked #133

For instance, I particularly like this image of a church in the city of Salamanca. The strong graphic lines of the church’s shadow on itself, was not only dynamic because of its oblique orientation, but also offered a second yin-yang with the tourists, some in shade against the sunlight, the others in sunlight against the shade. But, it ranked only #208, again, not even close. But I find the fact it was not very popular more interesting, than disappointing. It wasn’t an obvious image to take, I had to see the opportunity first, then carefully compose, and wait for people to enter the light (and shade) at just the right time. I got it after almost an hour of waiting. Is that part of the reason I like it so much? I find that an interesting question.

Church shadows ranked 208

Of course the reverse also happens. The following image of the field of sunflowers was an easy photo to take, and much easier to spot as a photo-op, versus the church in Salamanca. Speaking as a photographer, I don’t think it’s one of my best images technically or creatively, but that doesn’t change the fact it’s a beautiful landscape. The people who look at your photos don’t (and shouldn’t) care about how hard or easy an image was to take. They either like it or they don’t. In this case, the field of sunflowers was very popular, ranking 4th overall.

Sunflowers ranked 4

Now, this doesn’t mean that you should only take photos that you think will be popular. But if you want to please a crowd with a slideshow, or a book, paying attention to what people like will make it more successful. It doesn’t matter how lucky you got, or how hard you worked to get a photo. The important thing is to try to look at it through other people’s eyes. If you enjoy sharing your images, it’s crucial to remove your own bias, and in the end it will make you a better photographer.

Editor’s note: How you can go about using this new knowledge without making a book? You can try posting a set of images as a collection on Facebook and ask people to rank their favorites. Or post a color and black and white of the same image and ask people which they prefer. Why not go ahead and try it here – post some photos in the comments below and rank each others images. How else can you look at your image objectively? 

googletag.cmd.push(function() {
tablet_slots.push( googletag.defineSlot( “/1005424/_dPSv4_tab-all-article-bottom_(300×250)”, [300, 250], “pb-ad-78623” ).addService( googletag.pubads() ) ); } );

googletag.cmd.push(function() {
mobile_slots.push( googletag.defineSlot( “/1005424/_dPSv4_mob-all-article-bottom_(300×250)”, [300, 250], “pb-ad-78158” ).addService( googletag.pubads() ) ); } );

The post How to Critique Your Images Objectively: Ask for Other Points of View by Mike Randolph appeared first on Digital Photography School.


Digital Photography School

 
Comments Off on How to Critique Your Images Objectively: Ask for Other Points of View

Posted in Photography


How to Critique Your Images Objectively: Ask for Other Points of View

07 Apr

What happens when you ask 150 people to look at the same photos and pick their favourites? The answer is simple: a pattern emerges. But which pattern emerges can be very surprising, as I found out recently.

Last year I decided to self-publish a photo book on Spain. I’d been wanting to do it for years. When the crowd-funding website Kickstarter announced it was opening up shop in Spain, where I live, I took it as a sign and made sure my project was uploaded the day they opened.

Alhambra palace ranked number 1

#1 ranked image by my crowd-fund book supporters.

But I wanted to do something different with the book. Then it hit me – I could get supporters to be a part of the process by choosing which photos would go in the book. I thought of it as crowd-funding meets crowdsourcing. I wanted everyone to play a role in my book. So I uploaded 240 images onto a private webpage, and gave everybody a password and a mission; chose your favourite 80 images. After the voting period was over, I tallied up the results and the top 80 images went into the book.

I was blown away by the results. Some of my personal favourites didn’t even make it in, and some other images that I didn’t think were particularly strong, ended up being extremely popular. It was very instructive. The one that stands out for me is of cows in a field beside a church in the mountains of northern Spain. I almost didn’t even include it in the original batch of 240 images. But not only did it make it into the top 80, it was the 6th most popular image!

Cows ranked 6

On the other hand, here’s a shot of a beach in the south of Spain that I quite like. But it didn’t make the cut – not even close. It ranked a mere 223rd. Fascinating!

Beach ranked 223

I think there are a number of things at play here. For one, the photographer often attaches a value to a photograph that the viewer doesn’t. If an image took repeated attempts to achieve, or was somehow difficult to get in another way — perhaps finding the right angle took hours, or maybe there was some fantastic luck involved that would be impossible for the viewer to appreciate — then it’s natural for the photographer to place a greater value on it. But the final image is what counts, and should be judged on its merits alone, which is sometimes hard for the photographer to do without bias.

Wild horse roundup ranked 133

Ranked #133

For instance, I particularly like this image of a church in the city of Salamanca. The strong graphic lines of the church’s shadow on itself, was not only dynamic because of its oblique orientation, but also offered a second yin-yang with the tourists, some in shade against the sunlight, the others in sunlight against the shade. But, it ranked only #208, again, not even close. But I find the fact it was not very popular more interesting, than disappointing. It wasn’t an obvious image to take, I had to see the opportunity first, then carefully compose, and wait for people to enter the light (and shade) at just the right time. I got it after almost an hour of waiting. Is that part of the reason I like it so much? I find that an interesting question.

Church shadows ranked 208

Of course the reverse also happens. The following image of the field of sunflowers was an easy photo to take, and much easier to spot as a photo-op, versus the church in Salamanca. Speaking as a photographer, I don’t think it’s one of my best images technically or creatively, but that doesn’t change the fact it’s a beautiful landscape. The people who look at your photos don’t (and shouldn’t) care about how hard or easy an image was to take. They either like it or they don’t. In this case, the field of sunflowers was very popular, ranking 4th overall.

Sunflowers ranked 4

Now, this doesn’t mean that you should only take photos that you think will be popular. But if you want to please a crowd with a slideshow, or a book, paying attention to what people like will make it more successful. It doesn’t matter how lucky you got, or how hard you worked to get a photo. The important thing is to try to look at it through other people’s eyes. If you enjoy sharing your images, it’s crucial to remove your own bias, and in the end it will make you a better photographer.

Editor’s note: How you can go about using this new knowledge without making a book? You can try posting a set of images as a collection on Facebook and ask people to rank their favorites. Or post a color and black and white of the same image and ask people which they prefer. Why not go ahead and try it here – post some photos in the comments below and rank each others images. How else can you look at your image objectively? 

googletag.cmd.push(function() {
tablet_slots.push( googletag.defineSlot( “/1005424/_dPSv4_tab-all-article-bottom_(300×250)”, [300, 250], “pb-ad-78623” ).addService( googletag.pubads() ) ); } );

googletag.cmd.push(function() {
mobile_slots.push( googletag.defineSlot( “/1005424/_dPSv4_mob-all-article-bottom_(300×250)”, [300, 250], “pb-ad-78158” ).addService( googletag.pubads() ) ); } );

The post How to Critique Your Images Objectively: Ask for Other Points of View by Mike Randolph appeared first on Digital Photography School.


Digital Photography School

 
Comments Off on How to Critique Your Images Objectively: Ask for Other Points of View

Posted in Photography


Bird’s eye view: Photographing Cherry Blossoms with the DJI Phantom 4

03 Apr

The cherry blossoms at the University of Washington are a hugely popular attraction every spring in Seattle. Weekends during the peak of the blossom bring in crowds of people to the Quad, all hoping to capture the blooms with everything from professional cameras to tablets and selfie sticks. Rather than trying to avoid the mass of people, photographer and DPR reader Dale Johnson embraced the scene and found a new perspective by shooting from above. Find out how he’s adopted aerial photography and what went into capturing this shot.

By Dale Johnson

Trying to find unique perspectives of familiar places is becoming harder and harder, as everyone and their mother has a camera (mostly built into their phones) and hundreds of thousands of images are uploaded to social media every day. A camera attached to an aerial platform is a fairly new concept, but it’s a category that’s growing rapidly. Adding a drone to my photography kit has provided opportunities to find new ways to see things. In addition to the new perspective, I’m finding that I love to have the element of movement in the scene, which the video and smooth and stable platform allows.

I started experimenting with drone photography last summer with the DJI Phantom 3 Professional. I’m not much of an early adopter, tending to wait until the technology has matured before jumping in. I have been following the development of drones for some time since I bought one of the early remote helicopters several years ago. I tried to learn how to fly it around my living room, though not very well I must say. The Phantom 3 is a joy to fly and incredibly simple to control. I have loved flying it around Seattle. 

Having purchased the new DJI Phantom 4 quadcopter the day it was released, I’d been on the lookout for a place to fly it. The cold, wet, grey days of our Seattle winter have been slowly improving into a beautiful spring and I was eager to get it in the air. I was a student at the University of Washington many years ago, and remember how the ‘quad’, with all its cherry trees, would explode in full bloom each spring. It seemed like the perfect place to fly and get a shot that I had not seen before. 

I first went to the quad just after sunrise on Friday morning to catch the warm light with fewer people around. I was able to get a few decent shots, but the sunlight blew out the highlights a bit and even though I was shooting in Raw, the small sensor on the built in camera didn’t give me the latitude for corrections that my DSLR would. I decided to go back on Saturday afternoon as it was mostly overcast with more even contrast. This time the quad was buzzing. The symmetry of the scene made for an easy composition with the cherry trees framed by the buildings, and the crisscrossing red brick paths added diagonal elements to the image. I also like how all the people give the image a sense of scale and contrast.

A quick word about drones and flying within the city. There are a lot of negative feelings out there about drones and people concerned about privacy issues, or collisions with airplanes. The FAA (in the US) has a new requirement to have drone operators register with the FAA (which I have) and some rules for flying. I followed all the FAA requirements during this flight and found after a quick check with the University of Washington Police that there are no restrictions for flying on campus, except over stadium events.

This new vantage point of the world looking down from above has inspired me all over again to look for unique views on familiar places.

DPReview encourages responsible, legal and safe use of drones. Check local regulations before flying any unmanned aerial vehicle.


Dale Johnson has been taking pictures for over 30 years after receiving a Nikon camera as a graduation present from high school. He now has a day job that has him traveling the world, giving him the opportunity to see and experience people and cultures that he would not otherwise visit (56 countries and counting!). Travel photography has become his new passion. You can see more of Dale’s work at:

500px: https://500px.com/drjhnsn

SmugMug: https://dalejohnson.smugmug.com

Instagram: https://www.instagram.com/dalejohnsonphoto/

Youtube: http://www.youtube.com/c/dalejohnsonphoto

Articles: Digital Photography Review (dpreview.com)

 
Comments Off on Bird’s eye view: Photographing Cherry Blossoms with the DJI Phantom 4

Posted in Uncategorized


What a view: Aukey Super Wide Angle lens quick review

05 Mar

Aukey is a mobile device accessory maker that has been in the clip-on lens business for quite some time. We’ve had a chance to try out one of the company’s latest models, the ‘Super Wide Angle’ lens which at 238 degrees offers quite an extreme angle of view. Read more

Articles: Digital Photography Review (dpreview.com)

 
Comments Off on What a view: Aukey Super Wide Angle lens quick review

Posted in Uncategorized