RSS
 

Posts Tagged ‘Using’

Panasonic promises high sensitivity sensors using ‘Micro Color Splitters’

04 Feb

mcsthumb.jpg

Panasonic has devised a method to increase the sensitivity of image sensors, by replacing the near-universal colour filter array with prism-like ‘Micro Color Splitters’ to generate colour information. The key advantage is that all of the incoming light is directed to the sensor, instead of half or more being absorbed by the color filter dyes. This promises to deliver images with less noise in low light. The development is published in the journal Nature Photonics, and outlined in a press release on Panasonic’s website.   

News: Digital Photography Review (dpreview.com)

 
Comments Off on Panasonic promises high sensitivity sensors using ‘Micro Color Splitters’

Posted in Uncategorized


Using AutoPano Giga To Create Panoramas With Gigapan Heads Or Freehand Shooting Grids

04 Feb

I know, it’s a long title but I want to show how easy it can be to assemble panoramas with either a Gigapan head or by shooting freehand, gridded panoramas. AutoPano Giga has been my panorama product of choice after starting with huggin, a free option that does quite well it its own right.

One ability AutoPano Giga excels at is the ability to take images and information from a number of automated shooting heads, such as Kolor’s own PanoGear or even other brands, such as the GigaPan EPIC Pro, which I reviewed for DPS two years ago. I noted in that post that Gigapan’s software was in its first stages and was quite basic and while the software has been upgrade over the intervening two years, it’s still not as robust as Kolor’s AutoPano Giga. Plus, it can not handle freehand panoramas

Utilizing AutoPano Giga to produce stunning panoramas shot with Gigapan’s heads (mine were shot with the EPIC Pro) is fairly simple.

Shoot

Shooting with the Gigapan EPIC Pro is explained in the previously mentioned post. That much hasn’t changed.

Import

Bringing images into your computer is no different than your normal shooting method. The nice thing about AutpoPano Giga is it will understand your RAW files no problem, so there is no need to convert (but you can if you are impatient and want smaller file sizes). I have found it handy to shoot panoramas, especially large ones, on a separate memory card reserved just for panoramas. That makes finding the files all the easier.

With all your panorama files in one location, it is time to use the stitching wizard in AutoPano Giga.

Wizard

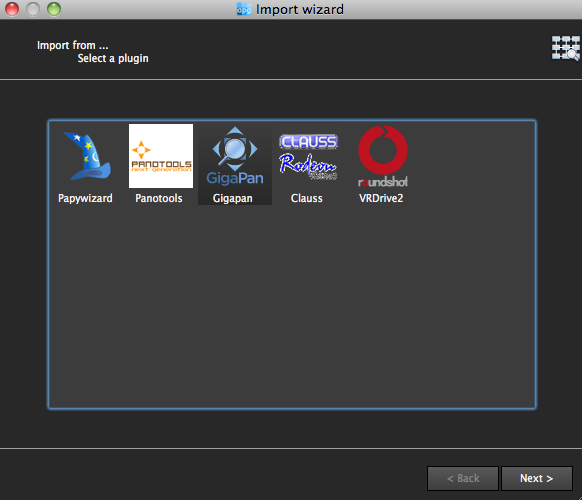
The first step in the wizard is to pick the device that was used, in this case we select Gigapan.

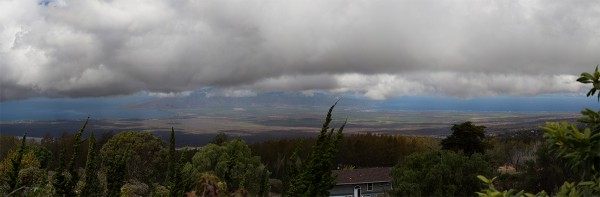
The next screen asks for input. If your shot went off without a hitch and you have a nice grid of images, AutoPano should know this. For instance, when I select the 98 images from my demonstration shot from Maui, Hawaii at the Ali’i Kula Lavender Farms, AutoPano knows this shot was 7 rows and 14 columns. The nice thing about this method is there is no need to import a control file that explains the grid to the software. This is also why, with careful execution, freehand panoramas can be imported.

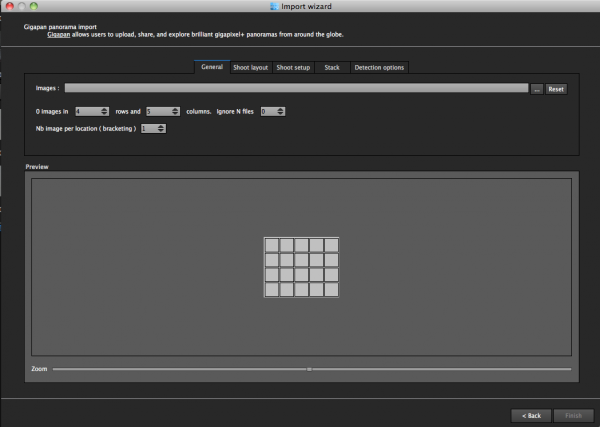
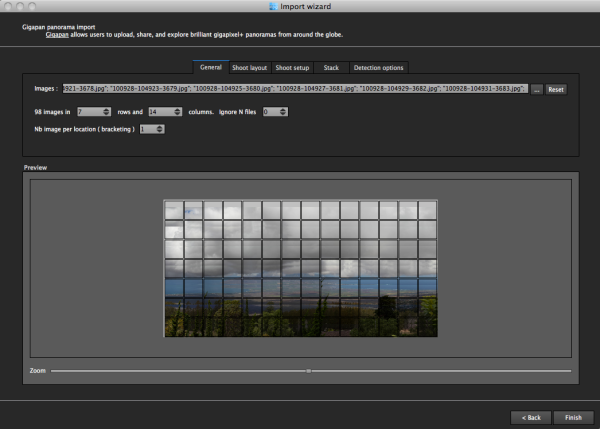
With a straightforward shot like this, there is little else for me to do, but let me show you what the other screens do, if you are curious.

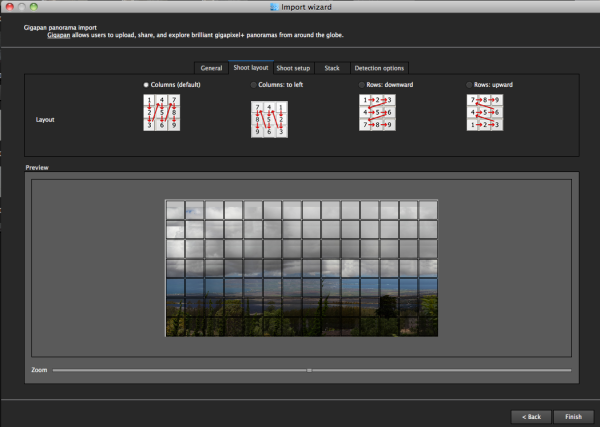
The next screen allows for changing of the panorama shooting direction. One thing I wish this screen had is the ability to pick a grid shot top to bottom, then back up the next column, down the next, and so on, for those times when I shoot a panorama freehand, such as this 2.2 gigapixel image of the Taj Mahal (shot without a tripod and head because they are restricted).

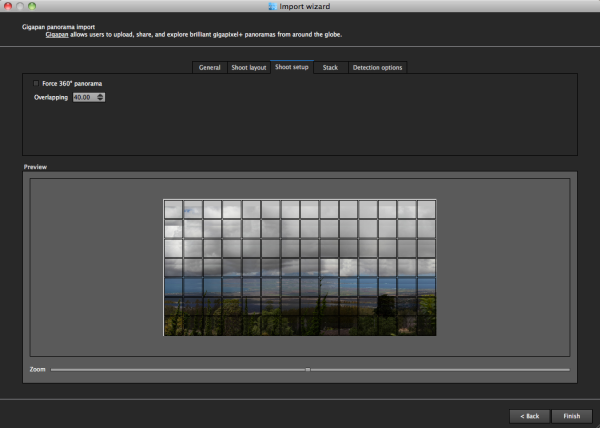
After that screen, custom overlap or forcing a 360 degree view can be selected.

The last two screens deal with control points and that can be left on auto unless you have a particularly good reason to change them. This software works quite well on auto (with some manual tweaks to come).

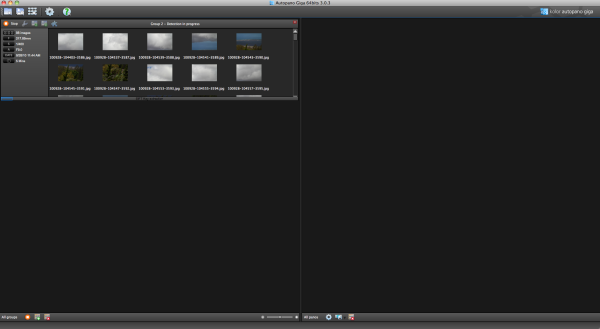
Press “Finish” and AutoPano takes you to the main screen and starts detecting and stitching. I like that, while I can tell the program the pattern of a shoot and the amount of overlay, it will still automatically detect control points and I can even set this number to 200 by default, to ensure the best matching.

Output

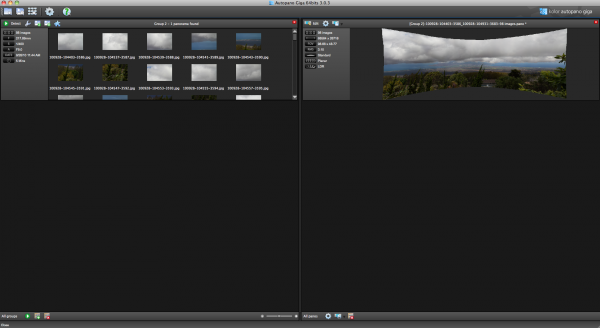
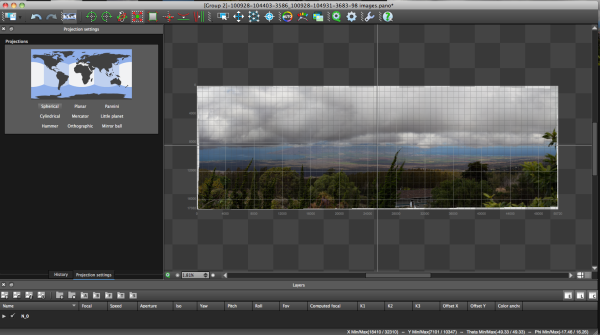
Things aren’t always perfect right out of the box because the software doesn’t know which type of projection you want. Below you will see the resultant output on the right, which has a planar projection.

This is easily changed in the Edit screen, where a number of adjustments can be made if desired. I decided on a spherical projection to keep my sides straight.

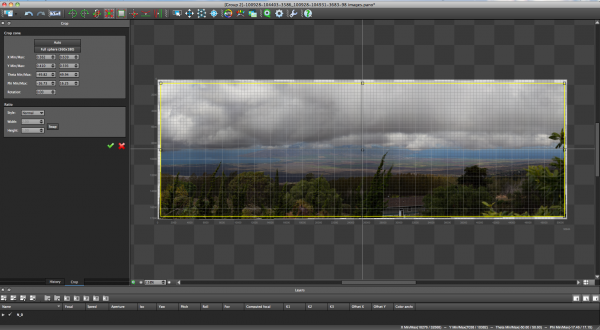
From there, the only change I saw that needed to be made was to crop the image, which is dead easy: click on the crop tool and it automatically selects the crop dimensions. Changes are made by dragging corners or sides and rotations can be made (in case your tripod wasn’t level when shooting).

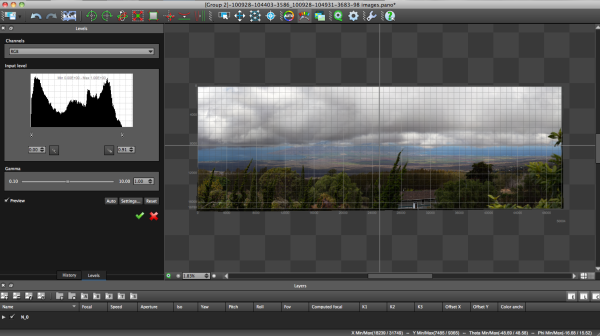
The last bit of editing I tend to do in the program is to set the levels, which is as easy as setting them in Photoshop or other programs.

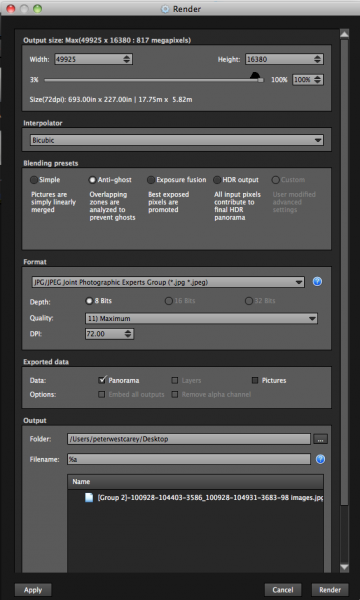
Before being completely done, we need to get the resultant image out of AutoPano Giga and that is done by clicking on the gear in the main screen in order to render the image. Settings on this screen allow for the resizing of the image once rendered (handy if you are sending this out as a JPEG as the max dimension for those is 30,000 pixels) as well as file type, compression, color depth and more.

What Else Can Be Done?

AutoPano Giga is a robust panoramic creation and editing program. This post is not intended to be a complete review of all the features as that list is rather long. Some of the highlights include:

  • Ability to handle HDR bracketed shots (it is available in the first screen of the wizard and is labeled Nb image per location (bracketing)
  • Manual removal of ghosts via masking(although the automatic option works well)
  • Saving results in a variety of file types, including .PSB and .TIFF
  • Batch processing
  • Editing vanishing points and pitch, roll and yaw

Results

How did it come out? Great! But…unfortunately DPS isn’t set up to show case large panoramas but I have hosted the resulting image on my blog. The final image is 43MB large and will take a little time to download with the amount of traffic DPS typically sees.

Click here to be taken to the image. Zoom in and use Full Screen mode for the best experience. Can you spot the airplane taking off? What about people surfing?

For references sake, the panorama was made with a Canon 7D and 28-300mm L lens. It was composed of 98 images shot in Manual Mode at ISO 100, 135mm, f/9, 1/400. The Gigapan EPIC Pro was lent to me from Borrowlenses.com.

AutoPano Giga is available for free trial download here.

Post originally from: Digital Photography Tips.

Check out our more Photography Tips at Photography Tips for Beginners, Portrait Photography Tips and Wedding Photography Tips.

Using AutoPano Giga To Create Panoramas With Gigapan Heads Or Freehand Shooting Grids


Digital Photography School

 
Comments Off on Using AutoPano Giga To Create Panoramas With Gigapan Heads Or Freehand Shooting Grids

Posted in Photography


Using Active D-Lighting

01 Feb

Questions? Go here: www.youtube.com Here’s how to use Active D-Lighting (ADL) feature that is available in some cameras. Cameras with Active D-Lighting option available: D90 D3000 D3200 D3100 D5000 D5100 D7000 D300-Series D600 D700 D800-Series D3-Series D4-Series Note: Nikon Capture NX2 software is required in order to apply Active D-Lighting onto final RAW files when saving as JPEG. No other software has this option.
Video Rating: 0 / 5

dombowerphoto.blogspot.com as you change your Q scale settings from -16 (highest quality) to -1 you lower the bit rate of the video, meaning you get more video time, but lower quality video, at -16 my memory card cant keep up for more than 1 second, around -9 my card can do fine but if i am doing a long video i feel it is ok to go to -6 on the q scale. going to Postive 16 it is just a mess, it is only about 1mb a second speed, very very slow and very poor quality. This was shot on the canon 550d with firmware 0.2.0 as of March 22nd 2011


Using Photography and Video to Tell Stories that Need to Be Told

30 Jan

This morning I came across a short film that I just had to share with the dPS community. It is the story of Jill Brzezinski-Conley who shares her story of life, love and the challenges thrown her way through breast cancer.

Nothing I can really say adequately expresses what this video presents so… please watch and consider sharing this video.

‘The Light That Shines’ a story for all from InBedWithSue.com on Vimeo.

I guess to bring it back to what we do here at dPS – this is a beautiful example of one photographer (Sue Bryce) and one videographer Hailey Bartholomew using their gifts and talents so positively to impact the life of another person and to tell a story that I suspect will touch and hopefully inspire many.

Read more at Hailey’s blog and on Sue’s site and connect with Jill here on Facebook.

Post originally from: Digital Photography Tips.

Check out our more Photography Tips at Photography Tips for Beginners, Portrait Photography Tips and Wedding Photography Tips.

Using Photography and Video to Tell Stories that Need to Be Told


Digital Photography School

 
Comments Off on Using Photography and Video to Tell Stories that Need to Be Told

Posted in Photography


Start Using The Nikon D5000 In Just 2 Minutes

29 Jan

Start Using The Nikon D5000 in Just 2 Minutes By EasyRaoul Copyright 2009 Start using the Nikon D5000 in just two minutes. Check the lens thats attached to the D5000. If the lens have these controls, set the following: Set the A and M switch to A Set the VR switch to On Set the Mode dial to Auto. This is the icon with the green camera. Turn the camera ON by turning the ON / OFF knob around the shutter button to the left. Look through the viewfinder. Compose your shot. Press the shutter button just slightly and halfway. This will operate the Autofocus function. The viewfinder will indicate by several flashing Red boxes which elements or subjects within the frame are in sharp focus. If your chosen subject has not been overlayed with the red box, meaning it is not in focus, just lift your finger off the shutter button and repeat the autofocus operation. If your subject has the red box indicator over it, then it is in focus. Press the shutter button all the way and take the picture. The image appears on the LCD monitor at the back of the camera. If the image doesnt appear, press the Playback button and the image will be shown. Start using the Nikon D5000 in just 2 minutes.
Video Rating: 3 / 5


How to update camera firmware – Tutorial using a Canon 5D Mark II

25 Jan

A step-by-step guide to updating your camera firmware. This tutorial goes through the entire procedure of downloading the file, putting it on a memory card, and update the firmware using a Canon 5D mark II
Video Rating: 4 / 5


Showing Speed: Using Panning When Shooting Action

23 Jan

Panning is a great way to capture children at play. Exposure is 1/15, f/13, ISO 100. Canon EOS 5D Mark II with EF 24-105 f/4L IS at 84mm.

For the most part, photography is all about freezing a moment in time, stopping the action in front of you. But there are times when freezing the action fails to show the full story.  People move.  Often, at high speeds. Sometimes freezing the action fails to pay homage to the speed on display on the field, or the track.  Showing speed or motion is less important when shooting individual people in action, because a person in motion flexes muscles, contorts their expressions, creating a compelling image.  However, when photographing vehicles, such as in auto racing, the ability to show that speed is paramount.  If you use a fast shutter speed to stop the action, a car will simply appear as if it’s parked on the track.

Panning is a simple technique for showing speed, but it requires some practice, and a willingness to experiement a little.  First of all, you’ll want to slow your shutter speed way down.  Easy enough in poor light, but on a bright sunny day, it becomes a problem.  There are a few ways to handle this.  First off, lower the ISO on your camera to ISO 100.  For panning, I like to set the camera to Shutter Priority mode.  This allows me to choose the shutter speed I want, and the camera will then set the proper aperture.If stopping down the aperture and lowering the ISO still don’t give you a slow enough shutter speed,  try using a polarizing filter on the lens. A polarizer will lower your exposure by two stops.  Another option would be a neutral density filter, which can be found in greater than 2-stop densities when necessary.

A wide angle lens requires a slower shutter speed to create a dramatic panning effect, but with cars moving as fast as those at a NASCAR race, it doesn't have to be THAT slow! Exposure: 1/40, f/22, ISO 100. EOS 5D Mark II, EF 16-35L II at 35mm.

Your shutter speed will vary dependent on the subject and the speed at which it moves. For an athlete running, it could be as low as 1/15 or 1/20.  When shooting auto racing, your shutter speed could be as fast as 1/125.  The slower the shutter speed, the greater the illusion of speed will be.  You’ll have to match the speed of your subject with your speed of panning the camera as the subject passes.  This can take some practice. The best way to practice that I’ve found is to stand on the sidewalk of a busy street and photograph passing cars at various speeds.  Set your drive to Continuous shooting and hold the shutter button down to take several exposures of your subject as it passes.

It takes some practice, but try to pay attention to composition when positioning the subject in the frame.  When panning, it becomes very easy to focus solely on keeping pace with the subject, to the point that you end up simply placing it in the center of the frame.  Use the compositional aids in your camera to help you.  If your camera has a grid focusing screen, use that. If not, use the AF points that are etched in the viewfinder.

Lens choice also impacts the way the pan looks.  A telephoto lens that compresses perspective will create more dramatic effect than a wide angle will, which means the wide angle lens will require a longer shutter speed to create the same effect as a telephoto. Experiment a bit with both to create different effects.

Add panning to your action repertoire for a different take on motion in your photos!

Exposure: 1/60, f/16, ISO 100. EOS-1D Mark IV, EF 100-400mm f/4-5.6L IS at 210mm.

Post originally from: Digital Photography Tips.

Check out our more Photography Tips at Photography Tips for Beginners, Portrait Photography Tips and Wedding Photography Tips.

Showing Speed: Using Panning When Shooting Action


Digital Photography School

 
Comments Off on Showing Speed: Using Panning When Shooting Action

Posted in Photography


Pat puzzling in the kitchen – Creative, Build-it Slideshow Tutorial using Paint Shop Pro by mimitalks, married w/children

21 Jan

Check out these visual art images:

Pat puzzling in the kitchen – Creative, Build-it Slideshow Tutorial using Paint Shop Pro by mimitalks, married w/children
visual art
Image by mimitalks, married w/children
kind of how this is achieved – slideshow made using the capabilities of Pinnacle Studio 12,
all visuals made using the capabilities of Paint Shop Pro 6 (my fav version so far, too bad they don’t make it anymore!). I would think any digital imaging program could be used to achieve this.

Check out the first comment for the settings close up and personal and still!

Like all tutorials, take what you understand and can deal with and play around with the rest.
There is never an absolute way to achieve anything here on earth. The joy is in the challenge
for moi.
Included in my set on Flickr of Creative, Build-it Slideshows
template for personal use: www.flickr.com/photos/mimitalks/3930326621/in/set-7215762…

Phantom Limb [Thomason]
visual art
Image by Dr. RawheaD
Meta-art Thomasons are usually what one might call "achitectural je m’en fous"––architectural elements that once had, but lost its meaning due to neglect or oversight. So these severed tree branches and trunks entangled in fences, wires, and other artificial structures––being primarily a natural phenomenon––don’t quite fit the definition of a Thomason. But because of their visual peculiarity in the urban landscape, are one of the favorite type of Thomasons collected 🙂

What is a Thomason?

Ilford HP5+ @ ISO200, D76 (1:2), 12.5 min @ 20?C

 
Comments Off on Pat puzzling in the kitchen – Creative, Build-it Slideshow Tutorial using Paint Shop Pro by mimitalks, married w/children

Posted in Photographs


Using Backlight in Nature Photography

18 Jan

Antelope Canyon, Arizona
Backlight is when the sun is directly in front of you lighting the back of your subject.

Shooting a backlit scene is more difficult technically but that is no reason to shy away from what can become a dynamic and energizing image.

One of the strengths of backlight is that it emphasizes shape so you will want to find subjects with strong shapes.

In this image of Antelope Canyon in Arizona, it would be hard to distinguish the shape of this part of the canyon wall had the sun not been high in the sky.

Because it was mid-day, the light went straight down the slot canyon lighting up the canyon walls. I was at the bottom of the canyon shooting straight up, so my subject was backlit.

Lobster Cove Lighthouse

I always think of this image as the shot I almost didn't make. It was an after thought. My intention was to get down to the beach for a seascape and I was disappointed that I couldn't find a way down. As I went back to the parking lot feeling defeated I looked back and thought "I just have to capture that sky regardless of how boring those buildings are." When I looked at the photo on my computer afterwards I learned my lesson that an image only needs one really exciting element. I was able to bring quite a bit of detail out of the shadows in post-processing.

Egret, Ding Darling Wildlife Refuge, Florida

Backlight creates the rim light you often see in portraits but this effect works on wildlife too.

In this image of an egret the majority of the light was coming from behind the bird, causing the feathers around the edge of the bird to glow, but there was still enough ambient light to capture detail in the front.

When there is not enough ambient light to capture the details in the foreground you can use fill flash or a reflector.

The part that can be technically more challenging when it comes to backlit scenes is getting the proper exposure. If you have your camera set to evaluative metering it will take into account the entire scene and try to determine the best exposure. This works great when you have a fairly evenly lit scene, but when you have a scene with high contrast it doesn’t work as well. Your camera can’t meter for both the bright areas and the dark areas at the same time.

The solution is to switch to a different metering mode, such as spot metering, so you can tell your camera which part of the frame is important to you. You can choose to meter on the darker area to maintain detail in the shadows and let the highlights go completely white as I did in the photo of Antelope Canyon above. Or you can meter on the bright part of the scene and let the shadows go completely dark to create a silhouette.

Mono Lake Silhouette

One of my favourite techniques is to create a starburst effect in a silhouette image when the sun is still above the horizon. To do this, position yourself so that the sun is partially hidden behind an object and use a small aperture, like f/22.

Arches National Park, Utah

When the sun is in your frame it’s a good idea to use your live view on your LCD monitor to protect your eyes rather than looking through the viewfinder, especially if you are using a telephoto lens.

Lens Flare
Be sure to watch for lens flare when you are shooting directly into the sun. Lens flare is when the light hits your lens directly and reflects inside the lens causing bright streaks or polygonal shaped bright spots with rainbow colours to appear. This is not necessarily a bad thing but if you don’t like it you will need to shade your lens with a lens hood or your hand. Shading your lens is not usually possible when the sun is in your frame but you can reduce the lens flare by positioning yourself so the sun is partially behind an object.

Tips:

  • Find a subject with great shape.
  • Change your exposure mode to spot metering.
  • Point your camera directly at the part of the scene you want to exposure for and use the exposure lock feature on your camera to set the exposure (check your camera manual to find the exposure lock function on your camera). Then you can recompose and press the shutter half way to set the focus while the exposure remains locked.
  • Use a small aperture to create a starburst.

Once you master the art of setting the exposure for a backlit scene you will open the door to new possibilities by looking into the light.

Post originally from: Digital Photography Tips.

Check out our more Photography Tips at Photography Tips for Beginners, Portrait Photography Tips and Wedding Photography Tips.

Using Backlight in Nature Photography


Digital Photography School

 
Comments Off on Using Backlight in Nature Photography

Posted in Photography


Using Polar Coordinates In Photoshop

17 Jan

Make a square selection

1. Open an image in Photoshop (screenshots are from Photoshop CS2 on Mac). Higher resolution and size will give better results. I used a picture I found online on Freedom Wallpaper.

2. You need to make a selection that is squared. Use the selection tool, and set the aspect ratio to fixed:

fixed-ratio

3. Enter the same number in both fields. 1 and 1 works.
1-by-1

4. Make a selection.
make-a-selection

Apply The Filter

5. Apply the filter Polar Coordinates:
apply-filter

6. In this step, use the bottom radio button, marked “Polar to Rectangular”:
rectangle

7. Now your image will turn into something that may look interesting at best, but we’re not yet there:
after

Rotate And Apply Filter Again

8. Rotate the selection 180 degrees. There are a few different ways to do this. One of them is to use the Edit menu, then Transform and Rotate 180 degrees.
rotate

9. Now apply the same filter we did in point 5. But do NOT just choose it from the top of the Filter menu. We are going to change one of the parameters so you have to choose it from Filters > Distort > Polar Coordinates… again.

This time, choose the upper radio button, labeled “Rectangular to Polar”:
switch

Crop And Save

10. Crop your picture to get rid of the stuff surrounding your new circle:
final

Any suggestions, ideas? Feel free to comment on this article!

Back to Top

BlogPhoto

 
Comments Off on Using Polar Coordinates In Photoshop

Posted in Equipment