RSS
 

Posts Tagged ‘Using’

Create a Festive Christmas e-Card Using Your Photo

04 Dec

A short tutorial for those who don’t have a graphic design degree, but wish to create a simple clean Christmas e-card from their images within the familiar surroundings of Photoshop. Don’t miss our our great collection of Christmas gift ideas for photographers! Before

The post Create a Festive Christmas e-Card Using Your Photo appeared first on Photodoto.


Photodoto

 
Comments Off on Create a Festive Christmas e-Card Using Your Photo

Posted in Photography


Create a Festive Christmas e-Card Using Your Photo

03 Dec

A short tutorial for those who don’t have a graphic design degree, but wish to create a simple clean Christmas e-card from their images within the familiar surroundings of Photoshop. Don’t miss our our great collection of Christmas gift ideas for photographers! Before

The post Create a Festive Christmas e-Card Using Your Photo appeared first on Photodoto.


Photodoto

 
Comments Off on Create a Festive Christmas e-Card Using Your Photo

Posted in Photography


Using Levels in Photoshop to Image Correct Color and Contrast

03 Dec
Notice the difference some quick adjustments in the Levels tool can make

Notice the difference some quick adjustments using the Levels tool can make

Image editing is an important part of making your good images look spectacular. Photoshop and Lightroom are packed with tools to help you get your images to look great after you have downloaded them on to your computer. While there are many different tools in Photoshop to enhance your image, there are really only a handful of tools that you will use on just about every image; one of those is the levels tool. Photoshop has a levels tool, Lightroom doesn’t unfortunately. Each photographer has a different workflow when editing images, my suggestion is to follow a process that is the same for each image. When you open up an image in Photoshop or Lightroom, the first step is to look at the exposure. Is the image over or underexposed? At this stage of the workflow, you could be looking at a tool like the Shadow and Highlights adjustment, the next one to use would be Levels.

What is the Levels tool?

Levels tool in Photoshop

Levels tool in Photoshop

Levels does two things in one tool, it corrects the tonal range in an image and it corrects the colour balance. Adjustments made using the Levels tool are not only about getting the exposure on your image correct; it also has a second function and that is, it can correct for colour too. Yes, there are other tools within Photoshop that can do this, but the Levels tool can make it really quick and easy.

The Levels tool uses a histogram to show a visual representation of the tonal range in your image. There is a lot to be said about a histogram, but the most important thing to remember is that there is no right or wrong histogram. If you are unsure about how a histogram works, check out: How to read and use Histograms. On the histogram in the Levels tool, you will see a numerical range starting at zero on the left hand side of the graph, and 255 on the right. In the Levels function, zero represents black and if you have pixels that are at zero, that means there is no detail, they are totally black. The right hand side at 255 represents total white. If you have pixels at 255 that means they are totally white, with no detail. If the shape of your histogram is leaning to the left hand side, that means you have a lot of dark pixels in your image and your image is possibly underexposed. If the histogram is more on the right hand side that means you have a lot of bright highlights in your image and it is possibly overexposed. The middle slider is the mid-tone or gamma adjustment. All the pixels that are not highlights or shadows, fall into this category.

How does the Levels tool work?

When you open the Levels tool, very often your first instinct is to push the sliders into a position that makes the image look brighter. That can work, but I suggest that you do the following: Before you make any adjustments, take a look at your image and see if you can pick up a colour cast. This is a tint or colour that affects the whole image, and is often unwanted. For example, if you have a wedding photo of a bride shot on an overcast day and while everything looks okay, there may be a slight blue hue in the image from the overcast light. This means that her dress looks a little blue instead of white. In a case like this, a colour cast is something you want to get rid of. If however you have shot a summer sunset and the whole scene is bathed in warm orange light, this could also be seen as a colour cast, but in that case you would probably not want change it. One way to find colour casts in your images is to look at an area of the image that should be white and see if it has a tint. A colour cast will vary depending on the light you shot under; it could be green, magenta, blue, yellow, orange, or anything in between.

How to use the Levels tool

Make and adjustment layer for Levels

Make and adjustment layer for Levels

You can use the Levels tool on any image that needs the colour or contrast corrected. If you have an image that needs to have the colour cast corrected, like my shot of the Star Wars Stormtrooper does, then do the following:

  1. Open your image in Photoshop.
  2. Click on the adjustment layer icon at the bottom of the Layer panel and create a Levels adjustment layer, or click on the Levels tool icon in the adjustments panel which is directly above the layers panel.

Step 1 – If you need to do colour correction

If your image has a colour cast (the example image does, as there is a slight blue colour because it was overcast weather that day), follow these steps. Not all images need to have the colour corrected, if you are happy with the colour in your image you won’t need to do this. If you do have a colour cast in your image, then do the following:

Bring the white and black sliders to the point where the graph starts moving upwards

Bring the white and black sliders to the point where the graph starts moving upward

Part 1: In the levels tool, click on the drop down box above the histogram that says RGB. This will open up the three channels individually. Click on RED and bring the white slider and black slider in to part of the histogram where it starts to move upwards. Click on the the RGB drop down box again and click on GREEN and do the same, and finally click on BLUE and repeat one more time. This step will only work if there is a colour cast in your image. If there is no colour cast, the histogram will spread to the edges of the graph. In this image, there was a colour cast and this was how the GREEN channel histogram looked.

The red areas in the screenshot above show you where there was no colour information. By sliding the sliders inward to the edge of the graph, you will start to neutralize the colour cast.
Part 2: You will notice that as you make these adjustments, your image may have a very strong colour cast of the channel you are adjusting. Don’t be alarmed, this will all work out once you make the final adjustments.
Part 3: Once you have adjusted for the colour correction in all three colors, you can now adjust the exposure and contrast

Don't be alarmed at the crazy colours you might see during the colour cast adjustments, they will work out in the end.

Don’t be alarmed at the crazy colours you might see during the colour cast adjustments, they will work out in the end.

Step 2 – Adjusting for exposure and contrast

The Levels tool can also adjust your image’s exposure and contrast. In other words, you can use it to make the highlights, shadows and mid-tones brighter or darker – an all-in-one tool. The levels tool is really great to make some quick adjustments to your image, here is how:

Part 1: In the RGB channel, move the white slider in from the right to the edge of the histogram. Do the same for the black slider, adjusting it in to the edge of the histogram on the left. The important tip here is to make sure that you don’t overexpose the highlights and underexpose the shadows. This is called clipping and the best way to see if you are clipping any pixels is to hold down the ALT key when you are adjusting the white and black sliders.
2. Once you have those two sliders adjusted, you can slide the mid tone slider to add some contrast to the scene and this will be the final touch to your levels adjustment.

The final adjustment showing colour correction and contrast correction

The final adjustment showing colour correction and contrast correction

Some final tips to remember

1. Like any tool in Photoshop, if levels is overdone, you will be able to see it in the image. So, be aware of over adjusting your image.
2. Small adjustments always work better than one big adjustment. Make small changes first and see if that works.
3. Use the ALT key to make sure you aren’t losing detail in the shadows and the highlights by clipping your pixels.
4. Add some contrast to your images in levels, that will give your image a bit more pop and will enrich the tones.

The levels tool is a powerful ally to have in your image editing workflow. I use this tool on just about every image I edit. It can really add some contrast and punch to your images so try and use it as often as needed. These techniques take practice, but once you know what to do, the levels tool is quick and easy to use.

Compare the images side by side, there is a subtle but real difference

Compare the images side by side, there is a subtle but real difference

The post Using Levels in Photoshop to Image Correct Color and Contrast by Barry J Brady appeared first on Digital Photography School.


Digital Photography School

 
Comments Off on Using Levels in Photoshop to Image Correct Color and Contrast

Posted in Photography


How to Make Freckles POP or Disappear using Lightroom

24 Nov

Editing Freckles in Lightroom

One photo, edited completely in Lightroom

One photo, edited completely in Lightroom

digitalphotographyschool-1-9

I recently photographed a model in New York City. As I was communicating with her leading up to the shoot I noticed in some of her pictures that she had freckles. I personally am a big fan of freckles and wanted to do a shoot that highlighted her skin rather than hide it behind makeup or photoshop tricks. One of my favorite photos that came out of the shoot was this one, cropped close to highlight her eyes and skin:

digitalphotographyschool-1-2

After I posted the photo above on Instagram I was emailed by someone asking me what process I used to get that gritty look. I’m here to share my secrets and show how you can achieve this look in less than 30 seconds with Lightroom, every time.

First off, here is what the original looked like, straight out of the camera:

digitalphotographyschool-1-3

I shoot in RAW to make sure I have enough information to work with. All the freckles are there in the skin, which you can see lightly showing up in the original photo.

Step One: Convert to Black and White

The first step is to convert your image to black and white by selecting “B&W” in the develop panel of Lightroom, or using the shortcut key “v.”

Now I have something that looks like this:

digitalphotographyschool-1-4

Step 2: Adjust Red and Orange Sliders

Still not seeing the freckles, right? Under B&W in the develop module in Lightroom you should see “Black and White Mix” and a column of sliders beneath it with all the colors of the rainbow. These allow you to control the original colors in the photo, within the black and white mode.

Knowing that freckles and skin blemishes are typically orange/red in nature, you will be playing with the orange and red sliders only. You get to decide how far you want to push them, making your subject more or less intense looking.

digitalphotographyschool-1-5

That’s about it, actually. You’ve just enhanced the freckles in your photo. Congratulations! If you want to give it even a little more pop, try this with your tone curve and exposure sliders:

editing_freckles_dps

The last thing I did to the picture was use the Adjustment Brush (k) to bring the highlights down on the hood of her sweater, which I felt was too bright for the photo. Then I used the Adjustment Brush to brighten the eyes a bit using the Dodge (Lighten) effect.

digitalphotographyschool-1-2

Voila! This is equally impressive in color. You just need to adjust the Color sliders Red and Orange:

digitalphotographyschool-1-7
I would love to see what you do with photos of your children or self-portraits using this technique. And if you are someone who really wants to get rid of freckles, you can basically reverse the the effect by pulling the same sliders to the right instead:

digitalphotographyschool-1-8

Please post your examples below!

The post How to Make Freckles POP or Disappear using Lightroom by Phillip VanNostrand appeared first on Digital Photography School.


Digital Photography School

 
Comments Off on How to Make Freckles POP or Disappear using Lightroom

Posted in Photography


Using a 10 Stop Neutral Density Filter to add Drama to the Sky

24 Nov

In this Adorama video Bryan Peterson shows you how he uses a 10 stop neutral density filter to take an image from average, to dynamic. The filter basically just blocks light allowing you to make longer exposures. In this city skyline shot it changes how the clouds appear in the final image.

Filter mentioned in the video:

  • B+W 10 stop neutral density filter

Other dPS articles about using ND filters:

  • Polarizing and Neutral Density Filters: Essentials for Landscape Photography
  • High Speed Sync Versus a Neutral Density Filter to Overcome Bright Sunlight in Portraits
  • How to do Dreamy Landscape Photography with a Neutral Density Filter
  • 7 Tips to Help Improve Your Seascape Photos by Controlling the Waves
  • Step-by-step Guide to Long Exposure Photography

The post Using a 10 Stop Neutral Density Filter to add Drama to the Sky by Darlene Hildebrandt appeared first on Digital Photography School.


Digital Photography School

 
Comments Off on Using a 10 Stop Neutral Density Filter to add Drama to the Sky

Posted in Photography


Tips for Using Shutter Speed Creatively

23 Nov

Shutter speed is one of those things that is initially a problem to be solved, but once you do that it becomes a tool that allows you to take better and more creative photos.

First you should understand how shutter speed works and how to change it. You will need to make sure it is fast enough that your pictures turn out crisp. But once you’ve mastered those things, you can start using shutter speed to your advantage. You can slow it down to create a sense of movement, or speed it up to stop the action.

GreyWhale

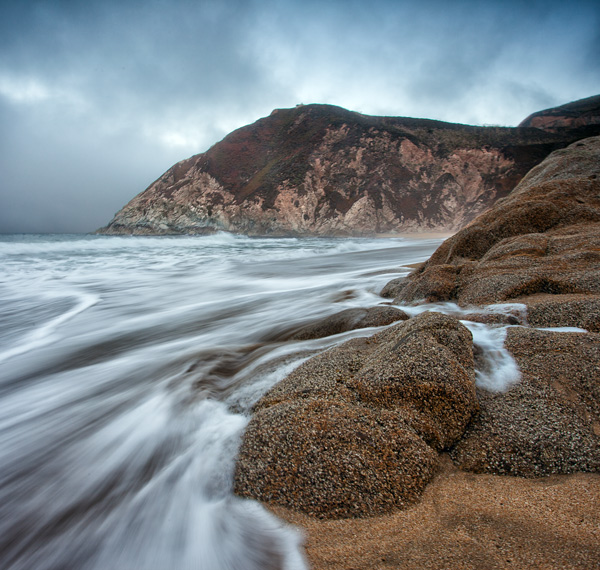
Grey Whale Cove: 1/4 second at f/16, ISO 100

This article will show you the basics of what you need to know regarding shutter speed and get you started with some creative effects using different shutter speeds.

What is Shutter Speed?

Shutter speed is simply the amount of time the shutter inside the camera is open, allowing light onto the digital sensor to expose the picture. The longer you hold the shutter open, the more light is let in to the camera to expose the picture.

But holding the shutter open longer than a tiny fraction of a second has consequences. The camera must be held completely still during the exposure or the picture will be blurry. Without using a tripod or some other means of support, you cannot hold the camera still for longer than about 1/60th of a second and blur will start to creep in to the picture (more on this in a second).

Shutter speed is recorded in fractions of a second. So a shutter speed that says 1/60 (it may just show 60) means that when you take the picture the camera will open the shutter for 1/60th of a second.  Most cameras have shutter speed ranges between 1/4000 of a second (on the short side) and about 30 seconds (on the long side). In addition, many cameras have a Bulb mode that allows you to hold the shutter open as long as you wish.

Make Sure Your Shutter Speed is Fast Enough

One of the first issues you will confront as a photographer is making sure your shutter speed is fast enough. If you have a tripod, this will not matter as much and you can leave the shutter open a long time (sometimes even several minutes). But assuming you are hand-holding your camera, a long shutter speed will introduce camera shake and make your image look blurry.

But how fast is fast enough? There is something called the Reciprocal Rule designed to help you with that answer. This rule states that your shutter speed should be at least the reciprocal of your focal length. That sounds complicated, but don’t worry it is easy to figure out. You just put a one over your focal length and that is your minimum shutter speed.  So, for example, if your focal length is 60mm, just make sure your shutter speed is 1/60th of a second or faster. If you are zoomed in and your focal length is 200mm, make sure your shutter speed is 1/200 of a second or faster (remember to consider lens factor as well if you have an APS-C sensor) Any slower than that and it is time to break out the tripod (or raise open your aperture and raise the ISO).

Beam

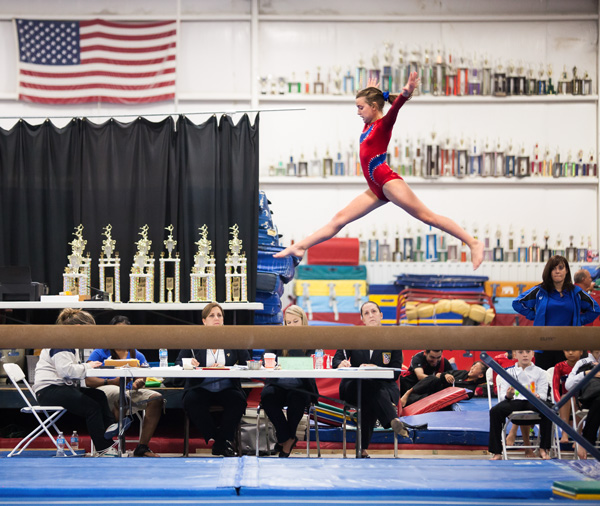
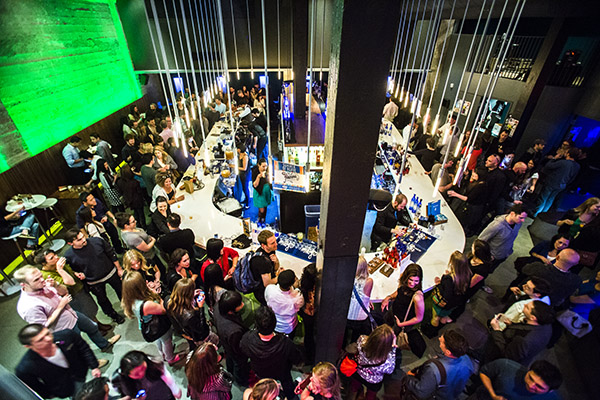
1/200th at f/2.8, ISO 3200

Changing Shutter Speeds

The next question you will confront is how to change your shutter speed. The actual physical changing of the shutter speed is pretty simple, it’s typically done via a dial on top of your camera. The more important question is how are you to offset the change to shutter speed, assuming you are in manual mode (if you are in Aperture priority or Program mode the camera will make the change for you).

If you use a faster shutter speed, the shutter is not open as long so the camera gathers less light. So, without something else changing, your picture will be underexposed by using a shorter shutter speed. To make a proper exposure, additional light has to come from somewhere. You can add that extra light to offset the use of a faster shutter speed in one of two ways:

  1. Open up the aperture: The aperture is the hole your the lens that allows light to pass into the camera. A larger aperture allows more light into the camera. So if you open up your aperture by one stop, you are letting in twice as much light during the same period of time.  But be careful, a larger aperture also creates a shallower depth of field, which you might not want.
  2. Increase the ISO: The ISO is the rating assigned to how sensitive your digital sensor is to light. It is adjustable, and the higher the number, the more sensitive you make your camera’s digital sensor to light. But this comes at a cost, digital noise, which increases as you increase the ISO.

There are separate controls on your camera to make these changes.  Use either of these methods to add more light to your exposure whenever you are shortening your shutter speed.

Using Shutter Speed Creatively

Now that you understand shutter speed a little bit, you will want to put it to use creatively. There are several ways to do this, and we will work through some of them from the faster shutter speeds to the slowest.

Stopping the Action

In times of high action or drama, you can stop the motion by using a very fast shutter speed.

To do this, you will want your shutter speed to be 1/250 of a second or faster. At times, like with the picture below of the water droplets being flipped through the air, you may want the shutter speed to be significantly faster. This particular picture was shot at 1/8000th of a second.

Water

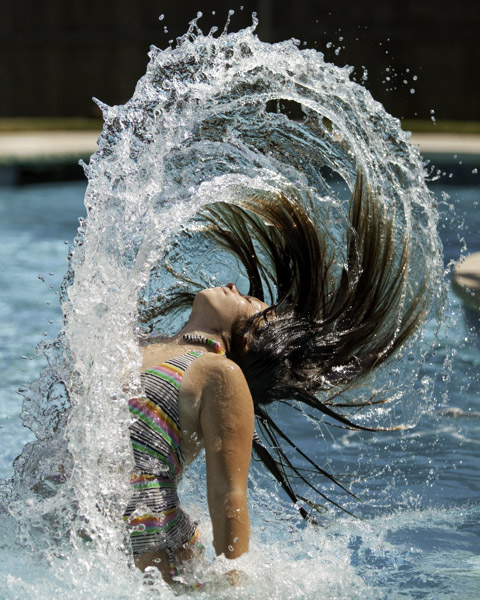
1/8000th at f/2.8, ISO 250

Accomplishing shutter speeds this fast, even on bright sunny days, will require offsetting moves. For example, you will need to open up the aperture to its widest setting. Doing so will result in a shallow depth of field, but in this sort of picture that usually won’t matter. You will also probably need to increase the ISO (a little on bright days, a lot on cloudy days or indoors).

Another key for these type of shots where you are stopping the action, is to anticipate the shot. With the speeds at which modern cameras shoot, you may often want to just hold the shutter button down and blast away, this rarely works though. The decisive moment is usually only captured by anticipation and triggering the shutter at precisely the right moment.

Panning

Another way to use shutter speed creatively in times of action is to pan the subject. Panning is where you move the camera during the exposure to follow the subject. Done properly (or when you get lucky) the subject is relatively sharp, while the background is blurred and conveys a sense of motion.

LondonCabPan

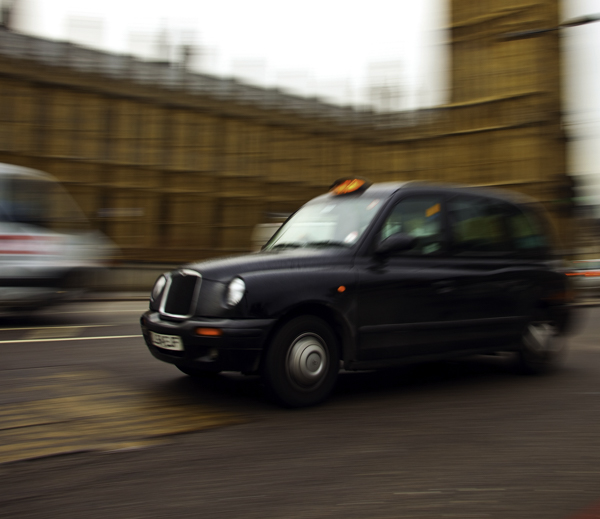
1/15th at f/7.1, ISO 50

Accomplishing this is usually best at slower shutter speeds between 1/8 and 1/30 of a second. Being able to slow down the shutter speed is typically welcome news, as it will mean you do not have to crank up your ISO, or make other offsetting moves. Getting a good result will frequently require at least a few attempts, while you gauge the speed, and other settings.

If possible, get your exposure set up before you attempt to pan. That way you are only thinking about the panning during the shot, as opposed to worrying about all your other settings.

Creating a Sense of Motion

Still another creative use of shutter speed is slowing it down to create a sense of motion. This is accomplished when the subject is moving slightly through the frame during the exposure. This idea is for the subject to be identifiable, but slightly blurred.

GreyWhaleRock

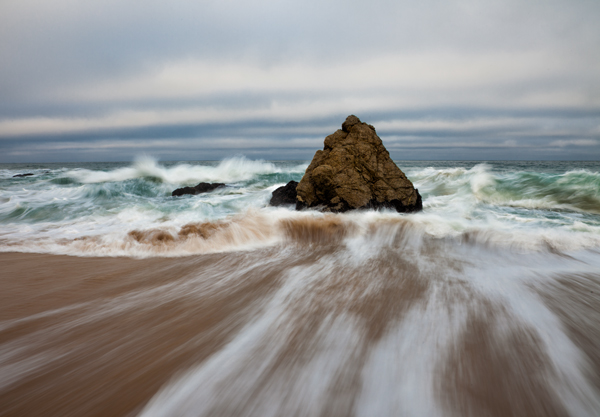
1/4 second at f/16, ISO 50

Shutter speeds for this type of shot are between 1/4 and 1/10th of a second. That is virtually always too slow for you to hand-hold your camera, so you will probably need to break out the tripod for this type of shot.

Long Exposures

The final creative use of shutter speed we will cover here is a long exposure. This is where you hold the shutter open for a long time and allow certain parts of your picture to move through the frame. You will always need a tripod for this technique.

DavenportRock

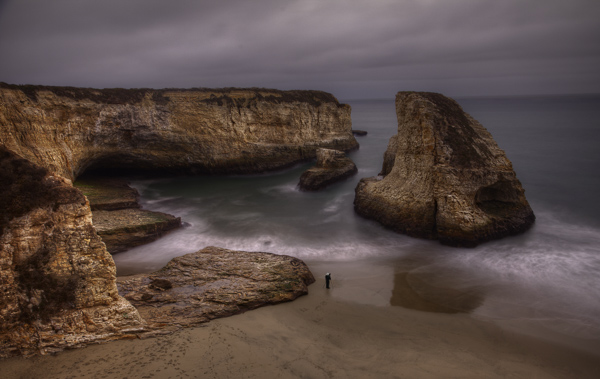
20 seconds at f/8, ISO 400

Long exposure shutter speeds are between 10 and 30 seconds. Most cameras offer you the ability to go even longer by using Bulb mode, where the shutter will stay open as long as you hold the shutter button down. A remote shutter release, which is always a good idea when you are shooting from a tripod, is almost a necessity for this type of shot.

Long exposure is a great technique whenever there is moving water involved, such as coastal scenes, rivers, and waterfalls. It is also great for streaking lights in night photography.

Whereas most of the time, your challenge with shutter speed is to get enough light into the camera; in this context getting the shutter speed you want usually involves the opposite problem. The challenge is to limit the amount of light entering the camera so that you can leave the shutter open a long time without overexposing the image. To do that, first close down the aperture to its smallest setting and use the lowest ISO setting on your camera. The lowest ISO setting is usually 100, but some cameras contain an expandable ISO range that will allow you reduce the ISO further, so be sure to check your camera’s menu for that.

But if those moves don’t restrict the light enough, you will need to use a neutral density filter. These are filters that restrict the amount of light coming into your camera. They come in different strengths, with typical values between two and 10 stops of light. Get one of these (or a few different strengths) and keep it in your bag if you think you will have any long exposures in your future.

Guadalupe

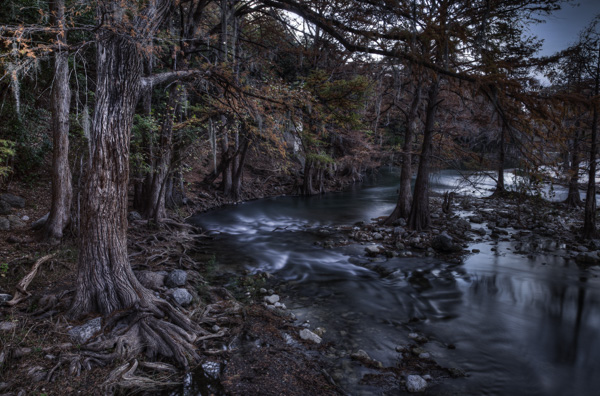
15 seconds at f/8, ISO 500

Conclusion

Once you have mastered the basics of shutter speed, it is a great tool for adding creativity to your photography. It is perhaps the most effective way to make our photos more interesting. So lock down the basics, and then give some of these techniques a try.

The post Tips for Using Shutter Speed Creatively by Jim Hamel appeared first on Digital Photography School.


Digital Photography School

 
Comments Off on Tips for Using Shutter Speed Creatively

Posted in Photography


How to Correct Skin Blemishes Using the Patch Tool in Photoshop

11 Nov

There are many articles that discuss the overuse of skin smoothing in portrait photography. Photographers strive to find a balance between realistic skin and fixing the imperfections. Obviously, one way to minimize the use of Photoshop for skin issues is to hire a phenomenal makeup artist who can make the skin look realistic and flawless all at the same time. For the times when there are issues with a client’s skin I try to not go overboard and fix every little thing. I want my client to still look like themselves when I am done editing.

UsingPatchToolSidebySideBeforeandAfter_DigitalPhotographySchool_LoriPeterson600

Some photographers use the spot healing brush religiously. I never use it. Instead I use the patch tool. My reasoning is that the Patch tool actually takes samples of the pixels and closely matches them to what you are trying to fix. If the results are not quite right, you can tweak them to suit your needs.

Step 1. Open your image

As you can see my model is absolutely beautiful, but she does have a few blemishes on her skin and we are going to fix those before we give the image to her.

Step 2. Select an area and apply a path

Hit Ctrl or Command + J to duplicate your layer. You can add a Layer Mask in case you want to undo anything later.  Then select the Patch tool and draw around the part of the skin that you want to replace (make sure the “Source” setting is selected to patch the source from the destination so it will use information from the area you drag to fix the blemish). Once selected, keep holding your mouse down and move it over to better spot of brighter skin. The skin does not have to be in the same area where you are working. You can use skin from the neck, shoulder, hand, or wherever you find better, smooth skin.

1UsingPatchToolEdits_DigitalPhotographySchool_LoriPeterson600

Step 3. Repeat and refine

Repeat the process for any other skin issues. Just keep circling the area you want to replace and dragging the circle over to a clean area. If you change something you did not want to or it doesn’t look right you can use your layer mask to hide it or you can click undo (Cmmd/Ctrl+Z).

Step 4. Reduce dark circles under eyes

Most of the time you will find that some dark circles under the eyes are showing. While it’s actually normal, we want our clients or models to look bright eyed.  If you want to decrease these, simply use the patch tool and circle the under eye area. Drag that circled area over to better skin. The result will be very harsh if left like that, so fade the technique. Go to Edit > Fade Patch Selection and a pop up window will appear. Lower the slider until the fade looks like it will blend in. Repeat the process for the other eye. The percentage of fade you use may not be the same on both sides, depending on the lighting.

2UsingPatchTool_DigitalPhotographySchool_LoriPeterson600

Step 5. Review and merge layers

Once you finish, you will see that the skin looks much better and smoother, but the details of the skin are still there without being overly fake looking. If you are satisfied, merge your layers. If you are going to do any further edits, go to your History in the Layers Palette and make a snapshot of the image so you can always come back to it.

Step 6. Brighten eyes optional

Optionally, you can brighten up the eyes a bit. Duplicate your layer again using Ctrl or Command + J. Again, add a Layer Mask in case you might want to change anything later. Select the Dodge Tool and make sure your exposure is set to around 30%. Take a big brush that covers the eye and the brow and in one motion with your mouse sweep over the eye and the brow. You can adjust the layer if it’s too bright or use your Layer Mask and remove the parts that might be too overdone.

3UsingPatchTool_DigitalPhotographySchool_LoriPeterson600

The Patch Tool can be one of the easiest and quickest ways to clean up skin and still retain the overall look of your client without making the image seem overdone. After a few times, using the Patch Tool can become like a second nature and skin edits will go quicker. Here is the before and after showing that with just a few motions with the patch tool you can achieve an overall better image where skin looks smoother, brighter, and still looks natural.

UsingPatchToolSidebySideBeforeandAfter_DigitalPhotographySchool_LoriPeterson600

The post How to Correct Skin Blemishes Using the Patch Tool in Photoshop by Lori Peterson appeared first on Digital Photography School.


Digital Photography School

 
Comments Off on How to Correct Skin Blemishes Using the Patch Tool in Photoshop

Posted in Photography


Fake Perfect Fall Colors Using the HSL Tab in Lightroom

08 Nov

It can be extremely hard to predict when and where the peak colors of falls will hit. If you’ve ever been a week or two early you’ll know the frustration of seeing little splattering of color when you were hoping for full on peak color. Well, using a little bit of post-production magic, you can add some life to those early fall shots and get it closer to the vision you’d hoped mother nature would’ve given you in the first place. Let’s see how we can fake fall color using the HSL tab in Lightroom!

before&after

As a side note: I do want to mention that while this article is about faking the colors to create a vision that didn’t exist in the first place, a lot of these techniques can be applied to enhancing fall colors that do exist. Even if you’re completely against the idea of changing the world in post-production it might be worth reading through it to see how you might be able to use these techniques in a way that retains a more true to life look in your image.

What is the HSL tab

HSL
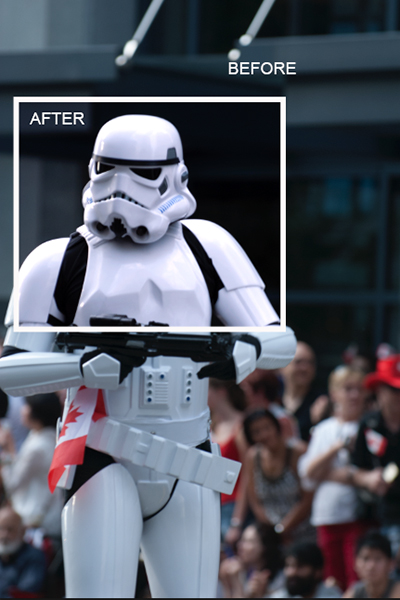
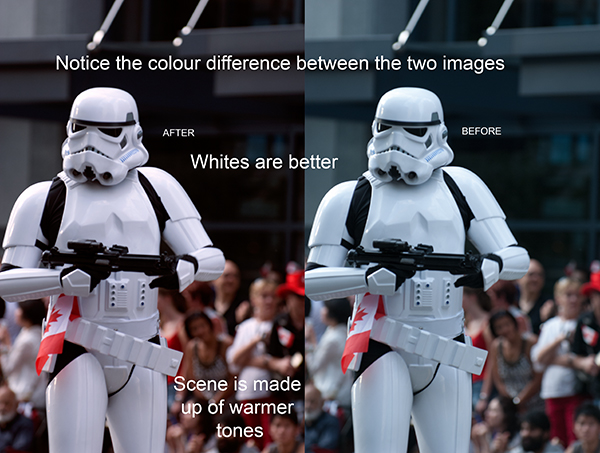
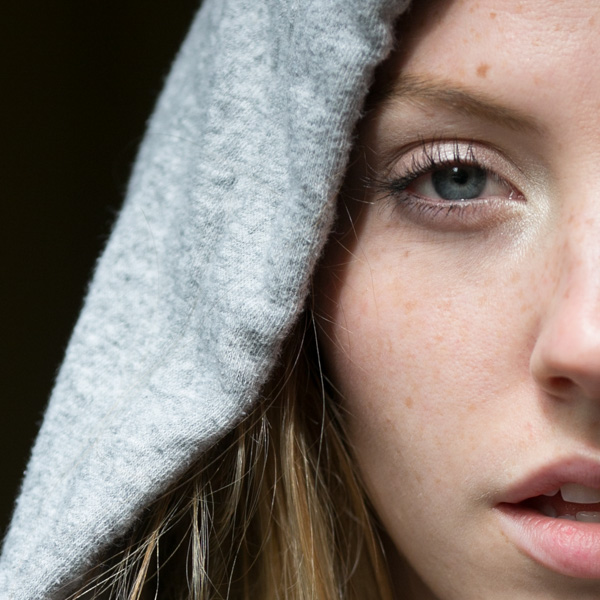
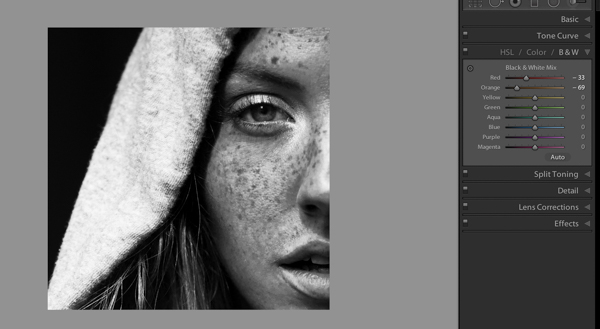
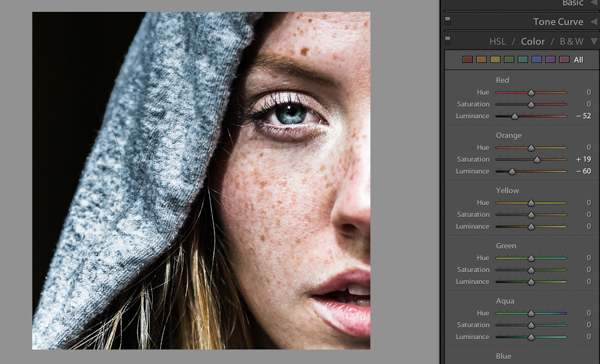
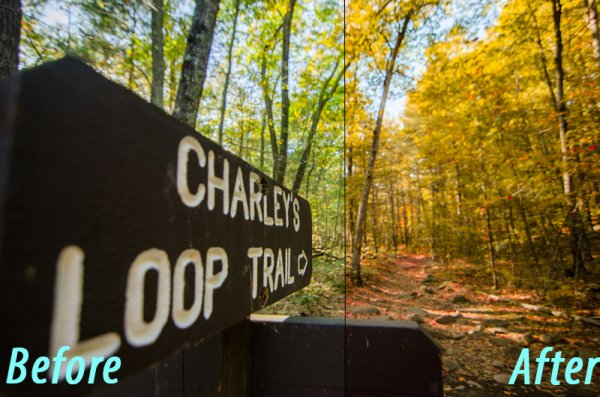
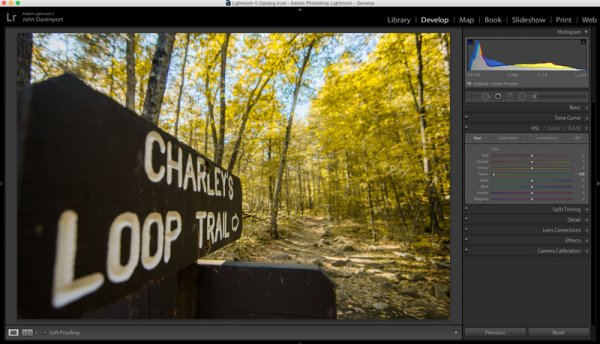
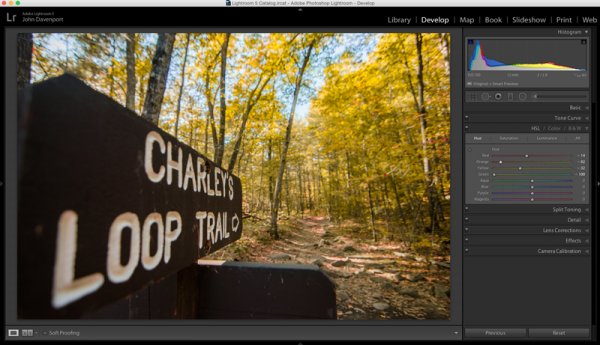
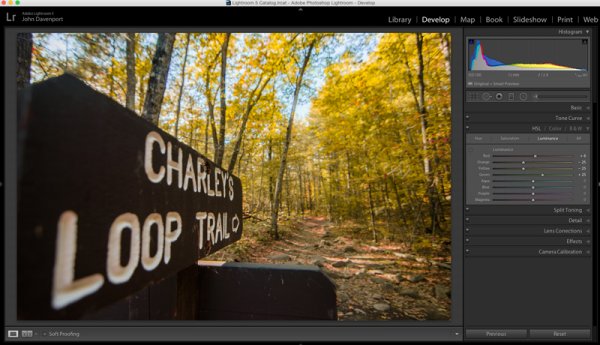
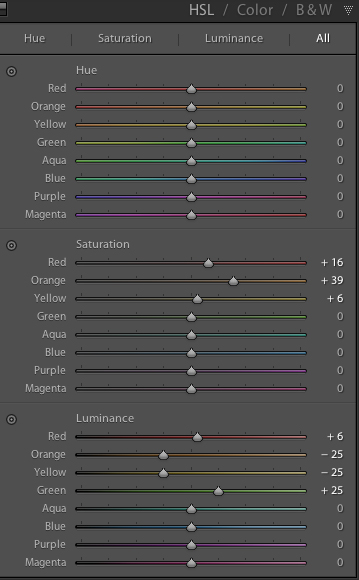
The workhorse of the manipulations you will see today is the HSL tab in Lightroom. It allows you to control the Hue, Saturation, and Luminance of your photograph on a color by color level. This gives you the ability to modify reds separately from oranges, blues from greens and so forth.
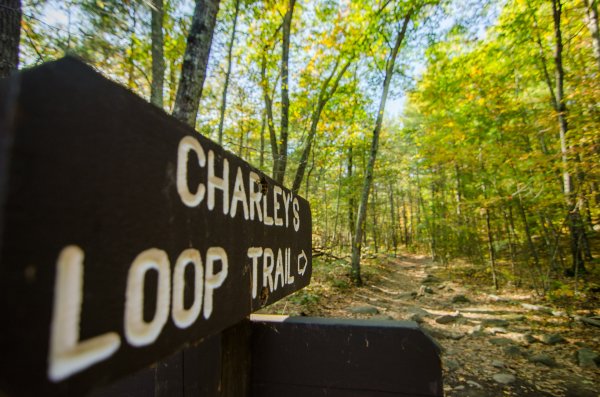
Each of the HSL controls have a unique slider for the eight different color tones that make up an image and as you’d expect, each of the HSL controls allow you to modify different aspects of that color.

  • Hue – Controls the tonal range of the color that you’re modifying. For example greens can be anywhere from yellow to aqua.
  • Saturation – Controls the intensity of the color that you’re modify. More saturated means deeper and more intense color, less saturated and you’ll have muted or even no color for the selected color.
  • Luminance – Controls the brightness of the color you select. Moving a slider to the right will brighten the selected color, while moving to the left will darken it.

As you can see there is a wealth of specialized controls built into the HSL tab. I hope the walkthrough below gives you some ideas on what you can do with it. Remember it’s not just limited to faking the colors of the fall season.

Fake perfect fall colors with Lightroom

To get started you’ll need a photograph to work with. It is going to be important that you choose your images carefully here as not every photograph will work for this kind of post-production.

For example – you’ll want to make sure that the trees you’re featuring do in fact change color in fall (evergreens do not), and, that the other surrounding features of your photograph are outside of the green/yellow spectrum that you’ll most-likely be changing, or you’ll be altering them as well as your trees.

fall

Once you have a great shot and you’ve completed some of the basic post production steps then you’ll want to hop over to the HSL tab in your Lightroom develop module.

As you’ll be working with trees that have yet to change color you’ll mostly be working with greens and maybe some yellows or reds. Again, this is why it’s important that the photograph you’re modify doesn’t contain any non-leaf items in these color ranges – or you’ll change them too – and that might looking more unnatural than the fake fall colors you’re creating.

fakingfallcolor-green

As you saw above, the shot I’ve chosen for this article contains mostly green leaves with just a few hints of fall color. The first step is to remove the greens from the image by moving the green’s hue slider all the way to the left. This effectively changes the green colors in the image to yellow giving a more fall like look the the photograph, but we’re not done just yet!

Next you can experiment with moving the reds and yellows sliders around to try and see how they effect the image. Different color tones will come to life that you may not even realize were there in this step so it’s important to take it slow and look at the entire photograph as you make the changes. In this image the leaves on the ground took on a rusted red look while the trees themselves got a deeper orange look.

fakingfallcolor-hue

Once you’ve got the Hue the way you like it you may want to move into the Luminance and Saturation tabs of the HSL tool. This will allow for further modifications of the colors tones by effecting the richness and brightness of the colors you’re presenting.

fakingfallcolor-luminance

Remember the color tones are still the same as they were in the Hue slider, so even though the greens appear as yellow, moving the green Luminance slider to the right brightens the trees a bit, while the orange and yellows sliders effect their respective color tones.

Another idea that you might want to toy around with is modifications of the white balance. Adding more yellows with the Temp slider or more magenta with the Tint slider can add even more dimension to the shot giving the colors a more dynamic feel.

fakingfallcolor-wb

However, it is extremely important to be careful with the white balance sliders when you’re doing these manipulations as bad things can happen very quickly if you’re too aggressive with the changes!

fakingfallcolor-toomuch

After you’ve set your color tones and adjusted the white balance of the image it’s time to give the entire photograph a good, close, once over.

For this demonstration image the lettering on the sign started to take on a reddish/yellow tint after the white balance tweaks were performed. To fix this an adjustment brush was added to the sign which reduced both the Temp slider (to remove yellows) and the Tint slider (to remove the magenta colors). Also at this point the sign was given a little more definition with the adjustment brush by increasing the clarity and fine tuning the exposure.

fakingfallcolor-adjustment

All in all using the HSL tab in Lightroom can be a fun way to create that fall color when it might have been just out of reach. Of course, this doesn’t compare to the real thing so, the best way to get fall color is to go find it in person. Therefore don’t let this stop you from getting out and planning your next hiking trip – the unpredictable nature of the fall season is one of my favorite parts about it!

fall-2

Watch this technique in action

Do you have any other fall photography or post-processing tips to bring out those great colors? Please share in the comments below.

The post Fake Perfect Fall Colors Using the HSL Tab in Lightroom by John Davenport appeared first on Digital Photography School.


Digital Photography School

 
Comments Off on Fake Perfect Fall Colors Using the HSL Tab in Lightroom

Posted in Photography


5 Tips for More Successful Event Photography Using a Shot List

26 Oct

Company parties. Special galas. Nonprofit fundraisers. When someone asks you to shoot one of these events, you aren’t exactly leaping for joy, right?

Event Photo 04

Corporate event photography can get a bad reputation among creatives, mostly because it sounds like an unglamorous style of photography. While it is true that many aspects of corporate event photos can be very rote, these events actually a huge advantage that can lead to even more creative expression. Here’s why: There is almost always a set structure and schedule to corporate events that rarely deviates, meaning it is incredibly easy to build a shot list to get your essential shots out of the way very quickly. That means you have more time on your hands at the event to get creative with the way you choose to take these shots. Whether you’re a budding event photographer, or taking on an event as a favor, use these tips to build an effective event photography shot list that will make your clients happy and maybe even lead to other photography opportunities with them down the road!

Fact: Most corporate clients will not know what kind of photos they need.

At least in my experience working with west coast corporate clients, most of them can’t give me a clear answer when I ask how many photos they need, what they need shots of, etc. While this may seem frustrating at first, bear in mind that this vagueness from your client gives you the perfect opportunity to shine by filling in the blanks for them, because in general, most corporate clients want the same types of event photos.

So what kinds of photos do corporate clients want?

To answer this question, put yourself in the shoes of the branding or marketing coordinator who put the event together. Often, their whole purpose to having you there to is capture images that show that they did their jobs right by properly setting up the space and making sure the people they invited showed up and had a good time. They want shots that capture:

1. Setup shots of empty rooms, trade show booths, promotional items, signage, etc.

Event Photo 02

Be sure to arrive early to capture any event setup shots. It was someone’s job to put everything together, so he or she will definitely want images that show off all of the hard work that went into it. Generally, setup shots should be taken before guests arrive so that everything is still intact.

2. Candid and posed shots of VIPs or executives that are deemed important by the company.

Event Photo 01

This can be extremely tricky because often times, you won’t have any idea who the company CEO or big wigs are, even if the event coordinator hands you a sheet with all of their names on it. The best way to handle this is to ask the coordinator ahead of time if there is someone from the company who can accompany you and point out their VIPs and executives on site. Don’t be afraid to ask for help so that you can get your job done right.

3. Closeups and wide angle shots of any speakers.

Event Photo 03

As much as possible, get shots of speakers that include branding and signage somewhere in the photo. Also bear in mind that you will not always have a designated spot to shoot from, so bring a telephoto lens and prepare to possibly shoot from farther away. If you’re shooting from up close, make your shots quick so that you don’t block the view of guests.

4. Guests looking engaged and interested at the event.

Barneys New York And The Parkinson's Project Host A Luncheon In Support Of The Parkinson's Project At The Kingfish Cafe

Try not to capture photos of people (especially VIPs and executives) making unflattering expressions or gestures. It can take some patience, but make sure you get images that indicate everyone was having a good time. If you captured any goofy expressions or moments, you might be able to submit them, but be sure to flag them as optional outtakes.

5. Shots that indicate the event was well attended, such as full room shots with lots of people.

Event Photo 07

While it might still be valuable to include full room shots where only half of the seats are filled, you’ll want to pull out your zoom lens and focus in on larger clumps of people to provide shots that indicate the event was well attended.

The photos that corporate clients DON’T want

While event photography can in many ways feel like photojournalism, this is not the time to take too many images that are overly honest. Bear in mind that many times the photos are intended to be used for marketing purposes, so the last thing your clients want to see are ugly, unfavorable photos. Even though events might be poorly attended and the attendees might not be the most interesting people, it’s your job to make the event look and seem as fun as possible, even if you have to act like a hype person or stage photos to do so.

While there are many lessons and creative inspiration that can be obtained by winging it and thinking quick on the spot, professionals know there is generally more value to preparing ahead of time. One way to effectively do this is to think out every aspect of the shoot beforehand and great a comprehensive shot list. This will help you picture the finished shoot even before you step foot on set, greatly reducing any last minute issues that might arise, and giving you more freedom to take your necessary shots with creativity.

Do you photograph events? Do you have any other tips you’d like to share? You could also read 5 Tips for Special Event Photography here on dPS for more tips on covering events.

The post 5 Tips for More Successful Event Photography Using a Shot List by Suzi Pratt appeared first on Digital Photography School.


Digital Photography School

 
Comments Off on 5 Tips for More Successful Event Photography Using a Shot List

Posted in Photography


How to Add a Grunge Effect to Your Portraits Using Lightroom

26 Oct
Grunge Main 600

All images copyright Gina Milicia – Model credits from left to right: Jess Kenneally, Nathan Kennedy, Firass Dirani.

Gina has a new dPS ebook just released – Portraits: After the Shot – check out out!

The style of side lighting (in the image below) is a great way to enhance muscle definition, and the post-production technique complements the lighting style. You can see that it appears as if Nathan has far better muscle definition in his after shot. I love using this post-production technique in character portraits for the entertainment industry, advertising and editorial shoots. It deliberately gives the skin a hard, detailed, gritty look, which is perfectly suited to character-style portraits.

Nathan Kennedy for ML Denim

Model credit: Nathan Kennedy for ML Denim. In this image I used fill flash from my Elinchrom Quadra lights with a Rotolux Deep Octabox camera left, which is lighting Nathan from a 45-degree angle.

If you want to see a full tutorial on my favourite lighting style for this type of effect, check out: How to Create this “Fight Club” Inspired Portrait using One Light.

It’s not the most flattering technique for skin post-production, so I’m selective about which projects I use it on and tend to avoid using it on female skin tones. There are very few women who will say, “Wow, I love how detailed and large my pores look.”
Don’t forget my overnight rule. After you’ve edited your image, try not to look at it for a minimum of 12 hours. When you look at it again with fresh eyes, you should trust your gut instinct on how it looks. If your first reaction is “Ewww”, then you may have gone too far!

Here’s my step-by-step recipe for adding a grunge effect to your portraits using Lightroom:

LW GRUNGE 1 LW GRUNGE 1B

Note: Every lighting style is going to give you a slightly different result. I suggest you use my recipe as a rough guide only, tweaking your images until you get the results that best suit your image and personal style.

LW Grunge 2

Find a neutral area of your image and use it to correct white balance. In this case I’ve selected a very light gray section of the white shirt the model is wearing.

Step 1. Import the file into Lightroom and in the Develop module, use the eyedropper tool (A.) and do a custom white balance (B.). This is achieved by finding a neutral area on your image (gray or white works best) then using your eyedropper tool (A) click on this (Neutral area) and Lightroom will automatically adjust your white balance.

The best and most accurate technique to achieve a good white balance is to ask your model to hold a gray card in front of their face for the first frame. This gives you an accurate neutral gray to select from for your white balance.

The third option to achieve white balance is to use Lightroom’s auto white balance. Test them all if you can and see which option best suits your shooting style.

I like working with a combination of gray card and finding neutral areas. I will use Lightroom’s auto function if I am shooting television stills or theatre productions where I need to color correct images that were shot under tungsten lights.

LW GRUNGE 3

Step 2. As a starting point, increase shadows (+81) and decrease highlights (-60). The image starts to look a little wrong, but stay with me.

LW GRUNGE 4

Step 3. Switch on clipping mask (A.) by clicking on little triangles above the histogram.

Move the blacks slider to the left until your image gets a good black tone. The areas in blue highlight loss of detail in the shadows, and areas highlighted in red indicate loss of detail in highlights.

Purists will probably start twitching at this point because I am crunching my black tones (B.) and blowing my highlights (C.). I believe this gives the image a more realistic feel because we don’t always see detail in shadow areas with our naked eye.

I personally like my images to look good overall, and if that means losing some detail in the shadows to gain good contrast across the whole image, I’ll do it. Just because Lightroom gives us the technology to see the entire gray scale doesn’t mean we have to.

LW GRUNGE 5

Step 4. In the next step, I increase the mid-tone contrast or clarity) (A.). I also decrease saturation to counter the digital orange glow the skin tone tends to take on in Step 3. Then I increase vibrance to bring some tone back to the muted tones.

LW GRUNGE 6

Step 5. The next step is to add a vignette from the Effects menu (A.). This is optional, but I feel it finishes the image off nicely and draws our eye to the hero of the shot, Jesse.

LW GRUNGE Main 2

Step 6. Finally, I enhance the eyes slightly using my eye-enhancing technique for Lightroom.

If you’d like to try it, you can check it out here: 3 Simple Ways to Create Stunning Eyes in Your Portrait Photography.

LW GRUNGE BTS

Behind the scenes on my air shoot with actor Jess Kenneally and my MacGyver-inspired lighting boom.

  • Canon 1DS MK3 ISO 100, F/5.6, 1/125th, 70-200mm IS zoom @ 200mm.
  • Jess has been lit using a Canon 580EX Speedlite and a medium softbox.

How do you create a grungy, gritty look to your portraits? Should we keep detail in the blacks and highlights, or is it okay to crunch and blow out to create the right vibe? I’d love to hear what you think.

Gina has a new dPS ebook just released – Portraits: After the Shot – check out out!

The post How to Add a Grunge Effect to Your Portraits Using Lightroom by Gina Milicia appeared first on Digital Photography School.


Digital Photography School

 
Comments Off on How to Add a Grunge Effect to Your Portraits Using Lightroom

Posted in Photography