RSS
 

Posts Tagged ‘Using’

4 Tips for Effective Lighting Using Only One Speedlight

19 Jan

Flashes

If the idea of incorporating flash into your photography work strikes fear in your heart, this is a must read article for you!

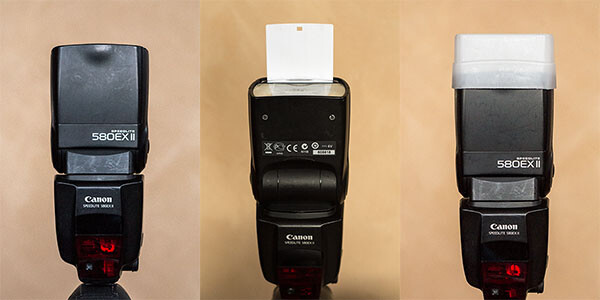
The ability to use a portable electronic flash can do wonders for your work by giving you more creative options, and the truth is you don’t need a ton of fancy equipment to begin utilizing flash. In fact, this article is focused purely on the speedlight, the Canon 580 EXII Speedlite to be exact (equivalent to the Nikon SB-900), and how you can get started experimenting with lighting effects using just one speedlight.

Among the smallest, most compact forms of external lighting, speedlights offer consistent, daylight-balanced lighting powered by four AA batteries. They are easy to fully integrate with your DSLR camera, allowing the two units to operate as one. While most speedlights offer manual settings, it is also easy to just leave it on auto (TTL) and let it adjust the light output according to your camera settings. Depending on what kind of camera you own, it might come with its own built-in pop up flash, but a speedlight is still recommended due to its ability to tilt and swivel, giving you more control over where the flash is aimed.

The following examples were photographed using a Canon 5D Mark III and a 580 EXII Speedlite. All included photographs were shot in auto (TTL) setting and received no retouching other than cropping and resizing.

Ambient Light Isn’t Always the Best Light

No Flash

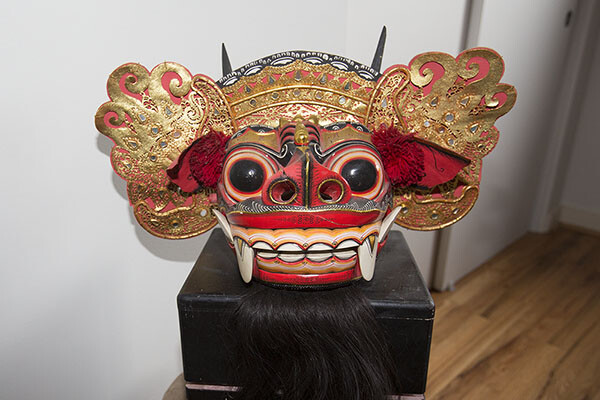
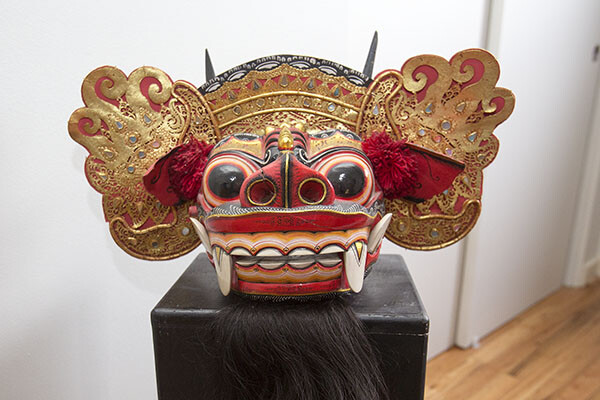
While ambient lighting is often the easiest lighting source to use, it comes with its share of shortcomings. There might be too much or too little ambient lighting, it might be coming from the wrong direction, or it might have a strong color cast. To kick-off this example, let’s see how this Balinese mask photographs using just the ambient light available in the room (see image above). Notice that the colors are dull and the surfaces of the mask are unevenly illuminated. It’s a less than optimal photo, showcasing all of the shortcomings of relying purely on ambient lighting.

If you’re lucky, the ambient light might be able to be moulded using a reflector or simply moving your photo subject. But say you can’t control the ambient light? Here are some tips for using a speedlight in your favor.

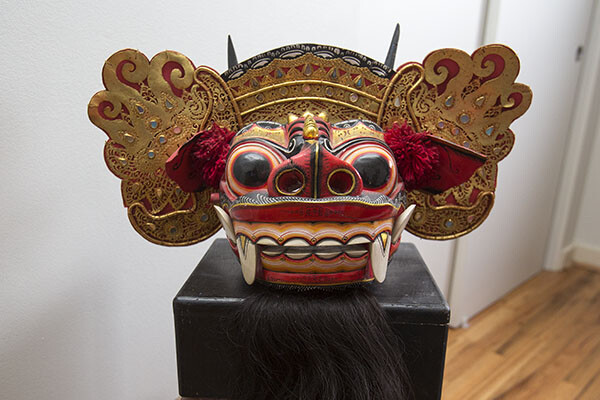
Option 1: Shoot with the flash straight on

Straight On

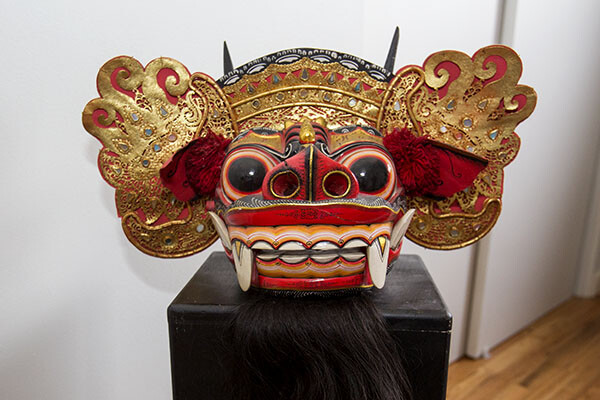
The easiest way to use your speedlight is to aim it directly at your subject. The result is a decently lit subject, similar to the type of photo that a built-in pop up flash would produce. Notice how that colors pop more and the mask is more evenly lit compared to the photo shot in ambient light. However, aiming your flash straight forward can result in some harsh shadows, not to mention cause human photo subjects to be temporarily blinded by light flashing in their faces. It is also very non-directional light making the subject appear flat and lacking dimension.

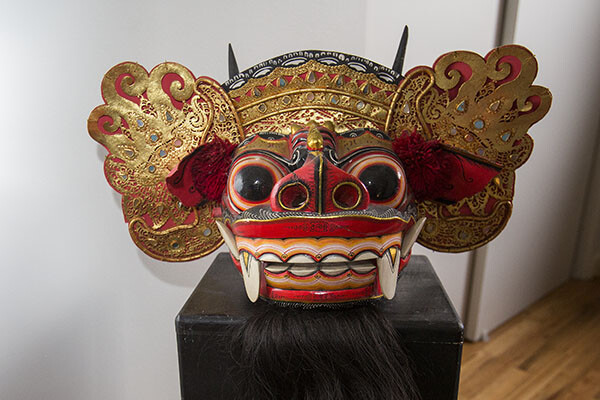
Option 2: Bounce the flash off the ceiling or wall

Straight UP

Flash bounced straight up off the ceiling

The simplest way to soften the speedlight’s effects is to bounce the flash off of a nearby surface. In this case, the flash is aimed directly up at a white ceiling. When the flash is fired, the light is spread out onto the ceiling and reflected down on the subject. As a result, the front part of the mask from the eyes to the nose are nicely lit, but the mouth, ears, and ornamental headdress are left in the shadows. This is one of the pitfalls of simply bouncing the flash off the ceiling: the image will generally produce shadows on any protruding elements of your subject.

Bounce Off Wall My Left

Bounced of the wall to the left of the camera.

Alternatively, the flash can also be pointed directly at a nearby wall so the light is bounced in another angle. In the above example, the flash was bounced off a white wall to the right of the mask. The result is more dramatic lighting that focuses on one side of the mask, using the shadows to indicate more depth.

Option 3: Use the built-in white bounce card


Straight Up with Whitecard

To solve the problem of shadows produced by bouncing the light off the ceiling, one solution is quite simple. Keep the speedlight pointed at the ceiling, and simply pull up the thin white bounce card that is built into the top of the flash. When the flash is fired, the light not only bounces off the ceiling, but a portion of it is also reflected off the bounce card, as seen in the catchlight of the mask’s eyes.  The resulting image is much more evenly illuminated, all thanks to a thin piece of plastic. However, the eyes do reflect quite a bit of the spilled light from the ceiling.

Option 4: Use a white flash diffuser cap on your speedlight

Flash Cap copy

When it comes to flash modifiers for speedlights alone, there are a ton of options to choose from. One of the most effective modifiers is also incredibly compact and cheap: a translucent white cap or box that fits snugly on your flash. It helps to evenly spread out the light to eliminate harsh shadows. In this case, the diffuser cap was attached to the flash which was pointed directly up at the ceiling. The effect is similar to using the built-in white bounce card in Option 3, but the light is more controlled. The evidence is strongest in the mask’s eyes, which now only have the catch light and not the spilled light bounced from the ceiling.

This is just a very basic introduction to flash photography with a speedlight, intended to simply demonstrate how adding a single external flash can produce dramatically different results. What is your take on flash photography? Do you prefer natural light, speedlights, or strobes?

googletag.cmd.push(function() {
tablet_slots.push( googletag.defineSlot( “/1005424/_dPSv4_tab-all-article-bottom_(300×250)”, [300, 250], “pb-ad-78623” ).addService( googletag.pubads() ) ); } );

googletag.cmd.push(function() {
mobile_slots.push( googletag.defineSlot( “/1005424/_dPSv4_mob-all-article-bottom_(300×250)”, [300, 250], “pb-ad-78158” ).addService( googletag.pubads() ) ); } );

The post 4 Tips for Effective Lighting Using Only One Speedlight by Suzi Pratt appeared first on Digital Photography School.


Digital Photography School

 
Comments Off on 4 Tips for Effective Lighting Using Only One Speedlight

Posted in Photography


5 Tips for Using Pinterest for Photography Inspiration

19 Jan

Untitled-1

Let me just come right out and say it – I think Pinterest is amazing. Not only is it a wealth of information when it comes to recipes and easy craft projects for my two kids, but it is also an incredible source for both photography instruction and inspiration. As a photographer, I am constantly inspired by the images that I see while browsing the “Photography” category on Pinterest, and I think it can be a really valuable tool in terms of identifying your personal style in photography as well as pushing yourself as a photographer.

That said, I think it goes without saying that Pinterest is not always used appropriately. We’ve probably all had a prospective client email us asking, “Can you do this?” with a link to a particular pin on Pinterest, where the client means that exact pose, backdrop, and that exact style of post processing. This isn’t inspiration, it’s flat-out stealing. But Pinterest really can be a great resource when used correctly, so here are some tips on the best way to use Pinterest for photography inspiration:

1. Don’t (Only) Browse Your Favorites

If you’re a newborn photographer, don’t just search Pinterest for newborn photos. Rather, try browsing the general photography category, or searching for more general terms like “golden hour” or “high contrast photos”. I’m a firm believer that portrait photographers can be inspired by landscapes, and vice versa. There’s no good reason to limit yourself!

2. Click Through

Once you find an image that you love, take the time to click through the link and make sure that (a) the pin leads to the proper photograph or specific blog post, (b) the correct photographer is credited (Google is not a photographer), and (c) that the photographer wants the image to be pinned. Many photographers pin their own photos and encourage others to repin, or include “pin now” buttons on their blog, which generally makes me feel comfortable with repinning their work. Others install a script that will not allow images from that website to be pinned, which is pretty self-explanatory that they’d prefer their work did NOT appear on Pinterest. If you’re not sure whether or not it’s okay to pin an image after visiting the original website, it’s a good idea to shoot the photographer a quick email or leave a comment asking if they’re open to their images being pinned. This is really new territory without much legal precedent, so I just think it’s better to be safe than sorry!

3. Caption Everything

Leave yourself thoughtful and detailed comments about what, specifically, you love about the photo. Is it the lighting, the pose, the processing, the coordination of outfits? Or is it the emotion behind the image? Whatever it is, try to identify something concrete that speaks to you about each and every image that you pin. I also think it’s good practice to include the photographer’s name in your caption, especially if the image isn’t watermarked, not only to help ensure that the images are properly attributed, but also to begin to identify who inspires you as a photographer.  Here’s an example of how I captioned one image that I pinned as inspiration, coincidentally from this article by Oded Wagenstein about using reflectors here on dPS.

Pinterest2

Text Reads: “I love this portrait by Oded Wagenstein. It’s full of emotion in a way that doesn’t feel posed. Also? Great catch lights even with darker eyes, which is something I struggle with sometimes!”

4. Reflect Regularly

Every couple of months, be sure to go back and look at the images that you’ve pinned, and see if there’s anything that you can glean from what they have in common. Are you noticing a lot of photos with a particular style of processing, or that you’ve pinned many images from a different genre of photography that perhaps you’d like to try? Are you noticing that you’ve selected lots with strong posing, which is something that you could possibly brush up on a little? Try to identify at least one theme across the images that you’ve pinned.

Several years ago I realized that nearly every photography blog I followed was written by a newborn photographer. After months of admiring from a far, and soaking up everything I could read about newborn photography, I finally decided to ask a couple expecting friends if I could come over and take some pictures of their new babies, “just for fun”. My first time photographing a newborn certainly wasn’t perfect, but it ignited a love of a whole new genre of photography that I may never have pursued otherwise. I’m sure this won’t be the last time that I discover a love of something new photographically!

Pinterest3

This is an image from that very first time photographing a friend’s newborn. Years ago, I never would have guessed that this would be a genre of photography that I now love!

5. Put it into Practice

Once you’ve identified some common themes about images that you admire, carve out some time with your camera to put it into practice. Are you a portrait photographer who was pinning lots of images of food? Make some time in your schedule to read about techniques for food photography, and then give it a shot.

Here’s a personal example: one area that I’m not as confident in is posing several people together. I recently did a session for a friend’s family, and checked out several of her Pinterest boards before the session. I noticed that many of the captions on the images that she had pinned were about how she liked how the siblings were posed in the portraits – arms wrapped around each other, holding hands, etc. So, I made it a personal goal to really spend some time looking at small group posing before their session, which made me more confident in posing in general. I think that I was more able to encourage her daughters into a pose that would emulate the feel that their mom liked, while also being more natural for them than it would have if I had tried to recreate one specific pose that I’d seen on Pinterest.

Pinterest1

 Do you use Pinterest to find inspirational images? Any dos or don’ts you’d like to add to the list?

googletag.cmd.push(function() {
tablet_slots.push( googletag.defineSlot( “/1005424/_dPSv4_tab-all-article-bottom_(300×250)”, [300, 250], “pb-ad-78623” ).addService( googletag.pubads() ) ); } );

googletag.cmd.push(function() {
mobile_slots.push( googletag.defineSlot( “/1005424/_dPSv4_mob-all-article-bottom_(300×250)”, [300, 250], “pb-ad-78158” ).addService( googletag.pubads() ) ); } );

The post 5 Tips for Using Pinterest for Photography Inspiration by Meredith Clark appeared first on Digital Photography School.


Digital Photography School

 
Comments Off on 5 Tips for Using Pinterest for Photography Inspiration

Posted in Photography


A Super Simple Way to Make Landscape Photos POP Using Lightroom

17 Jan

It seems like virtually all outdoor or landscape photographs suffer from the same illness when they come out of the camera. The symptoms are:

  • An overly bright sky
  • Foreground that is too dark
  • A general lack of color and contrast.

Sound familiar?

Fortunately, there is a cure for this ailment. Actually, as anyone who has worked with post-processing software for any length of time knows, there are a lot of different cures. But I want to show you a super simple way to fix pictures with these problems. I performed these fixes in Lightroom, but you can also do them on the Adobe Camera Raw screens of Photoshop or Photoshop Elements.

Colorado road photo with Lightroom adjustments

The quick-fix shown here will involve nothing more than moving six sliders, each of which is in the Basic panel of Lightroom’s Develop module. The edits will take less than 30 seconds of your time. I performed these edits – and only these edits – to the pictures you see throughout this article to show you the effects.

The Steps

Let’s not dally with a lot of explanation just yet. Here are the steps to perform a quick-fix of landscape photos. The first three steps are the most important, where you will see about 90% of the changes to your pictures. After walking you through these steps I will explain the process in a little more detail.

  1. Decrease the Highlights: Just pull the highlights slider to the left as much as is needed to add more detail to your sky.
  2. Increase the Shadows:  Pull the Shadows slider to the right to brighten the foreground. Don’t worry if it looks a bit washed-out after this step.
  3. Reduce the Blacks: Pull the Blacks slider to the left. This will add contrast back to the picture, and will fix the washed-out look that might have crept into your picture after the last step.
  4. Increase Vibrance: Pull the Vibrance slider to the right a bit to add more color to the picture.
  5. Increase Contrast: Pull the Contrast slider to the right a little bit to increase overall contrast. Don’t go too far, or it might start to undo the changes you just made above.
  6. Increase Clarity: Pull the Clarity slider to the right to add some clarity (edge contrast) to your photo and make it appear less soft.

That’s it. Just move these six sliders and you should see a vast improvement in your landscape pictures. This might seem more complicated than it actually is, because there are six steps. But after a while you will be able to do all of it in a matter of seconds.

Bass Harbor photo with Lightroom adjustments

What’s Going on Here

Now that I’ve shown you the steps and a few examples, let’s talk about this process.

What you are doing first is reducing the tones in the sky by using the Highlights slider. The sky is typically the brightest part of landscape photos. The Highlights slider will ONLY affect the brightest tones in the image, so decreasing it should tone down your sky but not touch the darker portions of your picture. Decreasing the highlights will not only keep the sky from being too bright, but will also add detail and texture to the clouds.

After the change to the sky, step 2 is to increase the brightness of the foreground. The foreground is almost always too dark in outdoor photos, and you need to brighten it up and add detail there. As you pull the Shadows slider to the right, you should see your foreground brighten up. The sky, which is not among the shadows of your photo, should remain largely unaffected. Your photo should be looking a lot better at this point.

Many times, when you make the change to the foreground in step 2, that area starts to look a little bit washed-out. Therefore, step 3 is the pull the Blacks slider to the left. Whereas the previous step brightened the shadows, we are now taking the very darkest tones in the photo and bringing them closer to black. The shadows were made brighter in the last step, and now the blacks are made even blacker. That adds more contrast to the foreground and eliminates that washed-out look. It often adds a little bit more contrast to your sky as well.

Note: For a handy tip on using sliders, read The Magic Alt Key article here. 

At this point, your photo should be looking pretty good. In fact, about 90% of the effect is applied to your photo after step 3. Now you will just clean up by making the photo a little clearer, and more colorful.

Texas field photo with Lightroom adjustments

In step 4, we will just increase the vibrance of the photo to add more color to the scene. The Vibrance slider is just below the sliders you have been working with.  Pull it to the right to add more color to the picture. You can adjust this slider however you want, but don’t overdo it.

You might wonder why you should use the Vibrance slider instead of the Saturation slider. The answer is that vibrance is designed to have a higher impact on less saturated colors. Saturation adjustments apply to all colors equally, so an increase in saturation can make certain highly saturated colors look garish. Vibrance, by focusing on colors that are less saturated, lets you increase the overall saturation of your colors without overdoing any colors.

Next, you add a little contrast. Pull the Contrast slider to the right a little bit. You have to be careful here because essentially what you did in the first three moves of this process was reduce overall contrast (making the bright sky darker and the dark foreground lighter). If you crank the contrast up now using the Contrast slider, you will be working against the moves you previously made. A small or moderate increase in contrast, however, can add more texture to the photo, so I recommend you do that.

Finally, a small to moderate increase in Clarity usually makes the photo look sharper and clearer. Don’t overdo this, as clarity is a powerful tool. Just add a little bit by pulling the Clarity slider to the right, and this final step can really make your photos pop.

After having gone through this process, there is nothing stopping you from continuing with additional editing, if you wish.  You can take your photo into Photoshop and make a lot of other changes, or you can use the plug-in of your choice. But even if you decide to do additional editing, the process I have described in this article can still be a good starting point for your landscape photos. It also works really well when you are in a hurry or you’d like to process a lot of photos at once.

Head Harbor Lighthouse photo with Lightroom adjustments

Bonus Tip

I want to keep this process as simple as possible and not confuse it with a bunch of other things, but there is just one more tip I want to pass along in this article. It is a way to add more contrast to your skies in Lightroom (or in ACR in Photoshop).

Scroll down to the HSL/Color/B&W panel in Lightroom’s Develop module, where you will see sliders for eight different colors. Go to the Blue slider and make sure the Luminance tab is selected just above the colors. Decrease the luminance of the blues in your picture by pulling the Blue slider to the left. This will make the color in your sky a deeper, richer blue.

Recall that Step 1 of the process above was to decrease the highlights in an effort to tone down and add detail to your sky. If you decrease the luminance of the blues, you might find that you don’t need to do Step 1 (or at least that you do not need to pull down the highlights as much). In fact, keeping the highlights nice and bright, while decreasing the luminance of your blues, can really add some nice contrast to your skies.

Colorado National Monument photo with Lightroom adjustments

Conclusion

This is one simple way to make super fast changes to your landscape photos. After you have done it a few times, you can make these changes in mere seconds. I know we are all sensitive to falling into ruts and doing the same thing over and over again, so you don’t want to do this process all the time. But it is great when you just want high impact in a short amount of time, or as a quick baseline for further changes.

googletag.cmd.push(function() {
tablet_slots.push( googletag.defineSlot( “/1005424/_dPSv4_tab-all-article-bottom_(300×250)”, [300, 250], “pb-ad-78623” ).addService( googletag.pubads() ) ); } );

googletag.cmd.push(function() {
mobile_slots.push( googletag.defineSlot( “/1005424/_dPSv4_mob-all-article-bottom_(300×250)”, [300, 250], “pb-ad-78158” ).addService( googletag.pubads() ) ); } );

The post A Super Simple Way to Make Landscape Photos POP Using Lightroom by Jim Hamel appeared first on Digital Photography School.


Digital Photography School

 
Comments Off on A Super Simple Way to Make Landscape Photos POP Using Lightroom

Posted in Photography


3…2…1…Actions!! A Guide to Using Photoshop Actions to Speed-Up Your Workflow

06 Jan

Do you find yourself doing the same processes in Photoshop over and over again? Do you wish you knew a way to quickly do amazing things to your photos without going through a bunch of steps? If you haven’t entered the world of ACTIONS yet, let me be your guide! I’m going to teach you how to install Photoshop Actions that you purchase or download on the web, and even better, how to create your very own Actions.

197

Find the “.atn” file and double-click it.

There are tons of places to find Actions on the web. Some cost a lot, some are free. There are a lot of great ones, and a lot that aren’t really worth using. I look for Actions that fit my style, and are fully adjustable. Which means that I can turn every layer off or on, adjust the opacity of each layer, and customize to fit my style and each individual photo.

Installing Photoshop Actions

Once you’ve purchased and downloaded your Action, make a backup file somewhere, just in case. Then, open the folder, find your Action (it will be a file with .atn extension), and double click it.

(You do not need to have a photo of a gorgeous bride open in Photoshop as you do this, but it never hurts!)

198

This might seem too easy to be true, but most of the time this works. It’s automatically installed into Photoshop when you double click. Easy as that! If for some reason that doesn’t work, or you like to do things the hard way, you can use the following method.

199

Make sure your Actions Palette is open. You can do this by clicking “Window” at the top of Photoshop, and making sure the check mark next to “Actions” is on. If you don’t see a check mark, just click on “Actions” and your Action Window will appear.

Click on the upper right hand corner of your Actions palette, and a drop down menu will appear. Select “Load Actions”.

200

Then, you’ll navigate to find and select that .atn file, click “Open”, and it will be installed. Now your Action is ready to be used. All you have to do is open a photo, click on your Action, and it will run through a bunch of steps in a very short amount of time (running times may vary based on the number of steps in the Action and the speed of your computer). Be aware that not every Action will look great on every photo, and many times Actions need to be adjusted before they look right. Be careful not to overuse Actions. They are great tools, but can ruin a photo quickly if you don’t practice adjusting and learning what Actions work with different types of photos.

How to create Photoshop Actions

Now that you know how to install someone else’s Actions, I want to teach you how to be a Photoshop rock star and create an Action of your own. You can create Actions for so many different things, from a simple sharpening Action, to a complex multi-step stylized Action.

184

For this demonstration I’m going to show you how to make a simple “soft light” layer to add a boost to your photos. Go ahead and open Photoshop and make this Action along with me. Once you see how the steps work, you can experiment with making more Actions for all the things that you find yourself doing over and over again. You will need to have a photo open when creating your Action, so choose a beautiful bride, or any photo you’d like.

Your Actions palette may be in button mode, or it may not. I like mine in button mode for normal use, but you have to change out of button mode to create Actions. Click on the top right corner in your Actions palette, and make sure that the check mark next to “Button Mode” is deselected.

185

Before you create an Action, you will want to make your own Action folder set, so that everything stays organized. Select “New Set” from your drop-down menu.

186

You can name your set anything you’d like. A great set to start with would be a simple “My Actions”, so you will know which ones you created. Later you can divide them into multiple categories if you’d like.

187

Right in the Actions palette is your very own set of Actions. You are now that much closer to Photoshop rock star status! Make sure your set is selected for the next step. If it’s highlighted, you’re ready to go.

188

Select “New Action” from the menu. We are going to create an Action inside your Action set.

189

Now you’re going to name your Action. It’s good to pick a name that lets you know exactly what it does, or describes the results of the Action well, so you won’t be wondering later. Since this Action will be a “Soft Light” layer, I just named it “Soft Light”.

190

If you’d like to, you can also choose a color for your Action, this only applies if you are in Button Mode. This helps with Action organization. You can make all of your Actions within your set the same color, so you can easily find different sets of Actions, or you could only choose a color for your frequently used actions, so they are quick to find. Now you’re ready to start recording. Just click record. Don’t worry, you can go as slow as you need to. It just records the process that you are going through, but doesn’t record the time it takes you to do it. It will play much faster than it takes you to record it.

191

We are going through the steps of making a Soft Light layer right now. It’s super simple, but it’s a great one to make for your very first Action. Just drag your background to the “create a new layer” icon (the square with a corner folded over), and it will make a duplicate of your background.

192

Make sure your “background copy” layer is selected, then click on the Blending Mode menu. (It will say “normal” on the button. It’s at the top left of your Layers Palette.) Find “Soft Light” and select that blending mode.

193

I like to name the layer when I make Actions, so that I can easily know what each layer does when I run the Action later. Just double click on the name of that background copy and type in a new name for that layer. I went with “Soft Light” because I’m very original and creative.

I also adjusted the opacity to around 50%, just because I know that on most photos I won’t want it 100% strong (adjust to your own taste and style). When you run the Action, you can always adjust the opacity to suit the individual photo, but I suggest you put the opacity at a level that you use most, because often that will save a step when you run it later.

194

Now we are done with our Action and we just need to press “stop” to end the recording. It is the square just to the left of the red recording button.

195

There’s your Action. Pretty exciting, isn’t it? You can try it out by making sure your Action is selected, and pushing “play” at the bottom of the actions palette. You’ll be amazed how quickly your “soft light” action goes through those steps. It doesn’t take long to do all those steps without an Action, but it’s almost instantaneous with one. Once you get a lot of your regular go-to steps turned into Actions, you’ll find that it takes a lot less time to edit each photo.

196

If you want to change back to button mode, it will really streamline things. All you have to do is click once on the Action. You don’t have to push play, or scroll a lot through open steps to find your Action. Give it a try.

Let me know how you did creating your first Action along with me. If you’re an Action-creating enthusiast, I’d love to hear what Actions you have made, and which Actions have been most helpful to your workflow.

googletag.cmd.push(function() {
tablet_slots.push( googletag.defineSlot( “/1005424/_dPSv4_tab-all-article-bottom_(300×250)”, [300, 250], “pb-ad-78623” ).addService( googletag.pubads() ) ); } );

googletag.cmd.push(function() {
mobile_slots.push( googletag.defineSlot( “/1005424/_dPSv4_mob-all-article-bottom_(300×250)”, [300, 250], “pb-ad-78158” ).addService( googletag.pubads() ) ); } );

The post 3…2…1…Actions!! A Guide to Using Photoshop Actions to Speed-Up Your Workflow by Melinda Smith appeared first on Digital Photography School.


Digital Photography School

 
Comments Off on 3…2…1…Actions!! A Guide to Using Photoshop Actions to Speed-Up Your Workflow

Posted in Photography


Using Graduated Neutral Density filters for Landscape Photography

23 Dec
You can see the effect an ND Grad has on the scene

You can see the effect a graduated neutral density filter has on the scene

One of the biggest challenges in photography is managing the light in your scene. It is for this reason that many landscape photographers love to be out shooting during the golden hours or blue hour when the light is beautiful and the contrast is manageable. Contrast is tough to manage on bright days and in certain scenes, but there are a few ways to work around this. In this article we are going to look at the usefulness of using neutral density gradient filters (aka ND grads). These filters have been around for a long time, most landscape photographers will have a set of them in their camera bag.

Filters or Photoshop?

In recent years, there has been an ongoing debate around whether it is better to use filters or to bracket the images and blend them in Photoshop afterwards or even use HDR to capture all the different tonality and light in a scene. In many cases this is a personal preference, and I switch between the two depending on the scene or the vision I have of the image I want to make.

If I am shooting during golden hour I will most often use an ND grad filter. If I am doing a starscape, I will take two images and blend them, one for the sky and one for the foreground. The reason is this. At golden hour, I can expose for the ambient light and use a filter to keep the detail in the sky. If I want a starscape (not a star trail) I need to push my ISO up really high and if there is something in the foreground of the scene that is a little too bright, it will overexpose. My first shot will be an image that will expose the the scene properly. For my second shot, I will expose the sky to capture a starscape shot. Afterwards, I will blend them in Photoshop, which really works well.

In some cases, there is no substitute for an ND grad. If you want the waves in a seascape scene to become silky smooth or a river to look soft and white, then you will need to use ND grads. This effect cannot be made in Photoshop (not yet anyway). The best part about using ND grads is the surprise you get when you see the image on the screen. You will be amazed at the effect of capturing the blurred movement of different elements in your image.

What is a graduated neutral density filter (ND Grad)?

Essentially it is a rectangular, optically correct piece of resin or glass with a gradient from dark to light. It is called “neutral” because the dark part of the filter should not make any colour differences, or add a colour cast to the scene. This is not always true of cheaper filters, but the well established filter brands (Lee, Singh-Ray) leave very little colour cast on the final image. The reason behind using an ND filter is to hold light back so that the part of the scene that is brightest (usually the sky) does not overexpose. This effect creates a pleasing image. The sky is well exposed and the foreground is correctly exposed as well.

If you were to expose the scene without using an ND grad filter, very often, the foreground would be well exposed while the sky may simply be overexposed or, if you were to expose for the sky, the foreground would be very dark. As I said earlier, you can do blending in Photoshop, but sometimes, you may not capture all the detail in the sky and using a filter to capture the scene may be useful. Also, you will be able to spend more time shooting and less time editing afterwards!

A set of ND grads in varius strengths

A set of ND grads in varius strengths

When should you use an ND grad filter?

Most landscape photographers will use them at sunrise or sunset, during the golden hour. You can also use them during the day to slow the shutter speed to make water smooth and silky. Blurring moving objects such as people, cars, buses or even trees blowing in the wind is also an option. What you will get is a well exposed, daylight scene with some blurred movement. This can look really interesting and dynamic in your image.

The reason you will want to use an ND grad filter is that there can be a substantial difference, light wise, between the sky and your foreground. If you have more than a two stop difference, you will probably need an ND grad filter to correct that and get a good, well balanced exposure. This not a rule, but if you try and average the exposure and you are finding that your foreground looks too dark and your sky is too bright, maybe it is time to use the filter.

An ND Grad was used in this image to expose the sky and clouds correctly

An ND grad was used in this image to expose the sky and clouds correctly

Types of ND grad filters

ND grad filters have a few variables. The first is whether the filter has a hard or soft edge. There is a reason for this and both types are useful. The hard edge filter has a very definite transition between the dark gradient part of the filter and the part that is clear. The soft edge filter gently blends the gradient across the filter, so the line is less obvious. Each one of these filters are used on different scenes. For example, the hard edge filter is really useful if you have a very definite horizon line (i.e. a seascape or a landscape scene where the horizon is pretty flat and straight). The soft edge filter is used for scenes where there is no clear horizon (i.e. a forest or street scene). Learning when to use which type of filter takes some practice, but once you can visualise what the result will look like, it is pretty easy.

Hard Edge and Soft Edge ND Grads

Hard Edge and Soft Edge ND Grads

ND grads come in different strengths

The filters are made in different strengths to compensate for different lighting conditions. Depending on the dynamic range (the difference between highlights and shadows) in your scene you can choose an ND grad filter that will be darker or lighter. Darker filters hold back more light and lighter filters, hold back less light. ND Grads are made in the following strengths 0.3 or one f-stop of light, 0.45 or 1.5 f-stops, 0.6 or two f-stops, 0.75 or 2.5 f-stops, 0.9 or three f-stops. The important calculation to remember is to try and keep your sky and your foreground within one stop of one another. Also, ND grads can be stacked if the light is really bright, so you can make the sky even darker, depending on the effect you want.

How do I use an ND grad filter?

It is easier than you might think. There are some technical details to think of, but once you have used grads a few times, it is really quite simple. Here is a process that works pretty well in most lighting conditions:

  1. Set up your camera on a tripod and take a light meter reading of the foreground. Making sure that your camera is on Manual, point it down and fill the viewfinder with the foreground to take the reading.
  2. Take a light meter reading in the same way as above, of the sky.
  3. Work out the difference between the two exposures and use an ND Grad to get your scene to within one stop of light difference. As an example, if the sky is three stops brighter than the foreground, you can use an ND Grad that blocks two f-stops of light or a 0.6 ND Grad.
  4. Slide the ND grad filter into place in front of the lens and determine the best position for the gradient to be in your image. If it is a hard horizon (i.e. a seascape scene) use a hard edge grad, if it is a forest scene, use a soft edge grad.
  5. Expose for your foreground and make the shot.
  6. Check the result on your LCD screen, zoom in on the image to make sure everything is properly exposed. Make any adjustments and shoot another image if necessary.

That’s it, simple really. Of course, as I said earlier, it takes a fair amount of practice to become adept at using these filters, but the results are worth it.

In this scene, the ND grad allowed the sky to be exposed properly and slowed the shutter speed won enough to blur the water

In this scene, the ND grad allowed the sky to be exposed properly and slowed the shutter speed down enough to blur the water.

Image editing

Once you have captured your well exposed scene, you will want to take it into Lightroom or Photoshop to put the finishing touches to the image. There are many different ways to enhance the image and make it really pop. I am not going to go into all the different adjustments you could make to the image except for one piece of advice. I will generally select the sky and the foreground separately and make a layer for each of them, then make separate adjustments to each. You may want to make the sky even more foreboding if it was a cloudy day, or perhaps brighten up the foreground a little more to show the detail. By doing this you will get the most out of the the light in the scene. Many photographers will convert their ND grad images into black and white because the movement and softness of the water in the scene can look very compelling in monochrome. The choice is yours.

What’s next?

To do this kind of photography, you will need to buy an ND grad or two. Some of the cheaper ND grads are a good place to start, brands like Cokin are good, and they are not especially pricey. The more expensive brands offer top quality, and in some cases the filters are hand made. If you find that you really love the effect these filters give, then you may want to invest in some Lee filters or Singh-Ray. These are top filter brands and the results from these products are amazing.

The most important thing to remember is to invest the time in getting the technique right and knowing how to use the equipment. Photography is all about practice and getting the technique right. Yes, good equipment helps, but the most important thing is practice. Once you have mastered the technique with a cheaper filter, then consider making the investment in the more expensive ones.

A final image after being processed in Photoshop

A final image after being processed in Photoshop

googletag.cmd.push(function() {
tablet_slots.push( googletag.defineSlot( “/1005424/_dPSv4_tab-all-article-bottom_(300×250)”, [300, 250], “pb-ad-78623” ).addService( googletag.pubads() ) ); } );

googletag.cmd.push(function() {
mobile_slots.push( googletag.defineSlot( “/1005424/_dPSv4_mob-all-article-bottom_(300×250)”, [300, 250], “pb-ad-78158” ).addService( googletag.pubads() ) ); } );

The post Using Graduated Neutral Density filters for Landscape Photography by Barry J Brady appeared first on Digital Photography School.


Digital Photography School

 
Comments Off on Using Graduated Neutral Density filters for Landscape Photography

Posted in Photography


Restaurant Menu Food Photography Using Natural Light

22 Dec

There are many ways to approach food and drink photography, from big budget shoots with food stylists and complicated lighting setups, to low budget natural lighting setups. For a formal restaurant photo shoot, which setup would you choose? I’ve had successes doing both types of photo shoots, but in this particular example, I’ll show you super low budget ways to pull off professional, tasty-looking food photos appropriate for a menu.

restaurant photography tutorial natural lighting

Client Brief

Based in Seattle, this client is an American restaurant going in a new direction with the hiring of a new chef and his decision to revamp the menu into one with distinctive Southern and Creole flavor.  This client reached out in need of 10-20 menu photos for use in their press release announcing the rebranding efforts. I had photographed their interiors previously and knew that the multi-room restaurant and bar was vintage themed with diverse backgrounds, patterns, and lighting schemes throughout the restaurant. Based on the budgeted resources for this shoot, I decided against making it a big production with a food stylist and opted for a low budget approach.

Planned Setup

Initially, I planned a simple lighting setup using a Canon 580 EX-II Speedlite, a shoot-through umbrella, Pocket Wizards, and a compact Manfrotto 5001B Nano light stand. This is my favorite relatively compact and affordable lighting setup for everything from quick portraits to food and drink photography. However, I realized when I got onsite that I was missing a crucial piece of my setup: the flash and umbrella mounting adapter, meaning I had no way of connecting my flash and umbrella to the lighting stand. Oops…time to improvise!

Actual Setup

Since I had photographed the interiors of the venue before and knew that there were two areas that had copious natural lighting: the bar area near the front entrance with huge floor to ceiling windows, and a large room with glass panels for a ceiling. Luckily, it was a typical cloudy day in Seattle, so there was nice diffused natural light flowing through the ceiling, making these two areas the perfect spot for food and drink photography without any flash or external lighting.

In terms of gear, I shot all of these photos with a Canon 6D camera and a 24-70mm f/2.8 lens. I also used the 580 EXII Speedlite on occasion when I needed some fill light.

Composing and Shooting

I photograph a lot of restaurant interiors and as a result I’ve learned that there is a lot of thought and strategy that goes into the design of the space. As a result, I like to find distinct elements of the restaurant to fuse into the food photos that I create. This does two things: 1) it highlights unique features that a designer or architect spent a lot of time working on, and 2) incorporating aspects unique to the restaurant places the dishes in different atmospheres, thus creating more diverse imagery.

Photos at the Bar

Cocktail photography

I started off with two appetizer and cocktail dishes, photographing them at the bar that was naturally lit by the huge floor to ceiling window. The white granite bar top was a nice contrast to the warm colors of the food and drinks. I shot this first image at f/4 to keep the main elements of the glass and bowl of nuts mostly in focus. The first few shots looked like they were missing some depth, so on a whim I moved the pairing in front of a bowl of citrus fruits placed at the bar. The color and placement of the fruits ended up being nice complimenting elements, contributing to the image below.

restaurant photography tutorial natural lighting

This second dish that was shot at the bar was presented on a super long wooden cutting board. It was actually too long for such a small appetizer, and I solved this problem by zooming in to the image and shooting at f/3.2 to keep the focus on the main element: the chunky shrimp remoulade topping the bread!

remoulade photography

Photos in the Dining Area

Percy's in Ballard, Seattle, WA

Another intriguing section of the restaurant that offered nice, albeit darker, lighting was the dining area. Featuring an illuminated mirror behind circular booth seats and a light colored wooden table, this was a great space to utilize for cocktail shots. This particular beverage was shot at f/2.8 to keep the glass and its elements in focus and give a nice blur of the mirror background.

FINAL-Cocktail

Photos on the Patio

FINAL-Percys 01

Finally, the bulk of the food and drink photos I shot were taken in the aforementioned covered patio area in the back. As you can see from the images below, the space has a huge glass ceiling, brick walls, long colored picnic tables, and a nicely textured wooden floor panels. All of these elements made for great textures and backgrounds for shooting each dish in a variety of settings.

Final-Kale

Salads can be a bit tricky to shoot because there can be so many competing elements to focus on. In the case of this kale salad, I chose an aperture of f/5.6 to make sure more parts of the salad were in focus other than the shredded cheese and mustard seeds.

Final-Chicken

The winning dish of them all was this epic made-from-scratch fried chicken entree with rice and beans. Again, lots of different parts of this dish competing for attention, so I used an aperture of f/8 to make sure the most important parts were clearly in focus.

Wrap Up

Overall, this photo shoot of 10 dishes, each paired with cocktails took me about two hours to photograph. I had a bit of a challenge by forgetting one key piece of my lighting kit, but was able to improvise thanks to copious natural lighting and using my handy 580 EXII Speedlite. All photos received light post-processing treatment and were turned over the next day for the client.

What do you think? Is a lighting kit essential for professional food photography, or is natural lighting the way to go?

googletag.cmd.push(function() {
tablet_slots.push( googletag.defineSlot( “/1005424/_dPSv4_tab-all-article-bottom_(300×250)”, [300, 250], “pb-ad-78623” ).addService( googletag.pubads() ) ); } );

googletag.cmd.push(function() {
mobile_slots.push( googletag.defineSlot( “/1005424/_dPSv4_mob-all-article-bottom_(300×250)”, [300, 250], “pb-ad-78158” ).addService( googletag.pubads() ) ); } );

The post Restaurant Menu Food Photography Using Natural Light by Suzi Pratt appeared first on Digital Photography School.


Digital Photography School

 
Comments Off on Restaurant Menu Food Photography Using Natural Light

Posted in Photography


Tips for Retouching a Night Photograph using Lightroom

21 Dec

I will show you an experience I had of shooting in the middle of the night after sunset without a tripod. Many monuments don’t allow you to shoot with a tripod but you still want to take a photo. The nicer light in my opinion is usually after sunset or before sunrise, so I will show you how to take and process a photo without a tripod at night.

dPS-Before-after

If you have a nice high vantage point to take a beautiful photo but cannot put down your tripod you will see that there
is something we can do about it. The trick is you must put your camera on a timer, (use the built-in 2-second timer) meaning when you press the shutter it counts to two and then takes a photo. This way when you take the photo you are not pressing the button so there is less vibration.

Next go into manual mode and put it on 1/20th of a second. Usually it will be blurry, but if you put your arms on your stomach and stop breathing you should get a sharp photo. Then open the lens as much as you can. As you can see the photo is very sharp and I was only at 320 ISO.

As usual I am always shooting to get the highlights, so what you do is you put your camera at 1/20th of a second, 2 second on timer, approximately f/2.8 aperture (or open as wide as you can), then start going up on the ISO. You take several photos until you see that you have something you like.

Now let’s see how we are going to retouch this photo. First we are going to open up the shadows; you see how we can see the entire city?

Screen shot 1
Now on the white balance. When you are taking a photo of a sunset in a city there is one white balance that I advise you to use, but it is very difficult to get the right white balance right away. What I usually do is go to the shade preset, and add a bit of magenta, that is something I like.

Then bring down the highlights, and lastly do the white and black points.

Look how incredible this photo is, I took it without a tripod at night, now the only problem is that I don’t have a long exposure so the cars are very sharp, I don’t have the lighting streak behind the cars that I would have liked but it’s still pretty good.

Ok, now let’s crop the photo a bit to get it to look more dynamic.

Screen shot 2

Next, let’s take a brush, select a warm temperature and add some clarity to it and we will now start painting the photo in specific areas where we want to add color.

Screen shot 3

We will now create a graduate filter to accentuate the sunset.

Screen shot 4
Create a new graduate filter to add some highlights to parts of the buildings to make them come out a little bit more.

We will now add a gradient filter on the top of the photo to create more of a blue sky.

Screen shot 5

We will remove some clarity on the overall photo. Last but not least let’s add some sharpness, there is almost no noise as I am using this amazing Sony camera, so we will only remove a bit of noise.

We can now see the end result of this photo that was taken at night without a tripod. I find it quite incredible!

Before

After

For a full walk-through of how this is done check out this video:

If you enjoyed this tutorial you can find more of Serge’s tips and courses here.

PhotoSerge

googletag.cmd.push(function() {
tablet_slots.push( googletag.defineSlot( “/1005424/_dPSv4_tab-all-article-bottom_(300×250)”, [300, 250], “pb-ad-78623” ).addService( googletag.pubads() ) ); } );

googletag.cmd.push(function() {
mobile_slots.push( googletag.defineSlot( “/1005424/_dPSv4_mob-all-article-bottom_(300×250)”, [300, 250], “pb-ad-78158” ).addService( googletag.pubads() ) ); } );

The post Tips for Retouching a Night Photograph using Lightroom by Serge Ramelli appeared first on Digital Photography School.


Digital Photography School

 
Comments Off on Tips for Retouching a Night Photograph using Lightroom

Posted in Photography


Using Rain Puddles to Create Unique Reflection Photos

17 Dec

6

Implementing water into a shoot ratchets up the drama in the images but also the difficulty in the execution. I equate the learning curve of lighting water to learning how to light metal objects and other reflective surfaces. It’s not a quick learn, so be patient with yourself.

Rain puddles are awesome. I bet you never thought to run out after it rained to hunt for decent puddles. But as you can see in the image below, that’s exactly what I was working with. Since the product I was shooting was a cologne bottle, which is rather small, the puddle didn’t need to be very wide or long. If I was shooting something larger, like a person, I would need a much larger puddle to pull off this technique of making reflection photos.

1

The setup: I was working with a rain puddle in a parking lot, on a patch of blacktop. I added a grid to my flash to keep light from spilling onto the foreground.

The first thing I was looking for was a puddle on a patch of blacktop, or dark asphalt. Typical asphalt or concrete is much lighter in color, and you need something darker to really make this work. The next thing to keep in mind is the height of the flash. Notice I placed it on the same level as the product – on the ground. If I were to light it from a higher angle instead, the light would illuminate too much of the ground around the product, resulting in a less than dramatic image. I also added a honeycomb grid to the flash to further contain the light spill.

Since the day I photographed this was particularly drab and dark, I had no problem dialing down the ambient with a moderate exposure. With a flash output of ¼ power I had all but eliminated the ambient light, leaving me with an exposure of 1/60 at f/7.1. On a brighter day, I’d likely need a neutral density filter to get rid of the extra ambient light.

Though the ambient has been lowered to an almost night-time quality, there are still some reflections of the sky and trees visible in the puddle. The lower shutter speed allowed these tones and shapes to remain. Though the puddle was not especially wide or deep, it sufficed in allowing me to achieve the glassy surface that I was going for, see below.

2

The final shot: This rain puddle, shot on a drab, gray, day has been transformed into a dramatic, glassy surface.

If the sky had been clear, rather than dark gray, the surface of the puddle would have been a nice, vibrant blue, as seen below. In this shot you can see that while the blue tone is nice, the illuminated foreground is pretty distracting, not to mention the dozens of small rocks. This was because the light was elevated, lighting the concrete in front of the shoes as well, which is why it’s important to lower your lights, so that they’re parallel to the ground.

3

When the sky is clear, the surface of the puddle changes to a lovely blue color. However, be sure not to light from above, because as seen in this image, the illuminated concrete makes for a distracting foreground.

4

The setup: A puddle, this time a large one, is the setting for this portrait. The shoot took place right after the sun dropped below the skyline.

In this next image I was using a rather wide puddle, which was large enough to allow me to isolate my subject, Max. Once again, to minimize light spill, I set my light at the same level as the subject, rather than above, as well as used a grid. The puddle reads really well, though the reflection shows a bit of the building in the background. After I finished color grading the image in Lightroom, I opened up the file in Photoshop to remove the building.

To do this, select the trouble area and simply hit the delete key. As long as you are using Adobe Photoshop CS6 or CC, you’ll see the option to use Content Aware Fill (see below). It will typically do a decent job at filling in the selection, but minor cleanup is often needed. I used the Spot Healing Brush tool to clean up any remaining trouble areas.

5

I quickly removed the building reflection by using the Content Aware Fill option in Photoshop CC.

6

The final shot: After removing the building reflection, the water surface looked seamless.

Have you got any other tips for creating reflection photos? Please share them and/or your images in the comments below.

googletag.cmd.push(function() {
tablet_slots.push( googletag.defineSlot( “/1005424/_dPSv4_tab-all-article-bottom_(300×250)”, [300, 250], “pb-ad-78623” ).addService( googletag.pubads() ) ); } );

googletag.cmd.push(function() {
mobile_slots.push( googletag.defineSlot( “/1005424/_dPSv4_mob-all-article-bottom_(300×250)”, [300, 250], “pb-ad-78158” ).addService( googletag.pubads() ) ); } );

The post Using Rain Puddles to Create Unique Reflection Photos by Nick Fancher appeared first on Digital Photography School.


Digital Photography School

 
Comments Off on Using Rain Puddles to Create Unique Reflection Photos

Posted in Photography


Architectural Photography Using Layer Masking to Correct Contrast and White Balance

17 Dec
Dps 2

A challenging nighttime scene was overcome with multiple exposures and layer masking.

Blending indoors and outdoors in architectural photography can often create a compelling image. Unfortunately, however, it is often fraught with exposure and white balance issues. These issues are compounded at night, when artificial lights inside buildings coupled with the darkness of the night sky create an especially contrasty image with an unattractive colorcast created by the different light sources. Luckily, with multiple exposures and layer masking in Photoshop, you can create a photo that looks a lot like what you saw with your own eyes.

This method is a little different than HDR, which involves taking three or more photos at different exposures, then using automated software to combine them into one image that captures the range of light in the scene. Here, you’ll be taking three or more photos and blending them manually, since HDR software often creates unpleasant artifacts and odd color blending when used in the type of situations presented in this tutorial. You can always try HDR software first, and if the colors don’t seem to bleed, you can skip down to the later part of the tutorial for dealing with the colorcasts.

Dps 1

An image that required three exposures and had a color cast from the lamps.

Shoot three or more exposures on a tripod

You need to shoot as many photos as it takes to capture the dynamic range (the range from light to dark) in the scene. It is really important to shoot in RAW, to get as much mileage out of each photo as possible. A tripod is also necessary, since you’ll probably be taking these at night, and also because you won’t be using HDR software which aligns the images. You can use auto exposure bracketing to capture three images, but at night, exposures on the high end can often exceed 30 seconds, the longest shutter speed most cameras will let you shoot manually. It’s probably easiest to use manual mode, set your ISO to 100 or 200, stop down your aperture to f/7.1 or f/8 (if it’s really dark out, you can open it up wider), and then take a series of shots at increasingly slower shutter speeds until you’ve captured the range of light in the scene. If you need to go past 30 seconds, go into bulb mode (consult your camera’s manual for how to find it), and use a remote trigger release, holding the shutter open as long as you want. Don’t worry about white balance yet.

Dps 3

Processing one of the RAW files in Lightroom. Here you can see where just processing one RAW file wouldn’t be sufficient.

Process each exposure in Lightroom or Camera Raw, then open as layers in Photoshop

First, you are going to process the photos for exposure only, ignoring white balance. If you don’t have Lightroom, you can do this in Adobe Camera Raw. Since you have multiple exposures, you don’t need to go crazy trying to recover lost highlights (overblown bright spots) and shadows (dark parts that look black), but you want to recover them a little bit to give you more leverage later on in the process. There’s no magical formula for processing here. I usually apply lens profile correction, remove chromatic aberration, and do a little noise reduction before bringing down the highlights a little bit and bringing up the shadows and whites a little bit. Once you’re done processing each exposure, select them all, right click, and select “open as layers in Photoshop. Now you’ve got an image with three or more layers all ready to go, but we’re no quite ready to do the layer masking yet.

Dps 4

Go back and reprocess for white balance

White balance is a setting that keeps the whites in the image white, removing any colorcasts. Different light sources have different white balance settings though, so if you have a photo with two or more different light sources (such as the night sky and an artificial light), no matter how you adjust your settings, you’ll always have a color cast somewhere on your photo. What you’re going to do here is reprocess each photo so that you’ve corrected any colorcasts. If you’re lucky, you’ll have no more than two light sources in the photo. Unfortunately, though, there can often be more.

It’s important to note that you only have to correct for colorcasts that are in properly exposed parts of each photo. For instance, in one of your overexposed photos, don’t worry about the white balance for the overblown highlights. You’ll be discarding that part of the photo later. For one of your underexposed photos, don’t worry about correcting for the shadows, since you’ll also be discarding that. Start with your most properly exposed photo, and correct for any colorcast you see (for instance, the lights inside a building have a yellow cast).

All you have to do to correct the white balance is slide those two sliders (one goes from blue to yellow, and the other goes from green to magenta) until the part of the photo with the colorcast looks normal. When you’re done, open that photo in Photoshop, and make it a layer in the other image you have open. Do this by hitting Ctrl-A on Windows, or Command-A on a Mac to select the photo you just opened, then Ctrl-C or Command-C to copy it. Then click on the image with the three layers, and hit Ctrl-V or Command-V to paste it in as a layer. Repeat the processing until you have corrected all colorcasts in the photo. Then, move on to the other exposures, and correct any color casts there (remember, only the properly exposed parts need to be corrected).

Dps 5

Mask in one layer at a time

Once you’ve finally got every exposure and every colorcast accounted for as separate layers, you’re going to mask them in one by one. I start by making all but the bottom two layers invisible and masking in one layer at a time (by the way, the order of the layers does not matter, but having the most properly exposed image on the bottom will probably make things easier). Do this by clicking the little eye to the left of each layer except the bottom two. Then, with the layer one up from the bottom selected, click the layer mask icon (it’s a rectangle with a dot in the middle, found at the bottom of the layer panel). Make sure the paintbrush icon is selected as well (this can usually be found on the left hand side). You may need to adjust your brush size as you go through.

When painting with black on the layer mask, you will cover up the parts of the layer you don’t want appearing (the improperly exposed or color cast parts of the image are what you want to cover up). When you want to go back and reveal parts because you’ve made a mistake, paint with white on the layer mask. Click X on your keyboard to toggle back and forth between black and white.

When you’ve masked out all the parts of the layer you don’t want shown, select the layer on top of that and make it visible (click the space where the eye used to be). Then create another mask and start masking that layer. Keep revealing layers and masking them in until you’re done. In some cases, one part of the photo may be properly exposed in more than one image. In this case, keep the one that looks better to you. Once you’ve finished this process, save the photo as you would normally. If you think you might come back to this photo later and edit it, make sure to save a copy as a PSD.

Dps 6

Sometimes you get lucky, and the part of the image that’s colorcast has a very strong hue to it. If you have a colorcast that’s almost all one color, you can automate the masking process a bit for that layer. In the top pane, go to Select –> color range, then click somewhere in the colorcast. Look at the preview. You want the part of the image that’s your colorcast to be almost completely white, and the rest to look almost completely black. Adjust the fuzziness slider until this is the case, and then click ok. You actually want to select the inverse of that, so go to Select –> inverse. Now click the layer mask icon, and you’ll have a mask that hopefully masks out the colorcast. If it doesn’t look right, undo it and try it again with a different fuzziness setting. This is not a perfect fix. You will still need to do some fine-tuning, but it really helps move things along quicker.

Dps 7

A simple “select color range” layer mask got rid of most of the colorcast in this photo.

Conclusion

This is just one method of conquering the challenges brought on by nighttime architectural photography. As you start working with photos of this nature, you may find a different method that you prefer. Luckily, many photos only require some of the steps detailed in this tutorial. Sometimes you only need one exposure, but you need to process for colorcasts. Other times, the white balance is even, but you need to mask for exposure. It takes practice to master these intricate masking techniques, so don’t give up if you’re unhappy with your results at first. Start with simpler photos with fewer colorcasts and exposures needed before diving into a really complex one. In time you’ll be creating photos that look as natural as they appeared when you saw them in person.

Dps 8

A single exposure that required layer masking to correct colorcasts.

Have you got any tips for doing architectural photography or using layer masking? Please share in the comments below.

googletag.cmd.push(function() {
tablet_slots.push( googletag.defineSlot( “/1005424/_dPSv4_tab-all-article-bottom_(300×250)”, [300, 250], “pb-ad-78623” ).addService( googletag.pubads() ) ); } );

googletag.cmd.push(function() {
mobile_slots.push( googletag.defineSlot( “/1005424/_dPSv4_mob-all-article-bottom_(300×250)”, [300, 250], “pb-ad-78158” ).addService( googletag.pubads() ) ); } );

The post Architectural Photography Using Layer Masking to Correct Contrast and White Balance by Samantha Decker appeared first on Digital Photography School.


Digital Photography School

 
Comments Off on Architectural Photography Using Layer Masking to Correct Contrast and White Balance

Posted in Photography


Photoshop Video Tutorial: Dodge & Burn Using Curves

11 Dec

From the early days of photography dodge & burning has been used to help add emphasis and impact to selective areas of images. Within photoshop we show one of the many ways to digitally dodge & burn an image with an added level of flexibility. Check out our LAB Color Correction Video Tutorial! Before After

The post Photoshop Video Tutorial: Dodge & Burn Using Curves appeared first on Photodoto.


Photodoto

 
Comments Off on Photoshop Video Tutorial: Dodge & Burn Using Curves

Posted in Photography