RSS
 

Posts Tagged ‘Understanding’

Understanding Aperture and Landscape Photography – Why F16 Isn’t the Only Choice

27 Mar

Landscape photography is, in my opinion, one of the most difficult disciplines of outdoor photography, and perhaps one of the most challenging genres of photography in general. At first glance, the art seems straightforward. You find yourself a pretty piece of scenery, wait for some good light, and click the shutter. Easy, right?

Understanding Aperture and Landscape Photography - Why F16 Isn't the Only Choice

And yet that’s not the end of the story. I have screwed up endless opportunities by making errors in composition, focus mistakes, unwanted motion blur, over and underexposures, and of course, by messing up the settings of my camera. I suspect anyone who has dedicated much time to the art of landscape photography can say the same.

Let’s Talk About Aperture

While entire articles, even books, have been written about each of those errors and frequent mistakes, there is only one I’m going to discuss here – aperture.

What aperture should you use in landscape photography, f/16 right? That’s what I’ve always heard. It’s the perfect combination of sharpness and depth of field. So set your aperture to f/16 and shoot away.

That’s it, article finished. I hope you enjoyed it. No, of course, that isn’t all. But I am surprised how many photographers assume that is the end of the story.

The real answer to the question of which aperture to us is – all of them – depending on the situation.

First, landscape photography is much more than just the classic composition that includes a foreground element in front of lovely background scenery. Rather there are detail shots, aerials, night photography, telephoto landscapes, and god knows how many other sub-genres within the category. For each of these, and for each situation within, a different aperture may be appropriate.

Understanding Aperture and Landscape Photography - Why F16 Isn't the Only Choice

Before we get into that – first a warning.

Sharpness Issues

Wide Open

There are costs to different apertures. Wide open, most lenses will be soft because every part of each glass element in the lens is being put to work. Imperfection in the lenses, dirt, scratches, and the physics of light all combine to mess with your image sharpness. This is part of the reason that sharp, fast lenses cost so much. The glass has to be excellent to retain sharpness wide open.

Diffraction

Diffraction happens at the opposite end of the f-stop range. When the aperture is closed way down, images also show a reduction in sharpness, but not for the same reason. Rather, something called diffraction occurs. Diffraction is actually a term derived from physics of waves.

Take a look at the terrible hand-drawn illustrations I made below and you can see why I’m a photographer, not a painter. Hopefully, however, you’ll also learn something about diffraction. The lines on the left show waves moving across space. Think of them as light waves or ocean waves, it makes no difference.

Understanding Aperture and Landscape Photography - Why F16 Isn't the Only Choice

As they approach a wall with a large opening, the gap allows the waves though largely intact causing only a slight dispersion and curving of the incoming wave.

But apply a smaller opening (below), and suddenly those waves are quickly curved and dispersed.

Understanding Aperture and Landscape Photography - Why F16 Isn't the Only Choice

In photography, a large aperture will cause relatively little change in the light waves entering your camera, but a small aperture will force a small amount of light to spread, disperse, and curve before hitting the sensor unequally, and with less intensity. This results in a loss of sharpness.

While the physics of it all is interesting, when it comes to photography, what you really need to know is that very small apertures will be less sharp than mid-range apertures.

Attaining Sharpness

Understanding Aperture and Landscape Photography - Why F16 Isn't the Only Choice

It’s probably clear to you by now that if you wish to achieve maximum sharpness then neither fully wide open nor closed down apertures are the best. Rather, sharpness can be found somewhere in between. For most lenses, 2-stops down from wide open is the sharpness sweet-spot.

Perhaps that is why f/16 is so popular in landscape photography, it’s a good compromise between sharpness and depth of field.

So What Now?

We are back where we started, right? Just shoot at f/16.

Understanding Aperture and Landscape Photography - Why F16 Isn't the Only Choice

Well if tack-sharpness were the end all and be all of landscape photography, that would probably be the case.

However, sometimes you may wish to sacrifice some lens sharpness for shallow depth of field or suffer some diffraction blur for the sake of attaining a long shutter speed.

Detail Shots

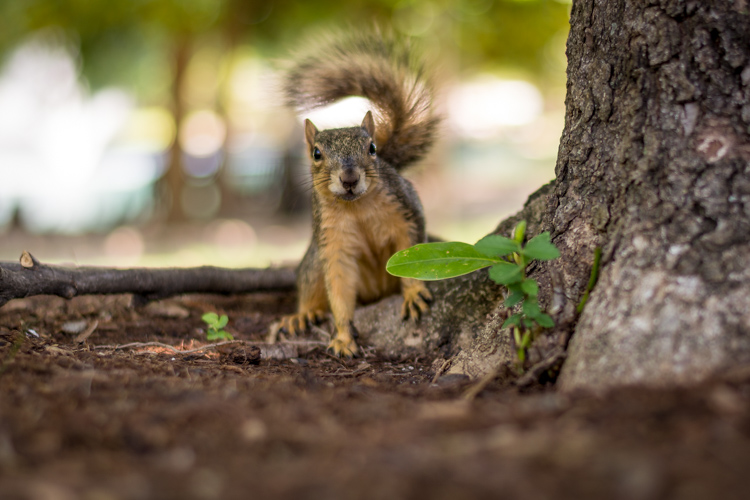
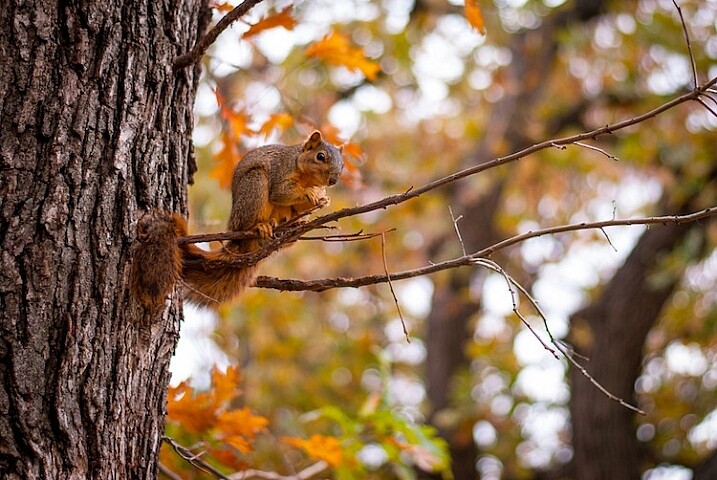
Landscape details are those small parts of a landscape that catch your photographic interest. This may be a cluster of autumn leaves, a stone in a tundra meadow, or light upon snow-covered trees, among many other possibilities.

In such situations, you may want to isolate that interesting subject from a cluttered background.  You can do that by embracing the shallow depth of field, through the use of a fast (large) aperture.

Understanding Aperture and Landscape Photography - Why F16 Isn't the Only Choice

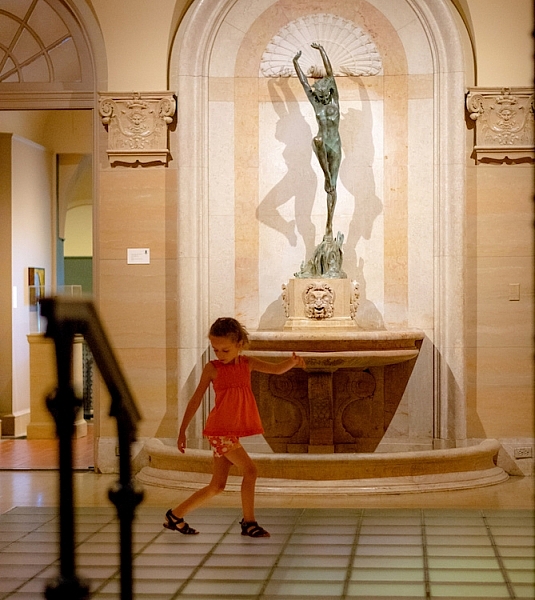
I was photographing a couple of years back on a crisp autumn day. Frost covered the meadow I was walking around, and each stem of grass glittered in the early morning sun. Spotting one particular stem, rising from the rest, I paused. I wanted to isolate that single piece of grass.

So, using a 70-200mm f2.8 lens, I opened the aperture wide to create a shallow depth of field, composed, and shot.

Understanding Aperture and Landscape Photography - Why F16 Isn't the Only Choice

I’ve used this strategy, again and again, with my landscape photography. Shooting autumn colors, I frequently wish to isolate a single leaf, or patch of foliage from a distracting backdrop. Fast apertures and shallow depth of field are the only way to do this.

Understanding Aperture and Landscape Photography - Why F16 Isn't the Only Choice

In such cases, I’m happy to sacrifice a bit of sharpness.

Aerial shots

Understanding Aperture and Landscape Photography - Why F16 Isn't the Only Choice

In aerial photography, you are always well separated from the landscape you are photographing (if you aren’t, you’d have much greater concerns than making photos). Thus, depth of field is not your top concern.

Meanwhile, the vibration of the airplane or helicopter’s engine is a much greater risk for lack of sharpness than setting your aperture too open.

Understanding Aperture and Landscape Photography - Why F16 Isn't the Only Choice

When I’m shooting aerials, I open my aperture wide open to maximize shutter speed. When you need a shutter speed of around 1/1000th of a second, minimum, a wide open aperture is the only practical way to go.

Long Exposures

Purposefully dragging your shutter for multi-second (or even multi-minute) exposures requires you to greatly reduce the light hitting your sensor. Even with a low ISO and a neutral density filter, trying to get a long exposure on a bright day is impossible without stopping down your aperture.

I was shooting along a river in Alaska a couple of years back, on assignment for a conservation organization. It was a bright afternoon, but some clouds were breaking up the sky making for decent photography conditions.

Understanding Aperture and Landscape Photography - Why F16 Isn't the Only Choice

I knew I would be unable to return there in the evening, so I needed to make the most of the situation. Despite the bright afternoon light, I still wanted a long exposure of the flowing water.

I lowered my ISO to its minimum setting (50), put on a 4-stop neutral density filter, and sacrificing a bit of sharpness, stopped my aperture down to f/22.

With that combination, I was able to get an 8-second exposure of the flowing river. The rippled water blurred pleasingly to a ghostly reflective surface, and I got the image I wanted.

Understanding Aperture and Landscape Photography - Why F16 Isn't the Only Choice

Night Photography

Here in Alaska, I spend a lot of time shooting the Northern Lights and taking out visiting photographers to do the same. There is a myth about Aurora photography that you need a long exposure – you don’t. In fact, you really don’t want one.

One of the things that make the Aurora Borealis so spectacular is the details in the curtains, the shifting colors, and the near-constant motion. A long exposure, anything more than a few seconds, will cause all those details to blur away. Fast shutter speeds (or as fast as you can manage) are far, far better.

Understanding Aperture and Landscape Photography - Why F16 Isn't the Only Choice

Understanding Aperture and Landscape Photography - Why F16 Isn't the Only Choice - night sky aurora

To get a fast shutter speed at night, you have to be willing to open your aperture all the way up, sharpness loss, be damned. High ISOs and fast lenses set wide open will allow shutter speeds fast enough to capture the details of a fast-moving aurora display.

Conclusion

So sure, in classic landscape photography, with a foreground element, and background scenery, you’ll want a deep depth of field and maximum sharpness. In those conditions, by all means, set your aperture to f/16 and forget about it. But such situations are not all there is to landscape photography.

Your cameras and lenses are equipped with many tools. To say there is only one that is “right” is like saying that the only tool a carpenter needs is a hammer. Sure a hammer is the perfect tool for a carpenter when he needs to bang in a nail, but it’s really lousy at cutting boards.

What is the lesson here? Set your aperture for what is needed for the scene, not how you’ve been told it should be by someone else. “They” say a lot of things. You don’t always have to listen to them. 

The post Understanding Aperture and Landscape Photography – Why F16 Isn’t the Only Choice appeared first on Digital Photography School.


Digital Photography School

 
Comments Off on Understanding Aperture and Landscape Photography – Why F16 Isn’t the Only Choice

Posted in Photography


Your Guide to Understanding the Luminar 2018 Dashboard

10 Jan

With Macphun (soon to be Skylum) keen to promote Luminar 2018 as a replacement for Lightroom, there’s no doubt that there are many photographers who are interested in trying it. Unfortunately, that’s where the confusion may start as the Luminar interface is completely different from both Lightroom and Photoshop.

If you’re new to Macphun software then it can take time to find your way around the new interface. But if you’ve already used some of their other programs you’ll find that Luminar is very familiar, as Macphun tends to use the same layout in most of its software.

Note: The screenshots in this article are taken from the Mac version of Luminar 2018.

Luminar Dashboard Layout

When you open a photo in the program for the first time, you see something like this.

Luminar dashboard

The photo you’re working on is displayed in the center. Presets are shown along the bottom (red). The side panel on the right is where you apply filters and create workspaces (green). There are more tools along the top (yellow). See the image below.

Luminar dashboard

Let’s take a look at each of these in more detail.

Luminar Presets

One of the benefits of using Luminar is that it comes with lots of presets that you can use. If you don’t like presets, that’s okay – presets are optional and you can ignore them, or hide the panel if you do not use them.

Luminar presets are intelligent and each one comes with an amount slider. If you like a preset but the effect is too strong you can reduce the intensity. That means Luminar presets are adaptable and you can use them in a subtle way if that’s what you prefer.

Click on any preset to apply it to your photo (marked below). In this example, I selected a preset called Center of Attention. Afterwards, you’ll see an amount slider which you can set anywhere on a scale from zero to 100. You can also click on the star icon to add the preset to your list of favorites so you can find the ones you like quickly.

Luminar dashboard

Click on the Categories button (marked below with the big red arrow) to reveal a list of preset categories available in your version of Luminar. Click on any of the categories to display the presets underneath.

Luminar displays Basic presets by default, but you can choose from categories such as Street, Dramatic and Portrait. You can also click on Favorites to show any presets you have marked as a favorite. Clicking on “Get More Presets” takes you to a page on the website where you can get additional sets of preset (some which are paid, and some that are free).

Luminar dashboard

Workspaces, Layers, and Filters

If you’re a Lightroom user then Luminar’s right-hand panel will look familiar as they are similar to the panels in Lightroom’s Develop module. There’s a histogram at the top, layers underneath that (yes, Luminar has layers!) and then filters below.

Luminar dashboard

This area might look a little bare at first, but that’s only because the workspace is clear. In Luminar, a workspace is a selection of filters displayed which are ready for you to use.

Filters are Luminar’s equivalent of the right-hand panels in Lightroom, or the various Layer adjustments available in Photoshop. The reason Luminar doesn’t display all the available filters is that there are so many of them (50 in total). Instead of showing all the filters, Luminar arranges them into workspaces. You can use one of Luminar’s built-in workspaces or you can create your own.

Click on the Clear workspace button (below) to choose one of Luminar’s built-in workspaces. Here, I chose the Portrait workspace. It has nine filters which, as you might expect, are useful for developing portraits.

Luminar dashboard

Click on the gray arrow (marked below) to open up a filter and reveal its settings and sliders. The screenshot below shows the Develop filter, which is similar to Lightroom’s Basic panel.

Note: When working with RAW files this filter is called RAW Develop, and when working with JPGs is simply called Develop.

Luminar dashboard

Another benefit of using workspaces is that you can customize them to display only the filters that you want to use. You can start by removing and adding filters to one of Luminar’s built-in workspaces.

To remove a filter click on the white arrow next to the filter name (marked below) and select Delete from the pull-down menu.

Luminar dashboard

To add a filter, click the Add filters button (marked below). Luminar opens the Filters Catalog to the left, and they are displayed in helpful categories as you can see below like; Issue Fixers, Creative, etc. Here, you can select a filter to add it to your workspace.

Luminar dashboard

When you hover over the name of a filter in the filters Catalog Luminar displays an information panel to tell you what the filter does.

Luminar dashboard

To save the workspace, click on Custom workspace (marked below) and select Save As New Workspace. Now, your new workspace will appear in the list and you can select it any time you want.

Luminar dashboard

The Luminar Toolbar

Finally, the Toolbar at the top of Luminar contains some extra commands and tools that you will find useful. Most of these are self-explanatory. When you hover the mouse over an icon Luminar displays a strip of text to explain what it does. In the screenshot below, you can see that the mouse pointer is over the Compare icon.

Luminar dashboard

As you can see, the Luminar interface is simple and easy to use. The biggest obstacle to using Luminar is understanding how presets, workspaces, and filters work. Once you understand how to use these tools then you can start exploring the potential of Luminar to create beautiful photos.

Disclaimer: Macphun, soon to be Skylum, is a dPS advertising partner.

The post Your Guide to Understanding the Luminar 2018 Dashboard by Andrew S. Gibson appeared first on Digital Photography School.


Digital Photography School

 
Comments Off on Your Guide to Understanding the Luminar 2018 Dashboard

Posted in Photography


How Understanding Your Learning Style Can Improve Your Photography

28 Apr

Lady in the blue hat walked into my shot and I chose to include her to emphasize the size of the trees and the distance of the park

Introduction

It’s an exciting time, going to the camera shop, discussing options, making the final choice, parting with a reasonable sum of money. Finally the anticipation of getting home and unpacking your shiny new camera gear. Suddenly all the dials and buttons seem so much more confusing, the manual may not explain things enough. The menus are complicated so it’s easiest to switch over to Auto mode and leave it there while you try to figure it out.

Six months later what’s happening with your camera? Are you still using it? Is it still on Auto or have you tried other modes? Did you decide it was too hard and the camera is gathering dust in a cupboard somewhere (this is more common than you may realize)?

Toi Toi silhouetted by sunset – an experiment in backlighting.

Learning to learn is a skill that also needs to be developed

Learning a new skill is difficult. It takes commitment to put time and effort into the learning process. It requires you to admit you are at the beginner stage, where you will struggle to produce the quality of work that you want. Learning is a process which requires you to put some thought and structure into working out a process that is right for you. Different people learn in different ways, so it’s helpful for you to understand how you prefer to learn. Why?

  •  Value: If you are spending money on a course or a workshop, you want to make sure you are going to get the best value out of it.
  • Time: Learning takes time, so when choosing an option, knowing your preferences helps maximize your benefits.
  • Fun: It’s more fun if you are learning in a way that you enjoy.
  • Return: You are more likely to invest the time and effort into something that makes sense to you and shows a return on your investment.
  • Pain avoidance: No one enjoys doing something painful or difficult for the sake of it.
  • Find the best sources: Information is everywhere but varies in quality – you need to sift the good from the not so good.

Narrow depth of field, focused on the sparrow using a 70-200mm lens at a distance.

Learning styles

While there are many theories on learning styles, there are three basic types that apply to most people:

  1. Auditory learners – learn by hearing and listening – you may prefer to read things out loud as you store information by the way it sounds to you.
  2. Visual learners – like to see what you are learning as either pictures or words – you understand and remember things that you see.  May use flash cards or similar for studying.
  3. Tactile learners – you learn best by being hands on – touching things, taking them apart, twiddling with the settings (probably not listening to a speaker while you are doing it).

Of course, most people are a combination of all of these styles but you will likely have a preference for one or two. Understanding them can help you make choices around developing your own personal approach to learning photography. There are many options. Some don’t need lots of money but others might cost quite a lot, and it’s difficult to know in advance if it will be worth it.

Swan Yoga – if you take time to sit and be with your subject, all sorts of interesting things might happen

Opportunities for learning photography

  1. Books, magazines and other printed material – can be purchased, downloaded in digital format or borrowed from libraries.
  2. Online tutorials – short tutorials on a specific subject.
  3. Video courses – can be watched for free online or many options can be purchased.
  4. Short workshops (a day or less) – attend in person – usually listening to a speaker plus opportunities for questions and hands-on experimenting.
  5. Long workshops (several days) – attend in person – some travel may be involved, often with a specific focus, planned talks plus time for independent shooting, discussion sessions, editing sessions.
  6. One-on-one tutoring – customized service offered by some professionals where you can have a training session targeted to a particular subject.
  7. Small groups – similar to one-on-one tutoring but with 3-5 students.
  8. Camera clubs – often organize workshops or field trips for members with the aim of learning for everyone, often a safe place to ask questions.
  9. Photography forums – online forums where photographers gather to post images and share information, might be general or around a specific subject (landscapes or birds).
  10. Online courses – structured learning courses hosted online aimed at a range of capabilities from beginner to advanced (rather than random videos) on specific topics.
  11. Formal education – University Degree courses in photography and other tertiary institutes are available.
  12. Apprentice or intern – offering to work for free assisting a professional and learning on the job.
  13. Mentor – someone experienced who is happy to answer questions, go for a bit of a photo walk, give you tips and advice (be nice and buy them lunch).
  14. Organize your own DIY photography retreat focused on specific techniques.
  15. PRACTICE!! – take your camera out and use it as often as you can.

Learning the hard way about photographing a subject in bright sunlight – washed out colors and harsh shadows as the result.

How to choose?

There are many choices listed above and even within just one of those options, there are many more choices – thousands of books available, tons of YouTube videos, loads of courses and workshop options. That workshop in Iceland might sound super exciting but are you okay with learning outside in some possibly dodgy weather, where you have to drive and hike for hours? Maybe you have to camp and will be tired and grumpy from getting up early in the morning to get the sunrise.

Would you prefer a structured classroom environment, where you can interact with students and the teacher for questions and discussion? Does it suit you better to watch videos at home after work, when the kids are in bed and you can pause them to write notes, or play the same step over and over until you understand it?

Practicing isolating a subject from the background and blurring with bokeh effect.

We are all busy people, with limited spare time to dedicate to our hobbies and passions. So it makes sense to maximize the value of your time spent learning. Understand what your personal preferences are and then take the next steps.

Learning factors

  •  If you like to read do you need to buy expensive printed books or magazines – does your library have them? Can you get them cheaper in digital format? Can you borrow them?
  • The voice of the person presenting a video course is important – do they speak in a language or an accent you can understand? Do they present in a style that you like? Are they to the point or do they waffle all over the place and take twice as long to get the point across? Is the video a “talking head” or are they demonstrating the subject matter in some way? Is it something you can listen to for hours without getting annoyed or a headache?
  • When attending a workshop is there time allocated for questions and discussion? What reviews do the workshop speakers get from other attendees?
  • Are there sample videos available for you to hear/see speakers present so you can get a feel for their delivery style and approach to the subject matter?
  • Do you get frustrated in a group of mixed ability? If you are new and need a lot of help do you feel uncomfortable asking questions, or if you are more advanced do you feel held back when beginners are present?
  • Is the subject matter relevant to what you want to achieve? Do you have a chance to clarify goals and outcomes with a workshop presenter or speaker in advance?
  • Do you have the time or money for more formal education? Is it really necessary or a nice to have in the overall scheme of things?
  • Does being in a group of strangers bother you or inspire you?
  • How much time or money do you have available?

All these factors can have an affect on how well you will learn. It would be a real shame to spend several thousand dollars on a workshop in an exotic location to find that you get very little out of it. Or you might discover the most helpful channel on YouTube that really resonates with you.

Using flash on a dull overcast day seemed like a good idea until you see the bright highlights in the final image

How do we learn?

Research tells us that the best way to learn is via a technique called “distributed practice” which is where you study in an intense burst and then take a break, and keep repeating this cycle. Photography lends itself well to this style as it is often taken up as a hobby to be done in spare time. So allocating a weekend or an evening when you have time to focus on a particular style or technique, and then having a break is actually okay.

Applying some variety to your learning process improves outcomes as well. You could apply this easily with photography by changing the subject matter you are shooting. Or take your camera into different situations. Moving between similar topics can help you see connections or understand concepts in a different way. Bear in mind that getting out of your comfort zone is an important learning opportunity too, so be prepared to push your boundaries as well.

NZ Native Tui – shot in an enclosure at a nature park

Teaching someone else also helps you retain knowledge more effectively too. Writing things down after a learning session is also a recommended way to improve knowledge retention. Perhaps start a photography blog and share your learning journey with others? Keeping track of your achievements is important to give you a sense of scale (i.e. how far you have come from being a complete beginner) and it also motivates you to move forward, knowing that you have mastered some learning steps.

Learning to see from a different viewpoint is important as a photographer, as is taking chances and experimenting – this is a chair

Summary

Ultimately everyone learns on their own but the learning doesn’t truly happen until there is a link between action and reflection (i.e. what was I trying to achieve and did I manage it?) You must be prepared to experiment, and with experimentation there comes failure.

No one likes to fail as there is a lot of ego tied up in success. So to truly learn you must suspend your ego, embrace failure and admit to yourself that you can improve. These days with digital it’s more or less free to shoot as many frames as you want. So other than the cost of time, it’s never been more cost effective to get into photography (after the initial hardware purchase, of course).

Both the foreground and background were important in this image, composition was a challenge

Spend some time on this

Learning also requires you to move out of your comfort zone and do different things, try new styles. It requires you to actively think about what you are doing, what outcomes you are trying to achieve, and analyzing how and why you did (or didn’t) achieve them. Yes, you can just go out and randomly shoot and put no more work into it than that. However, any improvement is likely to be slow. It’s difficult to produce work of a consistent quality if you don’t understand how you got there in the first place.

Take a bit of time to understand your best learning style, look at the available options, try a few out. Maybe ask for recommendations from other beginners. Accept that it’s okay to say, “I’m new at this and I need some help.” In general, many people are happy to offer advice, after all, they were once new at it too.

Playing with an old vintage lens with manual focus and odd imperfections that did strange things around the edges was a fun afternoon field trip.

Conclusion

Investing in your own personal learning process is important. Learning a new skill can happen via osmosis but improvement will be slow and the process is frustrating for many. So much so that they may give up completely as it was too hard. Having a considered structured approach gives you an achievable goal to aim for – it’s even better if you break it down into smaller milestones so you get some sense of accomplishment at each step.

Learning a new skill takes time, so why not ensure that your time is well spent in the learning you are doing. Often there is a cost involved, so investing time in understanding a good learning choice for yourself is also important. Keep in mind that your learning journey will never be finished, don’t get lazy or complacent once you reach a certain level of mastery, there will always be something new to try.

Most of all, it should be fun!

Long exposure as the tide was going out after sunset.

(Note:  All the images provided are ones taken by the author on her learning journey which started 10 years ago and is only now getting to the really fun stuff!)

The post How Understanding Your Learning Style Can Improve Your Photography by Stacey Hill appeared first on Digital Photography School.


Digital Photography School

 
Comments Off on How Understanding Your Learning Style Can Improve Your Photography

Posted in Photography


Tips for Understanding the Lightroom Adjustments Panel

28 Sep

Lightroom can be an intimidating program. Even longtime users sometimes find themselves confused at all the options or unsure of exactly what to do to achieve a specific type of look for their pictures. Fortunately much of this can be mitigated by learning new things slowly and carefully, and taking the time to master just one new tool, option, or set of sliders at a time. The first thing I usually recommend to beginners is the Basic panel because, as its name implies, those sliders can go a long way towards improving your pictures. However another set of sliders in the Develop module, called the Adjustments panel, can take your images to a whole new level if you learn to use it properly.

lightroom-adjustments-panel-squirrel

What is the Adjustments panel?

While the Basic panel allows you to adjust global settings on an image related to things like white balance, overall tint, and highlights/shadows, the Adjustments panel lets you get much more specific with selective color editing. To access this panel click on the Develop module and then look on the right-hand side of your screen. If you do not see it (it’s the third one down), right-click (ctrl-click on a Mac) on any of the Develop panels and make sure the Adjustments option in the pop-up menu is checked.

lightroom-adjustments-panel

Right away you might be a little confused because the options have odd-sounding acronyms with no explanation. But once you understand how they are related it should get a little easier. For starters, here’s a brief explanation of the three main categories of HSL / Color / B&W.

  • HSL: Allows you to control the Hue, Saturation, and Luminance of all the main colors that make up a picture (Red, Orange, Yellow, Green, Aqua, Blue, Purple, and Magenta)
  • Color: This is essentially the same thing as the HSL panel, as you will see shortly, but the options are organized in order to help you focus on specific colors, and then specific types of adjustments within those colors.
  • B&W: This panel is often the most misunderstood, but one of the most powerful tools available in Lightroom when it comes to converting your images to black and white.

lightroom-adjustments-panel-apple

The HSL tab

This abbreviation stands for Hue, Saturation, and Luminance and allows you to control these parameters all at once for the various colors in your image. When you click the HSL option in the Adjustments panel you can then choose each of these three options to control, or you can click the “All” option and have access to all of the parameters at a glance.

lightroom-adjustments-panel-hsl

Hue sliders

Click the Hue option and you will be able to change the look of specific colors such as Red, Green, Yellow, etc. for the entire image. For example, you could make your greens have more of a yellow tint to them, or make them look almost fluorescent just by changing the Green slider. You can give your skies a deep, rich blue or tone it down to make them look a bit pale. Your purples can be anywhere from reddish to deep violet, all with the click of a mouse button.

Simply adjusting the green hue can give your nature photos an entirely different look and feel.

Simply adjusting the green hue can give your nature photos an entirely different look and feel.

Adjusting the hue, as is the case with many editing decisions, can be most effective when used subtly and in combination with other options such as the tone curve or white balance. Too much editing can come across as obvious and give your images a look that seems overly processed, especially when it comes to portraits. Still, it’s a powerful and valuable adjustment that can greatly affect your pictures.

If you are not sure exactly which color option to select from the ones that are available to you, you can click the target button in the top-left corner of the Hue panel (circled in red below) then click and drag on a specific point in your image. This will adjust the hue that matches the target area, and all similar colors for your entire photo.

lightroom-adjustments-panel-hue-click-drag

One tip I like to use when adjusting the values is to click on the 0 and enter numerical values using my keyboard. I’ll start with something small like 5 and then press the up and down arrows on my keyboard to raise the value in increments of 1. Or you can hold down the shift key while tapping the arrows to raise and lower values in increments of 10. It’s a good way of making more precise adjustments rather than moving the slider with your mouse.

Saturation and Luminance

The Saturation and Luminance tabs function in much the same way. You use sliders or enter numerical values in order to adjust how much of each color is present (Saturation) or the brightness of each color (Luminance). Finally, clicking “All” will let you edit all three parameters at once. I find that a bit overwhelming but others can think is quite useful. See what works best for you.

Subtly editing the HSL values on this picture helped me bring out more vibrant colors and produce the final image I was really going for.

Subtly editing the HSL values on this picture helped me bring out more vibrant colors and produce the final image I was really going for.

The Color tab

At first when you click on the Color tab of the Adjustments panel you might be hit with a feeling of déjà vu. The options look remarkably similar to what you might have already seen in the HSL tab, in that you can once again change the Hue, Saturation, and Luminance. The difference here has to do with how things are organized, and it’s why I find myself working more often in the Color tab than the HSL tab.

Here all three adjustments are available to you at the same time for each individual color, which makes it very easy to work with your image on a per-color basis as opposed to a per-adjustment basis. If I’m shooting portraits and want to tweak the color of my subject’s purple shirt I will probably want to adjust all three parameters at once, but just for the color purple. This tab gives me the option to do exactly that, and once again you can click on the All option to see all the colors, along with all their corresponding adjustment options, at the same time.

Working in the Color tab of the Adjustments panel let me tweak various parameters of the greens and yellows to get the final image I was going for.

Working in the Color tab of the Adjustments panel let me tweak various parameters of the greens and yellows to get the final image I was going for.

The B&W tab

lightroom-adjustments-panel-bw
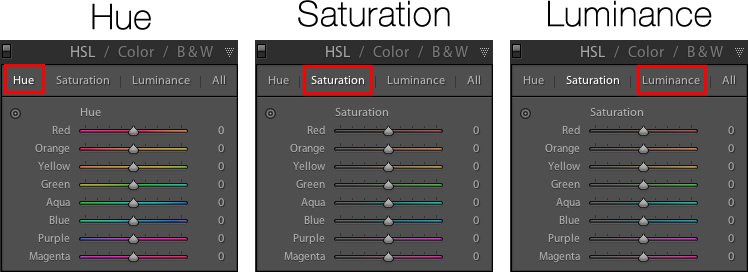
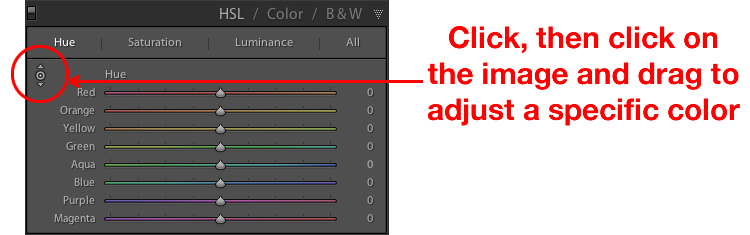
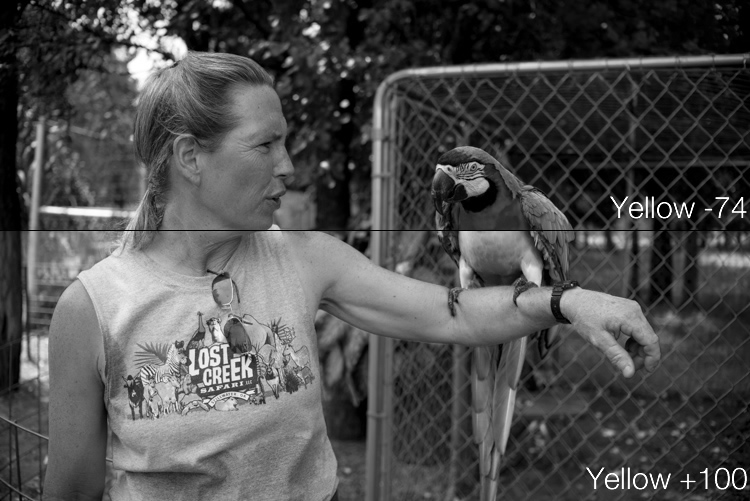
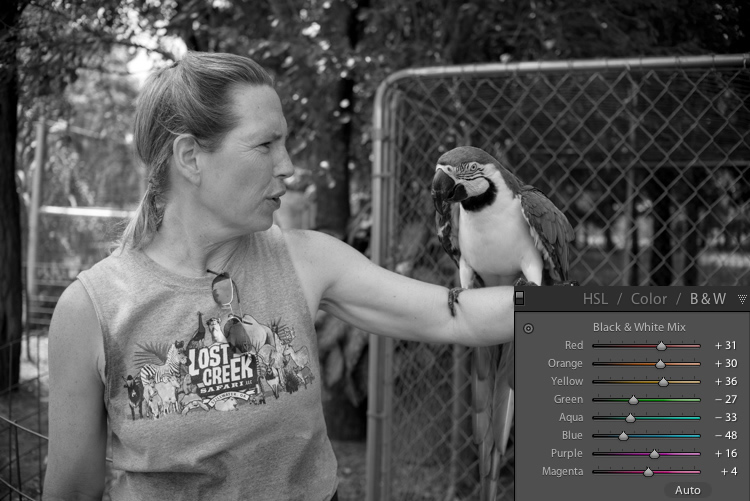
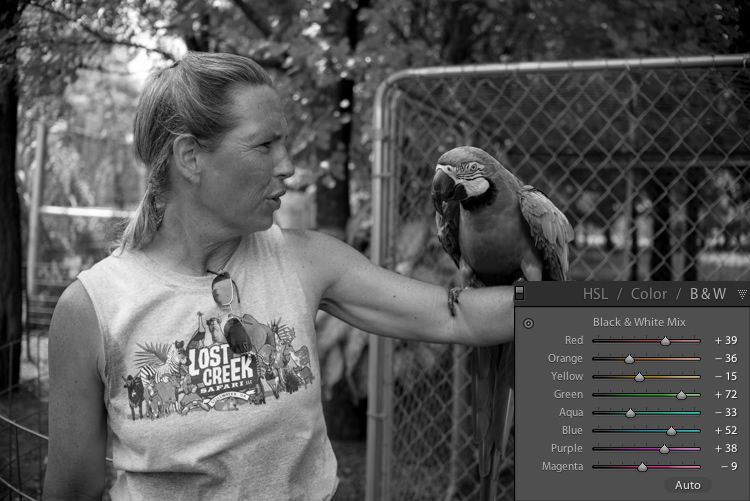
This part of the Adjustments panel is often the most confusing because as soon as you click on it, your image turns grey, and yet you still have all the same color sliders as on the other tabs. What’s going on here?

The answer lies in how Lightroom essentially tries to mimic the effect of black and white filters on color pictures. What you are doing with this panel is turning your image into a grayscale version of its colorized counterpart, then adjusting the tone of each of the individual colors as the image is processed. Incidentally, if you open this panel and then click on one of the Black and White filter presets in Lightroom (in the presets panel on the left side of LR) you will see the sliders move around because they are really just specific values for the sliders you see here.

An example B&W conversion to see how the sliders work

To demonstrate how these Adjustment options work, here’s an image of a woman who owns a wildlife refuge in Oklahoma holding a macaw.

lightroom-adjustments-panel-macaw-color

There are several distinct colors in this image such as yellow, aqua, and green, which makes it an ideal candidate for understanding how the B&W adjustments work. In this first example I have clicked the B&W filter and left all sliders at their default values, but changed the yellow option for two different results.

lightroom-adjustments-panel-macaw-bw-yellow

Most of the image remains unaffected except for the bird’s bright yellow chest, which is starkly different depending on the values I have selected for the Yellow slider. Increasing the numerical value of yellow has made the corresponding areas much lighter, and decreasing it has made them appear significantly darker. Once again you will likely find that in this B&W panel the best edits are the most subtle, and you can use the sliders to creatively adjust the look and feel of a monochromatic image. To further illustrate the effects of these sliders, compare the following images. The first one has higher values of colors that correspond to the skin tones of the woman and the chest plumage of the bird, and darker greens for the foliage in the background.

lightroom-adjustments-panel-macaw-bw-all-1

Be careful not to go too far

In the next example, the colors of the bird’s chest have been significantly darkened while the background is much lighter, and the woman’s skin tone has been toned down quite a bit as well. I find the top image much more natural and pleasing, whereas the bottom one significantly alters the appearance of the bird and makes the woman look almost as though her face has been burned, particularly if you look where her jawline meets her neck.

lightroom-adjustments-panel-macaw-bw-all-2

As you play around and experiment with the B&W sliders you will start to get a feel for how you might prefer various adjustments in your images. If you are the type of person who likes to try black and white photography this panel is significantly more useful than just clicking on a preset or using built-in filters in a program like Instagram.

Conclusions

I hope this article has helped you understand a bit more about some of Lightroom’s useful editing options. If you have never used the Adjustments panel before go ahead and try it out! Lightroom is non-destructive which means your edits are not permanent and can be undone at any time, so it never hurts to try something and see what happens.

If you find the Adjustments panel to be useful, or have your own tips to share, please leave your thoughts in the comments below. I’m sure other readers would enjoy hearing them.

googletag.cmd.push(function() {
tablet_slots.push( googletag.defineSlot( “/1005424/_dPSv4_tab-all-article-bottom_(300×250)”, [300, 250], “pb-ad-78623” ).addService( googletag.pubads() ) ); } );

googletag.cmd.push(function() {
mobile_slots.push( googletag.defineSlot( “/1005424/_dPSv4_mob-all-article-bottom_(300×250)”, [300, 250], “pb-ad-78158” ).addService( googletag.pubads() ) ); } );

The post Tips for Understanding the Lightroom Adjustments Panel by Simon Ringsmuth appeared first on Digital Photography School.


Digital Photography School

 
Comments Off on Tips for Understanding the Lightroom Adjustments Panel

Posted in Photography


Lighting 102: Understanding Soft Light

02 Aug

So what is it that actually makes a light soft? And why is it a function of both size and distance?

In the portrait above, Dean is being bathed in soft umbrella light from camera right. But let's zoom in a little closer and place some waypoints on his forehead…Read more »
Strobist

 
Comments Off on Lighting 102: Understanding Soft Light

Posted in Photography


Understanding the HSL Panel in Lightroom for Beginners

02 Mar

Understanding the HSLPanel for Beginners

There are many things involved in post-processing an image, that might seem a little bit daunting at first. That doesn’t mean that they are difficult to learn, or hard to understand. The HSL panel in Adobe Lightroom (or similar editing software that uses Adobe Camera Raw), tends to bring about feelings of anxiety, when it comes to making sense of all those sliders. Some photographers choose to pretend it doesn’t even exist, just because it looks a little complicated. Nothing could be further from the truth!

Simply put, those three little letters stand for Hue-Saturation-Luminance. What makes the HSL panel so powerful, is that it allows you to control different colors independently. HSL adjustments will enable you to brighten, or emphasize specific saturations, and control the hue of only certain colors. Like working with black and white? Then you should definitely make use of the HSL panel, and take your black and white conversions to a whole new level. Let’s get started!

HSL Dropdown

We’ve already talked about what the letter HSL stand for, so now let’s break it down, so that you will really understand how each one affects your image.

H – What is hue?

Admittedly, trying to discern the functional difference between the words hue and color, can form a little bit of a gray area (haha color humor). But generally, we think of hue in terms of the shade of a color on a gradient and is dependant on the wavelength of the light reflected. Don’t worry, that’s about as scientific as we will get.

Let’s say that I see a flower out in a field. The flower has beautiful yellow petals. What shade of yellow are the petals? Are they actually yellow, or are they maybe a dark yellow with a little bit of orange? Maybe a brighter, more greenish yellow? This subtle gradient of color is what we might describe as hue, and it varies infinitely across the color wheel. Controlling the hue of the colors in your image is a great way to bring realism to your photo, or even depart from it using psychedelic alternatives to the actual colors within the scene.

S – What is saturation?

Saturation is much simpler to comprehend. When we talk about saturation, we are referring to the intensity of a color. Saturation can play a central role in controlling the mood of a photograph. Highly saturated colors generally convey brighter emotions, whereas muted, desaturated color can lend a sense of brooding or sadness. What the HSL panel allows you to do is control the saturation of only the colors you choose, which will really expand your creative range.

L – What is luminance?

This may very well be the most easy part about HSL to understand, and requires the least amount of explaining. Luminance is simply the reflective brightness of colors. It is extremely useful when there are certain colors within the image that you feel should be either darker, or brighter. This comes in handy, especially when working with black and white images (converted from color), but more on that in just a moment.

There are a couple of ways to configure the HSL panel, but I prefer to leave each adjustment section open while I work. True, it takes up a fair amount of space in the develop module, but it also let’s me make quick adjustments as I go without switching back and forth between the dedicated hue, saturation, and luminance panels.

HSL All

Adjusting specific saturations

Let’s say you have an image that you want to bring out only certain colors. You can do this by using the saturation slider. An easy way to select the color you want to adjust, is by using the color picker. It eliminates the guesswork of deciding what color is actually which. In this case I want to increase the saturation, brightness, and hue of the leaves, without affecting the blues of the background.

Original Image

Find the saturation section of the HSL panel, and select the picker tool (see red arrow below to locate it).

Color Picker

Hover over the color you want to saturate or desaturate. Notice that this will subtly highlight the corresponding color values in the saturation section of the HSL panel. Then simply click and hold while you drag up or down.

Saturation Image

The change here is barely perceptible for the time being, but after some more adjustments, it will be obvious.

Adjusting specific luminance

Next, we will make the leaves a little bit brighter, so that they stand out from the blue background even more. They mainly consist of oranges and yellows. Go to the luminance section, and again select the color picker tool. This time it will control the brightness of the selected color.

Click and drag (up to lighten, down to darken).

Luminance Image

Adjusting specific hues

I like saving the hue adjustments for last, because it’s easier (for me at least) to decide the final color tone, after it has reached the desired brightness and saturation. For this picture, I want to make the leaves more orange than yellow in hue. As above, locate the hue adjustment section and the color picker and then…you guessed it, click and drag.

Hue Image

After you finish, make sure to go back and perform any fine tuning using the sliders, in order to get everything just right.

Original Image

Before adjustments

Final Image

After – final image

HSL with Black and White

When it comes to black and white, the HSL panel can work wonders. Of course, seeing as the image is black and white, there won’t be any effect on the hue or saturation of the colors. Rather, Lightroom gives you a completely different set of controls, which is virtually a stand-alone luminance adjustment panel.

BW Panel

Even though you are working with a monochromatic image, the color information is still stored, so the program knows what color was there, before the conversion to black and white. Keep in mind, this does not apply to images shot in non-RAW format (like JPG) using your camera’s black and white setting, or images which you previously converted to grayscale in Photoshop. Doing so removes all the color information from the image file, making the option for working with individual color luminance in Lightroom unavailable.

By being able to selectively adjust the brightness of each color, you will now be possible to adjust the luminance of your black and whites very creatively. This way, you can really control the contrast and mood of your image much better and easier. Adjusting the luminance of certain colors, within a converted black and white image, can drastically change the way the photo appears to the viewer. Here is color image after being converted to black and white.

Black and White

Here you see the same image, after some selective adjustments in the black and white section of the HSL panel.

HSL Black and White 2

Working with the HSL panel may look overwhelming, but once you understand how each adjustment affects your photo, it becomes a lot less scary. By being able to adjust the hue, saturation, and luminance of colors, independently of one another, will allow to take a huge amount of creative control over your post-processing. Don’t be reluctant to experiment with HSL and have fun with your photography!

Have you used the HSL panel before? What other tips or tricks to you have for using it? Please share in the comments below.

googletag.cmd.push(function() {
tablet_slots.push( googletag.defineSlot( “/1005424/_dPSv4_tab-all-article-bottom_(300×250)”, [300, 250], “pb-ad-78623” ).addService( googletag.pubads() ) ); } );

googletag.cmd.push(function() {
mobile_slots.push( googletag.defineSlot( “/1005424/_dPSv4_mob-all-article-bottom_(300×250)”, [300, 250], “pb-ad-78158” ).addService( googletag.pubads() ) ); } );

The post Understanding the HSL Panel in Lightroom for Beginners by Adeel Gondal appeared first on Digital Photography School.


Digital Photography School

 
Comments Off on Understanding the HSL Panel in Lightroom for Beginners

Posted in Photography


Understanding Normal and Cross-Type Focusing Points

11 Feb

Look through the viewfinder of any DSLR camera and you will see several dots, or squares, that represent individual points at which the camera is capable of focusing. The purpose of these focusing points may seem fairly obvious, but not all of them are created equal. When you press the shutter button (or back button) halfway, some of these points will light up, indicating that everything at that specific spot is crystal clear and your photo will be nice and sharp.

However, the speed at which your camera can focus on one of the points, as well as how accurate the focus will be, depends greatly on whether the individual focusing point is a single or cross-type. Understanding the differences in how they operate can help you decide which ones to use to take better photos.

cross-type-focus-sensors-joy-of-the-waters

Most DSLR cameras use what’s called a phase-detection focusing system – whereas most mirrorless cameras, point-and-shoots, and mobile phones use a separate system called contrast-detect. In a DSLR, most of the light coming through the lens is reflected upwards by the mirror, to the optical viewfinder, which lets you see precisely what the camera lens sees.

However, a tiny bit of light is also sent downward to a series of sensors that are capable of figuring out whether the image is in focus. The science behind this involves splitting the incoming light, and comparing two beams, to essentially see if they match up. If not, an electronic signal is sent to the focusing motor, to adjust the lens until the image is in focus. All this happens in a fraction of a second, but these fractions matter in photography, and can often be the difference between a tack-sharp image and a blurry shot.

I used my camera's cross-type focusing points to make sure this picture of a holstein cow was tack sharp.

I used my camera’s cross-type focusing points to make sure this picture of a holstein cow was properly focused.

The problem with traditional phase-detecting systems is they get a bit stumped if there are a lot of vertical lines in the spot where they are trying to focus. To see how this works for yourself, print a sheet of paper on your computer, with nothing but vertical lines. Tape it to a wall, and try to focus on it with your camera. If you are using one of the focusing points on the outside edge of your camera’s viewfinder, your lens will likely spend a few seconds hunting for focus but will probably never find it. However if you turn the paper sideways and try again your camera will likely get things focused fairly easily. This is because when light is sent to the phase-detection sensors in your camera, the sensors don’t have enough information to determine focus, if all it sees is vertical lines.

While most of the time when you are out taking pictures, you are probably not shooting images of vertically-lined paper, this example does illustrate how your camera’s autofocus can get slowed down, and become unreliable under certain conditions. Ironically, in this test, your camera will find focus much better if you use the live view function. That employs a contrast-detection focusing method which is also used in most mirrorless cameras, and while it is a bit slower, can have some advantages over traditional phase-detect systems.

Test your camera's focus sensors with nothing but a lined piece of paper.

Test your camera’s focus sensors with nothing but a lined piece of paper.

To address this issue, most camera manufacturers have implemented cross-type focusing sensors that work fine when focusing on images with horizontal and vertical patterns. On high-end models (like the Nikon D5 or Canon 5D Mark III) there are several clusters of cross-type focusing sensors, but lower-end models (like the Nikon D3200 and Canon Rebel T3i) usually have just one, right in the center. This means that the center autofocus point will likely be significantly faster, and more reliable, than the points on the edge. You can see the results yourself by repeating the test from earlier with the center focus point, instead of one on the perimeter of your viewfinder.

Using your camera's cross-type sensors can help ensure your pictures are perfectly focused.

Using your camera’s cross-type sensors can help ensure your pictures are perfectly focused.

The real-world implications of this are quite significant, and may very well change how you approach your photography. Many people use an automatic setting that allows their camera to look at all the available focus points, and determine which one should be used to set the focus. But, if you know that the the cross-type points will give you consistently better results, you might try using them more often.

This is especially useful with sports and fast action, but other types of photography situations can benefit from utilizing cross-type points also. Portrait, family, and wedding photographers often utilize the focus-and-recompose method to nail focus with a cross-type sensor, then shift their camera’s field of view to get precisely the composition they want. If you shoot landscapes you might not need speedy autofocus, but using your camera’s cross-type sensors may help your focus be more accurate.

Of course all this doesn’t mean that the normal focusing sensors on your camera are worthless, just that knowing which ones are cross-type can often give you an advantage you might not have otherwise had.

My Nikon D750 has 15 cross-type sensors all in the middle. To get this shot I used a cross-type sensor to nail focus and then recomposed by slightly shifting my camera to the right.

My Nikon D750 has 15 cross-type sensors, all in the middle. To get this shot I used a cross-type sensor to nail focus, and then recomposed by slightly shifting my camera to the right.

One other point worth noting is that mirrorless cameras use phase-detection focusing more than they used to, and some are implementing cross-type sensors too. Just because this technology started with DSLRs does not mean it will be forever limited to these types of cameras, and as manufacturers continue to innovate we will likely see more, and better, focusing options in the years ahead.

To help you figure out how many cross-type focusing points your camera has, you can do a little searching online, or look at the list below. I have compiled some data based on the more popular camera models for you:

Canon

  • 70D, T6/T6i: 19 points, all cross-type
  • 60D, T5/T5i, T4/T4i: 9 points, all cross-type
  • T3/T3i, T2/T2i: 9 points, 1 center cross-type
  • 6D: 11 points, 1 center cross-type
  • 7D: 19 points, all cross-type
  • 7D Mark II: 65 points, all cross-type
  • 5DSR, 5D Mark III: 61 points, 41 cross-type in 3 columns (middle, left, and right-side)

Nikon

  • D3300, D3200, D3100: 11 points, 1 center cross-type
  • D600, D610, D7000, D5500, D5300, D5200: 39 points, 9 cross-type (clustered in center)
  • D750, D810, D7100, D7200: 51 points, 15 cross-type (three center columns)

Sony

  • a6000: 179 points, 15 cross-type
  • a77II: 79 points, 15 cross-type
  • a77: 19 points, 11 cross-type
  • a7II: 117 points phase detection, PLUS 25 cross-type points
  • a7R II: 35mm full frame: 399 points (phase-detection AF) APS-C: 357 points (phase-detection AF) / 25 points (contrast-detection AF)

Pentax

  • K-5: 11 points, 9 cross-type
  • K-3: 27 points, 25 cross-type

Have you ever tried using cross-type focusing points? What have your results been like, and what other tips and tricks do you have for other dPS readers? Leave your thoughts in the comments section below.

googletag.cmd.push(function() {
tablet_slots.push( googletag.defineSlot( “/1005424/_dPSv4_tab-all-article-bottom_(300×250)”, [300, 250], “pb-ad-78623” ).addService( googletag.pubads() ) ); } );

googletag.cmd.push(function() {
mobile_slots.push( googletag.defineSlot( “/1005424/_dPSv4_mob-all-article-bottom_(300×250)”, [300, 250], “pb-ad-78158” ).addService( googletag.pubads() ) ); } );

The post Understanding Normal and Cross-Type Focusing Points by Simon Ringsmuth appeared first on Digital Photography School.


Digital Photography School

 
Comments Off on Understanding Normal and Cross-Type Focusing Points

Posted in Photography


10 Ways That Understanding Your Camera Leads to Better Images

02 Feb

Perhaps you’ve heard this one before, or said even it yourself: I could take great pictures too, if I had your camera. But saying pictures are great because of the camera is like saying Michael Jordan was great because of his shoes. Sure, the camera determines an image’s resolution, but give a $ 7,000 camera to a toddler and you’ll have Continue Reading

The post 10 Ways That Understanding Your Camera Leads to Better Images appeared first on Photodoto.


Photodoto

 
Comments Off on 10 Ways That Understanding Your Camera Leads to Better Images

Posted in Photography


Understanding the Focus and Recompose Technique

28 Jan

Digital cameras have an array of squares or dots, that you see when you look through the viewfinder, which represent the points at which it is capable of focusing. Put your subject on top of one of those dots, press the shutter button, and you’ll get a nice sharp image….usually.

But, sometimes your camera doesn’t light up the right dot, or your subject is out of the range of the focus points, or you want to select a specific point but you have trouble moving the buttons, knobs, and dials on your camera fast enough. If this sounds like you, or if you just want to check out a new way of using your camera, you might want to try the focus-and-recompose technique.

focus-and-recompose-shoes

Kids move around all the time, so rather than hunt for a specific focus point I used the center point to focus on their shoes and then instantly recomposed before snapping the photo.

Every digital camera allows you several options when selecting which focus points to use such as:

  • Full automatic – Your camera decides which dot to use, and what should be in in focus, often based on what’s closest to the viewfinder.
  • Face Detect – Your camera looks at the scene to see if there are any faces and prioritizes those above all else. If there are multiple faces, it usually looks for the ones that are closest.
  • Single Point – You select one point to be in focus and your camera makes sure that one specific spot is sharp before taking the picture.

There are other methods as well, but these are the most common, and all of them are quite effective but can also be a bit limiting. Automatic and Face Detect generally work fine but aren’t always accurate. If you want to select the focus point yourself you will usually have to turn a dial or press a joystick on the back of your camera, which can cost you precious seconds, and lead to some missed shots. Focus-and-recompose inverts the equation a bit, and instead of moving the focus point around you focus once, and then move your camera around to compose and get the shot you want.

focus-and-recompose-squirrel

Focus-and-recompose is a process wherein you select the focus point, often just one single dot or square in your viewfinder, and lock focus with a half-press of the shutter button. Then with a flick of your wrist you physically move your camera back and forth, or up and down just a bit, in order to recompose your shot will still keeping the focus where you locked it. It sounds a bit complicated, but once you get used to this technique it quickly becomes second nature, and is much faster than fiddling with buttons and dials to select a focus point every time.

In the following image I have overlaid an exact representation of all 51 focus points on my Nikon D750 camera. You will notice that the object on which I wanted to focus, the red pully mechanism on the crane arm, falls outside the focus points of my camera.

focus-and-recompose-focus-points-crane

If I had to rely solely on the focus points of my camera, I wouldn’t have been able to get the shot I wanted. However, the focus-and-recompose technique offered an easy solution. All I had to do was focus on the top pully, lock it with a button on my camera, and then recompose the shot by shifting my camera’s field of view down just a bit. By using this method I did not need to make an compromises, and I am pleased with the final image

Even though some cameras offer a much broader spread of focus points that can reach to the very edge of the frame, it is time-consuming to select them, or shift from one to the next using the dials on your camera. Some cameras don’t have nearly the number of focus points as higher-end models, which can be a bit frustrating when your subject falls between two points, but focus-and-recompose can solve this issue as well. I don’t even use all 51 of my camera’s points, because it’s quicker to select one from only 11, as you can see in the image below, and then recompose as needed.

focus-and-recompose-portrait

It’s not always possible to get the focus precisely where you want it, if you let your camera do all the work for you.

This portrait of a college sophomore (above) illustrates a big problem for traditional focusing methods, especially on cameras without a lot of focus points. In order to get the focus point precisely on her left eye where I wanted it, the only option using traditional methods would have been to scoot my camera’s field of view over a bit, which would have meant compromising what I wanted the shot to look like. Rather than sacrifice my artistic vision because of the limitations of my camera, I selected the top center point (highlighted in red), focused my camera on her eye, and then shifted my camera over just a bit to get the picture. Because I was only using 11 out of 51 possible focus points it was much quicker to select the one I wanted instead of repeatedly tap-tap-tapping on the dial on the back of my camera.

focus-and-recompose-baby

This baby’s eyes were out of the reach of my focusing area so I used the top-left square to lock focus and then recomposed to get the shot I wanted.

There are some important limitations to know about this method, and it does not work for every type of photographic situation. Most cameras have a few different autofocus modes such as single (the camera focuses once and doesn’t refocus until you shoot a picture) and continuous (the camera refocuses continually until you take a shot). If you shoot static subjects, such as landscapes and architecture, you can leave your camera in single mode, in which focus-and-recompose works quite well.

However if you shoot things that are always on the move such as families, kids, sports, autos, or animals, you will get better results using continuous focusing. This makes focus-and-recompose tricky because as soon as you move your camera to re-frame your shot, the focusing point moves too. In these instances I usually just leave my camera in continuous focusing mode while I move myself around to get the picture I want, since the subject has usually moved by the time I would normally lock focus, and recompose the shot.

One of the trickiest aspects of focus-and-recompose involves the physical action of holding the shutter button halfway down with your finger, while you reframe your shot. Fortunately you can solve this if you use the back button focus, technique which decouples the action of focusing, from that of actually taking a picture. Moving to back button focus, along with using focus-and-recompose, has entirely transformed my approach to photography, and made me a lot more nimble and versatile as a photographer.

focus-and-recompose-tesla

I used focus-and-recompose to nail focus precisely on the Tesla “T” logo.

One other thing to note about focus-and-recompose is that the center focusing points on most cameras are typically more sensitive than those along the outer edge of the frame, and are thus able to get more a more accurate focus, especially in dim light. If you use the outer focusing points, your pictures might not always be as sharp as they could be, but if you focus with the center point and then recompose your shot you will likely get more keepers. Of course this is not recommended for macro photography or other applications where your depth of field is razor thin, since any tiny movement of the camera will dramatically alter your picture, but for most other situations it can be a huge benefit.

What about you? Have you tried this technique or do you have other focusing tips to share? Leave your thoughts in the comments below!

googletag.cmd.push(function() {
tablet_slots.push( googletag.defineSlot( “/1005424/_dPSv4_tab-all-article-bottom_(300×250)”, [300, 250], “pb-ad-78623” ).addService( googletag.pubads() ) ); } );

googletag.cmd.push(function() {
mobile_slots.push( googletag.defineSlot( “/1005424/_dPSv4_mob-all-article-bottom_(300×250)”, [300, 250], “pb-ad-78158” ).addService( googletag.pubads() ) ); } );

The post Understanding the Focus and Recompose Technique by Simon Ringsmuth appeared first on Digital Photography School.


Digital Photography School

 
Comments Off on Understanding the Focus and Recompose Technique

Posted in Photography


Understanding Natural Light Part 3: Direction of Light

21 Jan

Light has different qualities, and by understanding those differences and using them in your favour, you can become a better image maker.

In two previous articles I covered:

  • Understanding Natural Light Part 1: Quality of Light
  • Understanding Natural Light Part 2: Color of Light

Mix1
In this third chapter, you will learn:

  • How to control the direction of natural light in the field.
  • How to understand the different effects the direction of light will have on your portraits. How to mix light colors to create depth.
  • A few advanced techniques, like using reflectors or flags.
  • How to practice using exercises.

Please note that as a portrait photographer, I will be discussing portraits, and using them as examples. However, this knowledge applies to any kind of photography.

Working with natural light does not mean compromising

Most people will tell you that while working with artificial lighting will allow you to fully control the lighting situation in your shooting, working exclusively with natural light will limit your ability to control the lighting to almost zero. In my opinion, this false assumption is leading many photographers to mediocre images. Stating that the lighting is poor, because “that’s how it was” when they made the photo, is not acceptable.

So, the first step in controlling natural light is to carefully plan your time of the shoot. In the preview articles, we have discussed how the quality and color of light are affected by time, and weather, during the day. Now, let’s understand how the direction of light will change throughout the day, and how it will affect the lighting situation in our portraits.

Frontal lighting

Frontal lighting refers to light which comes directly in front of your subject (the light source is behind you and the camera). The situation is possible or when your subject is facing the light source (for example face directed to a setting or a rising sun). Another possibility is with reflected light. Like in this image, Dialsiz was standing in the shade, but in front of her was a bright sunny wall, reflecting the sunlight directly on her face.

1b

Pros: Frontal lighting will usually illuminate your subject’s face evenly, without any shadows. It will create an aesthetic and balanced look, which is why this setup is very popular in fashion and beauty shoots.

Cons: The lack of shadows will create a lack and depth and drama.

45 degree lighting

As the name suggests, this refers to a situation where the light comes from an angle of 45 degrees from the nose of your subject. This is extremely popular lighting setup in portrait photography, which is sometimes called Rembrandt lighting. It can be easily achievable with side light coming from a rising or setting sun, or by positioning your subject at a 45 degree angle to a window.

26b

Pros: in this lighting setup, you will note how the light illuminates your subject’s face gradually. Creating a gradual shadow, and in our two dimensional art form, shadows usually mean depth and volume. That is the reason this setup is so appealing in the eyes of most viewers.

Cons: The dramatic effect of shadowing parts of the subject’s face might not be suitable for your visual story.

90 degree lighting

As the name suggests, this refers to a situation where the light comes from an angle of 90 degrees from the nose of your subject. It can be achievable with side light coming from a rising or a setting sun or by positioning your subject at a 90 degree angle to a window.

F11A1636

42


Pros: Extremely dramatic effect, which is almost impossible to ignore.

Cons: This dramatic lighting setup can be a little over dramatic, and with the right subject, this lighting can be scary! It all depends of course, on what you want to evoke in your visual story.

Backlighting

This refers to a situation where the light comes from behind your subject, and in front of you.

IMG 9185b

Pros: Backlight will create highlights in the contours of your subject, and unlike with frontal lighting, this will create a sense of depth, and a clear separation between the subject and the background. Unless the light source is very dim and fully covered by your subject’s body, working with backlight will force you to be creating with your photography, as it will make the exposure a bit more difficult. This is where switching from the automatic mode can be handy. While overexposing can be good for creating a burned out background or a lens flare, underexposure will usually result in a nice silhouette (as above)

Cons: As mentioned, this one is a bit more advanced to handle, and will mostly require switching out of your camera’s automatic mode, but again, a great opportunity for some creative photography.

Light from above

This refers to a situation where the light comes from directly above your subject, like during midday.

F11A0035b


Pros: This interrogation room style lighting setup will not be flattering to most faces. Light coming from above will result in deep shadows on your subject’s face, making the forehead shadow the eyes, and making the nose shadow the chin. However, it can be used as a way of creating a very dramatic image. Oscar-winning Cinematographer Gordon Hugh Willis, did a groundbreaking work in Francis Ford Coppola’s movie, The Godfather, with the combination of underexposing and positioning the lighting source above the actors’ faces. He managed to support the dark and mysterious sense of this movie, with the audience was unable to see most eyes throughout the movie.

Cons: As mentioned, when handled right, this lighting setup, can lead to great and creative results. Otherwise, you subject will look like he or she is going to answer some tough questions.

Controlling natural light

Basic: in the simplest form, controlling natural light is first in the planning. Choose the right time to be outside, or take your subject indoors to use the soft light coming from a window.

Advanced: You can control natural light almost like controlling artificial lighting, with the help of reflectors or/and flags.

Reflectors are used to bounce light into the subject’s face. For example, if you are dealing with light coming from above, you can overcome the problem of dark eyes by illumining them using a reflector. It can also lighten the dark side of the face, if needed, in the case of lighting from a 45 or 90 degree angle.

F11A1258b 1

2
You can see the reflection of the reflector used to bounce light back into this man’s face.

A flag is usually a piece of black fabric that can be used to block unwanted light and create shadows (shadows mean a sense of depth remember?) on the subject’s face. To use a flag properly, you will need somebody or something that can hold it. That is the way I use all kind of flags in the field. I have used my hat (which I was holding in my left hand) to shadow an overexposed forehead numerous times, or using the help of an innocent bystander that was asked to stand in one spot for a moment, to create a shadow when needed.

Exercise #1:

Christmas (or just after it) is the best time to ask for a favor. Bring your favorite friend, family member, or pet, and position it in front of a window. While moving your subject, practice the concepts of frontal, back, 90 degree and 45 degree lighting setups. Examine the images, and get a deeper understating of how light direction will affect your portrait.

Exercise #2:

Reflectors are effective and fun to use. You can buy yourself a reflector, or prepare one with a small piece of cardboard and a simple aluminum foil.

googletag.cmd.push(function() {
tablet_slots.push( googletag.defineSlot( “/1005424/_dPSv4_tab-all-article-bottom_(300×250)”, [300, 250], “pb-ad-78623” ).addService( googletag.pubads() ) ); } );

googletag.cmd.push(function() {
mobile_slots.push( googletag.defineSlot( “/1005424/_dPSv4_mob-all-article-bottom_(300×250)”, [300, 250], “pb-ad-78158” ).addService( googletag.pubads() ) ); } );

The post Understanding Natural Light Part 3: Direction of Light by Oded Wagenstein appeared first on Digital Photography School.


Digital Photography School

 
Comments Off on Understanding Natural Light Part 3: Direction of Light

Posted in Photography