RSS
 

Posts Tagged ‘travel’

7 Travel Photography Tips Your Tour Guide Won’t Tell You

14 May

This article is sponsored by the New York Institute of Photography. NYIP offers high-quality online photography courses that are affordable, convenient, and accredited.

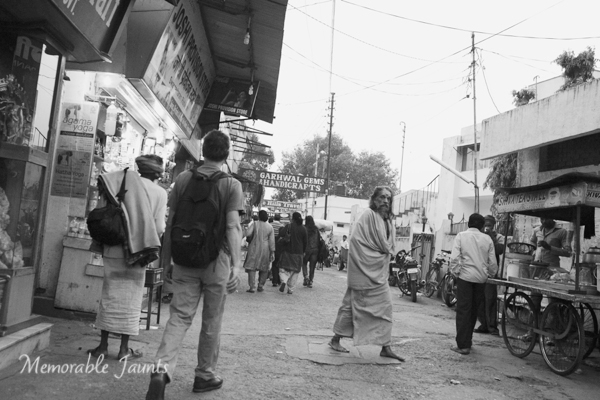
Beauty is hiding in plain sight, but only for those who learn to see beyond the obvious. To capture the heart of a region through your lens, you must connect with a place on a deeper level. This often involves slowing down and immersing yourself in the culture of those who call it home. By doing so, you become more than just a tourist with a camera, but a participant searching for truth and understanding. Every corner of this earth has its own unique characteristics, and the successful travel photographer exposes these differences in a way that others can relate to.

chris_corradino_travel_1

1) Search for Simplicity

It seems counterintuitive, but in searching for clean, simple compositions, your photos will benefit from a new level of sophistication. As Paulo Coelho said,

“Elegance is achieved when all that is superfluous has been discarded and the human being discovers simplicity and concentration: the simpler and more sober the posture, the more beautiful it will be.”

When visiting new places, sensory overload can overwhelm even the most deliberate photographers. This is where a slow, methodical pace will have a big impact on your work. Large bus tours with heavy agendas don’t typically allow the necessary time to capture the look and feel of a place. Instead, try a self guided tour, or a small group that caters to photographers.

chris_corradino_travel_2

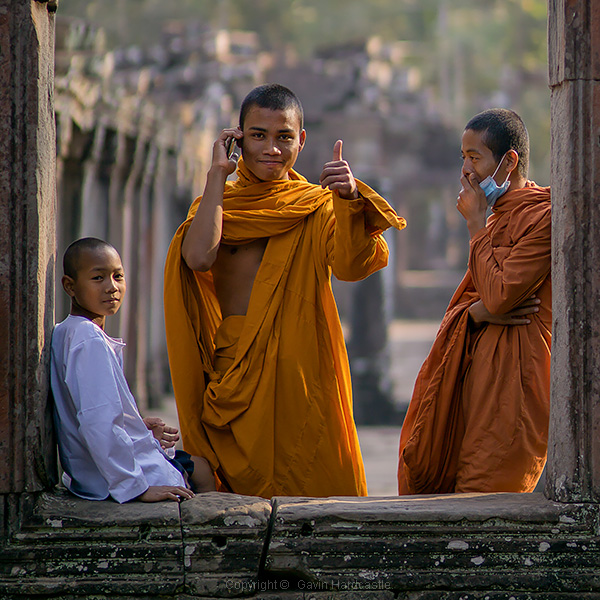
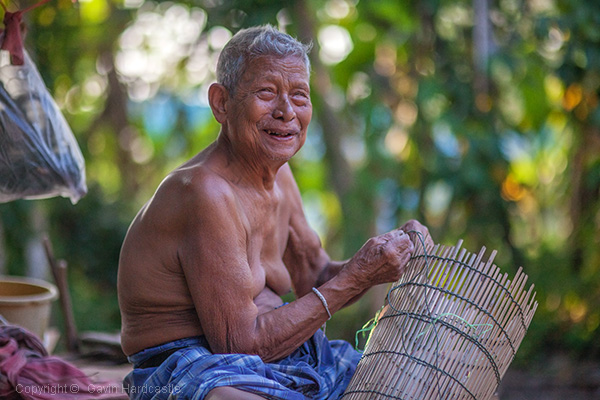
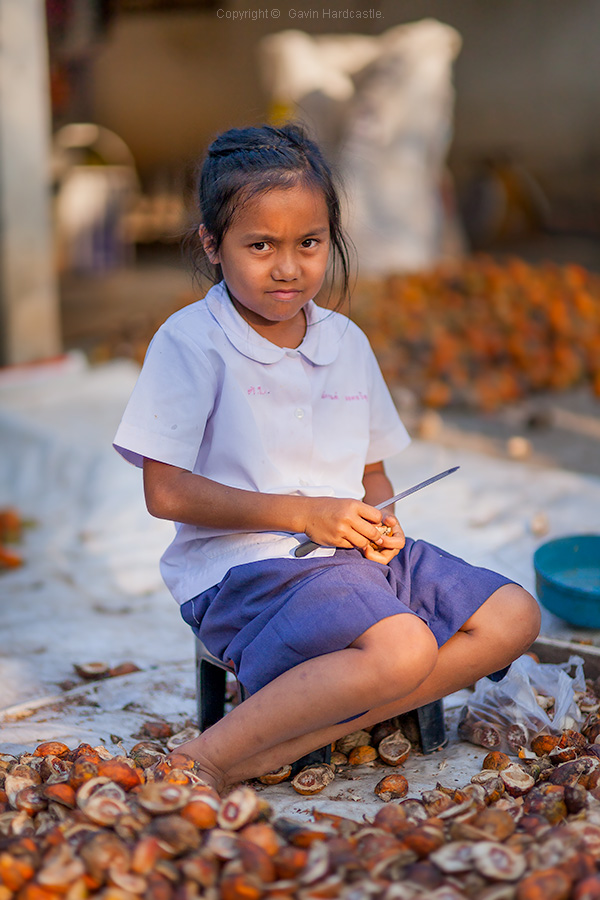
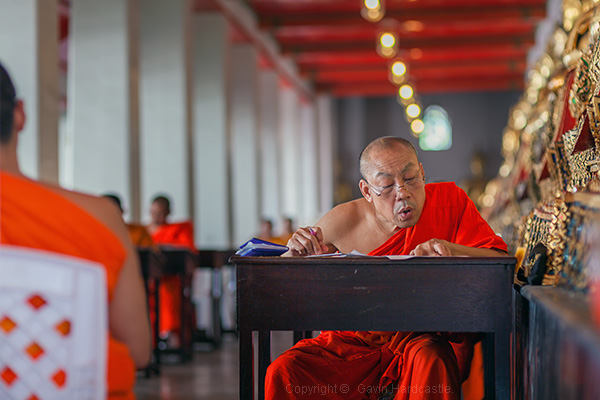
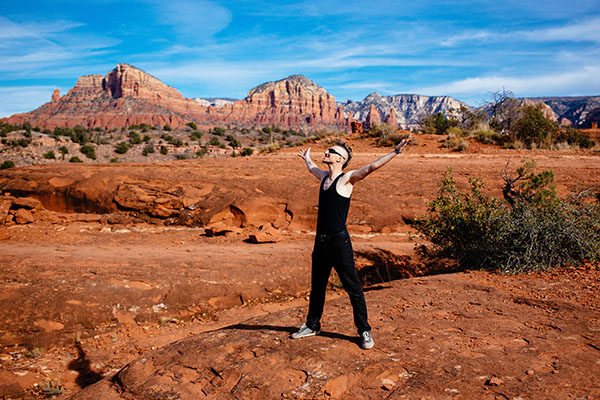
2) Include a Human Element

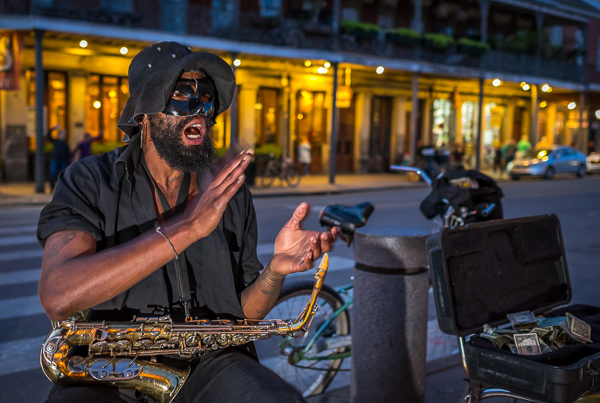
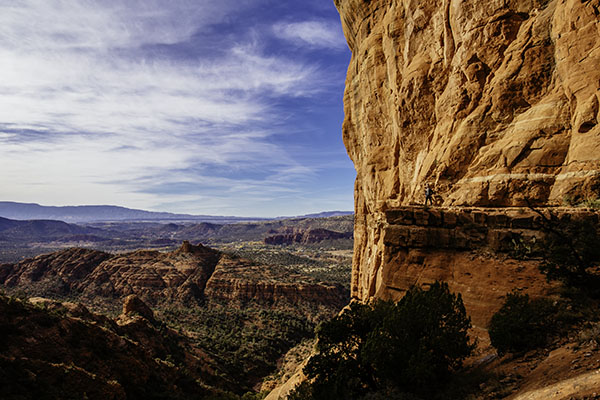
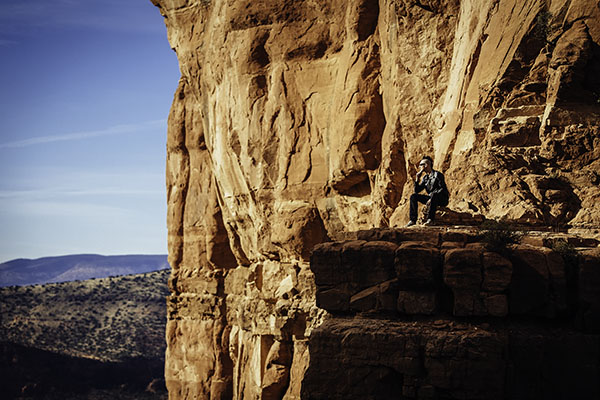
Many photographers struggle with the idea of adding people to their compositions. After all, it can be unnerving to include a stranger in your composition. Yet, by working a human element into your travel work, your photography will become more visually engaging. Not only does it create a sense of scale, but they become more salable for stock photography. You’ll just need to secure a model release in order to do this. With a number of smart phone and tablet apps for releases, this no longer needs to be an awkward exchange of actual paper documents. For the participant’s cooperation, you can offer to send a high resolution copy of the image.

chris_corradino_travel_3

3) Think Small

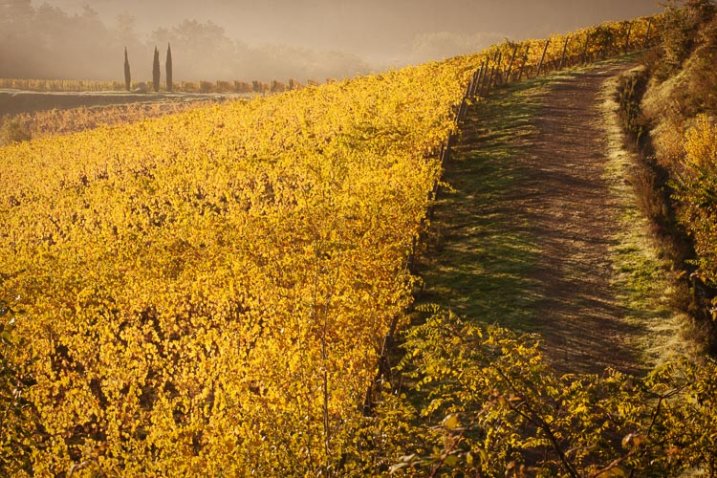
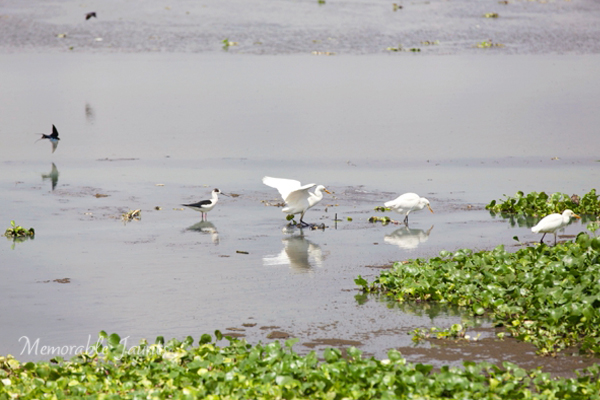
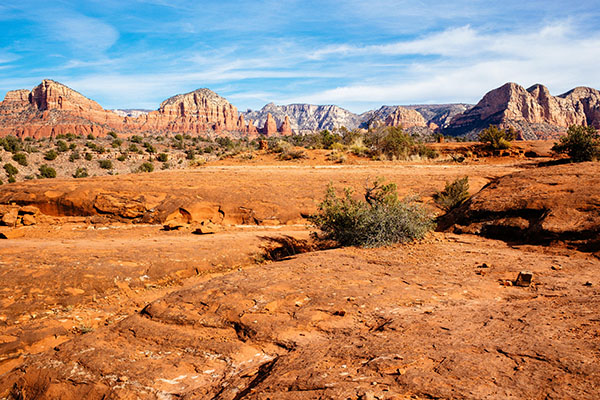
We all love to shoot scenic vistas bathed in the golden light of magic hour. While these dramatic landscapes can certainly round out a portfolio, it’s what you do with the remainder of the day that sets your collection apart. As you explore a location through your lens, think of yourself as a visual detective. No detail is too small. It’s the little things that ultimately add up to form the bigger picture.

chris_corradino_travel_4

4) No Rest for the Weary

Anyone who says you should pack your camera away midday is doing you a disservice. Contrary to what many suggest, the light is good all day, even at high noon. The trick is to best match the various qualities of light to your subject matter. A rolling green landscape can appear lush and vibrant with the simple twist of a circular polarizing filter. Why limit your photography to the hours around sunrise and sunset?

chris_corradino_travel7

5) Plan on Getting Lost

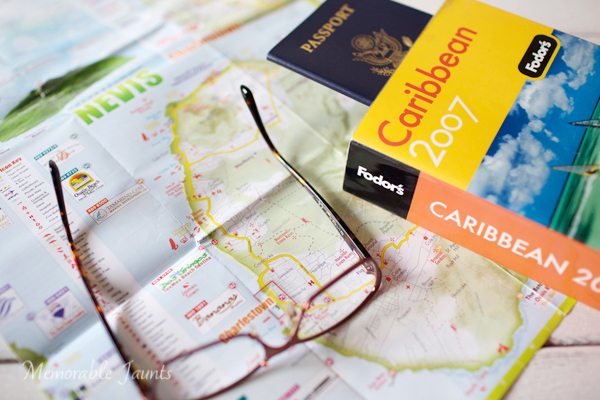
Researching potential shooting locations on the web is an essential part of any pre-trip preparation. With tools like the Photographer’s Ephemeris, you can study the precise time and locations of sunrise and sunset, along with with the moon phase. While this is helpful to create a basic shot list, remember to leave some time for unexpected adventure. Recognize that things will not always work out as planned. Getting lost is sometimes the only way to find what you’re looking for.

chris_corradino_travel5

6) X Does Not Always Mark the Spot

It seems that even the most remote destinations have been photographed from nearly every perspective. This doesn’t mean you shouldn’t shoot them however. Instead, consider it a personal challenge to go one step further and create something unique. How can you take what’s already been done, and make it yours? It’s this vision that separates your work from the masses.

chris_corradino_travel_6

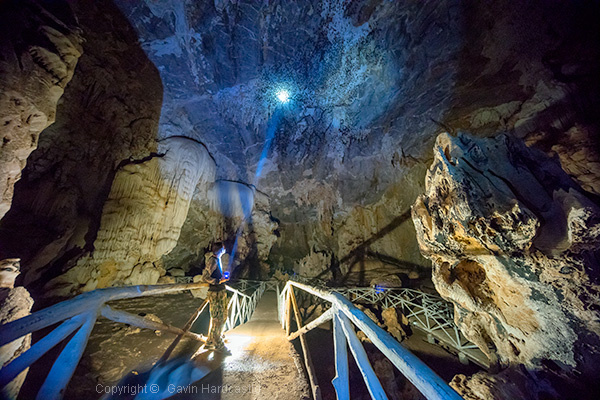
7) Explore Beyond Your Zoom’s Range

Zoom lenses give you the ability to change your focal length with a flick of the wrist. This is indeed convenient for many types of photography including travel work. Yet, if you limit your perspective to what the lens provides, you’ll miss out on a number of great opportunities. Travel photography calls for us to explore beyond the end of our zoom range. Let curiosity guide your compositions and the nature of a place will reveal itself.

chris_corradino_travel 8

This article is sponsored by the New York Institute of Photography. NYIP offers high-quality online photography courses that are affordable, convenient, and accredited. Chris Corradino is a paid instructor with NYIP. 

googletag.cmd.push(function() {
tablet_slots.push( googletag.defineSlot( “/1005424/_dPSv4_tab-all-article-bottom_(300×250)”, [300, 250], “pb-ad-78623” ).addService( googletag.pubads() ) ); } );

googletag.cmd.push(function() {
mobile_slots.push( googletag.defineSlot( “/1005424/_dPSv4_mob-all-article-bottom_(300×250)”, [300, 250], “pb-ad-78158” ).addService( googletag.pubads() ) ); } );

The post 7 Travel Photography Tips Your Tour Guide Won’t Tell You by Chris Corradino appeared first on Digital Photography School.


Digital Photography School

 
Comments Off on 7 Travel Photography Tips Your Tour Guide Won’t Tell You

Posted in Photography


Video Share – Travel Photography Hacks and Gear Tips

03 May

In these two videos travel photographers Brendan van Son shares some of his hacks for travel photography gear – how to go lighter and spend less money.

In this first one he offers eight photography hacks to help you while you’re out on the road:

  1. Welding glass as a neutral density filter
  2. Macro extension tubes instead of a macro lens
  3. 2x teleconverter to extend the range of your lenses
  4. Tripod/monopod combination (he mentions he uses one of the 3-Legged Thing models)
  5. Trigger Trap remote release
  6. Camera cap case
  7. WiFi EyeFi memory cards
  8. The Crop Sensor advantage

Watch the whole video to see how you can use those tips to your advantage when travelling.

In this second video he talks about different camera strap options and which is the best for travel photography.

The strap he mentions is the Indigo Marble designer sling.

Some other options are:

  • imo Camera Straps: Review – for a bit more fashionable and stylish strap.
  • Black Rapid RS-7 Camera Strap Review
  • Peak Design Capture Camera Clip v2 review
  • Preview of the Slide and Clutch Camera Carrying System from Peak Design
  • Spider Camera Holster Review

Do you have any other tips for hacking your travel photography bag? Please share with us in the comments below. What goodies have you found?

googletag.cmd.push(function() {
tablet_slots.push( googletag.defineSlot( “/1005424/_dPSv4_tab-all-article-bottom_(300×250)”, [300, 250], “pb-ad-78623” ).addService( googletag.pubads() ) ); } );

googletag.cmd.push(function() {
mobile_slots.push( googletag.defineSlot( “/1005424/_dPSv4_mob-all-article-bottom_(300×250)”, [300, 250], “pb-ad-78158” ).addService( googletag.pubads() ) ); } );

The post Video Share – Travel Photography Hacks and Gear Tips by Darlene Hildebrandt appeared first on Digital Photography School.


Digital Photography School

 
Comments Off on Video Share – Travel Photography Hacks and Gear Tips

Posted in Photography


Jet Set: The travel photography and photojournalism of Mark Edward Harris

12 Apr

With nearly thirty years of photography as well as almost ninety countries under his belt, travel, editorial and reportage photographer Mark Edward Harris has dedicated his eye to capturing life. His career in photography began as a still shooter for the Merv Griffin Show, but it was a four month trek through Asia when the show ended that first ignited his true love; travel photography. Read more about Harris’ photography as well as his tips on traveling light in our Q+A. See gallery

Articles: Digital Photography Review (dpreview.com)

 
Comments Off on Jet Set: The travel photography and photojournalism of Mark Edward Harris

Posted in Uncategorized


5 Lessons Learned Switching from DSLR to Mirrorless for Travel Photography

23 Mar

Two months ago, after shooting for 10 years with Canon, I completely switched to Sony. It surprised some readers of my blog, as well as some fellow photographers. To address the issue, I published a detailed post on my blog with the reasons behind my switch. To save you time, I will summarize my reasoning, not only in one sentence but in one word: INNOVATION. I could see that, in the last two to three years, the main innovation was happening in the realm of mirrorless systems and I felt that Canon was simply an outside observer.

I considered the switch for a long time. I first waited because mirrorless systems were not up to DSLR standards to which I was accustomed. Then suddenly, about a year ago, all mirrorless manufacturers began releasing new camera models that could compete with any DSLR and, in some cases, even surpassed them.

SwitchingfromCanont Sony Photo 1

Big Sur, California – Sony A6000, Sony 10-18mm lens

That was when I decided to switch. But, it took another six to seven months to choose the right kit (camera and lenses) for my travel photography needs.

My initial choice was the Panasonic Lumix GX-7 which was the perfect camera for me feature-wise but I was not too crazy about the selection of high-end wide angle lenses.

My second choice was the full frame Sony A7 and, I almost pulled the trigger last fall. However, after holding it in my hands, the Sony A7II in combination with the newly released Zeiss 16-35mm lens was almost comparable to the DSLR in weight and size.

That was when my choice was made. Just before the Christmas holidays, I sold all of my Canon gear to prevent cold feet. Then, I ordered the Sony A6000, Sony 10-18mm f/4, and Zeiss 16-70mm f/4 in one shot. I paid $ 2000 in total. Sony lenses are always pricy but I found that the price of the complete kit was very reasonable.

SwitchingfromCanont Sony Photo 2

Sony A6000, Sony 10-18mm lens and Feisol Tournament Tripod

I just returned from my first photography trip of the year; I spent two weeks in Hawaii and Northern California where I exclusively shot with my brand new Sony gear.

Below are my thoughts after putting this new equipment through the real life test of travel photography. Please note, I only addressed the features of the camera which are important to me as travel photographer.

Lesson 1: Size does matter in travel photography

As a DSLR shooter, when preparing for a long and demanding sunrise/sunset hike, I always faced the same dilemma – what equipment to bring? Should I carry everything and look (and feel) like a Sherpa tackling Everest? Or should I hike light and risk missing important gear?

I do not have to compromise anymore as I can now put everything in a small camera bag and bring it with me. The Sony A6000 (344g) and the Sony 10-18mm (220g) weigh 564g (19.9oz) total. I still cannot believe that a high-quality wide angle zoom lens can weigh only 220g. I call it freedom.

Don’t get me wrong, the size and the weight were not the main reasons for my switch. I would never jeopardize quality for the sake of weight reduction but it was important consideration.

SwitchingfromCanont Sony Photo 3

San Francisco, California – Sony A6000 with Sony 10-18mm lens

Lesson 2: Electronic Viewfinder (EVF) – a new way of looking at the scene

Somehow, in many mirrorless reviews, the EVF is presented as a negative factor and is portrayed as somewhat of a disadvantage compared to the DSLR optical viewfinder. I do not agree with that conclusion. For me, the EVF is one of the main advantages of mirrorless cameras. Finally, when I look through the viewfinder I can see what the camera’s sensor sees.

It is a very new and refreshing experience with the EVF, when you can assess the depth of field of the scene before taking the picture.

Here’s a real life scenario. Earlier I was shooting using exposure compensation -2EV and I forgot to reset it to zero. Now, when looking through the EVF, I can see right away that the exposure is wrong because the EVF picture is too dark.

When I shoot wide at 10mm, I can even see barrel distortion which realistically represents the photo I am about to take.

I often use manual focusing when shooting landscapes, which was pretty much an impossible task with the DSLR in bright conditions because of the display screen glare. Now, not only can I easily use the manual focus in any condition, I can also take advantage of Focus Peaking, an amazing feature that highlights areas that are in focus with the bright color. There is no more guess work.

In one of the reviews, I read how awful and pixelated the EVF picture becomes in dark conditions. I can confirm that it looks pretty bad but it is good enough for composing the shot and beats the DSLR where all you can see is pitch black.

For me, the EVF simplifies the process of taking pictures and makes it more predictable.

SwitchingfromCanont Sony Photo 4

California State Route 1 – Sony A6000 with Zeiss 16-70mm lens

Lesson 3: I love the 24 megapixels sensor

During the silly megapixel war between major camera manufacturers, I decided for myself that 16Mpx was the right pixel count for my needs and I had no plans of upgrading only for that reason.

The Sony A6000 comes with 24Mpix, which I initially did not consider as an important upgrade. What I realized later, after starting to process photos, is that the 24Mpx sensor produces unbelievably clean and sharp images and, in combination with native quality lenses, it resolves an insane amount of detail. Photos look acceptable even at 100% magnification.

Although, I have to admit the higher pixel count is more taxing on my computer and I might need to upgrade it soon.

High ISO photography is not something that I do often when I travel and it was hard for me to assess low light performance of the sensor. But, what I can see based on family photos from the holidays is that ISO 3200 is still acceptable and excessive noise is easy to eliminate in Lightroom.

SwitchingfromCanont Sony Photo 5

Lanikai Beach O’ahu, Hawaii – Sony A6000 with Sony 10-18mm lens

Lesson 4: 11fps is a game changer

Sports photography is somewhat of a hobby for me. The only times when I shoot sports are when professional cycling peloton comes to Montreal every September and when my daughter is playing water polo. In order to test 11fps in combination with the fastest focusing system in the industry, I went to the beach in Hawaii to photograph surfers.

I switched from RAW to JPEG, set the camera to a continuous shooting mode and enabled Object Tracking. I was amazed not only with the new experience of shooting but with the results as well. Shooting at 11fps reminded me of filming the video and then going frame by frame in the editing software, selecting the best frames. There are no missing moments. The focus was spot on, in pretty much every frame.

I can see how the Sony A6000 can be a game changer for sports and wildlife photographers.

SwitchingfromCanont Sony Photo 6

Makapu’u Point O’ahu, Hawaii – Sony A6000 with Sony 10-18mm lens

Lesson 5: Not everything is perfect in paradise

Even though my initial experience of using the Sony A6000 is very positive, there are some shortcomings and annoyances I want to address.

Battery life:

According to Sony, you can take up to 360 shots on a single battery charge and I found this number to be pretty accurate. I even managed to take close to 390 shots when shooting in bracketing mode. It is not bad at all considering the small battery size and the EVF high power consumption. However, when you are accustomed to shooting 1500 shots on a single charge with the DSLR, the difference is very obvious. Now, I carry three spare batteries with me at all times and I have to remember to keep them charged.

Bracketing:

For some inexplicable reason you can shoot five bracketed shots at 0.7EV intervals only, which makes it completely useless. In extreme lighting conditions I have to shoot two sets of bracketed shots (-2, 0, +2), offsetting them manually using exposure compensation (-1 EV). This is very annoying.

No GPS tagging:

Even though the camera has decent wireless connectivity, the GPS tagging utilizing a mobile phone is missing.

Buffer writing lock:

When a camera transfers photos from the buffer to a memory card, the system is completely locked. You cannot even preview images during the transfer.

2-Second delay shortcoming:

You cannot trigger bracketed shots using the 2-second delay functionality. I had to buy, and carry around, an unnecessary extra piece of equipment: Wireless Shutter Release ($ 10).

SwitchingfromCanont Sony Photo 7

Sandy Beach, Hawaii – Sony A6000 with Sony 10-18mm lens

Conclusion

The switch from a Canon DSLR to the mirrorless Sony A6000 was less stressful and less painful than I expected. I believe that one of the main factors that made it possible was my purchase of native Sony lenses so I did not have to deal with the glass from other systems with the converters.

I am waiting for the widely rumored Sony A7000 which is supposed to be the successor of the Sony NEX-7. I hope Sony addressed the shortcomings of the A6000 and introduces new pro features like: weather sealing, built-in body stabilization, GPS tagging and advanced bracketing. I am definitely planning to get the new A7000 and keep the A6000 as a backup body.

googletag.cmd.push(function() {
tablet_slots.push( googletag.defineSlot( “/1005424/_dPSv4_tab-all-article-bottom_(300×250)”, [300, 250], “pb-ad-78623” ).addService( googletag.pubads() ) ); } );

googletag.cmd.push(function() {
mobile_slots.push( googletag.defineSlot( “/1005424/_dPSv4_mob-all-article-bottom_(300×250)”, [300, 250], “pb-ad-78158” ).addService( googletag.pubads() ) ); } );

The post 5 Lessons Learned Switching from DSLR to Mirrorless for Travel Photography by Viktor Elizarov appeared first on Digital Photography School.


Digital Photography School

 
Comments Off on 5 Lessons Learned Switching from DSLR to Mirrorless for Travel Photography

Posted in Photography


5 Reasons to Use Flash to Improve Your Travel Photography

19 Mar

When it comes to travel photography, I am all in for carrying less. However, a good flash is always within reach in my everyday camera bag. I strongly believe that a flash helps to achieve much better results in a number of situations, and here are five reasons and examples:

1) Fill the shadows

Fishing on the Cau River

The alleyway that protects these fishing villagers from the heat in Vietnam makes it almost impossible to have a good balance between the bright sunlight on the river, and the walls of the alley. The use of flash, in a controlled way, over the foreground helps to open up the shadows and show some detail on the otherwise totally dark foreground.

2) Under-expose your background

Farmer in Van Ha

When making portraits, it is always good to have decent separation between your main subject and the background. Granted, one of the most popular ways is to use a shallow depth of field and blur the background while keeping the principal element of your photo sharp. Another way is to intentionally under-expose your photo one or two stops, and light your subject with flash to compensate.

3) Freeze motion

For the love of the kids

If you are working with moving subjects, the use of flash will help to freeze some of the motion if you intend to do so. This depends on a number of factors, including what shutter speed you are shooting at and the length of the flash duration. But, if you notice in the example above, the flash is only being used to achieve points one and two of this article, meaning I am also underexposing the image a tad, and opening up the shadows in the main subject to bring more attention to them.

4) Dark interiors

Old Black Hmong man

This artisan from the Hmong minorities in North Vietnam was working his craft inside his house where no lights are available. Despite being close to a window, it was way too dark to photograph, even at high ISO. If you encounter a similar condition, the use of flash will not only make a big difference, but could also be the reason you get the shot at all.

5) Keep shooting at night

Street performer at night in New Orleans

Some places are meant to be enjoyed at night. All kind of photos are possible during this time. Cityscapes and lights trails are certainly compelling propositions, but when it comes to capturing street life there is no better way than with the aid of flash. That extra pop of light will make your subjects come alive and stand out.

The key to doing this is to practice and learn how to manage and balance ratios. Every moment is different and sometimes your key light will be your flash, and other times you’ll be using it just to fill. My personal preference is to do it manually. I think you have much better control by dialling in the power of your speedlights manually, rather than letting the camera figure it out. It takes practice, but it is not difficult to master.

In terms of equipment, I really like the Yongnuo YN 560-III, the main reason is the integrated radio trigger. The units are inexpensive, but well made, which doesn’t hurt either. But as I always use it off-camera, the fact that I don’t need to attach cables or be worried about optical slaves is something that I appreciate. That radio signal goes everywhere, even behind walls, making it very easy to trigger.

What about you? Do you use any flash in your travel photos or in situations like these? Share your images and comments below.

googletag.cmd.push(function() {
tablet_slots.push( googletag.defineSlot( “/1005424/_dPSv4_tab-all-article-bottom_(300×250)”, [300, 250], “pb-ad-78623” ).addService( googletag.pubads() ) ); googletag.pubads().enableSingleRequest();
googletag.pubads().disableInitialLoad();
googletag.pubads().collapseEmptyDivs( true );
googletag.enableServices();
} );

googletag.cmd.push( function() { googletag.display( ‘pb-ad-78623’ ); } );

googletag.cmd.push(function() {
mobile_slots.push( googletag.defineSlot( “/1005424/_dPSv4_mob-all-article-bottom_(300×250)”, [300, 250], “pb-ad-78158” ).addService( googletag.pubads() ) ); googletag.pubads().enableSingleRequest();
googletag.pubads().disableInitialLoad();
googletag.pubads().collapseEmptyDivs( true );
googletag.enableServices();
} );

googletag.cmd.push( function() { googletag.display( ‘pb-ad-78158’ ); } );

The post 5 Reasons to Use Flash to Improve Your Travel Photography by Daniel Korzeniewski appeared first on Digital Photography School.


Digital Photography School

 
Comments Off on 5 Reasons to Use Flash to Improve Your Travel Photography

Posted in Photography


Have Shutter, Will Travel: Some Considerations for Travel Photography

11 Mar

Travel and photography could be considered a thing unto itself, kind of like macaroni and cheese or peas and carrots. Travel has a natural allure to photographers, promising unique views of life and existence that can only be experienced — and photographed — by throwing yourself into new worlds and meeting new people. While there’s something to be said for the Continue Reading

The post Have Shutter, Will Travel: Some Considerations for Travel Photography appeared first on Photodoto.


Photodoto

 
Comments Off on Have Shutter, Will Travel: Some Considerations for Travel Photography

Posted in Photography


Safety Tips for Travel Photographers (Particularly Women)

06 Mar

Let me first address the obvious that while this article talks about safety tips for women photographers, it does not mean that these tips don’t apply to men as well. Most are general tips that could be applied to both genders. Being a woman photographer who has started to venture out alone for photoshoots and solo photowalks, these are things that I notice and practice as I do travel photography.

Solo Hiking in the Appalachian Trail in Great Smoky Mountain National Park USA

Solo Hiking the Appalachian Trail – Great Smoky Mountain National Park, USA

It all started with a single trip. A couple of years ago while visiting Great Smoky Mountain National Park in the US, I decided to flex my muscles and go for a solo hike with my young kids. This was supposed to be a bonding experience as well as a confidence booster that I could do this alone. So off we went, water bottle and camera in hand to hike a two to three mile stretch of the Appalachian Trail.

Half way into the trail, my confidence took a nose dive, as I realized I had done several stupid things – I vaguely remember telling my husband the actual trail we were going to take, we only had one bottle of water among the three of us, I was carrying 20lbs of photo gear and I had no emergency kit or even a phone. My kids, then 7 and 3, were hot and cranky and there was no end in sight. In my paranoia of either being attacked by a bear or a crazy psychopath on the trail, we literally sprinted the entire way. Thankfully, my husband had started off at the other end of the trail and met up with us. While it was an adreallian pumping, nerve racking experience, it did make me realize that with a few simple tips, one can travel smart, safe and actually have a wonderful time.

#1 Research, research and then do more research

Bird Photography in Chennai India

A google maps satellite search revealed a bird photographer’s paradise literally five minutes from home when I travelled to Chennai, India

There is no lack of informational resources for someone wanting to travel anywhere in the world. Between maps, guide books and online forums we can pretty much take a virtual tour in our pajamas and not have to leave the comfort of our homes. But if you are anything like me, the wanderlust bug is very prominent and the urge to escape the clutches of everyday life too urgent to ignore. Make sure you know everything there is to know about the place you want to visit. Scope out all the possible locations that interest you in detail. There are many online photography and travel forums where you can post questions around photographic opportunities for specific locations.

#2 Record and insure your gear

This is one of those business expenses that may seem like it is discretionary but trust me, it is absolutely critical especially if you plan to travel extensively. Having that peace of mind that your gear is as protected as it can be is very liberating.

#3 Blend in as much as you can

Safe Travel Tips for Photographers DPS Article Memorable Jaunts

A simple bag pack to carry your equipment might be the best travel gear to blend in with the locals

With a camera in one hand and a map/guide book in the other, chances are you already stand out from the local crowd. Try not to make it more obvious in the way you dress or behave. The smart thing to do is to blend in with the locals. Dress like the locals wherever possible, then if you have done your research and planned out your excursion you don’t need to hold on to the map (a sure giveaway that you are a tourist).

#4 Keep an updated itinerary with family and friends at all times

Safe travel tips for women photographers DPS Memorable Jaunts Article

Have a plan of where you want to go and what you want to do and make sure you communicate that to the right people

This seems like a no-brainer but often times is easily overlooked. It’s one of those travel smart strategies that could literally save a life. This is one time when having a game plan for where you want to go, and when you want to get there is advisable particularly for solo travellers. Avoid changing plans on the fly – especially if you have taken the time to research and scope out the best photographic opportunities for your trip. If you have to change travel plans, make sure changes are communicated to the right people, at the right time.

#5 Plan for emergencies

Lets face it – this is life, not a scripted, rehearsed, movie set. Chances are things are going to go wrong – travel plans may change, equipment may malfunction, batteries may run out. Regardless, have a plan of action for some of the more obvious mishaps. Keep numbers handy for any local camera shops in case you need to use them in a pinch – definitely a much cheaper option than having things shipped or mailed to you, especially if you are out of the country.

#6 Listen to your gut

Words like “gut feeling” and “woman’s intuition” do actually exist, and more often than not, they are spot on. Trust your instincts. At the end of the day missing a photo opportunity is not as critical as being safe. Don’t do anything that you are not comfortable doing.

#7 Carry only the essentials

Safe travel tips for photographers DPS Memorable Jaunts Article

We photographers LOVE our gear and cannot imagine being away from it. Most of us feel we need every lens and gadget for every shoot for those what if situations. But challenge yourself to pack light. Maybe you only want to shoot with a wide angle lens or the nifty-fifty. Carry only what you need and not all the gear you own – your body will thank you.

#8 Carry personal protection equipment

No, I am NOT advocating carrying a gun or other such personal protection mechanisms. Personal protection can mean different things to different people and can also differ based on the situation. For a while I carried pepper spray in my purse. Then I switched to a swiss army knife. Then I decided that my 90lb german shepherd dog was my best defense mechanism especially for local sunrise and sunset photo excursions. Choose what is appropriate and practical for you.

Do you have any safe travels tips to share based on your personal experiences? Feel free to share…

googletag.cmd.push(function() {
tablet_slots.push( googletag.defineSlot( “/1005424/_dPSv4_tab-all-article-bottom_(300×250)”, [300, 250], “pb-ad-78623” ).addService( googletag.pubads() ) ); } );

googletag.cmd.push(function() {
mobile_slots.push( googletag.defineSlot( “/1005424/_dPSv4_mob-all-article-bottom_(300×250)”, [300, 250], “pb-ad-78158” ).addService( googletag.pubads() ) ); } );

The post Safety Tips for Travel Photographers (Particularly Women) by Karthika Gupta appeared first on Digital Photography School.


Digital Photography School

 
Comments Off on Safety Tips for Travel Photographers (Particularly Women)

Posted in Photography


10 Ways to Improve Your Travel Photography

20 Feb

How to improve your travel photography

Get the most out of your travel photography and capture the moment with these 10 simple tips. Most of these tips are pretty basic and some of them are useful for traveling in general.

1 – Focus on faces

Sounds obvious I know, but whether it’s wildlife or people, it’s often best to focus your lens on the face of of your most important subject. We are naturally drawn to eyes, so that’s where you’ll usually want to focus.

10 Ways to improve your travel photography

2 – Shoot fast

Photographing people in fascinating cultural situations requires a totally different mindset to shooting landscapes.

Forget your tripod, forget low ISO settings and think less about image quality and more about capturing the moment. Be ready, by relying on your autofocus and fast shutter speeds to freeze the action. Handheld is the way to go because you just don’t have the time to be fiddling around with tripods.

In bright sunlight you’ll get away with ISO settings between 400 and 1000 but when the light starts to get low, don’t be afraid to crank that ISO way up into the thousands.

Use wider apertures like f/2.8 to achieve faster shutter speeds and get a pleasing shallow depth of field to accentuate your main subject. Shooting in Aperture Priority mode (AV) lets you quickly dial in the desired aperture while your camera decides on the shutter speed.

If your lens has some kind of vibration reduction be sure to switch that on when going handheld.

Travel Photography tips

3 – Learn the lingo

Take at least a few hours while traveling to learn the basic language skills for your location. Knowing how to say ”Hello, excuse me, please, thank you, sorry, yes, no,” etc., goes a long way even in countries where English is spoken in tourist areas.

Having some basic language skills can make a huge difference to the type of access you’ll get, and the things you’ll get to see. Language opens doors that would otherwise be closed to the average tourist.

4 – Hire a translator or guide

Getting access to people’s everyday lives is often difficult if you don’t know any locals, especially if it’s your first time at a particular location. Consider hiring a guide or translator so that you can communicate with locals on a deeper level than just knowing the basic phrases.

I’ve done this a few times and you sometimes get to make great friends with your guides, who will be happy to introduce you to interesting people and places.

Travel Photography Tips

5 – Smile and make friends

When taking pictures of strangers or communicating with locals, don’t be a dour faced tourist. Smiling is universal and softens what might otherwise be an intimidating approach to people who have little experience with adventurous foreigners.

If you want people to like you, a smile is a good place to start.

6 – Ask for permission whenever possible

If you’re able to ask a person for permission to take their picture, you should. In many countries there is no legal obligation to do so but it’s just good manners, and some people may have religious reasons why they’d really prefer not to have their picture taken.

Conversely, don’t interrupt a delicate social situation if there’s a chance it might be socially awkward. This picture I took at the very famous What Pho in Bangkok is a good example. The monks were taking an exam in front of hundreds of tourists under a high pressure situation so I’m hardly going to walk up and interrupt.

Wat Pho Thailand - Travel Photography Tips

7 – Choose the right lenses

When it comes to capturing atmospheric cultural shots, I’ll choose prime lenses that offer a lovely blurred bokeh effect while keeping my main subject sharp. Typically these will be in the 35mm, 50mm or 85mm, range on a full frame camera. These types of lenses will give you that lovely cinematic look that all-in-one zoom lenses just can’t deliver.

You can achieve a similar look with big telephoto lenses but those are less portable. Smaller primes also make you look more low-key and have great image quality.

Best lenses for travel photography

One of my favourite lenses for travel photography is the Sigma 85mm 1.4 prime.

8 – Carry two cameras

This goes back to what I said about shooting fast. With people and animals you often won’t have time to switch lenses, so consider carrying two cameras that have lenses for different purposes. Let’s say a wide angle lens on one camera, and a lovely 85mm prime for portraits on the other. This way you’ll be able to cope with most situations at a fast pace.

If you are going to carry two cameras, try and keep one in a small bag at all times. If you look too much like a paparazzo it might intimidate some people.

9 – Step out of your comfort zone

I’m not advising you to put yourself in danger. You should always use common sense, but consider doing things you might otherwise find yourself saying NO to. That’s where you’ll find the best photo opportunities.

An example of this would be my recent visit to a mountain cave in Thailand called Phra That Cave in Kanchanaburi Province. The cave has no lights, claustrophobic tunnels and thousands of bats, some of which you’ll have flying right in your face. To me, that’s fun, but to others it’s a living hell.

10 Travel photography tips

”Bats, you say? Thousand of bats?”

10 – Take responsibility for your ownsafety

Third world countries (and even some first world countries) have a very vague concept of Health and Safety. Modern day westerners are raised in a bubble of relative safety that can sometimes result in us having a misplaced sense of responsibility.

Use common sense when traveling, and don’t assume that those hastily built steps you’re about to climb have been passed by a safety inspector.

Got Your Own Tips?

I’d love to hear your travel photography tips. From always carrying toilet paper to having your lawyer’s phone number on speed dial, please share your hard earned experiences and let’s grow this tip list.

googletag.cmd.push(function() {
tablet_slots.push( googletag.defineSlot( “/1005424/_dPSv4_tab-all-article-bottom_(300×250)”, [300, 250], “pb-ad-78623” ).addService( googletag.pubads() ) ); } );

googletag.cmd.push(function() {
mobile_slots.push( googletag.defineSlot( “/1005424/_dPSv4_mob-all-article-bottom_(300×250)”, [300, 250], “pb-ad-78158” ).addService( googletag.pubads() ) ); } );

The post 10 Ways to Improve Your Travel Photography by Gavin Hardcastle appeared first on Digital Photography School.


Digital Photography School

 
Comments Off on 10 Ways to Improve Your Travel Photography

Posted in Photography


How to Tell Better Visual Stories with Travel Photography

18 Feb

Take a look at your favorite travel magazine, and you will notice a pattern in the images.

Establishing 12

Understanding how to turn a bunch of images into a story – creating series is crucial to any travel photographer.
In this article, we will get familiar with two kinds of very important visual concepts in the travel photography world: the establishing shot (above) and the detail shot (below).

Detail 1

It doesn’t matter if you wish to do travel photography professionally, or if you just want to come back home with better pictures from your next trip. Understanding these visual concepts will help you.

Establishing shot

The establishing shot is arguably the most important shot in a travel photography series. In a print magazine, this image will usually cover the two first pages of the article (the spread). In a digital-based platform (your website or Facebook page), this will be the album’s opening image. However, you can find the establishing shot later in the series.

Establishing 10

The establishing shot’s purposes are to:

  • Give a general idea about the story and the “what” and “where” of this series.
  • Be visually interesting enough so that the viewer wants to read the article or go through the digital album.

Establishing 8

From the technical point of view:

There are no clear rules. But in most cases, the image is a horizontal one (sometimes you will see two vertical images side by side).

Most important:

This image is the grand entrance to your story. Make it impressive and epic. It is usually recommended to leave room for text on this image. So take it into account when you create your composition.

Establishing 9

The detail shot

While the establishing shot is all about being big and epic, the detail shot is about putting a spotlight on something small and making it the image’s hero.

The detail shot’s purposes are to:

  • Give attention to different aspects in your story that might get lost in the bigger picture.
  • The detail shot is like sorbet ice cream in a gourmet dinner — it gives balance to the other, bigger images.

Detail 4

From the technical point of view:

It is all about making small things bigger, so a macro lens is useful (but not obligatory) here.

Most important:

While in the field, be on the lookout for interesting details of things that relate to your story. If you are doing a series on a city a funny street sign, graffiti, or food in a local market can be your detail shot. If you are doing a story about a specific person, his hands or his work tools can be the hero of the shot.

Detail 3

Putting it all together

Of course, I’m not saying that there are certain rules that you must apply in order to create a well-built travel photography series. But by thinking in terms of visual concepts, such as the establishing and detail shots, it will help you be more focused in the field.

Examples include taking the extra effort to reach a high vantage point, or getting an “off limits to the general public” pass to an interesting location in order to get that jaw-dropping establishing shot. Or, taking an hour just to “hunt” for interesting subjects to snag the detail shot. From my experience, having a framework to work within allows you to know what you are looking for, and increases the chances you will find it!

Establishing 14

Want to get more tips and hints about travel photography in a snap? Check out Oded’s ebook, about travel photography, by dPS and our sister brand – Snapn Guides.

Note: the author would like to thank Nicholas Orloff for his help in writing this article.

googletag.cmd.push(function() {
tablet_slots.push( googletag.defineSlot( “/1005424/_dPSv4_tab-all-article-bottom_(300×250)”, [300, 250], “pb-ad-78623” ).addService( googletag.pubads() ) ); } );

googletag.cmd.push(function() {
mobile_slots.push( googletag.defineSlot( “/1005424/_dPSv4_mob-all-article-bottom_(300×250)”, [300, 250], “pb-ad-78158” ).addService( googletag.pubads() ) ); } );

The post How to Tell Better Visual Stories with Travel Photography by Oded Wagenstein appeared first on Digital Photography School.


Digital Photography School

 
Comments Off on How to Tell Better Visual Stories with Travel Photography

Posted in Photography


Create More Unique Travel Photos by Adding a Model

06 Jan

Creative travel photography is becoming increasingly difficult as world travelers have easier access than ever to stellar cameras. In fact, travel photography can at times seem uninspiring when you arrive at a tourist spot and see that everyone around you is taking the exact same shots. There are many ways to reframe your perspective to capture unique angles of a tourist attraction, but there is also another way that seems to be overlooked: turn travel photography into a series of creative portrait sessions with a model.

Sedona creative travel photography

You may have noticed a trend among some of your amateur photographer friends who take an object like a Lego figurine toy and place it in a unique location as a way to maintaining some continuity between travel photography images, or tell a visual story. Using a consistent model is actually a great way to exercise creativity and tell a compelling, unique story, with imagery. While it’s definitely easy to use an inanimate object, why not exercise your portrait skills by adding a human model? This was the way of thinking my photo companion and I assumed during a recent long weekend escape to Sedona, Arizona.

Sedona creative travel photography

Before: landscape without a model, or the shot that everyone else was getting.

Famous for its natural red rock formations, Sedona is one of those areas that has already been widely photographed from a landscape perspective. In fact, the hotel we stayed at gifted us with a set of six postcards. Each one is a striking landscape photo of a notable attraction in Sedona taken during the perfect time of day, and from a high altitude, likely from a helicopter or high hiking spot. That immediately began to deter our ambitions for capturing stunning images of Sedona, as I’m not inspired by capturing the same images that others have already taken and widely publicized. Immediately, the idea of placing a unique model in the middle of a popular landscape came to mind as a way of crafting one-of-a-kind images.

Sedona creative travel photography

After: landscape with a model.

Background

Luckily, my travel companion loves having his photo taken and isn’t afraid of drastically altering his appearance for the sake of a photo shoot. As we began mapping our trip around Sedona, he decided that assuming a character identity similar to that of Mad Max would make a perfect visual theme for our travel photo sessions. The result? He went and shaved his full head of hair into a mohawk and donned an outfit of black pants and black leather jacket, which he wore throughout our entire trip to Sedona. A bit out of place for a hot desert? Indeed, and appropriately so, as a mohawk can be seen as an emblem of nonconformity, in our case, against the typical tourist photos everyone around us was taking. We were met with many stares and raised eyebrows throughout the entire trip, but, we walked away with a unique series of images that not only showcase the beauty of Sedona, but also add some intrigue by inserting a seemingly out of the ordinary character into these landscapes.

Sedona creative travel photography

Executing the Photo Shoots

As mentioned earlier, Sedona is very popular among camera-wielding tourists, making it tough to find clearings for taking portraits. The best method we found was setting up the scene as best as we could and waiting for a quick, often one second, gap when people passed by. The gear was simple: a Canon 6D camera, a 24-70mm f/2.8 lens, and a 70-200mm f/2.8 lens. No external lighting was used, just the sun in all of its glory. As the photographer, it was a fun challenge to figure out the best way to photograph someone with a mohawk. In fact, the only way to capture the full effect of the mohawk is from a profile view, so the real trick was to get creative with the backgrounds, perspectives, and angles to make each portrait unique.

Sedona creative travel photography

This portrait was taken at the Chapel of the Holy Cross, one of the most visited and easily accessible tourist spots in Sedona. While this would be a pretty common shot of the chapel, inserting a model into the scene makes for a more dynamic image. A wide angle shot like the one above sets the scene, whereas the telephoto shot below takes essentially the same pose and turns it into an entirely new image.

Sedona creative travel photography

Another way to add flair to landscape portraits was to use the 70-200 f/2.8 telephoto zoomed in to 200mm

Sedona creative travel photography

Same principle with these images: in the one above, I started off with a wide shot at the vista of the popular Cathedral Rock Trail, and then zoomed way in with a telephoto lens below.

Sedona creative travel photography

Any other creative landscape portrait artists out there? Show off your images and the stories behind them!

googletag.cmd.push(function() {
tablet_slots.push( googletag.defineSlot( “/1005424/_dPSv4_tab-all-article-bottom_(300×250)”, [300, 250], “pb-ad-78623” ).addService( googletag.pubads() ) ); } );

googletag.cmd.push(function() {
mobile_slots.push( googletag.defineSlot( “/1005424/_dPSv4_mob-all-article-bottom_(300×250)”, [300, 250], “pb-ad-78158” ).addService( googletag.pubads() ) ); } );

The post Create More Unique Travel Photos by Adding a Model by Suzi Pratt appeared first on Digital Photography School.


Digital Photography School

 
Comments Off on Create More Unique Travel Photos by Adding a Model

Posted in Photography