RSS
 

Posts Tagged ‘tool’

5 Tips for Using Risk Taking as a Tool for Better Photography

03 Apr

With the rising tide of enthusiast photographers and the ubiquitous camera phone, there is more competition for eyeballs than ever before in the photo industry. How can you ever stand out from the crowd to be noticed? The trick is both deceptively simple and incredibly complicated: take more risks. Great photographers rarely play it safe, but before you head into the world with reckless abandon, let’s dive into what kinds of risk taking is productive.

1 – Your camera is a tool, not a pet

You’ve received your very first, very shiny, very expensive DSLR kit. Your instincts are to cradle and protect the expensive piece of equipment. Don’t. While you shouldn’t fully submerge your camera, or throw it off the balcony and expect good results, coddling it like your newborn child won’t do you any good either. It’s a tool and is meant to be used out in the world. It should get a few scratches in the paint and some wear and tear on the grip. Take a look at the following images and ask yourself where the camera is.

CmscottiRisk01

CmscottiRisk02

CmscottiRisk03

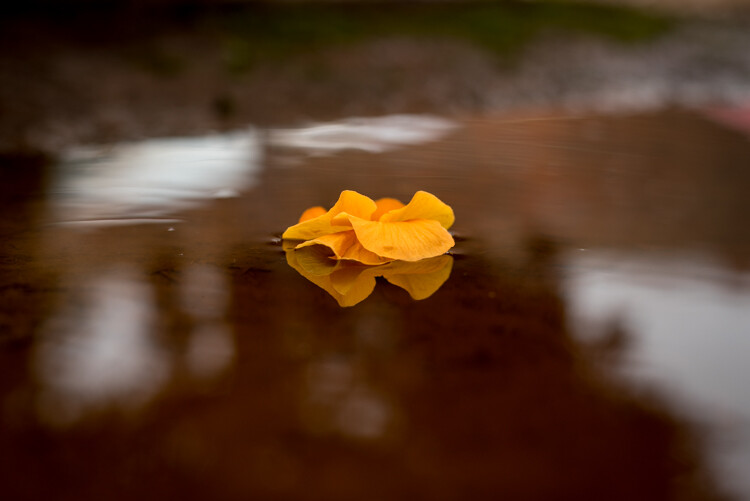
For the first two, the camera is sitting on the bow of a kayak roughly four inches above the water. For the third image, the camera is a half inch off the muddy ground. Water is often a camera’s worst enemy, but without the risk of the camera getting wet, these images would not be possible. Water is not your camera’s only enemy though. Dings and scrapes, dust, and even wild animals pose a threat.

That said, there are ways to be smart about risk taking and mitigating potential problems. For example, when kayaking you could store the equipment in a dry bag, so it is only exposed when you stop to take a photograph. You could have a friend kayak with you and help stabilize your kayak, or warn you when a large wave is coming. (It is recommended to do outdoor activities with a buddy anyway for general safety). You can use various coverings, coatings, and cases as well to protect your gear.

CmscottiRisk04

You don’t even have to be in the water to expose your camera to harsh elements. The spray from Wli falls in Ghana was strong enough to reach me 300 meters away. I kept a light jacket in front of my camera until the right moment.

2 – Know your tools

In order to take risks in a smart fashion, it helps to know the limitations of your tools. Does your camera have dust or weather sealing? Does the lens? Did you remember to put a clear (UV) filter on the front of the lens to protect against the basic threats? Is the body primarily plastic? Does it have a metal frame? A quick visit to the manufacturer’s website or a websearch for your equipment’s user manuals should get you the information you need.

There are many more things to consider, but the point is to learn as much as possible about your kit. Your DSLR and lens may be weather sealed and can handle light rain but the audio recorder may not be and may wind up being the weak link.

It’s wise to know how to use your camera well. Often in risky situations you will want to expose your equipment to that risk for the least amount of time possible. The better you know your camera, the less time you’ll spend fiddling with settings. Be sure to practice using your equipment in a low-stress environment, before exposing yourself to a risky situation. Digital Photography School is a great resource for articles on the nitty-gritty workings of your camera, so you don’t have to travel far to get started mastering your gear.

3 – Do your homework on your subjects too

CmscottiRisk05

Let’s say you have been given an assignment that involves getting into an occupied cage at the zoo. How do you prepare? It isn’t enough in this situation to know your gear alone. You need to learn about the animals you are interacting with, some basics on their behavioural cues, and what potential stressors may be present. Luckily in this situation you are likely to get help from the zoo’s staff; in fact, they are required to enter the enclosure with you. But be sure to meet with them prior, and take some time online or in a library to supplement your knowledge. Be sure to ask questions specific to your situation as well.

CmscottiRisk06

Photo courtesy of Clare Hancock.

In this case, what do you do if an animal approaches you and grabs, bites, or otherwise latches onto the camera? It turns out in the case of lemurs, just hold still and they’ll lose interest pretty quickly. The point is don’t panic and don’t be afraid to ask questions, even if they sound far-fetched.

CmscottiRisk07

What would you do in this situation? Photo courtesy of Clare Hancock.

In the same vein as asking questions to be prepared, don’t be afraid to ask questions during a shoot either. You are only expected to be an expert photographer. In this particular example, the zoo staff are there to help everything go smoothly. Don’t let pride prevent you from tapping into their expertise. Consider the photo above, I had no idea what to do when a wallaby and her baby decided I made a comfy resting place. I checked with the keepers to make sure there wasn’t any risk to myself or the wallabies. There wasn’t, so I continued to shoot from that position until she eventually hopped away.

Being informed is the best way to enter a potentially risky situation. The zoo session may seem specific, but consider what would go into photographing a tall ship setting sail, or snowboarders screaming down slopes, or even your own dog in your backyard. Snapping good images often involves getting in close, or shooting from a unique angle that could involve having a camera accidentally knocked out of your hands on a crowded ship deck, having snow sprayed onto your camera, or even having an excited dog slobber all over your equipment or tackle you. Do some homework, be aware of your surroundings, ask questions and you will have mitigated most of the riskiness.

4 – Taking risks in your career

Using risk as a tool in your career is not specific to photography, but it is especially important in this field. If you always use the same tried and true portrait poses, and standard three point lighting that you learned in your high school photo course, you are likely going to be stuck at a studio in the mall holding a stuffed giraffe in one hand and a remote trigger in the other, praying that baby Jesse stops crying. (If you work at one of these and enjoy your job, that is awesome and you are honestly a much more patient person than I). Most photographers I know have bigger dreams than this, whether it is running their own mall studio or becoming a successful commercial photographer. Unless you run into some magnificent stroke of luck and were born with real talent, this is going to a lot of time, more effort, and a few risks.

I am no Warren Buffett when it comes to business sense, but I can say the biggest jumps in my own career came from taking big risks. When former Ghanaian President John Atta Mills passed away in July of 2012, I was just coming out of graduate school and interning at the Daily Guide newspaper in Accra. President Mills was the first Ghanaian president to die in office and his state funeral was considered one of the most important stories in the region. I had just arrived in country, knew only what I had read about the culture and only had two weeks to convince my new, sceptical editor to let me be a part of the team covering the story. I worked very hard with my new coworkers, contributing to as many stories as possible, and hanging out with the reporters to learn about Ghanaian politics, history and culture.

CmscottiRisk08

Two days before the funeral, I convinced my editor to let me go on the assignment. Going in I was scared. I felt like I could never be prepared enough, and doubted every decision I made during the assignment. Regardless, I took the risk of screwing up an important assignment, and managed to rise to a challenge. The images ran front page and an entire centrefold was dedicated to my images of the event. Moments like these demand taking risks. If you have ambitions beyond photography as a hobby, you will need to get used to going in over your head. Risk will always force you to be a better photographer.

CmscottiRisk09

However, the risks you can take regarding your career can be mitigated to some extent as well. The key, as you already know, is being prepared. This is a much more abstract process compared to mitigating risks related to camera equipment. While some things are the same, – knowing your tools and subjects well enough to work efficiently – others go a little beyond the act of photography itself. They involve politics in your particular branch of the profession, and knowing just how far you can push yourself.

CmscottiRisk10

As I eluded to earlier, I am not the kind of guy you will see doing family portraits or weddings. I am horrible at convincing the average person to smile or look natural. I simply am no good at those kind of portraits. That said, after I won my first photo award I ran out and bought a Vivitar flash, cloth backdrop and three hot lamps. I was convinced I was going to quit my job waiting tables and pay for my impending college career with my photographic talent. I was wrong… very wrong. I managed to perform poorly on three portrait sessions before realizing that my foray may have been a mistake, and I was out a few hundred dollars in studio gear.

I knew nothing about the family portraiture business. I didn’t do any research aside from reading a couple of gear reviews and really burned myself in the process. Worst of all I didn’t know my equipment very well. I had a total of one lesson in studio lighting under my belt at the time and may have purchased a book, that to this day, I have read a total of three pages of. I took a dumb risk and hurt my confidence and disappointed people in the process.

CmscottiRisk11

Crappy portrait of Markus Sales

5 – When things go wrong

There is one catch to risk taking. What if it doesn’t pan out. You may end up with broken equipment, angry customers, or bodily injury. What now?

Broken equipment is relatively easy to deal with: mourn the loss of your trusted tool, then buy a new one. If you are worried about not being able to afford replacing equipment, talk to your insurance company about whether your homeowners or renters insurance will cover your gear outside your home. Specific camera (and commercial) insurance policies are available as well. Be sure to find out what is covered and how they handle claims.

Smoothing customer relations or repairing a career are tougher issues. Patience and good customer service skills will go a long way, but every case has to be approached individually. Giving a discount for a mediocre portrait shoot might work in one case, but blowing an expensive commercial shoot is going to take a whole different approach. I have been lucky enough that I haven’t had to do this in my own career, but I encourage joining professional associations and talking to other professional photographers to learn what consequences there might be, and how to recover from them.

Bodily injury is the worst on this list. If you are risking your life or serious injury for a photograph, STOP! No photograph is worth getting hurt or dying for. There has been a recent rash of people dying while taking selfies or trying to capture memories from crazy angles over the edge of a skyscraper. It doesn’t matter if it could be the best photo ever taken, this kind of risk is never worth taking in the first place. Broken cameras can be replaced, careers rebuilt, and customer relations smoothed over, but the best photo of your career is worthless if you die or are maimed in the process. Just don’t do it.

One final disclaimer

The nature of risk taking is that the result could be game changing good, or painfully bad. You can fail and fail hard. The advice given here is simply what I have learned over the course of my own career, and it may not apply to you at all. There is no guarantee that taking any kind of risk will result in a positive outcome. Ultimately, you must decide if the risks you take – if any – are worth taking. The outcomes of taking those risks will be entirely yours, so use your best judgment. If you do decide to take a risk, be smart about it and do everything in your power to lessen that risk. Best of luck out there.

googletag.cmd.push(function() {
tablet_slots.push( googletag.defineSlot( “/1005424/_dPSv4_tab-all-article-bottom_(300×250)”, [300, 250], “pb-ad-78623” ).addService( googletag.pubads() ) ); } );

googletag.cmd.push(function() {
mobile_slots.push( googletag.defineSlot( “/1005424/_dPSv4_mob-all-article-bottom_(300×250)”, [300, 250], “pb-ad-78158” ).addService( googletag.pubads() ) ); } );

The post 5 Tips for Using Risk Taking as a Tool for Better Photography by Christopher Scotti appeared first on Digital Photography School.


Digital Photography School

 
Comments Off on 5 Tips for Using Risk Taking as a Tool for Better Photography

Posted in Photography


5 Tips for Using the Lightroom Adjustment Brush Tool

03 Apr

One of Lightroom’s most useful tools is tucked away at the top of the Develop panel, under a rather strange-looking icon that looks like a magic wand from Harry Potter. Clicking this Adjustment Brush icon, gives you access to many of the macro-scale alterations and edits available on some of the other Develop panels, but lets you control them on a micro level. It’s a fantastic tool for editing specific portions of an image, as opposed to the whole picture, but figuring out how to use it can be a bit overwhelming.

Here are my five favorite tips and tricks for using the Lightroom Adjustment Brush tool, and hopefully some of these will be useful to you as you explore how to use it for your own editing.

five-tips-brush-tool-woman-portrait

1. Use the A/B brush options to alternate between different types of brushes

My wife and I have done a great deal of painting in our house over the years. From hallways, to walkways, to bedrooms, we have spent more time and money on painting than I ever thought possible before we became homeowners. One of the most valuable lessons we have learned is that different types of painting jobs require different brushes. Sometimes you need a large roller, other times you need a small one. Sometimes you need a two-inch angled brush, and other times you need a small foam one. Each brush has its own purpose, and all are required to properly complete a painting task.

The same principle holds true in Lightroom, and you often need more than one brush to make the adjustments necessary on a given image. This problem is easily remedied by switching between the A and B brushes near the bottom of the Adjustment Brush panel.

five-tips-brush-tool-a-b-brushes

Brush A is highlighted by default when you click on the Adjustment Brush panel, which means that any size, feather, flow, mask, and density settings you use will be automatically applied to that brush. When you click on Brush B you can use an entirely different set of options, then cycle between the two brushes just by clicking A and B. In the example above, Brush A is small with a medium feather and flow rate. Brush B is larger with a much lower flow rate and no Auto Mask, which makes it better suited for large-scale edits, whereas Brush A would be better suited for fine-tuning specific parts of an image. Setting up two different brushes is a great way to speed up your editing workflow, since you won’t need to continually change the parameters of a single brush, and you can instantly switch between the brushes by pressing the forward slash (/) key.

I used a large brush on the background and a smaller brush on the flower petals, and was able to switch between the two easily to get the edits I needed quickly.

I used a large brush on the background and a smaller brush on the flower petals, and was able to switch between the two easily to get the edits I needed quickly.

2. Create custom brush effect presets

If the A/B brushes are similar to choosing different physical brushes at a hardware store, then the brush effect presets are like picking out different types of paint. Lightroom has several different presets that are available as default options, and they have names like “Highlights,” “Temp,” and “Teeth Whitening.” These presets are just default values that Lightroom thinks would work well to accomplish specific tasks like: adjusting exposure, adding contrast, or reducing noise. You can see how they work just by looking at the sliders, as you change from one preset to another.

These presets don't inherently do anything special, they just adjust various sliders in different ways.

These presets don’t inherently do anything special, they just adjust various sliders in different ways. You can create your own presets to do unique tasks as well.

The beauty of these presets is you are free to add new ones that suit your own workflow. You would never select from only a dozen colors when choosing how to paint a room in your house, and neither should you be forced to stay within the confines of the existing presets in Lightroom. To add your own presets, adjust the sliders how you want, click the name of the existing preset to pull down the list, and choose “Save Current Settings as New Preset.” Give your new collection of slider settings a name, and you can now select it whenever you want, right alongside the rest of the presets.

For example, I have found that on many of my portraits I need to brush in some sharpness while reducing the noise so I created a preset to do exactly that. I also have custom skin smoothing and teeth whitening presets that are a bit different from the default set Lightroom uses, and it’s very handy to switch over to these brushes whenever I need to, instead of configuring the sliders from scratch every single time.

3. Adding color to a brush

I started this article with an analogy comparing the Adjustment Brush tool in Lightroom to a literal paint brush, but what some people don’t realize is you actually can use the tool exactly like a paint brush to add color to your images. Near the bottom of the color panel is a rectangular box with a large X through it, and if you click on that you will see a color picker with an eyedropper tool that you can use to give your brush strokes a bit of color.

five-tips-brush-tool-color-selection-animated

Once you apply a color, the Lightroom Adjustment Brush tool now functions just like the paintbrush in any standard painting application on your computer. It applies any effects you are already using such as exposure, clarity, or saturation while also painting in the color you specified. In the following picture I used this technique to add a subtle splash of color to the baby’s face, but you can also use it on much larger edits like changing the color of flowers or altering the eyes on a portrait.

five-tips-brush-tool-man-baby

4. Use Auto Mask to contain the brush to specific areas

One of the most frustrating parts about the Adjustment Brush tool is that, unlike regular paintbrushes, it only comes in one shape: a circle, which can present a bit of a problem when editing photos with hard lines and angles. How do you confine your brush edits to just a specific area? The key to this lies in the Auto Mask feature which, when checked, tries to keep all the brush edits to places on the image that are similar to where you started painting. In the following picture I used some custom brush settings involving highlights and clarity and then clicked the Auto Mask function to keep these edits within the petals only, and not the surrounding areas.

five-tips-brush-tool-white-yellow-flower

An easy way to make sure the Auto Mask is doing what you want is to hover your mouse over the black dot that appears where you started brushing in your edits (hit the H key if you do not see it). You will then see a red overlay that shows precisely where your edits for that particular brush have been applied, and as you can see below they were confined to the precise area that I wanted, the flower petals. This type of precision is very difficult without the Auto Mask option, but with the click of a button Lightroom makes it very easy for you to do as your kindergarten teacher likely admonished years ago, color inside the lines.

five-tips-brush-tool-white-yellow-flower-edits

5. Changing brush size, resetting settings, and fixing mistakes

There are so many useful elements to the brush tool that it’s kind of difficult to distill everything down to five points. As such, here are a few more tips and tricks that I have found quite handy and you might too.

  • Use the scroll wheel on your mouse to quickly change the size of your brush. For fine-grain adjustments you can click the numbers in the brush parameters that indicate Size, Feather, Flow, and Density and increase or decrease them with the arrow keys on your keyboard. To go up and down in units of ten, hold the [shift] key while pressing arrow-up or arrow-down.
  • five-tips-brush-tool-reset
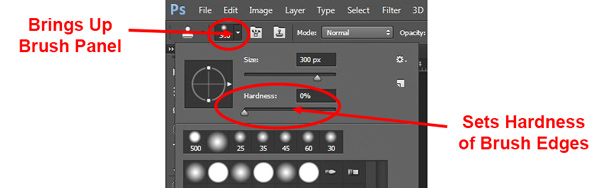
After you have brushed in a particular set of edits, click “New” on the top-right of the Brush panel to create a new brush, but notice that all your sliders and adjustments remain unchanged. To reset all your parameters to their default values, hold down the alt key (option on a Mac) and you will see the Effect label at the top change to Reset. Click on that and everything will be set back to zero for you to start creating a fresh set of edits.
  • Pencils have erasers, but fixing errors when painting with brushes and pigment is not so easy. Fortunately the Brush tool in Lightroom has a feature that makes it much more like its wood-and-graphite counterpart in the real world, and makes fixing mistakes as simple as pressing a button. No, I’m not talking about Edit > Undo. If you’re brushing away with some edits and realized that you made a mistake or two, press and hold the Alt key (option on a Mac) and your brush will instantly switch over to eraser mode. Now, just like using the rubber end of a pencil, clicking and brushing will remove any edits you have made to the photo with the current brush. If you have used several different brush edits within one photo, your edits will mercifully be confined to the whatever brush is currently selected, and you can also adjust parameters of the eraser like size, feather, and so on.

five-tips-brush-tool-white-flower
As I mentioned earlier there are enough tricks with the Adjustment Brush tool to fill several articles, but I’m going to stop here and instead ask you for your favorite tips and hidden features. Leave your thoughts in the comments section below and I’m sure I will learn a thing or two from your experiences as well!

googletag.cmd.push(function() {
tablet_slots.push( googletag.defineSlot( “/1005424/_dPSv4_tab-all-article-bottom_(300×250)”, [300, 250], “pb-ad-78623” ).addService( googletag.pubads() ) ); } );

googletag.cmd.push(function() {
mobile_slots.push( googletag.defineSlot( “/1005424/_dPSv4_mob-all-article-bottom_(300×250)”, [300, 250], “pb-ad-78158” ).addService( googletag.pubads() ) ); } );

The post 5 Tips for Using the Lightroom Adjustment Brush Tool by Simon Ringsmuth appeared first on Digital Photography School.


Digital Photography School

 
Comments Off on 5 Tips for Using the Lightroom Adjustment Brush Tool

Posted in Photography


Flickr makes Auto-Uploadr tool a Pro-account exclusive

10 Mar

In a statement released on Tuesday, photo sharing site Flickr announced that its desktop Auto-Uploadr tool, which automatically and privately uploads images to a user’s account, is now available only to paying ‘Pro’ customers. Users with free accounts must upgrade to Pro to continue using the tool.

Flickr Pro offers a few benefits over free accounts, including ad-free browsing, access to additional stats, discounts on Flickr merchandise shipping, a 20% discount for Adobe Creative Cloud Photography and, as of yesterday, exclusive use of the Auto-Uploadr tool. 

Flickr Pro is temporarily discounted by 30%, putting it at $ 34.99 for a year’s subscription.

Via: Flickr

Articles: Digital Photography Review (dpreview.com)

 
Comments Off on Flickr makes Auto-Uploadr tool a Pro-account exclusive

Posted in Uncategorized


MaxCurve curve editing tool for iOS connects with Photoshop on a desktop

19 Jan

MaxCurve is an app for iPhone and iPad that, as the name suggests, relies predominantly on curves for image editing. Overall, there are 20 curve adjustments available which are grouped into so-called kits. Another key feature of MaxCurve is its ability to connect, via Wi-Fi, to a desktop version of Photoshop that is running on a Windows PC or Mac. Read more

Articles: Digital Photography Review (dpreview.com)

 
Comments Off on MaxCurve curve editing tool for iOS connects with Photoshop on a desktop

Posted in Uncategorized


Can the iPad Pro be a serious editing tool for imaging professionals?

03 Oct

When the original iPad was launched, speculation began about when tablets would replace laptops for most users. That has yet to happen, and in the hands of photographers tablets are more often used for presentation rather than image editing. The iPad Pro has the hardware to become a serious image editing device, but will it become one in reality? Lars Rehm weighs in. Read more

Articles: Digital Photography Review (dpreview.com)

 
Comments Off on Can the iPad Pro be a serious editing tool for imaging professionals?

Posted in Uncategorized


Pixbuf photography analytics tool launches as public beta

15 Aug

Pixbuf, a free social media management service for photographers, has launched a new analytics tool. With Pixbuf, photographers can upload images and then share them directly with several supported social networks, including 500px, Twitter, and Flickr. Pixbuf will then track analytics data related to the images. Read more

Articles: Digital Photography Review (dpreview.com)

 
Comments Off on Pixbuf photography analytics tool launches as public beta

Posted in Uncategorized


Photoshop CC 2015.0.1 update addresses healing tool issue

05 Aug

Adobe has issued an update for Photoshop CC 2015 with a number of bug fixes. Notably, an issue with the healing brush tool has been addressed, as users reported that the tool was creating unwanted artifacts in images. Read more

Articles: Digital Photography Review (dpreview.com)

 
Comments Off on Photoshop CC 2015.0.1 update addresses healing tool issue

Posted in Uncategorized


Meet Ralph, the New Horizons probe imaging tool responsible for Pluto photos

21 Jul

Over the last week or so, images from the New Horizons mission have been arriving back at Earth as the probe begins the 16-month task of returning data from its July 14th Pluto flyby. Take a look at the imaging systems responsible for the impressive photos of the dwarf planet. Read more

Articles: Digital Photography Review (dpreview.com)

 
Comments Off on Meet Ralph, the New Horizons probe imaging tool responsible for Pluto photos

Posted in Uncategorized


The Most Under-Valued Editing Tool for Architectural Photos

04 Jun

Gradient-header

Nothing catches the eye of a potential home buyer or design client quite like a beautiful set of photos. Whether it’s for real estate agents, designers, or homeowners, expectations are high, and restrictions are often many. It’s not uncommon to have to deal with extremely short notice, very short windows of time in which to work, or to be asked for almost immediate turnaround. We, as photographers, become torn between meeting all the needs while still producing work we are proud of… and all while still making a profit! In real estate, especially, this often leads to photos that are “good enough”. But does it have to be this way?

While most are aware of the basics of editing images for interior spaces, there is one tool that is often undervalued – the Gradient Filter. This can be a tremendous tool for helping to balance out fading light on the edges of a frame when you are limited on gear and are not able to balance out the light on location. Adding a few Gradient Filters onto an image can make your mundane interior photos go from acceptable to impressive, with minimal time invested. The Gradient tool is also excellent in helping to sharpen up towards the edges of the frame, helping to compensate slightly for lens distortion.

The Gradient Gilter can be found just below the histogram in Lightroom. Once applied, you can move it around by grabbing the central node, you can change the angle of it by placing cursor over center line and clicking to spin it, and you can also spread or tighten the gradient by grabbing the outermost line and moving it inward or outward. The flexibility of positioning alone is a great benefit when trying to keep editing time to a minimum.

Gradient filter tool can be found under the histogram in Lightroom

Gradient filter tool can be found under the histogram in Lightroom

Another great quality about the gradient filter is that, unlike the lens vignetting correction (under the Lens Correction module) or the post-crop vignetting effect, the Gradient Filter can adjust many factors of the image. You can adjust exposure, temperature, tint, sharpness, clarity, and several others. This makes it a very handy tool for making subtle adjustments that would otherwise be tougher to blend in with a brush filter. In this before-and-after example, the gradient filter has been used to adjust for the blue tint in the shadows on the floor due to the bed cover. It’s a subtle adjustment that helps to elevate the quality of work.

Gradient4

Let’s look at a few more before and after photos so you can see the effect of the gradient filter. In the series below, the only change that has been done to the After photos is the addition of Gradient Filters. While the Before photos are acceptable to most, adding the Gradient Filters helps to add extra polish to the photos. It helps to bring it up another notch, and will help to impress your clients even more than usual!

Gradient3

Gradient2

Gradient1

Note that in most cases, you will want to add several gradient filters, not just one. Each space will be a bit different, but the need tends to toward adding a bit of subtle light onto the sides of the frame, along with some clarity and possible slight temperature adjustments depending on light sources.

Exterior photos can benefit just as much from the Gradient Filter as interiors! Not all scenes will need this type of adjustment, but below is an example of a common setup that benefitted greatly from gradient filter adjustments. The shadows in the lower left corner of the frame are too dark, and a gradient filter adjusting the brightness of shadows is ideal for balancing them out.

Gradient-ext

As a final point, it’s worth noting that the Gradient Filter tool is one that should finish off your editing, and should not be the main editing technique used on an image. In nearly all cases, it will be a perfect tool for some finessing of highlights/shadows or temperature so that your image will have that extra bit of polish. Before exporting your final files and sharing with your client, be sure to consider if a Gradient Filter should be added into your arsenal of editing tools.

Do you have a different tool that you feel is undervalued for photo editing? Please share your thoughts in the comments below!

googletag.cmd.push(function() {
tablet_slots.push( googletag.defineSlot( “/1005424/_dPSv4_tab-all-article-bottom_(300×250)”, [300, 250], “pb-ad-78623” ).addService( googletag.pubads() ) ); } );

googletag.cmd.push(function() {
mobile_slots.push( googletag.defineSlot( “/1005424/_dPSv4_mob-all-article-bottom_(300×250)”, [300, 250], “pb-ad-78158” ).addService( googletag.pubads() ) ); } );

The post The Most Under-Valued Editing Tool for Architectural Photos by Natalia Robert appeared first on Digital Photography School.


Digital Photography School

 
Comments Off on The Most Under-Valued Editing Tool for Architectural Photos

Posted in Photography


12 Tips for Mastering the Clone Stamp Tool in Photoshop

29 Apr
Clone Stamp Tool - Opera Garnier shot

You will not often find the stairs of Opera Garnier in Paris free of people, so you will need to put the Clone Stamp tool to work to remove the people if you want a clean picture. This applies at many other tourist destinations as well.

There are a lot of good post-processing tools available for making minor edits to your photos. Within Photoshop, there are the Healing Brush and the Spot Healing Brush tools. Lightroom now has its own healing brush. Those are great for minor edits to your photos like removing spots or power lines. When it comes time for serious, intensive surgery on your photos, however, there is no substitute for the Clone Stamp tool. You will only find this in Photoshop and Photoshop Elements, there is no Lightroom substitute.

Getting started with the Clone Stamp tool is simple. You just have to tell Photoshop two things: (1) where you want to replace the pixels (target area), and (2) from where Photoshop should take the pixels to use as replacements (s0urce area). To use the Clone Stamp tool, just follow these steps:

  1. Select the Clone Stamp tool from the tool bar on the left side of your screen (you can also use the keyboard shortcut S). Once selected, set the brush size and hardness.
  2. Put your cursor in the area where you want to change the pixels.
  3. Select the source area: Press the Alt key (your cursor will now become a target) and move your cursor to the location where you want to take pixels from (source area). Click your mouse in that location.
  4. Paint in the target area: Release the Alt key and move your mouse back to the original location. Hold down the mouse button and paint in the pixels from the location you chose.

That is a simple process, but if you have used the Clone Stamp tool you realize that there is a lot more involved if you want to master it. This article will provide you with some tips to move you along the road towards conquering this important tool in Photoshop.

#1 – Work on a New Layer

First, always create a new layer before making changes with the Clone Stamp tool. Any changes you make should be made on the new layer. You can flatten the image when you’re done.

Why should you do this? There are many reasons. First of all, it is non-destructive – meaning you are not changing the underlying pixels of your image. In addition, when you use a layer, you can delete it if you don’t like where the changes are going. You can also create a mask if there are portions of the changes that you decide later you do not want. Finally, you can target adjustments to just the cloned areas if they are on a new layer (as will be shown below).

Creating a new layer is easy; simply press Ctrl+J (Cmd+J on Mac) to create a duplicate. You can also press Shift+Ctrl+N (Shift+Cmd+N on Mac) to create a new blank layer, but if you do so, make sure that you have “All Layers” selected as your source in the Clone Stamp Tool settings.

Clone Stamp Tool - Work on a New Layer

I prefer working on a new layer (as opposed to a duplicate layer) but either way will work.

#2 – Zoom in (way in)

When working with the Clone Stamp tool, zoom in on the area you are working on. In fact, zoom way in (to 100% even). That will help isolate the area you are working on, and importantly, it will also allow you to work at a much greater level of detail than you otherwise would. Make your changes look as good as you can at this higher level of detail, then when you zoom back out, the changes will be indistinguishable (which is what you want).

A shortcut for zooming quickly is to hold the Alt key with your left hand while using the scroll wheel on your mouse to zoom in and out (or use Cntrl/Cmd and the + or – key on the keyboard). That will allow you to move in and out quickly.

#3 – Set Your Brush Size Quickly

You will change your brush size often when working with the Clone Stamp tool. You should do this often to make sure that your brush size is tailored to the change you are making. Changing the size through the Brushes panel is cumbersome. Instead, use the keyboard shortcuts for changing brush size:

  • Left bracket [ makes brush smaller
  • Right bracket ] makes brush larger

Using these keys will allow you to rapidly tailor your brush to the specific circumstance.

#4 – Set the Proper Brush Hardness

The Clone Stamp brush’s edges can be set to whatever hardness you desire. Hardness determines the level to which the cloning will blend in with the surrounding pixels. If you set the hardness level more toward 100%, the edges will be hard and definite. If you set the hardness more toward 0%, the edge will blend in with the surroundings.

Clone Stamp Tool - Setting Hardness of Brush

In general, keep the hardness level at 0%. That will help you seamlessly blend in the effect. There will be times, however, where you are working near a defined edge, in which case you should increase the hardness. Even then around 50% will usually do. Setting the hardness any higher creates harsh transitions that are dead giveaways to your use of the Clone Stamp tool.

#5 – Clone Without Adjustments

Do your cloning before making other adjustments to contrast, color and other changes often made via adjustment layers in Photoshop. If you use the Clone Stamp tool after creating those layers, you are baking the changes permanently into your picture when you clone.

Clone Stamp Tool - Adjustments

However, in some cases you will have already made changes on an adjustment layer, and you need to decide whether your cloning should include those adjustments. Photoshop lets you decide whether to include those changes in your cloning. After you have selected the Clone Stamp tool, the top row of your screen will include a circle with a line through it (see graphic above). Photoshop defaults to applying the changes of any adjustment layers, but if you click on this icon, Photoshop will ignore any adjustment layers when cloning.

#6 – Grab the Low Hanging Fruit

Most of the time your pictures will have some easy items to clone out, as well as some harder things. Clone out the easy ones first. In addition to giving you confidence in the tool, this will also help you when the time comes to make the hard changes.

How will that help you? Remember that you need clear space from which to draw pixels when using the Clone Stamp tool. By making the easy changes first, you are doing just that so you can draw replacement pixels and will make your job easier when it comes time for the harder, more in-depth changes.

#7 – Watch for Patterns

Sometimes you want to include patterns in your cloning. In that case, when selecting pixels from which to draw, try to find patterns in your picture that match the area you are replacing. For example, if the background is a building, look for a similar building. Then make them match (which will be the subject of the next tip).

Clone Stamp Tool - removing distractions without creating a pattern

Here is a different example to show the Clone Stamp tool in another context. The right side of this image was filled with distractions, but the Clone Stamp tool eliminates them. Be careful that you do not create patterns by using pixels immediately adjacent, or it will give away your use of the Clone Stamp tool

But many times you will not want there to be any discernible patterns in your cloning. Usually a pattern is a dead giveaway to your having cloned something out. In that case, the way to ensure that there will be no patterns is to keep resetting your source point. Sample from one area and clone one part, then sample from another area – repeat frequently. Keep doing that to blend everything together without repeating a pattern.

#8 – Follow the Lines

A key to successful use of the Clone Stamp tool is making all the lines in your picture match. Even slight deviations look fake and destroy the effect you are trying to achieve. For example, in a landscape setting make the edges of tree branches match up. In an urban context, follow lines in buildings such as roof lines, doorways, and patterns on the ground.

When you are using the Clone Stamp tool, start with the lines and then let the rest of the pixels fall where they may. After that, if you need to go back over other areas, you can do so.

Here I've zoomed in on a portion of another shot of the Opera Garnier. Use the patterns on the floor and door to recreate the space where you clone over the people.

Here I’ve zoomed in on a portion of another shot of the Opera Garnier. Use the patterns on the floor and door to recreate the space where you clone over the people.

#9 – Avoid Selecting from Adjacent Areas

As previously mentioned, a dead giveaway of Clone Stamp tool usage is repetition. The Clone Stamp tool is all about repetition – you just need to do it in such a way that the viewer doesn’t notice it. If you draw pixels from an immediately adjacent area, you are risking the viewer noticing the repetition. Take the pixels from somewhere else in the picture instead.

Inadvertently creating a pattern is an easy trap to fall into because the immediately adjacent areas usually are the closest in color and tone to the area you want to replace. As you move further away, tones and colors change so that the pixels get harder to match. Working hard to find a way to use pixels from somewhere else in your picture will pay dividends because the viewer won’t see the repetition.

#10 – Muddle Through (accept the messiness)

By now you have fixed all the easy areas in your picture and you’re ready to tackle a bigger problem. It might be a crowd of people or a car that entered your frame, but it is a large area of your picture. This is the scary part of using the Clone Stamp tool.

The key is to just dive in. Don’t try to figure it all out beforehand (you never will). You can do this in a couple of different ways:

  1. Go big first: Set your brush a little larger than you might otherwise use and just replace the entire area in one fell swoop (and then clean up with a smaller brush), or
  2. Go small and steady: Stick with the smaller brush and paint in gradually, but the key is to keep going. Remember that you can go over it again. Whatever you are doing, while it is probably not perfect, will undoubtedly look better than what you started with.

The key thing is just to do it. There is a tendency to freeze up and plot the entire change before doing anything, which causes you to stare at the computer screen for long periods of time.

Remember, you can always undo what you’ve done (Ctrl/Cmd+Z). In addition, because you followed tip #1 above and are working on a new layer, you can always mask this area off or delete it if it isn’t heading in the direction you want.

#11 – Use the Mirror Function

You can affect a lot of settings involving the Clone Stamp tool in the Clone Source panel (to see it, go to Window and then click on Clone Source). For instance, you can change the shape of the brush or the angle of the replacement pixels.

One of the most useful features in the Cone Source panel is the flip-horizontal option in the middle of the panel. If you click on it, the pixels will be replaced in the opposite horizontal direction as the source. This can be extremely useful in many instances since often you will be dealing with a symmetrical subject where you can now draw from the other side.

Clone Stamp Tool - Flip Horizontal setting

A typical example where you might want to use the flip horizontal option is where something covers one side of a doorway or window that you want to remove. By clicking on flip-horizontal, you can use the other side of the doorway or window as your source. Take another look at the Opera Garnier examples above and you will see how the flip horizontal tool would be used quite frequently whenever your picture contains any symmetry (I used this feature in those pictures quite a bit).

#12 – Change the Cloned Areas with Adjustment Layers

Sometimes your cloned areas just won’t look exactly like the surrounding areas. Perhaps it is too bright or too dark, or perhaps the colors are just off a little bit. You can fix it without affecting the surrounding pixels.

Clone Stamp Tool - tying adjustment layers

One of the great benefits of working on layers is that you can create adjustment layers that affect only the areas you just cloned. Simply create a new adjustment layer (levels, curves, or hue/saturation), which will appear above your cloning layer. Then hold down the Alt key and click at the bottom of the adjustment layer (you will see your cursor change). Doing so will apply the changes of the adjustment layer only to the layer below it.

Conclusion

Remember that using the Clone Stamp tool can be a messy process. Don’t worry if you find yourself having to redo changes or make things up as you go. There is no magical “clean” process. One of the fun parts about the cloning process is the problem-solving that goes into it. Take your time and just keep moving. You can always redo your changes or, if you are working in layers, get rid of them without losing the rest of your work.

The Clone Stamp tool will save more pictures than almost any other tool in your post-processing. If you master it, you can remove almost anything in your pictures that you do not want.

googletag.cmd.push(function() {
tablet_slots.push( googletag.defineSlot( “/1005424/_dPSv4_tab-all-article-bottom_(300×250)”, [300, 250], “pb-ad-78623” ).addService( googletag.pubads() ) ); } );

googletag.cmd.push(function() {
mobile_slots.push( googletag.defineSlot( “/1005424/_dPSv4_mob-all-article-bottom_(300×250)”, [300, 250], “pb-ad-78158” ).addService( googletag.pubads() ) ); } );

The post 12 Tips for Mastering the Clone Stamp Tool in Photoshop by Jim Hamel appeared first on Digital Photography School.


Digital Photography School

 
Comments Off on 12 Tips for Mastering the Clone Stamp Tool in Photoshop

Posted in Photography