RSS
 

Posts Tagged ‘Tips’

10 Tips to Make Your Photography Business Flourish

17 Oct

As with all other types of businesses, your photography business won’t become successful overnight, no matter how much you want it to. There’s so much to consider when starting it up: marketing costs, an online presence, physical store space, overhead and, of course, consummate skill in shooting and editing your pictures. There is only so much of the marketplace available Continue Reading

The post 10 Tips to Make Your Photography Business Flourish appeared first on Photodoto.


Photodoto

 
Comments Off on 10 Tips to Make Your Photography Business Flourish

Posted in Photography


7 Tips for Helping Women Love having their Photo Taken by You

14 Oct

When I look at a picture of myself, I can point out a million things I hate: my hair is always flat, I hate the ptosis in my left eye, I hate the shape of my brow bone, I have a bad complexion. And I’m a photographer! How can I expect women in front of my camera to feel any different than I do when I have to endure having my photo taken? I know that some men hate having their photo taken, too, and many of them probably aren’t as easy to admit that they hate their complexion or the shape of their brow bone, but I’m sure they think these things.

As in any situation, we photographers just need to start by asking ourselves…what would we want? How would we want a photographer to treat us? It’s a pretty simple, solution, really…to behave in line with the golden rule.

Women usually aren’t afraid to offer criticism about themselves. In fact, we’re downright professionals at criticizing ourselves. So if a woman truly hates having her photo taken, she usually says so upon making the booking with you. At that point, I would first congratulate her on coming to the point of actually making the booking in the first place. That’s a big step!

I wouldn’t have a questionnaire for her to fill out about the things she hates about herself. And I wouldn’t make promises and I definitely wouldn’t mention the word ‘Photoshop’. The instant you say ‘Photoshop’, I guarantee that 90% of women instantly begin thinking of Madonna, Kim Kardashian…any and every celebrity who looks NOTHING in real person like they do in magazines. And they may expect/require you to edit every last hair on their head, freckle on their body, roll of fat on their hips. And before you know it, you’ve aged 10 years infront of your computer editing one session.

Instead, this is how I would proceed:

  • Upon the first conversation and placing the booking, just assure her that having photographs taken by a professional is different and if she’s never done it before, she will probably love it in the end.
  • Simply ask: “what do you hate about it?” This will probably lead on to things she hates about herself. But don’t let her dwell on it too long. Ask what she loves about herself. Make notes about all this and keep them to yourself.
  • When you start shooting,  she might behave or seem awkward and uncomfortable. If so, talk to her as you’re shooting. Ask if she feels a certain side is her ‘good side’. Get her laughing. Tell her she looks great. But don’t patronize her. I mean…I know my left eye is droopy from Ptosis. If someone said it wasn’t, that would make me more uncomfortable.
  • When I edit, I will subtly smooth and ‘suck in’ bumps and bulges. I won’t eradicate them all together because that wouldn’t be natural. But I just do a little work that she won’t even notice and I’ve never had a woman as to get her muffin top put back the way it was! Of course, I understand that this is a controversial topic and doesn’t work for everyone.

Some tips on photographing women:

  • For goodness sake. Please PLEASE be responsible with low shots. I very rarely see a photo of a woman taken from down low (looking up) that doesn’t make her look totally unattractive. This isn’t a good angle no matter the size or shape of who you’re photographing. Friends don’t let friends get photographed this way so beware that a loving friend may tackle you at any point should you choose to proceed with a low shot.
  • On the opposite side of the spectrum. shooting from above (or even a slightly down-angeled POV) can be very flattering for a lady, particularly a fuller figured one. But also beware that this is the calling card of a large lady – this trick has become so well known. Don’t overdo it or you’ll be kind of highlighting the fact that she’s larger rather than minimizing it.
  • Learn from the red carpet – those poses aren’t accidental. Celebrities have training for how to handle the red carpet photographers. Learn their tricks so you can guide your subjects through poses that will highlight their lovely long legs or help minimize their post-partum baby bulge. And you don’t have to tell them what you’re doing because naturally, that will make them feel self conscious.

One hour with a sensitive professional can change a woman’s view of herself forever.

Post originally from: Digital Photography Tips.

Check out our more Photography Tips at Photography Tips for Beginners, Portrait Photography Tips and Wedding Photography Tips.

7 Tips for Helping Women Love having their Photo Taken by You

The post 7 Tips for Helping Women Love having their Photo Taken by You by Elizabeth Halford appeared first on Digital Photography School.


Digital Photography School

 
Comments Off on 7 Tips for Helping Women Love having their Photo Taken by You

Posted in Photography


7 Lifestyle Photography Tips

12 Oct

By Annie Tao.

Lifestyle Photography has been around for as long as there were cameras, but it was called Photojournalism and was mostly seen only in the newspapers. During those times, most Portrait Photographers captured their subjects posed and “perfect”.

Once DSLRs infiltrated the market at lower price points, everyone and their grandmas (okay, maybe not all grandmas) had one. Digital photography allowed the birth of this new form of portraiture – Lifestyle Photography – by allowing people to shoot freely without the worry of film and film development costs. Now with smart phones and other electronics that piggyback a convenient camera, snapping photos about your life has become mainstream.

True Lifestyle Photography, however, is more than taking candid shots. It is about capturing images that reveal a story. A personality. A relationship. A feeling.

7 Lifestyle Photography Tips:

1. Anticipate what’s going to happen

Don’t wait to take the shot until you see something happening because some things last only one second and you can miss it.  Be ready.

Annie Tao Photography Tips on on Lifestyle Photography Anticipate whats going to happen

2. Capture the second before and second after an anticipated moment

Annie Tao Photography Tips on on Lifestyle Photography Capture the moment before or after

3. Know your light at all times

When capturing Lifestyle, it’s often best to not disturb what is unfolding naturally. So if your subject is not in the best light, then it is up to you to make it work. It may be changing your shooting position, your camera angle or quickly grabbing a reflector.
Annie Tao Photography Tips on on Lifestyle Photography Know your light at all times

4. Help create the mood

Just because the photo shoot started doesn’t mean your couple will instantly jump into a romantic moment or a family will burst into a fit of laughter.  Help create an environment for those scenes to happen.  Talk to them, play music, be silly, etc.

Annie Tao Photography Tips on on Lifestyle Photography Help create the Mood

5. Don’t forget the details

Get a close-up of the lace on a dress, the way someone stands or the way a baby grips a parent’s finger with his entire hand.  These shots are pieces of information that help tell a cherished story.

Annie Tao Photography Tips on on Lifestyle Photography Dont forget the details

San Francisco Bay Area East Bay lifestyle baby photography family of four portrait of their lower half baby is slipping

6. Pay attention to the environment

I carry a wide angle lens with me to all my Lifestyle shoots because I like getting a shot that includes the environment. Often we think of close-up shots when we photograph people, but step back and look at the environment too. Those are just as important.

Annie Tao Photography Tips on on Lifestyle Photography Pay attention to the environment

7. Give your subjects something to do

Lifestyle Photography is the opposite of look-at-me-and-say-cheese type of portraiture. If your subjects have something to do, then you are setting the stage for their personalities to show and they will have natural expressions.

Annie Tao Photography Tips on on Lifestyle Photography Give subjects something to do

If you have an example of a Lifestyle image, feel free to share it in the comments below. I’d love to see it!

Annie Tao is a Professional Lifestyle Photographer in the San Francisco Bay Area who is best known for capturing genuine smiles, emotions and stories of her subjects.  You can visit annietaophotography.com for more tips or inspiration and stay connected with her on Facebook.

Post originally from: Digital Photography Tips.

Check out our more Photography Tips at Photography Tips for Beginners, Portrait Photography Tips and Wedding Photography Tips.

7 Lifestyle Photography Tips

The post 7 Lifestyle Photography Tips by Guest Contributor appeared first on Digital Photography School.


Digital Photography School

 
Comments Off on 7 Lifestyle Photography Tips

Posted in Photography


Maternity Photography – 7 Tips for Taking Great Shots

29 Sep

In this tutorial Natalie Norton shares 7 great tips for great Maternity Photography.

7 Tips for Creative Maternity Photography

When I first began doing maternity work I made a pledge. A commitment I swore I’d stand by through thick and thin. I promised myself I’d never take “the maternity picture.” You know the one. Daddy’s arms around mommy’s belly with hands affectionately forming… gag… excuse me… a heart. There’s NOTHING wrong with this photo. AT ALL. Calm your rage oh you who just did this exact shot this afternoon.

It’s just that I didn’t want to do the typical maternity image that every mother who’s every had her belly photographed has in one of her 9 baby albums (9 for the first child that is… 1 for the second…a few images in an envelope somewhere for the third… and oh, that poor fourth child, he has to borrow pictures from his brother when he’s highlighted on the bulletin board in Kindergarten). I marched right into that first session ready to stand by my commitment to creativity! I’d no sooner pulled out my camera than mom, all giddy with excitement, said “Woo! Can we do that shot with Daddy’s arms around me and our hands forming a heart over my belly button?!?” I stood by that pledge of mine for a full… well, 2.4 seconds. Of course I did the shot. But guess what? I did a lot of other stuff that she’d never have dreamed of. Guess which image DID NOT get purchased. Belly button heart.

7 Maternity Photography Tips

Here’s 7 tips toward creative maternity photography:

1. The Great Outdoors:

So many maternity sessions are done in studio. I understand the reasons behind this. I’ve been pregnant. 3 times over. I’m not the petite and pretty pregnant. I’m the gal you find wedged between the double doors at The Sizzler. Studio shoots are great because there’s privacy. I can’t argue with that. Particularly if you’re going to do anything in less than a fully clothed state (that’s my PC way of saying naked). But there’s something about being outside. Taking that natural beauty of a woman who’s ready to bring new life into the world and placing her in the majesty of the great outdoors is simply breathtaking.

maternity photography-1

Maternity Photography

2. At Home:

When you shoot a mommy-to-be in her own home she’s comfortable to let go in a way that she may not be otherwise. This is a fantastic reason to hold maternity sessions at home. This is not however why I do it. As a photographer I feel like it’s my responsibility to help my subjects feel comfortable and capable of giving me their best, no matter where we’re shooting. I pride myself on my ability to do this. To me, it’s a HUGE part of my success as a photographer (Uh oh. I feel a post in this regard coming on… check back soon). I shoot maternity sessions at home primarily because it’s wonderful for a couple to have a capture that truly shows what their life was like at the time their baby came to be a part of their family. I’m a second generation photographer so I’ve got some really lovely shots of my sweet momma awaiting my arrival. My favorite however is a simple picture of her standing by my bassinet with her hand on her tummy. I CHERISH it.

maternity photography-2

3. Simplify:

No matter where you shoot, studio, home, outside, 7Eleven, you’ve got to simplify your surroundings. The beauty of a mother anticipating the arrival of her child should be captured in a way that allows the miracle to speak for itself. Pregnancy doesn’t require anything “else” to be present in a photograph to help tell it’s story. Everything in the frame that may not belong will simply serve to distract from the story that’s already being told, naturally. Pay attention to background.

maternity photography-3

4. Help Her Feel Beautiful

Women don’t generally feel very sexy when they’re pregnant. Understandably so, and trust me I connect with this feeling as much as the next gal. But just because an expectant mother doesn’t feel sexy, that doesn’t mean she’s not totally knock out. Bring that out in her. Pull that beauty out of her. A good way to do this is by talking as you shoot. It’s perfectly appropriate to say things like: “That’s beautiful!” “Yes, perfect!” “Oh that’s just LOVELY.” “Pregnancy looks good on you girl!” Whatever works! If you’re a male photographer you’ll need to be careful about what you say in this crazy world of sexual harassment, but you’re even more capable of pulling the beauty out of her than a female photographer. It’s one thing when your girlfriend tells you you’re beautiful, but when your girlfriend’s brother tells you that you’re looking good, you actually believe it. Obviously be careful and be genuine. The success of this tip will depend on your personality, but you can help her help herself. If she feels pretty she’ll look a whole heck of a lot better. It’s that simple.

maternity photography-4

5. Highlight Relationship:

Hopefully new babies are coming into a loving home. I always try to include photographs that highlight the tender relationship between mom and dad, because bringing a child into the world with someone is arguably love in it’s purest form.

maternity photography-5

6. Don’t Forget the Siblings… or the dog for that matter:

Remember that often a baby is coming into an established family unit (not to say that Mom and Dad alone aren’t an “established family unit” but for the sake of my point, go with me on this one). If the siblings are available, make sure to include them in at least a few frames. I have to mention the dog, because I’ve got a sister-in-law who’s dog, Wanda (seriously that’s her name) is her pride and joy. When she and her hubby have kids, you can trust that Wanda will be right there in at least a handful of her maternity photos. She’s as much a part of the family as the next guy.

maternity photography-6

7. Give ‘em Something Different:

Don’t just shoot what’s always been shot. This is a good general rule of photography. I really try to be “consistently inconsistent” (I recently heard another photographer, Nate Kaiser of theimageisfound.com, use this term and I had to pirate it). Let me explain, you’ve got to approach each shoot as it’s own. I’m very committed as a photographer to tailoring each shoot for the subject I’m photographing. Like I said before, this is a good general rule that applies particularly to maternity photography. Even though millions and millions of mothers have given birth to millions and millions of babies for millions and millions of years, a momma-to-be needs to feel like her pregnancy is miraculous, special and sacred, that the things she’s experiencing are unique only to her. Because they are.

maternity photography-7

Happy Shooting!!

Post originally from: Digital Photography Tips.

Check out our more Photography Tips at Photography Tips for Beginners, Portrait Photography Tips and Wedding Photography Tips.

Maternity Photography – 7 Tips for Taking Great Shots


Digital Photography School

 
Comments Off on Maternity Photography – 7 Tips for Taking Great Shots

Posted in Photography


7 Tips for Photographing Paddlers

24 Sep

I would like to remind you this old post, How Did you Shoot It? with some updates and revisions. It was written two years ago as part of ProBlogger’s group writing project – “How to …” I hope that these tips are still useful. They represent quite well my own approach to paddling photography.


After posting the above picture, “Paddling in Clouds”, I’ve got several questions: How did you do it? And, I had troubles to provide a reasonable answer since the shot was technically really trivial.

Finally, I figured out that it is more about seeing pictures than about shooting and wrote these more general comments.

1. Look and See

Learn to see pictures. You do not need a camera to practice it. I am often “shooting” without camera, especially, when driving: that would be a good picture, this old barn would look great at sunrise, that dust devil at a horizon can be seen only through polarized glasses.

I believe that looking at photographs in magazines, books and calendars also help to develop your seeing capability. I am checking all new photography books arriving to my university library and browsing most of photography magazines in a local bookstore.

There are several good books on the art of seeing. Freeman Patterson comes to my mind first. Recently, I spent a lot of time with Photographer Eye by Michael Freeman.

2. Have a Camera

A photographer is shooting pictures, not a camera, but you should have your camera ready. “Ready” means not only accessible. You should be familiar with your camera settings and operations. Learn what camera settings are working for your paddling photography. It may be difficult to figure out camera features when sitting in a tippy kayak and waves are splashing.

Compact waterproof digital cameras like Pentax Optio “W” or Olympus Stylus “SW” revolutionized my kayak photography. I can shoot pictures I was not able to execute before, e.g., with a partially submerged camera. I am ready to sacrifice some camera features or to some extend a picture quality for convenience and accessibility of these tiny camera for paddling environment.

3. Be Aware of Light

The best light for outdoor photography is when the sun is low, i.e., around sunrise and sunset. I know that I can expect interesting light at the end of my afternoon paddling workout. If the sunset is not very exciting I can shoot water reflections or a tree silhouette.

Ironically, on paddling trips, we are often passing the best scenery in the middle of day, when the light is harsh and unpleasant. I am still shooting some snapshots for documentary purposes. My primary motivation to start paddling fast kayaks was to get in time to my shooting spots. All that racing craziness came later …

4. Point (compose) and Shoot

Do not be afraid to shoot without viewfinder. Well, you don’t have one in Pentax Optio. And, the LCD display is often difficult to read in a bright sun. It shouldn’t stop you from shooting. Use some creative angles as far as you can extend your arm. Remember, you can put this camera under water next to you kayak. The lack of a viewfinder is perhaps the main reason preventing some photographers from buying this camera, but I think that this a reasonable compromise in the camera of this size.

I didn’t have a clear view of the camera display when shooting my “Paddling in Clouds” picture. I was just trying to keep a paddle diagonally in my frame.

foggy sunrise over Suwannee River, Florida

5. Shoot Multiple Frames

Shooting pictures with a digital camera is cheap. You do not need to worry about film cost. You can always erase the picture and shoot again unless you are after some action shots. So, do not be afraid to experiment and shoot even if you do not see the image in your LCD monitor. Shoot some extra frames. It is helpful to have an adequate memory card.

I shot about 30 frames trying to catch a sky reflection in water and in my paddle. However, I would show not more than 3 or 4 from those 30 frames.

6. Practice

The more you shoot the better you should get. I have shot similar pictures before including reflections and a paddle.

Review your pictures on the camera LCD if possible. Check the histogram. Analyze your shots after paddling on a computer screen. You have all information about camera setting included in each digital image file. Try to figure out what worked and what not. Learn from mistakes.

7. Have Fun

I don’t consider myself a professional photographer. When paddling I am shooting what I like just for fun. Documenting my paddling trips and races is still fun. I feel free to experiment.

The great Alfred Stieglitz was an amateur photographer too. Anyway, the photography is not a profession…

Sometimes I sell a picture to a magazine or donate to a book cover. A year ago, I started to sell my pictures through microstock agencies. I am just taking more often my DSLR camera and a tripod for paddling.

Related posts:kayaking Colorado - Douglas Lake

  • Use Your Paddle to Stabilize Camera
  • No Viewfinder? 10 Tips on Shooting Pictures without Viewfinder
  • Pentax Optio WP/WPi – 10 Tips on Paddling and Shooting
  • Can Pentax Optio waterproof cameras be used in the water?
  • Pentax Optio W10 as a Helmet Cam – Inline Skating along the Poudre
  • Shooting movies with Pentax Optio WP and W10 and Sisson Nucleus 100 kayak


paddling with a camera

 
Comments Off on 7 Tips for Photographing Paddlers

Posted in Photography


Documentary Photography – Six Tips for Creating a Legacy

21 Sep

documenting-dps-02

We’ve all gone through times in our lives where we’ve lost loved ones. As a portrait photographer I would get calls all the time for “Urgent” family photos where one family member was terminally ill, and yet others that have photos done after the loss of a loved one.

Why do we wait until it’s too late, or almost too late to capture the lives of those most important to us?

As photographers (and before you argue that you aren’t a “professional” or you aren’t a photographer, I’m here to tell you that you are! If you take photographs you are a photographer, and this applies to you!) it is almost our duty to record the lives and times of those closest to us, family and friends. I’m not just talking about birthday parties and weddings, which are both important, but how about everyday life?

Last fall/winter my husband and I lost our two cats who were 18 and 19. He had them for 18 years, they lived with me for five. It hit me hard and I wrote this: “Do What’s Important Photograph Your Loved Ones”.  I vowed to go and photograph my grandmother who is now 92. I finally did that and I have some tips for you on how to go and photograph, and document the lives of your loves ones both young and old.

So this article comes with both tips AND a challenge, for you to go do the same.

  1. Documentary means as it happens naturally, in their environment.
  2. Capture the person’s essence, their real personality
  3. Remember to capture the details and scene setters
  4. Think big picture, take shots for the background of a collage or potential photobook or album
  5. Not every photo needs to show their face. Facing away from camera, hands and body are important too.
  6. Create a story with images, leave a legacy
Unfortunately Uncle Ward has now passed on, but his legacy does live on in these images, now treasured by family.

Unfortunately Uncle Ward has now passed on, but his legacy does live on in these images, now treasured by family. They sure did love their instant coffee. He even took a spoonful of the grounds and ate it!

#1 DOCUMENTARY MEANS IT OCCURS NATURALLY

Documentary photography usually refers to a popular form of photography used to chronicle significant and historical events. It is typically covered in professional photojournalism, or real life reportage, but it may also be an amateur, artistic, or academic pursuit. The photographer attempts to produce truthful, objective, and usually candid photography of a particular subject, most often pictures of people. – Wikipedia

Get into their day to day life. Plan to go spend a few hours chatting with the person, listen to their stories, capture what comes naturally and what just happens. Don’t create something that isn’t part of them, just be there to grab moments in time that will mean so much down the road.

The afternoon "soaps"

The afternoon “soaps” among all her family photos that plaster the walls.

Neil going to feed the cattle

Neil going to feed the cattle

#2 CAPTURE THEIR TRUE ESSENCE

This is not too far off from #1 but let’s take it a bit deeper. Just being in their home, using their environment doesn’t guarantee you’re getting into their heart and soul. If this is someone close to you, as in my grandmother, what is it about them you want to capture? What part of their personality do you want to shine through in the photos:  wisdom,  a gentleness; intelligence, caring, a sense of fun, or all of the above? Is there something quirky about them that makes them unique, how can you show that in your images?documenting-dps-14

For my grandmother she is a social butterfly so I photographed her with some friends and playing cards (see above).  My husband’s uncles are farmers and storytellers. We got out the old family photo albums and listened to them for hours while they showed us old photos from the 1940′s. They came alive as they recounted tales of their younger days and when they had a TV delivered “a couple years ago” which we later learned to be around 1975!

documenting-dps-06

We found out my husband’s grandmother was a hobby photographer during the 20′s and she had some really great images and albums!

documenting-dps-17

The key here is to get emotional. I don’t want to see a studio portrait, or even a lovely window light portrait for this type of project, I go for real, raw, emotion.

#3 REMEMBER TO CAPTURE THE DETAILS

When photographing a person with the intent of documenting, make sure you think in terms of these three views: overall, medium range, and close-up or details. What that means is don’t forget to get in close on some things, and not just have the whole face or person in every image. Details like how they hold their spoon as they stir their tea (so get in close on the hands or maybe even just the tea cup) can add a lot of impact.

Tea and cookies at Grammy's. For as long as I can remember she's been feeding us. "Do you want a cookie dear?"

Tea and cookies at Grammy’s. For as long as I can remember she’s been feeding us. “Do you want a cookie dear?”

She does love her Bingo

She does love her Bingo

Tea at the Uncles'

Tea at the Uncles’

#4 THINK BIG PICTURE AND SET THE SCENE

Things around them in their daily life set the scene, so remember to capture some of those things too. If they live in a house make sure to get an exterior shot, some of the garden, and maybe even a close-up of the wall you can use later as a textured background. Does she has a favorite dress, one you always think of when you think of her – if so they photograph it, or a section of the material. Is he a craftsman, then by all means photograph his tools.

The most important thing in my grandmother’s life is her family and in her small living room the walls are literally plastered corner to corner with family photos. Weddings, graduations, new great grandchildren, and even the pets are all there. Every shelf and horizontal surface has photos on it. You can bet I captured that (even though I’d taken make of those photos over the years, seeing them all up in one places speaks volumes to anyone that enters that room and you instantly know what she’s all about. She also collects angels and always has one pinned on her blouse. She has hundreds of them in her house everywhere.

documenting-dps-19

For the uncles that all consuming thing for them was farming and their animals. So I got lots of images of the barn, farm buildings and old retired machinery. Do all that without their assistance, let them go about their day while you just shoot background stuff. Think about how those images may work together making a photo album or even a digital book.

documenting-dps-18

The Cooper Homestead farmhouse

The Cooper Homestead farmhouse

#5 NOT EVERY SHOT NEEDS TO SHOW THE FACE

Similar to get in and show the details, think outside the box. Not every image needs to show the face or even hands. How about feet? Use a slower shutter speed and add some motion if applicable. Shoot for something different here that the “norm”. Think about how to represent them, and their life without showing their face.

documenting-dps-16

With her youngest great grandchild, young and old.

Unfortunately Uncle Ward has now passed on, but his legacy does live on in these images, now treasured by family.

#6 CREATE A STORY WITH IMAGES

Every other point in this article leads directly into this one, telling a story. By following all the tips above you pretty much can’t help but create images that do just that so the only thing I will add here is to do it consciously. Go in knowing you’rl./e creating a story. Intention is a powerful thing. When you show up planning to create a story, your subconscious will naturally kick in and go to work for you, if you aren’t aware (hint:  that’s why it’s your subconscious).

documenting-dps-12 documenting-dps-08 documenting-dps-09

One other thing you can do it go look at other photo stories, specifically some of the great photographers, masters of the photo essay. W. Eugene Smith comes to my mind, go study some of his stories for LIFE magazine. Anything by Cartier-Bresson but especially The Decisive Moment. Or some of my favorites Dorothea Lange, Margaret-Bourke White and Walkers Evans who all documented the Great Depression. Find out what draws you in to their images. How do they use scene setters and detail shots? Learn from the masters.

ACTION PLAN

If you read my articles regularly you’ll know what I’m going to say – get out there and go photograph someone important to you. That’s the first step! Then DO something with the images that will create a family heirloom. A book is ideal as you can make copies for the whole family.

To see the full book I made of The Uncles for an example of how to put it all together. Blurb.com is a great way to make books that are high quality that don’t break the bank. I’ve made several copies of this one for family and have done other volumes for special occasions and family events as well as clients. 

Cheers, Darlene

Post originally from: Digital Photography Tips.

Check out our more Photography Tips at Photography Tips for Beginners, Portrait Photography Tips and Wedding Photography Tips.

Documentary Photography – Six Tips for Creating a Legacy


Digital Photography School

 
Comments Off on Documentary Photography – Six Tips for Creating a Legacy

Posted in Photography


Taking Shots of Your Car Like the Hot Ride She Is: Amazing Car Photography Tips 101

18 Sep

Anyone who has tried to shoot a photograph of their new car (or their old, well-loved car after it finally drove through the car wash) knows that a car is difficult to capture. Nevertheless, those of us who have practiced can vouch for this series of tips that I’ve aimed at my neighbor’s Mustang and my own practical Prius. The Continue Reading

The post Taking Shots of Your Car Like the Hot Ride She Is: Amazing Car Photography Tips 101 appeared first on Photodoto.


Photodoto

 
Comments Off on Taking Shots of Your Car Like the Hot Ride She Is: Amazing Car Photography Tips 101

Posted in Photography


6 Tips for Creating Unique and Emotion Filled Wedding Photos

15 Sep

A post by wedding photographer Susan Stripling – one of the course presenters in this weeks Creative Live Photo Week – an event that showcases teaching by 50 photographers across 3 tracks including Weddings and Family.

The best wedding photographers know how to create not only beautifully composed images, but also the moments of emotion and connection at the core of every dynamic wedding story. Focusing on capturing these unique, organic moments allows you to tell a story that’s true to the couple you’re working with. Here are some tips for finding and capturing the images that keep a wedding story dynamic and fresh.

Wedding photography emotion

1. Build the Right Relationship with the Right Client

It’s important to assess whether a client is the right match for your photography style and the stories you’re good at capturing. When you’re consulting with clients, ask questions about what exactly they want, and consider whether you’re prepared to offer the services they want. Once you’ve decided to work with a couple, cultivate a positive, communicative relationship. You don’t have to be best friends with every couple that you shoot, but a basic level of trust helps clients to be themselves on the wedding day. The more comfortable they feel with you, the more moments you’ll be invited to shoot.

2. Be Prepared

To capture unique moments, preparation is essential. Before you show up to shoot a wedding, think through the choices you’ll make about gear, lenses, equipment, and lighting. It’s inevitable that plans will change on the day of the wedding, and that’s okay. Being prepared doesn’t mean you have to be inflexible.

Wedding photography emotion 1

3. Check your Composition

If an image is too soft or technically imperfect, you can’t share it with clients. A poor image of a great moment is essentially the same thing as no image at all. Remind yourself of the basics both before and during a shoot. Be mindful of focusing and recomposing with the f-stops you choose, and make sure your shutter speed correlates with the lens you’re using.

4. Be aware of the Background

Nothing spoils a dynamic image more than a random person wandering through the background or an angle that makes everyone in the room look like they have lampshade hats on. Don’t just focus on the subjects of each image – focus on the entire frame.

Choose backgrounds that either enhance an image or that are clean and simple. For example, you might decide to photograph rings against the background of other sparkly jewellery the bride plans to wear. Or you might decide that it’s better to have a clean, simple background instead.

Wedding photography emotion 2

5. Challenge Yourself

When I’m photographing a wedding, I like to challenge myself to see how many unique moments I can capture in one single frame. This allows me to tell stories that are more complex. I might be able to catch the mother of the bride’s reaction as the bridesmaids help her daughter into her dress, or I might capture the flower girls dancing along to a couple’s first dance.

If you’re telling multiple stories in a single frame, each aspect of the story has to be dynamic and engaged. Make sure everyone in the frame is doing something interesting; no couple wants an image from their wedding day where half the people look bored. Know when to focus on a single, super-impactful image instead.

6. Watch and Wait

Watch for shots that both capture a unique moment and help advance the overall wedding story you’re telling. The balance between patient and proactive can be hard to strike, but it’s important.

Create a calm atmosphere and be a chilled presence – don’t constantly have cameras in people’s faces and shutters consistently going off. When a moment starts developing, be assertive about getting the shot you need, but find a way to do so without being intrusive.

Give the couple space to emote, but also be aware that some people might not be outwardly emotional, and that’s okay too. Capture the couple as they are, without trying to force specific moments, reactions, or feelings.

For more wedding photography tips, check out Susan’s upcoming creativeLIVE course during Photo Week which starts on Monday.

Photoweek logo

Susan Stripling is a world-renowned wedding photographer. She has won some of the photography industry’s most prestigious honors including 1st place in WPPI’s Wedding Photojournalism category and the Grand Award for Photojournalism. Susan has photographed weddings all throughout the US, the Caribbean, South America, Finland, France, and the Bahamas.

Post originally from: Digital Photography Tips.

Check out our more Photography Tips at Photography Tips for Beginners, Portrait Photography Tips and Wedding Photography Tips.

6 Tips for Creating Unique and Emotion Filled Wedding Photos


Digital Photography School

 
Comments Off on 6 Tips for Creating Unique and Emotion Filled Wedding Photos

Posted in Photography


Splendid Fall Photography Tips and Tricks to Make The Most Of This Gorgeous Season

06 Sep

Fall is indeed a magical time for everyone. With the air becoming clean and crisp, you get to dust off your overcoats and walking boots. You’ll hear the chopping of the wood that will see everyone though the winter months. But there is nothing more recognizable with the season of autumn than the colors associated with the falling of the Continue Reading

The post Splendid Fall Photography Tips and Tricks to Make The Most Of This Gorgeous Season appeared first on Photodoto.


Photodoto

 
Comments Off on Splendid Fall Photography Tips and Tricks to Make The Most Of This Gorgeous Season

Posted in Photography


7 Tips for Photographing Kids

05 Sep

kids-photography-tips-dps-10

Notice something about the title of the article? It doesn’t say how to take “portraits” of kids! Kids, especially those five and under, pretty much dictate how the photography session is going to unfold, and it usually involves moving. Fast! Over the years my style has evolved from format portraiture with medium format film camera (which is NOT conducive to movement) to 35mm, and finally to digital. Digital allows much more freedom of motion and with a few tips you should be on your way to some great photos of kids. 

THE SEVEN TIPS :

  • have patience
  • be ready
  • get down to their level
  • using natural light or flash
  • choose your focus mode carefully
  • be a goofball
  • let them run the session, don’t try and control it

#1 HAVE PATIENCE

When photographing kids sometimes you get a whole lot of nothing for a while, or they may be shy to start, or play coy. Even kids that know you may decide they don’t want you to take their picture and say so. My three year old niece did just that when I spent the day photographing her. “Don’t take my picture Auntie!” she said as soon as I pointed the camera at her. She’s a regular ham for the camera usually and I knew she’d warm up. Eventually she was giving me “the wave” that you see below which sort of means “don’t take my picture but I’m going to act like I’m the star anyway just in case you do”.

So if you get this kind of behaviour don’t rush or force it. Just keep hanging out with them, play and interact and eventually they’ll come around. A couple hours later she was telling me to take her photo.  kids-photography-tips-dps-14

#2 BE READY

This is almost a given, but be ready for anything with kids! Expect the unexpected and be ready to shoot it. One of the things I say to my students is that photography is about being in the right place, at the right time, with the right lens on – there’s a lot of truth to that! So learn to anticipate what might happen, and where you need to be to capture it. Have the right lens on and make sure your settings are all good. Be ready technically, and in all other aspects. Be ready to move fast if this happens:

Oh yes she did!

Oh yes she did!

I fired off two shots and then she fired right at me with the water gun and I had to turn to protect the camera. I however, took a direct hit in the backside. Luckily it was a nice warm day and it was refreshing. I got the shot, saved the camera from drowning and had a lot of fun with her.

Here’s another of my nephew at the same age. My sister was watering the flowers, nobody knew he was going to do this. Be ready!

kids-photography-tips-dps-04

Part of being ready also means to stop looking at the images on the back of your camera! If you are looking there you are missing something happening live. You can review them later, so stop chimping! 

We set her up with the streamers but being ready meant making sure I get it all in the frame and capture it when she throws it in the air.

We set her up with the streamers. So being ready here meant making sure I got it all in the frame and captured it when she threw it up in the air.

#3 GET DOWN ON THEIR LEVEL

When you photograph little ones doing so from an adult perspective makes them look even smaller. Getting down to their level puts you more on equal ground. Get in the mud or sandbox with them, don’t stand over top looking down. Crawl around on the floor and play trucks.

Get down to their level literally, and figuratively. You nee also to get skilled at holding your camera and playing, coloring, or any number of other interactive things with the child.

kids-photography-tips-dps-06

We tied the dinosaurs together, I had to hold them sometimes while I was shooting.

 #4 USING NATURAL LIGHT AND FLASH

“When should I use flash?” is a common question I get in my photography classes. My answer to that is two part:

  1. if there isn’t enough light, add flash
  2. if the light isn’t “good”

Part one, not enough light, is fairly obvious. It’s too dark if you have the aperture on the lens as wide open as it goes, and you are still getting a shutter speed that’s slower than your lens focal length (see Tips for getting Sharper images for more info on that). It helps to use a lens with a large aperture either an f/2.8 zoom lens (but they’re pricey) or even better an f/1.8 prime lens like the handy little 50mm f/1.8 or 85mm f/1.8.

But what about part two, what is “good light”? How do you know if you have bad light? 

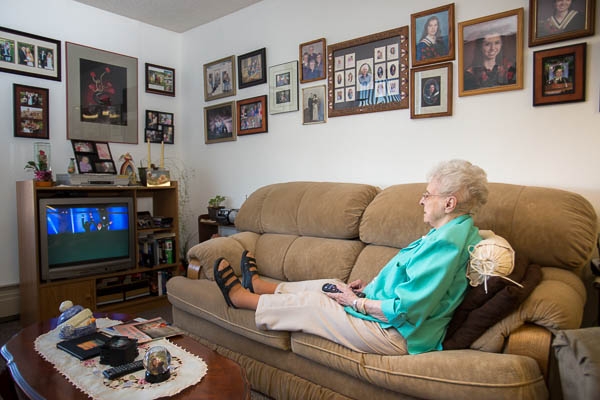
That part is a bit subjective but tough lighting situations like backlighting, or strong overhead light would be some times where you might want to add flash to balance out the light or overpower the natural light entirely. I tend to use flash to supplement natural light whenever possible, and to try and correct the lighting where necessary. Notice the image above – there is NO flash used for that image. The light coming from the windows in the living room on the right provided a nice soft directional light on his face. Selecting a large aperture allowed me to use that light.

Now look at the image below. Can you tell if there was flash used or not?

kids-photography-tips-dps-07

Flash was used here, bounced off the ceiling but aimed slightly back.

Flash was used for the image above because the windows behind him were leaving his face in deep shadow. So I used a flash bounced off the ceiling, angled slightly behind me. Avoid direct flash whenever possible as it flattens out the subject and produces harsh shadows. Bouncing off walls and ceilings is ideal if you can do so. In this case I aim my flash backwards slightly as well so the result isn’t light coming straight down on him and making dark eyes. I use this technique a lot at events, even with 15-20′ high ceilings.

#5 CHOOSE YOUR FOCUS MODE CAREFULLY

Capturing moving subjects of any kind requires the right camera settings, practice and trial and error. Most cameras have different Focus Modes – read your manual to find out more. Select the one for continuous or tracking focus. What that means is the camera does not lock focus when you push the shutter button halfway down. Instead it “tracks” any moving objects as they come nearer and farther away from you. If you hold the shutter button down the camera continues to look for focus and if the object is moving towards you some cameras actually anticipate their speed and prefocus in front of them so when you press the shutter fully your image is sharp. There are too many camera brands and models and each are different and offer different choices, so I can’t tell you what to choose. Just know that when shooting moving objects you want the tracking option.

You may also want to shoot in burst or high speed shooting mode. That’s when you press the shutter all the way down and hold it, the camera takes multiple images until you let go or the camera can’t hold any more information. Most SLRs have this feature but vary in the frames per second rate they are capable of shooting. Even three frames per second will give you more options than just shooting a single frame at a time.

This was shot using the tracking focus mode - on my Canon that's called Servo

This was shot using the tracking focus mode – on my Canon that’s called Servo

Another example using focus tracking. I keep the camera pointed at him and the button partly pressed and it follows him with focus.

Another example using focus tracking. I keep the camera pointed at him and the button partly pressed and it follows him with focus. Make sure to get out of the way of errand water sprays during water fights!

#6 BE A GOOFBALL

I’ve often been told that I’m good with kids during sessions because I get silly with them. I make fart noises and silly faces. I play with puppets with them. I get down in the sand and play. Too often we adults worry about our dignity and how we “look” – throw all that out the window and get over yourself and let go a little, Give yourself permission to be a GOOFBALL for a little while. Who knows you might actually have some fun!

The image below happened because we were blowing raspberries at each other and having a face making competition of sorts. He won, but I got the shot! He was also soaking wet from running through the hose several times and the read dye in his hair was running down his forehead, which just adds to the image!

kids-photography-tips-dps-05

#7 LET THE CHILD RUN THE SESSON

Really, you will never be in control anyway so why not relinquish it right from the start and call a spade a spade. The child is in charge and will run the session, so the sooner you accept that the more fun you’ll both have. Here’s a few DOs and DON’Ts.

  • DON’T try and make them do anything
  • DON’T get upset with them if they don’t follow your plan
  • DON’T, for heaven’s sake yell at them, especially if they are your kids or family. That will only serve to make them hate getting photos done and they will make it even harder next time. That only leaves the child feeling like they’ve been bad and you frustrated.
  • DO go with the flow. Take whatever happens and go with it.
  • DO be ready. See #2 above!
  • DO approach it from a perspective of having fun, not one of getting the best photos. The second is a product of the first.
kids-photography-tips-dps-16

You must test the chalk to make sure it writes don’t you know! So serious.

I was literally putting my bag in my car to leave, camera all packed away when the sidewalk art began and the light was so perfect. So out came the camera again! This image follows pretty much all the points above: be ready, get down on their level, use the natural light when it’s good, play with them.

I just can’t resist good light! I have a slight case of Photography Compulsion Syndrome, perhaps you suffer from it too?

ACTION PLAN

If you photograph kids or have some of your own, go out and practice using these tips and tell me how you did. Do you have any additional tips you’d like to add, please share in the comments below.

Now get out there and go do some photography! Happy shooting.

Cheers, Darlene

Post originally from: Digital Photography Tips.

Check out our more Photography Tips at Photography Tips for Beginners, Portrait Photography Tips and Wedding Photography Tips.

7 Tips for Photographing Kids


Digital Photography School

 
Comments Off on 7 Tips for Photographing Kids

Posted in Photography