RSS
 

Posts Tagged ‘Tips’

Lightroom Tips for the Develop Module – the Magic Alt Key

08 Dec

LR_Alt_option_visualization_opener

Lightroom tips for the Develop module – one feature in Lightroom that isn’t obvious or easy to discover is the visualization feedback which you can get in the Develop module. In many cases when you hold the Alt key, (Option on a Mac) and click (and hold it) on a slider, the screen will change to give you feedback on the adjustment you are making.

This feedback (visualization) take some of the guess work out of how the adjustment you are making is affecting the image. Here are some of the useful visualizations available in the Lightroom Develop module:

Alt and the Exposure, Highlights, Whites, Shadows and Blacks Sliders

When you hold Alt (Option) and drag any of these sliders you will see any areas where whites or blacks are clipped as a result of the adjustment – the color shows which channel is being clipped. When you adjust Shadows and Blacks the white areas of the image aren’t clipped.

LR_Alt_option_visualization_1

Showing where the blacks are being clipped

When adjusting Exposure,  Highlights and Whites – the black areas are not clipped.

LR_Alt_option_visualization_2

Showing where the highlights are being clipped

Sharpening

When adjusting Sharpening you can preview the result of the sharpening on the image by holding the Alt (Option) key and drag on any slider. Alt (Option)  and the Amount slider shows you the sharpening applied to a black and white version of the image – as Lightroom sharpens only the luminance and not color this gives you a better view of the sharpening result.

Alt (Option)  with the Radius slider shows the halos being applied to the edges in the image to sharpen it.

LR_Alt_option_visualization_3

Showing the radius or amount of sharpening being applied

Alt (Option)  and the Detail slider shows the suppression of the halos occurring as you drag on this slider.

LR_Alt_option_visualization_4

Alt (Option) and the Masking slider shows a black and white mask over the image – the areas which are black are not sharpened and those which are white will be sharpened.

LR_Alt_option_visualization_5

Showing the mask when sharpening – makes it easy to control which areas are sharpened and which are not, very useful for people photos.

Split toning

Alt (Option) and either of the two Hue sliders shows the currently selected hue in place on the image even if the Saturation slider is set to zero. This lets you see the color you are selecting, at 100% saturation, before you apply it.

LR_Alt_option_visualization_6

Noise Reduction

Alt (Option) and the Luminance, Detail and Contrast sliders for removing  noise converts the image into a black and white image so you can see the effect of the adjustments more clearly.

LR_Alt_option_visualization_7

Lens Correction – Color tab

Alt (Option) and the appropriate Amount slider shows the areas in the image affected by fringing. White is not affected and you will see any areas affected by purple or green fringing.

LR_Alt_option_visualization_8

Alt (Option) and the appropriate Hue slider lets you view the range of hues being fixed. Black areas are already being targeted and any remaining purple or green color indicates residual color fringing.

LR_Alt_option_visualization_9

Recognizing the times you can use the Alt (Option) key in the Develop module will help you make adjustments to your images more easily and effectively. I hope you enjoyed these Lightroom tips for the Develop module.

Post originally from: Digital Photography Tips.

Check out our more Photography Tips at Photography Tips for Beginners, Portrait Photography Tips and Wedding Photography Tips.

Lightroom Tips for the Develop Module – the Magic Alt Key

The post Lightroom Tips for the Develop Module – the Magic Alt Key by Helen Bradley appeared first on Digital Photography School.


Digital Photography School

 
Comments Off on Lightroom Tips for the Develop Module – the Magic Alt Key

Posted in Photography


5 Tips for Successful HDR Photos

05 Dec

How do you create successful HDR photos? It’s a question that I’ve gotten from time to time, and before we get started with this post I do want to make clear that there’s no question that HDR photography is one of those never ending battle grounds in the photography world. Much like the Windows vs Apple battle of the PC world, HDR vs non-HDR is a battle that continues to stir the pot.

Five tips for successful HDR photos – for those that wish to do it!

While it’s always fun to add fuel to the fire from time to time, let’s put the argument of whether or not it’s a valid form of photography aside for a minute, and simply focus on trying to get those who wish to learn a new technique on the right track from the start.

Tip #1 – use a tripod

HDR Photography Tip - Use a Tripod

Using a tripod to photograph HDR brackets helps keep the frames from shifting between shots. (This image was taken with my iPhone using an Olloclip fisheye lens and processed using Snapseed)

This should be a no brainer and I really didn’t even want to put it into this article, but alas, here it is.

A tripod will not only allow you to stabilize each individual image (some of which may be fairly long shutter speeds), but in order to capture the full dynamic range of the scene you will need to take multiple exposures with your camera and it’s vital that these frames line up perfectly. A tripod will ensure that each frame you capture is identical to the previous one, with the only exception being the exposure times.

Tip #2 – don’t tone map a single exposure and call it HDR

I see this all the time, and while I understand it’s a great way to get more out of a single exposure, it’s not really an HDR image. Yes you can create an underexposed, neutral, and over exposed image in Lightroom from the same RAW file, and then merge those three images into one HDR photo, but it’s really not the same as capturing individual images.

Why you ask? Simple. When you capture one exposure at a given set of settings (Exposure Values) on the exposure triangle you are recording data within that given range. No matter what you do to that file in post production the data captured by the camera doesn’t change – you’re only changing the way in which that data is output into an image.

When you capture three or more images at different exposures (EV), then those three images are all going to have different levels of data from which you can pull; allowing for a truly high dynamic range photograph. The more images you capture the more data you’ll have at your disposal. That being said there’s the law of diminishing returns, which basically means that there comes a point when adding more data to the pile doesn’t help improve the photograph.

Tip #3 – know when you need it and when you don’t

hdr-photography-tips-01

Use HDR only when you need it (IE: when the light range of your scene is too large to capture in a single exposure)

Some people use HDR for every photograph they take. In fact it’s step two on this list of 10 Steps Every HDR Photographer Goes Through. You do not have to do this.

HDR stands for ‘high dynamic range’ so if you’re photographing a scene where the lighting is fairly even from shadows to highlights (the scene fits nicely on the histogram, with nothing clipped at either end of the scale) you don’t need to do HDR. Your camera is capable of pulling out enough detail from the highlights and shadows to cover the scene in its entirety with one exposure. It’s also probably not worth it to try capturing moving objects or people in HDR as they typically don’t look right when they get tonemapped.

So when should you use HDR?

Use it during sunrise or sunset, especially when you are photographing into the sun. Use it to photograph during the middle of the day. Use it to photograph architecture or man-made objects, as HDR has a way of really bringing out the detail of craftsmanship.

Tip #4 – invest in a good tone mapping program

Once you capture your bracketed set of photos you’re going to want to put them together in the best way possible. There are a ton of great programs out there to do this, but I recommend using either HDR Soft’s Photomatix Pro or Nik Software’s HDR Efex Pro. There are free alternatives out there, but I find that they don’t do as good of a job at tone mapping. Remember the tone mapping process is done algorithmically so the more powerful the software’s algorithms, the better the end results.

Tip #5 – control the urge to go big

HDR Tip - Avoid Going Too Big

Avoid the urge to create surrealistic photos (unless this is truly the style you wish to go in).

This is where HDR really becomes a touchy subject. Some people say that it’s their style to create over the top, surrealistic style, HDR photography and other’s say that they are destroying the world of photography by creating these highly saturated and oddly lit photographs.

It’s easy to get carried away with tone mapping your images, but if your goal is to recreate what you saw, the best way to do this is to remember to tone it down a bit before you press that process button. It’s also a good idea to watch out for haloing which takes place typically along tree lines (as you see in the photo above above the dark trees on the left side of the image).

hdr-photography-tips-02

Final word

While this is not an exhaustive list of HDR tips, it is a good start to get you on the right track to capture your first high dynamic range photos. That said, if you’re a bit more experienced with HDR and are looking to take your HDR photography to the next level, check out this post Creating HDR Panoramic Photographs written by one of my buddies on his HDR workflow process for creating massive HDR Panoramic images.

Do you have some tips to add to the list? Leave one in the comments below!

Post originally from: Digital Photography Tips.

Check out our more Photography Tips at Photography Tips for Beginners, Portrait Photography Tips and Wedding Photography Tips.

5 Tips for Successful HDR Photos

The post 5 Tips for Successful HDR Photos by John Davenport appeared first on Digital Photography School.


Digital Photography School

 
Comments Off on 5 Tips for Successful HDR Photos

Posted in Photography


4 Tips for a Perfect White Background in High Key Photography

03 Dec

A guest article by Tony Northrup, author of Stunning Digital Photography, on sale 20% off – now at SnapnDeals.

A bright, white background creates a high energy, happy, and distraction free scene, perfect for pictures of your friends and family. Known as high key photography, this technique instantly cures problems with ugly backgrounds and focuses the viewer’s attention on your subject.

Besides being a popular for portrait photographers, it’s a more modern choice, rather than traditional (ie., painted muslin). Here are my favourite tips for creating high key photos.

4 tips for perfect white backgrounds in high key photography

Tip #1 – Use a Solid White Background to Eliminate Distractions

I used a big, white piece of paper as the background for this portrait of my twin nieces because anything natural for a background would have clashed with their colourful outfits. The brightness also perfectly matches their expressions.

high-key-white-background-portraits-01b

High-key backgrounds focus your attention on the subject

High key photography was the perfect choice for this picture of my daughter eating a strawberry because there’s nothing to distract the viewer from her eyes and the strawberry. You don’t need to use an expensive camera or lens for this type of picture, because you can use any camera for high key photography.

High key white background portraits 02

The solid white background eliminates all distractions

Tip #2 – use sunlight as your background

A white background isn’t everything you need to create a perfect high key photograph, however. You need one additional ingredient – light. A white background without light doesn’t appear white in the photo, it appears grey. My flash failed to fire for this next photo, causing an ugly, grey background.

If you don’t light your background, it will be grey

If you don’t light your background, it will be grey

To create a solid white background, you need to completely overexpose your background without overexposing your subject. That means you’ll need much more light on your background than on your foreground subject; about 16 times more light (or four stops of light).

Fortunately, we all share a very powerful and free light source: the sun. For this photo of a radio talk show host and his dog, I had him kneel in my kitchen at midday when the sun was streaming through the glass doors behind him. I added three stops of exposure compensation to properly expose their faces. Because the sunlit background was much brighter than the shade in my kitchen, the camera captured it as solid white.

High key white background portraits 04

You can use the sun to create a bright background

Tip #3 – use a flash on the background

Another easy way to create a bright background is to light it with an off camera flash. Simply move your model four to six feet away from your background and hide a flash behind your model, pointing it at the background. When you take your photo, the flash will light the background to overexpose it and make it appear completely white.

An off camera flash doesn’t have to be expensive. Any manual flash with an optical slave will work, including the $ 60 (US) YongNuo YN-560 that I often use. Simply turn on both the flash’s optical slave and your built-in flash. When you take a picture, your flash will trigger the off camera flash to light the background.

High key white background portraits 05

Place a flash behind your subject to light the background

For more information about using flash both on-camera and off-camera, refer to Chapters 3 and 6 of Stunning Digital Photography.

Tip #4 – don’t over, overexpose the background

You can overexpose a high key background too much. If you bounce too much light off your background, the backlighting will overtake your model and wash out your picture. For example, the picture on the left had too much light on the background, while the picture on the right had just the right amount.

If you have too much light on your background, it’ll wash out your subject

If you have too much light on your background, it’ll wash out your subject

To get a perfectly white background without washing out your picture, start your background light at its lowest power and increase it one stop at a time until the background is barely overexposed. In this video, my wife Chelsea and I show you exactly how to find the perfect flash output. Our book, Stunning Digital Photography, includes more than six hour of video integrated into the lessons, because photography is a visual art, and often it’s easier to learn by watching than reading.

Summary

High key photography is challenging because it requires you to create an intentionally overexposed background while still properly exposing your subject. Once you learn how to use exposure compensation and light your background, you’ll be able to create perfect white backgrounds in just a few minutes.


Award-winning author and photographer Tony Northrup has published more than 30 how-to books and sold more than a million copies around the world. His photography book, Stunning Digital Photography, is the best-selling photography book in the world and the top-rated instructional book of all time. His photos have been featured on magazine covers, book covers, CD covers, TV shows, calendars, and much more. He runs a stock and portrait photography business with his family, Chelsea and Madelyn, out of his home studio in Waterford, CT. He shoots travel and nature photography everywhere he goes.

Post originally from: Digital Photography Tips.

Check out our more Photography Tips at Photography Tips for Beginners, Portrait Photography Tips and Wedding Photography Tips.

4 Tips for a Perfect White Background in High Key Photography

The post 4 Tips for a Perfect White Background in High Key Photography by Guest Contributor appeared first on Digital Photography School.


Digital Photography School

 
Comments Off on 4 Tips for a Perfect White Background in High Key Photography

Posted in Photography


Tips for Photographing Star Trails

03 Dec

Photography is a fantastic tool to explore the world around you, especially in ways normally invisible to our eyes. Landscapes at night often reveal untold treasures in the sky, and the stars can be made to swirl around like a dream. The process for photographing the movement of the stars isn’t nearly as difficult as it once was; star trails can be easily captured by any camera with a wired shutter release cable!

Enjoy these tips for photographing star trails at night! 

Star trail open

Composition comes first

There are a few things to consider when making a star trail image; the first is composition. As with any good landscape photograph, you should be able to visually navigate through the image. A foreground element is very helpful, and having water in the scene is a bonus – the stars can reflect off the surface of the water. The image shouldn’t only be about the stars, but how they interact with the landscape.

You should try to shoot with the widest lens you have. This offers more stars to fill the night sky, and also a greater potential to have the North Star somewhere in the frame. Most of my star trail images are photographed with a fisheye lens, because of the 180 degree field of view. The wider the field of view, the more star trails your image can contain.

As the Earth spins around its axis, the North Star is the only star that doesn’t move (much). All of the other stars appear to spinning around this central location, which can add a visual anchor point in your composition. If you’re not familiar with the exact position of the North Star, simply set your camera to bulb mode and take an extra-long exposure in the neighbourhood of 4-5 minutes. This should give enough of a “spin” so the stars to help you pinpoint the center of the celestial circle.

Camera settings

The goal for your final image however, requires a different exposure. Start with the following, set on manual mode:

  • Shutter speed: 30 seconds
  • Aperture: F/3.5
  • ISO: 3200

Take a test shot and see what you get. If the exposure is too bright, decrease the ISO or choose a smaller aperture (higher F-number). If the image is too dark, try increasing the ISO to compensate. Always leave the shutter speed at 30 seconds. When you get an exposure that looks good on the back of your camera, you’re set. Just make sure the camera is set to continuous shooting mode with long-exposure noise reduction turned OFF.

Also be sure to set the camera or lens to manual focus. The focus can’t shift from one image to the next, so dial it in manually. I find that focusing on distant light sources using Live View allows for the best depth of field while still keeping the stars sharp. Foreground objects may appear blurry, so going the “extra mile” would be to focus on the foreground and focus-stack the landscape.

With a wired remote shutter release, press and lock the shutter control. When one exposure ends, the next one will automatically begin. Let the camera continue this way for roughly an hour, and stop it whenever you’re ready to leave. If you left the camera for one hour, it should have recorded 120 separate 30-second exposures. These images can then be combined very easily in Photoshop.

Forgot your remote shutter release, or haven’t purchased one yet? I’ve found myself ready to make a star trail image and digging around in my camera bag offered me no cable release – it was somewhere at home, far far away. In a rare moment of creativity, I grabbed some tape (always keep some Gaffer’s tape in your camera bag!) and a small pebble from the ground. Simply taping the pebble over the camera’s shutter button with enough force to fully depress the shutter, the camera happily clicked away until the tape was removed. The below image was created this this “rock and tape” trick.

Rock tape trick

Post-processing workflow

Combining 120 images may seem like a daunting task, but the process is fairly straightforward – start by editing one image. In Adobe Lightroom, edit your image to your liking. Common adjustments would usually include shadows and whites, white balance, clarity, and noise reduction.

Single frame

Make this one frame as perfect as you can make it, and copy the development settings. Right-click on the image in Lightroom and choose “Settings > Copy Settings” and make sure all of the settings you’ve adjusted are selected.

You’ll need to paste these settings across the entire range of images. To do this, select all of the images you want to use in the filmstrip, and right-click on any of the selected thumbnails in the filmstrip. Now, choose “Develop Settings > Paste Settings” and your adjustments will appear on all of your images.

Alternate method to paste settings

There are a few ways inside Lightroom to copy and paste develop settings. Another way, which is particularly helpful when sharing settings over many images, is to use the “sync” feature. To do a Sync make sure the image you’ve worked on it selected in the filmstrip and visible on screen. Do a “select all” by holding “command+a” on a Mac or control+a on PC. That will select all the images in the folder. Next click the “sync” button in the lower right of the develop side panel. Choose all the settings you adjusted (as above) and click “synchronize”.

Putting them all together in Photoshop

You now need to send all of the images over to Photoshop in a single layer. With all of the frames still selected, right-click on any image and choose “Edit In > Open as Layers in Photoshop” and wait. This will take some time as Photoshop loads each frame into the same workspace as layers.

When all of the layers are finished loading, the next step is simple for users of Photoshop CS6 and beyond. Simply select all of the layers in the layers panel, and switch the blending mode from “normal” to “lighten”. Voila! The path of the stars through the sky will be revealed. This blending mode works by comparing pixels of all layers and displaying the brightest pixel. If the landscape remains static, there won’t be any change there, avoiding the additive effects of light pollution. The stars are moving, and as their position in the image changes the new location will contain brighter pixels.

Stacked frames

For users of Photoshop CS5 or previous, this can still be done but it will take some time. You cannot select multiple layers and change the blending mode on them all at once, it must be done one at a time.

When you’re done, flatten the image and save it. Continue to edit as you see fit, but the star trail is complete!

An alternative to Photoshop

Another option if you do not use Lightroom or Photoshop is to use a free program call StarStaX. It’s easy to use, just drop your images in and it does all the magic for you, AND even fills in the tiny gaps between each of the exposures.

Post originally from: Digital Photography Tips.

Check out our more Photography Tips at Photography Tips for Beginners, Portrait Photography Tips and Wedding Photography Tips.

Tips for Photographing Star Trails

The post Tips for Photographing Star Trails by Don Komarechka appeared first on Digital Photography School.


Digital Photography School

 
Comments Off on Tips for Photographing Star Trails

Posted in Photography


The Intimate Landscape – 5 Tips for Better Landscape Photography

28 Nov

Landscape photograph

A few weeks ago I spent seven days travelling across the northern tip of New Zealand’s South Island. Anybody who has been here knows that it is a beautiful place. I often come across remarks by photographers referencing New Zealand as a destination on their list of dream places to go to. Who can blame them? It’s a spectacular country, with beautiful landscapes.

However, the road trip brought home something of interest to all landscape photographers – landscape photography is hard. Really hard.

Not only do you need a beautiful location, but you are also relying on the weather and light to be conducive to the type of photo you want to take. If it isn’t, there may not be time on a short trip to wait for the ideal conditions.

It’s also a challenge to find an original way to photograph the landscape. Many other landscape photographers have been there before you. It’s difficult to create something new in a short space of time. Here are a few tips to help you do better landscape photography.

Split Apple rock, near Abel Tasman national park. I like this photo, but is it original? Not really – it’s a popular landmark and has been photographed by hundreds of photographers. It’s very difficult to create something new here.

Split Apple rock, near Abel Tasman national park. I like this photo, but is it original? Not really – it’s a popular landmark and has been photographed by hundreds of photographers. It’s very difficult to create something new here.

#1 Local knowledge

While there are ways to help ensure that you get the most out of a trip away (watch for those tips in an upcoming future article) today I want to make the point that one of the biggest advantages any landscape photographer has is intimacy with the landscape.

Intimacy comes from a deep knowledge of ,and a connection with the landscape. It’s an appreciation of the people that live there and the history of the location, plus an understanding of how the landscape changes through the seasons. People who have an intimate relationship with a region usually live there, or visit often. They are not passing through (like I was on the South Island). They know the best places to take photos, and when the light, seasons and weather are most likely to align to create the best results.

If you are struggling to find ways to photograph your local landscape, maybe it’s time to come at it from a different perspective. How can you turn your familiarity with your local landscape into an advantage?

Let me give you some practical examples. I live in Wellington, a city at the southern end of New Zealand’s North Island. I’ve never thought of it as a great location for landscape photography. Relatively speaking, it doesn’t have the spectacular landscapes of the South Island, nor the sub-tropical bush or white sand beaches of the northern half of the North Island. However, I’ve found other ways to incorporate the landscape in my photos.

Landscape photograph

#2 Long exposure and night photography

I know some good locations for these, including places that I would never have found on a short visit. The coastline south of the city has some beautiful, rugged locations. Walking along the sea front during all four seasons has given me an appreciation of how beautiful and changeable it is. The light and landscape change with the seasons and the weather, and I’d never understand that if I didn’t live here. Best of all, once I’ve found a location, I can wait out periods of inclement weather and return when the light is best to take advantage of it.

The benefit of these techniques is that they help you create photos with a very different look to what many photographers will take.

Example from another photographer

I recently came across the work of Mark Gee, another Wellington resident. He’s rather good at night photography. Most of his photos are taken in the local area and show an intimacy with the landscape that only comes with local knowledge and time.

Landscape photograph

#3 Try some special techniques

Painting with light and steel wool spinning are two that come to mind. The lack of spectacular landscapes has pushed me off into different directions as I look for more ways to make the most of the scenery we do have here. Mark Gee’s work has inspired me to try some night photography, and that ties in neatly with these techniques. Again, the freedom to return to the locations I want to use when the sky is clear and there is no wind is priceless.

If you are looking for original ways to photograph your local landscape, perhaps either of these techniques will help!

Portrait in the landscape

#4 Portraits

I take most of my portraits outside, using my favourite locations as backdrops. Sometimes a certain location may not be great for landscape photography, but it is ideal for taking portraits. The local landscape has become a part of my portrait work, and my style. If I lived somewhere else, my portraits would have a different feel to them.

How can you incorporate your local landscape in portraits?

Are there any other ways to utilize the local landscape?

#5 Use storytelling

There’s one way I can think of – tell a story. Perhaps there is the potential for a documentary project in your area. Stories are inevitably about people, so think about how local people interact with, or depend on the local landscape. For instance, activities such as running, sea kayaking, cycling, surfing and wind-surfing are all popular here in Wellington. Any one of those could make an interesting documentary project.

Or something more simple, such as Nathan Wirth’s seascapes with a Buddha.

What options do you have in your local area?

Ultimately, all these ideas are about the same thing: going deep and exploring your relationship with your local landscape in a way that isn’t possible on a brief visit. It’s the same reason that National Geographic photographers go away on assignment for months at a time. Intimacy with your subject and time produce a depth of coverage that you can’t get any other way.

Mastering Photography – additional learning

il-06

My ebook Mastering Photography: A Beginner’s Guide to Using Digital Cameras introduces you to photography and helps you make the most out of your digital cameras. It covers concepts such as lighting and composition as well as the camera settings you need to take landscape photos like the ones in this article.

Post originally from: Digital Photography Tips.

Check out our more Photography Tips at Photography Tips for Beginners, Portrait Photography Tips and Wedding Photography Tips.

The Intimate Landscape – 5 Tips for Better Landscape Photography

The post The Intimate Landscape – 5 Tips for Better Landscape Photography by Andrew Gibson appeared first on Digital Photography School.


Digital Photography School

 
Comments Off on The Intimate Landscape – 5 Tips for Better Landscape Photography

Posted in Photography


10 Tips to Motivate You out of a Photography Rut

22 Nov

Are you stuck in a rut?

Have you reached a point where all your photos start to look the same? Feeling uninspired? Or maybe you haven’t gone shooting for a while at all?

It happens to us all now and then, kind of like writer’s block. When we get too comfortable with what we do, we get into a routine and everything starts to look the same. This is why it’s important for artists to break out of our own molds from time to time.

photography rut and motivation Prairie Dog, Devils Tower National Monument, Wyoming, by Anne McKinnell

Prairie Dog, Devils Tower National Monument, Wyoming.

To help motivate you out of your photography rut, here are some of the best ways to get your creative juices flowing.

10 Tips to Motivate You out of a Photography Rut

#1 Explore other art forms

First of all, just remind yourself that it’s okay to think about something other than photography for a little while! Allowing your mind to take some time off will relieve the stress and tension that builds the scaffolding for creative blocks. Instead, devote some time to exploring other art forms to feed your creative soul – go watch a play, listen to music, check out a museum, or read some poetry. All of these experiences feed the muse, where they become thoughts, which associate with other thoughts, to then become new ideas.

photography rut motivation - The Museum of Man, Balboa Park, San Diego, by Anne McKinnell

Museum of Man, Balboa Park, San Diego

#2 Look at other artists’ work

But how do you know what to do, if you’ve never done it before? For inspiration, see what other people are doing. Look at pictures from other visual artists that you admire, or find a photography exhibit at a local gallery or museum. Go to the library and flip through photo books. Absorb as much as you can. Which photographers do you like best? What is it that you like about each of them, and what do they all have in common? Think about how each photograph was created and ask yourself: which direction is the light coming from? What focal length, aperture, and shutter speed do you think were used?

#3 Look at your own work

Open up your boxes and folders of old photos – the older, the better! As you look over them, think about how you’ve progressed as a photographer. With each photo, ask yourself what you would do differently if you were taking it now, with all you’ve learned since that time. Be honest with your self-critique; admit to yourself when something doesn’t work out, but be sure to congratulate yourself when something does. Feelings of accomplishment build your confidence to create new things.

#4 Try a new style

There are many styles of photography – portraiture, nature, street, abstract… the list can go on and on. If you’re getting too embedded in your usual style, step out of it and try something completely different. If you usually photograph people, photograph animals or still life instead. If you’re into landscapes, you could try your hand at street or architecture photography. You could even shoot exclusively in black and white for a while. Just do something you’ve never done before!

Try some new processing techniques too!

photography rut motivation - Anne McKinnell

Car decorated with bible quotes at Salvation Mountain, California.

#5 Re-create an image

If you find an image (either yours or someone else’s) that really interests you, grab your camera and do your best to emulate it. Look closely at the settings, lighting, depth of field, degree of blur (or lack thereof), the camera’s angle of view, and try mimic it with the tools and locations you have at your disposal. This is a fun and educational exercise that really gets the blood flowing through your creative brain.

#6 Take a class

Talking to others about photography can do wonders to rekindle your passion; seek out other photographers and try to connect with them. This could mean taking a recurring class, a one-day workshop, or joining (or creating) a local photography club. The artistic critique – the practice of discussing your work, as well as the work of others in a group setting – offers so many new opportunities to see things from differing points of view. Feedback, whether strictly positive or even constructively helpful, is very nourishing to the creative spirit.

#7 Borrow some new equipment

Having a new toy to play with can spark all sorts of ideas and inspiration in your imagination. If you are lucky enough to have a fellow photo friend who happens to shoot with the same kind of camera that you do, maybe you can share lenses or other accessories (flashes, etc.). You can also check with your local camera store about renting lenses and camera bodies, or borrow through a reputable online lens rental agency.

On the other hand, if you want to go lo-fi instead, you could opt to get your hands on a 35mm camera (they’re everywhere – try a thrift store) and some film (yes, they do still make it). Limiting yourself to the 36 shots per roll forces you to think about each frame more carefully, and is a completely different way to approach photography.

photography rut and motivation Bicycle with flat tire and Mardi Gras beads in New Orleans, by Anne McKinnell.

The effects in this image of a bicycle’s flat tire were achieved using a Lensbaby.

#8 Offer your services

If the opportunity arises, volunteering your time and skills for a good cause is a great way to challenge yourself and help others. You could run a photo booth at a local fundraiser or offer to take portraits of your friends and family, and there are countless charity organizations that would jump at the chance to have their fundraisers and other efforts documented.

#9 Get a new perspective

Look at the world from a different point of view. This can be as simple as getting up high – on a ladder, a building, or anything else – or down low, by crawling on your knees and belly to get a worm’s-eye shot. But it can also mean a more dramatic change, such as altering your surroundings all together. Try finding a brand new location to shoot in, whether that location is just another neighbourhood or whether you’d prefer to…

#10 Take a trip

This is, of course, my personal favourite way to keep my outlook fresh.

Sunset at Badlands National Park, South Dakota, by Anne McKinnell.

Sunset at Badlands National Park, South Dakota.

Going to a completely new place lets you view the world with fresh eyes and renewed wonder, and lets you see all the little details that get glossed over when you’re accustomed to the place you’re in. For me, traveling and photography are almost inseparable.

Creative ruts and blockages happen, but sometimes it’s our own hesitation that makes them seem so daunting. A lot of the time, all we need to get over that wall is to try jumping on a trampoline instead!

Post originally from: Digital Photography Tips.

Check out our more Photography Tips at Photography Tips for Beginners, Portrait Photography Tips and Wedding Photography Tips.

10 Tips to Motivate You out of a Photography Rut

The post 10 Tips to Motivate You out of a Photography Rut by Anne McKinnell appeared first on Digital Photography School.


Digital Photography School

 
Comments Off on 10 Tips to Motivate You out of a Photography Rut

Posted in Photography


3 Lightroom History Tips

06 Nov

Lightroom history tips opener

Like Photoshop, Lightroom has a History feature that shows a list of the fixes you’ve applied to an image. It can be used to wind back changes that you have made to an image. Unlike the Photoshop history, the Lightroom history entries don’t disappear when you close Lightroom – they remain accessible from one instance of Lightroom to the next.

The History panel is on the left in the Develop module. Click to open it and you’ll see a list of the edits made to the image. These read from bottom to top so the topmost history setting is the one you applied last to the image. These History settings show not only the sliders you adjusted when editing the image but also the final value of that slider and the amount of change you made at that step.

Lightroom history tips 1

You can wind back the history of changes that you’ve made to the image by clicking any of the entries in the History panel. Until you make further changes to the image you won’t lose the later history states if you click on an earlier one. So you can click from one history state to the next to view the image at that point in the editing process.

If you click to view an image at an earlier stage of its editing and then start making changes to the image you will lose all the later history states – they’ll be replaced by your new edits.

3 Lightroom History Tips

Here are three handy tips for working with Lightroom History:

1. Delete History

You can delete the Lightroom history for any selected image. To do so, click the X (Clear All) button in the top right of the History panel. This removes the history steps from the History panel – it doesn’t actually remove the edits from the image – it just clears the History panel.

Lightroom history tips 2

If you are like me you will use the backslash key (\) in the Develop module to compare the image Before and After your edits. However, sometimes you will want to compare the After version with the image as it was part way during the editing process – not as it was when you imported it.

You can set the Before version of an image to be the image as it was at any earlier History step. To do this, right click the History step that shows the image at the point you want to make the Before image and choose Copy History Step Settings to Before. If the most recent history step isn’t selected, select it to return to the current state of the image. Now, when you press the Backslash key you will compare the current state of the image with the selected history state.

You can also drag and drop History steps to do the same thing. So, if you are viewing the Before image you can drag and drop any History step onto the Before version and that will become the new Before version. Again – you don’t lose any history steps when you do this, you’re just creating a different Before version of the image.

Lightroom history tips 3

3. Create a Virtual Copy

When you are part way through editing an image you might want to go back and try a different editing process but also keep the version of the image you are working on. You can use the History panel to facilitate this. Start by selecting the History step where you want to begin an alternative method of editing the image. Right click the image and choose Create Virtual Copy. This creates a new Virtual Copy – its starting point is the current History step – it has no other History steps associated with it. Also note that this new Virtual Copy is the currently selected image.

Lightroom history tips 4

Before beginning to work on this image, click the original image in the filmstrip to reselect it and click the last History step in the list to return this version of the image to your current editing point.

You’ll now have two versions of the image – a virtual copy extracted from the image at the point at which you want to begin an alternative editing approach and the original version with all your current edits in place.

Post originally from: Digital Photography Tips.

Check out our more Photography Tips at Photography Tips for Beginners, Portrait Photography Tips and Wedding Photography Tips.

3 Lightroom History Tips

The post 3 Lightroom History Tips by Helen Bradley appeared first on Digital Photography School.


Digital Photography School

 
Comments Off on 3 Lightroom History Tips

Posted in Photography


Moon Photography: 6 Tips for Better Moon Photos

29 Oct

The moon is something so familiar to us, and yet so strange that it’s mesmerizing. It’s at once commonplace and extraordinary. As photographers, we are drawn to it in an attempt to convey the intrigue we feel when we look at it.

But moon photography can be tricky.

Moon Photography: Just the Moon, by Anne McKinnell

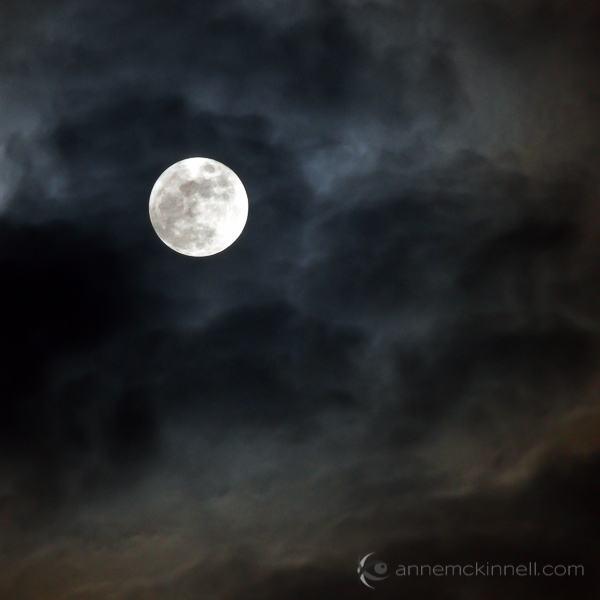
A bright full moon creates one of the most high contrast situations there is, posing a difficult challenge for photographers. Often photos of the moon appear like a spotlight in the sky that looks more like the sun than the moon.

Moon Photography Tips

To get the best possible pictures of our one-and-only moon, it’s important to know a few things about it first.

1. Learn the Phases of the Moon

The moon itself emits no light, it’s simply a huge rock being lit up by the sun. As it orbits the earth, and as the earth orbits the sun, how much we see of that reflection changes from a bright, full moon to no apparent moon at all.

Moon Photography: By Tomruen [Public domain], via Wikimedia Commons

By Tomruen [Public domain], via Wikimedia Commons

Because of our counter-clockwise trajectory around the sun, the shadow it casts on the moon is always moving to the left; after a new moon (no moon), the illuminated side starts to creep in from the right edge, expanding towards the left side each night. As the moon’s apparent size gets bigger, we call it “waxing”.

Once the moon is full, the shadow starts to reappear – again on the right side – and grow leftwards, shrinking the visible moon until it is dark again. This is called “waning”. Therefore, any time you want to know what the moon will look like tomorrow, look at it tonight; if it is lit on its right side, it is waxing towards fullness. But if it’s lit on the left, it is waning, and will soon be gone.

The twilight sky also holds clues to the lunar phases. If the moon is visible before sundown, it is waxing, but if you can see it before sunup, it’s waning. Alternatively, you can always look up a calendar online, or download a moon phase app that will do the calculations for you.

2. Use the Right Equipment

To maximize the success of your moon photography, there are a few bits of a gear that will come in handy.

Moon Photography: Moonrise over the Oak Bay Marina, in Victoria, British Columbia, by Anne McKinnell

  • A zoom lens.
    If you’ve ever taken a shot of the moon and been disappointed by the tiny white blob that results, you’re probably using too short of a focal length. A standard wide-angle lens makes everything appear smaller, particularly things that are far in the distance. To get a close-up shot, use a focal length of at least 200mm or more. Longer lenses will result in greater magnification and detail.
  • A tripod.
    To support the weight of this large lens, and to allow the slow shutter speeds that may be necessary to get a good exposure, mount your camera securely on a sturdy tripod.
  • A shutter release.
    These come in both wireless and wired options and will allow you to fire the shutter without having to depress the shutter button and risk camera shake. If you don’t have one, use your camera’s self-timer to achieve the same benefit.

3. Get a Good Exposure

The moon is very intricate and detailed, with craters, channels, and mountains dotting its surface. If the moon in your photo turns out bright white, it is overexposed. This happens frequently because the blackness of the surrounding sky throws the light meter off.

To fix this, turn down your exposure compensation (+/-), or use your camera’s spot metering mode to expose for the moon alone. Check your camera’s manual for information about how to do this on your specific model.

Moon Photography: Long Nights Moon by Anne McKinnell

For best moon photography results, bracket your shots. Some cameras will have an automatic bracketing feature, but if yours doesn’t, you can simply do it manually. First, take one shot at the automatically-determined settings. Then, using exposure compensation, take the same shot at -0.5EV, and one at +0.5EV. Do the same at -1EV and +1EV, and continue to +/-1.5EV and beyond if necessary. Later, you can choose the best exposure when you view them on your computer.

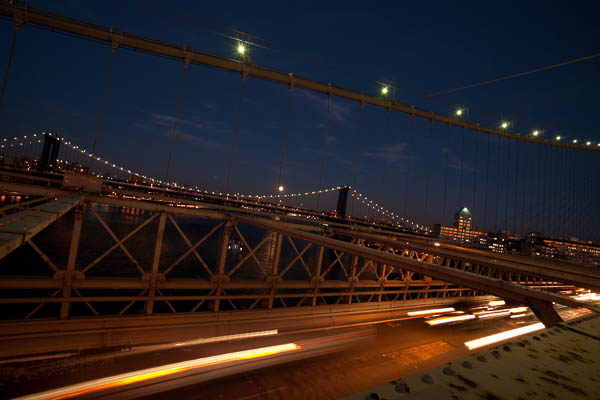
4. Find the Best Times and Places to Shoot

Unless the city is a part of your scene, you probably don’t want a lot of urban light pollution spilling into the sky when you’re trying to photograph a pristine moonlit night. You’ll get the cleanest shots outside of dense civilization. Explore backcountry roads, or take a hike into the nearby mountains to find truly dark night skies.

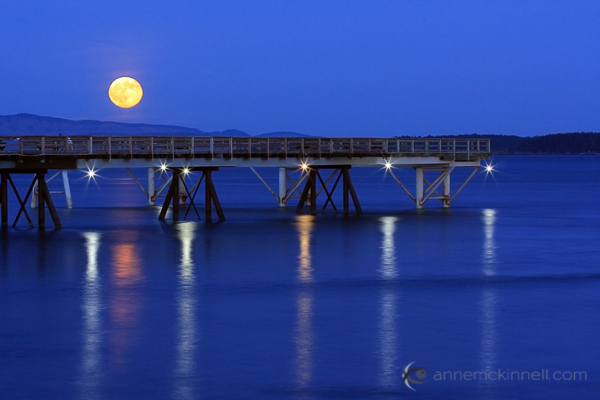
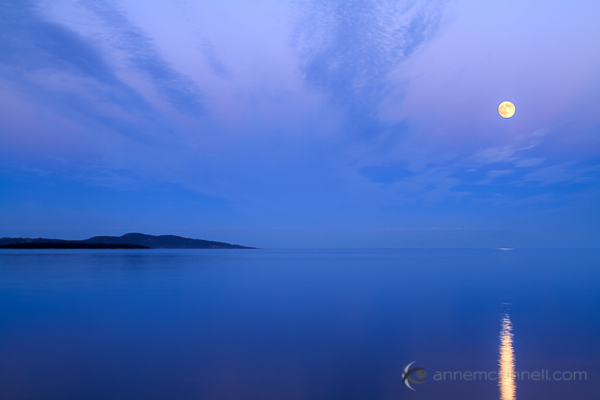
That said, a common problem photographers run into with moon photography is the harsh difference between a brilliantly lit moon and a pitch-dark sky. To avoid this, consider shooting during the “blue hours”, when the sky glows faintly after the sun goes down, or before it comes up. There is less contrast at this time, though the moon is still bright.

A moon phase app can help you determine when there will be a full moon during twilight.

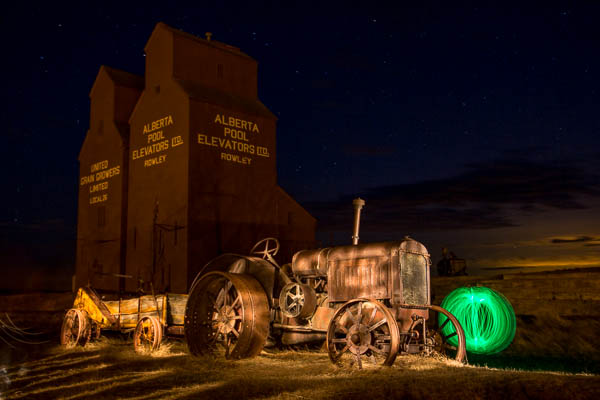
5. Create an Interesting Composition

Supermoon at Bryce Canyon National Park, Utah, by Anne McKinnell
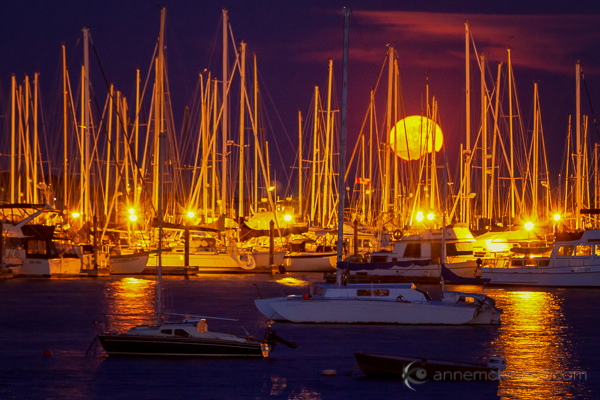
As compelling as a beautifully sharp, detailed image of a lonesome moon is, once you’ve seen one, you’ve seen them all. Getting that perfect close-up is excellent practice, but try to get creative by placing the moon within a more complex composition.

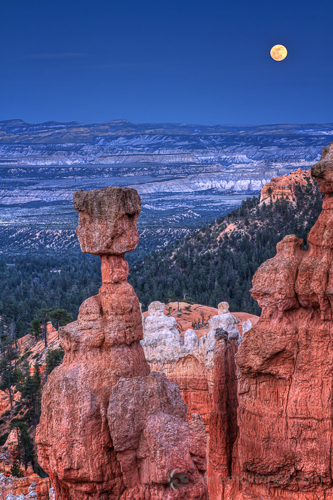
For instance, you could try framing it behind trees and buildings, or reflecting it off the surface of a still lake. Placing other objects in the foreground gives the moon context and scale that it lacks on its own. Think of the moon as a single element which should be incorporated along with other compositional elements and techniques to make a great final photograph.

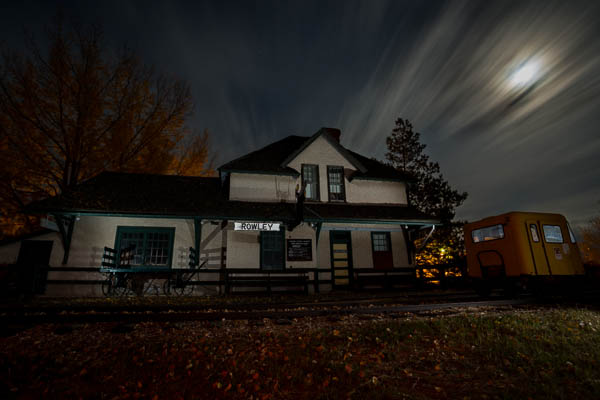
6. Combine Multiple Exposures

Incorporating other objects can complicate things though, and you may find that the perfect exposure for the moon doesn’t match that of the rest of the scene. Sometimes natural light doesn’t cooperate, and the camera doesn’t see things the way our eyes do. This is where digital photography comes in really handy, allowing you to play with your images to create the scene the way you saw it, even if the camera saw it a little differently.

To do this, take several shots at different exposures by bracketing, as mentioned above. When you open the files on your computer, choose two: the one with the best exposure on the moon (‘Image 1′), and the one with the best exposure on the rest of the scene (‘Image 2′). Using an image editing program, select the moon from Image 1 and copy it, then paste it into Image 2, covering the moon in that picture. Use the eraser tool with a heavily feathered edge to remove any imperfections and blend the edges together. This method may take some trial and error to get it just right, so try it several times with several different shots to get the hang of it.

Moonrise over the ocen in Sidney, British Columbia, by Anne McKinnell

When performing this technique, try not to stretch or enlarge the size of the moon. The goal of image editing is to faithfully recreate a scene that the camera simply can’t capture all at once, so beware of any visual exaggerations that make the composition look unnatural or inauthentic.

Share Your Moon Photography Tips and Moon Photos

Got any more moon photography tips to add? We’d love to see them in comments below. Also feel free to share any photos you’ve taken of the moon.

Post originally from: Digital Photography Tips.

Check out our more Photography Tips at Photography Tips for Beginners, Portrait Photography Tips and Wedding Photography Tips.

Moon Photography: 6 Tips for Better Moon Photos

The post Moon Photography: 6 Tips for Better Moon Photos by Anne McKinnell appeared first on Digital Photography School.


Digital Photography School

 
Comments Off on Moon Photography: 6 Tips for Better Moon Photos

Posted in Photography


7 Tips for Kayak Paddling Photography

19 Oct

I would like to remind you this old post, How Did you Shoot It? with some updates and revisions. It was written two years ago as part of ProBlogger’s group writing project – “How to …” I hope that these tips are still useful. They represent quite well my own approach to paddling photography.


After posting the above picture, “Paddling in Clouds”, I’ve got several questions: How did you do it? And, I had troubles to provide a reasonable answer since the shot was technically really trivial.

Finally, I figured out that it is more about seeing pictures than about shooting and wrote these more general comments.

1. Look and See

Learn to see pictures. You do not need a camera to practice it. I am often “shooting” without camera, especially, when driving: that would be a good picture, this old barn would look great at sunrise, that dust devil at a horizon can be seen only through polarized glasses.

I believe that looking at photographs in magazines, books and calendars also help to develop your seeing capability. I am checking all new photography books arriving to my university library and browsing most of photography magazines in a local bookstore.

There are several good books on the art of seeing. Freeman Patterson comes to my mind first. Recently, I spent a lot of time with Photographer Eye by Michael Freeman.

2. Have a Camera

A photographer is shooting pictures, not a camera, but you should have your camera ready. “Ready” means not only accessible. You should be familiar with your camera settings and operations. Learn what camera settings are working for your paddling photography. It may be difficult to figure out camera features when sitting in a tippy kayak and waves are splashing.

Compact waterproof digital cameras like Pentax Optio “W” or Olympus Stylus “SW” revolutionized my kayak photography. I can shoot pictures I was not able to execute before, e.g., with a partially submerged camera. I am ready to sacrifice some camera features or to some extend a picture quality for convenience and accessibility of these tiny camera for paddling environment.

3. Be Aware of Light

The best light for outdoor photography is when the sun is low, i.e., around sunrise and sunset. I know that I can expect interesting light at the end of my afternoon paddling workout. If the sunset is not very exciting I can shoot water reflections or a tree silhouette.

Ironically, on paddling trips, we are often passing the best scenery in the middle of day, when the light is harsh and unpleasant. I am still shooting some snapshots for documentary purposes. My primary motivation to start paddling fast kayaks was to get in time to my shooting spots. All that racing craziness came later …

4. Point (compose) and Shoot

Do not be afraid to shoot without viewfinder. Well, you don’t have one in Pentax Optio. And, the LCD display is often difficult to read in a bright sun. It shouldn’t stop you from shooting. Use some creative angles as far as you can extend your arm. Remember, you can put this camera under water next to you kayak. The lack of a viewfinder is perhaps the main reason preventing some photographers from buying this camera, but I think that this a reasonable compromise in the camera of this size.

I didn’t have a clear view of the camera display when shooting my “Paddling in Clouds” picture. I was just trying to keep a paddle diagonally in my frame.

foggy sunrise over Suwannee River, Florida

5. Shoot Multiple Frames

Shooting pictures with a digital camera is cheap. You do not need to worry about film cost. You can always erase the picture and shoot again unless you are after some action shots. So, do not be afraid to experiment and shoot even if you do not see the image in your LCD monitor. Shoot some extra frames. It is helpful to have an adequate memory card.

I shot about 30 frames trying to catch a sky reflection in water and in my paddle. However, I would show not more than 3 or 4 from those 30 frames.

6. Practice

The more you shoot the better you should get. I have shot similar pictures before including reflections and a paddle.

Review your pictures on the camera LCD if possible. Check the histogram. Analyze your shots after paddling on a computer screen. You have all information about camera setting included in each digital image file. Try to figure out what worked and what not. Learn from mistakes.

7. Have Fun

I don’t consider myself a professional photographer. When paddling I am shooting what I like just for fun. Documenting my paddling trips and races is still fun. I feel free to experiment.

The great Alfred Stieglitz was an amateur photographer too. Anyway, the photography is not a profession…

Sometimes I sell a picture to a magazine or donate to a book cover. A year ago, I started to sell my pictures through microstock agencies. I am just taking more often my DSLR camera and a tripod for paddling.

Related posts:kayaking Colorado - Douglas Lake

  • Use Your Paddle to Stabilize Camera
  • No Viewfinder? 10 Tips on Shooting Pictures without Viewfinder
  • Pentax Optio WP/WPi – 10 Tips on Paddling and Shooting
  • Can Pentax Optio waterproof cameras be used in the water?
  • Pentax Optio W10 as a Helmet Cam – Inline Skating along the Poudre
  • Shooting movies with Pentax Optio WP and W10 and Sisson Nucleus 100 kayak


paddling with a camera

 
Comments Off on 7 Tips for Kayak Paddling Photography

Posted in Photography


3 Tips for Creating Dramatic Images using Motion

18 Oct

motion-dps-09

There is a common misconception that if your image isn’t tack sharp and free of motion blur then it isn’t a good image. I’d like to show you three ways you can use motion blur to add drama and interest to your photography.

Misconception: motion blur in photography = a bad image

I would disagree and say, not necessarily so! It really depends on the subject you are shooting and your intention as the photographer and artist. Using blur can add interest and show implied movement in the image. It can help add a feeling of speed. If your are shooting a subject like sports, for example, you have use a fast lens and fast shutter speed to freeze motion at the peak of the action. OR you can introduce intentional motion blur by using a slower shutter speed to add a sense of speed. Neither is right or wrong, they’re just different. You get to choose and if you aren’t sure, do both!

Three tips for adding motion to your images

  • panning a moving subject
  • long exposures for affect
  • zooming or moving the camera during the exposure

Let’s look at each in more detail.

PANNING

DandC-Feb2013-0011-PPT

Panning is a technique for photographing moving subjects which allows you to get the subject relatively sharp, and blur the background. This adds a sense of speed and works particularly well when you have a background that is unattractive or distracting. The basics behind panning is you choose a slow shutter speed, and move your camera to follow the subject. Here are some tips on setting your camera for panning and giving it a try.

  • use high speed or “burst” shooting mode to take multiple images while holding down the shutter button
  • select Shutter Priority on your mode dial
  • start with 1/30th of a second and adjust slower and faster as necessary
  • practice following the moving object after it passes by
  • just like in golf, follow through is the key. Point your camera towards the approaching subject, shoot and follow them as they move through your field of view, and keep following their motion even after you stop shooting.

It takes a little bit of practice and a lot of trial and error but can result in some really stunning and creative images. Try shooting the same subject using a fast shutter speed and freezing the motion, then try panning and compare. It’s not something you will use for every subject, but it’s a good technique to have in your bag of tricks!

Here are a few examples of panning.

SanFran-2012-1090-PPT

1/25th of a second panned

DandC-June13-0092-PPT

1/30th of a second, panned

SanFran-2012-0893-PPT

1/25th of a second, panned

LONG EXPOSURES

By long exposures I’m taking about a shutter speed slower than you would usually be able to hand hold the camera. There are many reasons to use long exposures including: moving water, capturing star trails at night, car headlights moving through your scene, and night photography in general. You will need a sturdy tripod, a remote trigger to fire your camera and time. I say time for two reasons: one you will have to wait for some really long exposures sometimes, especially star trails; and two because you will need time to shoot, adjust and correct. A lot of photography is trial and error and in this age of digital photography we have the huge benefit of being able to have instant feedback so we can correct or adjust in the field and continue shooting.

Here’s an example of the same subject photographed at different shutter speeds. Which do you prefer?

1/5000th of a second

1/5000th of a second

1/40th of a second

1/40th of a second

Besides night photography another common reason to use long exposures during the day is to photograph waterfalls and moving water. Keep in mind neither approach is right or wrong, you just yield different results based on the choice you make. A faster shutter speed will freeze the water in mid air (like the first image above). A long exposure will blur the water, and if you use a long enough exposure it can even disappear or become misty looking. Here’s a comparison:

1/100th of a second

1/100th of a second

2.5 seconds

2.5 seconds

With moving water, there also comes a point where doing a longer exposure doesn’t look any different. Compare the image below a 5 seconds, to the one above at 2.5 seconds. The water looks pretty similar, but what did happen was the tree above was blurrier in the 5 second one, so I chose to use the 2.5 exposure.

5 seconds

5 seconds

Here are a few more examples of long exposures.

Do you see the motion in the images below? What is moving in each?

motion-dps-01 motion-dps-02 motion-dps-03 motion-dps-04 motion-dps-05

For more information on how to shoot these types of scenes read:

  • 15 Tips for Successful Fireworks Photography
  • Three Special Effects for Night Photography

ZOOMING

Last but not least, you can add motion by zooming your lens during the exposure. Basically what you do is physically rotate your zoom lens to change the focal length during a long exposure. This works really well and gives some really neat affects on night scenes with lights, neon signs, and even fireworks. But try it during the day too and see what you can create. It often results in a rather abstract image, sometimes completely obscuring the subject to make it unidentifiable. But that’s okay! Experiment and play with this idea. Have fun with it and get creative.

Some tips for zooming during your exposure:

  • Zoom in first to focus and lock it there so it doesn’t shift when you press the shutter button. You can use focus lock (a bit cumbersome), use autofocus and then turn it off, or use your camera’s back button focus capability. Whichever you choose just make sure you’ve focused with the lens at the longest focal length where it’s more critical than a wide one
  • Practice rotating the zoom mechanism on your lens. Get comfortable with which way to turn it, and how to turn it smoothly without making a bumpy mess.
  • Use an exposure of one second or longer. It’s pretty hard to do this a a/100th of a second!
  • Experiment with different zoom speeds (how fast you rotate the lens) and timing. The image will look different if you pause at the beginning and then zoom quickly, versus zoom slowly at the beginning and pause at the end of the exposure.

Here are a few examples of zoomed exposures

No zoom

No zoom. Notice all the small lights in this hotel lobby.

2 seconds

2 seconds

Also 2 seconds, notice how different they are? That's the zoom timing.

Also 2 seconds, notice how different they are? That’s the zoom timing.

2.5 seconds. Abstracted image of the sculpture in the first non-zoomed image (bottom left corner)

2.5 seconds. Abstracted image of the sculpture in the first non-zoomed image (bottom left corner)

motion-dps-06

No zoom, I thought it was boring so I played with panning and zooming while on the carousel. Parents were looking at me funny after my 4th time around.

No zoom, I thought it was boring so I played with panning and zooming while on the carousel. Parents were looking at me funny after my 4th time around.

motion-dps-08

Zoomed version. Is it better? Debatable but it’s the process of playing that leads to creating great images. Always continue to play.

ACTION PLAN

If you haven’t really played with long exposures much, I challenge you to try some of these techniques. Find some moving subjects and blur them on purpose. Or find something that will make an interesting abstract and blur it by zooming.

The point is that not every image has to be tack sharp and some have absolutely nothing in focus and they’re still great images. Don’t get stuck on technical things like sharpness and try experimenting with out of focus for a while. Add some motion using these tips, or maybe even shoot completely out of focus on purpose. Come back and share your images and experience with us.

Have you got some great motion blur images? Do share those as well in the comments below.

Got another tip you want to add to the list?  Please do!

Cheers,

Darlene-1-250x130


Post originally from: Digital Photography Tips.

Check out our more Photography Tips at Photography Tips for Beginners, Portrait Photography Tips and Wedding Photography Tips.

3 Tips for Creating Dramatic Images using Motion

The post 3 Tips for Creating Dramatic Images using Motion by Darlene Hildebrandt appeared first on Digital Photography School.


Digital Photography School

 
Comments Off on 3 Tips for Creating Dramatic Images using Motion

Posted in Photography