RSS
 

Posts Tagged ‘Tips’

Tips for Photographing Snow

16 Mar

Some of may still be in the throws of some nasty weather that Mother Nature can surprise us with like an early spring snow storm. Assuming of course it’s not completely freezing, why not get out there and do some winter photography!

In this short video you will get 8 tips for photographing snow; things like proper exposure, capturing falling flakes, what lens to use, and white balance.

Need more help with winter or snow photography?

  • Winter Photography Tips | Bendy straws and Ziploc bags?
  • Tips to Protect your Gear in Harsh Weather Conditions
  • 5 Uncommon Snow Photography Tips That Can Transform Your Winter Scenes.

The post Tips for Photographing Snow by Darlene Hildebrandt appeared first on Digital Photography School.


Digital Photography School

 
Comments Off on Tips for Photographing Snow

Posted in Photography


Tips for Photographing Popular Tourist Destinations

13 Mar

As photographers, we often note that one way to make interesting images that are different from the norm is to get our camera to out-of-the-way places that haven’t been flooded with photographers. But what about those times when you’re heading somewhere that has been photographed millions of times already? Is it possible to create interesting photos of tourist destinations? Can you create something intriguing if you’re headed to the Eiffel Tower, Golden Gate Bridge, Great Wall of China or Mount Rushmore?

I say yes. Let’s consider how you can make an interesting photo, or series of photos, at a famous location. Let’s look at an example from Alcatraz Island, the former prison that’s now a tourist destination in the San Francisco Bay.

Ahockley alcatraz 1

#1 First, cover the usual

Although we want to make photographs that go above and beyond the usual tourist snapshots, that doesn’t mean you’ll want to ignore those vantage points entirely. You’re at the location and you’ve probably seen the postcard photo a hundred times, but this might be your first time there with your camera.

If you’re going to Alcatraz, sure, take a photo of the island from the boat (see image above). It’s not the most interesting composition, but it provides a sense of location. Everyone else has done it, so why shouldn’t you?

#2 The Usual… with a twist

Try to mix it up a bit. How about that usual shot but with some sort of twist? Is there an element you could add to the composition for context? How about:

  • A photo of your ticket stub, with the date of the visit, in front of the tourist destination?
  • Intentionally including huge crowds in your photo instead of fighting with them?
  • Photos of other photographers as they make photos?

What would the usual shot look like if you got there before everyone else? Could a lack of people improve your shot? Do some research and see if there are any early entry or behind-the-scenes options.

At Alcatraz, you could take a photo from the boat, including the flag at the bow indicating your destination.

Ahockley alcatraz 2

#3 Turn around and look behind you

I’ve made many photographs simply by turning around and looking in the opposite direction to where everyone else is pointing their cameras. Could you get an interesting photo of the Marin Headlands while most folks photograph the Golden Gate Bridge from the north? As someone is photographing a sunset over the Pacific Ocean, what if you turned around to see what the golden light is doing to the scene at your back?

In this case, most everyone else was looking the opposite direction and photographing the San Francisco cityscape.

ahockley-alcatraz-3b

#4 Look for details

Capture the big-picture (pun intended) images. Get one with the whole Golden Gate Bridge in the frame. Go wide and ensure you have a photo of the full height and breadth of the Arc de Triomphe.

After you’ve done that, look for details. Instead of all of Lady Liberty (Statue of Liberty), how about a zoomed-in shot of just the tip of her torch? Take a look around at signs. What stories do they tell? Is there something old and worn out that helps tell the story of the location? Is there something fresh and new?

Ahockley alcatraz 4

Whether you use a zoom lens or just “zoom with your feet” and walk closer, get up close. Photographing a ship in port? Get a shot of the rope wrapped around the cleat at the dock. Hiking to a waterfall? Fill the frame with the area where the water hits the rocks, and get a photo of the trailhead sign as well.

Ahockley alcatraz 5

Each of these detail shots will help you as you get ready to use your images to…

#5 Present a story

You came, you saw, you photographed. What next? Go above and beyond the average tourist by creating an interesting presentation for your images.

After I visited Alcatraz a few times, I made a Blurb book, that’s one idea. Perhaps you would like to print three or four of the best images and display them together on your wall, that’s another. Lightroom’s print module allows you to create a nice album, which can be a fun way to display the images even if the only “printing” that you do is to create a PDF. If you’re going to share the images online, consider how you might present them in an organized gallery rather than just a haphazard fashion.

One of the reasons that good wedding photographers can charge a premium price for their services is not just that make good images, but also that they present those images in a nice fashion. You can do the same. After you’ve returned from your trip or photo expedition, think about how to wrap everything together into a nice storytelling package. Your friends, family, and others who enjoy your images will thank you.

Your turn

Do you have any additional tips for photographing popular tourist locations? Have you visited one recently that you’d like to share? Please do so on the comments section below.

Try these tips for more travel photography ideas:

  • How to Capture the Essence of a Place – Travel Photography Tips
  • Transcending Travel – a dPS ebook
  • 6 Tips for Photographing People When Travelling
  • 5 Ways to Create Detail Photos

The post Tips for Photographing Popular Tourist Destinations by Aaron Hockley appeared first on Digital Photography School.


Digital Photography School

 
Comments Off on Tips for Photographing Popular Tourist Destinations

Posted in Photography


5 Tips for Better Environmental Portraits

11 Mar

Environmental portraits typically show the subject in their natural environment. They are different from traditional portraits in that they tend to show more of the character of the subject, rather than just the subject in front of a neutral background. Most people, unless they are professional models or natural hams, tend to stiffen up in front of the camera. Because your subject is in his or her natural environment, they tend to be more relaxed, resulting in better facial expressions and body language.

Environmental portraits are my favorite way to photograph people. I love it when I get a shot that makes the subject’s friends and family say ‘Oh yeah, he’s got you down!” In this article I’ll discuss five things I always keep in mind when taking environmental portraits.

For this portrait, my client was very specific that she wanted to be captured in her apartment, just being who she is. It became quickly apparent that her dog was a very important part of that, so it was decided early that we would include him. EOS 5D Mark III with EF 24-70 f/2.8L IS II. 1/125 @ f/4, ISO 640.

For this portrait, my client was very specific that she wanted to be captured in her apartment, just being who she is. It became quickly apparent that her dog was a very important part of that, so it was decided early that we would include him. EOS 5D Mark III with EF 24-70 f/2.8L IS II. 1/125th at f/4, ISO 640

1. Do your homework

To properly photograph someone in their environment, you need to know your subject. You don’t have to be close friends, but generally speaking, when someone asks for an environmental portrait, you want to make sure you capture who they are. Ask what they have in mind. Ask what their hobbies are. If they want a portrait in their home, what’s their favorite spot in the house? What do they do in that spot? If it’s outside the home, where do they want to be photographed? Why? You need to become a bit of a reporter and sniff out the story. Then you need to illustrate it.

2. Get them talking

Now that you know a little about your subject, what they like to do, and where they like to do it, it’s time to point a camera at them.  This can be the “make-or-break” point of the shoot. If your subject is uncomfortable in front of the camera, this will come across in the images, unless you find a way to get them to relax. One of the easiest ways to get them to relax is to start a conversation. Make them forget that you are taking their photo by asking them about themselves. Have them talk about the spot they’ve chosen for the portrait, their hobbies, their families, their job – anything to get their mind off of the camera in front of them.

In the portrait below, my subject lives in the shadow of this bridge, and is most definitely a New Yorker. This was an impromptu session after a private tutoring session and she was reluctant to let me point the camera at her. She wanted to learn photography herself, so I wrapped a lesson into the banter and pretty soon she was just talking photography and forgetting I was snapping images.

My subject lives in the shadow of this bridge, and is most definitely a New Yorker.  This was an impromptu session after a private tutoring session and she was reluctant to let me point the camera at her. She wanted to learn photography herself, so I wrapped a lesson into the banter and pretty soon she was just talking photography and forgetting I was snapping images.  EOS 5D Mark II with EF 70-200 f/2.8L IS II. 1/200 @ f/4; ISO 100.

EOS 5D Mark II with EF 70-200 f/2.8L IS II – 1/200th at f/4,  ISO 100

3. Use Live View (if your camera has it)

This plays right along with item number two above.  Most people tense up when you raise the camera to your eye, waiting for the image to be taken. Some may even inadvertently shut their eyes, expecting a flash. If you can use Live View on your camera, you can get it away from your face. Your subject will be looking at you, and not at the camera, and will not necessarily anticipate you pressing the shutter button. This works especially well with cameras that feature articulating screens. It can be helpful to mount the camera on tripod as well, using a remote release to trigger the camera.

This is an image of my friend Chris (below), taken while he was supposed to be shooting me and my kids. We were discussing what shots we wanted next when I clicked this, using Live View to frame the shot and focus.

This is an image of my friend Chris, taken while he was supposed to be shooting me and my kids.  We were discussing what shots we wanted next when I clicked this, using Live View to frame the shot and focus. EOS-1D X with EF 24-70 f/2.8L II. 1/2500 @ f/2.8; ISO 100.

EOS-1D X with EF 24-70 f/2.8L II – 1/2500th at f/2.8, ISO 100

4. Modify the light

I try to go as minimal as possible with gear for environmental portraits, using the natural light at the location. However, there are always times where the light is less than optimal and you need to modify it in some way. This can be as simple as adding a reflector in a strategic location, or setting up a flash in a soft box or umbrella. It will all depend on what the available light is like and the look you are going for. One thing I always try to do is keep the light looking as natural as possible.

This was a business portrait, but my client wanted more than a simple headshot. It was taken late in the day, meaning I had to create my own light. She wanted her team in the background working, to show when you worked with her, she had a whole team backing her up. I used a Canon 430 EX II to light the background, aiming it off a white wall and the ceiling, out of the frame. I then used a Canon 580 EX II off camera in a Westcott Apollo 28″ soft box to light my client. I adjusted the intensity of the lighting so that the background light was at a 2:1 ratio with my main light.

This was a business portrait, but my client wanted more than a simple headshot.  It was taken late in the day meaning I had to create my own light. She wanted her team in the background working, to show when you worked with her, she had a whole team backing her up. I used a Canon 430 EX II to light the background, aiming it off a white wall and the ceiling, out of the frame. I then used a Canon 580 EX II off camera in a Westcott Apollo 28" soft box to light my client.  I ratio'd the lighting so that the background light was at a 2:1 ratio with my main light. EOS 5D Mark II with EF 24-105 f/4L IS. 1/100 @ f/4, ISO 400.

EOS 5D Mark II with EF 24-105 f/4L IS –  1/100th at f/4, ISO 400

5. Don’t be afraid to shoot tight

While it’s true than an environmental portrait normally means showing some of the area around your subject – the environment – you can get close and still show your subject’s character.  Take an element of your subject’s hobby, and show them participating in the hobby. If they’re a model builder, you could do a tight shot of them applying glue or assembling the pieces.  This is your chance to be creative, trying different angles, focusing on different aspects of  their personality and character.  Emphasize features that stand out, in a flattering way, if that’s the goal. Find out what makes the person in front of your camera special, and capture it!

Here's my subject from the shot in front of the bridge. She's a photographer as well now, but back then she was just a hobbyist who wanted to know more about her camera. I used the beautiful sunset light I was getting, and set up a reflector to camera right to bounce the light back into her face.  I wanted her peeking out from behind her camera, illustrating that she's into photography. EOS 5D Mark II with EF 24-105 f/4L IS. 1/250 @ f/4, ISO 100.

EOS 5D Mark II with EF 24-105 f/4L IS – 1/250th at f/4, ISO 100

This is the same girl as the shot in front of the bridge. She’s a photographer as well now, but back then she was just a hobbyist who wanted to know more about her camera. I used the beautiful sunset light I was getting, and set up a reflector to camera right to bounce the light back into her face. I wanted her peeking out from behind her camera, illustrating that she’s into photography.

Do you have any additional tips you’d add to this list? Please share in the comments below.

For more portrait photography tips check out these articles:

  • How to Create Great Environmental Portraits
  • 10 Techniques for Amazing Portraits
  • How to Choose the Perfect Portrait Lens
  • Portraits: Striking The Pose – a dPS ebook
  • Portraits Lighting The Shot – another dPS ebook

The post 5 Tips for Better Environmental Portraits by Rick Berk appeared first on Digital Photography School.


Digital Photography School

 
Comments Off on 5 Tips for Better Environmental Portraits

Posted in Photography


4 Tips for Post Processing Efficiency in Photoshop

08 Mar

post-processing-photoshop

A great deal of post processing can be done in Photoshop, more than most photographers realize actually. As a designer, I didn’t have Lightroom, and just wanted to adjust my photos to look a little nicer, little did I know the power behind Photoshop and its post processing capabilities.

Today I am going to give you some tips and tricks I learned that increased my efficiency within Photoshop.

1 – Photoshop Layout and Organization

The first way to increase efficiency before doing any photo editing, is to organize and optimize your Photoshop layout. Setting up and customizing your Photoshop layout is key to configuring exactly how you want your panels and canvas to look. It is also very easy to do, and can improve your workflow a lot.

Here are a few things to keep in mind when editing your Photoshop layout.

  • Only keep the necessary, delete all panels that are superfluous to your photo editing process. They really just get in the way and clutter your workspace.
  • Organize your panels based on your workflow. Keeping certain windows paired will help you work faster and make adjusting much easier.
  • Adjust spacing and panels so you can have the largest size available for your image.

Here is a quick preview of my layout, in case you need some inspiration.

Photoshop-Layout

After you carefully adjust and tweak the panels to perfection, it is really simple to save your workspace. Simply go to the top right corner of your Photoshop Document, where is says Mike’s Workspace in the image above, and click to activate the drop-down menu. Then click new workspace and you can save it as your very own Photoshop layout. You can even save shortcuts and menus within the layout.

2 – The Basic Effects

Now that you’ve organized your layout, it’s time to start editing your photos. When I start editing any photo I have a few basic steps I do religiously. These don’t have to be the same for you, and it is totally ok to completely disregard them (or come up with your own), but it is sort of a habit that can help contribute to your photography style.

The first small task I complete is duplicating the image layer. To ensure I don’t damage my original photo. From there I add a few subtle Adjustment Layers to balance the light in the image. It looks something like the image below.

curves-adjustment-layer-photoshop

The above effect is a simple curves adjustment that helps balance light and tone down the colors in a subtle manner. After that I mess with the brightness and contrast just a little bit to get the image looking clean and balanced (as an Adjustment Layer as shown below).

adjustment-layer-brightness-contrast

Consider all the above steps as precursory steps to the actual photo editing process. These are simply done to balance light, prevent error, and it is like a little system I use to keep my style inline.

3 – Grouping and Organizing Layers

The next thing I do that really helps me work more efficiently is to organize and group my layers. It is really easy and not time consuming at all to rename layers so that you know exactly what effect they are applying to your photo. Then you don’t need to go through all your layers, switching them on and off, to find one you want to remove or readjust.

These are the key areas I group and label my adjustment layers and filters.

  • Light and contrast adjustment groups
  • Tints and color variations
  • Strong filters such as HDR and blurs
  • Gradients and vignettes

By labeling these I can easily go to certain effects and adjust them accordingly. This makes photo editing a much faster process, and makes re-editing a photo way simpler and fun.

4 – Subtle Adjustments that Make a Huge Difference

As a final tip for efficiency I am going to share a few subtle effects that work wonders for photo editing. The tools used include:

  • Blend Modes
  • The Levels adjustment tool
  • Tints

Take a look at the difference a simple blend mode can do to an image, with just the click of one button. In the example below I’ve used the Overlay blend mode. Remember to duplicate your original layer and play with the blend modes on the top, copy layer. Blend modes dictate how the pixels in one layer behave and react with the layer below it. Try them all and see what they do.

Blend-Modes

Blending modes can be applied in a few ways. The easiest way, and the way I achieved the above effect is to duplicate your image and select the blend modes drop-down by double clicking your layer (or selecting it right from the Layers panel)

Blending

Double click the layer to get this dialog box

You can also find layer blend modes here on your layers panel

You can also find layer blend modes here on your layers panel

Simply pick the blend mode that looks best and adjust the opacity accordingly. Some of my favorite blend modes are – screen, overlay, soft light, and lighten.

I then use a Levels adjustment layer to adjust light and colors at the same time, adding a crisp and subtle tint. To add a new adjustment layer go to Layer > New Adjustment Layer > then choose the one you want.  Or select it from the bottom of the layers panel as shown below.

adjustment-layer-icon2

Adjustment layer icon location on the layers panel

adjustment-layer-icon

Adjustment layer options


Adjust the various levels by clicking the drop-down and working on the red, green, and blue tones. It is very versatile and easy to use. Just remember – pulling top sliders the ones under the graph) to the left will darken, to the right will lighten. The bottom sliders under the black-white scale, do the opposite.

Summed Up

This is the process I used to create ultimate efficiency when I started editing my photos more frequently. These steps probably won’t apply to everyone, but they are helpful in getting organized when beginning. To wrap it up:

  • Organize your Photoshop Layout to improve your workflow
  • Use some basic effects for consistency
  • Group and label your adjustments so you can easily find them for future reference
  • Take advantage of the subtle, but highly effective adjustment layers such as photo tints, levels, and blend modes

Now it’s up to you

Got some interesting tips or tricks for efficiency? Share them in the comments and help other photographers improve the way they work and edit photos in Photoshop.

The post 4 Tips for Post Processing Efficiency in Photoshop by Mike Moloney appeared first on Digital Photography School.


Digital Photography School

 
Comments Off on 4 Tips for Post Processing Efficiency in Photoshop

Posted in Photography


6 Tips for Lifestyle Newborn Photography

04 Mar

Newborn Photographers fall somewhere on a spectrum between producing posed, styled imagery and natural, lifestyle imagery.

Annie-Tao-Photography-newborn-photography-spectrum2b

While I enjoy looking at styled images of sleeping newborns in costume or appearing as though they are holding their own head up with the use of proficient Photoshop work, the emotions and stories captured in Lifestyle Photography images are what make my heart sing! So I stand comfortably and proudly on “side B” of the spectrum.

After following the rules outlined in The Sensitive Side of Newborn Photography, I follow these six tips for Newborn Photography:

1. Capture every detail

Whether the baby is crying heartily, yawning, or sleeping peacefully, they are all important and precious because the newborn stage is so brief. A yawn of a 4-day new infant, for example, looks different than a yawn of a 4-year old child, so photograph it all!

Annie-Tao-Photography-Lifestyle-Newborn-Photography-article-5b

Memorialize the details, including items in the nursery. Talk to the parents and find out what baby items are meaningful to them. Maybe the grandparent knit the blanket or the dog is considered the first-born!

Annie-Tao-Photography-Lifestyle-Newborn-Photography-article-12b

2.  Photograph them at home

Capturing images of the baby in his or her very first home means every backdrop and furniture will be meaningful in the photos. It also means every session will be unique since every home looks different than the other.

Annie-Tao-Photography-Lifestyle-Newborn-Photography-article-6bg

Annie-Tao-Photography-Lifestyle-Newborn-Photography-article-13

3.  Do the newborn photography session within the first 10 days

Annie-Tao-Photography-Lifestyle-Newborn-Photography-article-8Technically, babies are considered “newborns” the first 3 months of birth. However, in the first 10 days, babies sleep most of the day and can more easily handle noises and movement. Though in Lifestyle Photography, newborns do not need to sleep the entire time, the session will run smoother if the baby is calm.

They also have a better chance of not having skin issues, like newborn acne, which will save you time in post-processing after the session.

4. Be well-equipped

Most of the time, I confidently tell other photographers that their equipment is NOT as important as the person behind the camera when it comes to good imagery. This is still true with photographing newborns, however, you do need to have equipment that performs well in various indoor conditions, such as tight spaces and low light, A wide angle prime lens and a reflector are key. You should also have a macro lens to capture detail shots of the baby.

When I arrive at a client’s home, it usually looks like I’m staying overnight because I have a roller bag and carrying case!

Annie-Tao-Photography-Lifestyle-Newborn-Photography-article-1bg

5. Use natural light

Flash can startle newborns.

Also, when you are photographing new parents with their baby, using flash or other lighting equipment can take away from the spontaneity and natural tone of the shoot.

Annie-Tao-Photography-Lifestyle-Newborn-Photography-article-3b

6. Be flexible

A lot can happen when you’re photographing a newborn, like having unexpected baby visitors looking over your shoulder or being spit on, pooped on, vomited on! (that has all happened to me.) Just remember, you can’t always prepare for what happens at a newborn shoot, so stay calm and take everything in stride.

The first few days of a newborn’s life can be a hazy memory for new parents who are often sleep-deprived and running on adrenalin. Know that you are capturing a magical time for the family, and your photos of their life in that narrow slice of time will be treasured.

Annie-Tao-Photography-Lifestyle-Newborn-Photography-article-10b

Have you photographed any newborns or small babies? Do you have any additional tips or comments to add?

For more information on photographing babies and kids read these:

  • A Guide to Birth Photography
  • Maternity Photography – 7 Tips for Taking Great Shots
  • 7 Tips for Photographing Newborns without Becoming Clichéd, Derivative or Boring
  • Baby Sessions on a Shoe String

The post 6 Tips for Lifestyle Newborn Photography by Annie Tao appeared first on Digital Photography School.


Digital Photography School

 
Comments Off on 6 Tips for Lifestyle Newborn Photography

Posted in Photography


7 Tips for Taking Better Photographs of Cars

04 Mar

Taking photos of cars is such an interesting thing on its own. It’s like science. Every time I shoot a car I learn something from it! I would like to share some basic guidelines to get you started and help you understand this interesting niche in the photography world.

7 Tips for Taking Better Photographs of Cars

1. Shoot at the right time of day

This is by far the most common mistake people make when shooting cars. The best time to shoot will be a few minutes after sunset (or a few minutes before sunrise). Use a tripod and get that perfect soft light on the paint! This photo was taken for TopGear a few minutes before sunrise.

Car photography BMW M135i

2. Be on the lookout for reflections

You must be very careful of what reflects in the car. Have a look around you and look closely at the car and see what reflects on its surface. A car (especially a new shiny one) is like a mirror. Try and have an open space behind you like a field. Try and avoid shooting with buildings or trees behind you. One of the most important things you want to show in your car pictures are the design lines of the car, or as I like to call it, ‘her curves’. Reflections can spoil these curves.

Also be very careful not to have your own reflection in the photo. If you can’t avoid your own reflection its best to put the camera on a tripod, set the timer and move out of the shot. Just look at this photo I took of a dark shiny BMW 428i, behind me was nothing except the horizon. You can clearly see the horizon reflecting in the car.

Car photography tips BMW428i

3. Driving shots

One very easy way to get a cool image, is to shoot the car out of another moving car. (Please be super careful when doing this!) Shoot the car out of your window while driving at 60 km/h (40 miles/h) with a shutter speed of 1/100th of a second.

By doing this you will get some nice movement on the road and on the wheels. You can even decrease the shutter speed some more, but this will increase your chances to sit with unsharp photos afterwards. This Audi S3 was shot before sunset, driving at 70 km/h with a shutter speed of 1/80th of a second.

Car photography tips S3 driving shot

4. Color of the car

All types of paint react differently at different times of the day, with different light. Most colors hate direct sunlight, but some color works really well in direct sunlight. Just look at this baby blue beetle shot in the middle of the day.

Car photography tips beetle

5. Background

Make sure your background suits the car and the theme. Avoid having things in the background that will distract the eye. Things like dustbins, power lines and other cars can kill a picture. For this Aston Martin, I used a simple background . The yellow paint matches the car’s color.

Car photography aston martin

6. Panning for motion blur

A cool way to get some motion in your picture is to stand next to the road and let the car drive past you. Follow the car with your lens in one smooth action and set the shutter speed to 125th of a second. You will be amazed how easy this is! This Ferrari was shot at 125th of a second at 200mm. The car was driving roughly 60 km/h (40 miles/hr)

Car photography tips ferrari

7. Let the car interact with nature

Another way to make the photo speak to you is to make the car interact with its surroundings. Examples of this could be the car making dust, a 4×4 climbing over an obstacle. Look at this Chevrolet Trailblazer climbing over a rock or this G-Class AMG drifting on loose sand!

Car photography tips G AMG

Car photography tips trailblazer

8. Shooting at night

This might sound daunting but you will be amazed how easy and awesome this is! The biggest secret here is to find a spot where it’s completely dark, any streetlights or even a full moon could make life tricky.

When you have found this spot, set the camera up on a tripod. Set your ISO to 100, the shutter speed on 30 seconds and the aperture to f/9.
When the shutter opens take a strong constant light source and walk around the car ‘painting’ the car with your light. A normal household torch (flashlight) works for this.

There are no rules here, paint the car in different ways to get different effects; you will be blown away with the results! Here are some examples of this technique:

Car photography tips Opel Astra

This is an Opel Astra shot next to Table Mountain with Cape Town in the background.

Dodge Charger with the skyline of Detroit City

This is a Dodge Charger with the skyline of Detroit City in the back. This photo took me no longer than 5 minutes to set up and take.

Do you have any other car tips or favourite images you’ve taken of cars? Please share in the comments below.

For more related tips try these:

  • Light Painting Part One – the Photography
  • Showing Speed: Using Panning When Shooting Action
  • 3 Tips for Creating Dramatic Images using Motion
  • Do you pack up and leave after sunset and miss the fun of night photography?

The post 7 Tips for Taking Better Photographs of Cars by Desmond Louw appeared first on Digital Photography School.


Digital Photography School

 
Comments Off on 7 Tips for Taking Better Photographs of Cars

Posted in Photography


Tips for your Next Adventure Photography Trip

27 Feb

Many landscape photographers’ love for wilderness, drives them to venture far in search of wild and remote locations. The lure of solitude and unfamiliar scenery motivates many to photograph far off the beaten path. Adventure photography at it’s best.

Backpacking, rafting, canoeing, trekking, climbing, and other self-propelled modes of travel are a few of the ways these remote locations are accessed and used. Those adventures are often with other people and the rewards can be stunning scenery, wildlife, and of course: the wilderness experience.

On a canoe trip with my son we discovered this campsite on the shore (see image below). Earlier in the day I photographed the mountain reflecting in the lake before realizing the setting would make for a stunning photograph of a camp scene.

Sparks lake oregon

ISO 100, f/16, ½ second – Sparks Lake, Oregon

That experience is one reason many of us photograph! We photograph because we want to tell a story about the place we visited, what we saw, and how it looked. We do this by capturing wide views,long views and intimate details to create stunning nature images.

PHOTOGRAPHY IS AN ADVENTURE – PHOTOGRAPH IT

Photographing the landscape may be the sole purpose for some photographers heading into the wilds, but there might be another story that is often overlooked: the adventure itself. There are many photo opportunities from the scenery to the human experience that tell the story of a successful wilderness photo trip.

PLAN AND PREPARE BEFORE THE TRIP

Getting into the adventure mindset starts with pre-trip planning and determining a story line.

  • What is the trip about?
  • Who is going?
  • Will there be any specific events to plan for in advance?

Whenever I am preparing for an adventure I try to think like a National Geographic photographer. Their job and goal is to tell the story in pictures, in unique ways, and so is mine.

I have rafted many rivers including the Grand Canyon three times and each trip had a different group, with unique dynamics. To capture great storytelling images of an outdoor adventure, start by simply observing the other participants’ behaviour at the beginning of the trip. What will they do on the trip? Kayak, hike, climb, read, play music, or anything that you can observe and then plan to later photograph.

Next, I develop a list of photo ideas to reference during the trip. Most trip participants are not committed photographers like me, so it’s not hard to capture great images of them pursuing their interest and enjoying the adventure.

While I will photograph the scenery, all the activities like hiking canyons, cooking meals, sitting around the campfire, swimming in the waterfalls, dealing with physical challenges, and whitewater rafting through some of the biggest rapids in the U.S., are all on my mental shoot list.

Kayak grd cyn lava falls rapid 0001

ISO 100, f/5.6, 1/1000 – Grand Canyon Lava Falls Rapid

PACK THE RIGHT GEAR

Besides pre-planning the photo ops, I also plan the equipment and other gear I will need. For rafting trips I will take mostly the same gear as any other trip (when it comes to basic camera gear) keeping in mind limited space. But because it is a trip based around water I also take waterproof devices for the camera gear including Pelican cases, an underwater camera housing, and military ammo cans for accessories.

On a magazine assignment years ago, I took a horse pack trip into Hells Canyon in Oregon. The focus this time was on the outfitter himself, a cowboy (see image below, right) who ran backcountry horse trips and was also an elected official holding public office. The focus of the photography was the trip he was leading and included landscape imagery, the horses and horse packing, and the guests enjoying the wilderness adventure. I captured the adventure while the writer wrote about the politics. For my camera gear, I wore a hip pack for easy access to my camera while on horseback, while my camera backpack and tripod were tied down on a pack horse. Plan to take the right gear for the adventure.

During your pre-trip planning, start with some research on where you are going and observe how other photographers have photographed a similar trip. Make a list of the obvious: who, what, where, when, and how. This will remind you during the trip of images you had planned to capture when illustrating the story line.

Adventure photography people

Left: ISO 100, f/8, 1 second – reading by headlamp
Right: ISO 100, f/8, 1/30th – rancher Steens Mountain, Oregon

The woman above was always writing in her journal or reading in the evening, so I asked her to pose and read a book. (see image above, left)

SHOOT THE ORDINARY BUT SEEK THE EXTRAORDINARY

People are the key to telling adventure stories. It is images of their behaviour and how they interact with the wilderness adventure that communicates to the viewer just what the trip was about. Photos showing their highs and lows, their pain and their exuberance, how they overcome a physical challenge, all convey a sense of adventure.

As the adventure progresses you will develop a sense of how things are moving, what people do for activities, and where and when you can setup photo ideas from your to do list. I then suggest you ask people to pose in a storytelling scenario that ideally appears natural and un-posed. Posing can be a challenge to make look real, but by suggesting to the people to just ‘be themselves and read a book’ for example often results in a more natural pose. Other times, work like a photo journalist by keeping your camera in hand and ready to capture spontaneous moments which often lead to powerful storytelling images.

Alaska Raft Copper River 5

ISO 100, f/8, 1/200 – Alaska river guide

Photographing an Alaskan rafting trip, I was intrigued when I saw the river guide carrying this watermelon and in particular, his method of insuring we would not lose the fruit that went with tonight’s dinner. I asked him to stop and hold still.

VISUAL APPROACHES

Look up and down and all around when choosing your camera angles and storytelling compositions. I describe the two approaches I use as Observer and Participant. The photographer as Observer captures the activity as it happens, from the sidelines. The Participant photographs the action while being a part of it. The difference is the Observer captures views easily seen by anybody while the Participant captures views more difficult for everybody to see.

This is an angle photographed as an Observer from the river bank and while effective, was easy to capture the action and the setting.

Rafting grand canyon 002

ISO 100, f/5.6, 1/1000 – Rafting Grand Canyon, Observer viewpoint

This point of view photographed as a Participant, from within the boat, is very powerful; allowing viewers to feel like they were along for the ride as the boat was tossed around in the waves.

Gr cyn hermit 4

ISO 100, f/8, 1/250 – Participant viewpoint

The advantage for the photographer as Participant is capturing angles of the activity as though the camera was their eyes. Images shot from this approach give the viewer a perspective that can make them feel as if they are immersed in the action. A rock climber taking a photograph of the climber below them offers a unique perspective of what it is like to be on the rock wall. A view that the casual observer would not see without climbing the wall.

Rafting on a winter day with intermittent snow, I was positioned in the front of the raft when a wave came over the top of me and this paddler’s expression shows her bracing for impact.

Rogue erica yell

ISO 100, f/5.6, 1/60th – Participant viewpoint

ISOLATE AND ILLUSTRATE

Another effective visual approach in telling the story is to ‘isolate and illustrate’. Isolate refers to a subject isolated in the composition. They are the sole or dominant subject in the frame; the story is all about them and what they are doing. Nothing else visually is needed. These photos usually say ‘who and what’.

Here, a woman enjoying her coffee at sunrise was isolated in the composition using a telephoto lens, shot from the other side of the camp. The visual story is her and her camp. (see image below right)

Adventure photography sunrise tent

Left: ISO 100, f/8, 1/320th – sunrise
Right: ISO 100, f/5.6, 1/1000th – morning coffee

Captured on a 10 day climbing and photo adventure, the image above left, was shot during a hike up to watch the sunrise and it tells a story that the day is beginning. From the sun flare on the lens to the large view, this image clearly Illustrates the story of where they are and when.

The illustrated approach to a storytelling composition could be a subject much smaller in the scene in comparison to their surroundings. It’s a great approach for giving viewers the big picture and a sense of scale to the overall scene. An Illustrated image says ‘what and where’.

The example below of the illustrative approach shows a camp set among large mountains and the river. It tells the story differently by showing the size relationship between the subjects and background providing a sense of scale to the scene.

Alaska copper river camp 2A

As we were hiking back to camp, I noticed the shadows on the rocks and stopped and asked them to try various poses like a high-5 and dance on the rocks.

Egyptian shadow

ISO 100, f/11, 1/125th

Captured later in the afternoon, I used the Isolated approach to the composition showing the climber between the rocks. This created an image that’s all about her and what she is doing. (below left)

Adventure photogrpahy buttermilks climbing

Hiking with a group in Utah, one hiker spotted a small frog near a pool or water and picked it up to show it. The wide angle, up-close angle tells the story of humans interacting with nature (above right).

You can also create storytelling images by adding lighting to further tell that story. Here, one of my preconceived ideas was someone reading in this comfortable wilderness cabin tent. I asked them to sit on the bed and read a book, then placed my flash behind them so it placed a shadow on the tent that told the story.

Shadowed figure reading inside tent

ISO 100, f/8, 2 seconds

Finally…

There is always a story to be told from any photographic adventure and if you plan to go on an expedition of any kind, large or small, plan to photograph more than just the scenery. Here are a few steps to prepare:

  • Plan ahead of time to make sure you have the right equipment for the adventure.
  • Research the type of trip you are prepping for by looking at other images and methods photographers use to document the same trip. Use those for motivation.
  • Let the story line you thought of be a starting point to determining the images you want to capture.
  • Keep your mind open to other ideas beyond those on your shot list. Often the best images were not on your to-do list.
  • Think like you are on a magazine assignment and work hard to capture the whole story in your own unique way.

In the end you want your story in pictures to leave viewers feeling a great sense of what the trip was like, what was experienced, and how it might have felt to have been a participant.

Have you been on any adventures? Do you have any other tips to share? Please do so in the comments below.

More reading on outdoor photography:

  • Your Compete Guide to Outdoor Photography – Part Two
  • Your Complete Guide to Outdoor Photography – Part One
  • Winter Photography Tips | Bendy straws and Ziploc bags?
  • Living Landscapes a dPS ebook
  • 11 Tips For Eco-friendly Trail Photography

The post Tips for your Next Adventure Photography Trip by Charlie Borland appeared first on Digital Photography School.


Digital Photography School

 
Comments Off on Tips for your Next Adventure Photography Trip

Posted in Photography


Top 10 Pet Photography Tips and Techniques

26 Feb

Fergie bathroom copyright cowbelly pet photography

Top 10 Pet Photography Tips and Techniques

The pros make it look easy, but anyone who has ever tried to photograph an unpredictable creature like a cat or a dog knows it is anything but. Here are some pet photography tips that the pros use to help you ‘get the perfect shot’.

1. Relax

Animals are like little emotional sponges, and if you are stressed and anxious, they will sense it and become stressed and anxious too. A stressed animal will give you ‘ears flattened’, ‘concerned eyes’ looks, which don’t translate well ‘on film’. Take a deep breath and remember to have fun with it!

2. Focus on eyes and expressions

Ozzie copyright jamie pflughoeft

The eyes are the most expressive part of an animal’s face, so if you want to create really engaging portraits, focus on the eyes and facial expressions. A well-timed puppy whine (from you) can reel in focus in a puppy or curious dog, and have them staring straight at the camera faster than you can say “woof”.

3. Get rid of clutter first

Before you even pull your camera out of your bag, take a look around at your shooting location and get rid of clutter and distracting objects first. Do you really want to see that empty Starbucks cup on your coffee table in the photos of your cat? Is the garden hose snaking through the grass where you are photographing your dog, adding an aesthetically-pleasing element to your photos?

If an element in your background doesn’t serve to enhance your images in some way, either remove it first or move to a different location. An uncluttered environment produces more aesthetically pleasing images, and reduces post-processing work. Nobody needs to see photos of your puppy with an overflowing garbage can in the background.

Seamus copyright jamie pflughoeft

4. Shoot in their world

While a few shots looking down at your pet, while you are standing can be cute – to create the really engaging portraits the pros make, shoot down at their level, ‘in their world’. For a Great Dane their world may be the height of your hips; for a Chihuahua it may be all the way down at the level of your ankles. For a cat lounging on a cat tree, you may need to pull out a step stool to get on their level. Practice ‘shooting from the hip’ to place the camera in their world without having to crouch or kneel if they are on the ground.

Miles copyright jamie pflughoeft

5. Be flexible and do some stretching first

If you have ever watched a professional pet photographer in action, you will notice that they bend and twist and turn and crouch and crawl – whatever it takes to get the shot. Be prepared to get those muscles working in order to get the perfect composition. Sometimes all it takes for a dog to break their sit-stay is for you to go from sitting to standing, and it’s better to reach and lean, than make a large movement that will cause the pet to move from their perfect pose.

6. Go where the light is best

Good light is everything in photography, especially in pet photography, where it’s critical to be able to see the catchlights in the pet’s eyes (the white reflective parts). Avoid photographing in dark rooms or under heavily overcast days. Bright yet diffused light is the easiest to create flattering pet portraits under, so before you even start shooting, take a look around your subject’s environment and determine where the best bright, yet diffused light is; then move to that location.

Abbey copyright jamie pflughoeft

7. Pay your model

Every animal needs to have some sort of motivation to pay attention to you during the shoot; otherwise they will wander off and become disinterested. Determine what they are motivated by (i.e. their ‘payment’), and provide it to them throughout your shoot. For dogs it may be treats or toys, or simply getting love and affection. For cats it may be a feather toy, a paper bag, tuna fish, catnip or even their favourite blanket. For horses it may be their favourite food such as carrots or apples.

The biggest ‘trick’ in pet photography is to fool the animal into thinking that they are making the decisions, when it’s really you that is motivating them to do what you want, without telling them so outright . The ‘getting them to do what you want’ comes in the model payment. Get creative when it comes to ‘rewarding’ your models, and they will reward you with great shots and be more cooperative too. Plus the shoot will be more fun, and pet photography is supposed to be fun!

Penny copyright jamie pflughoeft

8. Create a concept and a shot list

The most engaging animal imagery shows them in context. It may be a cat looking up at an owner opening a bag of food in the kitchen (concept: desire), a dog looking longingly through a front door waiting for his or her buddy to come home (longing), a horse owner with her arms wrapped around her equine’s neck (connection). If you can say something with your images, they will speak to your viewers on a deeper emotional level.

Charlie doughnuts copyright jamie pflughoeft

9. Be quiet

There is no quicker way to confuse a dog, or freak out a cat than to bark commands at them repeatedly. Cats will disengage or even leave the room, and dogs will become confused and concerned.

Try communicating with the pets the way they do each other- nonverbally. Use hand signals or point to invite them ‘over here’. Use the sit hand signal for dogs that understand it. If you do need to say ’sit’, say it quietly and calmly, only once or twice. Avoid saying the pet’s name, because the more times they hear it during a photo shoot, the more inclined they are to tune out.

In my opinion, there’s nothing worse than a photographer (and an owner), hovering over a little dog and saying “sit Charlie,… no- SIT. I said Charlie sit. Sit. Down! Sit Charlie. Charlie- sit. Siiiit. SIT”. Poor Charlie! No wonder he’s confused. The less talking and ‘commanding’ you do, the better the shoot will be, and the more little Charlie will pay attention and ‘listen’.

Sid copyright jamie pflughoeft

10. Move slowly

Unless you are adept at documentary, on-the-fly, photography where the animal is moving a lot and you capture the perfect moment of them walking, sniffing, jumping, hunting, etc., learn to move slowly around them while taking their pictures. This is especially important with cats, who are prone to either radically change the expression on their face (and ears) at your slight movements, or split the scene altogether. This is also true of dogs that are in a sit or lay-stay position.

When you shift position they sense you are off on a new adventure and want to follow you. If you need to move, and you don’t want your model to move, do so very slowly without making any eye contact. And remember to reach, bend, and lean. You’ll not only have a comical pet photography session, you’ll get a workout too!

The post Top 10 Pet Photography Tips and Techniques by Jamie Pflughoeft appeared first on Digital Photography School.


Digital Photography School

 
Comments Off on Top 10 Pet Photography Tips and Techniques

Posted in Photography


10 Incredible Bird Photography Tips for Beginners

26 Feb

What is the most important factor in getting your bird photographs noticed by a large audience? Is it the camera or the lens or the bird?

Bald Eagle Flying Away With A Catch

Imagine you have a Canon 1DX or Nikon D4 and 800mm lens. You have been to a place to photograph the magnificent Bald Eagles. Everything seems perfect! Isn’t it?

But, what if you do not know what makes a good bird photograph? Do you think just by shooting a burst of photographs will give you the best photographs? Definitely not…you may get snapshots but not photographs.

“There is nothing worse than a sharp image of a fuzzy concept.” – Ansel Adams

Today you will learn some of the core principles of Bird Photography that will give you an understanding of what makes a good bird photograph.

1. You Don’t Need Expensive Lenses for Great Bird Photography

A great bird photograph does need several factors such as:

  • Quality and Direction of the light
  • Composition
  • Knowledge about the bird and its activities
  • Background
  • Knowledge about the gear you are using
  • Proper Settings
  • Proper Exposure
  • Your position
  • 3 + 1 Ps (Patience, Perseverance, Practice + Passion)

You see, it takes a lot more to become a good bird photographer. A decent APS-C or DX format camera body with telephoto lens of up to 300mm is more than sufficient to really get great bird photographs.

It is important to realize that bird photography is much more than just the camera or the lens. There is no denial of the fact that the longer the lens, the easier it is to photograph birds which are skittish. But, the lens itself cannot make a great bird photograph.

But, if you do not have a longer telephoto lens, nothing stops you from taking a great photograph of birds like Mallard ducks, geese, gulls, and herons that are easily approachable. If you cannot take a close-up of a Bald Eagle, nothing stops you from taking a unique photograph of a Bald Eagle in its habitat.

Everything boils down to how you view the situation. “Is the glass half empty or half full?”

2. Light and Composition

Green Heron Standing Tall
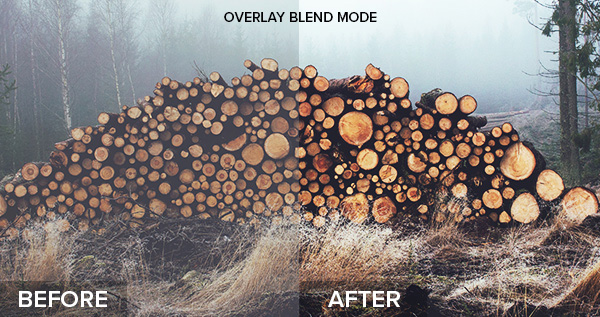
Photography is all about light. Light has few characteristics that will make a photograph wonderful.

Early morning and late afternoon light is usually the best time for bird photography. The light during these times is soft. As a bonus, the birds are very active as well.

Soft light has some wonderful characteristics like:

  • It does not cast harsh shadows on the bird
  • It brings out a glow to the bird’s plumage
  • It gives the catch light in bird’s eye

Composing a bird photograph helps you to convey your message in the best possible way. Bird Photography composition is generally very simple. Following a few basic composition principles will help you make a difference:

  • Use rule of thirds composition to place the bird off-center
  • Use color contrast by aiming for complementary background
  • Fill the frame with the bird
  • Use a clean background

3. Transport the Viewer into the Bird’s World

We see our world at 5 to 6 feet high, but birds see the world in few inches to few feet. To get a feeling of the bird’s world, then you need to get down to their level!

Go Low and Go Slow…

Always try to photograph the birds from their eye level, except the birds in flight of course. It has greater benefits that will overshadow any of your complaints like I can’t bend down, lie down etc. Some of the obvious benefits are:

  • You get more intimate photographs of birds since you will get an eye contact
  • You will get pleasing blur both in the foreground and background
  • You make the bird less scared since you can hardly move
  • You will transport the viewer into the bird’s world

Goslings Crossing the Road

4. It’s all in the Eye

Take a look at any photograph of a bird. What is the first thing you want to see? It’s the eye…right?

We tend to make an eye connection with any living being. It is no different with birds. The eyes are the windows to the soul. If there is no light in the eyes, then they look dull or lifeless. Birds look lively when there is light in their eye.

This light in the eye is called a catch light.

Sparrow perching on a tree branch

By following few guidelines you can easily get better bird photographs:

  • Always keep the bird’s eye in sharp focus
  • Check for a catch light in the bird’s eye (easy to get if the bird is front lit)
  • Make sure to photograph from bird’s eye level

5. Fill the Frame

In bird photography, mostly we photograph an individual bird. While photographing individual birds, it is always a good idea to fill the frame with the bird.

Advantages of filling the frame with the bird are:

  • It is easy to focus on the bird
  • It is easy to achieve a pleasing blur or bokeh effect in the background
  • It is easy to properly expose for the bird
  • It is easy to compose in the field

Juvenile Blue Heron Close Up

6. Tell a Story

Storytelling in bird photography should not be confused with the stories that run for pages. Storytelling is a way to express the time of the day, mood, place or activity of the bird in one photograph. Viewers should be able to picture themselves in the scene.

Simply put, a photograph with bird and its surrounding will give a better sense of story than just the bird filling the frame. Though, it may not always be true.

Great Egret in Misty Morning

Here are few tips you can follow while you photograph a bird in its habitat:

  • Make the bird an integral part of the photograph by including its natural habitat
  • Show the interaction of birds if there is more than one bird in the photograph
  • Indicate the weather conditions by including either snow, rain or mist
  • Take photographs during sunrise and sunset
  • Show season by including flowers in bloom, autumn colors, or snow

7. Capture their Action and Behaviour

Birds are always in action. They hardly sit idle. Capturing birds in action involves more effort and patience compared to photographing perched birds.

Here are few tips to capturing birds in action:

  • Photograph early in the morning or late in the afternoon when birds are very active
  • Use burst shot mode to take several photographs during the action
  • Track the bird until focus is locked before pressing the shutter
  • Learn to anticipate the action either by observing or reading about them

Juvenile Blue Heron with a Fish

Birds tend to ignore you when they are very hungry. It is very easy to photograph them in action during these times. But, care should be taken not to disturb them and maintain considerable distance.

Capturing bird’s behaviour is much tougher than any other aspect. Generally because birds become alert the moment you are in their sight.

The alert bird is always trying to fly away and rarely will you see its behaviour. You can observe actual behaviours of a bird when it is comfortable. There are few ways to make the bird comfortable:

  • Use a natural place to hide, like a bush or tree or something that obscures you
  • Wait patiently until the bird ignores you
  • Visit the location several days in a row, until the bird becomes comfortable with your presence or you get the right opportunity

Juvenile Great Egret Behavior

Remember to research and learn everything about the bird you are photographing. This will definitely make you a better bird photographer and also you will enjoy knowing about the bird.

8. Capture their Magnificent Flight

The most interesting part of bird photography is capturing their magnificent flight. This is a very tricky aspect for beginners and pros alike. It is not easy to take flight photographs that will wow viewers.

The success with birds in flight photography largely depends on the bird as well as the technique that one employs. Smaller birds are generally very erratic in their flight and also a bit difficult to track since they are generally too small in the frame. But the larger birds are slightly less swift and are not as difficult to track.

If you want to be successful with flight photography, start with the larger, slower moving birds. Learn all the field techniques to capture the perfect photographs of these birds.

Belted Kingfisher in Flight

Here are simple tips that will help you capture those magnificent flight photographs:

  • Learn about the bird’s flight patterns
  • Know their landing and taking off patterns
  • If there is more than one bird, it is almost always the case that if one flies, the rest will follow the suit
  • Track the bird for a while and let the camera achieve focus before pressing the shutter
  • Use Aperture Priority so that you do not have to worry much about the changing light conditions

9. The Background Makes the Picture

This is one of my favourite topics which I repeat often. What are your thoughts on this? – Is it the background or the bird which makes the picture?

Go through all your favourite bird photographs and see it for yourself. Let me know what you think, in the comments below.

Except extreme close-up portraits of birds, every other type of bird photograph will look great when the background is clean and complementing the bird.

Seagull the Eagle

It is very important to keep a check on the background while taking bird photographs. Just follow these simple tips:

  • Avoid taking bird photographs when the background is too distracting
  • Avoid taking bird photographs when the background is plain and boring
  • Wait for the bird to assume a good position or you change your position to get an interesting background
  • Choose maximum aperture values to throw the background completely, or slightly out of focus

10. Practice with Common Birds

I urge you to practice with common birds. You might have understood by now that the techniques are not dependent on camera, lens or the bird. I was using 18-200mm lens for first 4 years. I learned and practiced most of my birding techniques with common birds like seagulls, Mallard ducks, geese and herons.

I spend most of my time photographing these common birds, and I gave myself a challenge to make some unique photographs of them, that has fuelled my passion so long. I put more importance on learning and practicing photography, than whatever gear I possess. I am very glad to say that I learned most of the photography basics here at Digital Photography School.

I hope my story so far is an inspiration to you to embrace the beauty of these common birds.

Wrap up

Barn Swallow Taking OffFocus your time and energy in learning all the core principles outlined above. Prove it to yourself that you have so much passion to go out and photograph the birds every day, or as often as you can.

Remember that proper techniques will always outsmart equipment. Make every attempt to make amazing photographs of the common birds. Enjoy photographing birds. That is the secret to success.

Share your experience with us. Do you go out very often to photograph birds? Do you think technique outsmarts the equipment? I would be glad to answer any questions you have. Do let us know if you have any other suggestions on bird photography.

The post 10 Incredible Bird Photography Tips for Beginners by Prathap DK appeared first on Digital Photography School.


Digital Photography School

 
Comments Off on 10 Incredible Bird Photography Tips for Beginners

Posted in Photography


5 Street Portrait Tips to Overcome Your Fear of Approaching Strangers

21 Feb

It can be scary to start taking street portraits, especially if you’re an introvert. You like being quiet, people are busy and you don’t want to bother anyone. But you’re a photographer, so you see all of these “decisive moments,” and every time they slip away, it hurts a little. With practice and a few tips, though, you can shoot Continue Reading

The post 5 Street Portrait Tips to Overcome Your Fear of Approaching Strangers appeared first on Photodoto.


Photodoto

 
Comments Off on 5 Street Portrait Tips to Overcome Your Fear of Approaching Strangers

Posted in Photography