Low light photography is one of those types of photography that when done well can produce amazing photos but when not done well can leave you feeling a bit disappointed. It’s a type of photography that at first can seem quite complicated as if you need a PhD to master. Yet all you actually need is a few simple pieces Continue Reading
The post The Ultimate Guide To Low Light Photography: Tips, Settings, Cameras, Lenses appeared first on Photodoto.
The post 5 Tips for Setting the Focus in Your Landscape Photography appeared first on Digital Photography School. It was authored by Jim Hamel.
For many types of photography, the question of where you should set your focus is pretty simple. For example, in portrait photography, there is one simple rule: focus on the eyes. When the eyes aren’t on the same plane of focus, focus on the near eye. End of story.
It is pretty simple with other types of photography, as well. In wildlife photography, you focus on the animal. In fact, in any type of photography where there is a clear subject, you always focus on that subject. That’s not to say it is always easy, but at least it isn’t difficult to figure out.
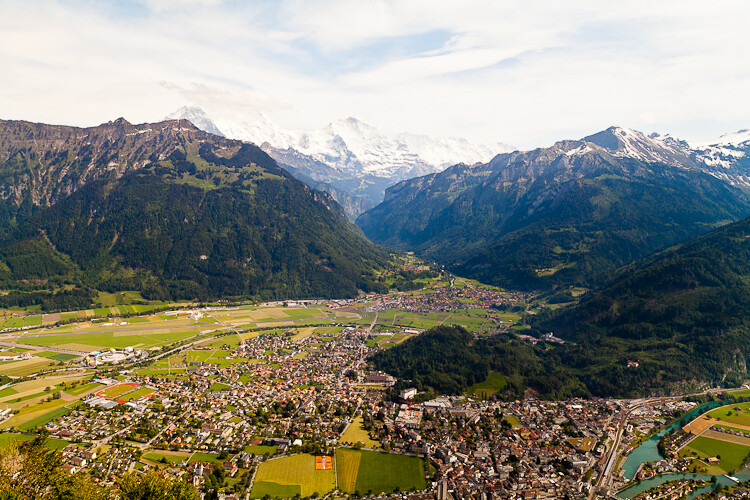
Foreground sharpness is paramount in many landscape photos.
But what about landscape photography, where you are generally capturing more of a scene than a solitary subject? Where do you focus to ensure that everything in the scene is as sharp as possible? The answer isn’t always so clear.
Therefore, in this article, we’ll cover some tips for helping you know where to set the focus.
Tip 1: Don’t just set the focus at infinity
Again, oftentimes in landscape photography, you are trying to capture a scene rather than a solitary thing. Many times, the scene you are trying to capture is far away from you.
Most lenses have a range of focus values, and once you get beyond a certain distance (often 20-30 feet, or 8-10 meters) the focus is set at infinity. Everything beyond that point will just be infinity. Therefore, if you are taking a picture where most things in the frame are far away, it might seem that you should just set the focus at infinity. If you are using autofocus (and most of us are), you might be inclined to set the focus using something that is very far away from you.
If everything in the frame is truly at infinity, then setting the focus at its maximum distance is not a horrible idea. If there is nothing close to you, then there is just no need to do anything else; you don’t need to overly complicate things. But more commonly there are aspects of the scene that are closer to you than infinity. Where do you set the focus then?
You can get into hyperfocal distance (we’ll talk more about that in a minute) and make this as technical as you want. But often your time is precious when you’re out shooting. The light is changing and things are moving. You can get a pretty good sense of things without resorting to calculations.
As a result, consider this rule of thumb: Set the focus at infinity and then just turn it back a little bit. But there’s an obvious question: How do you define a little bit?
I’m afraid I don’t have a good answer for you. It will vary from lens to lens, but will usually be about a 5-10° turn or just to the highest distance number printed on the lens (if your lens has these numbers).
Why would you want to do that?
Because of the depth of field that will be in your picture (more on depth of field below). Since you are taking an outdoor photo, you will probably not be shooting wide open, or even with a large aperture. So there will likely be some depth depth of field involved. It doesn’t necessarily have to be a large depth of field, but the point is that it gives you some leeway. By pulling the focus forward, that leeway will still get everything out to infinity in focus. It will also get things a little closer in focus, as well.
Tip 2: Try focusing a third of the way into the picture
Many pictures are ruined because the foreground is not sharp. It happens all the time. Therefore, if you have something in your scene that is close to the camera, focus on it. If the ground is prominent in your picture, set your focus close to you. Make sure that foreground is in focus. Often you will set the focus only a few feet in front of you.
But wait a second, you might ask, what about my background? Won’t it be out of focus or blurry?
Probably not. If you’re using your wide-angle lens (and if you are taking an outdoor photo that has a discrete foreground, then you probably are) you will have a wide depth of field, even at moderate to large apertures.
A sharp foregound focus furthers the viewer’s sense that they can walk into the picture.
Tip 3: Focus on the subject matter
Let’s not lose sight of the obvious, though. When you have a definite subject or center of interest in your photo, just focus on that. It is the most important part of your picture, and you absolutely need it in focus.
Don’t worry about your foreground, and don’t worry about your background. Just make sure the subject is in focus. Frankly, if there is a little fall-off in sharpness from your subject, that will probably not be such a bad thing.
Sometimes you just want a definite subject in focus, and having the background start to blur out is just fine, as in this image of a sheep.
Tip 4: Watch the aperture
There are no free lunches in photography. You probably already know that by using a smaller aperture to get a larger depth of field, it will cost you light. The smaller aperture lets in less light, so you will have to use a longer shutter speed (risking blur if you aren’t using a tripod) or raise the ISO (risking digital noise in your picture).
But the smaller aperture will also lead to something called diffraction, particularly in cameras with smaller digital sensors. Therefore, just using the smallest aperture possible isn’t always the answer. You cannot just set your focus anywhere and rely on a super-wide depth of field to save you.
There are two ways around this issue though, which we’ll talk about next.
With everything in the shot at a distance of infinity (30 feet or more), I did not need a wide depth of field to keep everything in focus.
Tip 5: Know Your hyperfocal distance
Hyperfocal distance is just a fancy name for determining how close you can set your focus and still keep your background acceptably sharp. There are apps and calculators that will tell you this distance depending on your aperture, sensor size, and focal length.
For a full explanation of hyperfocal distance along with some charts and links to apps that will calculate it for you, check out this article: How to Find and Use Hyperfocal Distance for Sharp Backgrounds .
An example will illustrate the point made above about backgrounds tending to remain sharp when you are using wide-angle lenses. If you’re using a 16mm lens on a full frame camera and shooting at f/11, your hyperfocal distance is only 2.5 feet. That means you can set the focus on a point just in front of you, and keep everything behind that point sharp.
Knowing the hyperfocal distance will often liberate you to set the focus point quite close, in order to maintain sharp foregrounds in your picture. It also means you often don’t need to use the smallest aperture your lens offers, so you can avoid the effects of diffraction.
Tip 6: Consider focus stacking
When the methods above won’t work for you, or you just need to make sure absolutely everything in the photo from front to back is tack-sharp, you may want to consider focus stacking. Here you take multiple pictures of the same scene using different focus points.
Start by setting the aperture of your lens where it is sharpest (also called the sweet spot; if you don’t know, that is usually in the range of f/5.6 – f/8). Take a shot with the focus set close to you, then repeat the process, gradually setting the focus point farther and farther away with each shot. Later you blend your pictures in Photoshop (for more about how to do that check out this article: Maximizing Depth of Field Without Diffraction).
This method is not a cure-all. It obviously won’t work with moving subject matter. In addition, it can be tedious, and you risk slightly moving the camera since you have to twist the focus ring between shots. Still it can be a powerful tool for maintaining focus and sharpness throughout your entire picture.
Setting the focus in landscape photography: Summary
No rule is going to cover every situation when it comes to focus. As with many aspects of photography, you’ll just have to use your own judgment in the field. Hopefully, as you do so, these tips will help you nail the focus and keep the picture tack sharp where it matters.
This week we are doing a series of articles to help you do better nature photography. See previous articles here:
3 Habits Every Outdoor Photographer Should Develop to Avoid Missing Shots
5 Tips for Better Nature Photography
27 Serene Images of the Natural World
Weekly Photography Challenge – Nature
10 Ideas for Photographing Nature in your Backyard
6 Tips for Capturing Character and Personality in Wildlife Photography
The post 5 Tips for Setting the Focus in Your Landscape Photography appeared first on Digital Photography School. It was authored by Jim Hamel.
The post Nature and Wildlife Photography Tips for Beginners appeared first on Digital Photography School. It was authored by Adam Welch.
If you have an interest in wildlife or nature photography, then there is a good chance you have seen an image at some point that has completely taken your breath away. Maybe it was a photograph of a sweeping landscape washed in the golden light of the dying afternoon sun, or a close-up of some small natural miracle that you had never noticed before that moment.
You might even have asked yourself, “How did they do that?”
Well, the majority of those incredible photographs came about through a good deal of physical hardship, practiced patience, and a healthy amount of self-made luck.
Here are some tips to help you become stronger at wildlife photography and better at recording the natural world.
Do your homework before heading out
Be as educated as possible before you ever make a photo. Doing your homework is one of the most important, yet loathed, parts of wildlife photography. It never pays to walk into a situation and be completely clueless.
Though you can never be totally prepared for every challenge you will face (that’s part of the fun), you can educate yourself so that you safely make the most of your outing.
What gear to pack
Advanced gear is not a requirement. However, patience and perseverance are essential. You don’t need the latest and greatest zoom lens or space-age gadgetry in order to produce outstanding nature and wildlife photos.
At the same, you must also understand any limitations of your kit, so that you will have realistic expectations and avoid disappointment.
This photograph was made using the 28-135mm kit lens that came with my camera after I slowly and quietly crawled into range.
Gear up for what you’ll most likely be shooting. Packing for a photographic outing can cause a lot of anxiety. It’s easy to overpack due to fear of lacking a piece of gear.
Overpacking, though, can be even worse than underpacking. You become weighed down and uncomfortable. You find yourself not enjoying what you’re doing, which is one of the most preventable of all mistakes made by photographers.
Research the animals and scenes you are likely to encounter. Decide what gear most and least important to you. Make choices, commit to them, and then let it go. It will make packing a lot less stressful.
If you plan on photographing wildlife, such as birds and animals that scare easily, then pack your best zoom lens so you can keep distance between you and your subject.
Are you shooting landscapes or scenes where stealth is not a concern? You might consider taking along a wider angle lens to better capture your scene.
Ultimately, there is no secret formula and no true all-in-one lens to cover every situation. Be informed before you leave so that you can make the best use of whatever lens you have.
A good bag is worth its weight in gold
All the planning in the world isn’t worth much unless you can comfortably carry your essential tools with you. Find a camera bag that can carry the gear you need easily and is equally comfortable on your body.
Bags range greatly in price and quality, but you usually get what you pay for. For added peace of mind, you might consider a bag that is semi-weatherproof or water-resistant.
Here’s my go-to lightweight bag for wildlife photography, shown with and without the handy rain cover deployed:
Read reviews and find a bag that fits your body, your gear, and your planned outing. You will have a much more comfortable and enjoyable experience.
Speaking of comfort:
Comfort items
Shoes: A good pair of hiking shoes or boots is one of the most important pieces of gear for any wildlife photographer. Grit, dirt, mud, water, insects, rocks, and creepy-crawlies; you need a pair of shoes or boots that can handle all of these elements.
Your shoes should be well-fitting and suitable for walking long distances. If your feet become uncomfortable, it won’t be long before you start thinking about cutting your trip short.
Prepare a checklist
It’s always a good idea to have a mental checklist before beginning any shoot. Before your outing, ask yourself the following questions:
Are any special permits or permissions required? Some national parks, state parks, and wildlife sanctuaries require special permits for access to certain areas, especially backcountry environments.
Where will I park my vehicle? This is very important. Believe me, if you park your vehicle in an unauthorized area, then you will be stuck with a sizeable fine. Or worse, you’ll return to find your vehicle has been towed.
Are there time restraints of any kind? Most natural areas and parks have hours of operation just like a business. You might arrive expecting to shoot a great sunrise, only to find out the location you chose isn’t accessible until after daybreak. Also remember that wild creatures and critters are usually most active in the early morning or late evening.
What are the expected weather conditions? This is a biggie. Know what to expect as far as the weather is concerned. Check the forecast the day of departure and keep tabs on it throughout the day if possible. Never risk endangering yourself or your equipment by venturing out unprepared for bad weather.
What are the times for sunrise and sunset? Again, be sure the places you want to capture a sunrise or sunset are accessible during those times. You need to also be aware of the sunrise-sunset schedule so that you can allow enough time to reach your location and set up your gear before it’s go time.
Are there any commonly photographed animals, landmarks, or structures? Research what is usually photographed around the area you plan to visit. Find a park ranger or staff member and ask about lesser-known spots that are less traveled by tourists. Knowing what’s popular will save you time and help you avoid shooting a scene the same way it has been done time and time again. Look for ways to be creative and set your work apart!
So, you’ve researched your location and have a good idea of what to expect. Here are a few basic tips that can help you after you’ve reached your destination.
Shoot RAW
If possible, set your camera to capture images in RAW format. RAW image files are basically unprocessed (one might say uncooked), straight from your camera’s image sensor. They contain a massive amount of pixel information when compared to JPEGs and take up a lot more memory card space. However, this additional information allows more latitude for adjustments in post-processing.
Use the lowest practical ISO
The ISO number of photographic film and image-sensors relates to their sensitivity to light. The boiled-down explanation is that, everything else being equal, the higher the ISO number, the less light that is required to make an image.
Unfortunately, with higher light sensitivity comes increased image noise. In most (but not all) situations, you will want to use the lowest ISO possible. That is not to say you should be afraid of bumping up the ISO. A fast shutter speed is often needed to capture the quick movements of wildlife, and increased noise is far less noticeable than a blurred image.
Use AF continuous (AI Servo) mode when photographing wildlife
Autofocus (AF) can be your best friend or your worst enemy. When it comes to photographing most wildlife, however, autofocus is a great tool!
Animals and birds, especially the wild variety, are almost constantly on the move. They shift positions and move closer or farther away selfishly, with little regard for the photo you are so carefully trying to compose. This is when AF-Continuous and AF-Servo modes come in handy.
Though called different names depending on your camera’s make, these settings both accomplish the same objective: They keep a moving subject constantly in focus.
Place your selected focus point over your subject and half-press the shutter button to engage the AF. Focus will be tracked for as long as you follow your subject while maintaining pressure on the shutter button. Read your camera’s manual (you’ve done that already, right?) for detailed information concerning specific autofocus capabilities for your model, and how each mode can be selected.
Don’t forget the tripod
“I really didn’t think I would need my tripod” are words that usually begin a sad story about how a potentially great shot was missed. In most wildlife and nature photography situations, a tripod is always a good idea. It’s better to have access to a tripod and not need it than to need it and not have one available. Find the lightest and most compact tripod that is sturdy enough to handle your camera setup.
Learn so you can prepare. Prepare so you can photograph. Photograph so you can grow.
Photographing wildlife can be difficult, but it can also yield huge artistic, personal, and even spiritual rewards. So go out and have fun doing what you do, but don’t forget to put the camera down every now and then to enjoy the world around you.
“Nature never goes out of style.” – Unknown
The post Nature and Wildlife Photography Tips for Beginners appeared first on Digital Photography School. It was authored by Adam Welch.
The post Tips for Getting Your Portraits Right In-Camera appeared first on Digital Photography School. It was authored by John McIntire.
Getting your portraits right in-camera is a skill that every portrait photographer should strive to develop. Doing so will save you time and improve your photography across the board.
This doesn’t mean you shouldn’t post-process your images, and it doesn’t mean that Photoshop is cheating. But by putting in the extra time and effort at the capture stage, there will be less post-processing to do.
It’s also good if you have certain post-production techniques in mind. If you are able to shoot to the requirements of the technique (that is, if you’re able to get it right in-camera), then the whole process will be easier.
Putting extra effort in at the capture stage will help you to get the best results possible straight out of the camera. If you take a lot of portraits, this will wind up saving you hours upon hours of time in the post processing stages.
This article will provide you with a series of tips to help you create better portrait images during the capture stage of the process. It should be noted that the points discussed here fall firmly on the technical side of things. Subjective things like composition, posing, expression, etc., won’t be discussed.
Also, nothing discussed here is a rule. I would hesitate to even call it a guideline. If you try something here that doesn’t get you the results you are after, that just means it’s the wrong tool for the job. By all means, do something else.
Aperture
One of the easiest things you can do in the pursuit of getting your portraits right in-camera is to prioritize sharpness. One of the easiest ways to do this is to choose the right aperture.
Shooting wide-open can be great in low-light conditions, and it can also provide a nice shallow depth of field for aesthetic purposes. The trade-off comes in terms of getting the focus right. The focal plane of a wide aperture lens (f/1.8, f/1.4, etc.) is very, very narrow, making it very easy to miss the focus on your subject’s eyes.
Left: Shot at f/4, this image has a shallow depth of field. Canon 5D Mark III | Canon EF 50mm f/2.5 Macro | 50mm | 1/125 sec | f/4 | ISO 100
Right: Shot at f/14, this image is sharp from front to back. Canon 5D Mark III | Canon EF 16-35mm f/4L IS USM | 35mm | 1/125 sec | f/14 | ISO 100
A good way to combat this is to choose a smaller aperture. By selecting an aperture around f/5.6 or f/8, ensuring the focus is where you want it to be becomes much easier. When you’re starting out, this can be the difference between a couple of sharp images (or even no sharp images) gained out of luck and a memory card full of them.
Again, this is not a rule, and shooting wide open is fun and has plenty of its own merits. But that doesn’t mean you should always shoot wide open.
Taking control of the light
You’ve probably heard the phrase “Photography is light.” It’s everywhere, but it cannot be repeated enough. If you want to take better photos, you need to learn to take control of the light. This is especially important for portraits.
Natural light
With natural light, you will want to learn how to find the light with the qualities best-suited to the portrait you want to create.
For the most part, you will want to avoid shooting in midday sun. Instead, learn to find patches of soft light. This can be an area of open shade, it can be window light, or it can be garage door lighting.
Looking for situations like this overcast day, where the light is more flattering for portraits, is a key skill to develop. Canon 5D Mark III | Canon EF 85mm f/1.8 | 85mm | 1/320 sec | f/1.8 | ISO 200
Studio lighting
In the studio, you will have a somewhat easier time of things.
After all, a studio should be designed from the ground up for you to alter the light at will. Use the right modifiers, learn some of the basic lighting patterns, and use modeling lights whenever possible. All of these will make it easier for you to take control of the lighting in your portraits.
Studio lighting is a lot easier to control as you are in charge of everything, but there are a lot of options to sort through. Canon 5D Mark III | Canon EF 16-35mm f/4L IS USM | 35mm | 1/125 sec | f/14 | ISO 100
Flattering light
Another thing about light that is important when getting your portraits right in-camera is whether or not the light is flattering. While this is quite a subjective topic, there are a few things for you to keep in mind that will help you to get more flattering light.
Light from above
In most natural circumstances, we humans are lit from above. This is how we generally see other people. Lighting your subject from other angles will result in oddly-placed shadows that won’t feel right to your viewer.
By placing the main light source above your subject, you are working to ensure that you are presenting your subjects in a way that people will recognize.
Lighting from above will help to ensure that your studio lighting looks more natural. Also, bringing the light source in close softens the light, making it more flattering.
Soft light
As mentioned, using a soft light source will help you get more flattering results. This will reduce the overall contrast in your images, and help to reduce the appearance of skin textures in your portraits. It will also help to make the transitions from shadows to highlights smoother.
Using as soft a light source as possible reduces contrast and provides more flattering light for your subjects. Canon 5D Mark III | Canon EF 16-35mm f/4L IS USM | 35mm | 1/125 sec | f/5.6 | ISO 100
Lens choice
Selecting a focal length suitable for portraiture is another important thing that will help you get your portraits right in camera.
The focal length you choose will dictate how your images are distorted. At the extreme ends, wide-angle and long telephoto lenses cause significant distortion in your images. In order to avoid this, you will find that most portraits are taken at a focal length somewhere between 50mm and 135mm. As a general guide, you can’t go wrong by selecting a focal length in that range.
Left: With a focal length of 35mm (taken up close), you should be able to see the distortion on the subject’s face caused by the wider angle lens. Canon 5D Mark III | Canon EF 16-35mm f/4L IS USM | 35mm | 1/125 sec | f/8 | ISO 200
Right: A 50mm focal length is a safer choice for portraits and is close to how the human eye sees. Canon 5D Mark III | Canon EF 50mm f/2.5 Macro | 50mm | 1/125 sec | f/5.6 | ISO 100
Now, that is, once again, not a rule. There are some amazing examples of portraits taken at extremely wide focal lengths, just as there are plenty of portrait examples taken with much longer focal lengths. If you think an extreme focal length is right for your portrait, go ahead and try it.
While you can use extreme focal lengths (such as 16mm, used in the photo above) if you want to, you will find that it’s usually best to stick to more traditional focal lengths for most purposes. Canon 5D Mark III | Canon EF 16-35mm f/4L IS USM | 16mm | 1/125 sec | f/5.6 | ISO 100
Perspective and viewpoint
Your viewpoint as the photographer has a huge impact on your portrait images, and there are a few things you can do and avoid to help you get better portraits.
Viewing angle
For the most part, try to keep your lens at the same level or below the level of your subject’s eyes. Shooting above and downward toward your subject has the effect of making your subject appear vulnerable and weak.
(This is my bias speaking. I really don’t like taking photos from above, but it is still not a rule.)
For stronger portraits, try to avoid that.
Left: Here, the camera was on a level with the floor. You can see the mild distortion this viewpoint has caused; the subject appears to be falling backward. Canon 5D Mark III | Canon EF 85mm f/1.8 | 85mm | 1/160 sec | f/9 | ISO 100
Right: Bringing the camera up to navel-height has removed the distortion. Canon 5D Mark III | Canon EF 85mm f/1.8 | 85mm | 1/160 sec | f/9 | ISO 100
Distortion
Just like when you are photographing buildings, having your camera not level to the ground can cause distortion in your images.
Converging verticals on a human subject look even weirder than they do on buildings. If you are shooting from above your subject, this can lead to distorted facial features. If you are shooting from below, it can cause distortions of the legs, arms, and torso that just won’t look right to your viewer.
Some of this can be mitigated by selecting a longer focal length or stepping further away from your subject, but this won’t completely prevent distortion. To avoid any of this distortion in close-up portraits, shoot from eye-level or just below eye-level. To avoid it in half-length to full-length portraits, shoot from the level of your subject’s navel.
Exposure
For the most part, exposure is another subjective topic. There is often no right or wrong exposure, but if you’re starting out with portraits, there are a few things that will help you along the way.
To ensure that you are retaining all of the details in your images, take test shots and watch the histogram as you are building your scene. Here, the spike on the left is the background, and the rest of the tones fall well within the two sides of the histogram, denoting relatively low contrast.
Portraits can have a lot of contrast in them. Just imagine a subject with light-colored hair who’s wearing a black shirt. For the best outcome, you will want to ensure that the exposure retains details in both extremes.
If you have access to them, tools like the light meter and the ColorChecker Passport shown above will help to give you accurate exposures and colors just about every time.
To ensure that you have retained all the details in your images, you can refer to the histogram on the back of your camera. A simple way to use this is to make sure that the information depicted by the histogram does not go past either the left-hand or the right-hand sides of the graph.
If the histogram goes off the right-hand side, your image will be overexposed and you will be missing details in the highlights of your image. If the histogram goes off the left-hand side, your image will be underexposed and you will be missing details in the shadows.
Manipulate the exposure
Sometimes, you won’t be able to retain all the detail in a given scene, as the contrast will be too high. In order to keep your shadows and highlights from clipping, you will want to manipulate the scene. There are a lot of ways you can do this.
You can use a reflector to bounce light into areas of the scene that are too dark, thus reducing the overall contrast of the scene. You could do the same with flash as fill light.
Using a reflector is a great way to help control the contrast in your images. Here, a piece of polystyrene (styrofoam) board from a package did the job and didn’t cost anything.
You could also use a diffuser in front of your main light source to soften the light and reduce the overall contrast in the frame. This works with both natural light and studio strobes.
Of course, in a studio, you could always opt to use a bigger modifier, or move your light source closer to your subject. Both of these have the effect of softening the light and reducing the overall contrast in your scene.
To soften your light, use bigger modifiers or bring them in close. Alternatively, as shown in the image above, do both and add a reflector for good measure.
If you are new to portraits but familiar with other aspects of photography, you can think of this as similar to using graduated neutral density filters in landscapes.
By placing a graduated neutral density filter in front of the lens, you are (usually) increasing the exposure time needed for one part of the image (usually the sky) so that it falls at a value closer to the foreground, reducing the contrast in the image by however many stops the filter represents.
You can think of these tools for portraits in the same way, except that they manipulate the actual light in the scene in front of you, rather than fitting onto the lens and manipulating the final exposure.
End
I feel the need to reemphasize that this article is in no way anti-post processing. Doing what you can at the capture stage is simply about better camera craft and obtaining a better starting point. Canon 5D Mark III | Canon EF 16-35mm f/4L IS USM | 35mm | 1/125 sec | f/5.6 | ISO 100
While this article is definitely not a complete and exhaustive guide to portrait techniques, these few basic tips should help you get your portraits right in camera. If you take your time to be mindful of your choices regarding camera settings, lighting, and exposure, you will start to find that you need to spend much less time in post-production.
Of course, if there are any tips that you use to get your portraits right in-camera, please feel free to leave them in a comment.
The post Tips for Getting Your Portraits Right In-Camera appeared first on Digital Photography School. It was authored by John McIntire.
The post Tips For Making Someone Comfortable in Front of the Camera appeared first on Digital Photography School. It was authored by Kevin Landwer-Johan.
For many photographers, making someone comfortable in front of the camera is a huge challenge. It’s often so difficult that they shy away from photographing people altogether. Or they only photograph people candidly with a long lens.
Much has been written about camera control, composition, and other aspects of photography. These things require no relationship skills.
But when you photograph people, making your subject comfortable is often essential.
When a person does not like having their photo taken, it shows in their expression. Your camera captures this. That’s why you need to help your subject overcome their anxiety about being photographed (which is particularly difficult for shy photographers).
Here are fifteen tips for making someone comfortable in front of your camera.
Tip #1: Provide instructions before the photo session
Prepare your subject before the photo shoot. Talk about what they will wear. Suggest the best time of day.
Take into account the timing. Will they be needing to rush away to another appointment? Having plenty of time is helpful.
Turning up to a portrait session with no ideas is not a good way of making someone comfortable. Talk with your subject prior to the photo session and share some of your ideas.
Talk with them about what they want. Tell them your ideas for the portrait session, and ask if they have anything specific in mind.
Be positive, even if you don’t like what they are suggesting. If you follow through with their suggestions, it will help them feel included. They’ll then be more likely to relax and enjoy themselves.
Tip #3: Choose a good location where your subject will be comfortable
You may use a certain location because you love it. But your subject may not like it at all. Check with them first.
There’s no point picking a place to photograph that will make your subject uncomfortable.
Often, it’s best to find somewhere away from where other people will be. If your subject is uncomfortable being photographed, they will not want to do the session in a location where others can see the process.
Arrive at the location of your photo session plenty of time before your subject does. Scope out the location. How is the lighting? What will be in the background? Figure out the best combination of these things and some places to position the person you’re photographing.
This may not seem relevant to making someone comfortable, but it is. The more you can sort out these issues in advance, the more you’ll be able to give your attention to your subject when they arrive.
Make sure your camera equipment is set and ready to use. Are your camera batteries charged? Do you have enough space on your cards? Will you need to use your flash or a reflector?
Know what exposure mode you’ll use. Set up your camera as much as possible before the person you’re photographing even arrives.
Having your gear set and ready to use allows you to concentrate more on your subject and on other aspects of photography. Making someone comfortable requires you to pay more attention to the subject than to your camera.
Be there for your subject and let them know it. Don’t rush in and start taking photos immediately. Spending time having a conversation will help them relax and build confidence in you.
Focus the conversation on them and keep it positive. Don’t discuss how difficult it was to find parking, and don’t discuss politics. These topics are not uplifting and will not help make someone comfortable.
Show you are interested in who they are. Asking people questions shows you care about your subject and will help build their confidence.
Explain to your subject that when they’re stressed, this will show in the photographs. You know they need to relax and why, but they may not know this. You need to take some time to explain it to them.
People often don’t look the same way in a photograph as they do in the mirror. Even if they’re stressed and see their reflection in a mirror, it’s different than the way they will look when being photographed if they are not relaxed. They will not like what they see in the photos. It’s vital that you overcome this, and explaining your reasons will often help matters.
If you get the sense that a person is uncomfortable being photographed, talk to them about it before the photo session. Then remind them again before you start taking photos. Give them time to think about what you’ve said and continue your conversation. It’s almost like giving someone a mental massage to help their mind relax.
Frequently commenting on how good a person looks will help them have confidence and feel more relaxed. Be careful to be genuine. Notice moments when your subject is more open and carefree. These are the times to compliment them as you are taking their photographs.
Tell them how happy you are with the photos you are taking. Talk to them about their smile and how good their hair looks. Mention positive aspects about the clothing they have chosen. Talk about how nice they look in a certain pose.
Don’t overdo the compliments or you’ll start to sound fake. Keep it balanced and be gentle but honest if something doesn’t look right.
You can almost always find some aspect of a person’s hair or clothing that needs a little tweaking. Even when you can’t see anything out of place, tweak anyway!
Paying attention to these details and putting them right does two things. It’ll make your photos better, and it will help make your subject comfortable. They will feel good that you’re paying attention to them and you’re focused on making them look good.
Put a little distance between your camera and your subject. Getting too close may not be comfortable for them. Using a 105mm or 135mm lens will provide a convenient distance.
Don’t use a monster of a lens. This can be intimidating. It’s one reason I am not a fan of 70-200mm f/2.8 zooms; they are so bulky and can be off-putting.
A little further into the photo session, you can consider coming in closer with a 50mm or 35mm lens. The person you’re photographing will need to feel good about you being this close. If they are comfortable at closer distances, your photos will be more intimate than ones taken with a long lens.
Tip #11: Show your subject the photos you’re taking
The monitor on the back of a digital camera is a great tool for making someone comfortable. When you show them how good they’re looking, it’ll build their confidence.
This young woman was surprisingly uncomfortable when I came to photograph her and some of her friends. She was part of a drama group, and I’d observed her confidence on stage in front of a crowd. But the self-assurance was missing when she was in front of my camera for the first time. Once I’d taken a few good photos, I showed them to her. She was impressed, so she immediately relaxed and enjoyed the photo session greatly.
Take time to do what you do well. Don’t be in a rush. Work carefully. Check your camera settings. Review your photos and make changes when you need to. Don’t work so fast you miss when you are making mistakes (because they will happen).
Plan for the photo session to last more time than you think it will. If you have extra time at the end, buy the person you’re photographing a coffee. This might be another opportunity for a few more nice pictures of them.
Use props or another person to help draw attention away from yourself and your camera. When someone is nervous about being photographed, it can help when they are distracted. They are more likely to look relaxed and natural when they are not paying attention to your camera.
When photographing a bride at a wedding, I’d often get the groom to stand just behind me and have him talk to his bride. There’s no way I’d get the same look from a bride as when she’s looking at her groom.
For this photo, I asked the subject to pretend to talk on her phone, as I thought this might help. It worked very well. Later she told me that she had actually called a friend and was talking to her, so she was totally distracted.
Have a nice manner and be positive; this will help you inject some fun into the photo session. When people are happy and relaxed, you’ll certainly get better photos of them.
Come up with some things that you can talk about or funny stories you can tell. Try to laugh together when things don’t go exactly as planned. If you have a positive attitude, this will rub off on the person you are photographing.
Tip #15: Be confident and your subject will be confident in return
Confidence in what you are doing is vital. Don’t be brash and boastful. Don’t bamboozle people with your photography knowledge or with how good your camera is. Just use your camera with certainty. If you are stressed and nervous yourself, the person you are photographing will feel uncomfortable.
Being quietly confident in what you’re doing, even if you’re a shy photographer, will help your subjects relax. Your mood and attitude will be reflected back to you by the people you are photographing.
Making someone comfortable is as important as getting your camera settings correct. So often I see portraits of people where it’s obvious they were not relaxed. As a photographer, it’s your mission to ensure the person you’re taking pictures of looks good. Much of this depends on how relaxed and confident the subject feels.
And I am not satisfied with the portraits I take unless my subject is, too.
Let me know in the comments below which of these tips you find the most helpful. Please also share other techniques you use for making someone comfortable when you are photographing them.
The post Tips For Making Someone Comfortable in Front of the Camera appeared first on Digital Photography School. It was authored by Kevin Landwer-Johan.
The post Tips for Managing Digital Noise in Lightroom and Photoshop appeared first on Digital Photography School. It was authored by Kevin Landwer-Johan.
If you’ve ever set your ISO toward the higher end of your camera’s range, you will find that your photos don’t always turn out so great. Digital noise is generally noticeable in photos that have been taken with a high ISO setting. Managing digital noise is important when you move toward the limits of your camera’s ISO range.
In this article, we’ll take a look at various techniques, both in-camera and during post-processing, for managing digital noise.
Digital noise appears like colored sand scattered through your photos. It’s particularly noticeable in darker and lighter areas of your compositions when you’ve used a high ISO setting.
Noise varies from camera to camera depending on the quality of the sensor. You’ll have noticed it in photos made with your smartphone at night. When the light is low and the ISO is high, a phone or camera with a very small sensor is prone to producing a lot of digital noise. On higher-end full-frame cameras there’s not so much of an issue with digital noise until your ISO reaches the highest settings it’s capable of.
At first glance, digital noise may not be so noticeable. But when you enlarge an image made using a high ISO, it is easy to see noise speckles. These speckles are discolored pixels and pixels with an incorrect luminance value. They contrast with the surroundings in an unnatural way.
Digital noise in photos is not the same as grain. Grain is associated with film and has a different appearance than digital noise. Different types of film have different grain structures. Grain can be used to creatively enhance photos, whereas digital noise degrades an image.
Detail showing digital noise. Nikon D700 | 70mm | 1/100 sec | f/2.8 | ISO 6400.
Two types of digital noise
There are two types of digital noise that affect your photos when you use a high ISO setting. These are color noise and luminance noise.
Color noise, or chromatic noise, appears as discolored pixels that contrast with how the colors in a photo should look. It’s most apparent in the very light or very dark areas of photos taken at high ISO settings. Sometimes this type of noise is difficult to eradicate. The best approach can be to simply convert your photo to black and white.
Luminance noise shows up as pixels that are brighter than they should be. When you raise the ISO setting on your camera, the pixels on the sensor become amplified and distort. Think of it as like turning the volume on your stereo up too high to the point that the sound distorts.
How can you avoid digital noise in photos?
The most surefire way to avoid digital noise is to keep your ISO setting low. This is not always possible, especially when photographing in low light conditions.
Raising your ISO increases the risk of adding unsightly noise, but it also allows you to choose a narrower aperture and faster shutter speed.
Getting sharp photos of action at night requires a fast shutter speed. And an easy way to achieve this is by raising your ISO setting. So it’s not always possible to avoid noise. Managing digital noise when you post-process your photos then becomes necessary. There are various tricks and tools you can use to do this.
Try this exercise to discover the highest ISO setting you are comfortable using on your camera:
Find a reasonably dark place to take photos of a static subject, such as a room with the drapes drawn or outside at night. Set your camera on a tripod, or on a firm surface where it won’t move.
You can set your camera to any exposure mode you’re comfortable with, but you must set your ISO to manual. And if you use your camera’s manual exposure setting, balance your aperture or shutter speed before each shot (so your meter is always reading zero).
Start with the lowest ISO setting. This is usually ISO 100. Take a photo of your subject. Then change your ISO setting to 200. Take another photo.
Repeat this process, doubling the ISO, until you have taken a series of images throughout the ISO range.
Study the photos on your computer. Zoom in to 100% and look at the digital noise. At what ISO setting does the digital noise appear to degrade image quality? The ISO setting below that point should be the maximum you use.
Post-processing programs and apps have functions that can reduce digital noise in photos.
The less noise apparent in a photo, the more successfully you can remove it. If you’re too aggressive with managing digital noise, your photos will appear soft and blurry.
Detail showing digital noise.
Reducing digital noise using Lightroom
In the Develop module in Lightroom, click on the Details Panel on the right side of the screen. Here you’ll see a number of sliders. The ones you want to use are the Luminance and Color sliders.
Start with Luminance slider and drag it to the right. Then slide the Color slider if you still see some noise. Watch what’s happening to your image as you do this. You don’t want to slide it further than you need to. The further to the right you move these controls, the softer your image becomes.
The amount you need to adjust the sliders will vary from image to image.
Detail with noise reduced. Note the position of the Color and Luminance sliders.
Reducing digital noise using Photoshop
If you prefer using Photoshop, you’ll still find good controls for managing digital noise.
In the top menu select Filter>Camera Raw Filter. In the new window that opens, select the Details icon (it’s the two triangles). Here you have the same two sliders as in Lightroom: Luminance and Color. Slide them to the right only enough to get a satisfactory result.
Detail of unprocessed image showing noise reduction tools in Photoshop.
You can further reduce noise by selecting Filter>Noise>Reduce Noise from the top menu.
Applying the noise reduction filter in Photoshop.
Photoshop allows you more flexibility in reducing noise. You can isolate the problem areas with masks or multiple layers. This can help retain detail in important areas of your compositions.
Try this noise reduction technique
When you are photographing a static subject and have your camera on a tripod, take two or more photos.
Open two of the photos in separate layers of the same file in Photoshop. Once you’ve done this, the easiest way to reduce the noise and retain clarity is by changing the blend mode of the top layer. The Multiply blend mode usually works well. You can also experiment with Overlay and Soft Light blend modes.
Conclusion
Whenever I’m taking photos, I try to maintain the lowest ISO setting possible to avoid digital noise. In many low light situations, using a higher ISO setting is necessary to take photos without extra lights.
Each camera model manages digital noise differently. Use the experiment I outlined in this article to ascertain the highest ISO setting at which you are comfortable shooting.
Managing digital noise is now easier than ever. Cameras have more advanced sensors than early digital cameras had. And imaging software has also evolved to be better at managing digital noise.
The post Tips for Managing Digital Noise in Lightroom and Photoshop appeared first on Digital Photography School. It was authored by Kevin Landwer-Johan.
The post 13 Tips for Improving Outdoor Portraits appeared first on Digital Photography School. It was authored by Guest Contributor.
Outdoor portraits present portrait photographers with a variety of challenges and opportunities. Today, James Pickett suggests 13 tips to help you with your outdoor portrait work.
When I bought my very first digital SLR, there was a sigh of relief. Everything was going to be so much easier, and I wouldn’t have to think anymore.
You know the scenario: You pull the camera out, charge the batteries, go for a walk around the house and down the street, taking the same pictures you have taken every time a new camera came into your life.
“This is great,” you think to yourself. “This is going to make my life so much easier!” I was wrong. In fact, I was dead wrong.
There are three very simple things that improve all photography, including portraits. To this day, there is no trick I have found that replaces the need for proper exposure, white balance, and sharp focus.
1) Never select all of the focus points for portraits; pick one
When you pick the autofocus option that allows the camera to select focus points, you are doing your portraits a terrible disservice.
This feature of a camera is usually designed to pick whatever is closest to the lens and focus there. In some cases, like with my 1DS Mark III, the camera will choose a cluster of focus points and make a “best guess” based on averaging the distance between all of the chosen points. Using one focus point gives you, the photographer, ultimate control.
2) Always focus on the eyes
The eyes are the windows to the soul and should be the focal point of any good portrait. Not only are the eyes the most important part of a good portrait, but they are the sharpest element on the face and should be left that way.
When you are shooting with a wide aperture value and you’re focused on the eyes, the lens’s bokeh will aid in softening the skin, as well.
3) Shoot wide open for shallow depth of field
There are quite a few reasons to invest in a fast lens capable of wide aperture values; the most common is for shallow depth of field.
If you can shoot at ƒ/2.8 or ƒ/4, you should use it. Most fantastic natural light portraits are from wide aperture values, and it is all because of the wonderful smooth background blur we call “bokeh.”
4) Never, ever shoot a portrait at less than 50mm; try to stay at 70mm or higher
The last thing you want to hear from a client is “Why does my head look swollen?”
Any focal length below 70mm can distort your subject. However, it doesn’t become very noticeable until you are below 50mm. The compression effect of a telephoto lens will also increase the blur of bokeh. Most of my portraits are done between 120mm and 200mm.
5) Always shoot in RAW
These words have bellowed from my mouth a thousand times, and they will surely come out a million more. Raw is an unmodified compilation of your sensor’s data during the time of exposure. It is your digital negative. When you shoot in JPG format, everything but what the image processor needs to make a shell representation of the image you intended to capture is stripped away. For every edit you make to a JPG, you lose more data. With RAW, you can make a vast range of edits before creating the JPG.
How can this make you portrait better? Think about the last time your white balance was set incorrectly and you tried for hours to remove the color cast, only to destroy the image with every attempt. RAW would have saved you by allowing you to fix the color before opening the image for retouching.
6) Always bring a gray card or a piece of a gray card for white balance
Gray cards aren’t free. However, $ 5.95 US for a cardboard Kodak gray card is darn close. To avoid confusion, I am going to explain this backward. When opening Adobe Camera Raw or any other RAW image editing application, there is always a way to select a custom white balance. Usually, it is an eyedropper of some kind that you can use to click on what you think is neutral gray in your image.
Imagine a world where your photoshoot involved 4 locations and a total of 800 images, and all day the camera was set to Auto White Balance. That is 800 different white balance values, a post-production nightmare.
If at each location you have your subject hold the gray card on the first shot, you will save hours of work. When you open images from the first location in your favorite post-production application, all you have to do is click the eyedropper on the gray card, select all the photos, and synchronize the rest. Precious hours will be saved.
(If you plan on taking your time, it may be wise to do this once every 30 minutes or so to compensate for the changing light of day.)
7) Shoot in the shade (avoid direct sunlight)
Direct sunlight is harsh, makes your subject squint, and creates hard directional shadows and unpredictable white balance conditions. When shooting in the shade, there are no more harsh shadows, only smooth, milky shadows created by your subject’s natural features. With proper exposure and white balance, you can make these shots look amazing.
8) Shooting carefully on an overcast day.
Nature’s softbox is a giant blanket of clouds. A good heavy blanket of cloud cover can help you enrich your colors, and make some very smooth and pleasing shadows.
9) If you must use hot, hard, bright light…
Always try to control the direction, use some kind of reflector, and try to mimic a studio light. Putting the sun directly behind your subject isn’t a good idea, unless you are trying to make a silhouette.
When the sun is at my back, I have the subject look off-camera (away from the sun) and get very nice results. Another great trick is to wait for a cloud to move in front of the sun; this usually creates a very bright-yet-contrasted look.
10) Use an existing reflector
For example, my guess is that about 75% of the delivery trucks on the planet are white. These big, white delivery trucks can make amazing fill light reflectors as long as they weren’t painted with an off-white. (A yellow tint can change the white balance in your shadows.) Picture framing outlets and craft stores always have medium-to-large-sized pieces of foam core lying around that have been left for scrap. They are usually more than happy to part with these scraps and, if not, chances are that there are pieces by the dumpster.
11) Learn the sunny ƒ/16 rule
Why?
So you have a baseline for proper exposure in your mind to work with if no other tools are present.
The sunny ƒ/16 rule states that on a sunny day, with your aperture value set to ƒ/16, your shutter speed will be the inverse of the current ISO speed. For example, if your camera is set to ISO 100, and your aperture value is ƒ/16, your shutter speed will be 1/100th of a second. On a cloudy day (or when in the shade), you simply use ƒ/8 instead. If you own an incident light meter or gray card, use either for the most accurate exposure instead.
(Note: the procedure for metering exposure with a gray card is not the same as a custom white balance.)
12) Bring a sheet and a few spring clamps from home
Leave the expensive 200-thread-count sheets on the bed. You already got them? Well, go put them back. You know that cheap old sheet you stuck in the corner of the closet to use as a drop cloth the next time you paint? Go get it.
(Another option is to buy the cheapest low-thread-count white top sheet you can find.)
A queen-sized sheet is an amazing, cheap diffuser. Sort of a seven-foot softbox for the sun. Wrap an edge of the sheet around a branch or clothesline and clamp for a sidelight.
(Anchor the bottom corners with rocks to keep the sheet from blowing into your image.) Clamp all four corners to anything you can above your subject for an overhead light.
13) Keep the powerlines and signs out!
We have already discussed keeping your camera focused on the eyes, but you must also keep the viewer’s mind focused on the image as a whole. Powerlines, signs, long single blades of grass, single pieces of garbage, and sometimes even trees can be serious distractions from the overall focus of the image: the person you are photographing.
Last, and most important, have a great time shooting! Enjoy what you’re doing, and it will show in your work (as well as in the expression of your subject).
A few bonus tips for shooting on cloudy days
Clouds are wonderful. They create a giant blanket of natural sunlight diffusion that makes your images rich and powerful. The clouds can fool your mind in ways you can’t imagine, much like your mind corrects for the natural white balance throughout the day.
When you are shooting on an overcast day, using your camera’s custom white balance is especially important. Every day is completely different for color, and that color depends on two things. First, the time of day; most people understand white balance and how it changes throughout the day. Second, you have to account for all of the wonderful things that light has to pass through before it hits your subject.
Pollution changes the color of the light from minute to minute. Even if your eyes don’t see it, your camera does. On a cloudy day, pollution particles are being carried around in the sky by tiny water droplets. Now your sunlight is passing through nature’s prism and reflecting off of pollution particles in infinite directions.
Don’t forget to white balance with that six-dollar piece of cardboard, your Kodak gray card.
The ultimate secret to shooting on a cloudy day is a compass. (You either tipped your head like a confused Chihuahua or just had an epiphany.) I am an experienced, internationally-published photographer, and rarely can I see where the sun is coming from on an overcast day. The light isn’t omnipresent; it’s just diffused, softened, and scattered. Sunlight on a cloudy day is still directional, and your subject still has a dark side. Use a compass to find out where the sun is, put it at your back, and shoot like mad. Never again will you look at an image after and wonder why the sky was blown out when it was so cloudy, or why the clouds look great but your subject is dark.
The post 13 Tips for Improving Outdoor Portraits appeared first on Digital Photography School. It was authored by Guest Contributor.
The post 12 Tips to Help You Capture Stunning Landscape Photos appeared first on Digital Photography School. It was authored by Kav Dadfar.
Whether you are an experienced photographer or just getting started, the amazing landscape photographs you see have all got a few things in common. The reality of landscape photography is that not only are you reliant on your own ability and skill of seeing and composing an image, but also on Mother Nature. But regardless of whatever weather you encounter, there are countless opportunities to be able to capture spectacular landscape photographs.
Here are 12 tips that you can follow if you want to capture stunning landscape photos.
1. Location, location, location
Landscape photography is as much about planning as it is about the actual process of photography. You should always have a clear idea of where you are planning to go, and at what time of the day you will be able to capture the best photograph. Learn how to read maps, and understand how you can utilize them to find the perfect location. By planning your exact location, you will be able to maximize your time there, and ensure not only that you get to your location safely and in plenty of time, but also that you find your way back (usually after sunset).
2. Be patient
It’s amazing the number of times that the elements conspire to ruin a perfectly composed photograph. Landscape photography requires patience, just in case that white cloudy sky disperses just long enough to allow the sun to break through for you to take your shot. The key is to always allow yourself enough time at a location so that you are able to wait if you need to. Forward planning can also help you hugely, so make sure to check weather forecasts before leaving, maximizing your opportunity for the weather you require.
3. Don’t be lazy
One of the reasons we are often stunned by impressive landscape photos is because it is a view taken in a way that we have never seen before. A photo taken from the top of a mountain which requires a huge amount of time and effort to get to is a view that most people won’t get to see for themselves. So don’t rely on easily accessible viewpoints that everyone else can just pull up to and see. Instead, look for those unique spots (provided they are safe to get to) that offer amazing scenes, even if they require determination to get there.
4. Use the best light
Light is one of the most important factors in any photograph, but even more so in landscape photography. It really doesn’t matter how great the location, is or how you compose your photo – if the light doesn’t do the scene justice, then the image will fail. The best light for landscape photography is early in the morning or late afternoon, with the midday sun offering the harshest light.
But part of the challenge of landscape photography is about being able to adapt and cope with different lighting conditions; for example, great landscape photos can be captured even on stormy or cloudy days. The key is to use the best light as much as possible, and be able to influence the look and feel of your photos with it.
5. Carry a tripod
Simply put, if you want to capture the best photographs, at the best time of the day, at the highest quality possible, then a tripod is an essential piece of equipment. Photography in low light conditions (e.g. early morning or early evening) without a tripod would require an increase in ISO to be able to avoid camera shake, which in turn means more noise in your images. If you want to capture a scene using a slow shutter speed or long exposure (for example, to capture the movement of clouds or water) then without a tripod you simply won’t be able to hold the camera steady enough to avoid blurred images from camera shake.
6. Maximize the depth of field
Choosing your depth of field is an important part of capturing stunning landscapes. Landscape photos usually require the vast majority of the photo to be sharp (the foreground and background) so you need a deeper depth of field than if you are taking a portrait of someone. But a shallower depth of field can also be a powerful creative tool if used correctly, as it can isolate the subject by keeping it sharp, while the rest of the image is blurred. As a starting point, if you are looking to keep the majority of the photo sharp, set your camera to Aperture Priority (A or Av) mode so you can take control of the aperture. Start at around f/8 and work up (f/11 or higher) until you get the desired effect.
7. Think about the composition
As much as possible you should always aim to get your composition right when taking the photo, rather than relying on post-production. If the scene doesn’t look right when you look at it through your viewfinder, then it won’t look good in the final output. There are several techniques that you can use to help your composition (such as the rule of thirds), but ultimately you need to train yourself to be able to see a scene, and analyze it in your mind. With practice this will become second nature, but the important thing is to take your time.
8. Use neutral density and polarizing filters
Neutral Density filters and polarizers are an essential piece of kit for any landscape photographer. Often you will need to manipulate the available light, or even try to enhance the natural elements. For example, if you are taking photos which include water, you may find you get unwanted reflections from the sun, which is where a polarizing filter can help by minimizing the reflections and also enhancing the colors (greens and blues). But remember, polarizing filters often have little or no effect on a scene if you’re directly facing the sun, or it’s behind you. For best results position yourself between 45° and 90° to the sun.
One of the other big challenges of landscape photography is getting a balanced exposure between the foreground, which is usually darker, and a bright sky. Graduated ND filters help to compensate for this by darkening the sky, while keeping the foreground brighter. This can be replicated in post-production, but it is always best to try and capture the photo as perfectly as possible in-camera.
9. Use the histogram
Histograms are an essential tool in photography, which you should aim to learn how to read and utilize the findings to improve your photos. A histogram is a simple graph that shows the different tonal distribution in your image. The left side of the graph is for dark tones and the right side of the graph represents bright tones.
For instance, if you find that the majority of the graph is shifted to one side, this is an indication that your photo is too light or dark (overexposed or underexposed). This isn’t always a bad thing, and some images work perfectly well either way. However, if you find that your graph extends beyond the left or right edge, this shows that you have parts of the photo with lost detail (pure black areas if the histogram extends beyond the left edge and pure white if it extends beyond the right edge). This is something you should avoid, so by seeing the evidence in the histogram, you are able to correct it by either recomposing the image or compensating for the exposure.
10. Never settle for a good photo
This is true of any photograph that you are taking. It doesn’t matter if it is a landscape or a portrait; if you can do it better, then you should. But often because of the time and effort that landscape photography requires, people settle for a good photo, rather than waiting or coming back to take a better one. You should always aim to photograph anything at the best possible time, in the best possible way, even if that means waiting or coming back later.
11. Shoot in RAW format
Simply put, if your camera is capable of capturing photos in RAW format, then I recommend that you always capture RAW files. They contain much more detail and information, and give far greater flexibility in post-production without losing quality. Remember, you can always save RAW files in whatever other formats you require, but you will not be able to save JPEGs as RAW files, so ultimately you are limited to the quality at which the JPEG was shot.
12. Experiment
For all the techniques and rules that exist to help aid composition and the process of taking the photo, there is always room to experiment. Digital photography means that taking a photo isn’t wasting a negative (and costing money), so there is ample opportunity to break the rules and your own style sometimes. Even if the majority of the time it doesn’t work and the image doesn’t look great, every now and again you might uncover a gem.
Landscape photography is one of the most common genres that amateur and professional photographers get into. With practice, hard work, and patience you can capture stunning landscape photos that will look great in your portfolio.
So come on, show us your great landscape shots, and don’t forget to share your tips and experiences below.
The post 12 Tips to Help You Capture Stunning Landscape Photos appeared first on Digital Photography School. It was authored by Kav Dadfar.
Great black and white photography is stunning. It’s eye catching, emotive, and expressive. Usually, it’s also wonderfully simple. So is still life photography. In this article, I’ll give you seven tips on how to create stunning black and white still life photographs. Before we get into the tips I’d first like to answer a couple of foundational questions: What makes Continue Reading
The post 7 Awesome Tips for Black and White Still Life Photography appeared first on Photodoto.
Instagram has undoubtedly become one of the most popular image sharing sites. It is also a sweet spot for photographers and enthusiasts looking to get their pictures noticed. Of course, the popularity of Instagram has led to fierce competition. To help you stand out on this social media platform, I decided to share some Instagram photo tricks to make your Continue Reading
The post 10 Tips & Tricks to Make Your Instagram Images Look Beautiful For Beginners appeared first on Photodoto.


You must be logged in to post a comment.