The post Beginners Tips for Night Sky and Star Photography appeared first on Digital Photography School. It was authored by Phillip Van Nostrand.
Star Photography
My favorite type of personal photography is taking night shots of the stars (long exposure pictures). I am often busy shooting pictures of people at weddings, or apartments, or models, and it’s important for me to make sure I take pictures for fun regularly. Taking pictures for no one other than myself is highly rewarding, soul filling, and fun! I also love taking travel photos and HDR photos, in this article we will take a close look at exactly how you can take your own epic star photographs.
30 seconds at f/2.8, ISO 1250
What you need to take jaw-dropping pictures of stars
To take your star pictures, you only need three things:
a full-frame camera (for better ISO capabilities)
a fisheye lens (for the widest view of the sky)
a tripod (for stability during 15 second photos)
(Note: You can do this with a cropped sensor camera, without a tripod, and without a fisheye lens. It will just be a little harder and slightly less jaw-dropping)
25 seconds at f/2.8, ISO 1600
Camera settings
You can nail this shot almost every time with these settings: 25 second exposure, f/2.8, ISO 1600
If your lens doesn’t open up to f/2.8 you can try 30 seconds at f/4 with ISO 1600.
Note: this kind of photography won’t work if there is a full moon out (or even a half moon). Don’t compete with large light sources, the stars will be over powered.The best location for star photography is way out in nature, away from city lights that cause “light pollution.”
13.0 seconds at f/2.8, ISO 1600
Why to use these settings
The most important component of these settings is the 25-second exposure. An exposure longer than about 25 seconds will start to show star trails. Photographing star trails is a legitimate type of photography on its own, but not the type of photography you are trying to do here. Since you are limited to about 15-25 seconds max shutter speed, you still need to let in more light.
The largest aperture you can find on a fisheye lens is f/2.8, and still, your picture might not be quite bright enough to look stunning. So this is where the ISO comes into play. On a full-frame camera like the 5D Mark III or the Nikon D800, you can bump the ISO up to around 2000 without seeing much noise.
You’ll learn how to reduce noise in Lightroom in the next section for a super clean photo.
Editing in Lightroom
I do extensive retouching in Lightroom after I take my photos. I’ll usually boost the exposure up by a stop or more, and I’ll use Noise Reduction under the Detail section to reduce any unwanted “noise” (those pesky extra white, red or blue pixels that show up when you push the ISO too high).
Here is a standard star photo of mine and the Lightroom settings I used to create it:
25 seconds at f/2.8, ISO 1600
Here are the Lightroom settings I used to edit the above photo:
1) You can see in the first panel that I bumped the whites up to +46 and brought the blacks down to -52. I really wanted to emphasize the stars against the dark sky and this is a good way to do that. Pushing the clarity up to +55 also helps define the stars against the sky, making them nice and crispy. I boosted the saturation to bring out any colors that are in the sky.
2) In the second panel, you can see that I sharpened up the image a bit, also to emphasize the stars. At the same time, I brought up the noise reduction to 33 to smooth out some of the noise that might show up, and I brought up the color to 25 for the same reasons.
Pro tips
Here is where you can have fun with the editing. Play around with the split toning sliders to make the colors in your sky appear magical. In the photo above you can see a little bit of turquoise in the lower part of the sky, and that comes from boosting that color in the Shadows of the Split Toning slider here:
You can also affect the color of the sky by playing around with the temperature and hue sliders to get some pretty magnificent looking star photos. Take a look at this one photo rendered three different ways:
Another pro tip that you may have noticed in all of the photo examples I gave here is this – shoot your stars in context. It really tells a great story to see a silhouette of a pine tree or a house in the background, and it shows the magnitude of the scene when you have an object in the foreground to compare to the stars.
Lastly, make sure you know which direction the Milky Way is. You can use an app like Sky Map to see exactly what stars are in the sky above you.
Have fun shooting, and please share your pictures below!
The post Beginners Tips for Night Sky and Star Photography appeared first on Digital Photography School. It was authored by Phillip Van Nostrand.
The post Tips and Tricks to Achieve a Graffiti Effect in Photoshop appeared first on Digital Photography School. It was authored by Ana Mireles.
Are you a fan of street art? Creating a graffiti effect is a great way to give an urban look to your designs or photos. In this article, I’ll show you some tips and tricks to get more realistic results using Photoshop.
Prep Work
You’ll need to do a little prep work to get you started on your way to making a realistic graffiti effect in your images.
Reference images
Whenever you’re recreating something that’s based on real-life, it is good practice to have a reference. Create a library from your own photographs or use online resources like Pinterest. That way, you have a visual guide to make your graffiti effect as realistic as possible.
Resources like Pinterest are great for finding graffiti resource images.
Get a photo of a wall
First, photograph the wall you want to use for your graffiti effect. (If you can’t photograph one yourself, look to stock libraries or free-use images online.) There are no specific rules to follow, but the more texture it has, the better the effect will look. For example, you can use a brick wall, a rough concrete wall, a corrugated iron fence etc.
Then you need to create a black and white version of your image that is highly contrasted. This will serve as your displacement map.
There are many ways to do this, so feel free to use your own technique. I like to add adjustment layers. Use the Hue/Saturation to make it greyscale by moving the saturation slider all the way to the left. Then add a Brightness/Contrast one to increase the contrast.
Once you’re done, save it as a PSD format for later use.
Create your graffiti
There are many types and styles of graffiti: Blockbuster, Throw up, Tag, Stencil, Piece, etc. If you want to achieve a good graffiti effect, you should pick one of them for your work. I don’t intend for you to be a street art expert, nor do I pretend to be one, that’s why you can use the reference pictures. That way, the effect will be more realistic.
1. Blockbuster
This is one of the most common text-based graffiti. In simple words, it’s the one that has colorful chunky letters with thick borders.
If you want to buy or download a specifically designed graffiti font, you’re welcome to do it. If you want to make it more unique, you can also use a default font and modify it.
Using the Text tool, you can choose your font in the Options bar. Type your text, and it will be created in a separate text layer. If you right-click on that layer, choose “Convert to Shape.”
Once it’s a shape, you can modify it using the pen tool.
In the toolbar, under the Pen tool, you’ll find the Convert Point tool. With it, you can drag any of the anchor points to modify the shape.
Select and drag any of the anchor points to change the shape of the letters to what you want.
Note: Using the pen tool, you could create the letters from scratch too, but unless you’re a painter or a graphic designer, it’s easier to have something to get you started.
Now, using Layer styles, add the colors, edges, and shadows to mimic the effect from the graffiti you chose.
2. Stencil
Another style of graffiti is Stencil. This can be as easy or complex as you want it to be. It’s often one color (but can be more) and without internal details or depth. So, a basic way to do them is by using the Shape tool. You can use predetermined shapes or create your own with the Pen tool.
Just like you did for the text, use the Convert Point tool to modify your shapes at any time.
3. Piece
The third choice you have is to use a photograph in order to create a Piece (as in masterpiece). For this, you just go to File->Place and select the image of your choice. This will open it as a Smart Object.
A graffiti piece is more of a drawing, so it will be less detailed than a photograph. To get a better result, you can turn it into a painting or a cartoon before you apply the graffiti effect.
Try using the filter’s gallery to simplify your work. Go to Filter > Filter Gallery and apply different styles until you find the one you like. Notice that you can build up many of them if you feel like experimenting.
Finishing Touches
Once you have chosen the type of graffiti effect you would like to use, there are a few more steps to make it realistic.
1. Displacement Filter
It doesn’t matter if you did a Blockbuster, a Stencil, or a Piece, you need to integrate it into the wall in order to make a graffiti out of it. This is where the displacement map you created in the prep work comes into play.
Just go to Menu->Filters->Distort->Displacement. In the pop-up window, select the values you want. I’ll use a value of “10” in both. Click “OK” and it will open a window for you to browse your files.
Choose the grayscale image of the wall you did in the prep work and apply it.
To fully incorporate this ‘distorted’ image into the wall, right-click on the empty part of the layer and choose Blending Options from the menu. Then use the “Blend If” sliders until you’re happy with the results.
2. Adding perspective
This step is completely optional, but if you want to give more depth, you need to add a vanishing point. For this, make a new layer that merges all of the other by pressing Shift+Ctrl+Alt+E for PC or Shift+Command+Option+E for Mac.
Now select it and go to Edit->Transform->Perspective. Pull one of the corners up and stop when you’re happy with the result. Apply the transformation and your Graffiti effect is ready.
The finished artwork uses Blockbuster, Stencil and Piece graffiti effects.
Conclusion
Graffiti is a very rich and complex art form that is very difficult to sum-up in just one article. However, I hope these tips and tricks will help you achieve a real graffiti effect.
There really is a lot of material to get creative in this area, so try it out, and have fun. Share your results and tips in the comments section.
The post Tips and Tricks to Achieve a Graffiti Effect in Photoshop appeared first on Digital Photography School. It was authored by Ana Mireles.
The post Tips for Organizing Photos in Capture One Pro appeared first on Digital Photography School. It was authored by Darina Kopcok.
No matter which RAW photo editor you use, organizing your photos is probably one of the least enjoyable tasks in your photography workflow. However, setting up your catalogs correctly, or making changes to its structure, can ultimately save you a lot of valuable time. In this article, I’ll give you some tips to get you started on organizing photos in Capture One.
Capture One Pro Worksapce
Setting up your Catalog for success
Capture One offers you the ability to work in Catalogs or Sessions. It’s recommended that you work with both.
A Catalog in Capture One functions like a Catalog in Lightroom in that it helps you organize large libraries of images; however, it offers more functionality. On the other hand, Sessions are great for on-set shooting and tethered shooting in studio and are an efficient way to organize the images from a specific shoot.
There are different importing strategies you can use when organizing photos in Capture One. However, before you get started, you should, decide where you’ll put your catalogs.
They don’t have to live in the same location as your photos, but your catalog should be kept in the fastest, most high-performing place you can put it – which is usually your computer’s internal hard drive.
In short, consider the performance limitations of any storage medium that you use when organizing your photos in Capture One.
Starting a new Catalog
If you’re new to Capture One, you’ll want to start a new Catalog. Creating a Catalog creates a new database; it tracks photos and adjustments, and stores metadata and keywords, and a small preview of your photos
You can have a single catalog for all of your images, which is further broken down into Sessions and Albums etc. depending on how you want to set up your workflow. You may choose to have more than one catalog; for example, a catalog for personal photos and another for client work.
I shoot food and still life photography for several stock agencies. I like to keep these images separate from my client work, as it helps me feel more organized. However, this is simply my preference. You may decide to organize your photos in Capture One differently.
How to start a new Catalog:
Navigate to File in the menu bar at the top of the Capture One workspace.
Choose New Catalog. The dialog box will appear.
Type in the name of your new catalog. Notice the location of where your catalog will be stored. You can change this by clicking the three dots to the right.
Hit OK. Now you’re ready for the import process.
Importing from an external hard drive
The chances are that you shoot a lot. If you shoot RAW files, it doesn’t take long for your computer’s hard drive to fill up with thousands of image files. Therefore, it’s a good idea to keep your image files on an external hard drive to keep your computer’s performance at an optimal level.
I keep my Capture One catalog on my iMac but have my files stored on two 4TB external hard drives – my main storage drive and a backup with duplicate files.
I also shoot tethered to a laptop when I shoot for clients. In this case, I save a backup of my files on a 1TB external hard drive and upload the photos to my main external drive after my shoot.
Before you get started with importing images, make sure that your image preview size is at least as large as your monitor, to ensure that they render properly. You can set this in your Preferences.
How to import from an external hard drive:
Go to File and choose Import Images. A Dialog box will pop up. Choose your external drive from the dropdown under Source.
Make sure to check off Include Subfolder to see your photos in the Capture One workspace, otherwise it will appear blank.
Choose where you want to import them to under Destination. I have a file named after every calendar year on my main drive. I create folders named after the contents of the shoot. ie: Blood Oranges, Moody Whiskey, Carrot Cake, etc.
You can also create another backup and save the images to that location.
After you have chose your importing parameters, hit Import All.
Leave your photos in the current location to honor the file structure that already exists on the hard drive you are copying from.
Importing from a memory card
To import your photos from a memory card, you need a Destination folder to get them off the card. You may already have a folder in mind or you can create a new folder ie: My Photos
The dialog box will pop up once the card reader and memory card are connected to your computer. The process is the same as for importing photos from an external hard drive.
You can create Subfolders and further organize the images by date or other criteria. Capture One calls this Tokens. Tokens pull this data from the photo.
If you click on the three dots next to the Subfolder option, all of the various Tokens will come up. You can then click and drag them individually to the Format section, as well as drag them around to place them in a certain order.
Be sure to scroll down to see all the Tokens.
I usually choose to organize further by date, or date and time. Often I also include “Rights Usage Terms” to help me track licensing stats of various photos.
Once you have chosen your tokens, hit OK and then Import All.
Moving files and folders to another location
If you want to move files between folders, you can just drag and drop them. The database understands that you’re doing this within Capture One. When you attempt to do this outside of Capture One, this is where you get into trouble.
Moving outside of Capture One is slower, and you’ll have to relocate the files.
You’ll get an Offline notice and will have to locate it by right-clicking on the image and choosing Locate and navigate to where your image is. Capture One will re-establish the connection.
If you move a whole folder, it’s the same process.
You can move folders the same way you move files, and move them from your internal drive or an external drive.
Organizing with User Collections
User Collections is the best way of organizing your photos within Capture One. If you use Lightroom, you’ll be familiar with the concept of Collections.
There are too many limitations when trying to organize by folders because you can’t bring certain images together for a specific purpose, such as printing your work, unless you move them. Therefore, User Collections is the perfect solution.
There are four powerful organizational tools in User Collections:
Album
Smart Album
Project
Group
Project is like a master container to put your Albums in. You can’t just drag images here; there has to be an album inside.
Much like a physical photo album, Album is a way to organize groups of photos that have a similar theme, such as vacation photos, or photos from a wedding shoot.
How to start a User Collection
To start a User Collection, click on the + arrow to the right of the User Collections dropdown.
Then give your Collection a name and hit OK.
Smart Albums
Smart Albums are a way to take this a step further, by giving you the ability to organize with star ratings and color tags. If you’re a Lightroom user, you’ll also be familiar with this concept.
Smart Albums populate themselves based on the criteria you pick. If you click off a star or rating, it will disappear from the collection, because this feature is dynamic.
Click + to add your search criteria, or use preset color and star ratings.
Conclusion
Organizing your photos in Capture One takes some effort and experimentation using the various tools the software has to offer. It’s a powerful program that has a lot of intuitive tools to help you create the most efficient workflow for your photography.
If you have any other tips for organizing your photos in Capture One, let us know in the comments!
The post Tips for Organizing Photos in Capture One Pro appeared first on Digital Photography School. It was authored by Darina Kopcok.
The post 8 Vital Tips To Crop Your Photos For Stronger Compositions appeared first on Digital Photography School. It was authored by Kav Dadfar.
Even the best photos can be ruined if they are not cropped properly. It’s easy to get carried away with cropping since you can take away more and more of what may seem like a useless portion of the image. This can quickly lead to cropping way too much. Or, the opposite can happen if you are worried that you’re taking away too much. Believe it or not, sometimes even the professionals need tips to crop their photos better. So here are 8 tips to crop your photos better so that you can avoid making mistakes.
f/2.8 – ISO 160 – 1/100 sec
1. Tell the complete story
If you’re taking a photo of two people
playing catch, you would never dream of cropping out one of the people or the
ball. The photo would no longer make any sense!
Take the subjects into consideration when
cropping out elements. Are they interacting with anything in the frame that
would change the context of the subject’s actions if removed? This is a
surefire way of knowing whether or not you are cropping too much from the
image.
f/8 – ISO 100 – 1/100 sec
2. Remove partial elements
There may be something in your frame that isn’t fully in view, like an elbow or a stray tree branch. Without the entire element in the frame, sometimes these partials can be distracting from the subject and should probably be cropped out.
Just like your image is trying to tell a complete story, you don’t want any unnecessary details distracting the viewer from what you are trying to get across in the image. Photobombs are funny, but only in the right context, so consider removing that random person in the background that you didn’t intend to be there in the first place.
The cropped image on the right removes the distracting elements.
3. Keep the subject at eye level
A portrait becomes much more engaging when the subject seems like they are at a more natural eye level. Concerning portraits, this may actually be one of the more important tips to crop your photos.
Cropping too tightly on the subject will
create a close-up shot that seems unnatural and even uncomfortable to look at. Keep
things in proportion by allowing the subject’s eyes to stay at a more natural
level in the frame.
Additionally, your subject will seem to want a little breathing room. When cropping at eye level, make sure that you are giving the frame enough space so that their gaze doesn’t seem interrupted by the edge of the frame.
f/3.5 – ISO 100 – 1/100 sec
4. Centering the subject is not a requirement
Just like you’re trying to tell the entire story by keeping important elements within the frame, that might also play into your composition as well. Apply the rule of thirds (or other compositional rules) to help you determine where your subject should rest within the frame. This will help you lay out other elements in frame as well, making sure that you don’t accidentally cut something out or when you don’t realize that you have centered your subject.
In fact, when cropping appropriately, you can even fix any composition problems that you might not have considered when snapping the image in the first place.
Using the rule of thirds, you can ensure you crop your images better.
5. Try to avoid cropping limbs
While it may be a good idea to crop out part of your subject, try to avoid cutting off the limb of your subject. Cropping limbs creates an eerie effect and shows that you hadn’t considered your framing when taking the shot. Similarly, you wouldn’t want to cut off any piece of your subject that doesn’t make sense, like half of their ear or the tip of their nose.
6. Crop out the errors
You might think that a true photo would include leaving the image as it stands, mistakes and all. However, cropping properly can mean that you cut off portions of an image that distract from the subject or are just simply wrong.
For example, maybe you have accidentally captured your camera strap in your shot. Would you really want to leave that in?
So one of the best tips to crop your photos is to remove anything that wasn’t your intention to include. Of course, ideally, you should spot these errors when taking the photo, but if you didn’t, and you can crop to correct, then you should.
f/8 – ISO 100 – 1/250 sec
7. Crop consistently
If you’re shooting a series of portraits, landscapes, or anything else of the same subject, then it’s important that you crop all of the photos in the series consistently. The series is supposed to be a coherent, consistent set of photos aesthetically, which means the composition and cropping should all work together as a set.
Without uniformity, when the photos are looked at in a group, if they are not composed and cropped consistently, then it is going to have a jarring effect. For scenario shots, like a landscape, keep the rule of thirds of the Golden Triangle rule in mind as well to help with consistency.
8. Cropping doesn’t always have to be right-angles
The majority of the time, cropping will involve right-angles to give you square and rectangle shapes. However, there is no hard rule that says this is the way it has to be. To wrap up these tips to crop your photos, you can also be creative and crop an image as an oval, hexagon, or any other shape that may lend itself better to the image.
Depending on the subject, the composition, and how you want your final image to look, cropping in various other shapes than right-angles may look intriguing.
Conclusion
Sometimes the difference between a good photo and a great photo comes down to the way you crop it. The great thing about digital photography is you can adjust photos without fear because you can always return to the original by using software like Lightroom. So experiment with your cropping, and you may see a big improvement in your photography. Also, share your before and after results in the comments section!
The post 8 Vital Tips To Crop Your Photos For Stronger Compositions appeared first on Digital Photography School. It was authored by Kav Dadfar.
The post 6 Tips For Capturing Better Urban Landscapes appeared first on Digital Photography School. It was authored by Kav Dadfar.
As you continue your quest to enhance your photography skillset, you should look to broaden your horizons by exploring various disciplines. In this article, we’re going to look more closely at how to capture better urban landscapes.
f/8 – ISO 100 – 1/250 sec
This discipline is all about bringing an urban environment to life in your photos. Shots of people living, moving, and working combined with an urban landscape can make for wonderful photos. It’s challenging even for experienced photographers. But you’ll find new ways of expressing yourself and capturing your surroundings, as well as immortalizing a piece of your growing environment.
But how do you best capture engaging images in an urban landscape? Here are six tips for capturing better urban landscapes.
f/8 – ISO 100 – 1/320 sec
1. Get to the streets
Whilst there’s nothing to say that you can’t take urban landscape shots from viewpoints in a city, if you want to capture exceptional urban photography then you should be right there alongside it. Get off your balcony and put yourself right onto the street in the middle of life as it unfolds.
To photograph better urban landscapes, try to find scenes where you can capture the combination of the urban landscape and people. A tight shot on two people talking isn’t necessarily what you’re looking for here. This is more street photography than urban landscapes. So you need to introduce some elements of the urban arena into your composition.
f/6.3 – ISO 250 – 1/160 sec
2. Play around with shutter speed
By lengthening your exposure setting, you can create a very dynamic image. Admittedly, this may go against having a live subject (like a person or animal), since they will probably be moving quite a lot. However, if you can, taking a wide shot of the urban landscape with a long exposure can create some interesting effects through movement.
The streaked clouds overhead can give a sense of movement to your still landscape. It’s a nice trick for capturing better urban landscapes if you’re just looking to get an image of the scene itself instead of active subjects.
At night, this also can create light trails from vehicles. Their tail and headlights will streak in the image, creating an amazing photo that captures the hectic expression of any urban setting.
f/13 – ISO 100 – 4 sec
3. Find interesting buildings
What’s really cool about urban photography is that it’s just as much about the manmade elements as it is people. If you’re shooting in a city setting, then there are likely many interesting buildings, sculptures, parks, and other manmade elements throughout to capture.
Do a little research and learn about why
the interesting buildings were built in the first place. By being just as
selective with your history as you are your visuals, you can create a story
using photography in an urban setting.
For example, if you’ve chosen a wonderful gothic church as the background for your scene, what is unique about that church’s history? It may look amazing, but what else is behind the building, historically-speaking? You might dig up something really interesting that’s going to help shape your photo sessions. It could be key elements in the architecture or historically important locations around the church. Or you may just find interesting viewpoints and angles for better urban landscapes of the church.
f/6.3 – ISO 100 – 1/250 sec
4. Come back during different seasons
Another tip for capturing better urban landscapes is to come back during different seasons. It’s easy to forget what an urban setting can look like during a different season. If you’re standing in the middle of a skatepark during the height of summer, and it’s very active with teenagers riding on every surface, you aren’t necessarily thinking about what the same scene would look like covered in snow.
However, you could make some really
intriguing juxtaposing images if you returned to the same scene during a
different season later in the year.
If you have the ability to travel to a location more than once a year, then you should consider taking advantage of that luxury. The lighting, skyline, and general feeling can all change dramatically, allowing you to capture great images that you might not have even considered previously.
f/13 – ISO 250 – 15 sec
5. Use the terrain
When you compose your shot, consider the golden triangle rule or the rule of thirds. You can also look to align your subjects with leading lines generated by the terrain; perhaps a bridge, trees, a street, or a mural.
Elements throughout your frame can guide the eye toward your subject naturally, or they can pull it away just as easily. Be aware of how you’re composing your shot and consider using the elements to better align your focal point for better urban landscapes.
f/8 – ISO 800 – 0.6 sec
6. Night versus day
An urban setting can really come alive at night. The shadows cast by daylight are now blending into the surroundings, and your lens will pick up way more than you thought possible.
Daylight photography can capture active scenes natural to that time, and the same can be said for nighttime photography. Aside from general lighting differences, the time of day also helps create an atmosphere in your image that you can’t replicate any other way.
If you can, just like visiting the scene during different times of the year, try and come back to see how the urban setting changes between night and day. Some differences may be subtle, but others will weave new visions for your camera to capture.
f/11 – ISO 200 – 20 sec
Conclusion
The wonderful thing about this type of photography is that often it’s accessible for lots of people. Most people live within or near urban environments. So there will be ample opportunity to practice capturing better urban landscapes. Use the tips above and you will be on your way for improving your photography in this genre.
Do you have any other tips for capturing better urban landscapes that you’d like to share? Do you have some images you’d like to share? Please do so in the comments section!
The post 6 Tips For Capturing Better Urban Landscapes appeared first on Digital Photography School. It was authored by Kav Dadfar.
The post 7 Essential Tips for Photographing Business Events and Conferences appeared first on Digital Photography School. It was authored by James Maher.
Photographing business events is a lesson in extremes. One day you might be photographing a fascinating gala with incredible lighting and a lot of alcohol and energy. Then another day, you might be forcing yourself to pay attention while capturing an insurance industry conference in a dimly lit hotel ballroom, waiting for one person to make a single joke so people will laugh or smile during a talk on offshore tax havens.
In both cases, you have to do the best job you can to come back with the best possible photography from the day. You have to be prepared for the worst lighting, awkward people, and speeches that will cause even the most focused business professionals to nod off in their chair.
Here are some tips that have allowed me to always be prepared.
1. Before the job/being professional
1/200s at f/5.6, ISO 800.
The more prepared you are before a job starts, the smoother the day will go, and that starts with communication.
Provide your client with quick responses to make sure you don’t get beat out by competitors. Make sure you understand all the details of the event and what will be required of you and explain everything that you will provide the client. The better the communication when photographing business events, the fewer surprises will happen during the day.
Provide an official PDF quote on branded letterhead (it’s a nice touch) and always make sure to use a contract. I know this can be stressful for those just starting, but have a standard contract created that you can easily alter for each job, and it will quickly become a simple step in the process.
1/30s at f/2.8, ISO 3200.
Price yourself well. Do some research on event photographers in the area and value your services. Consider your expenses, travel time, shooting time, and editing time. On top of this, consider the time you spend marketing to get these jobs, your overall business expenses, and your personal expenses.
If you under-charge, you may make a little money, but you will quickly be out of business as well as hurting your competitors at the same time. Your work is valuable.
Always make sure to bring backup equipment for everything vital to the day. Bring an extra camera, lens, flash unit, batteries, and more CF cards than you need. The more prepared you are, the less will go wrong.
Finally, dress the part. This tip segways into the next topic about making people comfortable. As a photographer, people are watching you. Cameras stand out, and as much as you want to lay low to capture the best candid moments, you will be a focus of people’s attention.
Because of this, you need to make the best impression possible, While it may feel superficial, the better you dress, the more people will respect you and believe that you are doing a good job (because they often aren’t speaking to you, just seeing you working). It’s simple, but it works.
2. Make people feel comfortable
1/160s at f/3.5, ISO 800.
Your job as a photographer is to capture people looking happy and comfortable. The first step to doing this is making yourself look comfortable. The more comfortable and pleasant you look, the more relaxed people will feel around you, so remind yourself to keep a smile on your face.
Early on, I smile at people and give a quick hello or nod to some of the guests if the situation warrants it. If people look like they want to avoid me, I’m happy to let them. This makes me look non-threatening.
As the event goes on, people will begin to forget about you. However, the earlier you make people feel comfortable around you, the quicker this will occur.
3. Fast equipment
1/160s at f/4.5, ISO 6400.
In my experience, a majority of business events are in places with terrible lighting, so having the right equipment is necessary. You need to have a fast lens (that goes to f/2.8 or even faster), a flash unit, and a camera that can shoot well at high ISOs of at least ISO 3200 (which most new cameras can do these days).
My main event lenses are the Canon 24-70 f2.8 and the Canon 70-200 f2.8. This will cover everything from the overall room shots, the walk-around cocktail photographs, the group shots, to the detailed speaker photographs.
If you are on a budget, a 50mm f1.8 lens is a fantastic and affordable lens for event photography. However, the prime focal length will cause some significant constraints.
For photographing business events in darker environments, I will raise my ISO to 1600 and often 3200. My camera can handle this level of ISO (and 6400 if I really need) without clients noticing and it allows me to always be able to shoot with f2.8 lenses instead of needing faster ones.
1/125s at f/6.3, ISO 1600.
Now, even though you need to be able to shoot at f/2.8 when the lighting warrants, that doesn’t mean that I always do this. Often you will want more depth of field to show the full venue or multiple subjects sharp.
Particularly when photographing groups of people, I will always try to be around f/4 at least when it’s possible. Photographing a group at f/2.8 will often have the center person sharp while the edge subjects (or people standing too far forward) can be quite blurry.
Finally, you need a reliable flash unit. This will allow your subjects to stand out from the background and give them a pleasing light source much more flattering than your typical overhead ballroom lights. For presentations, I stay away from using a flash and instead stick to high ISOs as to not annoy a room full of people trying to concentrate.
For indoor cocktail event photography and similar, I almost always use flash.
4. Balance the room light with your flash
1/40s at F3.2, ISO 3200.
Whenever I need to use a flash, I will first set my camera to expose the room correctly without the flash. In my opinion, the best event photographs show the room and natural lighting of the environment while artificially lighting your subjects, so they look as good as possible.
I will raise my ISO and lower my aperture number until the room looks good, making sure that my shutter speed does not go too slow to cause too much handheld motion or motion in the subjects.
After this, I will turn my flash on and use the TTL (through the lens) setting to allow it to expose the scene correctly. TTL gives the camera the ability to read the light in the room and to give off what it believes to be the right amount of light.
While this screws up occasionally, it can be very accurate and will allow you to focus more of your attention on the event itself.
5. Bounce your flash with a diffuser
1/80s at f/2.8, ISO 2000.
Using a flash does not mean the light that comes off of it will be automatically pleasing on your subjects. Facing it directly at the subject can be pretty harsh.
Instead, I typically aim my flash up and sometimes slightly to the back. That way, the light will spread out and bounce off the ceiling back to them. The shorter the ceiling, the more this works. With a very tall ceiling (or dark ceiling), you will have no choice but to aim the flash directly at your subject.
I also use a small cap diffuser on the flash, which spreads out and diffuses the light. It will also send some of the light forward when the flash unit is pointed up, which helps out significantly.
I highly suggest the smaller cap diffusers over the larger ones, since the larger ones will light up like a bright bulb and blind anyone near you. This can be disruptive for an event.
6. Anticipate and wait for the right moment
1/125s at f/3.5, ISO 1600.
Anticipation is the key to good event photography. If you walk around constantly, it’s so hard to both pay attention and to be in the right position to capture those quick, amazing moments. Instead, find a location with a good vantage point on people having fun and wait for the right moment to occur. When it happens, you will be in position and ready with your camera to capture it.
When I do this, I try to be candid about it because there is nothing that will stop a great moment from happening more than a photographer staring at you and waiting with their camera. So instead, I try to make it seem like I’m looking around the room or looking at something else. I am scanning the room, of course, but I’m primarily watching them out of the corner of my eye.
Sometimes the moment happens and sometimes it doesn’t, so don’t be afraid to give up and move on when needed.
For conferences and long speeches, the key is to wait for someone to make a joke. That is usually the only way people will smile during these serious events. And while I try to be at attention for the entire time, this can be very difficult for a full eight-hour event of speeches and talks.
Instead, I usually pay the most attention early on in each speech and talk. Usually, the jokes come at the very beginning, so I will shoot a lot early on until I’m sure I have enough good photos. Then I will rest my attention for a bit, while still waiting for jokes or light moments to occur.
7. Edit the photos efficiently
1/200s at f/2.8, ISO 1600.
Coming back from an event with 600-1000 photos (or more) can be a daunting experience, particularly for those newer to photographing business events. Having an efficient workflow is necessary for these situations.
I try to stick to a week-at-most turnaround time. This can be difficult, but it is a big draw for businesses in this fast-moving social media world. Often, I’ll even send a small section of the best photographs the next day.
But how do you do this efficiently?
Before I do anything, I cull down the photos to the selects as fast as I can in Lightroom. I use the star system to go through my photos. I give the best photos 5-stars, 3-stars to the ones I am probably not going to use, but I’m not yet sure about, and the rest 0-stars. Then I go through the 5-star images again to turn some of the photos into 4-star images. This allows me to get down to my final set of 5-star photographs to send to the client as quickly as possible. It reduces the rest of the editing time significantly, which is a key step.
From there, I will edit and crop the photographs. Take significant advantage of Lightroom’s copy and paste functions for the changes you make. Since you will have groups of photographs taken under the same lighting conditions, copying and pasting your changes will save you so much time. Often, some of the photos will need small tweaks after that, but the core of the work can get finished so much quicker this way.
1/160s at F6.3, ISO 1600.
Conclusion
Photographing business events can be overwhelming at first as you never really know what you are getting into. Some events will be easy, inspiring, and delightful, while others will test your patience. Moreover, you often won’t know how this will go until you show up.
But over time, even the tough jobs with bad lighting and boring subjects will eventually become routine, as long as you take advantage of the tricks to get the best out of these situations.
Do you have any other tips for photographing business events that you would like to share? Please do so in the comments section.
The post 7 Essential Tips for Photographing Business Events and Conferences appeared first on Digital Photography School. It was authored by James Maher.
The post 8 Tips for Editing Stock Photos so they Pass Inspection appeared first on Digital Photography School. It was authored by Kevin Landwer-Johan.
Editing stock photos requires a little more attention to detail than you otherwise might give your photos. Stock photo agencies have standards to meet and rules to follow. If you want your photos accepted into their libraries, you must adhere to them.
You may have applied to a stock photo agency in the past and had your imaged rejected because they were not up to scratch. Each stock photo agency has its guidelines for what is acceptable and what is not. Learning what these are can save you a lot of wasted effort and time.
It’s easier than ever to upload to stock photo agencies
Over the years micro-stock photography requirements for image editing have shifted somewhat.
Camera technology has improved, so there are fewer imperfections caused in images when you take them. With the increase in megapixels and image quality, there’s less need for as much post-processing now.
With more and more stock photography sites coming online over the years, standards are not so tough as they used to be. Newer, smaller agencies want to attract photographers. Not being so strict on image quality makes it easier to meet requirements. Image libraries are populated more quickly because there are fewer rejections.
As stock photo libraries contain millions of photos, the parameters for what style of photo is accepted has changed. Many photo sales sites will accept photos for editorial licensing, whereas in the past most did not.
From one agency to another, the quality and style of photos they accept differ. In this article, I’ll go over some of the most common things to look for in your photos that might hinder them from being accepted.
When I started learning about stock photography, there were fewer agencies, and their quality standards were much higher. It was more challenging to have your photos accepted into the best agencies. And, when you had been welcomed as a contributor, you could not let your standards drop.
Each submitted photograph gets thoroughly checked. The team of inspectors works with a list of parameters and standards. Every photo must meet these before it’s included in the stock library. In some cases, inspectors will offer you feedback. There can be a provision made to resubmit rejected photos once they are fixed. But not all stock agencies do this. Sometimes if your photos are rejected, there is no opportunity to fix them and resubmit.
Learning to meet the standards will help you improve your image editing skills. The bar may not be so high anymore, but it’s always best to aim to present the highest quality possible.
Some of the most common things stock photography inspectors look for in photos that will get them rejected are:
Before you start editing, you can do a lot to ensure your photos will get accepted. For more of your photos to pass inspection, you need to think like a stock photographer as you are taking your photos.
1. Set your exposure well
Keep in mind the importance of attaining a good exposure. This is far more desirable than correcting your exposure during post-production. Start editing stock photos that are poorly exposed and you’ll run into other problems.
When your exposure is poor, correcting it during post-production can result in artifacts in your image. This is when the digital integrity of the image starts to break down. Stock agency photo inspectors usually reject photos with artifacts.
Modern cameras have an incredible capacity to take photos in low light. Raising your ISO too high can create an unacceptable amount of digital noise.
Cleaning up the noise is often not at all difficult. With the correct balance of noise reduction slider, you can eliminate it.
When you’ve used a high ISO setting, make sure you zoom into 100% and take a look at the level of digital noise. You may not see it clearly unless you enlarge your photo. Using the appropriate sliders, you will be able to reduce it significantly.
Chromatic aberration is sometimes called purple fringing. It’s a fault in digital images caused by contrast in a scene. When you’re editing stock photos, you must look carefully for this problem.
Check along the edges of objects in your photos where there’s a contrast with the background. When you notice a band of color along the edge you will need to correct this. The color is usually magenta or green. Sometimes it can be blue or yellow.
Most popular image processing software now has dedicated tools for eliminating this problem.
4. Clone out sensor spots and other blemishes
Sensor spots look ugly in photos. It’s best to keep your camera sensor clean, but this is not always possible. Other dust and blemishes also need to be removed so you can upload the cleanest photos possible.
Using clone tools is often the best way to clean these blemishes from your photos. Again, zoom into 100% so you can see these spots easily. Work methodically over the whole photo to make sure you don’t miss any.
Sensor spots are usually visible against a clear space in your photos. They are likely to show up in large areas of sky, snow, or other similar elements containing little or no detail.
Buildings, lamp posts, horizons, and other elements must look properly aligned. If you’ve taken your photo with your camera on a bit of an angle, the vertical and horizontal lines will not appear natural.
Cropping your photos, so elements in them are aligned correctly, will help them pass inspection.
6. Correct your white balance
Most of the time, I have my camera set to auto white balance. This produces the correct color in my photos most of the time. When the color in your photos looks odd, it must be tweaked so it looks natural.
Having your camera set to save RAW files makes all aspects of post-processing easier, especially color correction. If you have photos where the color looks too cool or too warm, use the eyedropper tool or color correction sliders to help you achieve the natural color.
7. Remove all copyrighted elements when you are editing stock photos
This is the most frustrating aspect of stock photography for many people. So many things are copyrighted and branded. It’s best to avoid anything with a logo or branding when you are taking your photos. Sometimes you can’t, so you need to remove any instances of copyrighted material from your images.
If you are only uploading your images to sell under an editorial license, the requirements for copyright are different. You’ll need to check the terms and conditions for each stock photo agency as they differ from one to another.
Sometimes copyrighted material is in plain sight. Branding on a coffee cup. An outdoor advertising banner. Logos on shoes and clothing. All these are unacceptable when submitting photos to royalty-free microstock photo agencies.
Some of the more elusive things that contain copyrighted material are:
Zips with branding
Clips on bags with branding
Buttons with branding
Watches
Phones
Artworks
Text written in a language the inspector does not read will also often be rejected as they have no way of knowing if it’s copyrighted.
Cloning out any logos or branding can take a long time, so it’s best to avoid including these things in your photos when you can.
What’s allowed and what is not allowed is different for regular and for editorial licensing.
Images submitted for sale under a standard royalty-free license can be edited freely. Editorial stock images must meet higher standards. The most important thing to know is you cannot generally make use of the clone tool.
Any alteration to the content, other than sensor spots is not allowed. You must check the rules for each stock agency you submit editorial images to.
Conclusion
Become familiar with the requirements of each stock photo agency you want to upload to. Understand what is acceptable and what is not. This can take some time but ultimately will save you time and stress.
Take your time when you are editing stock photos. Look carefully at each one. Zoom into 100% to ensure your image quality meets the standards required.
I hope you find these tips useful. Do you have any other tips for editing stock photos you’d like to share? Please do so in the comments!
The post 8 Tips for Editing Stock Photos so they Pass Inspection appeared first on Digital Photography School. It was authored by Kevin Landwer-Johan.
The post Lightroom Moon Editing Tips for Awesome Moon Photos appeared first on Digital Photography School. It was authored by Simon Ringsmuth.
One of the most fascinating photos you can take is a crystal-clear shot of the full moon. Pictures like this don’t require a lot of fancy gear, but you do have to be in the right place at the right time. To make matters even more tricky, you only have a handful of opportunities each year to even attempt a moon shot. Getting a picture is just the beginning, though. If you want to make your shot stand out, it helps to follow these simple Lightroom moon editing tips.
The benefits of RAW over lossy formats like JPG are well documented. While there are certainly times where JPG is useful, RAW is essential when taking shots of the moon. You need all the editing leeway you can get to adjust colors, exposure, and other parameters.
For example, the photo below might not look like much, but it’s fairly typical of the types of moon shots most people would get with some basic camera gear. I shot this with a crop-sensor camera, which is much more common than expensive full-frame models. I also only zoomed to 200mm, and a lot of kit zoom lenses can easily reach this far.
This is straight out the camera with no postprocessing applied. Nikon D500, Nikon 70-200mm f2.8, 200mm, 1/200 second, f/5.6, ISO 720.
At first glance, it probably looks like there’s not much that I can do here. The moon is overexposed and a little blurry. It’s way too small, and the power lines cut right through the frame. Also, the sky has a weird blue tint to it that’s a bit unnatural.
However, hope is not lost! Thanks to the power of RAW files, and a little bit of editing prowess in Lightroom, this photo can be turned into a frame-worthy image.
Crop
Back in the early days of digital photography, people often debated the importance of megapixels. A common, though incorrect perception was that more megapixels equal better photos. While that is not necessarily true, having a higher megapixel count does allow you to have significant room for cropping, which is great when your subject is far away – 239,000 miles, to be exact.
Most cameras today have upwards of 20 megapixels, which gives you a huge amount of freedom to crop your photos. If you don’t have a huge telephoto zoom lens to zoom into individual moon craters, use Lightroom instead. Crop your image until it’s nice and tight with the moon right in the center.
Go ahead and crop your photo. If you have a modern camera you have plenty of leeway.
In this example, I cropped the image tight enough to get rid of everything but the moon and the sky. Gone are the power lines and trees, and what’s left is just the moon in all its glory. Even cropped in this much, the resulting image is 4.3 megapixels – more than enough to get an 8×10″ print made.
There’s still a lot of work to do, but cropping already helped a great deal.
White Balance
At this point the picture is better, but still has a long way to go.
The next step is to adjust the white balance. The reason I recommend doing this after you crop your moon photo is that it helps you focus on just the important part of the image. If you adjust the white balance before cropping, you might be focusing your edits on parts of the image that you discard after cropping.
There’s no right or wrong way to adjust the white balance on a moon photo. It all depends on how you want the final image to look and what you want your viewers to feel when they see it. If you want a starting point, here are two options I recommend.
Use the Daylight preset
Use the Eyedropper and click on the moon.
Both of these produce vastly different results. You can also play around with the sliders until you get a look that you like. One thing to remember is that the moon itself produces no light. It’s just a ball of rock falling through the sky. The light you see is sunlight reflecting off the surface, which is why some people prefer to use a white balance suited for sunlight. The choice is yours, though, and you can set the white balance however you want.
Another option is to combine the best of both worlds. Click the eyedropper tool on the moon, but then use the Brush tool to change the white balance of the moon. This will give you rich, deep blues for the sky but a yellow tint for the moon. However, this can be a little tricky. If not done right, you will see a weird color halo around the moon. So just make sure to use the Brush tool as precisely as possible.
You can use the Brush tool to change the white balance of the moon, but not the rest of the image if you choose.
Exposure adjustments
Nailing the exposure when shooting the moon is tricky. It’s a giant bright ball against a dark sky, which means a lot of the conventional rules don’t apply. I usually prefer to under-expose the moon and then adjust it in Lightroom. That way you preserve your highlights, but even if your picture is a little overexposed you can still salvage it if you shoot in RAW.
In this example, my shot is overexposed by about one stop. To fix it, I entered a -0.75 value in the Exposure slider in the Basic panel. This darkens everything: the moon and the sky. If you want the sky to stay the same level of brightness but just adjust the moon, use the Highlights slider. Drag it left to lower the exposure of the brightest portions of your image – in this case, the moon.
Raise or lowering the exposure in Lightroom to get just the right appearance.
Adjusting the exposure isn’t one of the most mind-blowing moon editing tips, but it’s an essential step in the process of getting your final shot to look good.
Texture and Sharpening
When you take a picture of the moon, you have to contend with all sorts of variables that can lead to a soft or fuzzy appearance. From earth, we see the moon through miles of atmosphere, which often contains dust and other particles. Your lens might not be tack-sharp either, especially if you got your zoom lens as part of a camera kit. Lightroom can help fix these issues with a few simple sliders.
Normally, I would recommend starting with the Sharpening slider, but not when shooting the moon. In this case, you want to bring out the moon’s texture and surface details, so the texture slider is a great place to start. You can find it at the bottom of the Basic panel. Alternatively, you can use the Brush tool to adjust the texture if you want a little more precision in your editing.
Raising the texture slider makes the surface look clear and crisp. I used a value of +80 which is a bit extreme, but I wanted to illustrate the impact of the Texture slider.
The Sharpening slider is great for fine-tuning your image after adjusting the texture. However, I do not recommend using the Clarity slider. That will result in a false, unnatural look with moon shots and can show some unwanted noise in the sky as well.
Final touches
At this point, you have several options to polish your image. While you can use any number of editing tools, some that I recommend trying are:
Adding a vignette
Use the Brush tool to reduce noise in the sky
Adjust the tone curve to have a very slight S-shape
Raise and lower the blue saturation
Convert your picture to Black and White. Click “Black and White” in the top-right corner of the Basic panel
Final moon shot. I added a vignette and brushed some noise reduction in the sky.
When it comes to moon editing tips, the sky is quite literally the limit. These should be enough to get you started, but I recommend spending time just experimenting with some of the sliders in Lightroom to see what you can do.
Nikon D7100, 200mm, f/8, 1/180 second, ISO 640. I used the editing tips in this article to process this shot.
What about you? DO you have any other moon editing tips you’d like to share? Do you have any favorite shots of the moon? Share your favorites in the comments below!
The post Lightroom Moon Editing Tips for Awesome Moon Photos appeared first on Digital Photography School. It was authored by Simon Ringsmuth.
The post Top Tips for Capturing Better Aerial Photos appeared first on Digital Photography School. It was authored by Matt Murray.
Up, up and away! For most people, taking a scenic flight is not an everyday occurrence. In fact, for most of us, it’s a once-in-a-lifetime thrill. If you plan on taking to the skies to capture some aerial shots, what gear should you take and how should you prepare for the experience so that you capture better aerial photos?
The northern Gold Coast photographed from a seaplane.
In the space of six weeks in 2017, I was lucky enough to take aerial photos from three different modes of transport: a hot air balloon, a seaplane, and a helicopter. Below is my guide to taking better aerial photos.
What gear should I take?
This is probably the first question you’ll ask yourself. The
answer largely depends on a few factors: what kind of flight you’re taking, how
much room you’ll have, and what kind of shots you want to take.
The gear you have available to you may also depend when and
where you’re taking the flight. For example, if you’re doing a scenic flight as
part of an overseas trip, you will probably have a smaller number of lenses to
choose from than if you were at home.
There are lots of photographic opportunities on a flight
A good starting point for aerial photography is taking one camera body with a zoom lens, for example, an 18-55mm or 24-70mm. My go-to zoom lens is the Fujifilm XF 18-55mm F2.8-4 R LM OIS, which has a full-frame equivalent focal range of 27-82mm.
Lenses like this are quite compact and suited to even the tightest of spaces. It also has optical image stabilization, which helps to keep images nice and sharp. I took almost all of the images in this article with that lens.
This focal length is also very handy if you wish to take photos of your companions, or images of the aircraft before, during, and after the flight.
Depending on the circumstances, a longer lens might be your preference – just make sure you have enough room to maneuver. In a hot air balloon? No problem. In a small plane? Maybe not.
Don’t forget to take photos of your companions on the flight!
If I was going on a flight where I knew I would have more room to maneuver, such as a doors-off helicopter ride, I would take a longer telephoto lens with the same maximum aperture (f2.8 or f4) throughout the range, such as the Fujifilm XF 50-140mmF2.8 R LM OIS WR lens.
If you want the best of both worlds, consider taking two bodies with two zoom lenses – I wouldn’t recommend trying to change lenses while airborne.
Have your gear ready
One thing you must do to take better aerial photos is prepare. Check and double-check your gear the night before your flight. Halfway through a once-in-a-lifetime balloon ride is not the time to discover you’ve run out of space on your memory card or you’ve had the ISO set to 6400.
Look for abstract images as well as scenic views.
Mistakes happen, we’ve all made them. However, you can minimize your risk by having a list of things to double-check before your flight. Here’s what I check:
Check image format: JPG+RAW.
Check film simulation: especially if you’re shooting JPG only.
Check your ISO settings. If you’re using Auto ISO, check to make sure the settings are suitable for your flight.
Format your SD cards ready for use beforehand. Take a couple of test shots to make sure everything is working okay.
If you have a second SD card slot, use it. Consider writing RAW images to one SD and JPGs to the other.
Choose a fast SD card. If you’re taking continuous shots on a slower card, there can sometimes be a delay before you can take more shots as the camera tries to catch up writing images to the slow SD card. You want to avoid this on a scenic flight.
Use a 64gb or 128gb memory card if possible. You don’t want to find out halfway through your flight that you’ve run out of space, and you need to delete shots or find another memory card.
Make sure your batteries are charged.
Have spare batteries and SD cards just in case.
Visualize your shots beforehand
Look at the images posted on your flight operator’s website and social media – this will give you a rough idea of the types of shots that are possible. Have these types of images in mind before you take your flight. You can also contact the flight operator if there’s a particular landmark you wish to photograph, or if you’d like advice on the best place to position yourself in the aircraft.
Overhead shot of a tractor from a hot air balloon.
There are many variables with flying, though, so perhaps on the day the flight, the shot you have in mind won’t be possible. Keep an open mind, and don’t be upset if you don’t nail it. I always look upon a flight as a fun thing to do, and if I get some good photos out of it, that’s a bonus.
Shooting mode
I’ve taken photos in the air in both shutter priority and aperture priority modes. In shutter priority mode, I’d start off by setting my shutter speed to a minimum of 1/500 second. This should keep your images sharp if you’re in a fast-moving aircraft on a bright, sunny day. Your ISO will depend on how bright the conditions are.
As always, check and review your images and change your settings as the conditions dictate.
Hot air balloons inflating.
In aperture priority mode, I’d start off by having my aperture at f/4 and my ISO to 400. I’d then take a test shot to see what shutter speed the camera is choosing. Again, these settings depend on the conditions, but you’ll want to aim for a fast shutter speed, above 1/500 second. If the shutter speed is as high as 1/4000 second, you could lower your ISO to 200 or change your aperture to f/5.6 or f/8. If your shutter speed is under 1/500 second, you’ll need to bump up your ISO and experiment.
The advice above is for fast-moving aircraft. If you’re
floating along in a hot air balloon, you don’t need to worry about shutter
speeds as much.
Look for other opportunities
A helicopter on a landing pad, hot air balloons being inflated or deflated, seaplanes on the water – taking better aerial photos is also about looking for shots you can take before and after the flight.
Look for photo opportunities before and after your flight too.
Case study 1: Hot air balloon
There’s nothing better than floating high above the landscape in a hot air balloon, and nothing worse than setting your alarm for 3.45 am to get up for it! Although you may not be feeling it so early in the morning, a hot air adventure is worth getting up early for. It’s one of the most magical things I’ve ever done.
A balloon ride is the easiest aerial adventure to undertake with a camera. For it to take place, you need good weather. You also have a guaranteed space at the edge of the basket with clear uninterrupted views – and no window glass. Best of all, the balloon moves at a relatively slow pace, so it’s not as much of a challenge as a plane or helicopter.
Hot air balloon floating above rural Queensland.
My balloon ride took place inland from the Gold Coast in Australia. I mostly shot with my Fujifilm XF 18-55mm F2.8-4 R LM OIS lens, but also took the wider 10-24mm lens for some shots of the balloons inflating.
Make sure you have a secure strap on every camera you take
with you – the last thing you want to do is drop your camera overboard.
Case study 2: Seaplane
A few days after my balloon ride, I was joined by my family for a seaplane ride. We flew from the northern Gold Coast to nearby South Stradbroke Island, where we spent two nights glamping. The flight left Southport, headed south over Surfers Paradise and Broadbeach, then we turned inland and headed north towards our destination.
View from Southport looking towards Surfers Paradise, Gold Coast.
Space was quite restricted inside the aircraft. I didn’t have a perfect angle of view in every direction, but I still managed to get some shots I liked. As it was so bright, shutter speeds were very high.
A couple of issues I had to deal with when shooting were the reflections off the windows and ensuring the wings of the aircraft weren’t in my images. I also got a little airsick, which wasn’t fun.
Some photographers swear by circular polarizing filters to cut reflections from windows – this is certainly something I will try in the future. Just be aware that it does cut the amount of light that reaches your sensor, but on the seaplane flight, it wouldn’t have been an issue.
Case study 3: Helicopter
A few weeks later, I took a magical trip to the Faroe Islands.
The highlight was taking an Atlantic Airways helicopter from the main international airport to the remote island of Mykines, where there are spectacular colonies of puffins and other birds.
A village in the Faroe Islands, shortly after take-off.
In the terminal, you’re given a safety briefing before heading out to the tarmac by bus. I made sure I was the last person getting on the bus, so I was the first person out. I then managed to secure a window seat in the helicopter. I didn’t mind which side of the helicopter I was on, as there were great views on either side.
The flight lasts just 11 minutes, so opportunities for taking images are limited. On this flight, I had window reflections again, but this time I also had the added problem of heat coming off the helicopter into the cold European air marring my view occasionally.
I still managed to get some photos I was happy with. However, as I’ve said before, think of any photos as a bonus, rather than the reason you take the flight. As always, look for other photographic opportunities – I took some photos of the helicopter on the landing pad at Mykines.
The stunning coastline of the Faroe Islands in the North Atlantic.
Conclusion
An aerial adventure is a lot of fun, but make sure you’re prepared before you take off. A zoom lens with a wide-to-mid focal range should be perfect, but make sure you use a large capacity, fast SD card. Also, make sure you prepare the night before your flight and ensure all your equipment and settings are ready to go.
The most important piece of advice is to have fun and enjoy your time in the air. Don’t spend the entire flight looking through your viewfinder.
I hope this helps you capture better aerial photos on your next flight. Remember to think of them as a bonus, rather than the main reason you took the flight.
Feel free to share any of your aerial photography stories or photos with us in the comments.
The post Top Tips for Capturing Better Aerial Photos appeared first on Digital Photography School. It was authored by Matt Murray.
The post Tips for Doing a Backyard Photo Safari appeared first on Digital Photography School. It was authored by Simon Ringsmuth.
Have you ever thought about taking a trip to the other side of the world to get beautiful shots of exotic locations? You certainly can, and traveling is one of the best things you can do to take your photo skills to the next level. If flying across the world isn’t an option, what about stepping out of your door? A backyard photo safari is just a few meters away instead of a thousand miles, and you can take some beautiful photos without expensive gear too.
Nikon D7100, 50mm, f/2.8, 1/2000 second, ISO 100
While you could just drop what you are doing and head outside right now, it helps to do a bit of planning first. If you keep a few tips and techniques in mind, it will save you some frustration and give you a few ways to approach your very own backyard photo safari that will help produce the best possible results.
Timing is everything
Familiar places can take on dramatically different appearances depending on the time of day. It’s not just about the quality of light but the type of things you are likely to find – especially in your backyard. In the morning, plants are covered in dew, and bugs and insects are seizing the day. You might also find familiar sights shrouded in fog. Revisit the same patch of earth in the evening, and the scene will be dramatically different.
Nikon D750, 50mm, f/8, 1/90 second, ISO 800. This frog wasn’t just in my backyard. It was on my back door! I shot this after the sun went down after a rainy day.
You already know your own backyard well, but have you ever gone out in the early hours of the morning, or as the sun was setting, or even late at night? It’s not the same place at all. You will quickly notice things that you just don’t see during the day. Familiar objects take on a whole new appearance when photographed in the early morning or late at night.
You can even take great shots after the sun goes down by using a long shutter speed.
Fuji X100F, 23mm, f/8, 15 seconds, ISO 1250. I took this from my back porch very early on fall morning. It was only a few feet away from where I shot the photo of the frog!
It’s not just time of day that matters, but the time of year as well. Revisiting familiar places, even your own backyard, throughout the year can reveal amazing photo opportunities that were hiding right before your very eyes.
Act fast though! When you see an interesting picture idea, take the shot. Waiting even one day can change everything and suddenly your beautiful photo is nothing more than dust in the wind.
Nikon D7100, 50mm, f/2.8, 1/1000 second, ISO 100. I saw a photo opportunity on a Saturday morning right as the sun came up, so I ran outside barefoot to get the shot. The very next day, the leaves had all blown away!
Spring, summer, winter, fall – everything changes throughout the year, and this has a profound effect on the photos you can take in your yard.
Rich greens in spring, deep colors in summer, browns and yellow in the fall, and shades of gray in the winter.
Even if you think you’ve seen it all, try revisiting familiar spots in your own yard at different times of the year. The result may surprise you and give you some interesting photo ideas.
Nikon D7100, 85mm, f/4, 1/30 second, ISO 800. Composite of several shots of a lunar eclipse I took from my back yard over the course of two hours.
Look at the light
No matter the time of day or season of the year, it’s essential to look for where the light is coming from.
Then think about how you can use the light to make a more interesting or compelling composition.
Most objects look great with standard front-lighting – that is, with the main source of light positioned behind you, the photographer. You might need to scoot around or shift your position to make this happen, but your photos will be better off for your efforts.
Nikon D200, 50mm, f/2.4, 1/80 second, ISO 100. This sunflower was right by my back porch, with the sun positioned behind my shoulder so the flower was evenly lit.
Backlighting is a fun technique to use also, especially on a backyard photo safari where you get fun and interesting colors. This involves placing the main source of light behind your subject, which can create really fun effects and make ordinary objects take on a whole new appearance.
It’s loads of fun if you have flowers. Even ordinary, run-of-the-mill flora that you probably have in your own yard.
Nikon D7100, 50mm, f/2, 1/3000 second, ISO 100. These crocuses show up for a few days every spring, and each year I enjoy taking their picture. I didn’t plant them, but I sure enjoy having them while they bloom for a few days. I used backlighting to make it seem like they were glowing.
It’s not all about sunlight either. There are other sources of light that you can keep in mind when looking for photo opportunities right where you live.
Streetlights can cast an eerie, moody glow over everyday streets and sidewalks. Passing cars can make really fun motion trails. You can even create amazing artwork right in your yard with nothing more than a tripod and a flashlight – all it takes is a little creativity!
Nikon D200, 50mm, f/16, 15 second, ISO 200. This is looking down the street from my driveway on a calm, foggy morning.
Adjust your angle of view
Most of the time, we see the world around us, especially our own domicile, from the same point of view. Our eye-level remains roughly the same throughout the day, altering between three to five feet off the ground, depending on whether we are standing or sitting. To really find some interesting photo opportunities, particularly in your backyard, try getting low to the ground. Really low. A whole new world awaits you if you have eyes to see it.
Nikon D750, 85mm, f/1.8, 1/200 second, ISO 125. I had to position my camera very low to the ground to get this shot, but it was worth the effort.
Lots of interesting things start to show up when you change the angle from which you see the world around you. Even familiar settings can be transformed with a simple change in perspective. While you could get some really good shots by getting up high and shooting with a ladder, I find that it’s a lot more fun to literally crawl around on my hands and knees when looking for photos in my backyard.
Nikon D200, 50mm, f/1.8, 1/3000 second, ISO 400. I put a few of my kids’ toys on the ground, laid down on my stomach, and photographed them in my own backyard. This picture isn’t going to win any awards, but I had fun taking it.
It might not be the most glamorous or flattering photographic pursuit, but photography can be a messy hobby. And if you’re more worried about how you look when taking pictures instead of the pictures you are taking, it might be time to reevaluate your priorities!
Nikon D7100, 50mm, f/1.8, 1/1500 second, ISO 280. My kids were blowing bubbles in the front yard. I had to practically lay on the ground to get this shot but the result was worth it.
Look for wildlife
I live in a small town in middle America. The most exotic animal I’m likely to see on any given day is what we call a Texas Speed Bump. (Think of what happens when an armadillo crossing the road meets a pickup truck.) It might seem like any attempt to take wildlife photos on a backyard photo safari would be an exercise in futility. However, while you might not have lions, giraffes, or gazelles out your front door, you probably have more interesting animals than you realize. You just have to look for them.
Nikon D750, 50mm, f/8, 1/180 second, ISO 5600. Shot with a +4 close-up filter. This was right outside my garage door. Cue the Lion King song “The Circle of Life”
Bugs, insects, worms, and other multi-legged creatures might give you the willies, but they can be fascinating photography subjects. The same goes for bees, butterflies, or anything with wings.
If you look closely and have a bit of patience, you can find all sorts of wildlife right where you live.
Nikon D7100, 50mm, f/4, 1/125 second, ISO 400. Shot with +10 close-up filter. This wasp was hanging out on the lid of my trash can on a chilly autumn morning.
I’m no entomologist or zoologist, and when I’m out in my backyard looking for photo opportunities, I don’t even know what most of the animals are that I’m photographing. If it’s interesting to look at, and if the lighting is good, then I’ll take a picture. Sure I get a little grossed out from time to time, but I get some really cool images too.
Nikon D200, 50mm, f/1.8, 1/750 second, ISO 200. I don’t know what this thing is, but it was hanging out in a pine tree in my front yard and it made for a really interesting photo.
You don’t just have to think small when taking pictures of animals on a backyard photo safari. Rabbits, squirrels, snakes, and birds – you probably have lots of animals come through your property that would be fun to photograph. The trick is to keep your eyes open, and it helps to have the tiniest sense of adventure too.
You don’t have to just look for small things either. Always keep your camera ready in case something larger comes your way! It might not be especially exciting, but it’s fun to get shots of everyday wildlife like rabbits, squirrels, birds, or other critters that call your backyard home.
Nikon D500, 200mm, f/2.8, 1/400 second, ISO 1600. A little patience was all it took to capture this photo of a male cardinal on my backyard fence.
Every now and then, you might see something a bit more exotic too. When those moments strike, it can be supremely rewarding to attempt a shot. Even if you don’t get the photo, you will at least have a fun story to tell.
Nikon D200, 50mm, f/4, 1/160 second, ISO 200. My wife saw this snake slithering across our front yard, so I grabbed my camera and a broom. After I got a few photos I gently encouraged it to vacate the premises.
Get a set of close-up filters
One of the best things you can do if you’re looking for a way to get great shots of the world around you is to buy a set of close-up filters. When you think of going on a wildlife safari, you might imagine huge camera rigs and giant telephoto lenses. Close-up filters are the opposite: they let you get very close.
Close-up filters are extremely inexpensive and screw on to the front of your camera lens. They take a bit of patience to learn, so make sure to plan some time to get acquainted with how to get the best results in order to avoid frustration when the moment strikes. Once you get the hang of it, close-up filters make even the most ordinary backyard subjects appear majestic and even otherworldy. In other words, they’re perfect for a backyard photo safari.
Nikon D7100, 50mm, f/11, 1/200 second, ISO 400. Shot with a +4 close-up filter.
Flowers, mushrooms, berries, leaves, sticks, even blades of grass take on a whole new appearance when shot up close.
These stationary objects work really well for macro shots because they allow you to try different focal lengths and experiment with manual focus.
When you’re ready for something a bit more challenging, you can combine close-up filters with bugs and insects. This involves a lot more skill, practice, and patience (as well as mastering the back-button focus technique, which I recommend for best results) but you will never look at your own yard the same way again.
Nikon D500, 50mm, f/5.6, 1/250 second, ISO 360, shot with +4 close-up filter. It took nearly a hundred shots over two days to get this image of a bee in my back yard, but it was worth the effort.
If you can find a bug that is relatively slow-moving, you can combine all the techniques in this article to get some really amazing shots. For this final image, I went out in the evening, looked at the angle of the sun, adjusted my own point of view accordingly, and used a close-up filter. I’m not even sure what kind of bug or insect this is, but I really like the photo.
Nikon D750, 50mm, f/1.8, 1/100 second, ISO 900. Shot with a +4 close-up filter.
Conclusion
This list is really just scratching the surface of what’s possible when you go on a backyard photo safari. You don’t need a lot of expensive equipment, and you don’t need to hire a tour guide. These few simple tips will be enough to get you started, and then it’s up to you. How far will your creativity and sense of exploration take you when you’re right in your own yard? It could be a lot farther than you think.
Share your tips, tricks, and backyard safari photos in the comments below!
The post Tips for Doing a Backyard Photo Safari appeared first on Digital Photography School. It was authored by Simon Ringsmuth.


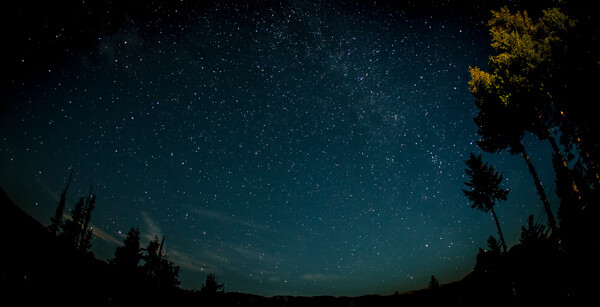


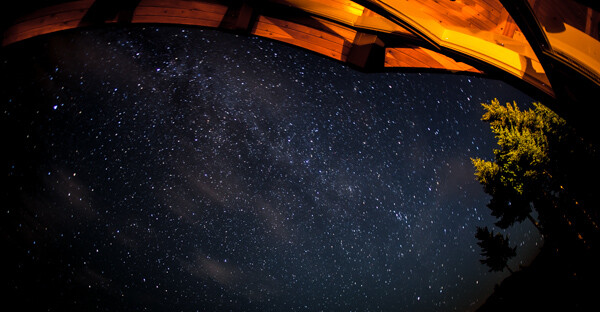


You must be logged in to post a comment.