RSS
 

Posts Tagged ‘Tips’

Taking out the Garbage – 7 Tips for Choosing Your Best Photos Fast

07 Oct

style2

One of the most time-consuming and difficult things in photography is going through all the unedited images you took and choosing your best photos, the ones to keep, and which images to pass by. When I first started out as a photographer, I’d get hung up on this every time. I’d spend way too much time agonizing over every photo, and worrying so much about throwing away a good one. If this sounds like you, then read on, maybe I can save you a lot of time and headaches with a few simple tips!

#1 Don’t take so many in the first place

When you take hundreds of images at a time, the idea of looking through every photo and choosing the best is daunting! If you take each photo with intent, and wait for the right moments before pushing the shutter, you won’t have so many throw-aways to wade through. Be careful to notice composition as you shoot, and focus carefully. Time is money (and if not money, time is sanity), so don’t waste your time with so many extra images to go through.

#2 Choose images that reflect your style

It’s actually quite surprising how much the images you choose reflect who you are as a photographer. Two different photographers could take the same set of images and they’d choose completely different images to keep or toss. This is actually a great thing. It’s what makes you stand out from all the rest, and it lets your heart and soul shine through. I might keep images that others wouldn’t, and toss some that they’d keep, but many people have told me that they can always tell a Melinda Smith, and that is one of the greatest compliments anyone could give me.

#3 Watch for distractions

style

You may notice something in the photo that you know you’ll have to fix in post-processing. You have to decide if this is a deal-breaker, or if it’s worth the fix. In the image above, there was a garden hose (I should’ve moved it before we took the photo, but it was someone else’s home, and I didn’t know how much I should disturb). I decided that I loved the style of the image (my style) enough that it was worth fixing the garden hose. Other times I might decide that I have enough images that don’t require extra work, and it’s not worth the hassle. It’s your call, but try not to keep too many that require extra time.

 #4 Blurry photos go

blurry

If any photos have softness, or blurriness, they’re automatically out. What if the client wanted to print that particular image on a huge canvas? I don’t want to be the one to have to tell them that yes, the expressions are adorable, but it’s going to look horrible when it’s blown up big. It’s so hard sometimes when everything else is great, but if you missed it, you missed it. You can’t fix blurry. You might have to pick a second choice photo, but do you want to be the photographer that gives out blurry photos? There are rare exceptions to this; sometimes a photographer will shoot out of focus on purpose, or a particular photo will work as an abstract blurry image, but be very picky. This rule can also apply to any photos that are way off with exposure. Just let them go!

#5 Eliminate similar photos

same

You may have two (or more) photos that are very similar. They might both be cute, but one must go. You will lose a lot of impact with your collections of photos if many of them look the same. I know that it can be hard to give up a photo that you like, but nobody needs five photos of nearly the same look and pose. Decide which one speaks to your style better, check sharpness, or choose the one that shows the subject’s personality a little better. In the above set I chose the photo on the right. They are almost the same photo, but the one on the right was slightly more enthusiastic, and this little girl was FULL of enthusiasm! I had to keep it.

#6 Don’t miss the hidden gems

potential

You might have a photo that you know could be really great with just a little bit of work. Maybe a head swap, or a little bit of magical editing will make it into a photo you absolutely love. Sometimes photos that you might pass by initially may end up being your favorite. Watch for those photos that might be your favorites with a little wave of your editing wand.

#7 Be ruthless, be quick

ruthless

I know, this sounds like a contradiction of the last tip, but unless you want to be agonizing over every photo for hours, you have to move quickly. You have to be somewhat ruthless as you go through your photos. You can’t edit every single one, and sometimes you just have to make quick judgment calls and move on. In the photos above, the one on the left is cute, but I decided that I liked the connection in the one in the middle the best, so that’s the one that I kept. If I’m having a really hard time giving photos up, I will give them star ratings as I go through them; five stars for definite keepers and four stars for maybes. I usually end up with more five stars than I need, so the four stars automatically go. Sometimes it’s easier to let them go after you’ve given them a fair trial.

What are some strategies that you use to choose which photos to keep and which to toss? I’d love to hear your ideas in the comments:

The post Taking out the Garbage – 7 Tips for Choosing Your Best Photos Fast by Melinda Smith appeared first on Digital Photography School.


Digital Photography School

 
Comments Off on Taking out the Garbage – 7 Tips for Choosing Your Best Photos Fast

Posted in Photography


Tips For Great Indoor Portraits Using Natural Light

05 Oct

192

You don’t have to have an amazing dedicated photography studio to get great shots indoors. Most homes have at least one or two spots that work just fine. You don’t have to have a lot of additional equipment, in fact, these tips will help you take indoor photos with just your camera and natural window light (and even incandescent light in a pinch).180

Seek the best light

Take a tour of the home you are going to shoot in to scout out the best light. I’ve done newborn sessions in a kitchen multiple times because that’s where the light was best. Often times bedrooms are little havens of sunshine as well. It might not be the room with the prettiest furniture, but that’s okay. Light is most important to me, and the other things in the room are secondary.

Eliminate clutter or simplify

Once you’ve found some nice light, do all that you can to eliminate clutter in the area you are going to shoot. Move distracting objects if possible; it’s much easier to move them before you shoot than to try to take them out later in post-processing. If you can’t avoid clutter, try getting in close to your subject.

200

Shooting in low light

Most of the time I shoot indoors with my 50mm f/1.4 lens on a full-frame body (try a 35mm lens on an APS-C or cropped sensor). It gives me enough space to get everything in the photo that I want, and gives me the ability to open the aperture wide enough to take photos in poorly lit rooms, if needed. Other lenses can work just as well, depending on what you are trying to achieve, but this is the lens that I have found has the most versatility for my indoor shooting.

You will often need to push the ISO higher if you don’t have a lot of natural light coming in. I prefer some noise, or grain, to the look of a flash, so this doesn’t bother me too much. Ideally you’ll want to shoot on days with plenty of sunlight, and a time of day when you have plenty of light indoors. This isn’t the situation to shoot in the golden hour, right before sunset. You might want to try late morning or early afternoon for more natural light.

185

Direction of light is important to create mood

When you are shooting with natural window light, pay attention to the direction the light is coming in, just as you would when shooting outdoors with the sun. You can have a beautiful hazy backlit photo, or a dimensional dramatic side-lit photo, or a flattering crisp photo lit directly from the front. Decide what mood you’d like in your photo, and also pay attention to the space you have to maneuver, and any clutter that may be in the background. 451

Mixed lighting situations

Sometimes you have to just work with what you’ve got. If you’re forced to shoot with incandescent lighting, you can still get some meaningful photos. Try not to have incandescent lighting and natural window lighting fighting to light your subject at the same time. It usually creates a crazy white balance issue, and it’s hard to make right, unless you just convert the photo to black and white. I’ll usually turn overhead lighting off, unless there is absolutely not enough light without it, or I’m shooting in a situation where I don’t have control over where the action happens.

456

Fitting it all in the shot

At times I have had to be very creative to get everything in the photo that I need to include. You can always use a wider angle lens, but that can distort things, and you might not want that look. I’ve stood on counter tops in the kitchen, on beds (watch out for ceiling fans-I’ve had a couple of close calls when I wasn’t paying attention), and wedged myself behind furniture. Anything for a good shot, right?

183

Finally

One last tip: Sometimes you may not be sure exactly where the best spot is for the lighting you’re hoping for. Don’t be afraid to experiment, and move your subject around until you’re happy with the way everything looks. If I have a newborn on a blanket, it’s a simple thing to rotate the blanket around until I like the way the light rests on his face.

Don’t be afraid to get your camera out indoors! With some practice and experimentation, you’ll find lots of ways to make great photos without any extra equipment.

171


The post Tips For Great Indoor Portraits Using Natural Light by Melinda Smith appeared first on Digital Photography School.


Digital Photography School

 
Comments Off on Tips For Great Indoor Portraits Using Natural Light

Posted in Photography


5 Beginner Tips for Photographing Animals in the Wild

03 Oct

As I traveled through Africa, I learned many things about photographing animals while on safari. At first I knew absolutely nothing about it, but then with time and experience shooting in different conditions, I noticed certain factors that helped improve my photos. If you’re new to photographing animals, here are fire tips for photographing animals in the wild.

DSC 0887 eagle

1 – Use a zoom lens

Many wild animals stay away from people. As soon as they notice you, they might immediately run off. This is truer with birds that tend to fly away if you get too close. The larger animals might stay put, but then you put yourself at great risk by getting too close to them. Elephants and rhinos can weigh a couple tons and could easily overturn your vehicle. Therefore, the easiest way for you to photograph animals is with a zoom lens.

The photo above shows what a zoom lens can do. There is no way I would have been able to get close enough to that bird with a wide angle lens. This particular photo was shot at 300 mm, using my 28-300 mm.

Some photographers will tell you that using a lens of this range will give you poor photos. But as a beginner, who was just starting to photograph animals, I found that it was adequate for my first few animal photo shoots. It was also easier on my wallet. A lens with this range will allow you to photograph birds in far away trees as well as larger animals which may be closer to you.

Another benefit of a zoom lens is that you will not need to change your lens as frequently which will allow you to easily adjust your focal length as needed and quickly get the shot. Less lens changing will also help you to prevent the forest or jungle dust from entering your camera body and possibly dirtying your sensor.

Therefore, if you are new to photographing wild animals, I recommend that you utilize a lens with a longer range. The zoom lens will help bridge the visual gap between you and the animal, while keeping you safe and the animal at ease.

2 – Employ a faster shutter speed

DSC 7131 leopard reflect

Because an animal may be constantly moving, you will want to use a faster shutter speed. Shutter speed is the amount of time your shutter is open. The faster or shorter this is, the less likely you are to blur the continuous movement of the animal in a single shot.

Notice the photo above where I used a shutter speed of 1/250th of a second. This was taken in the early morning. The leopard was especially active because he was hunting fish by the water. At no point did the cat ever stay completely still for more than a few seconds. Because it was always moving, at 1/250th of a second, parts of the leopard are still not as sharp as they could have been.

When photographing animals, you should try using a shutter speed of at least 1/500th of a second or faster, especially for more active or restless animals. This will help you freeze the animal’s motion and prevent parts of it from blurring.

3 – Don’t be afraid to increase your ISO

When you do use a faster shutter speed, you will notice that your exposure will darken since you are shortening the amount of time you let light onto your sensor. To balance this, you can increase your ISO. this is your camera sensor’s sensitivity to light. The more sensitive it is to light, the less exposure time you will need for light to hit your sensor.

As a caveat, when you increase your ISO, you amplify the image signal in your camera. This will in turn amplify and increase the amount of noise you capture in your photo. Fortunately, there are many methods that can help you reduce the noise in your image if you find it unbearable. Having a slightly noisier picture is small price to pay for a better-exposed photo with the details that you want.

Therefore, don’t be afraid to use a higher ISO. Play with the settings until you find that sweet spot. Yes, you may get a little noise, depending on your sensor, but that’s better than having an underexposed photo (or blurry), which may not capture all the detail.

4 – Shoot closer to golden hour

DSC 7849 elephant afternoon

The best time to photograph animals is close to golden hour. If you shoot when the light is directly overhead you’ll end up with a very harsh, bright, light and consequently dark shadows in your photos. The closer you shoot to golden hour, the closer the sun is to the horizon. This will produce a much more diffused and better angle of light on your animal subject.

The photo above is an example of a photo shot closer to sunset. Notice how the shadows fall behind the elephant and less of its body is in shadow. You are able to see more of the elephant’s lines, wrinkles and texture. This photo has not been post processed using any filters, yet the light in the photo is warm and inviting. Compare this to the image below which was shot closer to noon. Notice how much harsher the shadows are on the elephants. Their bodies are almost covered entirely in shadows, and you are not able to see the texture of the elephants’ skin at all.

DSC 1177 elephant group

5 – Hire a capable tracker to easily identify animals

DSC 7895 leopard camo

A good tracker will help you to see even the most camouflaged animals. As we were driving through the dense African jungle, our guide was able to spot this leopard, which to my eyes was hidden among the bushes. Without my guide I never would have photographed it.

You should hire a skilled tracker so that you don’t waste your time trying to find animals among the trees. Instead you can spend your time planning and improving your next shot. You can tell your tracker which specific animal you’d like to see. More than likely he will know where this animal prefers to roam. This will improve your chances of quickly finding your desired animal and getting your shot.

What other tips can you think of for photographing wild animals? Do you ever use a tripod to stabilize your shots? What’s your favorite animal photo you’ve ever shot and in what conditions? Share some examples with us and of course, if you have any other tips for better wild life photos that you think I’ve missed, please share those as well. Happy photo hunting!

The post 5 Beginner Tips for Photographing Animals in the Wild by Ry Sangalang appeared first on Digital Photography School.


Digital Photography School

 
Comments Off on 5 Beginner Tips for Photographing Animals in the Wild

Posted in Photography


Ready to Upgrade Your Kit Lens? Tips for Which Lens to Invest in Next

01 Oct

Most cameras come with a kit lens that generally works well as a decent all-around workhorse. A common focal range for these lenses is 18-55mm, which means they are capable of wide-angle shots as well as medium-telephoto pictures, and everything in between. The tradeoff for this zoom range, however, is a limited maximum aperture range of roughly f/3.5 when zoomed out (18mm), and f/5.6 when zoomed in to 55mm.

Of course some kit lenses cover a longer focal range and have different maximum apertures, but overall most kit lenses are designed for the types of all-around shooting conditions in which you may often find yourself. While this is not necessarily a bad thing, it does mean that the kit lens is more of a jack of all trades while being the master of none, and after a while you might start wondering what other options are available to you and how they will affect your photography. This all begs the question: which lens should you buy when you want to upgrade from the one that came with your camera?

Child bear

A 35mm or 50mm lens can work well for shooting portraits

Lenses are like apps

Think of lenses like different apps for your camera, and just as apps on your smartphone or tablet have specific functions, each lens is designed to meet a specific set of photographic needs. Next, think of the kit lens as a basic set of apps you might find on a device. It does many things well, but doesn’t really unlock the true potential of your camera. For some people, that’s fine: they don’t feel the need to install new apps (i.e. buy new lenses) and instead only use the ones that come with their device.

But when you start exploring the myriad of apps available for phones and tablets you might wonder how you ever lived with your device’s basic apps at all! The same holds true for lenses, but there is one key area where the analogy breaks down – price. When you start looking around for lenses, you might find that your vision quickly outstrips your budget! The choice, then, is this – which lens should you buy after exhausting the possibilities of the kit lens that came with your camera?

Montana

Wide-angle lenses are great for capturing photos of natural landscapes and other outdoor scenery.

Know what you need for the photography you do

The answer, unfortunately, is not as black and white as it might seem. While there are hundreds of options available, what you buy ultimately comes down to your unique needs and style as a photographer. After using your kit lens for a while, you will hopefully have an idea of what type of photography you enjoy most: landscapes, architecture, portraits, nighttime long exposures, pets, sports, weddings, etc. Or maybe you do a combination of everything! Before spending hundreds of dollars on another lens it’s important to know what will suit your needs – much in the same way that purchasing a vehicle is a matter of finding one that works for you, as opposed to simply buying the same car that all your friends have.

Grapes

A lens with a wider aperture will enable you to shoot get nice blurry backgrounds that are not always possible with a kit lens.

Prime lenses pros and cons

My first bit of advice, though, is to find a prime (non-zooming) lens that can accommodate your shooting style. If you take a lot of landscape and outdoor shots, you will likely want a wide-angle lens with a focal length of around 10-20mm (for cropped sensors, 15-35mm if you have full frame). For portraits, anything between 50-100mm is a good choice. Sports and wildlife shooters tend to use lenses that are on the telephoto end, such as 100-300mm. Remember the tradeoff between zooming and aperture I mentioned in the first paragraph? If you eliminate the zoom functionality you will find plenty of lenses with much larger apertures, which will let in much more light and allow you to use faster shutter speeds, as well as capture pictures in low-light situations that might not otherwise be possible without the use of a flash.

Church

Prime lenses can’t zoom, but you gain the ability to shoot in dimly-lit situations without the need for a flash because they often have large apertures.

It admit it can be a bit nerve-wracking to use a lens that can’t zoom in and out, but once you try it you may find a whole new world of photographic possibilities that you never knew existed, thanks to the larger aperture. Remember that you haven’t lost the ability to zoom, you can still move yourself around physically, which is another fantastic way to explore and stretch yourself as a photographer. You can often find prime lenses for a couple hundred dollars that will suit your needs exceedingly well, though even prime lenses with longer focal lengths could easily push the limits of your budget.

40mmPancake

It might be small, but Canon’s 40mm f/2.8 pancake lens packs a big punch.

If you would like to upgrade from your kit lens but are not entirely sure exactly what your individual needs are, I would recommend one of the following. All are fairly inexpensive as far as lenses go, and will suit a variety of photographic situations, though they are not the best for sports and wildlife due to their somewhat short focal lengths:

  • Canon 24mm f/2.8 – and the newly released pancake version at only $ 149 US
  • Canon 40mm f/2.8 (pictured on the right)
  • Canon 50mm f/1.8
  • Nikon 35mm 1.8G – get the DX if you have an APS-C or cropped sensor, get the ED if you have full frame.
  • Nikon 50mm 1.8G

Zoom lens options

You can buy prime lenses with longer focal lengths, but they can easily cost many times that of their cheaper counterparts. If you decide you absolutely cannot live without the zoom functionality, I would recommend going with a lens that covers one end of a focal range (i.e. wide-angle to medium telephoto) rather than one that covers both ultra-wide and ultra-telephoto. Of course this is all subjective, and there are as many opinions on this topic as there are photographers. In my experience lenses that try to cover as many focal lengths as possible are generally not as sharp as their more limited counterparts, unless you are willing to spend hundreds or even thousands of dollars. Lenses I would recommend include:

55 300mm

[caption: Nikon’s 55-300mm picks up where most kit lenses leave off and is a great option if you are interested in shooting sports and wildlife.

  • Canon 75-300mm f/4-5.6
  • Canon 28-135mm f/3.6-5.6
  • Canon 24-105mm f/4
  • Nikon 18-105mm f/3.5-5.6
  • Nikon 55-300mm f/4.5-5.6G

There are also many other really good third party options available. The options are almost endless so I’ve stayed with the two big brands here, but you can also look at Sigma and Tamron who both make some really good lenses also.

Deciding

The more you are willing to spend on a lens, particularly a zoom lens, the more features it will have like: image stabilization, higher-quality glass elements, weather sealing, and larger maximum apertures. These lenses are just the beginning. The sky’s the limit when it comes to upgrading your lens, and it’s important to not overlook options like simply borrowing one from a friend, buying older gear, renting, or even looking online for used equipment. Whatever you decide, it’s important that the lens is right for you and your photography goals, but chances are if the kit lens is too limiting there is a fantastic one out there with your name on it, waiting for you to come and explore what it can do for you.

The post Ready to Upgrade Your Kit Lens? Tips for Which Lens to Invest in Next by Simon Ringsmuth appeared first on Digital Photography School.


Digital Photography School

 
Comments Off on Ready to Upgrade Your Kit Lens? Tips for Which Lens to Invest in Next

Posted in Photography


7 Tips for Interacting with People to Create Better Portraits

30 Sep

Sassy kid

Interaction is the basis of a portrait session, in every single way. In the most obvious ways, for example, you must interact with the client to set up the session, during the session, and when the images are done.

The portrait session is also an interaction with self, both for you the photographer and for your subject. You the photographer, who is creating with integrity, must meet with yourself inside to bring about bold creativity. The subject, likewise, is faced with many insecurities that they may have very little experience with in their day to day lives. They are in a vulnerable position. The portrait session brings about all kinds of internal interactions.

The photos themselves are a form of interaction with the future. The way a portrait portrays someone goes a long way to communicating who they are – or, at least, who they’d like to be seen as, which is important in its own right.

It’s for this reason that developing habits for skillful human interactions is so important. They make everyone more comfortable, but, more so, it means capturing images of someone who is comfortable at the moment the image was taken.

The way someone responds to you is the way they will look in their images. The difference may be imperceptible to a stranger, or when simply viewed at a glance; but a strained smile, or nervous eyebrow might be clear as day to the people who care about them. You as a photographer are not a plumber who can still fix the pipes, even if your subject is having a bad time. Among the most important tools you have is the one that elicits an honest and flattering response from the subject:

The way you interact with people is key

Casual kids

Everyone is a Little Kid

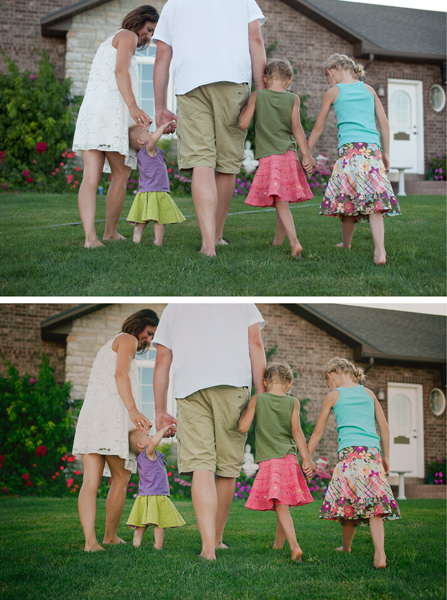
If you who wish to bring about a truth and transparency in your subjects, you can take a clue from the rules of photographing little kids; don’t slow the child down for your shot – you keep up with the kid!

Your goal is to keep your subject engaged and having a good time during their session, so what is true of working with children is also true for adults. It’s important to move at their pace. Adults get bored when you move too slowly and then you have pictures of bored adults trying really hard not to look bored. When you’re moving too fast, adults get anxious. They start having trouble understanding and interpreting your instructions. Then, you have photos of anxious adults trying really hard not to look anxious.

Getting a sense of your subject’s natural pace is all about how you interact with them. You can’t simply bark orders at your subject. You can’t withdraw into a technical and creative cocoon, sticking your lens out just far enough to take their picture. You have to actually engage with them personally. Allow time in between arrangements and locations to chat. Be open with your subject; make yourself vulnerable to them. Remember, that is the challenging posture a portrait session puts the subject in: vulnerability.

Pay attention to the things your client is saying, and the jokes they are making. If they say something like “I’m sorry, I must be terrible to work with” pay attention! They are blaming themselves, but it is likely because you are moving too fast and failing to communicate. The client is likely to blame themselves since they have seen all of your amazing photos and assume that all those people must have been able to keep up. Take this as a personal critique to communicate more openly and slow down.

Unexpected circumstances

Learn to Speak in Positive Terms and Say Positive Things

As you are open and communicating with your subject, remain positive as much as possible. When you have to be honest about something challenging or difficult, do so in positive terms. This takes practice, but it’s beneficial to your own well being as well.

I’m not advocating lies, or even twisting the truth. I’m talking about finding a legitimate perspective in whatever you’re saying, so that some form of positivity is also in view.

For example, say you’re shooting in a local park and the shot you’re working on just isn’t working the way you want. When you know the shot that you wanted is dead, there’s no reason to keep wasting time; you should just move on. If you say “Ugh, this spot just isn’t working out, let’s look somewhere else”, you would be telling the truth, but in a negative way, with the focus on what isn’t working right. That’s not the important part. Instead, if you say “Hmm, this spot isn’t turning out how I’d hoped, I think there might be something even better over in that direction” it sounds more hopeful, positive, and encouraging.

Both of those statements are essentially the same. But in the first, the emphasis is on a problem right then and there. In the second statement the problem is acknowledged, but the emphasis is on something positive “over in that direction”.

Keeping an attitude like this helps your subject remain optimistic about the result, which is important. As your subject’s optimism goes down, they will have to work harder to appear comfortable and relaxed. So even if you’re struggling in the beginning, and your subject might have objectively good reason to become more pessimistic, if you allow that to happen, you’ll be damaging your chances of recovering later.

Stay positive!

Naval Academy Runners Romance

Use Humor as a Diffuser

The situation your subject is stepping into is a vulnerable one. It’s your job to scrutinize how they look in order to present them in their most flattering light. Most of us feel uncomfortable being under the microscope like, especially concerning the way we look. People don’t like their looks being judged poorly and they spend a great deal of time, energy and money to avoid it. In fact, hiring you might itself, be a part of that desire.

So part of your job is to diffuse that feeling. You need to keep your subject comfortable, which typically means obscuring the overt need to scrutinize them and the way they look. An excellent method for this, without having to resort to being deceitful, is to place yourself under their microscope.

If you make a mistake, be open about it and laugh it off. By presenting your own momentary shortcomings, you make yourself vulnerable, and by contrast make them feel less vulnerable. You’re not lying, or manipulating them. You’re just levelling the playing field.

Likewise, if your subject has said or done something embarrassing, you can use humor to turn the embarrassment on yourself. For example, if my subject accidentally steps in a puddle of water and seems embarrassed, I might use the opportunity to tell them about the time I fell in the water during a portrait session. It’s humanizing.

By positively applying humor to your own shortcomings, you’re able to change the tone of the session from one where the subject feels that they must perform for you, into one where they must engage with you.

Engaged couple two tones

Speak in Terms Relative to Your Subject

In many cases, unless your subject has been trained as a model, they’re going to spend a fair amount of their mental energy trying to interpret what you’re telling them to do.

If you say, “tilt your head”, that means a lot more to your subject than that specific thing you want them to do, so for them, it has almost no meaning at all. Instead, you could say “tilt your forehead toward your toes”, or “bring your left ear closer to your left shoulder”. The same goes for the direction they’re facing and movements you need them to make. If you tell them to “step forward” they will often move in whichever direction their feet are facing, or they’ll feel confused about what you want them to do, and shuffle around awkwardly. Instead, you could say, “take a step toward me”.

These are specific instructions which are relative to your subject, rather than your vision. Giving subject-relative instructions also sounds a bit funny to many people at first so it acts as an excellent ice breaker too.

If you master no other subject-relative language, master your subject’s left and right. Instead of saying “step to the left”, say “step to your left”. By giving your subject terms that they do not have to interpret, they can devote more mental energy to the intangible elements of the shoot – like having a good time, or interacting with you.

Engaged couple in a tree

Demonstrate Posing

This is an extension of speaking in subject-relative language, except it takes it one step further. Taking a moment to demonstrate how you’d like your client to pose can have multiple benefits.

First, demonstrating a pose can often act as an icebreaker, since the motions you will ask your subjects to carry out sometimes feel a little silly, even though they look great in a photo! When you demonstrate the pose, the subject has a chance to see you feeling a little silly, or not feeling silly and also not minding.

Second, as with speaking in terms relative to them, demonstrating a pose helps remove a big chunk of the subject’s need to interpret what you want them to do. They can more easily just go for it and try, rather than timidly wondering if they’re “doing it right”.

Relaxed romance

When I demonstrate a pose for a subject, I tell them what I’d like them to do, as I do it.

So, I may sit down in the spot I’d like my client in and say, “Okay, I’d like you to sit right about here”. Then I’ll sit down and say, “You can cross your legs like this, or something like this, if it feels more natural for you” as I demonstrate a couple of different acceptable positions for their legs. Then I might point over to where I’m planning on shooting from and say “I will be shooting from right over there, so you’ll want to look in that direction”.

By the time the client sits down, they have a kind of template for what to do and can act more confidently in giving it a try. This also has the added benefit of allowing you to help your subject find their way into a pose that is more natural for them, rather than putting them in a position you’d never see them use in real life.

For more on posing check out this dPS eBook – Portraits: Striking the Pose

Be a Constant Stream of Affirmation for Your Subject

Hide and seek

I’ll say it again; remember what a vulnerable situation your subject is in when they’re in front of your camera. One of the simplest ways to offset that feeling for your subject is to be a constant stream of affirmation.

  • Thank you!
  • You’re doing a great job
  • Yes! That’s perfect, hold onto that!
  • You’re looking great!

Of course, you’re walking a line here, because what if your client isn’t doing a “great job” and they are in fact making your job a lot more challenging. Well, get over it. It’s your job as a photographer to work with who your customer is; some people are easier going with pictures, others need more attention, but the images will be yours and so the responsibility is too.

Friendly family

I wouldn’t advise lying if you’re struggling to get something you like while working with your subject. But affirmation is still important. Perhaps even more so. The thing about affirmation in this context is that it doesn’t necessarily have to be affirming anything the subject themselves is doing. Of course, that certainly works best to mitigate the feelings of a subject who is insecure about their appearance, or feels bad at photos. But simply affirming that the shoot is going well and you are excited is often enough to let the subject relax. Keep them coming – seriously, about every 15-20 seconds while you’re behind the camera.

  • Wow, this shot is coming out even better than I expected!
  • I love this background!
  • You and I are like a dream team!
  • The textures in this foreground are so interesting and juxtapose just right with your dress!

Easing a subject’s sense of vulnerability by making positive exclamations about the shoot makes sense logically too. By helping the subject to realize that they are only a part of what you’re paying attention to will relieve the pressure, and let them relax.

Dog kisses

Don’t Laugh at Anything that Shows up on the Viewfinder

Here’s what I want to leave you with. This advice, I believe, carries with it the heart of everything I’ve said here.

Never laugh at something that shows up on your camera’s screen.

I’m sure you can understand why – your subject’s vulnerability, of course. How might they interpret your laughter? It’s possible that you’ve cultivated an atmosphere of humor. Maybe you have consistently made yourself the butt of many jokes, and your subject might have joined in the fun and so maybe at this point it’s okay to laugh a little, as long as you’re laughing together. But let’s be honest, the average subject is pretty insecure. They’ll probably think you’re laughing at them and they’ll clam up.

But all of that is quite obvious. People don’t like to be laughed at. That’s not what is so important about this though. It’s not that you’re laughing, it’s not even why you’re laughing. It’s why your subject thinks you’re laughing. Truth is not important, your subject is going to respond to what they think, regardless of whether that is true or not.

It’s not that laughing is a problem. It’s that the subject thinks you’re laughing at them in some way. And it’s not just about laughing.

Let’s say you’re having some annoying problem with your camera for some reason. As you’re trying to work it out, you become visibly frustrated. Your subject probably doesn’t know what camera problems look like and their sense of vulnerability is causing them to take on a lot of blame. It’s not that you’re frustrated, it’s that you’re subject thinks you’re frustrated because of them.

Subjects place themselves in a position of vulnerability with photographers to a degree few other professions have access. Doctors and lawyers are a good example example. Doctors need access to the skin and the stuff underneath. Patients have to reveal their bodies to doctors – a vulnerable feeling indeed. Defence lawyers need access to the minute and truthful details of a defendant’s life. You as a photographer need access to their spirit – people must be who they really are with you.

You must take great care not to trample the spirit of your subjects. You must do mental, emotional, and creative gymnastics to avoid crushing the delicate structure of trust and assured respect. That allows their spirit to be reveal itself in honest smiles, cracked jokes, and a temperament of self-confidence standing in front of the camera.

Without your subject’s spirit, there is little reason for the photo.

Do you have any other tips for working with people and taking better portraits? Please share them and any stories you have in the comments below.

The post 7 Tips for Interacting with People to Create Better Portraits by William Petruzzo appeared first on Digital Photography School.


Digital Photography School

 
Comments Off on 7 Tips for Interacting with People to Create Better Portraits

Posted in Photography


Street Photography Video Tips With Valerie Jardin

29 Sep

I have been a regular co-host or guest on the popular This Week in Photo podcast. Recently they launched their new website and are going to be rolling out new spin off podcasts including one by our very own dPS writer Valerie Jardin on street photography. There is also one by Doug Kaye on gear, and interviews done by the host of TWiP Frederick Van Johnson. You can check out all their shows here.

In this first teaser Valerie and Frederick chat about various things regarding street photography, and traveling with your gear.

You can see more articles on street photography here:

  • Using Humor In Street Photography
  • 7 Street Photography Tips and Exercises to Try This Season
  • How to Create Amazing Urban Landscape and Street Photography Images
  • Practical Tips To Build Your Street Photography Confidence
  • How to Approach Street Photography in 12 Easy Steps
  • 103 Things I’ve Learned About Street Photography
  • 8 Things You Should Know if You are Dating a Street Photographer

You can also check out my last appearance on TWiP when we discussed the new iPhone6 and the newest releases from Canon and Nikon.

The post Street Photography Video Tips With Valerie Jardin by Darlene Hildebrandt appeared first on Digital Photography School.


Digital Photography School

 
Comments Off on Street Photography Video Tips With Valerie Jardin

Posted in Photography


How to Capture Perfect Selfie: 10 Tips for Amateurs and PROs

27 Sep

There is no wrong way to capture a selfie. The selfie is a way of self-expression and the artistic choices vary as much as faces themselves. “Selfie” was named Oxford Dictionaries Word of the year for 2013, and it’s defined as a photo taken of oneself and shared on social media. Taking selfies is a fun way to show your Continue Reading

The post How to Capture Perfect Selfie: 10 Tips for Amateurs and PROs appeared first on Photodoto.


Photodoto

 
Comments Off on How to Capture Perfect Selfie: 10 Tips for Amateurs and PROs

Posted in Photography


Nature and Wildlife Photography Tips for Beginners

23 Sep

If you have an interest in wildlife or nature photography there is a good chance you have seen an image at some point that has completely taken your breath away. Maybe it was a photograph of a sweeping landscape washed in the golden light of the dying afternoon sun or close-up of some small natural miracle that you had never noticed before that moment. You might even have asked yourself, “How did they do that?”

Winter landscape

Well, the majority of those incredible photographs came about through a good deal of physical hardship, practiced patience, and a healthy amount of self-made luck.

Here are some tips to help you become stronger at wildlife photography and better at recording of the natural world.

Do your homework before heading out

Be as educated as possible before you ever make a photo. Doing your homework is one of the most important, yet loathed parts of wildlife photography. It never pays to walk into a situation and be completely clueless. Though you can never be totally prepared for every challenge you will face (that’s part of the fun) you can educate yourself so that you safely make the most of your outing.

What gear to pack

Advanced gear is not a requirement, however, patience and perseverance are essential. You don’t need the latest and greatest zoom lens or space-age gadgetry in order to produce outstanding nature and wildlife photos. At the same, you must also understand any limitations of your kit, so that you will have realistic expectations and avoid disappointment.

Deer

This photograph was made using the 28-135mm kit lens that came with my camera – after I slowly and quietly crawled into range.

Gear up for what you’ll most likely be shooting. Packing for a photographic outing can cause a lot of anxiety. It’s easy to over pack due to fear of lacking a piece of gear. Over packing though, can be even worse than under packing. You become weighed down and uncomfortable. You find yourself not enjoying what you’re doing which is one of the most preventable of all mistakes, made by photographers. Research the animals and scenes you are likely to encounter. Decide what is most and least important to you. Make choices, commit to them, and then let it go. It will make packing a lot less stressful.

If you plan on photographing wildlife, such as birds and animals that scare easily, then pack your best zoom lens so you can keep distance between you and your subject. Shooting landscapes or scenes where stealth is not a concern? You might consider taking along a wider angle lens to better capture your scene. Ultimately, there is no secret formula and no true all-in-one lens to cover every situation. Be informed before you leave so that you can make the best use of whatever lens you have.

A good bag is worth its weight in gold

All the planning in the world isn’t worth much unless you can comfortably carry your essential tools with you. Find a camera bag that can carry the gear you need easily, and is equally comfortable on your body. Bags range greatly in price and quality but you usually get what you pay for. For added piece of mind, you might consider a bag that is semi-weatherproof or water resistant.

My go-to lightweight bag for wildlife photography, shown with and without the handy rain cover deployed.

Camerabag

Read reviews and find a bag that fits your body, your gear, and your planned outing. You will have a much more comfortable and enjoyable experience. Speaking of comfort…

Shoes

Comfort items

Shoes: A good pair of hiking shoes or boots is one of the most important pieces of gear for any wildlife photographer. Grit, dirt, mud, water, insects, rocks, and creepy-crawlies – you need a pair of shoes or boots that can handle all of these elements. Your shoes should be well fitting and suitable for walking long distances. If your feet become uncomfortable it won’t be long before you start thinking about cutting your trip short.

Prepare a checklist

It’s always a good idea to have a mental checklist before beginning any shoot. Before your outing ask yourself the following questions:

  • Are any special permits or permissions required? Some National or State Parks and wildlife sanctuaries require special permits for access to certain areas, especially those deemed as backcountry environments.
  • Where will I park my vehicle? This is very important. Believe me, if you park your vehicle in an unauthorized area you will be stuck with a sizeable fine or worse, return to find your vehicle has been towed.
  • Are there time restraints of any kind? Most natural areas and parks have hours of operation just like a business. You might arrive expecting to shoot a great sunrise only to find out the location you chose isn’t accessible until after daybreak. Also remember that wild creatures and critters are usually most active in the early morning or late evening.
  • What are the expected weather conditions? This is a biggie. Know what to expect as far as the weather is concerned. Check the forecast the day of departure and keep tabs on it throughout the day if possible. NEVER chance endangering yourself or your equipment by venturing out unprepared for bad weather.
  • What are the times for sunrise and sunset? Again, be sure the places you want to capture a sunrise or sunset are accessible during those times. You need to also be aware of the schedule so that you can allow enough time to reach your location and set up your gear before it’s go time.
  • Are there any commonly photographed animals, landmarks, or structures? Research what is usually photographed around the area you plan to visit. Find a park ranger or staff member and ask about lesser known spots that are less travelled by tourists. Knowing what’s popular will save you time and help to avoid shooting a scene the same way it has been done time and time again. Look for ways to be creative and set your work apart!

So, you’ve researched your location and have a good idea of what to expect. Here are a few basic tips that can help you after you’ve reached your destination.

Shoot RAW

Shootraw

If possible, set your camera to capture images in camera RAW format. RAW image files are basically unprocessed, one might say uncooked, straight from your camera’s image sensor. They contain a massive amount of pixel information when compared to JPEG and take up a lot more memory card space. However, this additional information allows more latitude for adjustments in post-processing.

Use the lowest practical ISO

The ISO number of photographic film and image sensors relates to their sensitivity to light. The boiled down explanation is, everything else being equal, the higher the ISO number the less light is required to make an image. Unfortunately with higher light sensitivity comes increased image noise. In most (but not all) situations you will generally want to use the lowest ISO possible. That is not to say you should be afraid of bumping up the ISO. A fast shutter speed is often needed to capture the quick movements of wildlife and increased noise is far less noticeable than a blurred image.

Use AF continuous (AI Servo) mode when photographing wildlife

Afservo

Autofocus (AF) can be your best friend or your worst enemy. When it comes to photographing most wildlife, however, autofocus is a great tool! Animals and birds, especially the wild variety, are almost constantly on the move. They shift positions and move closer or farther away selfishly, with little regard for the photo you are so carefully trying to compose. This is when AF-Continuous and AF-Servo modes come in handy. Though called different names depending on your camera’s make, they both accomplish the same objective which is keeping a moving subject constantly in focus. Place your selected focus area over your subject and half-press the shutter button to engage the AF. Focus will be tracked for as long as you follow your subject while maintaining pressure on the shutter button. Read your camera’s manual (you’ve done that already, right?) for detailed information concerning specific autofocus capabilities for your model, and how each mode can be selected.

Don’t forget the tripod

“I really didn’t think I would need my tripod” are words that usually begin a sad story about how a potentially great shot is missed. In most wildlife and nature photography situations a tripod is always a good idea. It’s better to have access to one and not need it than to need it and not have one available. Find the lightest and most compact tripod that is sturdy enough to handle your camera setup.

Learn so you can prepare. Prepare so you can photograph. Photograph so you can grow.

Photographing wildlife can be difficult but it can also yield huge artistic, personal, and even spiritual rewards. So go out and have fun doing what you do, but don’t forget to put the camera down every now and then to enjoy the world around you.

“Nature never goes out of style.” – Unknown

The post Nature and Wildlife Photography Tips for Beginners by Adam Welch appeared first on Digital Photography School.


Digital Photography School

 
Comments Off on Nature and Wildlife Photography Tips for Beginners

Posted in Photography


20 Tips for Photographing Historical Reenactments and Festivals

22 Sep

No matter what the season, people love to congregate in special places to celebrate or commemorate special events. Here are some tips that may help you take maximum advantage of the opportunities that festivals and historical reenactments present.

firing the canon

#1 Research the event before you go

Do some homework before you attend the event, to get an idea of the subject of the celebration, and something of its history. For example, if you are attending a battle reenactment, a little research before you arrive may give you an inside advantage as to how the battle may unfold in front of you. Even local street festivals exist for a celebration, so know what you can expect to experience, such as special displays, parades, entertainers, and fireworks.

#2 Know the rules of the event

For instance, some events may not allow you to bring coolers or large backpacks into a crowded venue, which could include your camera bag. Prepare accordingly to abide by the rules.

#3 Acquire a schedule of events and map of the venue before arriving

You’ll know ahead of time when to arrive and which locations you would like to shoot first.

#4 Develop a shot list

Preparing a shot list is a good way to help you to get all the images that you intend to capture. It is so easy to get caught up in a single attraction, then, when day is done, realize that you missed a lot of other shooting opportunities. So give yourself a game plan for the day, remembering that schedules can be flexible.

#5 Arrive early and stay late

The early bird gets the worm or the best parking place. Of course we know the best light of the day is during the early morning and pre-sunset, so arrive early and stay late to take advantage of it. Also, at many events the crowds don’t arrive until midday, and many who arrive early may also leave early.

Sunrise at the Ohio River Sternwheel Festival gives a colorful view of the event before the crowds arrive.

Sunrise at the Ohio River Sternwheel Festival gives a colorful view of the event before the crowds arrive.

#6 Bring a compass

Upon arriving it is very important to get your bearings, which may require taking a compass reading. This becomes very important when looking to for the best lighting and vantage point from which to shoot.

#7 Meet the people involved with event logistics

Interaction with the event coordinators, staff, participants or re-enactors of an event can be very beneficial to you when it comes to getting inside information, and perhaps some behind-the-scenes shots. In some cases getting to know the right person might land you a unique vantage point, not accessible to the public. Offering to send photos to them can also be great way to get access to some great images. (Don’t forget to get contact information.)

#8 Be prepared

Always bring a spare camera battery. There is nothing worse than missing a great shot because your battery went dead. Spare memory cards are a must also, because you could be shooting thousands of photos each day and you want to have enough memory with you to hold all your images. For shooting in the middle of the day, in the harshest lighting conditions with deep shadows, consider using your pop-up flash to provide fill light for close-ups and portraits.

#9 Prepare for weather

Be prepared by checking the weather forecast ahead of time. You may find yourself standing for long periods of time in the direct sunlight, so sun screen is a must. Also bring plenty of water to stay hydrated. A wide brim hat can also be useful to keep the sun out of your eyes. Your equipment also may need protection from weather elements, especially moisture related.

#10 Be aware of the wind direction

Wind direction can be very important if you are photographing an event where there will be weapons (e.g. canons) fired. If your shooting location is downwind from the action, all you may get in your image is a lot of smoke. In some cases this could add some very interesting effects but, it is best to be aware of this ahead of time.

#11 Play nice with re-enactors and other photographers

Sometimes photographing these events can mean shooting in very crowded locations with everyone wanting to get that same great shot. Be courteous to your fellow photographers, interact with the people around you and work to help everyone have a great experience. Offer suggestions that might be helpful to those who are obviously less experienced. Also, remember festival workers are providing a service to you and in many cases it might be for very little or no pay, so be considerate of them.

#12 Choose an appropriate lens

A good walk-around lens, like a 28-300mm or 18-200mm zoom, is a desirable choice for these types of events and will allow you to use the same lens all day. However, if such an item is not in your arsenal, narrow your options down to just a couple of lenses, like a wide angle and a 200mm or 300mm telephoto.  If you choose to use multiple lenses, remember there can be lots of dust in the air at outdoor festivals, so you need to be careful while changing them not to get dust in your camera, which will find its way onto your sensor. If you must change lenses it would be a good idea to try to find a dust-free area, (your car would be a good spot, if parked nearby).

#13 Shoot with a higher ISO if necessary

Raising your ISO will allow the shutter speed to stop the action and aperture to maximize your depth of field. However, in some instances a narrow depth of field may be useful to make your subject stand out from the background.

#14 Watch your background

When you are shooting at a reenactment event, the last thing you want in an otherwise perfect image is a car or other object that will seem historically out of place in the background. In some cases you can remove these objects in post-production, but it is best to avoid them, and look for a different vantage point that allows you to exclude them.

DSC_9671-Edit-2

#15 Look for details

Be observant to discover details that may make your shots stand out from all the other photographers shooting at the same location. Look for expressions on the faces of participants and spectators, as well as interactions between them.

Two officers standing at the fence discussing battle strategy.

Two officers standing at the fence discussing battle strategy.

Look for detail

This image captured from ground level, features a unique detailed view of reenactment maneuvers.

#16 Think safety

Remember to keep in mind where you are, when you are looking through your lens for an extended period of time. It is easy to lose track of just how close to the action you might have become.

#17 Tell a story

You’ve heard it said that picture is worth a thousand words, so look for images that tell a story. It doesn’t make much difference how well the photo is composed, that your exposure is correct and image is in sharp focus, if the shot doesn’t communicate the event experience to the viewer.

Lady in era dress watching and waiting, tells a story

Lady in period dress, watching and waiting, tells a story.

#18 Attend more than one day

If possible, returning for a second day can allow you to get some really great images. After attending the first day, it becomes easier to anticipate the action (especially in the case of a reenactment event), pick up other happenings missed the first day, or re-shoot favorite subjects with alternate lighting and camera settings.

#19 Capture images that may interest the event organizers

Often times festivals or events are looking for images to use for next year’s promotional material. Depending on the event’s budget, some might even offer to pay for desirable images, while others may not be able to offer more than a byline (it’s still very cool to see your images published). Many events hold a photo contest that pays prize money and features the winning image in promotional material. You should give such an opportunity your best shot.

Shoot images that might interest event organizers, such as this image from the Ohio River Sternwheel Festival held in Marietta, Ohio.

Shoot images that might interest event organizers, such as this image from the Ohio River Sternwheel Festival held in Marietta, Ohio.

#20 Give your photos a vintage effect in post-production

Giving your image a nice sepia tone to match the photos of former eras can be an interesting way to present reenactment or old-time feeling events.  Click on this link to download an American Civil War Lightroom preset. This preset will give you the era’s sepia tone effect, with faded corners and added grain.

DSC_9684_rto

Remember to have fun when you are photographing events and festivals. It is easy to get so involved with getting that perfect shot that you don’t take the time to enjoy the experience. Please share some of your favorite reenactment or festival shots.

The post 20 Tips for Photographing Historical Reenactments and Festivals by Bruce Wunderlich appeared first on Digital Photography School.


Digital Photography School

 
Comments Off on 20 Tips for Photographing Historical Reenactments and Festivals

Posted in Photography


Tips From a Landscape Photographer

21 Sep

B&H Photo Video is a huge mega camera store in New York City, but they also have a great selection of helpful videos. In this video Robert Rodriguez Jr. gives you some tips and insight into what it’s like to be a landscape photographer.

  • Capturing something that means something to you
  • Capturing emotion in photos is the essence of being creative
  • Compositions with layers to add depth
  • Why going back to one place again and again can help you take better photos of it
  •  The 4 a.m. filter
  • Printing your work, making it tangible

“Before you can think out of the box, you have to start with a box” – Twyla TharpThe Creative Habit: Learn It and Use It for Life

How will you get outside your box and be more creative?

Check out Living Landscapes and also Loving Landscapes, two dPS eBooks on this subject!

The post Tips From a Landscape Photographer by Darlene Hildebrandt appeared first on Digital Photography School.


Digital Photography School

 
Comments Off on Tips From a Landscape Photographer

Posted in Photography