RSS
 

Posts Tagged ‘Tips’

Some Wedding Photography Tips with Two Different Perspectives

16 Nov

Today I wanted to share these two videos with you that offer pretty my completely opposite ways to do wedding photography; candid storytelling and posed shots.

In this first video 19 year wedding veteran  photographer, Joe Buissink, talks about his philosophy on shooting weddings in a storytelling style. He says he started in 1995, I actually have him beat on that one – 1990 for me. Unlike Joe however, I started off doing the more traditional posed style which was popular at the time. Eventually I became a bit bored with it and moved towards using 35mm cameras with high speed b/w film and I got the same reaction Joe talks about in the video. Other photographers would gasp and tell me how wrong that was, that the images would be grainy and it wasn’t quote, “professional”. Like Joe, I did it anyway and my clients loved it because I was able to capture more of the storytelling he talks so passionately about.

While you’re telling their story, your story is also in there (your images) as well. – Joe Buissink

See what else Joe has to say and be inspired by his moving images:

In this second video, Moshe Zusman talks about creating poses rather than capturing moments. This is a different approach to wedding photography. Often many photographers use a mix of both candid storytelling images and posed. See if you can grab some tips from Moshe on posing in this video:

I don’t think either style and philosophy is right or wrong, just different. So which style do you relate to more? If you were getting married which would you want your photographer to shoot?

Want more wedding photography tips? Try these dPS articles:

  • Are you Ready to be a Wedding Photographer?>
  • Wedding Photography – 5 tips for the Speeches
  • How Connecting with Vendors Can Help Skyrocket Your Wedding Photography Business
  • Wedding Photography 101 (Part 1)

The post Some Wedding Photography Tips with Two Different Perspectives by Darlene Hildebrandt appeared first on Digital Photography School.


Digital Photography School

 
Comments Off on Some Wedding Photography Tips with Two Different Perspectives

Posted in Photography


5 Tips for Stress-free and Successful Child Portraits

12 Nov

DSC 7364dps

Children are the best examples of spontaneity, creativity, and wonder and that is precisely why we all love them so much. Then family picture day comes and you wish they’d just sit down and be still for five seconds. Photographing children comes with its own brand of challenges, but if you arrive to a session with a few tricks in your bag, you’ll come away from that shoot with pictures that perfectly capture that what being a kid is all about. Here are five tips to help you have more stress-free and successful child portraits

1 – Kids Don’t Like Dictators

Children are used to being told what do to. All day long, it’s all they hear. “Sit down,” “Be quiet,” “Don’t hit your sister,” and “Spit that out!” Wven though they don’t like being told what to do, they’ll expect the same treatment from you. You’ll find, however, that you’re more likely to get great photos out of them if you shatter those expectations and treat them as equals.

Children like being helpers and they like being grown-up. So give them what they want. Instead of saying, “Sit down there and look at the camera,” you might try something like, “Hey buddy, would you help me out by sitting right here so I can see if the light is right?” In that phrase, you made them the big helper. You may already know that the light is right, but the child doesn’t know that. All he knows is that you needed his help and you see him as an equal. Another technique is asking the child where they’d like their picture taken. This gives them adult-like control. Give them options though or you run the risk of them picking a bad spot. Point out a few spots that you’re okay with and let them choose from those. Even go as far as to ask their advice when it comes to posing. Give them a little control and they’ll be happy to give some back when you need it. I once had a three year-old tell me that he wanted to do his epic mad face for a pose. I told him, “That’s a great idea! Let’s do it!” After I took a picture of that epic mad face and I then said we should try out a few other faces just to make sure we get them all. He was more than happy to let me pick the next face.

DSC 7130dps DSC 6481dps

2 – They Don’t Need to Look at the Camera

Even with the best psychologist-tested techniques, children are still children. Most children have a hard time looking at a camera. The reason? Because the camera is a big black thing and it doesn’t even come close to resembling a human being. Children like to look at people’s faces, especially their eyes. Older children have an easier time, but younger ones really don’t like looking at the black hole in the middle of our cameras.

That’s okay! Some of your best shots could be the ones where the child isn’t looking at the camera. Being a kid means being on the go, constantly exploring, and living for the very next moment. Allow the child to move around the location and explore. Your job is to follow and click away. Once in a while, they may look directly into your lens and make a connection and that’s awesome. More than not, you’ll get shots of them whizzing past or looking down at a flower or hugging mom’s leg. All great shots that show what being a child is all about.

DSC 1742bwdps

3 – Use Their Inner Actor

Getting genuine smiles out of a child is difficult at times. It seems that as children get older their smiles get more forced. So how do you instruct a child to smile naturally? Even adults have a hard time with that. One effective technique is to work with the little actor that lives at the heart of so many kids. Try asking your kid clients to give you a fake laugh. Go as far as to model how the laugh should go. The awesome thing is that when you ask someone, child or adult, to fake laugh, it’ll make them feel silly and then they’ll really laugh. There is a smile that happens toward the end of a laugh and that is where their natural smile lives. This technique can work even on shy children.

You could also have them imagine something and see what expression you get. You could ask them to give you the smile they get when they’ve just gotten away with something or the smile they get when they get a present. For older children, it seems like asking them about a boy or a girl they like at school, in a playful manner, always elicits a very nice smile. Children like acting and pretending, so use it to your advantage.

DSC 9653dps

4 – Monkey See, Monkey Do

Most children, especially young ones, don’t really excel at following directions. If you’re trying to pose them and you’re giving them the same directions you’d give adults, you’ll end up with a very confused child who pulls off a really weird pose. If you’re photographing children and they’re okay to sit and pose for you, model every pose you want from them. Children can mimic like pros, so use that gift. If you want them to sit cross-legged with their elbows on their knees, get down and do it yourself. This goes for facial expressions too. Say you want them to smile, but not a big toothy smile. Show them the smile you want. They’ll give you their own version of it, but you’ll get what you’re going for. You may be exhausted at the end of the shoot after moving around so much, but in many ways, it’s easier than trying to verbally instruct a child into a pose.

DSC 9414dps

5 – Give Them a Break

DSC 9432dps

We all have our limits. Children are no different. If you find that your kid client is getting tired or upset, it’s time for a break. Take them by the hand and explore your location together. If the parents are okay with it, break out some snacks and have a sit. Talk to them and let them relax. Many photographers are worried about the use of time during a shoot and may be reluctant to do something like smell the flowers with a three year-old when they should be getting those precious shots mom and dad want. That’s understandable. But great photographers understand that you’re more likely to get the shot you’re after if you work with the client, not against them. In fact, you might find the perfect shot during the little break. Perhaps the child is picking flowers or collecting rocks and because they’re so happy, they look at you and click! You’ve got the shot. If you’re doing a family shoot, a break could mean that you go off to photograph another member of the family while the little one gets to sit back and relax a bit.

Children live in their own worlds with their own rules. If you prepare and have the right mindset, they’ll let you in and you’ll both have an awesome time.

The post 5 Tips for Stress-free and Successful Child Portraits by Anna Durfee appeared first on Digital Photography School.


Digital Photography School

 
Comments Off on 5 Tips for Stress-free and Successful Child Portraits

Posted in Photography


5 Tips for Filtering Advice from Other Photographers

09 Nov

Things seems to all be falling into place. You have your gear all set, a fancy new logo, a great new set of business cards and your portfolio is starting to shape up nicely.

DSC 1760

But you still have a lot of questions – ranging from technical to business. So you decide to seek out the advice from a seasoned professional photographer and hope they will help you with all of your unanswered questions about starting just starting out.

But who is there to help you decipher whether the advice you are receiving from said pro is good or not-so-good?

Here are some great tips to help you filter out the good advice versus the bad when it comes to improving your photography skills and business.

#1 – Consider the source

You have done a lot of research when it comes to photography and even running a business, so take the time to learn a little more about who it is you are talking to for advice. There is nothing wrong with looking at people’s credentials when seeking advice about something so important to you. Look at their resume and portfolio. Ask them how long they have been working in the field of photography, why they got started, why the love it and so on. Seek those out you admire for specific reasons – their technical abilities, website, blog presence, and so on.

DSC 2411

#2 – Don’t be scared to ask questions

The worst thing someone might say to you is NO. It never hurts to ask the questions you have in mind. Connecting with others is a great way to become a better photographer and business person. Check to see which photographers you admire offer one-on-one mentoring sessions, workshops or e-learning courses.

#3 – Ask the right questions

You have the undivided attention of an experienced photographer – make sure you prepare some questions before you speak with them. Be specific, not vague. If you are having technical issues show them some of your most recent work and ask how to improve. If you have some business questions, have paperwork and numbers handy (if you are comfortable sharing). The more specific you can be with your questions, the better they can help you with your problems.

DSC 1735

#4 – Listen and take advice with a grain of salt

There is no one said all, do-all, be-all, fix for any problem or issue. Just like life, different things work for different people. Certain photographers have different ideas about how to do different things – especially when it comes to business. Listen to the advice and do what is best for YOU. Some photographers sell the rights to their digital images, others don’t. Some photographers do in person sales, others do business online. While some practices might be successful for them, they may not be for you. Consider all the factors before making big decisions and do what is best for you and your business.

#5 – Be prepared for constructive criticism

What is the saying, “If you put yourself out there, be prepared”? While it would be wonderful to think that everything is rainbows and apple pies, you can’t grow from sugar coating things, especially if you want to grow. If you are willing to put yourself out there and ask for advice – you will be able to grow and learn from it. Participate in photography challenges, join a local photography group – put yourself out there. Yes, it might be uncomfortable. You might not like what you hear, but it is much better knowing the honest truth from trusted sources.

DSC 5027

#6 – Stay true to who you are

Advice is a pretty powerful thing and can be help solve many unanswered questions – but don’t cast aside who you are as a photographer and artist. Remain true to your core principles, what you believe in creatively and always follow your gut.

Best of luck in all of your photography endeavours.

DSC 1765

The post 5 Tips for Filtering Advice from Other Photographers by Allison Gipson appeared first on Digital Photography School.


Digital Photography School

 
Comments Off on 5 Tips for Filtering Advice from Other Photographers

Posted in Photography


Tips for Creating Dance Portraits

07 Nov

Dance and music have always been a part of my life, but work and my wife have kept me a bit busy lately. So when I had some photography assignments for a few dance concerts, I knew it was going to be a lot fun. It also made me realize that it can also be a bit challenging. In that split second, there is movement, emotion and a story to be captured. You need to anticipate that split second and capture the motion.

Emotion 1

When it comes to your viewers, you want them to believe and see that motion for themselves. So here a few tips to get prepared for a dance portrait. Why would you shoot dance portraits and how would you plan for it?

  • Dance concert – You are asked to take dance portraits as part of a dance concert.
  • Promotion – You are asked to take portraits of the dancer to promote them or the upcoming event that they are currently working on.
  • Head shots– You are helping the dancer to build their portfolio so that they can be represented by an agency or could be sent for casting calls.
  • To fulfil your creativity – You just want to experiment, unleash your creativity, and add Dance portraits to your portfolio.

Whatever might be the reason for your dance portraits here are a few things that are common while planning and executing a dance portrait session:

1. Knowledge and research

It’s always good to know what dance form your model or dancer is learning or practicing. This would help you to do your ground work which includes researching the dance form, checking online for inspiration and creating your mood board.

Research the clothing that is required for that dance form. You can either find a stylist to source the clothes for you or even better just ask the dancer if they would have something appropriate and comfortable that they can wear for the shoot. If you are doing this as part of a dance concert you would not have much say in it, as that will be predefined.

Knowledge and Research  1

Knowing the dance form can also help you choose music tracks for the shoot. Again your model can be a great help in this. Ask your model if they can bring along suitable music which you can play in the studio during the shoot. This helps to establish the environment.

2. Motion

The most important part in a dance portrait is motion or the sense of it. As a photographer you have to make sure that the viewer can visualize the motion. This can be done in a few ways:

  • It can be as simple as capturing someone mid-jump to convey motion.
  • Hair movement.
  • Dress or costume movement.

Some techniques which can be useful for this are, to use a fast shutter speed. Fast shutter speed ensures that the movement is frozen. This can also be achieved by using a flash. At times having a motion blur can also help create a sense of movement.

Motion 1

Motion 2

3. Emotion

Dance is all about motion and emotion. It’s an art form that involves facial emotions combined with body language to convey the idea or concept.

Make sure that you chat with your dancer beforehand to confirm the look they are after. This helps in two ways; one, it tells you what to expect and second you can adjust your lighting to capture the desired mood or add some more drama.

Emotion 2

Emotion 3

4. Anticipation

If you understand dance this one is very easy to master. But if you don’t you might need to work with your instinct. As a dance concert photographer you are expected to anticipate the movement and capture it at the right time to emphasize the effect. If you are photographing a dance concert the best way to address this, is to attend the dress rehearsal. This gives you an idea as to what to expect on the day. What will the lights be like and most importantly what are the critical moments that you need to capture and the best location from which to capture them?

Anticipation  1

If you are doing dance portraits in a studio this factor won’t be of much importance as you have more one on one time to repeat a step or pose if you missed it in the previous shot.

5. Energy

Capturing the energy of the dancer can make the photo look lively. One thing that works for me is I tell them the camera can capture their voice along with the picture. So don’t let them just stand there and smile. Tell them to shout or do something that they can’t do with their mouth closed. This could be done at the end of the shoot when you have got all your shots and just want to take some fun shots.

Energy 1

6. Creative twist

As with any photography, adding that creative twist is always fun. You can experiment with many of different techniques.
You can try panning where you follow the dancers’ movement, making sure that the dancer is in focus and blurring the background.
Drag the shutter (keep the shutter open for longer duration) and capture creative blur. Or try your hand at stop motion where the shutter is left open for a longer duration and a flash is fired at the very end to freeze the final movement.

Creative Twist 1

A few tips for dance portraits:

  • A fast shutter speed helps freeze the motion, but if you want a creative blur a slow shutter speed will do the trick.
  • A faster lens, like f/2.8 or lower, is better suited to take photos of a dance concert where flash photography is usually not allowed.
  • Do not be scared to use a high ISO for a dance concert, this will add grain (noise) to your photo, but you will be able to use higher shutter speed to freeze the motion. Sometimes grain isn’t all that bad.
  • Most important have fun and enjoy what you shoot.

Have you done any dance photography? Share your experience and any other tips you might have in the comments below.

The post Tips for Creating Dance Portraits by Siddhesh Jukar appeared first on Digital Photography School.


Digital Photography School

 
Comments Off on Tips for Creating Dance Portraits

Posted in Photography


Photography Workflow Tips – From Memory Card to Computer and Beyond

06 Nov

Discover the best workflow protocol for safe long-term file storage, and efficient file retrieval.

“Be willing to give that extra effort that separates the winner from the one in second place” – H. Jackson Brown Jr.

MemoryCards 1

All images copyright Gina Milicia – Playing your cards right means having a consistent workflow, which leads to safer long-term file storage and efficient file retrieval. Photo credits: Promo shoot for Fat Tony and Co. Image courtesy Nine Network Australia

“Respect your efforts, respect yourself. Self-respect leads to self-discipline. When you have both firmly under your belt, that’s real power.” – Clint Eastwood

It’s very easy to become lazy and a bit sloppy with post-production workflow protocols. If you are like many people I know, then you are currently downloading your files to a folder marked “downloads” or “photos” or “John”. Inside this folder you may have hundreds, perhaps thousands of images with file names like 5U9D2496.jpeg or 5U9D2497.CR2. This is all perfectly fine if you never want to see those images again but what if in five years time you need to find those images again?

Following a constant workflow protocol will save you hours of valuable time and also prevent potential heartbreak caused from lost files.

MemoryCards 2

An overview of the workflow tips:

  1. Import the images from your camera (first backup)
  2. Backup to portable hard drive (second backup)
  3. Backup to external hard drive (third backup)
  4. Editing
  5. Final backup
  6. Delivery

Workflow tips – step by step

“Success is the sum of small efforts, repeated day in and day out.” – Robert Collier

Step 1: Import the images from your camera (backup #1)

You can get the images off the memory card in a few different ways. Here are the pros and cons of each method.

Memorycards 3

Instant gratification: In this image I’m shooting tethered on a photo shoot for Australian entertainer Todd Mckenney (pictured second from left) and makeup artist extraordinaire, Fotini Hatzis (far right) with stylist to the stars Louise Petch (far left).

Shooting tethered to your laptop

I shoot about 70 percent of my work tethered (connected to my laptop) and it’s my preferred way of shooting. I have a memory card in the camera but the images are being downloaded straight to my laptop via image capture software. The memory card is just a backup.

My preferred software for viewing images as I shoot is Phase One Capture One. I use Capture One to view my files because it’s very fast and I’ll often have several people crowded around the computer waiting to see the image. In these cases a couple of seconds can make all the difference.

Shooting straight to memory card

MemoryCards 5

This shoot with Australian model, Mimi Elashiry was shot on location in Paris. It was photographed at dawn to avoid the crowds and I needed to work quickly in order to get all my shots done before the light became too hard and the crowds became an issue. This is a perfect situation for me to shoot straight to card.

I will shoot straight to a memory card when I can’t have my laptop with me. Like, on remote locations, in extreme weather conditions, at press conferences, at events where I need to be mobile or I’m on stage photographing someone.

I carry a special cardholder that is clearly marked “To be downloaded” and stored away from my gear. This way, if my camera bag is lost or stolen (or the day gets a bit frantic) before I’ve downloaded all the memory cards, I won’t lose my files.

The images are then downloaded to my laptop using a memory card reader via Capture One.

I use RAW capture software at this stage because it’s crucial to check my exposures and expressions as I work. I’m also often working with art directors, magazine editors, fashion designers or publicists who want to view the images straight away.

All images stay as RAW files. This step is simply for checking, viewing and selecting (tagging) images.

MemoryCards 4

Some people will prefer to copy the images directly onto their computer desktop and use other software. I choose Capture One because for most of my shoots, my clients are right next to me and we’re making sure we’ve got the shot. I’ve also got an assistant double-checking the technical aspects of the shots.

Capture One lets me handle the process simply and quickly, and the software is easy enough for clients to use. Lightroom works just as well but when I’m shooting thousands of images, I don’t like the interface. It’s a personal preference, that’s all.

As long as you can organize, select and name your files at this point in the workflow – use whatever works for you.

The memory card that has just been downloaded to my laptop is then put aside and not reused that day. This works really well when I’m shooting across multiple cards as it prevents any card being wiped, accidentally.

I never leave a memory card in the camera, always removing the last card at the end of a shoot. This is another way of protecting my files and prevents me, or anyone else assistants, from accidentally deleting files.

Renaming images

Now back to all those images you have sitting in a folder marked “Photos” or “John” or they may be roaming free across your desktop and stored wherever they happen to land when you download them. I call this the “shoebox file storage system”. Everything gets stuffed in one place without any thought to ever having to retrieve the information again.

For the sake of your own sanity, I beg you to not ignore this section.

I rename images when I download the files from the camera to my laptop.

My shoots often have very fast turnaround times with art directors, publicists, or clients choosing their images during or at the end of a shoot. Having the files already in an organized and consistent structure saves everyone a lot of time and hassle.

  • Images for private clients are renamed as:
    Folder name: Client name + year
    Filename: Client surname_first initial+last 2 digits of year_4 digit counter
  • So my shoot for James Brown in July 2014 would be named:
    Folder name: James Brown 2014
    Filename: Brown_J14_0001.CR2
  • Images for companies are renamed as:
    Folder name: Company + job + year
    Filename: Company_job+last 2 digits of year_4 digit counter
  • So when I shoot the next Nutella® Winter campaign (Dear Nutella® I’m available and will work for product. Call me.) I would create the folder and files as follows:
    Folder name: Nutella Winter 2014
    Filename: Nutella_Winter14_0001.CR2

This naming system allows me to search by folder or file and find shoot quickly and efficiently.

Step 2: Backup to portable hard drive (backup #2)

I backup my RAW files onto a portable external hard drive every hour. During a full day shoot I may end up with 3000-5000 files so I need to make sure they are secure as I go.

Step 3: Backup in the office (backup #3)

When I get back to my office, I copy the images from the external portable hard drive I used at the shoot onto one of three working hard drives. In this case, I copy them on to working hard drive A.

At this point in my workflow I have the entire shoot in three locations: my laptop, an external portable hard drive and working hard drive A. The shoot stays in all three locations until the job is delivered.

I only use hard drives that are two or three terabytes in size because I don’t want everything on one single hard drive.

I don’t use cloud storage mainly because my files are just too big. My website has storage for my final processed images and I use my website to deliver images to my clients. I trust the business hosting my website but if anything should happen, I still have the files on two other hard drives.

Step 4: Editing

I edit my images using Adobe® Photoshop® or Lightroom, or a combination of both, and the edited versions are saved to working hard drive A.

Step 5: Archiving

Memory6_11

Once post-production is complete I copy all my files onto working hard drive B, which is stored in an off-site location for safety.

If you think this is overkill, remember: memory cards corrupt, laptops crash and hard drives fail. Protect your work with as many backups as you can.

As a minimum, save your images in two different locations. Keep one with you, and store the other in a safe location off site. This way if disaster strikes you will still have a backup copy of your precious files.

Step 6: Deliver

Nearly all my jobs are delivered as electronic files with the exception of a small percentage of clients (about 5%) who require prints.

The images they have selected are delivered via file transfer protocol (FTP), my website image archive (I use Photoshelter), DVD or an external hard drive.

Editor’s note: your version of “deliver” might look like sharing photos online in social media, emailing a couple to friends, or making prints for yourself.

What are some of your favorite workflow protocols? Do you have any great workflow, storage and delivery techniques you’d like to share? How do you safely store your memory cards before you download them? I’d love to hear about them.

The post Photography Workflow Tips – From Memory Card to Computer and Beyond by Gina Milicia appeared first on Digital Photography School.


Digital Photography School

 
Comments Off on Photography Workflow Tips – From Memory Card to Computer and Beyond

Posted in Photography


7 Tips for Photographing Groups

04 Nov

Whether you’re an amateur or professional photographer, whether you usually photograph people, products, landscapes or insects, the time will come when you will be asked to photograph a large group of people.

Image H smaller family group

Of course large is a relative term. If you are used to photographing couples or taking individual portraits, large could mean a group of five people. In general, I consider large to be a group of seven or more.

The festive season is fast approaching, and this is the time of year when you are most likely to be asked to photograph large groups. During this season, families tend to congregate in one place, some travelling far and wide for the privilege of togetherness. Sports teams, dance clubs and social groups start winding down for the holiday season, and love to have an annual or seasonal record of their group.

Wedding and school photographers are the true experts in group photography. I am neither of those; I’m a family and children’s photographer, and I don’t mind admitting that I’m a one-trick pony.

However, over the past few months and for one reason or another, I have been asked to photograph an increasing number of large groups. Sometimes the lessons we need to learn find us, and it has been said that we best teach what we most need to learn. With that in mind, I’d like to share some of the lessons I’ve learned along the way, both through my own trial and error, and through tips for photographing large groups, passed on to me from other photographers.

#1 – Choosing a location

You won’t always have the luxury of being able to choose your location – sometimes you’ll be stuck with your aunt’s backyard, or some other less-than-ideal spot. If you have the luxury of choice, look to open spaces and uncluttered backgrounds.

There are two reasons why simplicity is even more important with a group shot than with any other kind of portraiture.

  • First, by its very nature, a group shot is cluttered. With so many different faces and competing outfits, your group shot can end up looking very messy if the background is also complicated.
  • The second reason is that, in order to keep your entire group in focus, you will need to shoot at a higher number f-stop than you would for a single portrait, so you won’t benefit from the blurred background that you would when shooting wide open.

When it comes to locations, my personal favourites are parks, gardens and beaches. The colours of nature never seem to clash or compete with your subjects. If you’re in a rural setting, and trees and grass are not your thing, look for hay bales, rustic sheds and timber fences. If you prefer an urban feel, seek out the unadorned walls and steps of old buildings and churches, or the clean lines of modern architecture.

The images below illustrate the different moods that you can create with background. Although the playground shot is a little busy, it conveys colour and fun.

Image A  teen group on branch

Image B teen girls in playground

These images show how you can create a different look to the same grouping, simply by changing your shooting position.

Image C group on lawn front

Image D group on lawn side

#2 – Lighting

Soft, even, light is imperative when photographing a group. If you can choose the time of day to shoot, opt for early morning or late afternoon to early evening, when the light is gentle and warm.

If you’re stuck shooting in the middle of the day, avoid harsh shadows by shooting in open shade such as beneath the canopy of a large tree, or in the shadow of a building. Importantly, make sure the light falls evenly on your group, and that there are no patches of sun on anyone.

#3 – Use a tripod

If you are photographing a small group, and you want to get creative with poses and shooting angles, you probably won’t need a tripod. While they go a long way towards preventing blurry images caused by camera shake, I personally find them restrictive.

However, when photographing a large group, you’ll probably want to keep your subjects in one position while you fire off lots of similar shots. A tripod has the benefit not only of preventing camera shake, but allowing you to take a number of shots at the same angle and focal length. So, when you discover that your perfect image is marred by one person blinking or doing something weird with their mouth, it’s easy to take spare parts from the other images and transpose them in Photoshop (do a head-swap).

#4: Lens and aperture selection

Lens and aperture preference are always controversial. To photograph a large group, I’d recommend playing it safe and using a 50mm lens. Depending on the depth of your group arrangement, stick with an aperture of f/9 or higher to ensure that everyone is sharp, and always do a test shot first.

To avoid distortion when using a lens that is 50mm or below, make sure you leave plenty of space between the people at either side of the group, and the edge of the frame. No one will thank you for making them look wider than they are (which is what a wide-angle will do to the people on the edges)!

While we’re on the subject, it’s a good idea to leave some space around your group to allow for different cropping ratios.

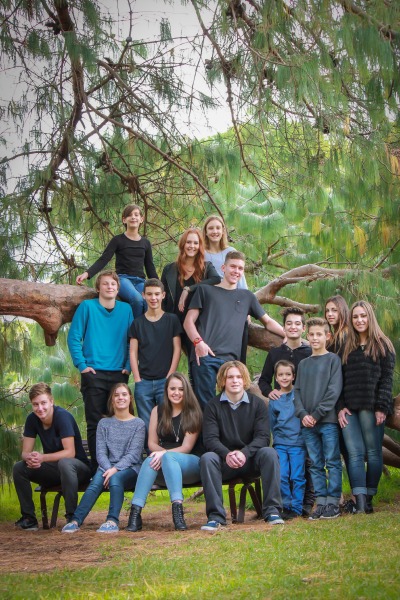
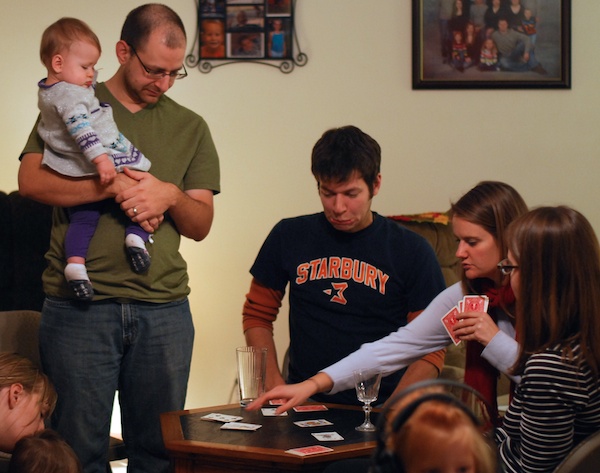
#5 – Vary the head heights

If your subjects are huddled close together on a level surface, chances are the people at the back will only be visible from the eyes up in the final images.

You can easily remedy this by placing them on a graduated surface. A flight of steps is ideal, or a sloping lawn, a playground slide, the branch of a tree – anywhere that you can stagger the height of the heads to make sure everyone can be clearly seen without sitting in a dead-straight row.

If you happen to be stuck with a flat surface, use chairs for a formal arrangement. Place some people standing behind the chairs, some seated on the chairs, and some sitting on the ground in front. The ground is a good spot for younger children, who get fidgety if asked to sit still for too long.

For something a little different, find a vantage point that allows you to look down on the group. This might be a balcony, a ladder, or a chair.

Image F- group tiered on tree

#6 – Last call: Nose check!

I can’t tell you how many hours I’ve spent in Lightroom cleaning up little noses (and big ones), fixing smudged eyeliner and removing lint from clothing.

While you are preparing your set-up, ask the women in the group to reapply their lipstick and check their hair and makeup.
Immediately before you start shooting, ask the adults in your group to check their partners’ and children’s faces and clothing, paying special attention to noses, teeth and eyebrows. Have a packet of tissues and wet wipes handy. If you feel uncomfortable asking this, think of all the hours you’ll save post-processing.

#7 – Ready, steady, shoot!

Once you have your group positioned, work quickly. Fire off a test shot for exposure, focus, and depth of field. When checking the image on your screen, enlarge it to the maximum size and make sure everyone from the front row to the back is in focus. Adjust your aperture if necessary. When photographing smaller groups, you can get creative with depth of field by focussing on some individuals and allowing others to soften, but that’s a whole other story. With a large group, everyone should be in focus.

With your camera’s drive mode set to continuous shooting, ask everyone in the group to close their eyes and open them on the count of three. Fire multiple shots on the count of three, and then repeat the process a few times to ensure you have at least one great image.

As to obtaining an image with everyone’s eyes open, the jury is still out as to the best method. What works for me is to set the camera’s drive mode to continuous shooting, and ask everyone in the group to close their eyes and open them on the count of three. I fire multiple shots on the count of three, and then repeat the process a few times to ensure I have at least one great image.

When you are satisfied with what you’ve captured, you can break the group down into individual families and other groupings, and have some fun with it. Ditch the tripod and get creative with posing and shooting positions. Avoid meltdowns by photographing families with the youngest children first, and use common sense when it comes to mixing children with water, pets, and climbable objects.

Image G girls under unbrella

Over to you

What kind of groups have you photographed? What are your tips for photographing groups? What did you do right, and where did it go wrong?

The post 7 Tips for Photographing Groups by Karen Quist appeared first on Digital Photography School.


Digital Photography School

 
Comments Off on 7 Tips for Photographing Groups

Posted in Photography


4 Tips for Taking Better Holiday Photos

02 Nov

With the holiday season just around the corner, many of us will be toting our cameras to festivals, parties, and family gatherings to preserve our precious memories for years to come. Unfortunately, you might look back at some of your pictures and wonder why they were blurry, out of focus, or just not all that interesting. Whether you have a smartphone or DSLR, here are a few simple techniques you can use to make your photos not only stand out, but help you learn a bit more about photography along the way.

4 tips for taking better holiday photos

ChildChristmasTree

#1 Get down to eye level with the kids

While you might be tempted to pass the time visiting with adults and catching up with friends at holiday gatherings, some of the best photos years down the road often end up being the ones of kids. It’s fun to see them grow and change over time, and when browsing photo collections people will often linger on photos of children for all the memories they bring back. When you have your camera out, though, remember to get on eye level with the little ones! It can feel a bit strange to squat down or sit on the floor to get a good shot of your three-year-old niece while all the adults are visiting in the other room, but the results will be well worth it. It’s tempting to shoot down at kids from your eye level, but this often results in unflattering pictures that seem cold and distant. Putting yourself physically at the same level as the kids offers a much more interesting view of their world, and makes for photos that are far more personal and memorable.

ThanksgivingFriends

My friend and her daughter before a Thanksgiving feast. I had to crouch down to get on eye level with the girl, but the results make for a much more interesting picture.

#2 Adjust the ISO instead of using the flash

If you leave your camera on Automatic mode, you might notice the flash constantly going off which can result in washed-out colors and unnatural shadows across people’s faces. But if you try to disable the flash, your photos will often come out blurry or out of focus. To fix this, you can set your camera to Program mode instead of Auto, which will allow you to have more direct control over the ISO setting and get better shots in low-light conditions (like indoor holiday parties) without using the flash.

ChristmasEveService

Using a flash would ruin this photo of a candle-lit Christmas Eve service. I got this shot by bumping the ISO up to 3200.

The higher you set your ISO, the less light your camera needs in order to take a photo. This is nice if you want to avoid blinding people with your flash, but the trade-off is that your pictures might look noisy or grainy. Fortunately, most modern cameras do a fine job even at ISO settings as high as 3200 or even 6400 – particularly if you just want to share the photos online or print at smaller sizes like 4×6.

Make sure to practice beforehand so you are comfortable not only setting the ISO, but knowing the limits of what your camera can do. But if used carefully, adjusting the ISO instead of using the flash can result in much better holiday photos with the added bonus of not blinding your guests or having to deal with red-eye corrections later on.

ThanksgivingDinner

If you really want to use your camera to its full potential, ditch Auto or Program mode entirely and try shooting in aperture priority (A or Av) mode where you choose the lens aperture and ISO while your camera calculates the best shutter speed. Or you could try shutter priority (S or Tv) mode, where you choose the shutter speed (1/60 to 1/90 second are good starting points when shooting indoors, such as holiday gatherings) and ISO, and your camera figures out the best aperture. I would recommend getting lots of practice with these modes and making sure you know how to adjust your settings accordingly before the holidays, though. You don’t want to try something new for the first time when everyone is opening presents and have a bunch of dark or out of focus photos as a result!

Finally, it’s worth noting that many modern digital cameras have user-programmable Auto ISO settings. You can use this to tell your camera to select the best ISO when using the semi-automatic (A/Av, S/Tv, or P) modes but stay within a few parameters that you define. For instance, if you know that your camera gets too noisy above ISO 3200, you can set that to be the maximum allowable ISO but let your camera do the rest. Or you can also set a minimum shutter speed before the Auto ISO kicks in.  If you don’t want to shoot anything slower than, say, 1/30 of a second, your camera will do everything in its power to maintain proper exposure by adjusting the ISO in order to stay above that shutter speed.  This can be quite handy at holiday gatherings when you don’t want to spend all night fiddling with your camera’s menus and settings but also want to make sure you get the best shots possible without the pop-up flash constantly blinding your guests.

#3 Shoot moments, not poses

It might be tempting to run around with your camera at holiday parties barking out orders like “Smile,” “Look here!” and “Say Cheese!” But a better option is to be a little more discreet and attempt to shoot moments instead of poses. Capturing the essence of what people are doing – talking, laughing, opening presents, sharing a drink – often makes for much more interesting photos as well as better memories in years to come. There is certainly nothing wrong with posed photos or having people look at you and smile while you take their picture, but these often lack context aside from the clothes people have on. What else was happening? Who else was present? What sort of activities were people doing? By taking a documentary-style approach and shooting pictures of people just being themselves (particularly if you turn the distracting flash off and adjust the ISO instead) you will capture memories that will strike a chord years down the road.

ThanksgivingCardGame

This picture of a game of cards over the holidays carries a great deal more meaning to me than if I had told everyone to look at the camera and smile.

#4 Know when to put your camera down

This might sound counter-intuitive for an article about how to get better holiday photos, but as the saying goes, there is a time for everything under the sun. This includes a time to shoot pictures and a time to just be with friends and family. Rather than 100 photos of your family opening presents, just take a handful and use the rest of your time to simply be with your loved ones and enjoy your time together. Try to be intentional when taking fewer photos, and the result will be more keepers that you want to look at years down the road instead of dozens and dozens of images of the same scene.

ChristmasPresents

Rather than a boat load of present-opening photos, just a handful will likely suffice and the rest of your time can be used to visit, laugh, and share memories.

Bonus tip: Invest in a prime lens

If you are still shooting with the kit lens that came with your camera, now is a fantastic time to spend a little money on a prime lens and get used to it before the rush of the holiday season. While these lenses don’t zoom in and out, the trade-off is an ultra-wide aperture that lets in so much more light (especially compared to a kit lens) that you will rarely have to use the flash even at lower ISO values. You will get the added bonus of having a lens capable of smooth blurry backgrounds that can capture the beauty of even the most mundane subjects. The Nikon 35mm f/1.8 is a fantastic choice, as is the Canon 24mm f/2.8, but there are plenty of options to suit your needs depending on your camera and shooting style.

TreeOrnament

What other tips do you have for getting good pictures at this time of year? Leave any in the comments below, and maybe share a few of your favorite holiday memories too!

The post 4 Tips for Taking Better Holiday Photos by Simon Ringsmuth appeared first on Digital Photography School.


Digital Photography School

 
Comments Off on 4 Tips for Taking Better Holiday Photos

Posted in Photography


5 Tips for Creating Creepy Halloween Photos

30 Oct

It’s the most wonderful time of the year! For some people that is Christmas, but for other’s it means that it’s time for the goblins and ghosts and all of the scary creatures to come out of hiding and find their way into our everyday lives. Theme parks have Halloween themed nights, scary movies are on television, haunted house tours start having people waiting in line and of course, it’s time for photographers to break out of their everyday subjects and come up with something dark and sinister to shoot.

Here are some tips to help you when you are  preparing to shoot some creepy Halloween photos.

CreatingaHalloweenPhotoshoot_DigitalPhotographySchool_LoriPeterson

The fear of clowns is called Coulrophobia.

#1  Pick a theme

When you choose your theme make sure it is one that you know that you can do without scaring yourself. If you have a fear of something, picking that as your theme may not be the best idea. Just because the theme is for Halloween does not mean that you need to bring zombies or blood into the shoot if you do not want to. Your theme could encompass some of the phobias that people have, including clowns, spiders, cemeteries, dolls, or death.

You can make your theme as twisted and as dark as you feel comfortable doing. Remember that there are more themes out there than just clowns, ghosts, and witches. You might even use the photoshoot as a way to get over the things that scare you. Your fears of clowns might be a little more alleviated if you are helping a clown with their costume and makeup and then watching them use their iPhone during breaks.

#2  Scout your location

CreatingaHalloweenPhotoshoot_DigitalPhotographySchool_LoriPeterson_DiadelosMuertos

The fear of the dead is called Necrophobia and the fear of bones is Cartilogenophobia.

Find a spot that is in the woods (if you can) so that you can shoot without being disturbed. You can also do a photo-shoot in a cemetery, but remember that most cemeteries close at dusk and please be respectful of the gravesites. While you may not know the people, that is the final resting place of someone’s loved one. Don’t climb on the headstones as some are very fragile. Wherever you decide to shoot make sure you leave the place as you found it. If the perfect location is on private property, ask for permission to use it. Stay off train tracks (that’s dangerous and illegal in most states). If shooting in a cemetery, be mindful that on the day you decide to shoot that there might be people there for a funeral. Move away from them and be respectful of their grief and what they are going through that day. If you are shooting in a park or in the woods and are approached by people, explain what you are doing. Some people will ask for your business card so they can look for the images online.

# 3 Will you need costumes or props?

You need to figure out (based on your theme) if you will need to find costumes that are already made or create costumes yourself.  The best costumes are usually the ones you make. Take elements of your idea and figure out what parts of it you can create yourself. Then the costume is customized and won’t resemble anyone else’s work. You can also add props to really create your look and pull it together.

Sometimes your models for your shoots will have pieces that will work and you can add jewelry or scary elements. You can find fake blood or for some photo-shoots you can even call your local butcher shop and they may be willing to help you out with some real props. They won’t be as surprised as you might think if you tell them you are a photographer and you need a pig heart for a photoshoot. You might be the one surprised when they ask “Do you want the heart with the valves attached or not?”.

CreatingaHalloweenPhotoshoot_DigitalPhotographySchool_LoriPeterson_EvilQueen

The fear of blood is called Hemaphobia.

#4  Find Your Models

Most photographers have at least a handful of models that they call for photoshoots. Ask your models if they are interested in doing something different from their regular sessions. If you are using children, make sure that their parents understand how the shoot might be scary. When they arrive talk to them about what you are doing and make it fun for them. They are less likely to be frightened once they see any masks or props before they are used. Give your models breaks if they are wearing masks. They can get hot no matter what time of year it is and some vintage masks have a very rubbery smell to them. Let children handle the props being used before you even pick up your camera so that they are familiar with them. You can even show them how you want them to be held and what you are wanting to get from the images. Some children actually enjoy scary stuff and will be more than happy to jump in. Some might need a little more guidance and support from you, so make sure you are paying attention to them.

aubrey bw fb

Lori_Peterson_Unconditional

The fear of dolls is called Pediophobia.

#5 Think Outside of the Box

Witches, ghosts and other Halloween ideas might not be your cup of tea because they are always associated with Halloween. Start thinking of things that fall outside of the typical Halloween realm. In the Halloween movies you were scared of Michael Myers because you could not see his face (and for other reasons too, but you had no idea what lurked under that Shatner mask.). Find some scary masks at a costume shop or online. Look for a gas mask, Plague Doctor, or clown mask. You can even use your own imagination and modify them to make them even scarier. When you can’t tell the identity of the person under the mask there is mystery and a little fear too. Don’t be afraid to create your own props or take old dolls or masks and modify them for your photoshoot.

CreatingaHalloweenPhotoshoot_DigitalPhotographySchool_LoriPeterson_ThePlagueDoctor
The wonderful thing about doing these types of shoots is that you don’t just have to do them close to Halloween. You can work on your ideas at any point through the year and accumulate the props, masks, costumes, or whatever you need and build up to the shoot. You can scout for your location to figure out where you want to do your shoot and what time of year. Exploring your creative side with Halloween photo shoots can bring a new insight into the work you do and you can have a lot of fun with these types of shoots.

Use these tips to participate in the weekly photography challenge: Spooky images for Halloween

The post 5 Tips for Creating Creepy Halloween Photos by Lori Peterson appeared first on Digital Photography School.


Digital Photography School

 
Comments Off on 5 Tips for Creating Creepy Halloween Photos

Posted in Photography


4 Tips for Photographing Bugs and Insects

29 Oct

Sometimes the most interesting things to photograph are right under your nose, even though you might have to look a little harder to see them. Bugs, insects, and other creepy crawlies might not seem like compelling subjects, but if you take a bit of time to examine the smaller creatures who inhabit the world around us, you might not only come away with new and exciting photographic opportunities but a renewed sense of wonder and admiration for the beauty of creation. If you have never tried this type of photography before, you can get started right away without any special equipment and these tips for photographing bugs might give you a few ideas to try out along the way.

butterfly-flower

#1 Keep your eyes open

This might sound obvious, but the first step in learning to take photos of insects is learning how to see them in the first place. Our six and eight-legged counterparts are all around us, but they don’t usually announce their presence with a trumpet blast. You often have to look just a little harder to see them, but you can great shots of bugs and insects on trees, shrubs, rocks, benches, buildings, or almost anywhere if you just keep your eyes peeled. The next time you head outside, whether it’s in a park or just in your own backyard, spend a little time examining the world around you to see if you can spot some of the amazing little critters that often go overlooked by us busy humans.

bee-flower

I wanted to get a closer look at some magnolia flowers, and noticed that they were full of bees. It took a while, but I finally got a shot of one of them on his way to gather some nectar.

Most days I have a fairly predictable routine involving work and home duties, and sometimes I get a little stuck when it comes to scratching my photography itch.  It can seem like there is just nothing new under the sun worth photographing, and it’s times like that when bugs are ideally suited to draw out a bit of creativity.  Sometimes I will find myself crouching down on the ground, straddling a fence, or perched atop a ladder in order to get a better view of these small critters.  It’s fun, challenging, and a great way to get some fascinating photographs.

#2 Be patient

While insects are great at giving you unique photographic opportunities, they aren’t so good at following directions. Most of bugs simply will not listen to perfectly reasonable requests like “Hold still,” or “Turn the other way.” To compensate for their lack of cooperation, you often have to simply wait until a good photo opportunity presents itself. This could mean watching a cicada explore a shrub, keeping your eye on a beetle as it blazes a trail across your lawn, or waiting for dinner to fly into a spider’s web. The slightest sound can disturb our tiny little friends, so take care to move about quietly and not intrude on what they are busy doing. If your camera has a long zoom lens, you can use it to get right up close and personal even if you are far away, but unless you have plenty of light your shutter speed might not be fast enough to capture the action.  In those cases bumping up the ISO is a good way to compensate, though your picture might end up looking a bit grainier or noisier than you prefer.

spider-grub

This garden spider built quite the web next to a fence, and his handiwork was rewarded when another bug wandered over to investigate.

Sometimes you have to keep an eye on a critter for quite a long time, and even after all your waiting they might just decide to scurry off or fly away.  This can be an exercise in frustration as you wait for what seems like hours with nothing to show for it.  Nothing is guaranteed when you set out to take pictures of insects, but if you can find a balance between shooting and waiting, you might be pleasantly surprised at the results you get.

#3 Capture the eyes, not just the insect

This tip might seem a bit strange, and it’s not always easy to accomplish, but if you can capture the eyes of an insect it lends an entirely new dimension to your photographs.  As the saying goes, the eyes are the window to the soul, and while this certainly holds true for humans it also works for animals and even bugs.  When you can get a shot of an insect’s eyes it can be almost like the two of are sharing a moment, watching each other and allowing you to be in the other’s space for a few brief moments.  Even though the insect might not care one bit about you or why you are pointing a rounded lens in its face, capturing its eyes will add an emotional hook to the image that would otherwise be lacking.

I don't know what this wasp was thinking, but judging by the look on his face I imagine it was something like "Leave me alone, and I'll leave you alone."

I don’t know what this wasp was thinking, but judging by his expression I imagine it was something like “Leave me alone, and I’ll leave you alone.”

katydid

This katydid seems like an inquisitive fellow, or at least that’s what I tell myself based on the expression on his face.

I’m no entomologist, and I have no idea if these insects were thinking anything at all when I took their pictures, but seeing their eyes and faces lends a significant amount of depth to what would otherwise be just another photo of just another bug. It takes time and patience, but if you try to capture your insect subjects’ eyes you can draw your viewers into your photographs in new and compelling ways you may not have considered before.

#4 Alter your perspective

One of the biggest mistakes you can make when photographing insects is to stand above them and point your camera down. You might get some pictures of spiders, beetles, or giant ants, but they will probably not be nearly as interesting, compelling, or engaging as they could be if you simply tried a different angle. I followed this cottonwood borer for almost a half hour as he climbed all over a pine tree, all because I wanted to get the picture from a more unconventional angle. I could have just taken a photo while he was on a branch or the trunk, but shooting him from a low angle while he was stretching out his front leg made for a much more engrossing photograph.

borer

This technique can also be used to transform almost anything into a more captivating photograph. People, pets, familiar scenery, even common household objects can take on entirely new dimensions if you examine them from new and unfamiliar angles. Of course it works great with bugs and insects, but the next time you pick up your camera try it with almost anything around you.

Of course one of the best ways to get photographs of insects is to invest in a macro lens for your camera, and even though they can be quite pricey the results they produce are absolutely astounding.  All of the photos in this article were taken with either a 35mm or 50mm prime lens, which have minimum focusing distances of about 12 inches. Macro lenses can focus on objects right in front of the lens, which can give you some outstanding pictures of insects, bugs, or anything else for that matter. But even if you only have the kit lens that came with your camera you can still get some amazing images. If you have any to share, leave them in the comments below as well as any other tips you might have for getting pictures of our small little friends.

Some other options for doing macro shots without investing an expensive lens:

  • Reverse Lens Macro: Close Up Photography Lesson #3
  • Getting Up Close with Close-Up Lenses
  • Alternatives to Buying a Dedicated Macro Lens for your DSLR
  • Extension Tubes: Close Up Photography Lesson #2

The post 4 Tips for Photographing Bugs and Insects by Simon Ringsmuth appeared first on Digital Photography School.


Digital Photography School

 
Comments Off on 4 Tips for Photographing Bugs and Insects

Posted in Photography


10 Tips to Help You Grow as an Artist in Photography

27 Oct

UmbrellasinTokyo

Over the past few days, I’ve thought about what’s helped me become a better photographer over the years. It’s a constant journey, and developing as an artist is a never ending pursuit that extends beyond owning any camera. In addition to practicing as much as possible with your camera, here are 10 tips to share that you may wish to consider while you continue on your own path in photography to help you grow as an artist.

1. Wait to look at your photos

I discovered this piece of advice over time, though a number of other photographers have suggested the same thing. Wait to look at your photographs if that’s possible. I know after a shoot you may feel anxious to go through and edit your pictures, but your anxiety and perception will often skew how you see your photos because this is at the height of your emotional attachment to your images. I’ve found that waiting a few days or better yet a couple of months to really go through a batch of photographs will be enough time to break down some of that attachment and reduce any biases you may carry.

2. Only delete the obviously bad shots

Some photographers even argue not to delete any of your shots because in the future, software developments may actually exist to fix super blurry or unfocused images. It’s your call, but if you see an image that you just don’t like, consider waiting a bit before you delete it. I’ve come across images that I marked with an X in my Lightroom, but interestingly, I’ve found that sometimes my perception of what I think is “good” changes. Photography is a learning experience as you expose yourself to other work and different styles. Down the road, you may rediscover some of your images in light of new ways you learn how to see. Besides, it’s always good to keep some of the bad shots around to really get an idea of the progress you make through the years.

3. Shoot some film

Shooting film can be more expensive, but it’s a great tool in becoming a better artist and photographer. With only a fixed number of exposures, you’re more selective of the images you shoot and the cost of developing film will keep you from shooting hit or miss style which forces you to think more. When shooting film, you’re in a different state of mind because of its limitations which challenge you to become more selective and refined before you press the shutter button.

Shootfilm

4. Study other artists’ work

You have no idea how good your stuff is until you have something to compare it to. You can shoot a ton and feel pride in your images, and as you grow, you should feel good about this progress. Studying from great artists and photographers you admire is really the best way keep you humble; but it also prevents you from falling into creative stagnation. I find this to be one of my biggest sources of inspiration, and it’s a great motivator for when you start to feel a little bored with your images.

5. Take a drawing or painting class

Years ago, before I ever even picked up a camera, I wanted to learn how to paint. I loved mixing colors and the thought of learning how to compose a scene and conveying my own impressions upon a subject interested me. So I enrolled in a class at a local art college which served as the foundational cornerstone as my development in photography. My teacher sat with us intimately every class and taught us about reading light and composition. She told us flat out at the beginning of the class that we would never see the same way again, and she was right! She taught us about negative space, composition, and all the basic concepts that artists are supposed to know, things which photographers should know too. My teacher was right and I did learn to see for the first time. If you have the time or haven’t been through art school already, consider signing up for a drawing or a painting class. It will take you a long way toward your artistic growth.

Tree

6. Don’t listen to your friends and family

I come across this advice often and it’s useful. Your friends and family are your biggest supporters, but because of this, they make it hard to get an objective, unbiased, perspective on your work. They all love your photos and they’ll even like or love all your pics on every social media site. But I’ve found that so much praise can become counterproductive or even misleading when you put too much stock into their opinions. Instead, you can join critique forums online or contact artists you admire to get them to review your work, as in my next point.

7. Ask for a portfolio review from a professional artist that you admire

This can often have an associated fee, but it’s a great way to get some professional feedback on your images. You can even seek help in sequencing the photographs in your portfolio as well. Better yet, join a workshop with a photographer you really admire and they’ll surely give you some substantial feedback.

8. Capture the essence of a place

Capturing the essence of a place in a photograph is its soul and without this connection, it’s hard to connect the story behind your images. It’s easy to get sidetracked or overwhelmed with seizing photo opportunities on a trip or when you’re traveling somewhere. But before you get too carried away with shooting, let your senses rest a little and try to feel the essence of the place and connect with it. Sometimes it takes a couple days or so to slow down and catch on to its vibe. When I went visited Sydney for the first time, I shot this photo of the ice cream truck on the beautiful day because I felt it perfectly captured both the beauty and the pace of life in the city.

Sydney

9. Fall in love with photography

Becoming a photographer can feel downright intimidating in a world full of talent. If you’re running a full-time business then it’s easy to lose sight of why you fell in love with photography in the first place. Don’t forget to continue to immerse yourself in other people’s work, indulge in the history of photography, and enjoy the art of photography for its own existential reasons.

10. Focus more on books and less on gear

It’s impossible not to appreciate the craftsmanship of a nice camera or a beautiful lens, but fixating upon having the latest and best gear won’t make your photos any better if you have a limited artistic vocabulary. Instead, invest in some inspirational photography books from a variety of different artists; look at the sequencing and learn from their styles. I feel this is even more important if you are self-taught. Learning what a good photograph looks like can’t be accomplished by just shooting alone. There’s a rich number of artistic styles you can potentially gain inspiration from. Even more important, brushing up on color theory, composition and lighting techniques will take your photographs to a whole new level. You don’t need to follow these rules all the time, but it’s important to know they exist so you can manipulate your camera and subject matter with more purpose in mind. I like the image below because it uses a simple compositional technique of aligning the foreground with the background. But without first reaching out and learning these kinds of ideas, you most likely won’t even know they exist.

Yokohamabridge

In the end, Mark Twain gives some excellent advice, “You cannot depend on your eyes if your imagination is out of focus.” I’d love to hear about your tips as well for honing your own artistic side as a photographer.

The post 10 Tips to Help You Grow as an Artist in Photography by Stephanie Huynh appeared first on Digital Photography School.


Digital Photography School

 
Comments Off on 10 Tips to Help You Grow as an Artist in Photography

Posted in Photography