RSS
 

Posts Tagged ‘Tips’

9 Tips for Photographing Mountain Lake Reflections

26 Apr

How to Photograph Mountain Landscapes

There’s something ultimately alluring about lake and river reflections in landscape photography, especially when surrounded by majestic snow capped mountains that glow hot from the light of the setting sun.

Here’s a little time-lapse video I put together using some of my recent lake reflection still shots in Alberta, Canada. Each frame is from a still image shot with a small mirrorless digital camera. Read on to learn the methods I use when trying to capture stunning lake and river reflections in my photography.

1 – Don’t shoot super wide

Regardless of whether your camera is full frame, APS-C or MFT (micro four thirds), it’s important to realize that when shooting mountain reflections you might not need your widest lens to capture the most pleasing composition.

A lot of the time I shoot in the super wide realm but that doesn’t work so well when shooting mountain reflections. A super wide lens tends to reduce the epic size of the distant mountains and magnifies the foreground.

That’s great when you can get fairly close to my central subject, but when that subject is a snow capped mountain a few kilometers away, it’s time to strap on a lens that gets you closer to the action.

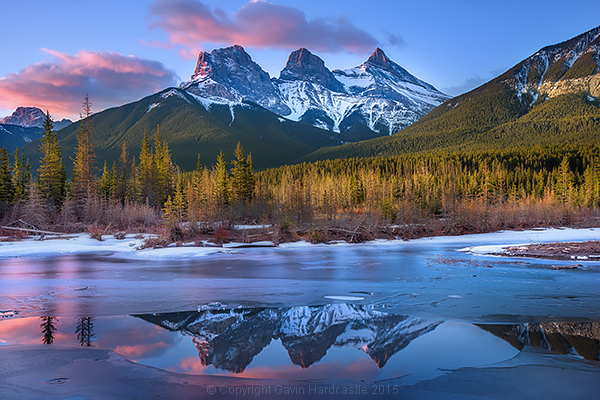
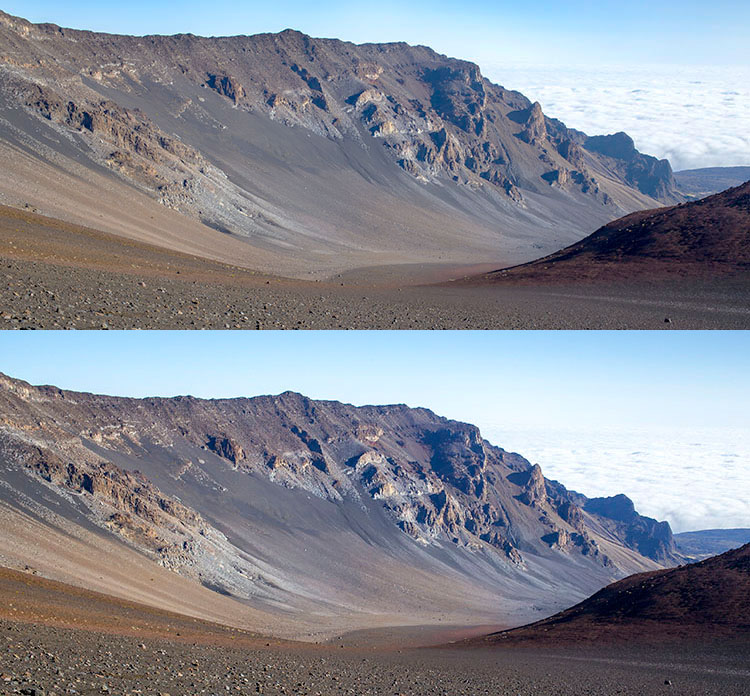
At my most recent visit to Banff and Jasper in Alberta I found that I rarely shot with anything wider than 35mm on full frame. In many cases I was zoomed in past 50mm, and often beyond 100mm. Here’s an example.

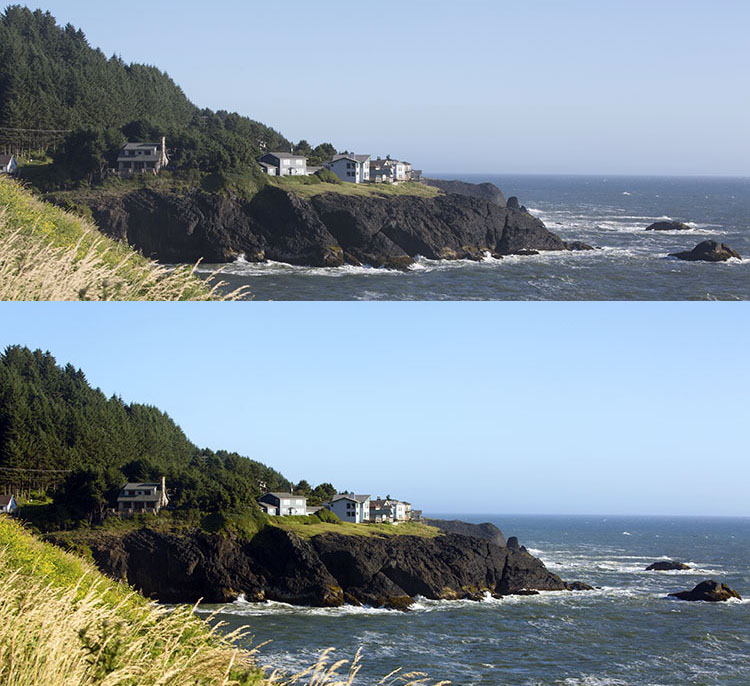
This first shot is at a focal length of 70mm.

How to shoot mountain lake reflections

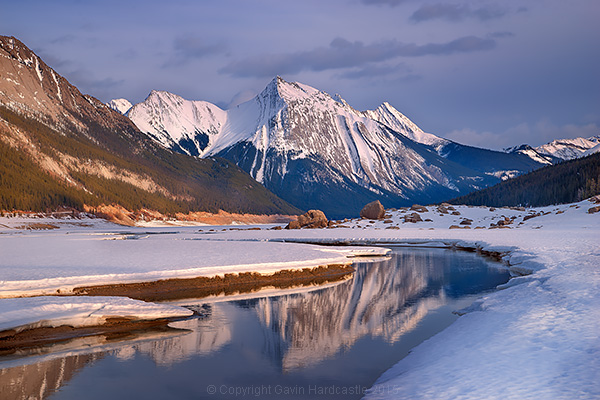
This second shot is at 16mm, super wide. There are a few minutes of light change in between the shots but otherwise it’s the exact same scene, from almost exactly the same position. I don’t know about you, but I much prefer the simpler, cleaner composition of the first, zoomed image.

How to shoot mountain river scenes

2 – Fill your frame with what’s cool

This is good advice for any kind of photography but with mountain lake reflections it’s easy to get wowed by the colourful clouds that are reflecting in the mirror surface lake. If they really are doing something impressive then by all means, devote some frame space to the clouds.

You’ll find however, that when you zoom closer to fill your frame with your most impressive mountain range and reflection, your image may have much more impact. At times this isn’t too obvious when you look through the viewfinder or LCD but when you view that zoomed image back on a large computer screen it often has more wow factor than your wider, cloud filled image.

How to Photograph River Landscapes

3 – Waiting for the wind to stop

If you’re out on a gale force windy day, don’t expect any lake reflections. You need that water to be perfectly still for good reflections. A mild, occasional wind is fine, just stick around and wait for it to periodically die down. You only need a few minutes. Bring a camp chair and thermos, then chill out while you wait for the perfect moment. It’ll come.

4 – Shoot two versions – adjust the polarizer

If you shoot lake scenes without a polarizer you’ll get a lovely mirror-like reflection, but you might be missing out on some interesting details under the water in the foreground. I like to take at least two shots with my polarizer in different positions. One shot will give me the maximum reflection while the other shot will reduce that reflection to reveal the details under the water.

I can then easily blend these two exposures in Photoshop to get the best mixture of reflection and water detail.

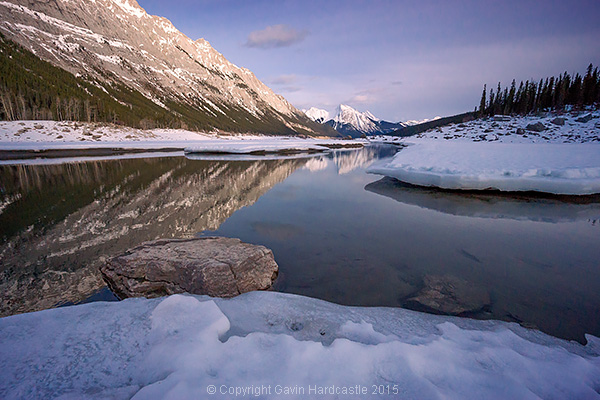
5 – Interrupt the reflection

Vermillion Lakes, Banff - Mirror World by Gavin Hardcastle

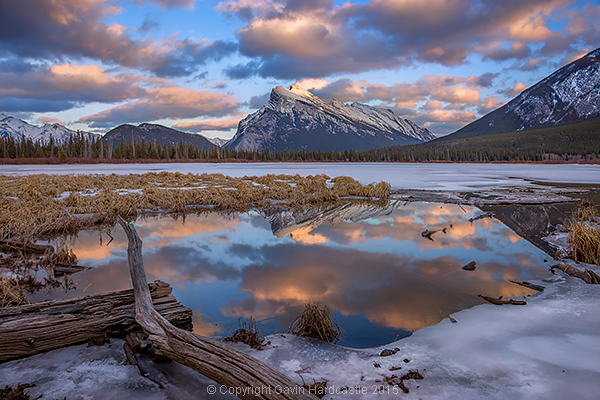
I have a thing for the interrupted reflection. I find it more interesting to have my mountain reflection interrupted by ice formations, river bends, rocks and branches as apposed to a completely whole and perfect reflection. Try and avoid that obvious BAM reflection. Be a bit clever and put some thought into how you can make the reflection more interesting.

6 – Get down low

I like to pick the most interesting point of my mountain range then find a spot in my foreground that reflects that interesting point. I often need to get the camera down lower to achieve this, sometimes adjusting the tripod to its lowest point. At times you might not need to get so low and maybe just step back a few feet to place your reflection where you need it to be.

You can’t change where the mountain is, but you can change your position relative to it to capture the most interesting foreground and reflection.

7 – Look for framing elements in the foreground

If possible, try to incorporate elements in your foreground than frame the scene. It creates a window into your scene that we humans find very appealing.

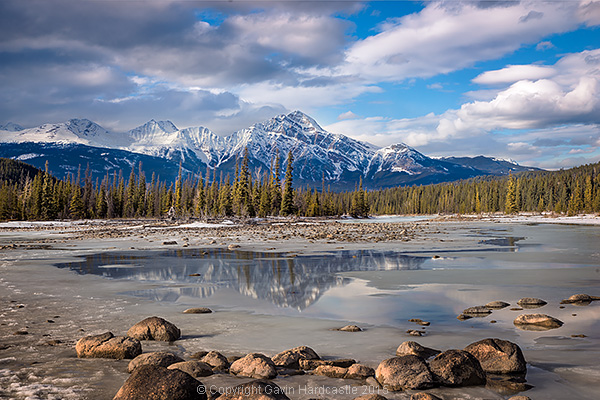
8 – Look for leading lines in your foreground

Lake Photography Tutorial

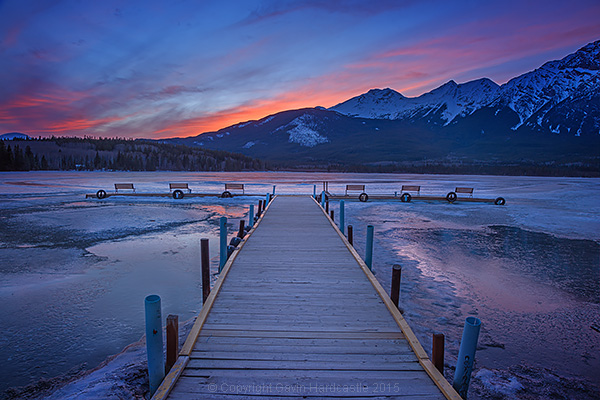
Try and find foreground elements that suck the eye in to the centre of your image. Use rocks, logs and branches to blatantly point at the mountain scene in your image. Obviously you’ve got to work with what you have but there’s almost always something there.

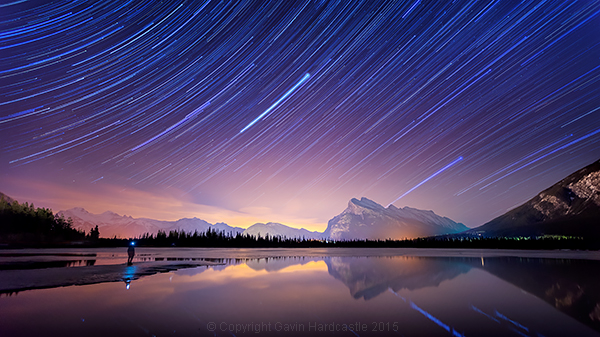
9 – Star reflections are gold

If you’ve got a calm, clear night that is the perfect chance to capture the Milky Way or star trails in your lake reflection. Place a colossal mountain range in the centre of that and you’ve got yourself a killer shot. For tips on how to shoot star trails like this, view my tutorial How to Shoot a Star Trails Selfie.

Star Trails Selfie Tutorial

googletag.cmd.push(function() {
tablet_slots.push( googletag.defineSlot( “/1005424/_dPSv4_tab-all-article-bottom_(300×250)”, [300, 250], “pb-ad-78623” ).addService( googletag.pubads() ) ); } );

googletag.cmd.push(function() {
mobile_slots.push( googletag.defineSlot( “/1005424/_dPSv4_mob-all-article-bottom_(300×250)”, [300, 250], “pb-ad-78158” ).addService( googletag.pubads() ) ); } );

The post 9 Tips for Photographing Mountain Lake Reflections by Gavin Hardcastle appeared first on Digital Photography School.


Digital Photography School

 
Comments Off on 9 Tips for Photographing Mountain Lake Reflections

Posted in Photography


3 Simple Tips for Subtle Landscape Photography Post-Processing

23 Apr

Landscapes are one of the most popular photography subjects, and for good reason. Nature is enchanting to the human eye, and it’s only natural for people to want to capture that stunning natural scene with cameras. Some landscape pros and über-enthusiasts will plan ahead with tripods, shutter release cables, filters, and extra gear to make sure they really nail the shot they have in mind.

Then there are more casual photographers like myself who tend to shoot landscapes on a spur of the moment basis, usually during vacation. If you fall into the latter group, this article is more geared toward you. Maybe you have a single landscape shot that looks pretty good, but you’re looking for some light post-processing tips to top it off. If that’s you, read on!

In this article, I will present a few methods for enhancing natural scenes to keep them looking close to how you originally viewed them. All of these techniques have to do with enhancing a single shot, and the effects are not too dynamic or exaggerated, keeping you safe from overdoing it with say, HDR.

Tip #1: Enhance details

One of the quickest and easiest ways to polish any photo is to apply image sharpening. There are several ways to do this in Photoshop. For this article we’ll focus on applying the High Pass filter’s image sharpening effects to the landscape image below of Haleakala, a hiker-friendly dormant volcano in Maui, Hawaii. The before image is above and the after one is on the bottom. The effects may seem subtle from a zoomed-out perspective, but compare distinct areas such as the rock formations to see the sharpening in effect.

High pass sharpening filter landscape photography

Steps for sharpening using the High Pass filter

  1. Start by duplicating the Background layer, and changing the blend mode of the new layer to Overlay. The image will appear heavily contrasted, and with the Overlay blend mode applied, you’ll be able to get a preview of the High Pass filter effects.
  2. Next, apply the High Pass filter to the duplicate layer. It is located in the Filter menu at the top screen in the Other section.
  3. Adjust the filter settings: You’ll then see the High Pass filter dialogue box, which will allow you to use a simple slider to increase or decrease the intensity of the radius value (aka strength of the filter’s effect). The higher the value, the more intense the High Pass filter effect. Generally speaking, it’s best to keep the value on the lower side, between 1-5 pixels. In the case of this image, the radius was set to 1.2 to provide just enough sharpening around the edges of the image without exaggerating the effect.
  4. Tweak the layer settings: After the High Pass filter is applied, it can be fine-tuned by adjusting the blend mode of the duplicate background layer and/or lowering the layer’s opacity. The blend mode you choose can either intensify or reduce the amount of sharpening. For some examples, take a look at the image comparisons below. Hard Light and Vivid Light increase sharpening, whereas Soft Light keeps it subtle.

Landscape photography high pass sharpening filter

High Pass filter landscape photography

Tip #2: Remove image haze

It’s not uncommon for landscape images to appear hazy or foggy when the natural weather conditions are such. The image above was shot on the Oregon Coast a few summers ago using a Canon 70-200mm at f/11 with just a basic clear UV haze filter on the lens. The mist in the air give the photo a dull look in the unedited, straight-out-of-camera version (top image below) but luckily this can be easily fixed in Photoshop (bottom image below).

Landscape Haze before and after

Since the biggest problem with hazy images is soft contrast, the quickest fix is to simply select the Auto Contrast function, located in the top menu dropdown under Image. Poor image contrast is then instantly fixed based on pixel luminosity, resulting in overall finer image contrast. After Auto Contrast was applied, I also adjusted Levels, Saturation, and Vibrance, and the resulting image looks much more balanced and vibrant despite the hazy conditions of the scene. 

Landscape photography auto contrast

Tip #3: Enhance the colors in the sky

Most sunset photos are already quite spectacular when they’re captured with a camera, but sometimes it doesn’t hurt to enhance them a bit more, to fully convey an exceptionally surreal or beautiful scene you witnessed. The photo below is an unedited sunset shot taken at the Grand Wailea in Maui, Hawaii. It looks pretty fine on its own, but I wanted to paint a little more orange and pink into the sky. 

Landscape photography Sunset before after

To do so, we’ll follow these simple steps:

  1. Create a new layer by clicking on the layer icon to the left of the trash can in the layers panel.
  2. Then go to the toolbox and select the Paintbrush icon. To ensure a smooth transition, make sure the opacity is set to 100% and the brush hardness is set at zero.
  3. Set your color: With the Paintbrush still selected, click on the Foreground Color, which is at the bottom of the toolbar. A dialogue box will appear and your cursor will transform into an eyedropper tool. Left click on the desired color in your image that you wish to paint with, in my case a light pink-orange.
  4. Next, start painting over the areas of the sky that you wish to enhance. Be sure to limit the brush strokes to just your sky area; in my case, I wouldn’t want to paint over the darkened shadows on the left side of the photo since I want to keep them as dark as possible.
  5. Change the Layer Blend Mode: After you’re done painting, right-click on the layer you painted on and change the blend mode to something like Soft Light or Overlay to achieve the desired effect. If the effect is too strong, adjust the opacity of the layer to a lower percentage.
  6. Violá! You should now see much stronger, vibrant colors radiating from your sunset image.

Landscape photography sunset sky painting

How do you process your landscape images? Do you have any other tips or tricks? Please share in the comments below.

googletag.cmd.push(function() {
tablet_slots.push( googletag.defineSlot( “/1005424/_dPSv4_tab-all-article-bottom_(300×250)”, [300, 250], “pb-ad-78623” ).addService( googletag.pubads() ) ); } );

googletag.cmd.push(function() {
mobile_slots.push( googletag.defineSlot( “/1005424/_dPSv4_mob-all-article-bottom_(300×250)”, [300, 250], “pb-ad-78158” ).addService( googletag.pubads() ) ); } );

The post 3 Simple Tips for Subtle Landscape Photography Post-Processing by Suzi Pratt appeared first on Digital Photography School.


Digital Photography School

 
Comments Off on 3 Simple Tips for Subtle Landscape Photography Post-Processing

Posted in Photography


7 Essential Tips for Shooting Portraits on Location

22 Apr

I have so many friends who have the good fortune to travel the world, but they always come home frustrated because they either try to take portraits in obvious places, standing on top of the landmark with thousands of people all around, or they don’t show the things that they found interesting or personal about where they were. So let’s Continue Reading

The post 7 Essential Tips for Shooting Portraits on Location appeared first on Photodoto.


Photodoto

 
Comments Off on 7 Essential Tips for Shooting Portraits on Location

Posted in Photography


Tips for Photographing Butterflies

16 Apr

Butterflies can provide a colorful and fun way to explore the macro world, and the basic techniques are easy to master with a little patience and practice.

Just because butterflies are fast movers, doesn’t mean you have to be! If you watch carefully, you will notice that each species tends to visit the same variety of flower. If you miss a photo opportunity, wait a couple of minutes and the chances are that the butterfly will soon be back again to the same flower, or to a neighboring one. When approaching, avoid unnecessary vibrations and be careful not to cast a shadow over the butterfly.

Butterfly 1

Lens choice

Although a macro lens is an advantage, almost any lens can be used. A wide angle lens will help show context, whilst lenses with a longer focal length will isolate the butterfly from the background and will also ensure that it is not physically disturbed.

Camera settings

As in all macro photography, the background is as important as the subject and using the right aperture can make or break the photo. Use Aperture Priority mode and choose a fairly wide aperture (a small f-number). A good starting point is somewhere between f/3.5 and f/5.6, which will help separate the butterfly from the flowers or branches behind.

Of course, a wide aperture will also reduce depth-of-field, so your final choice will often depend on the position of the butterfly. If its wings are closed for example, and you are parallel to its body a wide aperture will be fine. If not, you may need to try something smaller such as f/8 or f/11.

Sometimes you will be lucky enough to find a butterfly who is feeding and poses beautifully for the camera, but most of the time they are in constant motion. Using a fast shutter speed of 1/800th and upwards will help reduce your quota of blurry photos.

Ideally, your ISO will be set to either 200 or 400, although you may need to increase this depending on available light.

Butterfly 2

Focus

If your butterfly is part of a larger scene, you may get away with autofocus. For close-ups, there is only one way to focus, and that’s manually! Autofocus rarely puts the focus exactly where you want it, and with butterflies you are aiming at their eyes. If they are visible, the eyes are the key to the image and they need to be sharp.

If you are wondering how to manually focus on the microscopic eyes of a tiny, moving creature, don’t worry. Try pre-focusing on a flower so that when the occupant arrives you only have to make minor adjustments. Good focusing can be a bit hit and miss, so take plenty of photos to increase your chances of having a few sharp images.

Butterfly 3

Lighting

As for most photography, avoid the harsh light of the middle of the day. Early morning provides great light and slower moving butterflies, but late afternoon on a sunny day is often the best option. The butterflies are active and the sun is low in the sky.

Once you feel comfortable with the more classical front and side-lighting, have a go at back-lighting. This can be achieved by positioning the butterfly between yourself and the sun. Avoiding lens flare can be a bit tricky, but this type of lighting will really show off the details of the wings and put a beautiful rim of light around the butterfly.

If your back-lit photos are on the dark side, you may need to over-expose slightly. Dial in some exposure compensation until the butterfly is correctly exposed.

Butterfly 4

Composition

Photographing a butterfly from above, will showcase the patterns and colours of its wings. Getting down to eye level however, will give your photos much more impact and intimacy (especially if those eyes are sharp). Vary your perspective, move around, and show the butterfly from angles that are rarely seen.

As well as close-up shots, you may also want to consider the larger picture and show the butterfly in its natural surroundings.

Butterfly 5

Tripod

Whether you use a tripod or not is a personal choice. A tripod will bring you an element of stability and will help with composition and focus. The down side is that it is cumbersome and will severely restrict your movements when photographing these fast moving, and somewhat erratic subjects.

As for finding butterflies, you shouldn’t have to go far. Your garden will probably reveal several passers-by, and others can be found in local parks, fields and woodlands. Butterfly houses also provide great photographic opportunities with nice, even lighting and many species under one roof.

Butterfly 6

With a bit of perseverance you will soon develop your own technique for photographing these little beauties. Be warned though, chasing butterflies can become highly addictive!

Kathy Samuel is a natural light photographer with a passion for the outdoors and the world of macro photography. She is English, but now lives in the southern French Alps where there is no shortage of tiny subjects for her camera. You can visit her at Kathy Samuel Photography.

googletag.cmd.push(function() {
tablet_slots.push( googletag.defineSlot( “/1005424/_dPSv4_tab-all-article-bottom_(300×250)”, [300, 250], “pb-ad-78623” ).addService( googletag.pubads() ) ); } );

googletag.cmd.push(function() {
mobile_slots.push( googletag.defineSlot( “/1005424/_dPSv4_mob-all-article-bottom_(300×250)”, [300, 250], “pb-ad-78158” ).addService( googletag.pubads() ) ); } );

The post Tips for Photographing Butterflies by Kathy Samuel appeared first on Digital Photography School.


Digital Photography School

 
Comments Off on Tips for Photographing Butterflies

Posted in Photography


Shooting Better Waterfalls: Five Tips for Improving Your Waterfall Photography

14 Apr

Cave Selfie

Perhaps there isn’t a more sought after and photographed subject than water. More specifically, waterfalls. When you really think about it, waterfalls are one of the most basic and simple things that we can find in nature. They are just streams or rivers that happened, by one geological occurrence or another, to find themselves flowing over some height of cliff or stone or other drop-off. Still, we remain captivated by the simple beauty and serenity that can come from being near, and photographing a waterfall.

That’s where we, as photographers, often slam face first into a huge creative and artistic wall. How can you make an interesting photograph of something that has already been so extensively covered by countless other photographers? While there is unfortunately no secret formula for all waterfall photo sessions, there are some very simple and useful tips that can help you create better, and more unique images, of these phenomenal natural occurrences. Let’s dive in (get it?) and get started on the path to better waterfall photography.

Have a plan

I always stress the importance of research and preparedness before any photographic excursion regardless of what the subject or goal might happen to be. This is especially true when you, the outdoor photographer, are readying yourself to photograph waterfalls. There is simply no denying that the more you know about a location, the better your odds will be of coming home with images that you are happy to claim as your own.

Conduct some quick research and find out what the main waterfall or waterfalls are in the area you plan to visit. Google (or another search engine) will be your absolute best friend in this regard. Try to find as many images as you can before you set out so that you can be inspired and have a head start on coming up with your own unique compositions that haven’t been tried with that particular spot.

Map

Also, if at all possible, print out a map of the area and highlight the waterfalls that you feel are the most promising for you on that particular day and focus on those first. Don’t waste time trekking into a place that probably won’t yield a good result. Know before you go, and you will make better use of your time and become a much more efficient shooter.

Use a tripod

The topic of using a tripod can sometimes scare you off just from the sheer repetition of the statement. For whatever reason it seems like this essential bit of knowledge is where most beginner photographers find themselves in a state of complete denial. Believe me, I know how uncomfortable, to downright physically painful and tiring it can be to carry a tripod on your person for an extended amount of time. Still, though not always convenient, a tripod will always help you in the long run to produce better photographs. There is simply no other way to limit camera shake without having a solid shooting platform – there just isn’t. You will need such a platform for the longer exposure times often used when encountering waterfalls. End of story.

Another fact that beginners, and even some seasoned photographers, fail to grasp is that the quality of the tripod plays an essential role in its overall use to you. You will need a tripod that locks securely and reliably, and can handle the weight of whatever camera rig you happen to be shooting, as well as the shooting conditions. I can’t tell you how many long exposure images I ruined due to drifting of the tripod head because all I had available was a suboptimal tripod.

The biggest gripe I hear concerning tripods is that the good ones are too expensive. It’s true that a quality tripod will not be cheap. However, it is just as true that you can still obtain one without being outrageously expensive. Shop around and find a tripod that has good reviews, fits your current needs, and will also grow with you as a photographer. Do you really need carbon fiber? Do you need the most advanced ball head? Ask yourself questions like that and your purchase will make less of a dent on your pocketbook. A good tripod will last you years and yield incredible benefits. It will literally pay for itself and be one of the best investments you will make.

Make the waterfall the secondary subject

Foreground Focus

This image puts the colors of the moss and the detail of the foreground as the first point of interest and less on the waterfall itself.

This tip may seem a little counter intuitive but stay with me. It’s fairly straightforward to walk up to the front of a waterfall and snap a quick photo to take home. That’s great if that’s all you want. But let’s face it, you wouldn’t be pouring through all the great content here on dPS if all you wanted was to make average photos. You want to shoot with a purpose, and make photographs instead of taking snapshots. One of the best ways to do this is to think about the subject differently than the average photographer, and waterfalls offer a great opportunity to do this.

When you arrive at a particular falls you should really study the scene. Give yourself a few minutes before you even start thinking about making an exposure. Watch how the water flows and interacts with the other pieces of the scene. It may be rocks, boulders, sand, trees or any number of artifacts found in such places. Don’t let the waterfall itself distract you from the other photographs that could be there.

After all, the waterfall is not the only thing you notice so why should it be the only thing you show your audience? Look for ways to include different parts of the scene and even have the falls take a back seat if that makes a stronger image. Pay attention to what is often overlooked by other photographers. If you do this you will almost always be able to present the waterfall in a way that has never been seen before.

Pay attention to color

Color is a great way to grab the attention of your viewers and pull them into a photograph. Never underestimate the creative power of color when photographing waterfalls. Water is an incredible thing because it not only reflects the different colors around the surface such as the sky and leaves, but also the colors that come from underneath as well.

Use Color

The first step to getting the most interesting colors from a scene is to always shoot in RAW if at all possible. Shooting RAW will allow the most information to be recorded by your camera sensor, which will in turn give you much greater latitude for getting creative later with your post processing. Experiment with creative white balance and see what happens. Enhance the vibrancy and saturations in some areas and decrease them in another. You will be surprised how much more lively and interesting a waterfall can become with simply letting your imagination run free, and by using color creatively.

On the flip-side of the color coin, is that some waterfalls work much better when photographed in black and white. I have often said that I prefer images that tell a story through black and white, unless the color of the scene can speak louder. If you find yourself shooting a waterfall that lacks a lot of native color then why not put your pre-visualization skills to work (you’re still practicing that, right?) and try to imagine how the image could appear in black and white? Look for contrasts between light and dark areas on rocks, and contrasts within the water itself. Are there any interesting textures or reflections?

Here’s an unprocessed RAW version of a waterfall. Notice there’s not much color to boast about.

Virgin Falls RAW

Here we see the same image after a little cropping and black and white conversion.

Virgin Falls Processed

Lastly, with this photo, the textures and light really made the image so I converted it to black and white as well.

Rocks and Falls

Never discount the power of a monochrome image. Black and white waterfall work can be extremely profitable especially when you’re shooting in the drab and often colorless winter months.

Don’t forget to protect your gear

This isn’t really a tip, but rather a lesson that should be learned and become second nature to the serious waterfaller. When shooting a waterfall of any large size and flow there will always be moisture in the air, whether it is visible to you or not. The shear force of the water impacting the terminus of the fall, with render small droplets into the air that will absolutely ruin your shot and potentially destroy your camera and lenses.

Without Water Drops

The air surround a thirty-five foot waterfall without flash.

Water Drops

Then with a flash firing to show the moisture in the air.

Always use some protective barrier to protect your camera and lens while you set up for your exposure, and for transport around the waterfall. This barrier doesn’t have to be fancy. Personally I use pre sized slip-on plastic container covers that you can pick up at virtually any grocery store. They are perfectly waterproof and fit snugly around my camera and are unnervingly cheap.

Protect Gear

The same goes for your lenses. Even if they are in your camera bag, always protect them from the moisture. Again, low tech is often your best option here. I simply wrap my lenses in a cloth and place them individually into resealable sandwich bags. The cloths will help to absorb any condensation that builds up from temperature changes and were a hard learned lesson for me. Lastly, minimize the amount of time you leave the cap off your lens, and always carry a good lens cloth for wiping the front between takes.

Shooting even small waterfalls can be very rewarding, and are a great way to just get out and enjoy nature. Learning to shoot them creatively, however, can be a little more challenging. That doesn’t mean that it has to be difficult or intimidating. Just remember these five simple tips and you’ll be ahead of the game when it comes to waterfall photography:

  1. Research and plan beforehand.
  2. Don’t desert your tripod.
  3. Think of the waterfall as part of a whole and not the only part of a scene.
  4. Learn to use color creatively or when to get rid of it altogether.
  5. Always protect your gear from the elements.

Now go out and do what you love to do!

googletag.cmd.push(function() {
tablet_slots.push( googletag.defineSlot( “/1005424/_dPSv4_tab-all-article-bottom_(300×250)”, [300, 250], “pb-ad-78623” ).addService( googletag.pubads() ) ); } );

googletag.cmd.push(function() {
mobile_slots.push( googletag.defineSlot( “/1005424/_dPSv4_mob-all-article-bottom_(300×250)”, [300, 250], “pb-ad-78158” ).addService( googletag.pubads() ) ); } );

The post Shooting Better Waterfalls: Five Tips for Improving Your Waterfall Photography by Adam Welch appeared first on Digital Photography School.


Digital Photography School

 
Comments Off on Shooting Better Waterfalls: Five Tips for Improving Your Waterfall Photography

Posted in Photography


3 Tips for Getting Great Skin Tones Using Adobe Camera Raw

10 Apr

Skin tones can be one of the more difficult aspects of a photograph to master. Getting pleasing skin tones will make your image appear more eye-catching and attractive. If you know the right steps to take, skin can be pretty simple to master. Using these three simple tricks, using only Adobe Camera Raw (ACR), your skin tones will appear more balanced and pleasing to the eye.

Before3 1

After3 1

Note: working in Lightroom you can do the this as well, because the sliders and options are the same!

White Balance

When trying to get great looking skin tones, the first thing you should pay attention to is the white balance. Correct white balance will set the stage for great skin tones. If the white balance is too cool, your skin will appear gray or bluish. On the other hand, if the white balance is too warm, the skin will look yellow or orange. Neither of these options are very pleasing to the eye, and make the skin more difficult to work with later on.

To see if your white balance is accurate, use the white balance targeted adjustment tool. It looks like an eye-dropper and is located at the top of the screen. It is the third tool over from the left. Click on the dropper, then click on an area of your photo that is white. The whites of the eyes are a good place to start. This should give you a good indication of where the white balance should be set. If your image still appears too warm or cool to your taste, use the temperature slider located to the right of your screen, it is the first one. Adjust this by sliding it to the right or left until your get a pleasing white balance. You may have to adjust Tint as well.

Whitebalance1

Exposure

Next, make sure your exposure is correct. Take a look at the histogram located in the upper right hand corner of the screen. Ideally, you want it to look like a smooth bell curve, with the high point of the curve right in the middle. Check to make sure that the curve does not go too far to the left or the right. This may indicate that your photo is over or underexposed, causing your skin tones to either be gray and dark, or too bright and blown-out in some spots.

Exposure 2

If your curve does fall too far to one side, use the exposure slider to fix it. Located three sliders down on the right hand side of your screen, move it either left or right. Watch your histogram. When the majority of the curve is in the middle, you’ve got it! In some photos, there will be parts of your image that are very bright or dark, and cause your histogram to spike on parts of the curve. This happens often when you have a bright sky in the background. If this is the case, your curve will be off the chart on the right edge of the histogram. In an image like this, you would look at where the majority of your curve lies and ignore the parts of the curve that are out of range.

For more information see: How to Read and Use Histograms

Luminance

Finally, to give your skin tones just a little more brightness you will want to locate the luminance sliders (look for the HSL panel, the L stands for Luminance). You will see a horizontal strip of buttons directly under the histogram on the right panel. The fourth one to the left is HSL/Grayscale, click on that button. After selecting that option, three tabs will appear. Click on the Luminance tab. Choose the orange slider, which is two down, and move it to the right. You will notice that this affects mainly the skin in your photo and leaves the other areas of the image untouched. The more you move it to the right, the brighter the skin will appear. Keep moving the orange slider back and forth until the skin is the brightness you prefer.

Luminance 2

Before1 1

After1 1

Once you have adjusted your RAW image using these three steps, you can open it up in Photoshop to do any fine tuning or adjustments on the remainder of your photo. Your skin tones, however, should already look great and need little, if any additional work.

Before2 1

After2 1

Do you have any other tips for making great looking skin tones using ACR? Please share them in the comments below.

googletag.cmd.push(function() {
tablet_slots.push( googletag.defineSlot( “/1005424/_dPSv4_tab-all-article-bottom_(300×250)”, [300, 250], “pb-ad-78623” ).addService( googletag.pubads() ) ); } );

googletag.cmd.push(function() {
mobile_slots.push( googletag.defineSlot( “/1005424/_dPSv4_mob-all-article-bottom_(300×250)”, [300, 250], “pb-ad-78158” ).addService( googletag.pubads() ) ); } );

The post 3 Tips for Getting Great Skin Tones Using Adobe Camera Raw by Emily Supiot appeared first on Digital Photography School.


Digital Photography School

 
Comments Off on 3 Tips for Getting Great Skin Tones Using Adobe Camera Raw

Posted in Photography


3 Tips for Capturing Connections in Family Portraits

08 Apr

Capturing Conenctions in Family Portraits Article for DPS by Memorable Jaunts 01


We’ve all heard the dreaded words, “Okay everyone, look at the camera and at the count of three say Cheese!”. I have been guilty of using this technique too in my early days of as a family portrait photographer. I remember coming home from client photo shoots and kicking myself for not being original, botching up my client’s experience, and getting really mediocre images that lacked any emotion or connection.

Over the course of time, my style of photography evolved and I started investing more time and effort in making my clients feel comfortable before, during, and after their photoshoot. The results were images that were fun, fresh and full of emotions. Exactly the kind of images that I want in my portfolio. My clients love the experience and I often hear words like, “Oh that was so much fun!” or ‘Thank you for making it so easy”, and “I loved how you made us feel at ease”. I realized that if, as a photographer, I was having a good time interacting with and photographing my clients, they were having a great time too.

Capturing Conenctions in Family Portraits Article for DPS by Memorable Jaunts 02


At the end of the day, my job as a photographer is not only to take great, meaningful and beautiful pictures for my clients but also to make sure they have a great time and it is a pleasant experience. To that end, there are some things to keep in mind to capture connections among your clients

#1 – Family dynamics

It is very important to understand family dynamics prior to the photoshoot. This goes beyond the typical questions about the names and ages of the kids. Try and understand likes and dislikes of the people involved. If there are young children involved, take the time to understand personalities of the kids as individuals, and with their siblings. Is the family casual and easy going, or do they like formal, traditional posed pictures? Just because they like a particular style of imagery does not mean you have to stick to that. But certainly incorporate what they want first, then feel free to experiment.

Capturing Conenctions in Family Portraits Article for DPS by Memorable Jaunts 03

This family made it very clear that their new puppy was their second baby! – Rather than excluding the dog, I made sure to include him in almost all their images.

Capturing Conenctions in Family Portraits Article for DPS by Memorable Jaunts 04

Large family groups don’t have to be intimidating. Just engage with them and give them something to do.


#2 – Structure the shoot

Trust me, this is key and will ensure you maintain your sanity during the photoshoot. Have a plan of action. I make it a point to spend the first five minutes of every session educating my clients on what they can expect. The first few minutes is warmup time – testing the light, figuring out the right lens, etc. I let my clients know exactly what’s happening, and many times, I get a lot of beautiful images during this time. Clients are much more relaxed if they think these first few minutes don’t really count.

Then we incorporate an activity like walking along a path, climbing a tree, playing in the park, and I photograph around that activity. Finally we just sit down to enjoy each other’s company. This not only let’s the clients know exactly how we are going to spend our time but also helps keep me in check. Because let’s face it, for most of us, once we start clicking that shutter, it is so easy to loose track of time!

Capturing Conenctions in Family Portraits Article for DPS by Memorable Jaunts 05

A simple conversation that was set up resulted in some magical daddy-daughter moments.

Capturing Conenctions in Family Portraits Article for DPS by Memorable Jaunts 06

Sometimes just use hands to communicate connection among family members.


#3 – Make it fun

This is a critical part of capturing connections among family members during the photoshoot. For family portraits with little kids, try techniques like tickle-fest, blowing bubbles, rocking out those dance moves and other such methods to get the kids in the spirit of having fun. If kids are a little older, try cracking jokes. Bring some basic props if required and let the kids play. Photograph around the activity and capture candid moments of family interactions. If all else fails, it is okay to setup the shot and work the family into the pose. Make sure to keep clicking so that you can get some candids through out the whole process.

Capturing Conenctions in Family Portraits Article for DPS by Memorable Jaunts 07

Capturing Conenctions in Family Portraits Article for DPS by Memorable Jaunts 08

Bride + Bridesmaids + a catwalk pose = really fun images!


Remember that families that play together, stay together. Your job as a photographer is to capture these family dynamics in a fun and pleasing way. If your clients have a great time during the shoot, it is more than likely that they will love your images because they will remember the experience in a positive light.

googletag.cmd.push(function() {
tablet_slots.push( googletag.defineSlot( “/1005424/_dPSv4_tab-all-article-bottom_(300×250)”, [300, 250], “pb-ad-78623” ).addService( googletag.pubads() ) ); } );

googletag.cmd.push(function() {
mobile_slots.push( googletag.defineSlot( “/1005424/_dPSv4_mob-all-article-bottom_(300×250)”, [300, 250], “pb-ad-78158” ).addService( googletag.pubads() ) ); } );

The post 3 Tips for Capturing Connections in Family Portraits by Karthika Gupta appeared first on Digital Photography School.


Digital Photography School

 
Comments Off on 3 Tips for Capturing Connections in Family Portraits

Posted in Photography


Macro Photography Tips – Video Tutorials

06 Apr

This time of year is a great time to get out and find some macro photography subjects. So I dug around and found a few videos to help get you started if you want to try it.

Macro Photography by Matt Granger

First up is a lesson by Matt Granger as he teaches Tina (a new photographer) how to do macro photography. Follow along with her and try it yourself as they go through using a long zoom lens, hand held, natural light, adding flash, and using a tripod.

Getting sharper images

The second video is from Alessandro Zocchi he gives you a few tips to help you get sharper macro images.

Focus stacking

Lastly Peter Bargh covers a more advanced technique, focus stacking, which involves taking multiple shots focused at different points, and merging them later.

You can find the software he mentioned here:

  • Combine ZM
  • Helicon Focus

You can also use Phototoshop if you have it. Read: How to Focus-Stack Macro Images using Photoshop for more on that technique.  Check It’s a Small World – the World of Macro Photography if you need some subject ideas.

Have fun!

googletag.cmd.push(function() {
tablet_slots.push( googletag.defineSlot( “/1005424/_dPSv4_tab-all-article-bottom_(300×250)”, [300, 250], “pb-ad-78623” ).addService( googletag.pubads() ) ); } );

googletag.cmd.push(function() {
mobile_slots.push( googletag.defineSlot( “/1005424/_dPSv4_mob-all-article-bottom_(300×250)”, [300, 250], “pb-ad-78158” ).addService( googletag.pubads() ) ); } );

The post Macro Photography Tips – Video Tutorials by Darlene Hildebrandt appeared first on Digital Photography School.


Digital Photography School

 
Comments Off on Macro Photography Tips – Video Tutorials

Posted in Photography


Tips for Choosing a Tripod Head

04 Apr

NO PARKING

One of the first accessories many people buy after getting a camera is a tripod, and most of those are the all-in-one kind with three legs on the bottom, and a top part called a head, onto which you mount your camera. Typically these heads feature a handle that juts out from one side that can be tightened or loosened to allow you to change the angle at which your camera is situated. These tripods usually cost about $ 25 to $ 50 which makes them quite attractive to photographers looking to invest in some gear to help them take better photos. However, one of their main limitations involves the head: it is usually non-removable, which means you are bound by its constraints, and you may soon discover that your creative sensibilities outstrip the capabilities of the tripods.

two-tripods

All-in-one tripods like this are inexpensive and great for beginners.

I remember the first time I walked into a camera store to look at a some tripod heads and was shocked to find that the sticker price was well beyond what I thought was reasonable. I thought to myself, “Why would anyone spend $ 150 on a tripod head alone, when a basic tripod could be had for less than half that amount?” Then I looked at the price of tripod legs and just about hit the floor. Over the years I came to realize that the reason these components are so expensive was because they are made of much higher-grade materials and built to specifications that demanding photographers need.

When you’re ready to take the step of buying a tripod head and set of legs separately, there are so many options from which to choose it can leave you in a state of confusion with no clear answers. When you’re thinking about spending hundreds of dollars you don’t want to make a bad choice. So, I’m going to take a look at four of the most common types of tripod heads and discuss how they would suit different types of photography. Hopefully it will give you a better idea of what to look for the next time you walk down to your local camera shop, or browse through some of your favorite online photo stores.

Ball Heads

manfrotto-496rc2

Manfrotto 496CR2 ball head

This is my favorite type of tripod head, and one that I think suits most casual or enthusiast photographers quite well–much moreso than the standard pan/tilt head that comes with all-in-one tripods. Ball heads are designed around a 360-degree swivel (basically a large ball bearing, hence the name, ball head) which you can tighten or loosen with a lever or dial on the side. You can turn your camera from side to side, rotate it in a circle, or change its orientation from portrait to landscape in an instant, all with virtually no effort on your part.

Some are specifically designed to let you change just one direction of motion at a time, which is useful if you are into special types of shots like panning. The first time you use one it can be a bit disorienting until you get used to the sheer amount of freedom they offer. But be careful to keep one hand on your camera while you adjust the locking mechanism on the ball head. If you don’t, your camera may suddenly flop to the side which can be a bit scary the first time it happens. This degree of freedom can actually be a bad thing if you only want to adjust one parameter at a time, and it can be tricky to operate ball heads when you want micro-level adjustments. But, as an overall step up from an entry level tripod, it’s hard to go wrong with a ball head.

Pan/Tilt Tripod Heads

manfrotto-804rc2

Manfrotto pan/tilt tripod head 804CR2

If this model looks familiar to you, it’s because you might already have one like it, or have seen them on all-in-one tripods. Basic models have one or two adjustment levers, but if you spend a bit more you can get one with three levers to give you fine-tune control over specific adjustments. They are much more precise than ball heads in this regard, and it is not uncommon to find pan/tilt heads with built-in bubble levels to help you make sure you have your camera positioned exactly how you want. While it takes more steps to reposition your camera compared to a ball head, it can actually be a good thing because you can adjust just one parameter at a time. For example if you have your subject perfectly aligned up but need to rock your camera to one side, you can use one lever to adjust only the tilt. A pan/tile head is not as simple as a ball head, but the added control it offers is nice, once you get the hang of working with multiple levers.

Pistol Grip Tripod Heads

vanguard-gh-200

Vanguard GH200 pistol grip tripod head

Pistol grips are designed to give you the same degree of control as a ball head but some photographers find them much easier to adjust, due to their full-handed grip mechanism. Whereas a ball head requires you to turn a relatively small knob in order to alter the position of your camera, which can leave your camera flopping around like a wet noodle unless you keep one hand on it too – the pistol grip head, which is also available as a joystick style, gives you precise one-handed control over the exact position of your camera. To use it, just squeeze the grip and the head will unlock so you can reposition it. Most of these have tension dials to adjust how easily you can change things when you squeeze the grip, and more advanced ones allow you to rotate the camera along one axis which makes panning shots much easier. As you can see in the photo they are much larger than ball heads which makes them slightly less portable, but the tradeoff can be well worth it if you need precise control over the position of your camera, while maintaining a high degree of freedom, as well as quick access to a full range of motion with a squeeze of your hand.

Pan/Tilt Tripod Heads for Video

manfrotto-700rc2

Manfrotto 700CR2 tripod head

Similar to the pan/tilt head shown earlier, these specialty heads are designed with video shooters in mind, and while they can be used for still photography, they are less than ideal due to some important limitations. As is common with most video heads, these often feature a long extension arm which allows for greater control and smooth movements for panning shots, but is not very practical when shooting still photography. Contrary to what you might think, the extension arm does not twist in your hand to let you adjust your camera: it is merely a lever that lets you swing your camera from side to side, and does not actually do anything itself. You lock your camera in place by turning knobs on the side of the head, and loosen them to gain access to movement. This particular head is designed for two types of movement: rocking back and forth and twisting from side to side. This means if you want to tilt your camera to the left or right (to shoot a vertical image) you simply can’t do it–at least not without spending much more money on a high-end version.

Recommendations

vanguard-sbh-100

Vanguard SBH-100 ball head

If you’re looking to step up from a basic tripod my recommendation is almost always to get a ball head, partially because it allows such a fantastic amount of control, but also due to the more intimate relationship it creates between you and the camera. Using a ball head with your eye to the viewfinder (as opposed to the LCD screen) while positioning your camera is an incredibly freeing experience if you have only used an all-in-one tripod, and might even help you find new types of shots that you had not considered before. While ball heads do not offer the same type of precision control as dedicated pan/tilt heads, some like the  model shown here, do allow you to at least adjust the rotation of your camera separately from the other movements which can assist with motion or panning shots. If you like to shoot video with your DSLR perhaps a video head would suit your needs a bit more, and virtually all dedicated tripod heads feature solid construction and well-lubricated parts which make operating them much smoother overall.

Using a ball head made positioning my camera for this shot much easier than if I was working with a standard all-in-one tripod head.

Using a ball head made positioning my camera for this shot much easier than if I was working with a standard all-in-one tripod head.

What about you? What is your favorite type of tripod head, or do you have any other tripod tips to share? Leave your thoughts in the comments below!

googletag.cmd.push(function() {
tablet_slots.push( googletag.defineSlot( “/1005424/_dPSv4_tab-all-article-bottom_(300×250)”, [300, 250], “pb-ad-78623” ).addService( googletag.pubads() ) ); } );

googletag.cmd.push(function() {
mobile_slots.push( googletag.defineSlot( “/1005424/_dPSv4_mob-all-article-bottom_(300×250)”, [300, 250], “pb-ad-78158” ).addService( googletag.pubads() ) ); } );

The post Tips for Choosing a Tripod Head by Simon Ringsmuth appeared first on Digital Photography School.


Digital Photography School

 
Comments Off on Tips for Choosing a Tripod Head

Posted in Photography


7 Tips to Take Better Family Photos

02 Apr

Regardless of the type of photographer you are, family photos are among the most important pictures you’ll ever take. Here are some things to keep in mind.

#1 – Make sure the family is prepared

Picture1

Even if it’s a few emails, a phone call, or an in person meeting at a coffee shop, have a consultation with the family at some point before the shoot. Address things like what the family will wear (use a service like Pinterest to create a board for the family to look at for suggestions on how they might dress), what time of day would be the best for them, and what they’re looking to get out of the shoot (i.e., candids, headshots, or a holiday card).

Send out an email a day or two before their appointment with the time, date, and place of the session. Provide a checklist reminding them to make sure the kids are fed and they pack any essentials with them. Depending on the season, your checklist will change (e.g., knit hat reminders in winter and sunscreen and water it the summer). A family shoot will never go perfectly, but by making sure the family is prepared, you can maximize the likelihood that things will go as smoothly as possible.

#2 – Become friends with the kids (bribery is underrated)

Picture2

Young or old, everyone loves little gifts. Stop by the Dollar Store before your next shoot and pick up some bubbles, a baseball, stickers or a tiny stuffed animal. If it’s autumn, stop by a farm market and a grab a small pumpkin. Summer? Grab a bunch of wildflowers. These tiny gestures will take some pressure off the parents, gain you points with the kids, and have the added benefit of making the pictures more fun and interesting. It’s a win – win.

#3 – Let parents play with their kids

This is when the magic happens. If you let the parents be who they are and more importantly, let kids be kids, the pictures will start to fall into your lap. Facial expressions on both the parents and children will be authentic and genuine. Smiles will come more easily, and your job is just to capture the moment.

Picture3

#4 – Provide direction

Don’t be afraid to move the parents around and tell them where they need to be. Even if you’re just casually photographing your neighbor’s family, you’re the professional and people will listen. If a location isn’t working or the light is poor in a certain area, suggest an alternative in a positive way. Say something like, “Why don’t we try moving into that large open shade area by that tree, it will give us a break from this heavy sun”, rather than, “The light is horrible here, let’s move”.

Relying on the parents to direct their kids can make your job a lot easier too. A little boy will listen to his mom who tells him to hug his sister over a stranger that he just met.

Picture4

#5 Make everyone feel comfortable

Most people feel awkward having a camera pointed at them. Keep the conversation positive and periodically tell everyone how great the pictures are looking. You can even show them a few shots along the way. Your enthusiasm and excitement for what you’re seeing will put everyone at ease and make your job much easier.

Picture5

#6 – Improvise

The night before the shoot I’m usually scouring Google for “family photo tips” or pulling the “How to Pose Children” books off my shelf. Preparation is essential. But photographing a family is a mixture of luck and skill, and when you’re in the thick of it and things aren’t going as planned, you’re going to have to improvise. Kids won’t sit still? Pop on a telephoto lens, back off and let them run around a bit. You might be surprised at the photos you get when you’re forced to do what wasn’t planned.

Picture6

#7 – Embrace the outtakes

As photographers we want every photo to be a masterpiece – perfect light, natural expressions, everyone looking at the camera. But sometimes the best photos that you wind up taking are the most ridiculous — a boy with his hand up his nose, a brother embracing his crying sister, or one sibling looking at the other with a crazy face. Don’t stop shooting just because the kids aren’t cooperating for a moment, or the parents are chasing them around. Sometimes these situations can lend to the funniest and most memorable shots.

Picture7

We all wear different hats as photographers. One of these days, you’ll be asked to do family photos. Keep these tips in mind and you’ll be one step ahead.

Please share your comments and any other suggestions below.

googletag.cmd.push(function() {
tablet_slots.push( googletag.defineSlot( “/1005424/_dPSv4_tab-all-article-bottom_(300×250)”, [300, 250], “pb-ad-78623” ).addService( googletag.pubads() ) ); } );

googletag.cmd.push(function() {
mobile_slots.push( googletag.defineSlot( “/1005424/_dPSv4_mob-all-article-bottom_(300×250)”, [300, 250], “pb-ad-78158” ).addService( googletag.pubads() ) ); } );

The post 7 Tips to Take Better Family Photos by Joe Turic appeared first on Digital Photography School.


Digital Photography School

 
Comments Off on 7 Tips to Take Better Family Photos

Posted in Photography