RSS
 

Posts Tagged ‘Tips’

The Sun Is Your Friend: Tips for Summer Photography

18 May

Summer is just around the corner, folks. As the sun decides to become a more active member of our daily lives, we — especially those of us with nice cameras and itchy shutter-release fingers — feel an increasing compulsion to awaken from our lazy autumn habits and venture outside. And if you’re going to be outside, you might as well Continue Reading

The post The Sun Is Your Friend: Tips for Summer Photography appeared first on Photodoto.


Photodoto

 
Comments Off on The Sun Is Your Friend: Tips for Summer Photography

Posted in Photography


Fashion Photography – Tips for Making Something out of Nothing

18 May

Recently, I found myself in a conversation with a mentoring client who was feeling creatively stunted. I asked her where she wanted her portfolio to go and she said, “I want images like yours! But you live in California, and everything is pretty there!” I literally laughed out loud when she said that because California, while pretty, is filled with more urban yuck, specifically Los Angeles, than one can even imagine. I only wish I had infinity pools available to me, palm trees for as far as the eye can see, and no traffic to have to clone out! Even a green lawn, would be nice. But, alas, I’m not a Kardashian.

fashion-01

Beauty or fashion photography – not all glamorous

The honest truth is like anywhere else, locations are always troublesome to find. In Los Angeles County, to shoot on the street, beach or outside a structure, you need a permit. It’s a serious business. Applying for a permit can take a substantial financial cost, and if for some reason the weather is bad on the day of the permit, you’re out of luck. Because of this, I’ve learned to be more open-minded, and have found ways to “make it work”. You can too! Stop preventing yourself from making amazing images because you don’t have the right spot.

First, Don’t laugh at me. Nobody knows the magic behind the scenes, so keep that in mind. At the end of the day, the final image is all that matters! Trust me when I lead you down this liberating path of cheap backdrops, dirty backyards, and grocery store finds.

Reference #1: Create a backdrop from leaves

I shot a beauty story for Cosmopolitan magazine. I knew I wanted a lush tropical backdrop, and pops of color throughout. I called everyone I knew to see if anyone had bird of paradise, or other tropical looking greenery, in their back yards. Nobody had pretty backyards that were a good fit. So I decided to order some leaves from my local florist and make the backdrop I wanted. I decided my TINY backyard was the best place for me to shoot this story. So I will show you the final product first.

This is the image that went to Cosmopolitan.

Image 1b

Before we got started I set up a big piece of white plastic board I had in my garage. Why plastic board you ask? Because, I was out of white paper and it was there. I just needed a white background.

Using natural sunlight, I took photos of the leaves, cleaned and misted against the white backdrop for samples.

Image 2b

Then I took the photo against the white backdrop. Using midday sun. YES, 2 o’clock burn our your retinas, sunlight. Don’t be afraid of sunlight. Once you conquer it, you can shoot anything!

Image 3b

My assistant is simply holding the leaf up behind the model. Pretty, but missing something right? By adding the leaf samples (duplicating them) in post-production, it gives it such an exotic feel. You CAN do this. You have poster board, correct? You have nature around you, right? Use it!

Reference #2: Improvise

A cosmetic commercial client wanted a summer themed campaign, with the tagline, Summer in High Def. I pitched the idea of a pool shoot with bold aquas and colorful pops of color. She told me she had no location budget, I told her, “No problem.”

I took a quick stroll to my local grocery store chain. Luckily, it was May so they had lots of summer goodies in stock. I found an inflatable pool for $ 5. SCORE! Once again, at the end of the day, nobody knows what your set looks like.

Image 4b

The model barely fit in the five inch deep, kiddy pool. It was quite funny. The client LOVED the shots and couldn’t believe I pulled it off. I never had any doubts. This setup is my most requested one. Clients ask for it all the time. I simply say, “Oh yeah, it’s in my trunk”. They look at me oddly, and confused.

Image 5b

You can shoot at a mansion or in your own front yard, NOBODY KNOWS. Stop getting in your head that you need more. That’s what makes our business so beautiful. It’s really not about how big your studio is or how you have amazing locations. At the end of the day, all that matters is your final image.

Do you have any other make-shift background or location tricks? Please share in the comments below.

fashion-02

googletag.cmd.push(function() {
tablet_slots.push( googletag.defineSlot( “/1005424/_dPSv4_tab-all-article-bottom_(300×250)”, [300, 250], “pb-ad-78623” ).addService( googletag.pubads() ) ); } );

googletag.cmd.push(function() {
mobile_slots.push( googletag.defineSlot( “/1005424/_dPSv4_mob-all-article-bottom_(300×250)”, [300, 250], “pb-ad-78158” ).addService( googletag.pubads() ) ); } );

The post Fashion Photography – Tips for Making Something out of Nothing by Courtney Dailey appeared first on Digital Photography School.


Digital Photography School

 
Comments Off on Fashion Photography – Tips for Making Something out of Nothing

Posted in Photography


10 Tips for Better Cityscape Photography

17 May

This article is based on the new eBook: Landscapes, Cityscapes & Photography Tricks – 50% off for a limited time only.

Photography is escapism. We want to see what we can’t with our own eyes; towering skyscrapers, endless skylines, the people of faraway cultures. We long for the distant, so it makes sense that cityscape photos are so popular and marketable. I hope these 10 tips will help you take better cityscape photography, and inspire you to explore faraway cultures.

Cityscapes1

1. Right After Sunset is a Fantastic Time for Cityscape Shots

After the golden hour settles, the sky grows darker, while city lights illuminate below. This immediately post-sunset or pre-sunrise moment (known as twilight or the Blue Hour), I would argue, is the best time for shooting cityscapes. Building lights turn on before the sky turns off, and the balance of light can look almost equal. It’s a great combination of tones, and worth getting up in the morning to catch.

Cityscapes2

2. Capture the Whole Skyline with a Wide Angle Lens

For cityscapes, focal lengths between 12-35mm are a good bet. Not a necessity, but you will appreciate the wide angle, more often than not. This will allow you to capture a nice skyline without having to be miles outside the city, and allow you to include an entire skyscraper in vertical format, while standing near its base.

Cityscapes3

3. Use Your Camera’s Self-timer and a Tripod for Crisp Results

For shooting during the golden hours, and after dark, a tripod is practically essential if you want sharp crisp results. Better yet, set your camera up on the tripod, and set your camera’s two or 10-second self-timer so you don’t have to touch or jostle the camera during the actual shot. This will help your camera stay more stable, avoid blur, and capture stunningly sharp results.

4. Look for Those Leading Lines

Just like for landscape photography, leading lines are an integral part of three-dimensional cityscape composition. They add perspective, depth, and intrigue to any image, while taking the viewer on a journey from one point of the frame to another.

Cityscapes4

In cityscapes especially, leading lines can create a strong sense of coherence in an otherwise chaotic scene. Think of train tracks for example. Rows of tracks, surrounded by eager commuters and tall buildings, could easily appear cluttered and frenetic (which could be a good thing, or could seem unfocused). But, slicing the image up with the right composition and a clean line, or series of lines, can cut through the chaos.

5. In the Evening, Look for Good Vantage Points Over Busy Intersections

Practice your long exposures, then look for busy intersections of a city. Finding the right location for heavy traffic can be tricky. You’ve got to know a city pretty well, or at least have an idea of where the congested thoroughfares are located. The idea here is blurred movement; traffic in a straight line may be interesting if you’ve got some variety in the shot (maybe skyscrapers or a city icon nearby), but failing that, you’re going to want to see some movement, leading lines and curves. That’s why bendy roads and intersections work so well; you can create light lines out of conflict, movement and chaos.

Cityscapes5

6. Just like Rivers are Great in Landscapes, Fountains are Great in Cityscapes

Photographing fountains within your cityscape can add another element of beauty and serenity to your image. Most cities are full of them. From small, historic, fountains that can add interest to a composition to huge water fountain light shows that blast water up in the air and make for exciting and spectacular photos.

Cityscapes6

7. Look for Patterns

Patterns have the ability to bring a sense of visual rhythm and harmony to an image. While at first sight, a common city scene may appear dull or bland. Focusing on repeating strong graphic elements, like shapes, lines, colors or forms, will draw the viewer’s attention, and make the whole thing a lot more interesting.

Cityscapes7

8. Don’t Be Afraid to Include Pedestrians in the Shot

When it comes to intersections, some bigger cities; New York, Tokyo, Toronto; will have four-way crosswalks, where pedestrians stream across in all directions, stopping cars on all four sides of the intersection. These make especially great hectic shots, with cloudy masses, surrounded by headlights and condo lights.

Cityscapes8

9. When Tripods Aren’t Allowed – Improvise

Many businesses with great city views that attract photographers, have gotten the impression that tripods mean professional work and therefore, money. These establishments won’t let photographers in with a tripod, likely because they might be able to make money by charging a permit fee or production fee. I’ve run into this problem mostly in the U.S., but have also come across it in a few international cities I’ve visited. It is upsetting indeed, but instead of letting it defeat you, try to do your best with what you have.

Cityscapes9

Look to see if there is a place where you can set your camera down for the shot so you don’t have to hold it risking blur from hand movement. You can use tables, pillars, walls, edges, benches, anything that is flat and safe. If you can’t find a flat surface, you can make one. Prop your camera up with your jacket or other item of clothing.

10. See Bad Weather as an Opportunity (Carefully)

Not only does bad weather add an edge to your photo, but stormy weather creates skies that are full of color and texture, providing a feeling of gloominess, fury, eeriness and even peace. In short, the stormy sky portrays emotion.

Cityscapes10

With moisture everywhere, it just seems like the city glows more right after a rainfall. Most surfaces and structures will appear more colorful when wet, as water tends to bring out the saturation.

I hope these have been some helpful tips to get you started!

For Further Training:

This relentlessly in-depth new eBook is designed to help you master challenging lighting conditions no matter your experience level, take more compelling photos, post-process them to perfection, and delve even further into long exposure tricks so you know all the possibilities. By knowing all the techniques possible, it is my hope that you will learn a lot faster than I did and start seeing hidden photo opportunities that others might miss.

Found here: Landscapes, Cityscapes & Photography Tricks

googletag.cmd.push(function() {
tablet_slots.push( googletag.defineSlot( “/1005424/_dPSv4_tab-all-article-bottom_(300×250)”, [300, 250], “pb-ad-78623” ).addService( googletag.pubads() ) ); } );

googletag.cmd.push(function() {
mobile_slots.push( googletag.defineSlot( “/1005424/_dPSv4_mob-all-article-bottom_(300×250)”, [300, 250], “pb-ad-78158” ).addService( googletag.pubads() ) ); } );

The post 10 Tips for Better Cityscape Photography by Richard Schneider appeared first on Digital Photography School.


Digital Photography School

 
Comments Off on 10 Tips for Better Cityscape Photography

Posted in Photography


The 4 Ps – Tips for Improving Your Wildlife Photography

15 May

Taking photographs of wildlife can be one of the most exhilarating photographic experiences you can try. Spotting an animal in the wild can be thrilling, and being able to record that moment can be highly rewarding. However, wild animals can be a particularly challenging subject matter, so wildlife photography can often prove frustrating.

To help you get the most out of this compelling type of images, here are some tips to improve your wildlife photography.

Facetofacewithafox750

#1 PREPARATION

No matter what type of wildlife you have chosen to photograph you will need to spend time getting to know its behaviour, routine and movements. Read up about your subject in advance, or search online for video or audio files, that can help you learn more about spotting your chosen subject. If possible, talk to experts in the field who know where, and when, to spot wildlife. If you are heading to a nature reserve or national park to take photographs, staff and volunteers are normally very willing to let you know of recent sightings, or give you some handy local advice.

Because you may only get a limited time in which to take wildlife photographs, getting to know your camera settings is extremely important. Familiarize yourself with how your camera and lens work before you get to the location so that you don’t miss an important shot by having the incorrect settings.

Before setting out, make sure you have packed all of the required gear, and you have spare memory cards and charged batteries. For wildlife photography, a telephoto lens is probably going to be essential, but do not overlook packing a wider angle lens to capture your animals as part of the landscape. Some of the best wildlife photographs show an animal in its environment and are not necessarily frame-filling portrait shots. If you are using a telephoto lens, a tripod or monopod can also form a useful part of your kit to minimize camera shake. A monopod offers greater flexibility of movement than a tripod when you are tracking wildlife on the move, but can still provide adequate stability for your camera to get sharp images.

Autumnpony750

Check weather reports for the day you are going to shoot wildlife, but do not necessarily be put off by bad weather. Animals do remain active during rainy or stormy days, and it is possible to get some dramatic shots in such conditions. You can buy special covers to protect your camera and lens in wet weather but, often, a durable plastic bag fixed in place with elastic bands can work just as effectively.

As with all genres of photography, lighting is key, and the best light for wildlife photography tends to be around sunrise and sunset. Animals also tend to be more active at these times of day, often searching for food. Therefore, make sure you get up early to be ready to take photographs in the golden light as the sun rises. Shooting into the sunset can transform a mundane subject into something special, so look for opportunities to capture dramatic wildlife silhouettes as the sun goes down (see image below).

Cormorants750

#2 PRACTICE

As with all types of photography, composition can make the difference between a good image, and a great image. When composing wildlife photographs, remember basic compositional guidelines such as the highly effective Rule of Thirds. If your subject is looking to the left or right, leave an appropriate amount of space in the frame into which they can look. The same guideline applies if a moving animal is being captured – always leave room in the frame for them to move into.

Getting down to eye-level (or lower) with an animal can produce dramatic images. Taking a shot of an animal from a standing height looking down on it will usually lack any Wow Factor as this is the angle from which we are most used to seeing wildlife. Laying down on the ground so that you are at eye-level with, or looking up at, the animal will make your chosen subject seem large and powerful, and can add an element of drama to your final image.

A fundamental rule of wildlife photography is that the subject’s eyes must always be in perfect focus. However, the autofocus system on your camera can easily be tricked into locking onto another part of the animal. A helpful way around this is to set the camera to One Shot mode (AF-S for Nikon users), select the centre focus point in the viewfinder, lock the focus on the eyes by pressing the shutter release button halfway down and then, without releasing, recompose your shot. In addition to being perfectly focused on the eyes, the most compelling wildlife images have a catch-light in the eye. A flash, or speedlight, in your kit can be extremely useful for adding light to dark eyes when taking close-up animal portraits.

Hedgehog750

Getting the right focus becomes even harder when shooting an animal in motion. For moving wildlife, select a continuous autofocus mode such as AI Servo (AF-C) and select a single focus point in the viewfinder. Track the action by keeping the single focus point on the subject to ensure that remains in focus at all times, rather than the background or foreground.

Shooting in Aperture Priority mode can be extremely useful for wildlife photography. By using the widest aperture available (such as f/2.8) you will be able to use the fast shutter speeds necessary to produce sharp images. The narrow depth of field from using a wide aperture will also help to blur the background and, therefore, will isolate your subject and really make it stand out in the final image.

Do not be afraid to increase your ISO settings a little in order to keep the shutter speed fast, particularly if shooting in environments where lighting can be difficult, such as in a thick forest. A little bit of noise in your image is more acceptable (and easier to correct if you so wish) than an out-of-focus, or blurry image.

#3 PERSEVERANCE

Saltmarshstag750

While there is no denying that a certain amount of luck definitely comes in handy, the real key to taking better wildlife photographs is patience. Not necessarily the patience required for your chosen subject to appear, but the patience to capture the perfect shot that you have envisioned.

When you do find an animal out in the wild, watch it for as long as possible and not just from behind the viewfinder. Spend time with it and learn its ways. While observing the animal, try to capture some form of behaviour that is unique to that species. Documenting such behaviour can produce compelling wildlife shots. Most importantly, enjoy the experience of wildlife watching as much as taking photographs.

One quick tip is to keep all noise (as in be quiet, not camera noise) to a minimum when you are shooting in the wild. Dress appropriately, tread carefully, and possibly most importantly, switch your phone to silent mode. There is nothing worse than framing a shot and having your subject scared off by a ringing phone.

Swanreflection750

There may very well be some periods of waiting and watching. Try not to get too focused on one particular subject, take a look around while waiting for your subject to return. You never know, there may very well be something more interesting waiting just around the corner.

If you want to put in more practice with your wildlife photography but don’t have much time to spare, a public park can be a great place to visit on a lunch hour or after work. Parks attract a range of wildlife such as geese, swans or deer and often you can get a little bit nearer to the action. A duck pond can produce many opportunities for action shots and is a great place to practice your skills at close range.

#4 PASSION

To take your wildlife shots from good to great, you need to be passionate about the natural world you are photographing. Take the time to appreciate nature and wildlife in all of its forms, wherever you find it. You do not have to go to an exotic location to do great wildlife photography. For example, macro photography offers a range of wildlife opportunities including spiders, beetles and flies. As someone who was once highly arachnophobic, I can now appreciate the beauty of spiders and, since photographing them, I do find them more fascinating than scary.

Pollencoveredbee750

You could even make a few simple changes to your own garden to encourage more wildlife to come to you. Making your garden wildlife friendly can be relatively inexpensive and highly beneficial to local wildlife. Adding a pond or wildflower patch is both good for the environment, and may provide you with photographic opportunities.

Most importantly, take great care when photographing wildlife. Do not put yourself, or the wildlife, at risk and do not disturb their natural habitats in the process of getting your shot. Respect all wildlife, get to know your subject well and you will be rewarded with some great images to share with others, to inspire them to care as much about the natural world as you do.

Sikainthelight750


googletag.cmd.push(function() {
tablet_slots.push( googletag.defineSlot( “/1005424/_dPSv4_tab-all-article-bottom_(300×250)”, [300, 250], “pb-ad-78623” ).addService( googletag.pubads() ) ); } );

googletag.cmd.push(function() {
mobile_slots.push( googletag.defineSlot( “/1005424/_dPSv4_mob-all-article-bottom_(300×250)”, [300, 250], “pb-ad-78158” ).addService( googletag.pubads() ) ); } );

The post The 4 Ps – Tips for Improving Your Wildlife Photography by Richard Beech appeared first on Digital Photography School.


Digital Photography School

 
Comments Off on The 4 Ps – Tips for Improving Your Wildlife Photography

Posted in Photography


7 Travel Photography Tips Your Tour Guide Won’t Tell You

14 May

This article is sponsored by the New York Institute of Photography. NYIP offers high-quality online photography courses that are affordable, convenient, and accredited.

Beauty is hiding in plain sight, but only for those who learn to see beyond the obvious. To capture the heart of a region through your lens, you must connect with a place on a deeper level. This often involves slowing down and immersing yourself in the culture of those who call it home. By doing so, you become more than just a tourist with a camera, but a participant searching for truth and understanding. Every corner of this earth has its own unique characteristics, and the successful travel photographer exposes these differences in a way that others can relate to.

chris_corradino_travel_1

1) Search for Simplicity

It seems counterintuitive, but in searching for clean, simple compositions, your photos will benefit from a new level of sophistication. As Paulo Coelho said,

“Elegance is achieved when all that is superfluous has been discarded and the human being discovers simplicity and concentration: the simpler and more sober the posture, the more beautiful it will be.”

When visiting new places, sensory overload can overwhelm even the most deliberate photographers. This is where a slow, methodical pace will have a big impact on your work. Large bus tours with heavy agendas don’t typically allow the necessary time to capture the look and feel of a place. Instead, try a self guided tour, or a small group that caters to photographers.

chris_corradino_travel_2

2) Include a Human Element

Many photographers struggle with the idea of adding people to their compositions. After all, it can be unnerving to include a stranger in your composition. Yet, by working a human element into your travel work, your photography will become more visually engaging. Not only does it create a sense of scale, but they become more salable for stock photography. You’ll just need to secure a model release in order to do this. With a number of smart phone and tablet apps for releases, this no longer needs to be an awkward exchange of actual paper documents. For the participant’s cooperation, you can offer to send a high resolution copy of the image.

chris_corradino_travel_3

3) Think Small

We all love to shoot scenic vistas bathed in the golden light of magic hour. While these dramatic landscapes can certainly round out a portfolio, it’s what you do with the remainder of the day that sets your collection apart. As you explore a location through your lens, think of yourself as a visual detective. No detail is too small. It’s the little things that ultimately add up to form the bigger picture.

chris_corradino_travel_4

4) No Rest for the Weary

Anyone who says you should pack your camera away midday is doing you a disservice. Contrary to what many suggest, the light is good all day, even at high noon. The trick is to best match the various qualities of light to your subject matter. A rolling green landscape can appear lush and vibrant with the simple twist of a circular polarizing filter. Why limit your photography to the hours around sunrise and sunset?

chris_corradino_travel7

5) Plan on Getting Lost

Researching potential shooting locations on the web is an essential part of any pre-trip preparation. With tools like the Photographer’s Ephemeris, you can study the precise time and locations of sunrise and sunset, along with with the moon phase. While this is helpful to create a basic shot list, remember to leave some time for unexpected adventure. Recognize that things will not always work out as planned. Getting lost is sometimes the only way to find what you’re looking for.

chris_corradino_travel5

6) X Does Not Always Mark the Spot

It seems that even the most remote destinations have been photographed from nearly every perspective. This doesn’t mean you shouldn’t shoot them however. Instead, consider it a personal challenge to go one step further and create something unique. How can you take what’s already been done, and make it yours? It’s this vision that separates your work from the masses.

chris_corradino_travel_6

7) Explore Beyond Your Zoom’s Range

Zoom lenses give you the ability to change your focal length with a flick of the wrist. This is indeed convenient for many types of photography including travel work. Yet, if you limit your perspective to what the lens provides, you’ll miss out on a number of great opportunities. Travel photography calls for us to explore beyond the end of our zoom range. Let curiosity guide your compositions and the nature of a place will reveal itself.

chris_corradino_travel 8

This article is sponsored by the New York Institute of Photography. NYIP offers high-quality online photography courses that are affordable, convenient, and accredited. Chris Corradino is a paid instructor with NYIP. 

googletag.cmd.push(function() {
tablet_slots.push( googletag.defineSlot( “/1005424/_dPSv4_tab-all-article-bottom_(300×250)”, [300, 250], “pb-ad-78623” ).addService( googletag.pubads() ) ); } );

googletag.cmd.push(function() {
mobile_slots.push( googletag.defineSlot( “/1005424/_dPSv4_mob-all-article-bottom_(300×250)”, [300, 250], “pb-ad-78158” ).addService( googletag.pubads() ) ); } );

The post 7 Travel Photography Tips Your Tour Guide Won’t Tell You by Chris Corradino appeared first on Digital Photography School.


Digital Photography School

 
Comments Off on 7 Travel Photography Tips Your Tour Guide Won’t Tell You

Posted in Photography


10 Surefire Tips for Photographing Birds in Flight

08 May

Recently an internal survey in my blog revealed that photographing birds in flight is the most sought after topic.
It didn’t come as a surprise though, because that’s the specialty of birds. They defy gravity and rise up into the sky. How wonderful it is!

Here I have listed 10 surefire tips that will help you to make better photographs of birds in flight. The more you practice, the better your photographs will turn out.

1. Learn Flight Behaviour of the Birds

Birds in Flight Photography

Birds normally have the predictable flight behaviour. It requires observation. The more you observe them more you understand about their behaviour.

Why is it important to learn bird flight behaviour?

Tracking the bird as it flies is the trickiest part of birds in flight photography. If you know the flight behaviour of the bird, then you will be able to predict the next move and wait for the right moment to get best photographs.

2. Point of View Matters the Most

Generally the difference between good and bad photographs is the point of view. Photographing a bird in flight right above your head gives a different impact than a bird flying across.

A photograph of a bird flying towards you will have a greater impact than a bird flying away from you.
Taking an eye-level shot of a flying bird would yield an intimate result.

Birds in Flight Photography

3. Start with Slow Flying Birds

It can often lead to frustrating results if you choose to photograph birds in flight without really having an understanding of proper techniques.

Proper hand-holding and focusing techniques doesn’t come easy. There is no substitute to hard work when it comes to practicing these techniques. Best way to master them is to start with slow flying birds like Egrets and Herons.

Great White Egret in Flight in Bharatpur Bird Sanctuary or Keoladeo National Park in Bharatpur, Rajastan

Great White Egret in flight in Bharatpur Bird Sanctuary or Keoladeo National Park in Bharatpur, Rajastan

Egrets and herons are in abundance and it is not tough to put all 10 tips into practice, just with these birds, and become a better photographer.

4. Use the Right Camera Settings

Make your life easy with these settings:

  • Aperture Priority mode
  • Matrix/Evaluative metering
  • Auto ISO settings up to whatever ISO settings you are comfortable with for your camera
  • Shutter Speed of at least 1/500th of a second or faster
  • AF-C focus mode for Nikon users and AI-Servo mode for Canon
  • Highest frames per second burst mode setting
  • 9-point or 21-point zone focus or 3-D tracking

If you are unable to get decent shutter speeds of 1/500th of a second or more while hand-holding the lens, then wait for the proper light. No point taking high noise or poorly exposed photographs.

Grey Heron Landing on a Misty Morning in Bharatpur Bird Sanctuary in Bharatpur, Rajastan

Grey Heron landing on a misty morning in Bharatpur Bird Sanctuary in Bharatpur, Rajastan

If you are using a sturdy tripod and a gimbal type tripod head, then you would be able to make some creative shots like motion blur or panning shots with slower shutter speeds.

5. Choose the Proper Focus Points

Choosing the right number of focus points is critical to making successful flight photographs. Most cameras provide a selection of multiple focus points which is often referred to as zone focus.

I often select 9-point or 21-point zone focus out of 51-points. The idea is to use less, but enough auto focusing points, to make it easier for the auto focusing system and also for you to compose it in the field. If you do not have zone focusing then you might have to resort to using all focusing points. Also, with newer DSLRs, the 3-D tracking seems to have been improved considerably. You might want to try it too (consult your camera manual).

Birds in Flight Photography

6. Track Before You Photograph

Most often it is our tendency to start photographing the moment we see the bird taking off or flying away. That’s natural but wrong.

Photographing birds in flight takes patience. After waiting for a very long time you wouldn’t want to lose the opportunity. When you see a bird in flight, track the bird until the autofocusing system gets enough time to lock the focus. Once it is locked, you can fire off as many shots as you want without losing the focus.

Tip number 1 and 7 coupled with this tip will help you to make successful flight photographs.

Birds in Flight Photography

7. Wait till You Get the Best or Contrasting Background

Okay, assume that you are tracking the bird to get the focus to lock, but your lens is hunting for focus. If you understand how focusing systems work, then you will have better control over your photographs. Remember that the focusing system needs good enough contrast between the subject and the background. It is generally very easy for the autofocusing system to lock the focus when the bird is flying against a clean background like a blue sky.

With practice, you will discover the capabilities of your camera’s autofocusing system which will in turn enable you to make better flight photographs.

Birds in Flight Photography

8. Take-off and Landing Shots

Most birds often defecate before they take-off to lighten their load. This is a very important clue to get fantastic take-off shots. Of course, it also depends on your position and the light direction to get the most of the situation.

Wind direction plays a major role in getting better take-off and landing shots since birds often fly into the wind while taking off and landing. It is wise to stand with your back facing the wind, very similar to the way you would face your back to the sun.

Purple Heron Landing in Bharatpur Bird Sanctuary or Keoladeo Nationa Park in Rajastan

Purple Heron landing in Bharatpur Bird Sanctuary or Keoladeo Nationa Park in Rajastan

9. Get Creative with Silhouettes

Photographing silhouettes of birds in flight is much easier than you might imagine.

The brighter sky, to which you would expose, gives you a good enough shutter speed and also provides very good contrast for autofocus system to lock the focus.

What is more important in the silhouette shot is the definitive shape of the bird. Because the bird is going to be dark or featureless, you have to get the shape of the bird properly. If the shape is not defined then you won’t be able to make it work, no matter how beautiful the sky is.

Birds in Flight Photography

10. Pay Attention to the Composition

It is probably not as tough as you may think to get the decent composition in the field for birds in flight photographs. You just have to follow the Rule of Thirds guidelines so that you have enough breathing space, or room for the bird to fly in its direction.

It makes sense to use Rule of Thirds because you would want to keep the bird in the left of the frame if it is flying towards your right so that you do not clip its wings and vice versa.

Perfect Reflection of a Seagull Taking off during  Sunset in a Lake in Grayslake, IL, US. I love the reflection in this slightly frozen lake and the white plumage of the Seagull contrasting against the dark background.

Perfect reflection of a seagull taking off during sunset in a lake in Grayslake, IL, US. I love the reflection in this slightly frozen lake and the white plumage of the seagull contrasting against the dark background.

If the bird is taking off from ground level then you would want to keep the bird in the lower third position of the frame so that it takes off upwards. Keep the bird in the upper third position if it takes off downwards.

Conclusion

If you practice these 10 tips while photographing birds in flight, you will make better photographs for sure. It takes time to practice and make them your second nature, but it is worth a try.

If you like my photographs of birds in flight, they are the result of my 7+ years of photography. Very important thing to remember is, no photographer gets fantastic photographs every time he/she presses the shutter. There will be hundreds, or even thousands, of hopeless photographs before getting one photograph that is worth sharing.

You have got to have patience!

googletag.cmd.push(function() {
tablet_slots.push( googletag.defineSlot( “/1005424/_dPSv4_tab-all-article-bottom_(300×250)”, [300, 250], “pb-ad-78623” ).addService( googletag.pubads() ) ); } );

googletag.cmd.push(function() {
mobile_slots.push( googletag.defineSlot( “/1005424/_dPSv4_mob-all-article-bottom_(300×250)”, [300, 250], “pb-ad-78158” ).addService( googletag.pubads() ) ); } );

The post 10 Surefire Tips for Photographing Birds in Flight by Prathap DK appeared first on Digital Photography School.


Digital Photography School

 
Comments Off on 10 Surefire Tips for Photographing Birds in Flight

Posted in Photography


Video Share – Travel Photography Hacks and Gear Tips

03 May

In these two videos travel photographers Brendan van Son shares some of his hacks for travel photography gear – how to go lighter and spend less money.

In this first one he offers eight photography hacks to help you while you’re out on the road:

  1. Welding glass as a neutral density filter
  2. Macro extension tubes instead of a macro lens
  3. 2x teleconverter to extend the range of your lenses
  4. Tripod/monopod combination (he mentions he uses one of the 3-Legged Thing models)
  5. Trigger Trap remote release
  6. Camera cap case
  7. WiFi EyeFi memory cards
  8. The Crop Sensor advantage

Watch the whole video to see how you can use those tips to your advantage when travelling.

In this second video he talks about different camera strap options and which is the best for travel photography.

The strap he mentions is the Indigo Marble designer sling.

Some other options are:

  • imo Camera Straps: Review – for a bit more fashionable and stylish strap.
  • Black Rapid RS-7 Camera Strap Review
  • Peak Design Capture Camera Clip v2 review
  • Preview of the Slide and Clutch Camera Carrying System from Peak Design
  • Spider Camera Holster Review

Do you have any other tips for hacking your travel photography bag? Please share with us in the comments below. What goodies have you found?

googletag.cmd.push(function() {
tablet_slots.push( googletag.defineSlot( “/1005424/_dPSv4_tab-all-article-bottom_(300×250)”, [300, 250], “pb-ad-78623” ).addService( googletag.pubads() ) ); } );

googletag.cmd.push(function() {
mobile_slots.push( googletag.defineSlot( “/1005424/_dPSv4_mob-all-article-bottom_(300×250)”, [300, 250], “pb-ad-78158” ).addService( googletag.pubads() ) ); } );

The post Video Share – Travel Photography Hacks and Gear Tips by Darlene Hildebrandt appeared first on Digital Photography School.


Digital Photography School

 
Comments Off on Video Share – Travel Photography Hacks and Gear Tips

Posted in Photography


12 Tips for Mastering the Clone Stamp Tool in Photoshop

29 Apr
Clone Stamp Tool - Opera Garnier shot

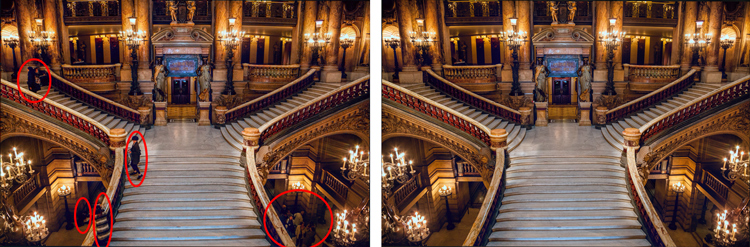
You will not often find the stairs of Opera Garnier in Paris free of people, so you will need to put the Clone Stamp tool to work to remove the people if you want a clean picture. This applies at many other tourist destinations as well.

There are a lot of good post-processing tools available for making minor edits to your photos. Within Photoshop, there are the Healing Brush and the Spot Healing Brush tools. Lightroom now has its own healing brush. Those are great for minor edits to your photos like removing spots or power lines. When it comes time for serious, intensive surgery on your photos, however, there is no substitute for the Clone Stamp tool. You will only find this in Photoshop and Photoshop Elements, there is no Lightroom substitute.

Getting started with the Clone Stamp tool is simple. You just have to tell Photoshop two things: (1) where you want to replace the pixels (target area), and (2) from where Photoshop should take the pixels to use as replacements (s0urce area). To use the Clone Stamp tool, just follow these steps:

  1. Select the Clone Stamp tool from the tool bar on the left side of your screen (you can also use the keyboard shortcut S). Once selected, set the brush size and hardness.
  2. Put your cursor in the area where you want to change the pixels.
  3. Select the source area: Press the Alt key (your cursor will now become a target) and move your cursor to the location where you want to take pixels from (source area). Click your mouse in that location.
  4. Paint in the target area: Release the Alt key and move your mouse back to the original location. Hold down the mouse button and paint in the pixels from the location you chose.

That is a simple process, but if you have used the Clone Stamp tool you realize that there is a lot more involved if you want to master it. This article will provide you with some tips to move you along the road towards conquering this important tool in Photoshop.

#1 – Work on a New Layer

First, always create a new layer before making changes with the Clone Stamp tool. Any changes you make should be made on the new layer. You can flatten the image when you’re done.

Why should you do this? There are many reasons. First of all, it is non-destructive – meaning you are not changing the underlying pixels of your image. In addition, when you use a layer, you can delete it if you don’t like where the changes are going. You can also create a mask if there are portions of the changes that you decide later you do not want. Finally, you can target adjustments to just the cloned areas if they are on a new layer (as will be shown below).

Creating a new layer is easy; simply press Ctrl+J (Cmd+J on Mac) to create a duplicate. You can also press Shift+Ctrl+N (Shift+Cmd+N on Mac) to create a new blank layer, but if you do so, make sure that you have “All Layers” selected as your source in the Clone Stamp Tool settings.

Clone Stamp Tool - Work on a New Layer

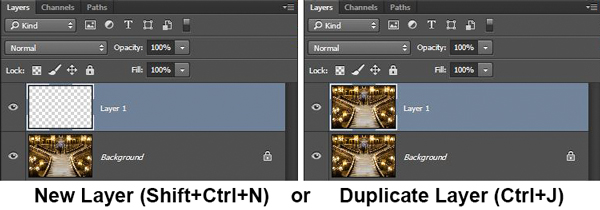
I prefer working on a new layer (as opposed to a duplicate layer) but either way will work.

#2 – Zoom in (way in)

When working with the Clone Stamp tool, zoom in on the area you are working on. In fact, zoom way in (to 100% even). That will help isolate the area you are working on, and importantly, it will also allow you to work at a much greater level of detail than you otherwise would. Make your changes look as good as you can at this higher level of detail, then when you zoom back out, the changes will be indistinguishable (which is what you want).

A shortcut for zooming quickly is to hold the Alt key with your left hand while using the scroll wheel on your mouse to zoom in and out (or use Cntrl/Cmd and the + or – key on the keyboard). That will allow you to move in and out quickly.

#3 – Set Your Brush Size Quickly

You will change your brush size often when working with the Clone Stamp tool. You should do this often to make sure that your brush size is tailored to the change you are making. Changing the size through the Brushes panel is cumbersome. Instead, use the keyboard shortcuts for changing brush size:

  • Left bracket [ makes brush smaller
  • Right bracket ] makes brush larger

Using these keys will allow you to rapidly tailor your brush to the specific circumstance.

#4 – Set the Proper Brush Hardness

The Clone Stamp brush’s edges can be set to whatever hardness you desire. Hardness determines the level to which the cloning will blend in with the surrounding pixels. If you set the hardness level more toward 100%, the edges will be hard and definite. If you set the hardness more toward 0%, the edge will blend in with the surroundings.

Clone Stamp Tool - Setting Hardness of Brush

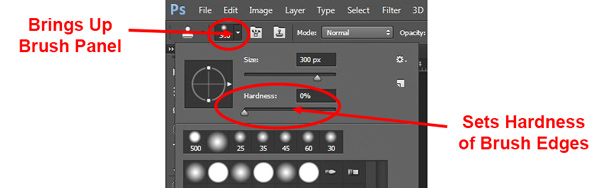
In general, keep the hardness level at 0%. That will help you seamlessly blend in the effect. There will be times, however, where you are working near a defined edge, in which case you should increase the hardness. Even then around 50% will usually do. Setting the hardness any higher creates harsh transitions that are dead giveaways to your use of the Clone Stamp tool.

#5 – Clone Without Adjustments

Do your cloning before making other adjustments to contrast, color and other changes often made via adjustment layers in Photoshop. If you use the Clone Stamp tool after creating those layers, you are baking the changes permanently into your picture when you clone.

Clone Stamp Tool - Adjustments

However, in some cases you will have already made changes on an adjustment layer, and you need to decide whether your cloning should include those adjustments. Photoshop lets you decide whether to include those changes in your cloning. After you have selected the Clone Stamp tool, the top row of your screen will include a circle with a line through it (see graphic above). Photoshop defaults to applying the changes of any adjustment layers, but if you click on this icon, Photoshop will ignore any adjustment layers when cloning.

#6 – Grab the Low Hanging Fruit

Most of the time your pictures will have some easy items to clone out, as well as some harder things. Clone out the easy ones first. In addition to giving you confidence in the tool, this will also help you when the time comes to make the hard changes.

How will that help you? Remember that you need clear space from which to draw pixels when using the Clone Stamp tool. By making the easy changes first, you are doing just that so you can draw replacement pixels and will make your job easier when it comes time for the harder, more in-depth changes.

#7 – Watch for Patterns

Sometimes you want to include patterns in your cloning. In that case, when selecting pixels from which to draw, try to find patterns in your picture that match the area you are replacing. For example, if the background is a building, look for a similar building. Then make them match (which will be the subject of the next tip).

Clone Stamp Tool - removing distractions without creating a pattern

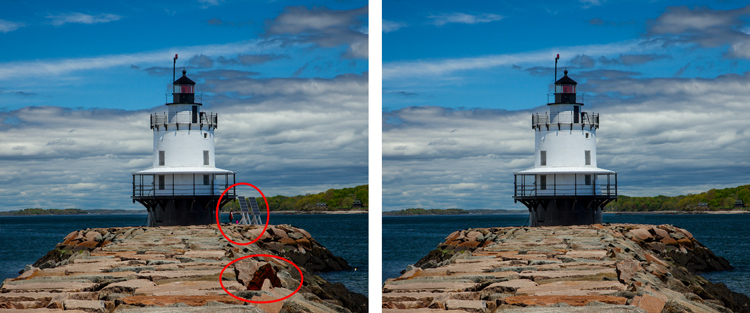
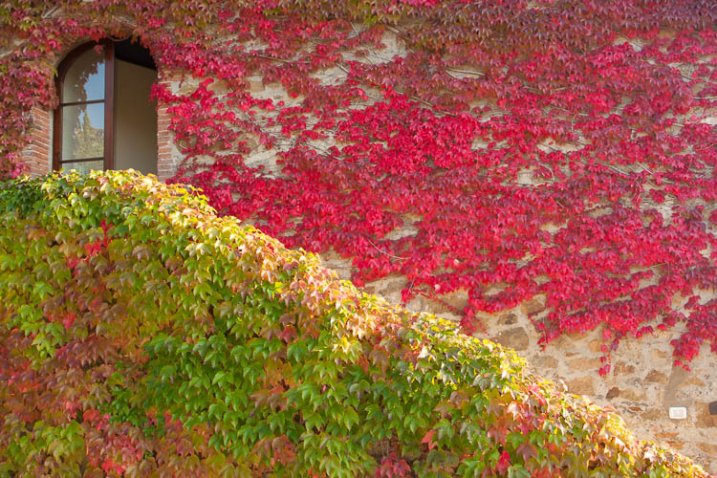
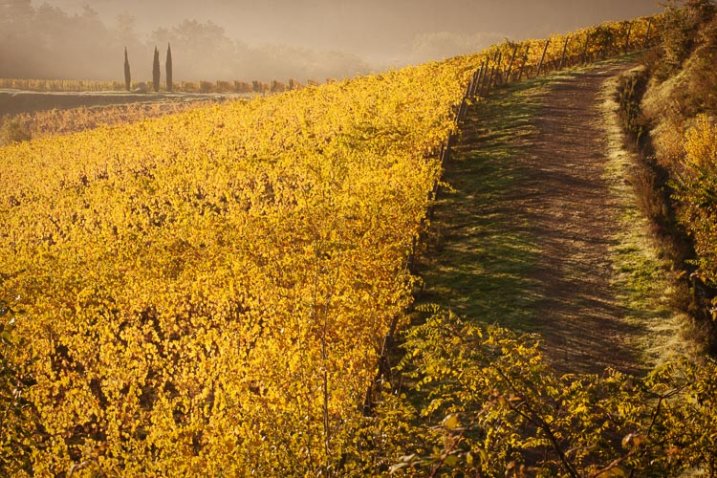
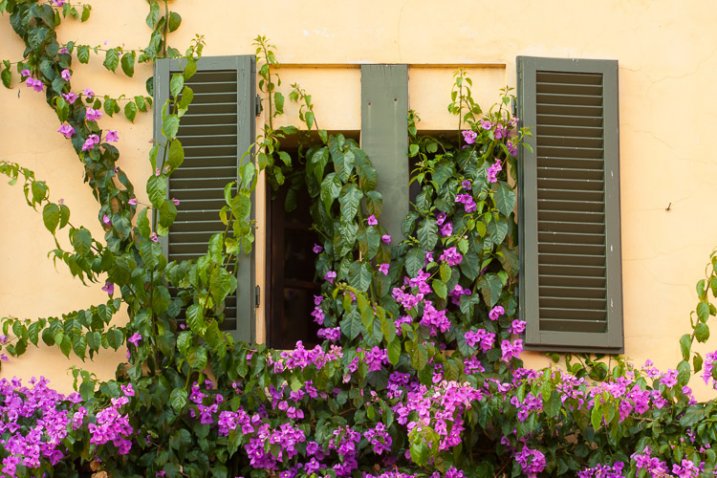
Here is a different example to show the Clone Stamp tool in another context. The right side of this image was filled with distractions, but the Clone Stamp tool eliminates them. Be careful that you do not create patterns by using pixels immediately adjacent, or it will give away your use of the Clone Stamp tool

But many times you will not want there to be any discernible patterns in your cloning. Usually a pattern is a dead giveaway to your having cloned something out. In that case, the way to ensure that there will be no patterns is to keep resetting your source point. Sample from one area and clone one part, then sample from another area – repeat frequently. Keep doing that to blend everything together without repeating a pattern.

#8 – Follow the Lines

A key to successful use of the Clone Stamp tool is making all the lines in your picture match. Even slight deviations look fake and destroy the effect you are trying to achieve. For example, in a landscape setting make the edges of tree branches match up. In an urban context, follow lines in buildings such as roof lines, doorways, and patterns on the ground.

When you are using the Clone Stamp tool, start with the lines and then let the rest of the pixels fall where they may. After that, if you need to go back over other areas, you can do so.

Here I've zoomed in on a portion of another shot of the Opera Garnier. Use the patterns on the floor and door to recreate the space where you clone over the people.

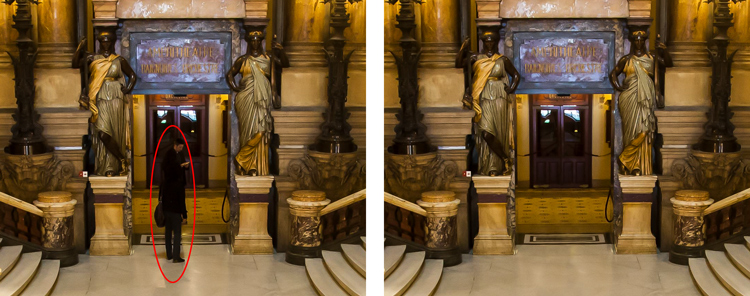
Here I’ve zoomed in on a portion of another shot of the Opera Garnier. Use the patterns on the floor and door to recreate the space where you clone over the people.

#9 – Avoid Selecting from Adjacent Areas

As previously mentioned, a dead giveaway of Clone Stamp tool usage is repetition. The Clone Stamp tool is all about repetition – you just need to do it in such a way that the viewer doesn’t notice it. If you draw pixels from an immediately adjacent area, you are risking the viewer noticing the repetition. Take the pixels from somewhere else in the picture instead.

Inadvertently creating a pattern is an easy trap to fall into because the immediately adjacent areas usually are the closest in color and tone to the area you want to replace. As you move further away, tones and colors change so that the pixels get harder to match. Working hard to find a way to use pixels from somewhere else in your picture will pay dividends because the viewer won’t see the repetition.

#10 – Muddle Through (accept the messiness)

By now you have fixed all the easy areas in your picture and you’re ready to tackle a bigger problem. It might be a crowd of people or a car that entered your frame, but it is a large area of your picture. This is the scary part of using the Clone Stamp tool.

The key is to just dive in. Don’t try to figure it all out beforehand (you never will). You can do this in a couple of different ways:

  1. Go big first: Set your brush a little larger than you might otherwise use and just replace the entire area in one fell swoop (and then clean up with a smaller brush), or
  2. Go small and steady: Stick with the smaller brush and paint in gradually, but the key is to keep going. Remember that you can go over it again. Whatever you are doing, while it is probably not perfect, will undoubtedly look better than what you started with.

The key thing is just to do it. There is a tendency to freeze up and plot the entire change before doing anything, which causes you to stare at the computer screen for long periods of time.

Remember, you can always undo what you’ve done (Ctrl/Cmd+Z). In addition, because you followed tip #1 above and are working on a new layer, you can always mask this area off or delete it if it isn’t heading in the direction you want.

#11 – Use the Mirror Function

You can affect a lot of settings involving the Clone Stamp tool in the Clone Source panel (to see it, go to Window and then click on Clone Source). For instance, you can change the shape of the brush or the angle of the replacement pixels.

One of the most useful features in the Cone Source panel is the flip-horizontal option in the middle of the panel. If you click on it, the pixels will be replaced in the opposite horizontal direction as the source. This can be extremely useful in many instances since often you will be dealing with a symmetrical subject where you can now draw from the other side.

Clone Stamp Tool - Flip Horizontal setting

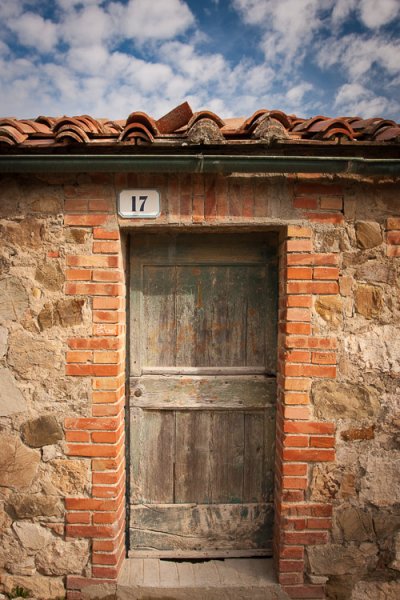
A typical example where you might want to use the flip horizontal option is where something covers one side of a doorway or window that you want to remove. By clicking on flip-horizontal, you can use the other side of the doorway or window as your source. Take another look at the Opera Garnier examples above and you will see how the flip horizontal tool would be used quite frequently whenever your picture contains any symmetry (I used this feature in those pictures quite a bit).

#12 – Change the Cloned Areas with Adjustment Layers

Sometimes your cloned areas just won’t look exactly like the surrounding areas. Perhaps it is too bright or too dark, or perhaps the colors are just off a little bit. You can fix it without affecting the surrounding pixels.

Clone Stamp Tool - tying adjustment layers

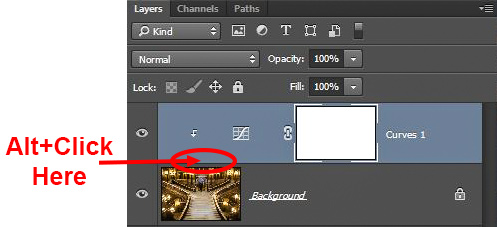
One of the great benefits of working on layers is that you can create adjustment layers that affect only the areas you just cloned. Simply create a new adjustment layer (levels, curves, or hue/saturation), which will appear above your cloning layer. Then hold down the Alt key and click at the bottom of the adjustment layer (you will see your cursor change). Doing so will apply the changes of the adjustment layer only to the layer below it.

Conclusion

Remember that using the Clone Stamp tool can be a messy process. Don’t worry if you find yourself having to redo changes or make things up as you go. There is no magical “clean” process. One of the fun parts about the cloning process is the problem-solving that goes into it. Take your time and just keep moving. You can always redo your changes or, if you are working in layers, get rid of them without losing the rest of your work.

The Clone Stamp tool will save more pictures than almost any other tool in your post-processing. If you master it, you can remove almost anything in your pictures that you do not want.

googletag.cmd.push(function() {
tablet_slots.push( googletag.defineSlot( “/1005424/_dPSv4_tab-all-article-bottom_(300×250)”, [300, 250], “pb-ad-78623” ).addService( googletag.pubads() ) ); } );

googletag.cmd.push(function() {
mobile_slots.push( googletag.defineSlot( “/1005424/_dPSv4_mob-all-article-bottom_(300×250)”, [300, 250], “pb-ad-78158” ).addService( googletag.pubads() ) ); } );

The post 12 Tips for Mastering the Clone Stamp Tool in Photoshop by Jim Hamel appeared first on Digital Photography School.


Digital Photography School

 
Comments Off on 12 Tips for Mastering the Clone Stamp Tool in Photoshop

Posted in Photography


5 Tips for Geting Sharper Images When Doing Long Exposures

29 Apr

Long exposure photography makes it possible to show the passage of time in a still photograph. It does this by blurring moving elements and sharpening the static parts. But there is a downside to long exposures – any camera movement blurs the static elements. Here are four simple ways you can prevent unwanted blurring.

Salt Lake Sunset at Mandurah

1. Use a Good Tripod

For very short exposures there are ways to hold yourself and your camera steady, like: How to Reduce Camera Shake – 6 Techniques. However, when you’re taking an exposure of a few seconds, you need something steadier than your hands to hold your camera. You may set the camera on a table, or a rock but risk dropping the camera or accidental movement that can ruin your shoot.

The most common way is to put it on a sturdy tripod. You have to get at least a decent tripod as El Cheapo tripods are going to give you camera shake too.

Light Trail Central

2. Use a Remote Shutter Release

Even with a tripod the act of snapping the shutter can cause the camera to shake. There are a couple of ways to combat this problem.

One is to set the delay on the camera (2-sec timer) so any movement is done by the time the shutter snaps. The other is to get a remote shutter release.

Remotes can be connected to the camera by a cable or wireless – either one snaps the shutter without shaking the camera. They are also called remote cable releases. This is a small and cheap accessory which can help you get rid of camera shake.

Rockingham Sunset

3. Use Manual Focus

Autofocus is a wonderful thing. Most of the time it does exactly what you want, making it easier to take great photos. But there are times, especially when shooting long exposure, that it can have the opposite effect.

In low light situations autofocus has trouble finding something to focus on. Even when it seems focused it can readjust when the shutter is snapped. Using ND filters can cause the same problem.

Light Trail IFC

Fortunately, there is a simple solution. When shooting in low light you can use manual focus, or use a flashlight for focusing and once the focus is set, turn autofocus off so it won’t change once the light is off.

For ND filters set the focus manually (either before or after mounting the filter) or autofocus first, turn it off and mount the filter. The shot will stay focused, the picture sharp.

Moving Cloud Sunrise at Kings Park

4. Lock the Mirror Up

If you are using a DSLR camera – and you probably are since you are shooting long exposure – it has a mirror that reflects the image from the lens to the viewfinder. It is between the lens and the camera sensor, so it has to move before the shutter snaps.

That small movement causes vibration. When you turn on the mirror lockup it turns the shutter button into a two stage button. The first click lifts the mirror and the shutter doesn’t open until the second click. The time between the two clicks allows the vibration of the moving mirror to stop.

Light Trail Hong Hum

5. Use Your Aperture Sweet Spot

Closing down the aperture can make you shoot longer. However, when your aperture is too small, it will start to have a diffraction effect which lowers the sharpness.

In most lenses, the sweet spot of the lens aperture is between f/5.6 to f/8. In other words, you will get the sharpest images when using this range.

When you step down to f/16 or smaller, you will get images like that seem out of focus. You can learn the physics about diffraction in the below video by Steve Perry:

Conclusion

Taking long exposure photographs is a science and an art. Like any art, taking long exposure pictures with the right balance of sharpness and blur takes both skill and intuition. These five tools will help you use your skills to turn intuition into great photographs.

googletag.cmd.push(function() {
tablet_slots.push( googletag.defineSlot( “/1005424/_dPSv4_tab-all-article-bottom_(300×250)”, [300, 250], “pb-ad-78623” ).addService( googletag.pubads() ) ); } );

googletag.cmd.push(function() {
mobile_slots.push( googletag.defineSlot( “/1005424/_dPSv4_mob-all-article-bottom_(300×250)”, [300, 250], “pb-ad-78158” ).addService( googletag.pubads() ) ); } );

The post 5 Tips for Geting Sharper Images When Doing Long Exposures by Kevin Choi appeared first on Digital Photography School.


Digital Photography School

 
Comments Off on 5 Tips for Geting Sharper Images When Doing Long Exposures

Posted in Photography


18 Awe-Inspiring Tips to Take Better Photos

27 Apr

Today all of us play the role of photographers – using small electronic cameras, smartphones or tablets, we document each and every moment of our lives. If you’d like to take better photos and memorize moments in your life in a more professional way, have a look at those 18 key tips. 1. Keep it to the eye level Just Continue Reading

The post 18 Awe-Inspiring Tips to Take Better Photos appeared first on Photodoto.


Photodoto

 
Comments Off on 18 Awe-Inspiring Tips to Take Better Photos

Posted in Photography