RSS
 

Posts Tagged ‘Tips’

3 Posing Tips for Young Siblings

17 Sep

posing-young-siblings-1

Have you ever tried to pose an elementary-age set of siblings, only to have one or more of them dissolve into a crying mess before you’re able to capture a single frame? When it comes to posing young siblings, I’ve discovered that things run more smoothly when I take a slightly more relaxed approach to posing, and I’ve compiled a few posing tips that will hopefully help you capture meaningful photos of young sibling groups a little more easily.

1. Get them close together

posing-young-siblings-2

Over the past few years, I’ve noticed that when I’m photographing groups of siblings, the favorite images are almost always ones in which the kids are closer together than they might usually sit, or stand, in day-to-day life. So now I usually begin every session that involves young siblings by asking them to hug each other, or put their arms around each other. If one sibling is very young, I have them sit down with the younger sibling on the older one’s lap. It’s a simple direction, but one that young children understand, and it really makes a big impact.

These images are most often family favorites, and are usually the ones that I see gracing Christmas cards and photo canvases in their living room. Most parents usually request at least one photo of both kids looking at the camera and smiling, and this is also where I most often try to fulfill that request.

posing-young-siblings-3

However, as a mom I can tell you without a doubt that the amount of time that elementary age siblings will stay this close together before they start bickering or crying is usually pretty limited, and it’s in your best interest as a photographer to have them move on to something different before they totally dissolve into chaos. So, get them close, and then pay attention – if you notice that either sibling starts getting a little aggressive with their love, and starts squeezing the other sibling’s waist or neck, it’s time to move on to something else.

2. Give them something to do

posing-young-siblings-4

Once it’s time to move on from hugging, I usually give the kids a small instruction that will keep them close together, but will also keep their hands occupied at the same time. For example, in the above photo I asked my girls to stand back-to-back, and hold hands. This kept them close physically, but also prevented some of the aggressive tickling that was starting to happen just before the photo was taken. I also often ask kids to stand facing me and hold hands, which achieves the same effect, and seems to be a favorite among parents as well.

posing-young-siblings-5

Another thing to try is to have the kids lay down. I usually keep a few quilts in the back of my car for this exact purpose, and you would be surprised how quickly this simple suggestion can calm rambunctious kids down and allow them (and you) to refocus. Once they’re laying down, try asking them to look up at you, hold hands, close their eyes, give each other butterfly kisses, or to touch their noses together. Again, pay attention to both the subtle, and not-so-subtle, cues that either child may be giving that they are ready to move on to something new.

3. Let them be themselves

posing-young-siblings-6

As nice as it is to have a perfect photo of everyone looking at the camera and smiling, I also know that some of my favorite images of my own girls are the ones in which their personalities really shine through. So, give the kids you’re photographing an opportunity to show you their personalities as well! Ask them to sing for you. Ask them to pose like their favorite superhero or princess. Tell them a knock-knock joke, then ask them to tell you one. I’ve yet to meet a kid who wasn’t totally game to give me a silly face, and usually the most genuine smiles and laughs quickly follow the silliest of photos.

posing-young-siblings-7

You can also combine tips 2 and 3 – give them a small suggestion like “sit on the ground with your feet touching each other”, and then sit back and watch the way that they interact with each other naturally. Hand them each a flower or a leaf, and ask them to tell you a story about it. These are great opportunities to capture images that are more candid, while still allowing you as the photographer to have a bit of control in terms of posing.

Sometimes, I cycle through some variation of these tips two or three times in the course of a session, and I’ve found that the variety is really helpful in preventing the kids from getting restless and bored. Overall, the key to posing young siblings is realizing that you simply can’t approach posing in the same way that you would with senior portraits or formal wedding portraits. Elementary age kids simply won’t hold a pose that they find to be the slightest bit awkward or uncomfortable, no matter how good it might look. Instead, give young siblings gentle direction that allows them to relax and be themselves, and watch their little personalities shine!

googletag.cmd.push(function() {
tablet_slots.push( googletag.defineSlot( “/1005424/_dPSv4_tab-all-article-bottom_(300×250)”, [300, 250], “pb-ad-78623” ).addService( googletag.pubads() ) ); } );

googletag.cmd.push(function() {
mobile_slots.push( googletag.defineSlot( “/1005424/_dPSv4_mob-all-article-bottom_(300×250)”, [300, 250], “pb-ad-78158” ).addService( googletag.pubads() ) ); } );

The post 3 Posing Tips for Young Siblings by Meredith Clark appeared first on Digital Photography School.


Digital Photography School

 
Comments Off on 3 Posing Tips for Young Siblings

Posted in Photography


5 Tips to Take Your Landscape Photography from Good to Great

15 Sep
The beauty of the scenery in Antarctica

The beauty of the scenery in Antarctica

Landscape photography is one of the most favoured genres of photography. It also happens to be the one genre that is not easy to master. The reason is simple, to become really good at landscape photography, you need to spend hours trying to master it. Most photographers are not able to dedicate that amount of time, so it becomes frustrating. Many photographers end up being disappointed with their images, but there are few things that you can do to make sure you get better results, in a short space of time.

1. Foreground interest

This is a common tip, but one that makes a lot of sense. Having a subject in the foreground, anchors the image. It tells the viewer where to look first and once they have looked at that, their eye will explore the rest of the image.

You can place your foreground subject anywhere in the lower third of your image, but it might be a good idea to put it more to the left side of the frame. This is not a rule (I really don’t believe there are any rules in photography), but rather a suggestion. We read text from left to right, so if your foreground interest is on the left hand side, it makes it feel easy for the viewer to interact with the image. The foreground interest could be anything, a piece of driftwood, a rock, a tree, anything that works for the scene.

Foreground interest anchors a scene

Foreground interest anchors a scene

2. Color in your scene

Your image will have inherent color based on the time of day and subject you are shooting. If you are shooting a forest, your scene might be predominantly green, if you are doing a seascape, there may be lots of blue because of the colour of the water.

Be aware of the colour in your scene and work with the opposite colors on the visual colour wheel. As an example, there are three primary colors that your camera sees, they are: Red, Green and Blue. The additive colors (opposite colors) are Cyan, Magenta and Yellow. To be clear, Cyan is the opposite color to Red, Magenta is the opposite to Green and Yellow is the opposite to blue. These opposing colors can work well in a scene, particularly yellow and blue.

Look at the colors in your scene and decide what you want to emphasize. To make sure you have great colours to work with, you will want to shoot during the golden hours and emphasize the warm colors.

Rich colours will enhance the drama in your image

Rich colors will enhance the drama in your image

3. White Balance

When you are shooting landscapes, you will want to be shooting at golden hour, or the blue hour. These are the times of day when the light works really well for dramatic landscape shots. In the golden hours, the light will be warm tones of yellow, orange, or red. Check your white balance setting when you are shooting at this time. If your camera is set to Auto White Balance, it will cancel out much of the warm tones in your image as it tries to neutralize any color casts you may have in your scene.

If the golden hour light is really strong in your scene, Auto White Balance will make the scene look really bland and colorless. Try and shoot on Daylight White Balance instead. That way, the camera will be capturing the light as it truly is in the scene. You could even turn your white balance to cloudy or shade to enhance the warm tones even more. Use this settings as a creative tool, it can really make a good impact on your image.

Use white balance creatively, this image was shot using shade white balance

Use white balance creatively, this image was shot using the Shade preset.

4. Movement

Some of the best landscape images have some form of movement in them. The movement can be caused by water, wind, or both. Subjects that work well with movement are rivers, waterfalls, seascapes and even stars. A long exposure image of the sea with water looking all silky and wispy is ethereal, and adds drama to the image. We don’t see this smooth silky water naturally with our eyes, it is only possible with the camera. The results are often very appealing, and it gives a serenity to the scene that is almost magical. You will need a tripod to get this right, you will also need to use a longer exposure of a few seconds. Timing is also important, particularly with seascapes. You may have to time the shot for when the water comes rushing over the rocks, or up the beach. That way, the image will be filled with silky streaks of water and it will look amazing.

Movement in water can make a scene look dramatic

5. Less is more

Landscape images become more dramatic if there is a very clear subject in them. If you are unsure about what should be included in your scene, ask yourself this question as you look around the scene, “Does that rock, tree, river, etc., add to the scene or not?” If you think it is not adding to your scene, remove it. Even if you are unsure, remove it and take a shot to see how the image looks. In many images, less is more. If you have less items in your scene, there is less to distract the eye, there is less that can make the scene confusing, so give it a try. Set up a shot, take a photo and then start minimizing the distracting elements.

Sometimes, less is more

Try these five tips and share your results in the comments below. Do you have any other tips to add?

googletag.cmd.push(function() {
tablet_slots.push( googletag.defineSlot( “/1005424/_dPSv4_tab-all-article-bottom_(300×250)”, [300, 250], “pb-ad-78623” ).addService( googletag.pubads() ) ); } );

googletag.cmd.push(function() {
mobile_slots.push( googletag.defineSlot( “/1005424/_dPSv4_mob-all-article-bottom_(300×250)”, [300, 250], “pb-ad-78158” ).addService( googletag.pubads() ) ); } );

The post 5 Tips to Take Your Landscape Photography from Good to Great by Barry J Brady appeared first on Digital Photography School.


Digital Photography School

 
Comments Off on 5 Tips to Take Your Landscape Photography from Good to Great

Posted in Photography


13 Useful Tips You Need To Shoot Stress-Free Fashion Events

14 Sep

13 Useful Tips You Need To Shoot Stress-Free Fashion Events

Hi there FashionPhotographyBlog.com readers, today we have a Peter Werner on our site. He has been a long time follower of FPBlog for many years and took time out of his day to write us a response to an article we posted before titled on how to shoot fashion shows. We at FPBlog thought that his reply had great insights and brought another viewpoint to our previous post, that we want to share it with you, because we know it will be useful to photographers currently shooting at fashion events, or thinking about doing it soon. 


We have invited Peter Werner to share with our community, his tips for shooting at fashion events so photographers can get a sneak peak into what to expect as well as how to prepare themselves so they don’t miss great photo moments in the middle of all the commotion at fashion events.


Just a word of warning before we dive into Peter’s tips – fashion shows and fashion events may not be suited for everyone. There are lots of people running around at these fashion events; triggers are going off everywhere, peak noise levels and you are constantly on your feet lugging around your photography gear. Then again, you could be an adventure seeker and live for the adrenaline rush. We just want you to be wary so you can be on point, focused on the shooting great photos and not getting distracted by all the commotion all around you. The stage is now all yours, Peter!


Fashion Events: How To Shoot Without The Stress


Thanks for the post (great stuff as usual)! I haven’t shot a fashion show yet, but I have shot several other types of fashion events so far. I absolutely hate it, too, but I think it is very good training for problem-solving when you have to move fast on a regular photo shoot. Here are a few things I have learned the hard way:


1. Don’t use the biggest memory card you have. If it dies or gets stolen, all your photos will be lost, and that’s a great way to destroy all the reputation you have built. Instead, use smaller ones.


2. If one memory card is full, continue shooting with your other camera body until you have time to change cards, don’t trade important moments for a card change.


3. Keep the full memory cards and the empty ones in separate pockets so you don’t lose time by re-inserting a full one by accident.


4. Use the two-pocket system for your flash batteries.


5. Don’t waste time deleting failures. You are very likely to miss your second chance to get it right.


6. Only check your images occasionally to make sure nothing is wrong (like a leftover exposure compensation or something like that). But don’t look at every single image you take right away.


7. Do take multiple shots of the same subject. The auto focus system sometimes focuses on the background, people have their eyes closed etc. So you want to have a backup in such a situation, plus you get to choose the best one of the set when you’re doing your editing. I usually take two or three shots per subject, depending on how much time there is, but you definitely need more for groups.


8. Always shoot RAW (even if you usually don’t), especially if you are using bounce flash a lot. Lighting often changes very quickly and people sometimes move in unexpected ways, so it is hard to get the exposure perfect every time. By shooting RAW, you can compensate for problems to a certain degree. Plus, you get between 12 and 16 bits of color depth instead of 8 with JPEG. Don’t rely on RAW’s ability to save you, though, you still need to expose as well as you can.


9. Get ear plugs. Not only can music be annoying, it can also be very loud. This is probably more relevant to concerts, but ear plugs also allow you to position yourself right in front of the speakers, where usually nobody is standing (or not for long), not even photographers, even if it gives you a perfect view on what’s happening.


10. Use a fast lens. Both Nikon and Canon make very sharp very fast zoom lenses. That way you can use more of the available light and thus get better recycle times on your flashFast lenses also enable you to use a shallow depth of field if you have to deal with a very busy background and but don’t have a chance to move.


The fast zooms are usually the more professional ones and, therefore, tend to give you sharper images, and they maintain their minimum aperture throughout the whole zoom range. And you can take non-shaky pictures at greater focal lengths if flash is not permitted or your flash does not reach far enough.


Even if you don’t use the aperture wide open, fast lenses are stopped down more at identical apertures, thus you are more likely to photograph on the lens’ sweet spot if you use an f2.8 lens at f4.5 than an f4.5 lens at f4.5. The Nikon VR system is great for low light, too.


11. If you know an important shot is coming up, make sure you don’t press the shutter release a few seconds before because your flash may not be ready again in time.


12, If you don’t own a good lens, you can always rent one, it’s worth it.


13. Also, be sure to get all the info you can in advance. If you know how the lighting is going to change, what the durations of individual segments are etc., you can plan in advance and for instance use a fresh card if you know you won’t have time to swap in the next 20 minutes. If you know that very shiny dresses are coming up, you can switch to spot metering and so on. Knowledge is power.


All those things can not only help in getting the pictures you want, they also help differentiate your images from those of the seven other guys right next to you with the exact same equipment as you have. I hope this is helpful for those of my fellow readers who are doing fashion events. Thanks again for this awesome blog, it is really an invaluable resource for the “secret” stuff that can’t be found anywhere else on the internet. Keep up the great work!


Peter Werner 


Did you find Peter’s tips for fashion events helpful? Please share this post on social media if you did. If you have tips of your own that were not covered in Peter’s list, please write them down for us in the comments box. below We would love to hear your tips!


Lastly, if you would like to be featured as a guest writer like Peter Werner, do send us a message and get in touch with us. We’d love to hear from you! For more details on how to contribute to FashionPhotographyBlog.com click here –> CONTRIBUTE TO FPBLOG HERE


Fashion Photography Blog

 
Comments Off on 13 Useful Tips You Need To Shoot Stress-Free Fashion Events

Posted in Uncategorized


7 Tips for Better Commercial Food Photography

14 Sep

Earlier this summer, I was awarded a dream photo shoot to photograph chocolate chip cookies for my local grocery store. What sounded like a simple job at first, ended up being more challenging than expected, and in this article, I’ll walk through the process of approaching a commercial food photo shoot for a real client, with seven key tips to keep in mind.

Select your gear

One of your best friends in food photography is a macro lens, as it lets you zoom-in and capture small details and perspectives, that your client’s camera phone can’t. In a day where just about everyone has the ability to take pretty good food photos with their cell phone, it’s important to always create photos that your client couldn’t easily capture themselves using low level gear. Personally, I always photograph food with two camera bodies (a Canon 5D Mark III and Canon 6D) and two lenses (24-70mm f/2.8 and a 100mm f/2.8 macro lens).

Lighting-wise, you can easily use reflectors and natural lighting if it’s at your disposal, but I prefer a simple and cheap off-camera flash setup consisting of a Canon 580 EXII Speedlight flash, Yongnuo wireless flash triggers, a simple lighting stand, and a shoot through umbrella. My lighting setup is in the diagram below.

Food photography tips

Depending on what kind of food photography quality you’re aiming for, it may also be wise to invest in a food stylist. In this case, I did not use one, but started to wish I did at certain key moments, which I’ll address later.

Set up the shot

Generally speaking, food photography can be done just about anywhere, but you should always check with your client to see if they have a preference of shooting on site in a particular location, or if they want you to conduct the shoot in your space. In this case, the latter scenario applied. Since the photo style we were going for would be pretty cropped and zoomed in, I didn’t need a fancy kitchen or dining room setup. But I would need a variety of surfaces and props to enhance those heavily cropped images.

Tip #1: Understand the client’s photo needs

There tend to be two main scenarios when it comes to food photography. Sometimes the client will have a menu of dishes prepared and you need to shoot as many as possible in a given time frame, OR the client has one particular dish or menu item that they want highlighted. This assignment falls into the latter category, as the whole point was to take images of one particular item: an extraordinary large chocolate chip cookie, dubbed “The Cookie.”

My local grocery store had spent a year experimenting in the kitchen to come up with a recipe for a gigantic chocolate chip cookie, and they needed photos of the product to help with promotional marketing. These photos in particular had a very specific purpose of being blown up into large decals and posters, that would be plastered on walls and windows throughout the store, so the highest resolution photos would be needed.

Food photography tips

Tip #2: Research with Pinterest

After understanding the client’s basic photo needs, I always conduct research on Pinterest to get inspired and visually identify patterns among other similar photo shoots. While many clients encourage photographers to add their own twist or dose of creativity, it’s also a good idea to have a sense of traditional ways that others have executed similar photo shoots, in case your client ends up wanting a more traditional image. A quick search for “chocolate chip cookies” on Pinterest gave me a slew of ideas on different ideas to effectively photograph, “The Cookie.”

Tip #3: Use a variety of surfaces

Per the researched examples that I had found, plus my personal approach to food photography, I set out to shoot these cookies using three main surfaces: a ceramic plate on a granite countertop, a wooden cutting board, and the white paper napkins and packaging that came with each cookie. The purpose was to offer the client a variety of surfaces and textures to choose from, in addition to a variety of implied settings in which “The Cookie” might be consumed.

Food photography tips

Tip #4: Incorporate people and action into the scene

The next photographic approach I took involved having a human model interact with my photo subject. Incorporating a human element, either by simply including a body part such as a hand holding the cookie, or a partially eaten cookie, gives the photo subject a sense of purpose and utility that the client might find helpful. It also adds a sense of scale – important to show the size of “The Cookie”.

Food photography tips

Tip #5: Use ingredients and pairings

Pretty much every food has a logical pairing, such as white wine and fish, beer and burgers, and milk and cookies. Instead of just focusing on one component, why not set the scene by introducing a natural pairing to the photo subject? This not only sets the scene, but it can also help provide scale, in this case showing how large “The Cookie” is compared to a glass of milk.

Food photography tips

Tip #6: Be open to feedback and further collaboration

After going through the above scenarios, and putting together a first batch of photos for client feedback, I was a bit surprised when they replied saying, “These are great, but not quite fitting our ideal vision.” Luckily, I asked for feedback early in the shoot and was able to collaborate further with the client to hone in on what they were actually looking for, which were photos more to the tune of this:

Food photography tips

While the client’s initial instructions were to produce a variety of photos of the cookie, like the ones I first delivered, it took an extra conversation with them to realize that there were two main points they really wanted to illustrate:

  1. Size mattered: Since “The Cookie” was truly large, similar in size to that of a DVD, we really needed to emphasize its huge size.
  2. Have to see the goo: The selling point of “The Cookie” is the super gooey melted chocolate center of each cookie.

With these two points really emphasized, the resulting images ended up being purely macro shots, but the challenge was capturing the gooey melted chocolate centers. This is when a food stylist probably would have come in handy, but through trial and error, I was able to use my oven and microwave to re-create the melted chocolate look in my own kitchen.

Tip #7: Find the finished product and document it!

Whenever you perform photography services for a client, make every effort to get your hands on the final product that has your photo(s) in use. Having proof of your published photos is excellent for building your portfolio and credibility as a photographer, not to mention it just feels really good to see your images blown up on the side of a building.

Food photography tips

The final product: my photos used in decals on the side of a building.

Conclusion

Do you have any other tips or approaches for tackling commercial food photography jobs? Let me know in the comments below!

googletag.cmd.push(function() {
tablet_slots.push( googletag.defineSlot( “/1005424/_dPSv4_tab-all-article-bottom_(300×250)”, [300, 250], “pb-ad-78623” ).addService( googletag.pubads() ) ); } );

googletag.cmd.push(function() {
mobile_slots.push( googletag.defineSlot( “/1005424/_dPSv4_mob-all-article-bottom_(300×250)”, [300, 250], “pb-ad-78158” ).addService( googletag.pubads() ) ); } );

The post 7 Tips for Better Commercial Food Photography by Suzi Pratt appeared first on Digital Photography School.


Digital Photography School

 
Comments Off on 7 Tips for Better Commercial Food Photography

Posted in Photography


5 Practical Lightroom Tips for Newbies

13 Sep

One of Lightroom’s most important assets is also its Achilles Heel. It is such a powerful program that many of its useful features can take a long time to discover, and are often hidden beneath a blanket of keyboard shortcuts and obscure menus.

When I first started learning Lightroom I was already a longtime user of Apple’s image processing program Aperture, and for a while after making the switch I was overwhelmed by the sheer number of options available. With so many menus, buttons, and sliders at my fingertips I thought there was no way I would ever be able to make sense of them all. After much experimenting, online searching, and good old-fashioned trial and error, I have figured out a workflow that suits my needs; the same holds true for most photographers. You may not use every single feature and option available to you in Lightroom, but the key is to find the tools that work for you and learn to master them.

five-lightroom-tips-for-beginners-sunrise

Adjusting the RAW file to arrive at this final image took a while, but was a lot easier thanks to some simple tips and tricks described below.

That being said, here are five of the most practical, useful features that I use on a daily basis. Try them out and they may greatly enhance your own experience with Lightroom as well.

1. Create import presets

five-lightroom-tips-for-beginners-Presets
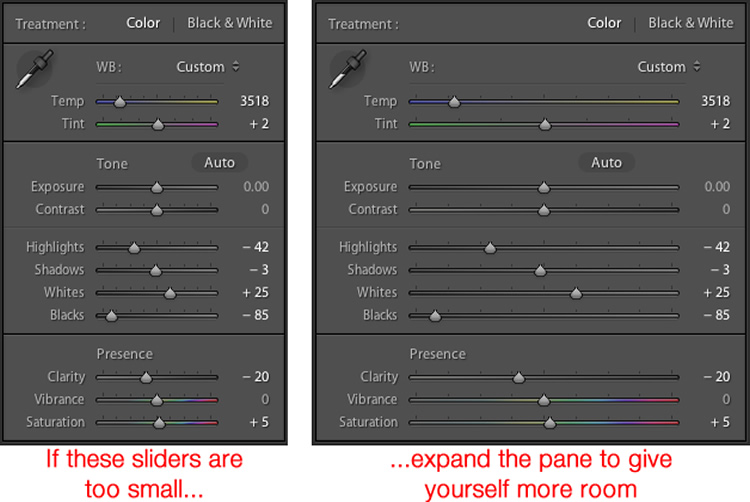
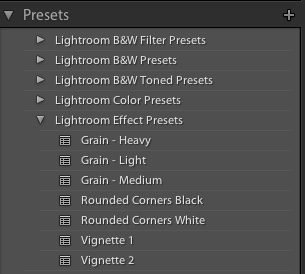
You probably already know that Lightroom contains dozens of presets to get you started when editing your photos, which can be quite handy when you need a quick adjustment or effect such as Aged Photo, Bleach Bypass, or any number of black and white conversions. These presets are not special filters like what you might find in Instagram or other such image-sharing programs, but in fact are pre-made manipulations of the various sliders and controls available to you in the Develop module. The Cold Tone filter, for example, is a collection of saved values for the White Balance, Tone, and Presence adjustments in the Basic Develop pane.
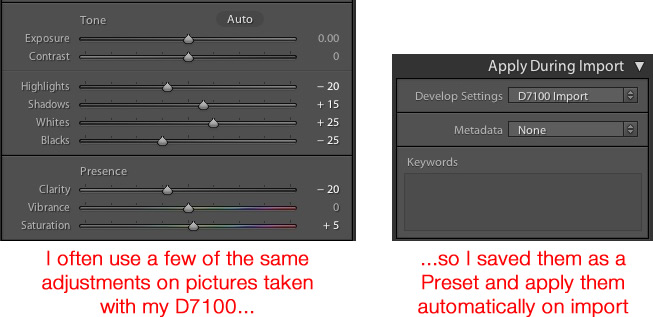
You might also be aware that you can create your own presets by adjusting any of the Develop parameters and then choosing New Preset from the Edit menu. But you can extend this functionality a step further by automatically applying a given preset, even one you create yourself, to all your pictures upon import. This is incredibly useful if you have a given set of values that you like to use as a starting point. Rather than making similar adjustments to things like Highlights, Shadows, and Clarity for every image you can simply apply default values to every picture you import. To do this, use the Apply During Impor” pane in the Import dialog, and select any of Lightroom’s existing Presets or one that you have made on your own.

five-lightroom-tips-for-beginners-D7100-Import-Preset

As an example of how this can be useful, I often found myself applying similar adjustments to every picture that I took with my Nikon D7100 because I was not happy with Lightroom’s interpolation of my RAW files. This became somewhat time-consuming, so I saved my common adjustments as a Preset called, D7100 Import. Now every time I import photos from my D7100 memory card, I apply that Preset. I have a unique Preset saved for each of my cameras, and applying these settings on import has saved me untold hours and a great deal of frustration. It’s a fantastically useful feature that could greatly improve your own workflow as well.

2. Use number keys to fine-tune adjustments in the Develop Module

When working in the Develop module it can be a bit tricky to get the exact values you want by manually moving the sliders. One way to fix this is to give yourself a bit more real estate by hovering your cursor over the left side of the panes and dragging until the panels are much wider.

five-lightroom-tips-for-beginners-develop-sliders

Another handy trick is to use the arrow keys to adjust the number values in very small increments. For example, click on the White Balance numerical value, and press the Up or Down arrow keys to change it in increments of 10. Or highlight Clarity and press Up or Down to change it in increments of 1. For greater adjustments, hold down the Shift key while you press Up or Down, which will alter White Balance in increments of 200, Clarity in increments of 10, and so on.

3. Customize the Develop Module

If you’re like me, you may have been overwhelmed at the massive number of options in the Develop module, but thankfully there is a way to tame this beast by right-clicking anywhere in the adjustment panels. Doing so brings up a menu that allows you to disable the adjustments you don’t want so you have a cleaner and less cluttered working environment, and don’t waste time clicking on features you never use.

five-lightroom-tips-for-beginners-hide-panels

One especially useful element of this right-click menu is called Solo Mode, which is a way to de-clutter the Develop module even more by collapsing all the panels except the one you are currently using. I used to waste all sorts of time scrolling up and down through the various open panels, expanding or collapsing them to get to the one I really wanted. But by using Solo mode every time I click on a new panel, the other one I was using is automatically shrunk to just its title. This one little feature has single-handedly saved me not just a lot of time, but a great deal of headache medicine as well.

4. Create Smart Collections to automatically sort photos in the Library Module

Lightroom’s Library module is a great way to help you keep your images organized. You can create virtual folders called Collections (e.g. Ceremony, Reception, and Speeches for a wedding) that can even be placed inside of Collection Sets (e.g. Smith-Miller Wedding).

But what I find even more useful is the Smart Collections feature which allows you to dynamically organize your images, based on any number of conditions you specify. To create a Smart Collection, choose New Smart Collection from the Library menu and specify the parameters you want to use. Any picture that meets these criteria, at any point in your editing process, will automatically be placed inside the virtual folder you have just created.

five-lightroom-tips-for-beginners-smart-collection

In the above example I have created a Smart Collection that automatically sorts through all my photos, including any that I import after the Smart Collection is created, that meet specific criteria. Using Smart Collections are a great way to enhance your organization process, and help you sort through your images to focus on the ones you really want to work with.

5. Hold down the Option/Alt key when adjusting Develop sliders

The effects of many of the adjustments in the Develop module are self-evident; increase the Exposure and your image will get lighter. Increase the Saturation and your photo will lose a bit of color. But what about the adjustments that are not so easy to see? One particular set of sliders I use all the time is under Sharpening in the Detail pane, but the exact effects of the Radius, Detail, and Masking are sometimes difficult to see. This problem can be solved by holding down the Alt/Option key when moving almost any slider in the Develop module, which will show you a realtime display of exactly what is happening when you make the adjustment.

five-lightroom-tips-for-beginners-pastry

As I was editing this photo I needed to make some adjustments such as dialing down the Black levels, but I didn’t want to go so far so as to make any part of the image completely black. (That is, I did not want to clip anything in the picture.) By holding down the Option key as I adjusted the Black slider I was able to see a realtime display of what areas of the image were being affected:

five-lightroom-tips-for-beginners-pastry-option-key

In the above image the bottom of the pastry has become completely black, which means it cannot get any darker while the red areas will soon become entirely black if I continue to move the slider to the left. The yellow areas are being affected, but not so much just yet that I am losing my color data. This works for almost every adjustment slider in the Develop module, and can greatly assist you in making sure you are doing the edits precisely how you mean to.

These five Lightroom tips and tricks have been a major boon to me as I have worked with the program over the years, what about you? What are your favorite aspects of Lightroom that you find particularly handy? Or do you have any hidden gems that others might not know about? Leave your thoughts in the comments below.

googletag.cmd.push(function() {
tablet_slots.push( googletag.defineSlot( “/1005424/_dPSv4_tab-all-article-bottom_(300×250)”, [300, 250], “pb-ad-78623” ).addService( googletag.pubads() ) ); } );

googletag.cmd.push(function() {
mobile_slots.push( googletag.defineSlot( “/1005424/_dPSv4_mob-all-article-bottom_(300×250)”, [300, 250], “pb-ad-78158” ).addService( googletag.pubads() ) ); } );

The post 5 Practical Lightroom Tips for Newbies by Simon Ringsmuth appeared first on Digital Photography School.


Digital Photography School

 
Comments Off on 5 Practical Lightroom Tips for Newbies

Posted in Photography


6 Tips for Taking Better Natural Light Classic Portraits

10 Sep

On now until September 22nd (2015) over on Snapndeals – 20% OFF Wayne’s eBooK – Portrait Tips and Techniques: Natural Light Black & White Portraiture. Grab it before the deal expires.

DPS STUDY 1

RETHINKING NATURAL LIGHT

Many photographers choose to use natural light as their chosen style, almost as a badge of honour. Natural light is a wonderful source, providing ease of use and flattering light to your subjects, but you should be using it the same way as you would studio lights. You need to create light and shade that will add emotion or mood, not flat lighting that gives no shape, texture or mood. Hopefully these tips will help you on a path to refining your natural light classic portraits.

#1 – FINDING QUALITY LIGHT AND SHADOWS

First, find good quality light – preferably open shade, as this offers soft flattering light and is lower in contrast. Avoid the sun as your main light as it will cause harsh shadows and squinting, which is undesirable for quality portraits.

Open shade can be found under awnings, the edge of trees or buildings, and inside doorways or windows, for example. In these images the girls are positioned approximately 1.5 metres (5 feet) inside the doorway of an old timber shed.

Look for the shadows; they are equally important. Shadows subtract the light and create shape and mood.

After you have established your location, check the background. Even if you have found the perfect, open shaded location, make sure the background isn’t too contrasty with sunlit areas. These can be visually distracting, so try and select uncluttered backgrounds that are lower in contrast and darker than the subject’s face. This will allow the face to project forward by being the lightest tone against the background (all the images in this article demonstrate this).

DPS STUDY 2

#2 – FIND THE DIRECTION OF LIGHT

Once you have found good quality of light, check its direction. You want the light to come across your subject’s face at approximately 45 degrees to the nose, and from a higher angle. That height should also be at around 45 degrees, as a basic starting point.

You can check the catchlight positioning by looking at the eyes; there should be one in both eyes at around 10-11 or 1-2 o’clock. (This depends on the side of the face that is being lit and the structure of the eye sockets). Deep-set eyes will need a slightly lower light source. You should also notice the nose shadow to be at around 45 degrees.

To lower the catchlights you need to change the angle of your subject’s head by tilting more or less. Even moving the subject further away from the edge of an overhang will lower the angle of the light. It’s the opposite of being in a studio where you can move the lights. Natural light is fixed and requires you to move the subject and/or camera to achieve good lighting.

DPS STUDY 3

#4 – EYES ARE WINDOWS TO THE SOUL

Catchlights are very important in portraiture. They not only guide you where the light is coming from, but also create a sense of depth. TIP: no catchlights = NO photo. When there are no catchlights, there will be minimal, if any, texture and colour in the eyes. Always study the eyes for guidance.

#5 – SIMPLE POSING

The portraits here are the basic classic style, looking into the camera. It’s usually more flattering to angle the shoulders away from the camera, again 45 degrees is a handy starting point. Leaning the bodies and heads toward each other gives an emotional connection. Upright or leaning away would show detachment from each other.

It’s also a good practice to have the noses turned slightly away from the camera, particularly with adults. Noses that point directly at the camera will look broader in many cases, particularly when combined with flat lighting. With kids, it’s not as critical and good lighting will create better shape.

Arms and hands need to be posed simply so as not to draw attention. In images #1 and #2 above (top of article), the lower arms are bent downwards and the hands clasped softly. Things you should avoid are open fingers, particularly draped over a shoulder, as this can make a portrait busy and untidy. Elbows bent at 90 degrees should also be avoided. Here’s a simple mantra to remember when it comes to posing people’s heads, arms, legs, hands, hips, shoulders, etc:

IF IT BENDS – BEND IT. IF IT CURVES – CURVE IT. IF IT TWISTS – TWIST IT.

Applying this will help you avoid static poses.

DPS STUDY 4

DPS STUDY 5

#6 – EXPRESSION

Above all else, expression is the most important element in a portrait. In most cases, a poorly lit and posed portrait with a beautiful expression will trump a technically perfect portrait with an average expression in most cases, but this is no reason to pursue a path of mediocrity.

Expression is a personal thing. A moody, soulful style is my preference, but your sessions should always include various expressions such as laughing, smiling, pensive, etc. To achieve this soulful style you can’t be jumping around in a hyperactive mood expecting soulful looks. The best approach is a more Zen-like style, quietly giving direction. These classic style portraits produce beautiful open eyes, relaxed facial muscles, and true shape to the lips. Truly timeless, heart and soul portraits, but it all takes PRACTICE.

DPS STUDY 6

SUMMARY

  • Treat natural light photography the same as studio lighting.
  • Find quality soft light.
  • Look for shadows to create shape and mood.
  • Place your subject at 45 degrees to the light as a starting point.
  • The light source is fixed, so move your subject and camera to reduce the height of the light in the eyes.
  • Check for catchlights in the eyes.
  • Simplify your posing.
  • Soft expressions work best for classic low-key portraits.

SPECIAL NOTES

With each of these images, other angles of the face (2/3 face and profile) can be achieved by simply moving the camera position. Although the pose and light would remain the same, you may have to adjust the head tilts slightly and check your backgrounds.

Clothing colours also play a big part with quality portraits. Darker clothing works best for low-key portraits. Your eyes should be drawn to the brightest tone in the portrait, therefore, light-coloured clothing would be visually distracting.

On now until September 22nd (2015) over on Snapndeals – 20% OFF Wayne’s eBooK – Portrait Tips and Techniques: Natural Light Black & White Portraiture. Grab it before the deal expires.


googletag.cmd.push(function() {
tablet_slots.push( googletag.defineSlot( “/1005424/_dPSv4_tab-all-article-bottom_(300×250)”, [300, 250], “pb-ad-78623” ).addService( googletag.pubads() ) ); } );

googletag.cmd.push(function() {
mobile_slots.push( googletag.defineSlot( “/1005424/_dPSv4_mob-all-article-bottom_(300×250)”, [300, 250], “pb-ad-78158” ).addService( googletag.pubads() ) ); } );

The post 6 Tips for Taking Better Natural Light Classic Portraits by Wayne Radford appeared first on Digital Photography School.


Digital Photography School

 
Comments Off on 6 Tips for Taking Better Natural Light Classic Portraits

Posted in Photography


5 Tips for Newbie Landscape Photographers

10 Sep

2-for-1 special

As part of Landscape Photography Week here on dPS, we’re offering TWO for the price of ONE on our best-selling Living & Loving Landscape Photography ebooks!

Click here to take advantage of this offer.


I don’t specialize in Landscape photography but I wanted to go out and see what I could learn so that I could impart some useful tips for beginners who are new to shooting landscapes.

Gear for landscape photography

What gear did I bring with me? I brought two cameras, one lens and a tripod. A wide angle is generally the go-to lens for landscape shooting. I brought my 24-120mm f/4G.

Landscape shot of the Dublin mountains

The Dublin mountains

A tripod is essential for landscape photography for two reasons. First, you will will want to shoot with a small aperture like f/16, that means also using a slower shutter speed. It is better to keep ISO down low to 100 or 200 for less noise. Secondly, by having your camera on a tripod also helps you frame your shot, I’ll cover this more below. If you are going to do long exposures, I would recommend a cable or remote trigger release too. You could also use the built-in self-timer.

Note: I didn’t mention any kind of filters as in Neutral Density (ND), polarizers and so forth. I don’t have any, but I also feel that they are best used when your skills are more advanced and you want to capture movement to produce soft, blurry clouds and misty waterfalls. Plus they are not cheap to buy.

1 – Where do you start?

Start in your own locality. I know for me, I can get so used to my surroundings, that I don’t bother to actually see what’s there. I suppose it’s just familiarity. But when you travel to a new country you have fresh eyes, and everything around you is new and exciting.

So as I live at the foot of some wonderful mountains, I knew where to begin. By car, it only takes me 20 minutes (approximately) to arrive at some breathtaking scenery. My first port of call was this spot, see photo above.

Scoping an area beforehand is an important aspect in landscape photography. This gives you a lay of the land, a chance to look for the best vantage points, see where the sun sets, and so on.

2 – Time of day

The time of day is crucial, as most landscape photographers shoot in the golden hour or at dawn. This doesn’t mean that you can’t shoot at any other time of the day.

Trees-in-forest

Tibradden forest in the Dublin Mountains. I know it’s not taken at the golden hour but I do like the blue sky and white clouds peaking through the trees.

3 – Shoot Raw

I am not going to debate the merits of RAW versus jpeg here. Simply put, RAW offers the most detail, which is essential if you want to get the best out of your images for landscape photography. You can also use the graduated filter in Adobe Camera Raw (ACR) to retrieve details that may have been lost, such as blown out skies, or underexposed areas in mountain regions where shadow detail needs to be brought out. See more about using the Graduated filter in ACR.

The reason Graduated Neutral Density filters (not to be confused with regular Neutral Density filters) are used by landscape photographers is because the land and the sky need different exposure readings – so if you expose for the sky, the land can be too dark and if you expose for the land, the sky gets washed out. This is where a graduated filter comes in handy. The top part is dark, fading to transparent at the bottom.

4 – Where to focus?

For landscapes, you are usually aiming to have the foreground, as well as the background, in clear focus. So, you need a small aperture such as f/16. This means that the depth of field (DOF) is bigger, and more of the image is in sharp focus. As a general rule of thumb, you should focus roughly one-third up from the bottom of the frame.

Focus on an element in your scene using autofocus then switch back to manual focus on the lens to lock it. This ensures that you achieve maximum sharpness and depth of field throughout. If you have Live View, you can zoom the view in to full magnification to manually focus. For more in-depth knowledge on focusing for landscapes, especially how to use hyperfocal focusing, I’d recommend that you read Getting Landscapes Sharp: Hyperfocal Distances and Aperture Selection.

5 – Composition

Composition is essential when framing a landscape shot. I really had to change my style of shooting. I spent more time looking around before even pressing the shutter button. I needed to see what I was going to frame in my shot. The landscape around me was fantastic and expansive.

This is where the rule-of-thirds is a useful guide. Think of your photo with imaginary lines that are drawn dividing the image into thirds both horizontally and vertically. Place important elements of your composition where those lines intersect.

Rule-of-thirds for composition

I really like this tree and the way it’s branches were leaning in so far to the left of the photo. I thought one of the branches seemed to hover over the gap in trees in the background which seemed to say what-is-through-there? Maybe I have watched too many Hobbit movies!

Don’t be afraid to experiment. The next shot maybe not classified as a typical landscape shot but I just loved the lighting on the ferns. I opened the aperture to f/4.5 because I wanted a shallower depth of field, so that the background was a little blurred, giving the ferns some separation from the background.

Close-up-ferns

Close-up of some ferns in Tibradden forest in the Dublin Mountains using a wider aperture of f/4.5

You don’t have to shoot just using landscape (horizontal) mode, try shooting in portrait mode (vertical) as well. I shot the next two images using the portrait style. I wanted the rope bridge to be the focus of attention amongst all the tall trees.

Activity-park-in-forest

A rope bridge forms part of an activity centre in Tribadden forest.

rope-bridge-shadow-in-forest

The shadow of the rope bridge suspended 13 metres up in the trees made an interesting viewpoint leading into the base of the tree.

Tip: Trees like buildings can converge when using wide angle lens. This can be corrected in post-processing, using the lens correction filter in Photoshop or Lightroom. Also try not to have the body of trees touching the side of your frame, crop them out. It will only make your shot close in on itself, give your image room to breathe.

Conclusion

All in all, this exercise was a great excuse to get outdoors and get fresh air. If you don’t shoot landscapes, I would certainly recommend going out and giving it a go. It makes for a great day out plus you are honing your photography skills, just don’t forget the sandwiches!

Are you a landscape photographer? What techniques did you use? If so please share in the comments below.


Here on dPS this is landscape week – here is list of what we’ve covered so far. Watch for a new article (or two) on landscape photography daily for the next day or so.

  • 6 Tips for Better Low-Light Landscape Photography
  • Landscape Photography and the Human Element
  • 5 Ways a Telephoto Lens Can Improve Your Landscape Photography
  • Landscape Photography from the Side of the Road
  • 32 Majestic Landscape Photos to Inspire Your Wanderlust
  • Weekly Photography Challenge – Landscape
  • Landscape Photography – Shooting the Same Location Through the Seasons
  • How to Solve 5 Composition Conundrums Faced by Landscape Photographers
  • 6 Tips for Creating More Captivating Landscape Photographs
  • Tips for Getting Started with Urban Landscape Photography
  • 3 Simple Steps to Make Your Skies Pop in Lightroom
  • Equipment Tips for Landscape Photography

googletag.cmd.push(function() {
tablet_slots.push( googletag.defineSlot( “/1005424/_dPSv4_tab-all-article-bottom_(300×250)”, [300, 250], “pb-ad-78623” ).addService( googletag.pubads() ) ); } );

googletag.cmd.push(function() {
mobile_slots.push( googletag.defineSlot( “/1005424/_dPSv4_mob-all-article-bottom_(300×250)”, [300, 250], “pb-ad-78158” ).addService( googletag.pubads() ) ); } );

The post 5 Tips for Newbie Landscape Photographers by Sarah Hipwell appeared first on Digital Photography School.


Digital Photography School

 
Comments Off on 5 Tips for Newbie Landscape Photographers

Posted in Photography


Equipment Tips for Landscape Photography

09 Sep

2-for-1 special

As part of Landscape Photography Week here on dPS, we’re offering TWO for the price of ONE on our best-selling Living & Loving Landscape Photography ebooks!

Click here to take advantage of this offer.


“The best camera is the one you have with you” someone said. Is it true? Almost.

The point is that if you are a landscape photographer and you want to pursue the perfect sunset shot, it’s unlikely that you will achieve that goal with your iPhone.

Here’s some advice on the gear you should have in your backpack, both for what I call primary gear (camera, tripod, and lenses) and for all other accessories. Without further ado, let’s start!

Image 0

Camera

Don’t focus on the brand, focus on technical features. Given that all cameras today have all the basic functions, for landscape photography you need a camera with a good (please read “great”) dynamic range and weather resistant body – that’s all.

Dynamic range is essential, because it defines the ability of the camera to capture shadow and highlight details at the same time. Its unit is the Exposure Value (EV), and a value of 14 EV or above identifies an excellent camera.

Weather resistant means that the camera is weatherproof to a certain extent (note: weatherproof does not mean waterproof!). Remember that you will not take shots comfortably seated in a studio, so you should be prepared for humidity, rain and snow.

A Full Frame or an APS-C DSLR camera is up to you and to your budget.

In the last few months I noticed an incredible hype for mirrorless cameras and I must confess that I was tempted too. They probably will be the future, but not today, at least for landscape photography. The point is that the only real advantage of those camera is the weight, and in a 10kg backpack, saving 0.5kg is quite useless. Also, do not be duped by megapixels: you need a 42.2MP camera ONLY if you are going to print larger than 24×16″, and there’re still great cameras with a lot of megapixels in the DSLR market.

Image 1

Nikon D810 – image courtesy of Nikon

Lenses

Landscape photography, fortunately, doesn’t require a lot of lenses, just a few good ones.

Focus on wide angle lenses: for a full frame camera, lenses with a range from 14-35mm are a great choice, from 10-22mm if you have an APS-C sensor camera. Zoom lenses are okay, but obviously prime lenses are best for sharpness and overall quality.

Another point for DSLR cameras is that there are really few wide angle lenses for mirrorless cameras. If you are thinking of using your DLSR lenses on a mirrorless camera using an adaptor, say goodbye to quality.

As with the camera body, I recommend weather resistant lenses: rain, humidity and snow could be a serious problem.
Finally, don’t focus on useless features: as you are going to shoot between f/8 and f/11 in the 95% of the times, you don’t need a fast f/2.8 lens (and for this choice your wallet will be extremely happy!). Also a stabilized lens is useless, because as you are going to use a tripod, you’ll turn if off every time anyway.

Image 2

Zeiss Distagon T* wide angle lenses – image courtesy of Zeiss.

Tripod

No, you can’t use a table or a flat surface, you need a real tripod. They could be really expensive, but as for other gear, focus just on some key features. Truth be told, there is just one feature that you need – sturdiness.

The aim of a tripod is to let you take shots avoiding any vibration, so you need something that can resist the wind. If you can, choose one with independent legs as they could make the difference if you’re on a rock in front of the sea or on any other irregular surface. Aluminium or carbon fibre is up to you (and your budget). Just remember that a carbon fiber tripod is not just lighter, but it will also not be affected by the galvanic corrosion of water, so if you’re a seascape photographer this could make the difference on its life expectancy. Finally, remember that the danger of using a carbon fiber tripod during a thunderstorm with lighting, is just an urban legend.

Image 3

Induro tripods – image courtesy of B&H Photo Video.

Remote shutter

To further reduce the possibility of introducing any vibration, I really recommend the use a remote shutter. There are many different type of remote shutters and it can be hard to decide which one is best for you. In my opinion, avoid wireless/infrared remotes and go for the more reliable cabled solution. If you love time-lapse or long exposure photography, choose a programmable one.

Avoid smartphones applications too: they will drain the battery of your phone very quickly and your phone is not weatherproof.

Genuine or compatibles? Of course, genuine remotes are probably more reliable, but they are quite expensive, especially the programmable ones. That said, I’ve been using a compatible programmable remote for three years, and it’s still working perfectly.

Image 4

Nikon MC-36 programmable remote shutter – Image courtesy of Nikon.

Filters and filter bag

You camera could have the sensor with the best dynamic range available, but unfortunately it’s far from the dynamic range of human eye. You can overcome this limit in one of two ways: post-production or using filters on camera. For a cleaner result, as I love to spend my time in the field and not behind the monitor of my computer, I suggest you use filters. Also because there are some filters, like Neutral Density and Polarizing filters that are not possible to simulate in post-production. There are many different kinds of filters and hundreds of different uses of them. We could speak for hours about this topic, so for now let’s just consider them as something that cannot be missing from our backpack.

Finally, if you are a filter user, don’t forget to bring with you a filter bag: handling filters on the top of a cliff or with your feet in the ocean is always a challenge: just one misstep and your precious glass is gone. Look for a dedicated filter bag and hook it to your belt, around your shoulder, or fixed to your tripod. I’ve tried many solutions, but actually I really believe that the Terrascape bags are the best, and most reliable solution on the market.

Image 5

Terrascape filter bag – image courtesy Terrascape.

Tablet/Smartphone

Even you are an old-school photographer, you should consider the incredible advantages provided by the use of a tablet (or a smartphone) in the field. Here are just few:

1) Cartography: Download the awesome, free app Maps.me and you’ll never get lost. You will not be only able to download the needed maps for offline use, but you can also import .kmz files, and this means that you’ll have always with you all the spots you found on Google Earth to reach them easily!

2) Weather: A good landscape photographer should continuously monitor the weather evolution. For that reason, the daily weather forecast is not enough. Download an application that lets you see the actual satellite/radar situation and you’ll be able to select between two or more spots according to the short term forecast. A wise choice is AccuWeather.

3) Planning: If you want to take a great sunset shot, you must know exactly where the sun will be, in the location where you’ll stand with your tripod. Once you know that, you’;; need a tool that allows you to calculate, quickly and accurately, all the needed exposure parameters to properly set your camera. There are many different applications that do theses task, but just one that let you do everything all in one app: PhotoPills

Image 6

Image courtesy PhotoPills

4) Food: Is there something better than having the perfect breakfast after a cold sunrise session, or a warm and delicious soup after a rainy sunset? An application like Tripadvisor will let you quickly find the best restaurant or coffee near your your location.

Cleaning cloths and a rain cover

A landscape photographer is at the mercy of the weather and Mother Nature, so you must consider that a sunny day can become a rainy nightmare in a few hours, so you must be prepared.

First of all, be ready to protect your camera and your lens. Even if they are weatherproof, it’s not a good idea to test the quality control system of the camera manufacturer. You can buy an expensive rain cover from a photography website, or for just few dollars you can go to a local market to buy some refrigerators bag for vegetables…they work perfectly!

Also remember that the overall quality of your shoot is affected by how clean your lens is – bring with you as many microfiber cloths as you can.

Extra tip: if you are using slot-in filters, to protect them from rain while you are not shooting, use a shower cap.

Image 7

ThinkTank Rain cover – image courtesy of ThinkTank

Torches (flashlight)

If you are out with your camera to capture a marvellous sunrise, it’s quite easy to remember to bring with you a torch or flashlight to reach the desired location. Do the same for sunset! After sunset the light fades out very quickly, and you may find yourself losing orientation in the darkness.

If an hand torch is fine, the best solution is a head torch (head lamp – get one at a camping supply store) is the best solution as it will let you both hands free. Remember – safety first.

Image 8

Petzl Tikka RXP Headlamp – image courtesy of Petzl.

Spares

Do you know what could be worse than having a dead battery or a full memory card? Nothing. Believe me, if you’re in front of the perfect sunset just with your iPhone it’s a pity, but if you’re there with your camera and a dead battery, you’ll blame yourself for the rest of your life. Remember that the intense use of Live View mode or extreme cold weather may compromise the charge level more quickly than expected.

Also bring always with you a spare memory card, even if your primary one has a lot of space and you want to take just few shots – it may break or crash. If your camera has two card slots, use them simultaneously, because having a live backup is always a great idea.

Image 9

Loupe

It’s difficult to review images on your LCD display when it’s sunny, so I always use a Loupe. They are also useful for a more accurate manual focus as they can reach a 2x magnification.

Image 10

Kinotehnik Loupe – image courtesty of Kinotehnik.

Bubble level

Every time you straighten the horizon line in post-production, automatically you crop a small amount of the image. So, why not to take your shoot correectly with a straight horizon line?

If you are like me, it’s impossible without help from outside. If you own a modern camera, you may have a built-in virtual horizon function. But if your camera is older, or simply don’t have this function, consider buying a hot shoe bubble level (also useful to protect the hot shoe of your camera against oxidation).

Image 11

Hot shoe bubble level

Clothing

Don’t underestimate the importance of your clothing; it is as essential as your camera. If you are suffering from heat or cold, you’ll definitely focus on yourself, and not on photography. You are dressed properly when weather conditions do not affect your activity. In summer, don’t forget to bring with you a water bottle and a cap; in winter, never forget gloves, a neck warmer and a wool hat. Always bring with you a rain cover and an umbrella (that you can also use to protect your filters and tripod from rain and wind).

Image 12

The North Face gloves – image courtesy The North Face.

First Aid Kit

It’s not that difficult to peel the skin from one knee on a cliff, or get a small wound on a finger, and when it happens a bandage and a disinfectant are worth a thousand sunsets. Again – safety first.

But don’t think just for yourself, think also for your gear. Always bring with you a swiss multitool knife and some duct tape. If they are able to fix the wing of a plane, they will be able to fix the leg of your tripod too.

Image 13

First Aid kit – image courtesy Care Plus.

Bonus tip: music!

To take a great landscape picture, you should be in the right mood, and for me there is nothing like hearing my beloved Ludovico Einaudi, while wandering deep in nature, with my tripod on my shoulder. Remember that you can have thousands of dollars of equipment in your backpack, but they are completely useless if your soul doesn’t want to use it.

Image 14

What gear do you use for landscape photography?


Here on dPS this is landscape week – here is list of what we’ve covered so far. Watch for a new article (or two) on landscape photography daily for the next day or so.

  • 6 Tips for Better Low-Light Landscape Photography
  • Landscape Photography and the Human Element
  • 5 Ways a Telephoto Lens Can Improve Your Landscape Photography
  • Landscape Photography from the Side of the Road
  • 32 Majestic Landscape Photos to Inspire Your Wanderlust
  • Weekly Photography Challenge – Landscape
  • Landscape Photography – Shooting the Same Location Through the Seasons
  • How to Solve 5 Composition Conundrums Faced by Landscape Photographers
  • 6 Tips for Creating More Captivating Landscape Photographs
  • Tips for Getting Started with Urban Landscape Photography
  • 3 Simple Steps to Make Your Skies Pop in Lightroom

googletag.cmd.push(function() {
tablet_slots.push( googletag.defineSlot( “/1005424/_dPSv4_tab-all-article-bottom_(300×250)”, [300, 250], “pb-ad-78623” ).addService( googletag.pubads() ) ); } );

googletag.cmd.push(function() {
mobile_slots.push( googletag.defineSlot( “/1005424/_dPSv4_mob-all-article-bottom_(300×250)”, [300, 250], “pb-ad-78158” ).addService( googletag.pubads() ) ); } );

The post Equipment Tips for Landscape Photography by Francesco Gola appeared first on Digital Photography School.


Digital Photography School

 
Comments Off on Equipment Tips for Landscape Photography

Posted in Photography


Tips for Getting Started with Urban Landscape Photography

08 Sep

2-for-1 special

As part of Landscape Photography Week here on dPS, we’re offering TWO for the price of ONE on our best-selling Living & Loving Landscape Photography ebooks!

Click here to take advantage of this offer.


Memorable Jaunts Urban Photography Article for Digital Photography School Downtown Chicago Skyline as seen from Museum campus

My friends always joke that if I had my way I would pack my belongings, load up the family car, and head to the mountains to live out the rest of my days away from all the chaos of city life. What a happy dream, and one that someday I hope to make a reality, but for now I live in a urban city as far away from mountains as you can get. Urban living does have some benefits, in that it presents some wonderful photographic opportunities, if you know where to look and how to go about it.

There is some confusion among photographers between the terms: urban photography and street photography. Technically they are quite similar, and it is very easy to overlap the two, but here’s how I look at them. To me, urban photography portrays the urban landscape (e.g. buildings, bridges, structures, monuments, etc.) and does not necessarily include people where as street photography often features people or other human elements living in an urban setting. Now keep in mind, urban in itself has different meanings for different people. Wikipedia says, urban is anything related to a city. I like to think of urban as anything that is not rural (e.g. no corn fields, agricultural lands or remote mountain areas). This opens up a whole gamut of photographic opportunities for every pallet.

In general, here are some of the rules or tips I like to follow while on an urban photo expedition.

Preparation

Memorable Jaunts Urban Photography Article for Digital Photography School Dharamsala Monastery Photo

A little prep work paid off as I was able to photograph inside one of the monastery temples in Dharmsala, India

Before going on an urban photography excursion it is very important to be prepared. That not only means packing your gear the night before, and making sure all the cards are formatted and all batteries are charged (although you should do that too), but it is also beneficial to understand where you are going, and how are you going to get there.

What are the traffic patterns? Are there any parking restrictions? Do you need any special permits to photography there? Is photography even allowed? The Art Institute of Chicago is a perfect example. While photography is permitted, they don’t allow large camera bags or roller bags. So a small purse/backpack with a single camera and lens setup is your best bet. Do some research, and ask around if other photographers have experienced any issues in the location you want to explore.

Gear choice

I touched on this briefly already, but most urban photography expeditions are best done on foot where you are free to explore alleyways, buildings and street corners. I don’t know about you, but walking with about 30lbs of gear on my back is not my idea of fun, unless I am backpacking in the mountains! Pack light and carry at most two lenses.

My camera of choice is the Canon 5D MKIII and my go to lenses are Canon EF 24-70mmL zoom and Canon 100mm macro. Sometimes if I am brave, and in the mood for a good upper body workout, I will ditch the 100mm macro and carry my Canon EF 70-200mm. I carry an extra battery for my camera and one extra 32GB memory card. All of these fit comfortably in my backpack.

Shoot smart

Memorable Jaunts Urban Photography Article for Digital Photography School Willis Tower Image Downtown Chicago

A really wide shot of Willis tower with other buildings around it, provides a sense of scale and grandeur of one of the tallest buildings in the world.

Often we tend to photograph first and think later. The mindset of, “I have a limited amount of time so I will take pictures of everything and anything and cull my images later” is one that is very easy to adapt. I am guilty of this as well, and have to consciously remind myself to think first, and photograph later. But challenge yourself to stop being a lazy photographer (I fall into this trap too) and start photographing smart. Especially with urban photography, there is only so much you can portray about a building or a monument. Limit yourself to

  • One horizontal photo of said object/building/monument
  • One vertical photo
  • One zoomed in detail if there is anything particularly appealing
  • One wide angle shot to give a sense of place and space


Memorable Jaunts Urban Photography Article for Digital Photography School Mumbai Sea Link Photo

However a zoomed out, wider view of the entire bridge in the early morning hours with the sea, gives the viewer a true sense of its beauty

Memorable Jaunts Urban Photography Article for Digital Photography School Mumbai Sea Link Photo

A zoomed in view of Mumbai’s famous Sea Link does NO justice what so ever to this engineering marvel.

Angles and Framing

Memorable Jaunts Urban Photography Article for Digital Photography School Pfister Hotel Downtown Milwaukee

Adding the name of this historic hotel in downtown Milwaukee in the frame makes it easy to find, and completes this story.

This tip goes hand in hand with the shoot smart strategy above. Try and get everything correct in-camera so you spend less time in front of the computer, and more time out exploring. I find that when I am out photographing urban scenes, I am shooting in conditions where I don’t have much control – think harsh midday sun, far away subjects, etc. Hence, I pay particular attention to the technical aspects I can control.

When I am framing my subject and composing the image, I try to convey a story. There is no right or wrong way to do it, remember it’s your story, so as long as you can convey your message, go for it. When photographing a really tall building, go wide. If you cannot go wide, then try to either get the top half or the bottom half. Is it a historic site? Are there some special markers or markings? Something that will help explain why you have taken that particular shot?

Experiment with various angles as well – get down low or shoot from high above. I am not a big fan of tilted angles, particularly on urban landscapes. They make me dizzy and I always wonder which way am I supposed to tilt my head to see the image. Unless the building has a natural slant like the Leaning Tower of Pisa, I don’t get the image! Of course, this is just my personal preference. If tilting is your thing, your forte – then go for it. Experiment and see what works for you.

Memorable Jaunts Urban Photography Article for Digital Photography School Chennai Train Station

The name of the train line at the front of the train gives this image a sense of place (and yes, I included people in this urban photo).

Memorable Jaunts Urban Photography Article for Digital Photography School Downtown Milwaukee Photo

An apartment community with boat parking docks is aptly called Harbor Front in Downtown Milwaukee, Wisconsin

End goal

Always have an end goal for any photographic exercise. Goals can vary. Maybe you want to try out new gear, explore modern architecture, or maybe you just want to explore a new city or an old favorite neighborhood though your view finder. No matter what the goal, be clear and set your own expectations.

Memorable Jaunts Urban Photography Article for Digital Photography School Taj Hotel Mumbai Photo

The majestic Taj hotel in Mumbai taken from a roof top building several miles away.

Memorable Jaunts Urban Photography Article for Digital Photography School Downtown Chicago Fountain Photo

A fountain in Downtown Chicago comes alive as the sunlight hits the water flowing out of it (my personal perspective, my story).

Memorable Jaunts Urban Photography Article for Digital Photography School Downtown Milwaukee Photo

I wanted to show the beautiful bridge that acts as an entryway to downtown Milwaukee, and decided to live with the glass refection very obvious against the blue sky (this was taken from the sky deck of the Pfister Hotel).

At the end, when all is said and done, if there is one tip I can give you, this is it – remember to have a good time exploring, and don’t get too caught up in getting the perfect shot. It is okay to put down the camera at times, engage in conversation with others, and also experience the space and place you are in with your mind’s eye! So get out there and explore.


Here on dPS this is landscape week – here is list of what we’ve covered so far. Watch for a new article (or two) on landscape photography daily for the next day or so.

  • 6 Tips for Better Low-Light Landscape Photography
  • Landscape Photography and the Human Element
  • 5 Ways a Telephoto Lens Can Improve Your Landscape Photography
  • Landscape Photography from the Side of the Road
  • 32 Majestic Landscape Photos to Inspire Your Wanderlust
  • Weekly Photography Challenge – Landscape
  • Landscape Photography – Shooting the Same Location Through the Seasons
  • How to Solve 5 Composition Conundrums Faced by Landscape Photographers
  • 6 Tips for Creating More Captivating Landscape Photographs

googletag.cmd.push(function() {
tablet_slots.push( googletag.defineSlot( “/1005424/_dPSv4_tab-all-article-bottom_(300×250)”, [300, 250], “pb-ad-78623” ).addService( googletag.pubads() ) ); } );

googletag.cmd.push(function() {
mobile_slots.push( googletag.defineSlot( “/1005424/_dPSv4_mob-all-article-bottom_(300×250)”, [300, 250], “pb-ad-78158” ).addService( googletag.pubads() ) ); } );

The post Tips for Getting Started with Urban Landscape Photography by Karthika Gupta appeared first on Digital Photography School.


Digital Photography School

 
Comments Off on Tips for Getting Started with Urban Landscape Photography

Posted in Photography


Top 6 Interview Tips For Making It In The Photography Industry

08 Sep

Photography Industry Leaders Share Their 6 Top Interview Tips For Getting Ahead

Top 6 Interview Tips To Advance In The Photography Industry

Hey there FashionPhotographyBlog.com readers. Our friends from the Dots are back once again to share great tips from photography industry leaders who attended their portfolio masterclass in London, UK. The Dots is a community of creative professionals, designed to connect creatives with collaborators, companies and commercial opportunities. They believe in collectively building a stronger, more profitable and diverse creative sector, similar to us here at FPBlog. We are super excited to have them here with us again on our website.


Just in case you may not be aware, The Dots hosted a Photography Portfolio Masterclass at Spring Studios to give talented emerging photographers the chance to have their work reviewed by some of the UK’s most prominent picture editors and photographic agents. It was also an opportunity for these budding photographers to ask questions and engage in dialogue with these photography representatives, who would be otherwise out of reach. 


With such a wealth of collective experience in the room, they all must have heard all sorts of answers photographers give in interviews when they come to meet them. This is why the team at The Dots took each of them aside to ask them for their best interview tips they could give to photographers to get ahead in the hugely competitive photography industry. Here’s what the photography industry representatives revealed:


6 Interviews Tips For Photographers Who Want To Move Up In The Industry


  1. Research


It may seem obvious to some, but our industry leaders’ main interview tip was to make sure you do your research.


Jamie Klingler (Publishing Manager, Shortlist/Stylist Magazine) made it very clear that “if you walk in and you don’t know what my job is, you don’t know where I’ve worked before, you haven’t seen any of the shoots I’ve produced before – you’re not gonna have an ‘in’ with me, you’re not gonna be showing me your professionalism.”


David Birkitt (Owner & Managing Director, DMB Represents) noted that you should “have a really good reason as to why you’re coming to see me, be aware of what I do. Be aware of something you can add to what I’ve got, not replicate what I’ve got. Have a goal, have a reason for why you want to come, and have at least one thing that you wanna learn.”


Our golden rule for interviews: Do your homework!


  1. Have a point of view


(Robin Derrick, Executive Creative Director, Spring Studios) illuminates why perfectly – “when people ask me how to become a fashion photographer – which is mostly what I commission. What they should remember is the word ‘Fashion’ is as big as the word ‘Photographer’ in that phrase, and it’s very important for a fashion photographer to have a point of view on fashion […] most people can take a picture; I think really learning about fashion and having a point of view on that is normally what improves the work.”


Holly Hay (Photographic Editor, AnOther Magazine & Another Man) reinforced this notion, stating that she also looks for “someone who has something to say, someone who has an opinion on the world and on fashion and on style.”


  1. Make sure your style fits.


If your work is more ‘classic’ than ‘edgy’ then there’s no point in applying for a job at places such as Dazed or Vice as that’s not the kind of work they’re looking for, it’s “a waste of time for everybody, a waste of time for the photographer and for ourselves” Dalia Nassimi (Deputy Picture Editor, WIRED).


Your time is precious; make sure you’re not wasting it!


  1. Be passionate.


Jamie Klingler needs to see passion from a photographer in an interview – “it’s not an easy job, we’re not in this because we want to work 9-5, we’re in this because we want more. So you have to show me that you want to give more and you want to collaborate more.”


Dalia Nassimi points out that, “in magazines – you’re not in it for money you’re in it for the experience, for the exposure. You’re going to get access to a really interesting person or access to a really interesting company. That’s what we’re giving you – go run with it, because in ad world you don’t get that.”


So, in your interview, be passionate about the project and let them know how much you want the opportunity to work with them.


  1. Be on time


Again it may seem obvious, but punctuality is crucial in an interview. It’s the very first impression you give to the interviewer and you don’t want it to be a bad one, as Jamie Klingler stresses, “if I think you’re late for an interview you’re gonna be late for my shoot and I just don’t deal with lateness […] I’ve never hired anyone that was late for an interview.”


And Finally…


  1. Be persistent


After so many emails sent with no response, it can feel like you may never get your big break.


But Holly Hay’s advice for breaking into the industry is to “have persistence – don’t feel like you’re chasing people. Everyone is so busy they won’t feel hounded […] it’s all about timing – hitting someone’s inbox at the right time. So persistence and be brave, and stay true to why you originally started taking pictures.”


What did you think about these photographer’s interview tips? Hopefully, next time you are sitting at the desk of a photography magazine editor or creative director to pitch an idea or show them your portfolio, you will now be better prepared. If you have any interview tips for getting ahead in the industry that you want to share, that hasn’t been mentioned in this post, or you want to leave a comment about the ones listed above please feel free to write them in the comment section below. 


To find out  more about The Dots’ next Photography Portfolio Masterclasses here: https://the-dots.co.uk/about/portfolio-masterclasses


You can also check out The Dots’ Vimeo channel for video interviews, tips & highlights from the Photography Portfolio Masterclass here:  https://vimeo.com/album/3444505


IMAGE SOURCE: 

Feature image & images 1: courtesy of Jack Woodhouse


Fashion Photography Blog

 
Comments Off on Top 6 Interview Tips For Making It In The Photography Industry

Posted in Uncategorized