RSS
 

Posts Tagged ‘Tips’

10 Tips for Better Interior Photography

10 Oct

Whether it’s because of a love of seeing what other people do with their homes, or because we’ve got a friend in real estate, loads of us are turning to real estate photography. Of course anyone can run around and shoot a house in a few minutes. It may be useable, but better images command a better price for a house, either for sale or rental. So what can you do to make your interior photography stand out from the others?

Well, quite a lot actually. Some of it just boils down to a basic understanding of what an interior shot requires. Great angles, straight walls, and even light make a massive difference to the shot. We’re not talking about high end, multi-light setups with tilt shift lenses here, just getting better shots.

#1 – Use a tripod

Tips for better interior photography 1

You can nip around and shoot handheld, but for many houses, you may need longer exposures. High ISO will just introduce too much noise, so a tripod is the best option. It does slow you down, but it also makes you concentrate on the shot more. You can use the time to check around the frame for stray cables, or clutter, and create the composition before you hit the shutter button. A few of the other tips benefit from using a tripod as well.

#2 – Use Live View

I shoot with a Fuji X-T10, so everything is live view, either by screen or by electronic viewfinder. Most cameras have a Live View option (if your camera has a video mode you likely have Live View), meaning you can see the shot before you take it. It’s even better if the camera has a tilt screen.

Tips for better interior photography 2

#3 – Go wide

Shooting wide can make the room look great, though you need to be careful that you don’t over do it. Sitting tight into one corner while you try to get the other three corners in just looks wrong. Don’t do it. Anything in the 16-24mm range on full frame (or the crop equivalent which equates to 10-16mm approx.) is great. You also don’t need to show everything. Our eyes and brain will fill in gaps, so half a cabinet and the pillows section of a bed work fine in a photo. I use the Samyang 12mm lens (check prices for that lens on Amazon or B&H Photo) for my wide interior work.

Tips for better interior photography 3a

Tips for better interior photography 3b

#4 – Shot one or two point perspectives

There are standard views you can shoot. A 1-point perspective is shooting so the sensor plane is parallel to a wall. It shows the side wall leading into the back wall and helps set a scene. A 2-point perspective is where you’re shooting into a corner. The corner doesn’t need to be centered in the frame, but don’t try and show three walls.

Tips for better interior photography 4a

Tips for better interior photography 4b

#5 – Shoot from mid-room height

We can’t all afford a tilt-shift lens to keep perspective in check, so it’s a really good idea to shoot with the camera at or slightly above mid-room height. This means you can keep the camera aimed out straight to keep the walls vertical. While the perspective distortion you get can be corrected in post-production, it’s much easier to get it right in camera. This is another reason to use a tripod as well.

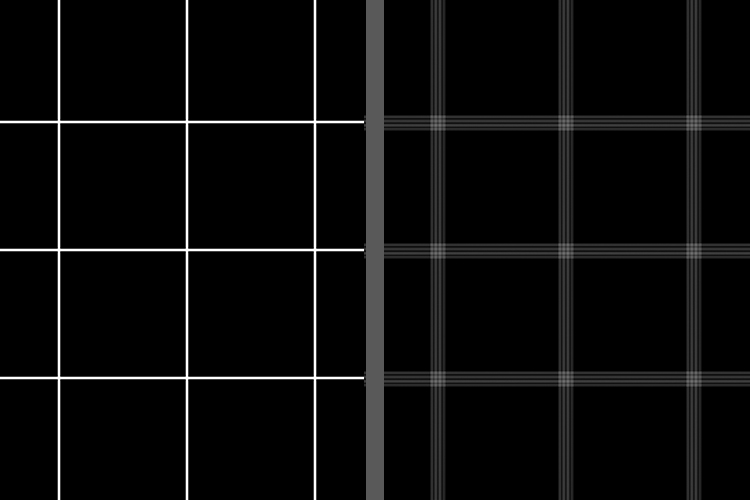
#6 – Use a bubble level

Most cameras have an electronic level, but not all. Even then, some only work for the horizon line, and don’t show tilt. There’s also a question of tolerance too. I find a little hotshoe bubble level to work great, and you see exactly when the camera is level, both side to side and up and down. The latter is essential to keep the walls looking straight.

Tips for better interior photography 6

#7 – Bracket, bracket, bracket

When shooting interiors, there’s often a huge range of light in a room. From the light outside to the darkest corners of a room. Often it’s more than your camera can capture in one shot. Bracketing is your friend here. This means you’re taking a normal exposure, a shot 2 stops underexposed, and one 2 stops overexposed. Lightroom’s Merge to HDR function can be used to combine the shots for more editing leeway. You can also opt to use more shots (4 stops under and overexposed if you want even more latitude) for example, when you want to show the view outside a window.

Tips for better interior photography 7

#8 – Use fill flash

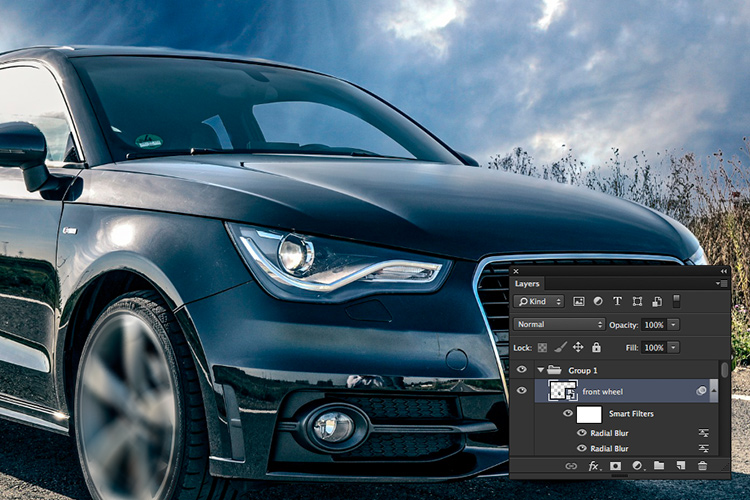
Another way to bring down the dynamic range is to use bounced flash to fill in the shadows. By aiming your flash at the ceiling and walls behind you, you can lessen the shadows in the area in front of you. It’s possible to do this on-camera, but it works well off-camera too. You can even just hold the flash in your hand pointed at the ceiling.

You’ll need a radio trigger for the flash, or a system with built-in triggers like the Cactus RF-60 (price on Amazon and B&H Photo) and V6ii trigger. See the difference in the towels and the near part of the bed in these photos? That’s what fill flash does. It’s subtle, but lifts the light in the room.

Tips for better interior photography 8a

Tips for better interior photography 8b

#9 – Go vertical for magazines

With so much interior work viewed on the web, there’s been a shift towards horizontal images in the interior photography world. But print magazines are still out there, and if you want your work published, you’ll need to shoot verticals for single magazine pages. Verticals usually mean letting the eye fill in gaps, so make use of composition to show hints of the room.

Tips for better interior photography 9

#10 – Post-processing magic

Get as much right in-camera as possible, but do edit your Raw files to bring out their best. When post-processing in a program like Lightroom, you should bring the Highlights down and open up the Shadows. Next bring the Blacks down to ensure that the contrast lost from opening up the Shadows doesn’t impact the image too much. A little Clarity can also help. Find a Lens Profile in Lens Corrections to correct for distortions. Use Lightroom’s Upright tool to fix perspective issues in the image that can happen.

Tips for better interior photography 10

Conclusion

Hopefully you’ve found these tips helpful for getting started doing interior photography. If you have any others to share please do so in the comments below.

googletag.cmd.push(function() {
tablet_slots.push( googletag.defineSlot( “/1005424/_dPSv4_tab-all-article-bottom_(300×250)”, [300, 250], “pb-ad-78623” ).addService( googletag.pubads() ) ); } );

googletag.cmd.push(function() {
mobile_slots.push( googletag.defineSlot( “/1005424/_dPSv4_mob-all-article-bottom_(300×250)”, [300, 250], “pb-ad-78158” ).addService( googletag.pubads() ) ); } );

The post 10 Tips for Better Interior Photography by Sean McCormack appeared first on Digital Photography School.


Digital Photography School

 
Comments Off on 10 Tips for Better Interior Photography

Posted in Photography


Winter is Coming: Here are some tips on what and where to shoot when it gets cold

10 Oct

Winter is Coming

Winter is only a month or two away and many photographers will find it challenging to press on through the dreary winter months; especially those of us that live in Seattle or other areas where wind, rain, sleet and snow pound the region for months on end.

In this article I’ve outlined some tips to keep your landscape photography fresh when the weather starts to head south.

Photograph Transitions

The transition between fall and winter offers up a unique opportunity to photograph fall color under a fresh dusting of snow. If the forecast is calling for snow toward the end of fall, head out and see what you can find!

The warmer colors of the fall leaves and foliage will be presented in stark contrast against the cold tones of the snow and can make for very interesting and dynamic images. The above image was taken in the central Cascade mountains of Washington state at the end of Fall.

Head to the Desert

This may sound like a weird tip, but if you have any sort of opportunity to visit the desert or the canyon lands of any kind during the winter, do it! Places like Bryce Canyon in Utah (pictured above) and the Grand Canyon in Arizona offer very unique conditions and compositions that the average tourist won’t get to see during the summer months.

Snow can add a nice color contrast to the desert landscape and can also add soft textures to the arid environment. As an added bonus you won’t have to deal with the crazy crowds and 100 degree temperatures.

Icy Waterfalls

Shooting waterfalls during the winter months can often times make even popular and well shot locations look refreshing and new. Multnomah falls is one of the most recognizable waterfalls in Oregon and even it can take on a different appearance during the winter.

The frozen spray from the falls can add some really nice textures and visual elements to your images. The snow can also contrast well with the icy blue water flowing over the falls.

  • If you plan to shoot waterfalls or any sort of moving water during the winter definitely invest in a good set of micro-spikes (for traction) to give you an extra edge for hiking and climbing.
  • Trekking poles (your tripod can work in a pinch) are also a great idea to help with stability and balance while transversing icy terrain. 
  • If your tripod comes with metal spikes or feet it’s always good idea to bring them along as they may work better (or worse) depending upon conditions.
  • Hip-waders and Gortex can definitely help keep you dry and comfortable.

Let’s face it, slipping and falling into a river or on a rocky slope isn’t something you really want to do in cold weather.

The Mountains are Calling

Snow and the winter weather that comes with it can really add depth and layers to your images. Heading to the mountains with a longer focal length lens can really help to emphasize winter weather conditions such as fresh snow, low clouds and fog. 

When the weather looks to be heading south I love to head up to the mountains to check out how the conditions are shaping up for sunset and sunrise.

  • Bring waterproof and breathable layers, snow shoes and any other supplies that you may need when you find yourself hiking in cold conditions.
  • Packing a Jet Boil (or another source of heat) and some instant meals can be a lifesaver if you’re in a pinch.
  • A GPS can be your best friend if your tracks get covered by fresh snow.
  • Check the weather forecasts often and do some research to ensure that you don’t find yourself in the wrong place at the wrong time.

Chase the Storms

The sunsets that often follow winter storms can offer some of the most intense and gorgeous light that you can capture. To really take advantage of this try heading to the coast just as a low pressure system has begun to move on shore. It takes a bit of planning but the sunset/sunrise conditions on the back edge of the storm can be absolutely spectacular! The above image was taken in late winter at Cape Kiwanda on the Oregon Coast.

  • Check the weather forecasts hourly when planning a trip like this.
  • The National Weather Service here in the US is a great place to track weather and believe it or not the Weather Channel website offers some of the most accurate forecasts you can find on the internet. 
  • The NOAA Hi-Def radar smartphone App can give you a great deal of insight into minute by minute precipitation and cloud cover forecasts.

As an added bonus you won’t have to deal with that pesky marine layer that often plagues the west coast of the US during the summer months. 

Stay Close to Home

If the conditions are just too dangerous or you just don’t have time to plan a trip, look to areas near you for unique vantage points and compositions that can offer up very different photographic results during the winter months. This was taken near my home in Snoqualmie, WA. 

Get creative in your surroundings! This shot was taken with my Canon 70-300mm F4-5.6L IS lens. Using longer focal lengths in your area can really open up new and exciting compositional opportunities. 

Articles: Digital Photography Review (dpreview.com)

 
Comments Off on Winter is Coming: Here are some tips on what and where to shoot when it gets cold

Posted in Uncategorized


5 Easy Tips for Photographing Babies Outdoors

10 Oct

When it comes to photographing babies under two years old (and newborns), most people immediately think of studios with elaborate backdrops and lots of available headbands, hats, and props. There’s nothing wrong with that type of photography for children, but if you don’t have access to a studio space of your own, you have to get a little creative.

outdoor-newborns

More and more, I’m discovering that I love to photograph both newborns and young babies outdoors. Yes, I often take even 5-10 day old little babies outside for at least part of their session. If you’d like to give it a try as well, here are five simple tips to help get you started while also keeping the little guys and gals safe.

1. Settle them inside

photographing-newborns-outs

When it comes to newborns, you’ll find that they settle best when they’re very warm. This means that if you want to photograph a baby outdoors, you will typically be more successful if you begin indoors. Inside, swaddle the baby up tightly. Keep in mind that babies like to be warm, so you may want to leave them in pyjamas under the swaddle. Then rock them while playing white noise or making sushing sounds until they are nice and sleepy. Next, lay the baby in a basket or bowl that has been lined with a fluffy blanket and let them settle. Once the baby has settled in, carry the whole thing outdoors.

newborn-photos-outside

Sometimes, photographing babies outdoors can be a bit of a race against time, as any big gust of wind or loud noise can startle them awake. For best success, scout out a location that’s close to the house before you begin. Also, even in the most ideal situations, there are times when a baby just won’t stay settled outdoors. If you experience that, don’t sweat it, just move on.

Recently, I tried to take a baby outdoors on several occasions, and each time she woke up crying before I could get even a single shot. So with permission, I cut a few flowers and brought them inside, and photographed the baby inside with the flowers instead (see photo above). Just be flexible. If you can’t bring the newborn outside, consider ways to bring the outdoors in.

2. Have someone hold them

newborn-session-outdoors

If you primarily shoot on location, you’ll find that not all families have a great space for family portraits indoors. Sometimes the physical shape or size of the room isn’t particularly conducive to a group portrait, or the decor doesn’t quite match the desired aesthetic. Sometimes families just have beautiful outdoor spaces that I love to showcase.

Regardless of the scenario, I often find myself asking mom or dad to hold the baby during a few family portraits outdoors. Particularly if the family has expressed an interest in “lifestyle” or “candid” images, as nature can tend to feel less stuffy and conservative than an indoor studio setup.

outdoor-newborn-session

Even if you experience a baby that won’t settle outdoors in a basket or bowl, keep in mind that being held in mom or dad’s arms may be an entirely different story. Sometimes babies just want to be held. Don’t be afraid to experiment with both scenarios until you discover what works best for each individual baby and family.

3. Shade them appropriately

outdoor-newborn

Whether you’re placing a baby in some vessel or having a parent hold them outdoors, it is really important to make sure that they’re shaded appropriately. Both newborns and older babies have very sensitive skin, and the last thing you want is for them to get a sunburn for the sake of some photos (it’s also better light for portraits). If you’re not able to find shade naturally available, some alternative options are a large umbrella (patio or beach umbrellas work well), or even a reflector held directly overhead.

When dealing with dappled light through trees, I sometimes position mom or dad strategically just out of frame so that they block any light that may fall on baby’s face or body.

4. Try to contain walkers and crawlers

photograph-babies-outdoors

When it comes to photographing older babies outdoors, there’s a sweet spot between sitting babies and crawling babies when outdoor photography is easiest. That said, you won’t always be working with the ideal developmental stage because all babies hit those stages at different ages. So, it’s best to be prepared with a few tricks up your sleeve to make photographing walkers and crawlers a little bit easier.

photograph-babies-outside-3

I usually start by laying a quilt or blanket down on the ground. Some babies will not crawl off the blanket because they hate how the grass feels on their bare hands and feet. This is typically not a solution that lasts for the duration of the session without causing frustration, but can sometimes buy you a few stationary minutes. Other than the blanket trick, I have used galvanized wash tubs, old crates, toddler sized chairs, and wagons, to help contain older babies outdoors.

When using any of these props, please be safe. Use a spotter if necessary to prevent tumbles, and don’t be afraid to use composite images (combine two shots) if needed so that someone can have a hand on the baby at all times.

5. If you can’t contain them, entertain them

photograph-babies-outside

If sitters, walkers, and crawlers aren’t happy being contained, your next best bet is to just roll with it. Don’t push things, or you’ll likely to end up with a baby in tears, and nobody wants that at a photo session.

At the first signs of frustration, transition to games or activities that will entertain the baby, then keep taking pictures. Many babies and early walkers love to hold hands and stand or walk, so let them. Have mom or dad pick up the baby overhead and play airplane. Play a game of chase. You’ll be surprised at the opportunities for candid images of the family having fun together, as well as the number of opportunities for images that have a portrait feel to them as well.

photograph-babies-outdoors-

Do you have any other tips for photographing newborns or young babies outdoors? If so, please chime in the comments below.

googletag.cmd.push(function() {
tablet_slots.push( googletag.defineSlot( “/1005424/_dPSv4_tab-all-article-bottom_(300×250)”, [300, 250], “pb-ad-78623” ).addService( googletag.pubads() ) ); } );

googletag.cmd.push(function() {
mobile_slots.push( googletag.defineSlot( “/1005424/_dPSv4_mob-all-article-bottom_(300×250)”, [300, 250], “pb-ad-78158” ).addService( googletag.pubads() ) ); } );

The post 5 Easy Tips for Photographing Babies Outdoors by Meredith Clark appeared first on Digital Photography School.


Digital Photography School

 
Comments Off on 5 Easy Tips for Photographing Babies Outdoors

Posted in Photography


Tips for Using the Blur Filters in Photoshop

09 Oct

For most photographers before they even press that shutter button, they have already pictured the type of shot in their heads. What exactly do I mean by that?

Well for example, a sports photographer may use a panning technique to shoot a moving sports car so that the background is out of focus to convey a dynamic shot of motion. Or maybe you are a portrait photographer and you want your subject set against a wonderful bokeh in the background.

Field Blur in Photoshop

Shallow DOF on the photo to the left. A Field Blur filter using Photoshop was added to create a greater depth of field look to the photo on the right.

In-camera blur versus done in Photoshop

All these techniques can be done in-camera. But sometimes due to time, technical constraints, or other factors, getting that desired shot in-camera isn’t always possible.

In this article, I will take a look at the Blur filters in Photoshop and demonstrate how useful these effects can be when applied in post-production. Whether you want to create a motion blur effect or simply blur part of the image to create a shallow-depth-of-field look.

When Photoshop CS6 was released Adobe added three new filters: Field Blur, Iris Blur, and Tilt-Shift. This brought the tally up to 14 different types of Blur effects in Photoshop. These new blur features were impressive.

Blur filters in Photoshop

First, let’s take a look at few and where you access them in Photoshop. I’m using Photoshop CS6. Go up to the Menu Bar > Filter and select Blur. I’m not going to describe all of them. Instead, I will concentrate on the few that I use the most but feel free to experiment with the others.

different-blur-filters

Where the different Blur filters are located in Adobe Photoshop.

Some of the filters I’ve never used let alone tried, such as Blur and Blur More. Here are some blur filters which include my personal favorites:

  • Gaussian Blur
  • Field Blur
  • Radial Blur
  • Motion Blur
  • Average Blur
  • Lens Blur

If you take a look at the following images, you can see the subtle, and not so subtle differences, each blur filter has on the same image, which are white lines on a black background.

white-lines-and-shape-blur

Normal whites lines on a black background – no blur effect. A Shape Blur filter was applied to the same image on the left.

gaussian-and-radial-blur

Gaussian Blur was applied to the image on the left and Radial Blur was applied to the image on the right.

lens-and-motion-blur

A Lens Blur was applied to the image on the left and a Motion Blur was applied to the image on the right.

Gaussian Blur

I use Gaussian Blur the most out of all of the blur filters. It is my general workhorse for blurring parts of an image and for softening the edges of a layer mask. It can also reduce noise in an image.

Field Blur

Field Blur works great when you want to focus on an area of your photo, such as the foreground or background. You apply a pin on the part of the image where you want the focus left as it is. Then reduce the Radius to 0px, which can be done either by using the slider in the top right part of the menu or by dragging the white bar around the pin until blurring disappears. Place another pin or pins on the image where you want to blur the focus. The default setting is 15px Radius.

sunflowers

Sunflowers in France – one is smiling while the others are wilting due to the intense heat.

sunflowers-pins-field-focus

Applying the pins on the image where I want the focus to remain, and others where I want it blurry.

sunflowers-field-focus

I applied the Field Blur to blur out the poor wilting sunflowers so that the focus was on the smiling sunflower.

Note: If you have version Photoshop CS6 13.1 or Photoshop CC, you can apply these blur filters to Smart Objects. That’s a big plus.

What I found particularly impressive when either of these three blur tools are accessed is the separate panel for creating Bokeh. Read this dPS article if you want to know how to create a Bokeh effect in Photoshop.

Radial Blur

Pick up any magazine or newspaper where you see photos of cars being advertised. If you look closely, you will see some images of cars where the motion effects were applied in post-production. Reflections, the wheels of the car, and the background are the usual tell-tale areas.

animated-car

An animated Gif to illustrate the Radial and Motion Blur effects applied to the wheels and parts of the car and the background.

Let’s take for example, the wheels of a car. A Radial Blur could be used here to create the effect of the wheels spinning around.

2-radial-blurs-to-front-wheel

Radial Blur applied twice to the front rim part of the wheel.

In the example above, I first selected the wheel rim and part of the tire using the pen tool (See Note below). The pen tool saves the selection and I can edit it later if needed. This selection was placed on its own layer and converted it to a Smart Object. I applied two Radial blurs. For the first method, I used Spin; Quality Best with a 8px blur. I then applied another Radial blur using the Zoom method; Quality Best at 6px blur.

Motion Blur

For the background and other parts of the car, I used the Motion Blur effect. I duplicated the image and converted it to a Smart Object. The car was isolated with the pen tool and I applied a layer mask so that when the motion blur is applied, it affects the background only and not the car. You will notice a little ghosting around the rear of the car.

car-with-radial-and-motion-blur-effects-applied

Radial Blur was applied to the wheels. Motion Blur was applied to the side panel, rear side window, and to the background.

Ideally, you would also cut out the car from the duplicated image and clone the area back in with the surrounding sky, trees, and road.

Disclaimer: I’m in no way inferring here in this article that to convey motion to a static shot of a car that all you need to do is apply Radial and Motion blur effects. Far from it. I fully appreciate that more techniques are involved, along with time, skill, and effort, to pull off a professional retouching job.

Note: I feel the Spin Blur Filter in Photoshop CC is definitely a much improved version of the Radial Blur. You add a pin over the part of your image. Click and drag the ellipse’s borders to resize it, or you can also click and drag the handles to reshape and rotate it. It’s much faster and intuitive to use. You have more control and it works on Smart Objects. The effect is also more realistic in my opinion.

Average Blur

This is a filter I don’t use that often but I wanted to demonstrate how to use it to remove color casts on your photos.

With your image already opened, duplicate the layer. Go up to Filter > Blur > Average. It will turn the image to a solid color by producing an average of all colors in the image. Add a Levels Adjustment layer. Click on the middle eyedropper tool and click anywhere on the solid color layer. This samples a gray point in your image. Turn off the visibility of this layer and you will see the difference, the color cast has been removed. It’s not perfect though, and you may find that further editing is required.

Average-blur-blue-drums

How to apply the Average Blur in Photoshop.

click-on-gray-eyedropper-tool

A solid average colour is calculated, which is blue. Add a Level Adjustment Layer and click on the middle eyedropper tool.

the-blue-color-changes-to-grey

By selecting the gray eyedropper tool and clicking on the image, the blue colour changes to grey.

color-cast-removed

The colour cast has been removed.

Lens Blur

The Lens Blur filter is probably my favorite of all of them if I had to choose one. It does a fantastic job of replicating the shallow DOF (Depth-of-Field) look normally achieved in-camera. While Field Blur also does a great job of this, I still prefer the Lens Blur method as you can import a depth map. That is an alpha channel which stores the selection as an editable grayscale mask in the Channels panel.

An example

In this image of the rhino taken at Dublin Zoo, I was too far away and I didn’t have a telephoto lens with me to get a nice shallow depth of field to blur out the background.

rhino-at-Dublin-Zoo

A rhino taken at Dublin Zoo.

So in Photoshop, I selected the rhino using the Quick Selection and Refine Edge tools. I saved this selection and named it. The selection or mask is now permanently stored as an alpha channel. To access it, I opened up the Channels panel and selected the alpha channel called rhino. By holding down on the Cmd/Ctrl key and pressing the letter I, it inverts the mask. The rhino is now black. Remember black conceals, white reveals on masks. Next, I clicked on the RGB layer to go back to the Layers panel.

I now need a layer mask for the foreground as I only want the background to appear blurred. Follow these steps to do the same:

Create a new layer and click on the Gradient Tool. Go up to the Gradient Editor and make sure you choose the preset Foreground to Background. Start near the bottom of the image while holding down the Shift key and drag upwards. It may take a few tries but you want a nice transition from black to white, similar to the image below.

Gradient-Toll-Editor-set-to-Foreground-Background

Open up the Gradient Editor and set the preset to Foreground-Background.

Open up your Channels panel again and duplicate any of the red, green, or blue channels and name this gradient. You now have two separate channel layers; one with the rhino and the other with the gradient for the foreground.

duplicate-channel

Duplicating the gradient channel to create one alpha channel.

Bear with me for the next few steps!

In order to create just one alpha channel to load as a depth map for the Lens Blur filter, we need to copy the rhino selection onto the gradient layer. So duplicate the gradient channel by right clicking on the layer or dragging the layer to the bottom of the Layers panel to the icon “Create new channel”. Name it rhino mask in this instance.

Hold down the Cmd/Ctrl key and click on the rhino layer. You will see the marching ants around the rhino and the border. Go up to the Menu Bar > Select > Inverse. Now the marching ants are just around the shape of the rhino. Go back up to the Menu Bar > Edit > Fill with Black. Click on the RGB layer and go back to the Layers panel.

fill-with-black-rhino

After inverting the selection of the rhino, you can now fill it with Black.

alpha-channel-for-rhino-photo

Now we have the rhino mask and the foreground mask on the one channel ready for the Lens Blur filter as a depth map.

Now we are ready to load this channel as a depth map into the Lens Blur filter. Duplicate the layer, or if you have a new version of Photoshop convert it to a Smart Object.

A separate dialog box appears and the image will initially be blurry. Go to where it says Source and click on None. A drop down menu appears and you can select the channel you have just created, in this case “rhino mask”. Adjust the radius value and click the Ok button.

loading-alpha-channel-in-the-lens-blur-filter

Selecting the channel rhino mask in the Lens Blur filter

Lens-Blur-applied-using-alpha-channel

The depth map has been applied and a shallow depth of field has been created.

Conclusion

I hope this article was helpful and your eyes aren’t too blurry from reading it.

Do you use Blur filters in Photoshop? What are your favorite ones? Please share your comments below.

googletag.cmd.push(function() {
tablet_slots.push( googletag.defineSlot( “/1005424/_dPSv4_tab-all-article-bottom_(300×250)”, [300, 250], “pb-ad-78623” ).addService( googletag.pubads() ) ); } );

googletag.cmd.push(function() {
mobile_slots.push( googletag.defineSlot( “/1005424/_dPSv4_mob-all-article-bottom_(300×250)”, [300, 250], “pb-ad-78158” ).addService( googletag.pubads() ) ); } );

The post Tips for Using the Blur Filters in Photoshop by Sarah Hipwell appeared first on Digital Photography School.


Digital Photography School

 
Comments Off on Tips for Using the Blur Filters in Photoshop

Posted in Photography


Tips for Getting Started with Coastal Photography

07 Oct

Many of us start out treating coastal photography the same as landscape photography. There are a lot of similarities. For both, you head out into the great outdoors, often to remote locations. You need a tripod and a remote shutter release for stabilization. You are capturing an entire scene rather than a discrete item or person. You want a deep depth of field. And so on.

But there are also differences between the two. In fact, treating coastal photography the same as landscape photography could leave you woefully unprepared when you head out. It could also lead to confusion as to how to set up and expose your photos. This article will help you get started with coastal photography, even if you are already familiar with outdoor shooting generally.

Mullaghmore-1

What to bring with you

There are two items you’ll need to add to your kit before you head out to do coastal photography. Both are filters, and you may have one of them, but they are both critical.

Neutral density filter

The first is a neutral density filter. In fact, you will probably want more than one since they come in different strengths. If you are not familiar with these filters, they restrict the amount of light allowed into your camera. Why would you want to do that? So you can slow down your shutter speed and allow the waves or the clouds to move through your frame while you are exposing the picture. That will smooth things out for you.

We’ll talk more about using them later, but for now just know that you’ll need one. I would start with a 10-stop neutral density filter, which is about as powerful as you will ever need. You can then add lesser strength filters like 6-stop and 3-stop filters later.

Graduated neutral density filter

VFH100_FilterGroup

Drop-in style filter system with a graduated neutral density filter on the right.

The second item you will need is a graduated neutral density filter (aka grad ND). You may already have this one since it is also useful for landscape photography. However, it is remarkably useful in coastal photography and you will use it all the time. In landscape photography, you may have trees, mountains, or other items sticking up into the sky such that you cannot use the grad ND.

In coastal photography, however, very often the horizon line is clear and unbroken in your picture. It makes is easy to use the grad ND in a lot more situations. For this reason you will use it all the time. In addition, the sky is often a significant portion of your picture in coastal photography. So making the sky look its best is incredibly important.

Acadia-6

Where to go

Now that you have the right gear, it is time to head out. Before you do, spend some time thinking about where you will go. When you first get started in coastal photography, you will have a tendency to go one of two places: either a scenic overlook or a beach. Both have problems though, so let me explain a bit.

A great view does not always translate into a great picture. Therefore, just going to a scenic overlook will often not result in great photos. It can, so I’m not saying to avoid them, but just be aware of a few problems you are going to face. The primary problem is that you will have difficulty establishing any sort of foreground. You are up too high, and there is usually nothing to use to bring the viewer into the picture. We’ll talk more about composition in a minute, but for now just understand that you often need to get down near the coast and sometimes even get right behind something to set up an interesting composition.

On the beach

When you do manage to get right next to the coast, often that will be on a beach. Beaches are great, but they have their own problems when it comes to composition. After all, a beach is just a bunch of sand, and that’s hardly something that is going to look great in your picture. You need to find something to use as a subject or at least a center of interest. Sometimes that’s a physical object in the sand (boulder, boat, moss, etc.), or it might be a pattern in the sand itself.

The best places to go are where there are interesting features to use as foreground, and you can get down to the coast. While I just warned about beaches, very often they are the best place. They allow you access to the coast, easy parking, etc. Just don’t stay in the middle of the beach. Look for interesting features, walk to the periphery, or even go beyond the beach.

Cheeca-Sunrise-5

When to go

Next you need to decide when to go take your coastal photos. This one is easy. You want to go before sunrise or at sunset.

While this tip is easy, it is also absolutely critical. The sky will often take up a healthy chunk of your picture, so you need it to be interesting. Further, if you go in the middle of the day, you will face harsh contrasts that will ruin your picture. Avoid doing that whenever possible.

This leads to another problem, which is access. Many beaches and scenic coastal areas are closed and blocked off until sunrise or even later. You’ll miss the best light waiting around for them to open. Pay attention to opening hours and access to make sure you can get your shot.

Green-Rocks

How to compose your coastal photos

When it comes to composing your pictures, you always want to think about the foreground, subject or center of interest, and the background. You’ll generally want to set these up in your picture according to the Rule of Thirds.

Background

Let’s start with the easy one first, the background. In coastal photography, the background of your picture will usually be the sky. That’s one of the reasons why heading out before dawn or at sunset is so important. The sky just looks better at those times. When it comes to composition, the background will be determined by how the sky looks. Therefore, you hardly need to think about the background of your picture.

Foreground

That leaves the foreground and some sort of subject or center of interest to worry about. The subject is very important, but it varies dramatically from person to person and scene to scene. It can be a physical thing like boulders or plants, or it can be a man-made item like a boat or a lighthouse. Your subject can even be an intangible thing like a leading line or a shape. Just make sure there is something tying the picture together. If you don’t, you will be left with a mere snapshot.

And finally we get to the foreground. This is often the hardest part of the picture to set up, but at the same time it is also the most important. You want to use foreground to create a sense that your viewer can walk into the picture. If you are on the beach, look for interesting sand patterns to use. Otherwise, look for rocks, boulders, or vegetation that can serve this purpose. Of course, the water and waves will often serve as your foreground. How this looks will depend largely on how you expose the picture, we’ll cover that next.

El-Matador-4-2016-05-10

How to expose your coastal photography

In coastal photography, your exposure controls affect more than just how bright or dark your picture looks. Your exposure controls also affect much more than just depth of field (aperture) or digital noise (ISO). How you expose your picture will also control things like the the subject and mood. That is partially true in other forms of photography, but it is especially true in coastal photography.

This is because your exposure settings will control how the water and waves appear in your picture. Specifically, how fast or slow you set your shutter speed will change the look of the water. If you want to stress the power and harshness of the sea, use a fast shutter speed (faster than 1/250th of a second). That will stop the action of the moving water. To create a sense of movement, use a slower shutter speed (between 1/8 second and 1 second). For a more serene scene, you can blur out the water entirely by using a very slow shutter speed (longer than 10 seconds). This is just a introduction to this concept, but to see the full range of options, check out this article: 7 Tips to Help Improve Your Seascape Photos by Controlling the Waves.

To go about using these different shutter speeds you can start by making sure you are in Manual mode and moving your aperture and ISO. To use a faster shutter speed, make your aperture a little larger (a smaller f-number) and your ISO a little higher. More often, however, you’ll want to use a slower shutter speed, for which can you should stop down your aperture to a small setting (f/16 – f/22) and use your lowest native ISO (usually ISO 100).

El-Matador-5

Using the neutral density filter

Frequently, however, there will be too much light to use the slow shutter speed you want. That’s where the neutral density filters come in. When you attach one of these filters to the front of your lens, it will restrict the amount of light allowed into your camera. That will allow you to use a slower shutter speed to achieve a proper exposure (without overexposing your picture).

Let’s make this a little more concrete with some specific numbers. Let’s say you have your shot set up with a correct exposure and you are at 1/50th of a second for your shutter speed, and your aperture is set at f/16 with an ISO of 100. You have a 6-stop neutral density filter in your bag, and you want to use a much slower shutter speed to create some blur in the water. In that case, attach the neutral density filter to your lens and now the amount of light coming into your camera is restricted by 6 stops. If you do nothing else, your picture will be severely underexposed (probably pitch black). This allows you to increase (i.e., slow down) the shutter speed by 6 stops to achieve a proper exposure, and the slow shutter speed desired.

Okaloosa-2

Let’s walk through the process of slowing down the shutter speed by 6 stops, which you will do manually.

  • Remember that a stop is a doubling of light, so slowing the shutter speed by the first stop from our starting point of 1/50th of the second will move it to 1/25th of a second.
  • After that, moving it another stop will get you to 1/13th of a second.
  • Next is 1/6th of a second.
  • 4 stops is ? or 0.3 seconds.
  • 5 stops is ? of a second
  • Finally, slowing the shutter speed by 6 stops will result in a shutter speed of 1.3 seconds.

Take the picture with that shutter speed and your picture should be properly exposed with a nice blur to the water.

Variations

This is just one example, and there are a lot of variations you can do on that. For example, you could use a 10 stop neutral density filter instead. That would allow you to set your shutter speed as slow as 20 seconds in our scenario above. That would really blur out the water. You can also adjust the aperture and ISO to bring the shutter speed in exactly where you want it.

You’ll note in our example above, we could have made our aperture smaller (to f/22 in most lenses) and restricted the amount of light by another stop. Or we could have increased the aperture or the ISO to increase the exposure and use a slightly faster shutter speed. Think of these controls as fine tuning after you have your neutral density filter on your lens.

Destin-Wave

Getting started with coastal photography conclusion

Hopefully you now have a little better sense of where to go, when to go, and how to set up your shots for coastal photography. Armed with this knowledge, just head to the coast when you can and put these tips to work.

But be careful – the coast can be a harsh and unforgiving environment for both your equipment and for you. That said, I think you’ll find there is no better place to be than on a coast at sunrise or sunset.

googletag.cmd.push(function() {
tablet_slots.push( googletag.defineSlot( “/1005424/_dPSv4_tab-all-article-bottom_(300×250)”, [300, 250], “pb-ad-78623” ).addService( googletag.pubads() ) ); } );

googletag.cmd.push(function() {
mobile_slots.push( googletag.defineSlot( “/1005424/_dPSv4_mob-all-article-bottom_(300×250)”, [300, 250], “pb-ad-78158” ).addService( googletag.pubads() ) ); } );

The post Tips for Getting Started with Coastal Photography by Jim Hamel appeared first on Digital Photography School.


Digital Photography School

 
Comments Off on Tips for Getting Started with Coastal Photography

Posted in Photography


Six Tips For Using Filters to Improve Your Landscape Photos

05 Oct

One of the secrets to good landscape photography is the way in which you capture various elements of the scene. Sure, you can let your camera do the heavy lifting and figure out the exposure. But a landscape photo doesn’t have to be a literal interpretation of what you see, or of what your camera sees when left to its own devices. While post-processing can help make adjustments to an image so that it’s less literal than what you saw, making certain adjustments at the time of capture is more important, giving you something special to work with when the time comes to edit the image in post. Using filters such as polarizers, neutral density, and graduated neutral density filters can help you capture the scene in more creative ways. These tips for using filters can help you start making these adjustments and creating more dynamic images.

Filter Tips

The following tips can help you start making these adjustments and creating more dynamic images.

1 – Use a polarizer to improve the sky

Using filters - a polarizer to reduce haze in an image.

A polarizer cut through the morning mist to reveal blue sky in this shot of Great Smoky Mountains National Park.

I believe every photographer should have a polarizing filter in their camera bag because of how useful they can be. Polarizers work by filtering out light that is reflected directly toward the camera at specific angles. When photographing a landscape with a blue sky, haze can occasionally cause the sky to be less vibrant. Using a polarizer, you can minimize the haze and reveal the true blue of the sky. This will work best when aiming the camera at a 90° angle from the sun; in other words, with the sun to your side.

By rotating the polarizing filter while composing your shot, you can see the effect the filter will have. Be sure you don’t go too far. It is possible to over polarize the scene, creating a darker blue splotch in the sky that will make the use of the filter obvious and the image appear unnatural. This is especially possible with ultra-wide angle lenses that take in a huge expanse of the sky. In the image above, a polarizer was used to reduce the amount of morning mist in the valley and show the blue sky behind the mist.

2 – Use a polarizer to reveal what’s underneath the water

Using filters - a polarizer cut down on reflections on the water's surface.

A polarizer can reduce reflections on the surface of the water to allow you see what’s beneath the surface, and add visual interest to a scene.

Often when photographing a stream or lake, the light may reflect off the water’s surface to such a degree that it’s impossible to see what’s below. However, there may be times when there is something of interest underneath the surface, such as rocks, fish, or logs from fallen trees. Using a polarizer, you can reveal as much or as little of what’s beneath the surface by eliminating the reflecting light.

It doesn’t have to be all or nothing either. You can nuance the effect by rotating the filter just a little bit, to retain some reflecting light while still seeing beneath the surface. In the image above, on the left, no polarizer was used and the reflected light prevents you from seeing below the water’s surface. On the right, a polarizer was used to reduce the reflected light on the water’s surface, allowing you to see the rocks beneath the surface.

3 – Use a polarizer to reduce reflections on wet rocks

using filters - Photographing wet rocks

In this image, light reflects off of the wet rocks by the waterfall.

using filters - A polarizer can reduce the reflected light from wet rocks.

In this image, a polarizer was used to reduce the reflected light from the wet rocks.

When photographing a waterfall, where there are generally a lot of wet rocks, light can reflect off of them, making them appear shiny. On occasion, that reflected light may be so strong that it detracts from the image. Using a polarizer can reduce the reflected light and reveal more detail in the rocks, adding interest to the image.

As with the water reflections discussed above, you can nuance the effect by rotating the filter to get the right balance of reflected light and detail underneath. In the images above, you can see how the highlights on the rocks can be reduced if desired by using a polarizing filter. Again, by rotating the filter as you look through the viewfinder, or on the live view screen, you can watch the effect happen and adjust it to your liking.

4 – Use Graduated Neutral Density Filters to darken the sky

Using filters - graduated neutral density filters for a better sky.

The difference when using a graduated neutral density filter can be very apparent, as seen in the comparison of these two images.

When photographing the landscape, especially at sunrise or sunset, there is often a high amount of contrast between the sky and the foreground. That forces you to make exposure choices to determine what will be exposed properly. While digital cameras are much improved with regards to dynamic range in recent years, nature can still push your camera to its limits in terms of how much can be captured in a single image.

Graduated neutral density filters can help to reduce the dynamic range of an image, by darkening the brighter areas, like the sky, so that it falls within the range of what the camera can capture. Use Live View on your camera to see the positioning of the filter over the lens, especially when using a hard-edged ND graduated filter. Watch the way the foreground exposure changes in relation to the sky, as it is possible to overdo a good thing. If the sky gets too dark in relation to the foreground, try a less dense filter, for instance, a 2-stop ND grad rather than a 3-stop grad. Above, the image on the left was taken without the use of a graduated neutral density filter. On the right, a 3-stop,

Above, the image on the left was taken without the use of a graduated neutral density filter. On the right, a 3-stop, soft-edged graduated neutral density filter was used to darken the sky. Notice it also has the effect of brightening the foreground in relation to the sky, bringing out more detail in the darker area in the bottom left.

5 – Control the motion of water

Using filters - an ND filter to control the motion of water.

A neutral density filter can be used to help capture the motion of water in a scene.

Because of its nature, moving water is often the most dynamic part of an image. You can create a different mood simply by changing the way you capture water. Longer exposures tend to be more calm and peaceful, while shorter exposures can capture the violence of a crashing wave, or the power of a river going over the falls.

Since shutter speed controls the effect of motion, by using neutral density filters you can evoke both moods by limiting the amount of light that enters your lens. Thus, you can adjust the shutter speed to give you the effect of motion that you want. You may not need a filter for faster shutter speeds, but if it’s a bright day and you want to slow things down, you’ll need a neutral density filter to do that.

Using a 3-stop ND filter is usually fine for waterfalls to slow them down just enough to get a nice creamy look to the falls, but when capturing waves on the ocean, it may not be enough to get the effect you need. Sometimes four or even five stops of neutral density is needed to get the exposure you need to slow it down to capture water the way you want. Adding a 10-stop neutral density filter will allow you to slow down your shutter speed to a minute or more, eliminating waves completely, creating a calm scene that feels quiet and peaceful as opposed to the crashing waves pounding the rocks or beach.

In the image above, a 3-stop neutral density filter was used to slow down the exposure just enough to allow the water’s motion to be captured as it crashed on the rocks. In the image below, a 10-stop neutral density filter was used to slow down the exposure further, to a full 2-minutes, creating smooth water and a calmer looking scene.

Using filters - a 10-stop ND filter to smooth water during a long exposure.

Using a 10-stop ND filter, you can make water appear calm by using a long exposure. This is a two-minute exposure.

6 – Create motion in clouds

Using filters - Clouds appear as normal when no ND filter is used.

When no neutral density filter is used, clouds are captured as we see them.

Using filters - a 10-stop ND filter to achieve a slower shutter speed of 60 seconds, I was able to capture the motion of the clouds as they passed over New York City.

Using a 10-stop ND filter to achieve a slower shutter speed of 60 seconds, I was able to capture the motion of the clouds as they passed over New York City.

As a landscape photographer, clouds are often the focus of an image or at least a strong component in the composition. Clouds add depth and drama to a good landscape, creating background interest. But you can also manipulate the clouds to your creative advantage as well, capturing their movement and blurring them to create a sense of flight and speed in your scene. By using a strong neutral density filter, such as Lee’s Big Stopper 10-stop ND filter or Vü Filter’s 10-stop offering, you can slow down your shutter speed to allow the motion of the clouds to be captured.

The proper shutter speed to capture cloud movement will vary, depending on how fast the clouds are moving. The longer the exposure, the more movement you will capture. An exposure of 30 seconds to one minute for fast moving clouds, such as in the image above, will result in a motion blur where the clouds still resemble clouds. An exposure of two or three minutes will result in the clouds becoming streaks of color across the sky, unrecognizable as clouds anymore.

Conclusion

One of the complaints I hear about using filters is that it takes too much time to put them on the lens, or it slows you down. I prefer to think of it as being deliberate about the shot I am trying to capture, and making sure that my camera captures exactly what I want.

Do you use filters? What’s your favorite technique using on-camera filters? Please share in the comments below.

googletag.cmd.push(function() {
tablet_slots.push( googletag.defineSlot( “/1005424/_dPSv4_tab-all-article-bottom_(300×250)”, [300, 250], “pb-ad-78623” ).addService( googletag.pubads() ) ); } );

googletag.cmd.push(function() {
mobile_slots.push( googletag.defineSlot( “/1005424/_dPSv4_mob-all-article-bottom_(300×250)”, [300, 250], “pb-ad-78158” ).addService( googletag.pubads() ) ); } );

The post Six Tips For Using Filters to Improve Your Landscape Photos by Rick Berk appeared first on Digital Photography School.


Digital Photography School

 
Comments Off on Six Tips For Using Filters to Improve Your Landscape Photos

Posted in Photography


Tips for Taking the Torture out of Extended Family Portrait Sessions

04 Oct

I have yet to meet someone who loves getting their picture taken with the whole extended family. The thought of getting all the dramatic aunts, crazy uncles, wild kids, and tired grandparents together and smiling all at the same time seems nearly impossible, and not at all fun. I know of many photographers who refuse to do big family portraits because they can be so unpleasant. I have grown to love big extended family portrait sessions throughout the years. You can too, whether you’re the photographer, or one of the silly cousins getting her photo taken.

Extended Family Portrait Session

Think of big groups as your own family

The first thing that helped me love extended family sessions was the way that I thought of them. Instead of a difficult crazy session, I try to think of them as my own family, and take the photos with love. Let me share a story that may change your mind about extended family sessions too.

A while ago I was asked to add a missing brother to an extended family photo. The entire family had been there when they had the photo taken, except for this one brother who couldn’t get off work. Months later, one of the other brothers tragically passed away. Their most recent family portrait wasn’t complete, and they’d never be able to get a new one.

So, I took this working brother to the same location, took a photo of him, worked him into the photo through the magic of Photoshop. I matched everything the best that I could, so they could have the last most complete family portrait. It made me realize how fragile life is, and how fragile families are. If I have an opportunity to capture a family right now, today, as they are, I’m happy to do it. You never know when or why that portrait may become priceless to them.

Not only are these photos precious and invaluable, but they can be a lot of fun, and not too difficult to pull off. Let me give you some tips to help.

Extended Family Portrait Session

Take charge, be bold, move fast

When you’re working with a big group of people, someone has to be in charge. That person is you, the photographer. This is not a time to be timid and quiet, hoping things will fall into place. As soon as you’re ready to start, get everyone’s attention. Taking charge right away will let them know that you are confident, that you know what you are doing, and that they can trust you. Smile a lot, and if it works for you, throw in some humor. Tell your group that if they will listen to you closely, and do everything you say, that it will be quick, painless, and even fun. Everyone there likes to hear “quick, painless, and fun”, so you’ll have their attention right away.

Don’t take a long time getting everything situated. Have everything scoped out beforehand, and have a firm idea of where and how you will place everyone. Know what order you will be photographing each group, and if you have any stragglers, kindly, but firmly move them toward the picture location. If there are a lot of small children, this is especially imperative. You will lose their interest and patience so quickly, so you need to take advantage of any time when they are even remotely cooperative. You won’t get any good photos when everyone is exhausted and sick of you, so you have to be done before that happens.

Extended Family Portrait Session

Add some personality

With a big group, it seems like you might only have one option – get everyone to look at you, and hope they are smiling. Many clients do want a more traditional family photo, very posed, with everyone looking and smiling. But try giving them a few photos with a little bit of their family’s personality. When you are working with so many people it’s really hard to get a perfect traditional photo anyway. Most of my clients know that isn’t really my style, so they are happy with the more fun, casual photos.

My favorite thing is to ask everyone to hug in to Grandpa and Grandma, or hug someone next to them. Set everyone up for the more formal photo, and once you’ve captured that, just ask them all to hug. Usually it feels silly enough that they start to laugh, and you get genuine laughs and connection.

Extended Family Portrait Session

Try different poses and positions

It can be a challenge to know how to arrange a really big family group. You could easily have four generations in one photo, which can add even more challenges with arrangements. Some families like family photos where they are all squished in together, in one big family group. I’ve had some that want them completely mixed up, where nobody is grouped into separate families. This is okay, but I find that most families like to at least be able to tell which small families within the group belong together. You can do this by just having each family stand next to each other, or you can even put gaps in between each family. I usually do both, so they have options to choose from later.

I usually place Grandpa and Grandma in the center then evenly distribute their children’s families on either side.

Extended Family Portrait Session

My style doesn’t involve a lot of props, so you won’t notice a lot of chairs and stools in my family photos. They are an option if you’d like to create different levels, but it usually takes a lot of time to get that set up, and your subjects lose patience fast. I prefer a more casual, natural look to something that looks very precise and contrived. Sometimes worrying about those extra things can cause a lot of stress for you, and for your families, and make the whole process more of a chore. But feel free to use them if it’s your style and preference.

Extended Family Portrait Session

Find suitable locations

If you want to have some seated photos, look for locations that have places to sit built in. I love rocks, logs, or even park benches. You can also have some people sit on the ground, some kneel, some stand, but again, be careful not to take so long over-posing that you lose their patience.

It can be difficult to find a place that will work for such a large group. Try to find locations with simple backgrounds that don’t detract from the faces. If possible, schedule the session during the early morning or evening, to take advantage of better lighting. Look for places that have large trees or buildings to filter the light. It’s much harder to make difficult lighting situations work with 30 people than it is when you’re just photographing one.

Don’t move around a lot with a large family once you’ve found a good spot. Find one or two good backgrounds, three if they’re really close to each other, and stick with them. This will keep their photo groupings more consistent with each other, and will make the session go much faster and smoother. Try getting 30 people to move quickly over to a different rock, and you’ll see what I mean.

Extended Family Portrait Session

Get all the break-off groupings

Once you’ve photographed the big huge family, it’s time to get all of the little groups. Keep this moving quickly, and be efficient moving from one group to the next. Here’s a list of the different groupings that I do:

  • Entire extended family
  • Grandpa and Grandma (Dad and Mom) alone
  • Dad and Mom with their children (siblings)
  • Dad and Mom with their children and children’s spouses
  • All the siblings
  • The siblings and their spouses
  • Grandpa and Grandma with the grandchildren
  • All the grandchildren
  • The sisters together
  • The brothers together
  • Each separate family

I don’t do every one of these every time. It depends on what the family wants. Also, I know every family is different, and there may not be Mom and Dad, or any grandchildren, etc. This is just to give an idea of how you might break the groupings up.

I try to do the whole family first, and then the smaller groupings. Because it’s hardest to get everyone paying attention and happy for the whole group, you want to get that in when everyone’s fresh. However, sometimes some of the families arrive before others. It’s a great use of time to take the photos of those families while you’re waiting for the entire group to get there. They’ll be happy that they’re finished early, and that they don’t have to sit around doing nothing while they’re waiting for the latecomers.

Extended Family Portrait Session

A few more tips

Remember when you’re working with big families, that letting go of perfection can save you, and them, from a miserable experience. Kids often don’t cooperate, and sometimes some of the family is really grumpy about being there for photos. Do the best you can, and let the rest go. If there are little ones not looking at the camera, or even crying, you are still capturing that family at this moment in time, and giving them a gift. They may end up treasuring the silly faces, and loving the memories of when one grandchild was going through his never-sit-still phase.

Direct the adults

Tell the parents and grandparents to do their best to continue looking at you and smiling, even if you are trying to get their kids’ attention. Many a good photo is ruined by a parent looking down and lecturing their child right at the moment when the child finally does look up and smile. If the adults are picture-ready at all times, then you will have a chance at catching the split second that their kid smiles, and they’ll be smiling too.

Extended Family Portrait Session

Shoot lots of the big group

Take LOTS of photos in a row with the big group. You may think that you have what you need, but then later when you look at the photos full size, you’ll realize that Uncle Bob blinked in every single one. If you take a lot of photos, one right after the other, you can do head swaps later if you need to open some eyes. If they’re taken at approximately the same time, it will be really easy to change the faces, because they’ll be in the same place in every photo.

Love your families

Lastly, remember to love the families you are photographing. They love each other, even through their faults and imperfections, enough to want to preserve a moment in their lives. This photo is so important to at least one person there. Important enough to go through all the hassle of gathering their entire family together in one place at one time. They are trusting you to give them this cherished gift. Consider yourself one of the family for that hour or so, and let your lens capture the love.

googletag.cmd.push(function() {
tablet_slots.push( googletag.defineSlot( “/1005424/_dPSv4_tab-all-article-bottom_(300×250)”, [300, 250], “pb-ad-78623” ).addService( googletag.pubads() ) ); } );

googletag.cmd.push(function() {
mobile_slots.push( googletag.defineSlot( “/1005424/_dPSv4_mob-all-article-bottom_(300×250)”, [300, 250], “pb-ad-78158” ).addService( googletag.pubads() ) ); } );

The post Tips for Taking the Torture out of Extended Family Portrait Sessions by Melinda Smith appeared first on Digital Photography School.


Digital Photography School

 
Comments Off on Tips for Taking the Torture out of Extended Family Portrait Sessions

Posted in Photography


5 Tips for Using a Kit Lens for Travel Photography

03 Oct

There are many good reasons not to use a kit lens for travel photography. If a kit lens is the only lens you own and you have a photography trip planned, you may be thinking about buying a better quality mid-range zoom or even a prime lens to replace or accompany it.

Kit lens in travel photography

But before you do so, I want to tell you a story.

Why a kit lens isn’t so bad after all

10 years ago I bought my first digital SLR, a Canon EOS Digital Rebel XT. I had switched systems from Pentax so I didn’t have any lenses to use with it. The camera came with an 18-55mm kit lens, and undecided about what other lenses I needed, I took it with me on an extended trip to South America.

I soon realized that the quality of the lens was not as good as it could be (I nearly used the word horrible). It wasn’t sharp and there was lots of chromatic aberration and purple fringing in my photos. Canon have since discontinued that early kit lens and replaced it with another, better one.

But that lens and camera combination gave me a tremendous amount of freedom. It was light enough enough to carry with me everywhere. I never had to change lenses, which helped keep the sensor reasonably free of dust. I had a wide-angle lens at 18mm, a short telephoto at 55mm, and all the focal lengths in-between.

It was during this trip that I had time to think about my future and what I wanted to do with it. I decided that I wanted to write about photography for a living.

Five months later I sold my first feature to Practical Photography magazine, illustrated with photos taken in South America with the Digital Rebel XT and that same kit lens. Yes, the lens may have been horrible, and I’d never want to go back to that camera and lens combination, but the photos I took with it were good enough to be published in a major photography magazine.

Kit lens in travel photography

What lessons can we learn from this? Here are some of the key lessons.

1. Your equipment matters, but not in the way you think

The key thing is that the equipment you chose to take with you is light enough for you to take just about everywhere, so that you don’t miss any photo opportunities that present themselves. That’s one of the reasons that mirrorless cameras and high end compacts have become popular with travellers.

Relating this back to lenses, one of the benefits of prime lenses is that they tend to be smaller and lighter than better quality mid-range zooms.

Kit lens in travel photography

2. Location and timing are more important than gear

Travel photography is about getting yourself to interesting places, when the light is beautiful, so that you can take photos that evoke the mood and atmosphere. If you don’t do this, it doesn’t really matter what camera and lens you have. Your photos won’t be as interesting as those from people who do take the trouble to do these things.

Kit lens in travel photography

The photo above was taken during a 4-day jeep trip in south-west Bolivia. It’s a remote location at 4200 meters above sea level in the Andes that I never would have seen without going on that trip. It doesn’t matter what camera and lens you have, you’ll never take photos like this if you don’t make the effort to get to places like this one.

3. You need to interact with the locals

You get more out of the journey on a personal level when you talk to local people. The ability to confidently communicate gives you the chance to learn about their lives and the way of life of people from a different place or country.

It also opens up the number of photographic opportunities that come your way. Perhaps the people you talk to would like to have their photos taken, if you ask. Or you can ask people what local sights they can recommend for you to visit with your camera. You will learn about local temples, markets, festivals and other interesting cultural events or places that make good subjects.

Kit lens in travel photography

I came across this scene in Punta Arenas, Chile (above) and was struck by the contrast between the expensive looking racing car and the houses. These two guys were happy for me to take a photo. The confidence to talk to people in this type of situation, and ask for permission to take a photo, is just as important as your gear.

4. Money is always a factor

Travel can be expensive, and it may be wiser spending money on experiences than gear. You don’t want to be in the situation of having spent so much on lenses that you don’t have enough money left to do all the things you would like on your journey.

Kit lens in travel photography

5. Kit lenses are not perfect

I think it’s wise to acknowledge at this point that there are many reasons why you might want to buy a better lens than your kit lens. You might need a prime lens with a wide aperture for shooting in low light or experimenting with shallow depth-of-field. Or you may need a shorter focal length or a longer one. A weatherproof lens so you can shoot with confidence in the rain might also be handy.

These are all valid reasons for buying a better lens. Most photographers who start out with a kit lens end up buying better ones eventually. My photos were published in spite of me using a kit lens, not because of it.

But if a kit lens is all you have, there is no need to worry. You will have plenty of opportunities to buy better lenses in the future. For now, just get out there and seize the moment. Enjoy your trip, have a wonderful experience and make as many beautiful images as you can.

Kit lens in travel photography


Mastering Lenses

If you want to know more about buying and using lenses then please check out my ebook Mastering Lenses: A Photographer’s Guide to Creating Beautiful Photos With Any Lens.

googletag.cmd.push(function() {
tablet_slots.push( googletag.defineSlot( “/1005424/_dPSv4_tab-all-article-bottom_(300×250)”, [300, 250], “pb-ad-78623” ).addService( googletag.pubads() ) ); } );

googletag.cmd.push(function() {
mobile_slots.push( googletag.defineSlot( “/1005424/_dPSv4_mob-all-article-bottom_(300×250)”, [300, 250], “pb-ad-78158” ).addService( googletag.pubads() ) ); } );

The post 5 Tips for Using a Kit Lens for Travel Photography by Andrew S. Gibson appeared first on Digital Photography School.


Digital Photography School

 
Comments Off on 5 Tips for Using a Kit Lens for Travel Photography

Posted in Photography


9 Tips for Creating Great Street Portraits

02 Oct

I love taking street portraits. Whether the people you are photographing are posing or just going about their day-to-day life, humans are the most captivating, strange and interesting of subjects.

9-tips-for-creating-great-street-portraits-01

Most of my portraits taken out on the street are shot with the permission of the subject. That’s my style. I love looking for people who intrigue me. I often signal them with a smile and gesture of my camera, then watch for their reaction. But I also shoot unposed portraits and life on the street, whatever catches my eye.

I know from my workshops that a lot of people find photographing strangers difficult and even, sometimes, terrifying. What is important to remember though, is that most people like to be noticed. It’s a compliment to be seen and thought of as interesting. But if they don’t like it, then the worst that can happen is that you have to delete the photo. Simple. Plus the more you do this, the easier it gets.

9-tips-for-creating-great-street-portraits-02

Here are some tips for creating interesting and evocative street portraits:

#1 – Simplicity

“The one guiding idea was to strip away the visual noise of the street so that the people emerge in a different and hopefully more surprising way.” Eamonn Doyle

I am a lover of simplicity in my composition and when it comes to street portraits, simplicity really is your friend. One thing that ruins so many portraits is a busy, complicated background. A background that’s too busy will make your image look flat because your camera can’t capture the depth that your eye can. You have to create depth yourself with your composition. A busy background will swallow up your subject and distract your eye.

One of my favourite types of backgrounds for street portraits is something clean, colourful, and strong, like the image below. The line in the middle creates a really strong balancing element for the subject. The strength of the colours and line contrast nicely with this older man, who with that slight smile looks like he knows a thing or two about life.

7-tips-for-creating-great-street-portraits-03

#2 – Break the world down into elements

You can simplify the purpose of composition into the idea that you are simply breaking down the world into elements and organizing them in an interesting way.

I find it really helpful to look at composition with this in mind – that all you are doing is organizing the world’s elements. It helps because our eyes make things very complicated for us photographically as we see everything in 3D. Not only do we see and sense hundreds of thousands of pieces of visual information every minute from all around us, but our senses can pick up on things happening behind us as well.

street-portrait-tips-6

To break this visual overload created by your eyes when you are bringing the world into your frame, start by breaking down what you see around you into elements – an interesting mural, strong lines on the road, beautiful shadows, etc. Then build your composition up from there. You only need one or two interesting elements to make a photo. Ones that work together and say something through their balance, shape, or placement.

An example

This photo below is super simple. Very little going on, but I like it. What do you think makes it work? There are a couple of strong elements here that make it an interesting photo. Firstly it’s the hand holding the newspaper with a glimpse of the face reading. Then the man farther ahead walking.

Now these two men, combined with that strong line of the wall, makes it look to me like a conveyor belt. You know that it’s morning, partly because of the sun, and then the newspaper, that’s the kind of thing you do on the way to work right? So now you have a little story, perhaps about the repetitiveness and the monotony of the human experience?

street-portrait-tips-2

I don’t always see a story in an image when I am shooting; often that comes after when I’m looking at my photos and sharing them. But what I do concentrate on is looking for interesting elements and figuring out how to place them together to make an interesting composition.

#3 – It’s all in the eyes

“The face is a picture of the mind as the eyes are its interpreter.” Marcus Tullius Cicero

When you are starting out taking photos of people it can be a scary experience. So much so that you often rush too much – perhaps in an effort to get it done as quickly as possible and to not offend or upset anyone. But the more you shoot street portraits, and the more effort you make to relax into the experience, the more you can work on revealing the deeper emotions of your subject.

When you take a more relaxed and patient approach you give people the space to unfold and reveal their thoughts and feelings through their bodies, faces and, most powerfully, their eyes. Eyes tell you how the subject is feeling, and often thinking.

7-tips-for-creating-great-street-portraits-07

This is where having a camera is an advantage. As humans we don’t usually look into someone’s eyes for long periods of time. It’s too powerful! It takes the interaction with that human to another level. If you have a camera between you and your subject though, it acts as a sort of safe barrier. So you can then spend time observing them, seeing what their face is doing, looking into their eyes, and seeing how they really feel.

7-tips-for-creating-great-street-portraits-13

#4 – Be patient humans do funny things

“You don’t have to enhance reality. There is nothing stranger than truth.” Annie Leibovitz

9-tips-for-creating-great-street-portraits-09

street-portrait-tips-23

For me taking photos of people on the street is all about opening yourself up to, and noticing the comedy of being human, as Elliot Erwitt calls it.

“You can find pictures anywhere. It’s simply a matter of noticing things and organizing them. You just have to care about what’s around you and have a concern with humanity and the human comedy.” Elliott Erwitt

#5 – Find a great background and wait

There is a tradition in street photography that you find an interesting location; a background, a road, or sign, and then you wait for someone or something to happen in front of it. It requires patience, which is a very good thing to develop. I’ve noticed that patience is something that beginners often lack. Possibly because we live in a world that is so used to immediate gratification that we expect good shots to come in abundance.

It rarely works like that. I therefore like this idea of finding something interesting out on the street – some elements, or a place that fascinates you, then waiting for something to happen. It’s a great way to train your eye, and perfect your timing. Plus, when you continually gaze at one place you become very familiar, very intimate with it. You’ll notice things that initially you didn’t see.

street-portrait-tips-8

#6 – Use colour

“I paint because colour is a significant language to me.” Georgia O’Keeffe.

Colour is also a significant language for me and I have always preferred shooting colour over black and white. I love the feeling you can communicate with colour and I think it moves me as much as light. So for me it’s an integral part of my style.

Street photography is often dominated by black and white photography. Although what I am doing is often not strict street photography (however, Bruce Gilden, controversial street photographer extraordinaire, did say “If you can smell the street by looking at the photo, it’s a street photograph.”).

street-portrait-tips-26

Whether you use colour or black and white, do what excites you the most. The more excited you are by your subject and what you are creating, the more you’ll imbue your photos will feeling and depth.

Colours communicate different feelings and ideas (e.g., yellow is warm and happy, green is peaceful, red signals confidence and aliveness). I love to use them to contribute to the story that I am telling with my images.

street-portrait-tips-14

#7 – Your camera is your licence to be curious

“I love that having a camera basically gives you a license to go up to anyone and ask them what they’re doing and why.” Andrew Hinderaker

Most people are perfectly happy to be photographed. That’s the key when you’re going out and about. My mantra when taking photos of strangers is – be confident (this comes with practice), friendly, curious, and ethical. In other words, I prefer to photograph people who are okay with the experience. I don’t generally photograph kids and the obviously vulnerable, etc. That’s my ethical line. For me photography is an exchange and I respect everyone whom I photograph.

7-tips-for-creating-great-street-portraits-10

Humans are built to want to connect with other humans, and photography is a powerful form of connection when you use it as such. When you are taking someone’s photo you are basically saying – I see you, you interest me. And for most people that’s a wonderful compliment.

For me the portrait above is about two things, the light and the couple smiling. The warmth of their smiles match the warmth of the light, as well as the lush, summery background of grass and trees. I took this photo by just smiling at the couple and gesturing with my camera. Of course the fact that it was a beautiful summer’s evening and we were in the park helped. People who are relaxing and enjoying themselves are, of course, easier subjects to approach.

#8 – The power of the gesture

The more closely you watch humans the more you see how they reveal themselves in so many ways. This was a photo I took for a project I was doing on people’s bellies. Each photo was totally different because the way that people presented their bellies and the gestures they made, showed so much about their personalities, what they felt about themselves, and their bodies.

street-portrait-tips-18

Keep watch of people’s gestures. Along with the eyes, hands are very revealing of people’s feelings and thoughts (and apparently hands are easier to read than eyes if you want to tell if someone is lying).

#9 – The key to original, interesting photos is to be yourself

“I’m photographing myself out there. Not myself physically, but mentally. It’s my take on the world.” Bruce Gilden

A lot of people in workshops worry about how over-photographed the world seems now and will they ever have anything interesting or original to contribute? Hasn’t it all been done before? Well, this is the wrong way to think about it. Of course the world is very photographed now. Especially places that I visit, London, Paris, Venice, Istanbul, etc.

But the world isn’t a staid thing – it’s an ever-changing, ever moving, organism. Nothing stays the same. Having humans moving around the world makes the possibilities for original and interesting photos infinite.

street-portrait-tips-4

More importantly though, photography is an expression of who you are. When you start out perhaps you’ll take photos like everyone else. But the more you do it, the more you’ll create something unique and original that’s a total expression of who you are – your passions, experience, style, and way of seeing the world. This creates the unique and interesting photographs that you are aiming for. It’s just like famous jazz musician Miles Davis says:

“Sometimes you have to play a long time to be able to play like yourself.”

Conclusion

I’d love to know what you think. What do you do to create interesting street portraits? Comment below, I’d love to hear your ideas!


Taking street portraits and exploring the street life of cities with your camera is an exhilarating experience. Learn how to conquer your fears of street photography and to create compelling compositions with Anthony’s popular street photography workshops in some of the most vibrant cities Europe.

googletag.cmd.push(function() {
tablet_slots.push( googletag.defineSlot( “/1005424/_dPSv4_tab-all-article-bottom_(300×250)”, [300, 250], “pb-ad-78623” ).addService( googletag.pubads() ) ); } );

googletag.cmd.push(function() {
mobile_slots.push( googletag.defineSlot( “/1005424/_dPSv4_mob-all-article-bottom_(300×250)”, [300, 250], “pb-ad-78158” ).addService( googletag.pubads() ) ); } );

The post 9 Tips for Creating Great Street Portraits by Anthony Epes appeared first on Digital Photography School.


Digital Photography School

 
Comments Off on 9 Tips for Creating Great Street Portraits

Posted in Photography


5 Tried and True Landscape Photography Tips used by the Pros

02 Oct

Have you ever found yourself wondering how do the professionals (pros) consistently turn out amazing photos day after day, year after year and what are some of their secrets? So besides knowing their camera like their best friend, what are some of the things that the pros do? Here are some tried and true landscape photography tips used by the pros.

DesertStorm Landscape Photography Tips used by the Pros

1. Experimentation

Experimenting is one of the best ways to shake yourself up out of the doldrums and yes even pros use it to get their creative juices flowing.

Try photographing something totally outside your comfort zone or even a different subcategory within your preferred genre. If landscape photography is your thing, you are probably already a master of the golden hours (sunrise and sunset). So experimentation can start with shooting a nightscape or even a long exposure in the middle of the day.

Note: I would highly advise against experimenting at someone’s wedding!

Night Sky Landscape Photography Tips used by the Pros

How about introducing a human element into your landscape and allowing them to be a part of the story? Experimenting keeps you on the learning path and when you learn, you grow as a photographer. It is about challenging yourself to do something different and pushing your boundaries.

Landscape Model Landscape Photography Tips used by the Pros

2. Making it your own

Many places on your photography list have already been captured hundreds of times. That thought can make you throw your hands up in the air and decide you may as well just recreate it. Before you think of recreating, try to showcase it differently. What else can you do? Is there another foreground element you can add or take away? One of the things that make pro’s work stand out from the rest, is their perspective and ability to make a place seem like you are seeing it for the first time.

Maracas Bay, Trinidad - landscape photography tips from the pros

While it’s not always easy to create something unique and new, your originality is one of the things that will set you apart. Can you get a different angle, add or detract an element when composing, or shoot it differently (e.g. with light trails or multiple exposures)? How about getting off the trail and the popular view areas and charting your own course to find another perspective? There is no problem in finding inspiration in someone else’s work, but at all times keep in mind that you want your work to stand out

There is no problem in finding inspiration in someone else’s work. But keep in mind that you want your work to stand out, as your own.

Guardians - landscape photography tips from the pros

3. Tell a story

Someone said that “being a good photographer does not necessarily translate into being a good storyteller.” Being able to evoke the emotions of your audience should always be a goal, though. Keep in mind that the purpose of your photo story is to interest, instruct, or amuse your audience.

Decide how you want the image to affect them and then how to achieve that goal. Is your story going to be in black and white or infrared? Is it going to be realistic or abstract? Pros use different styles of photography to keep producing interesting stories consistently.

Boat Friends - landscape photography tips from pros

4. Less can be more

In landscape photography, being more selective with the views you present tells a more effective story, so pros understand the power of good composition (a vast topic all on its own). One of the rules of good composition is that your image should contain just enough detail. In landscape photography you do not have the luxury of physically moving things around, so you must arrange the elements of an image by changing your position. This also helps with finding the most flattering view, or one that tells a different story.

Ocean Sunrise landscape photography tips from pros

Choosing the important elements in your photo to highlight helps you decide what to include in the frame and what to leave out. Make your subject dominate by accentuating it with one or few related elements, remembering to declutter as much as you can. As a general rule, if an element in your image doesn’t enhance the subject, it may be detracting from it.

Lily Pond - landscape photography tips from pros

 5. Know your post-processing

Ideally, you want to get the shot right in-camera and eliminate or minimize your post-processing. With so many features and settings on DSLRs now, it is possible to produce the image you want. If this does not materialize, then you need the ability to do basic adjustments. These include changes to color and contrast, exposure adjustments, straightening, and cropping.

Check out these dPS articles for tips on processing:

  • How Cropping in Post-Production Can Improve Composition
  • 4 Key Lightroom Sliders That Will Supercharge Your Photos
  • How to Enhance Urban Night Photographs Using Luminosity Masks in Photoshop
  • 3 Fun Ways to Enhance Your Landscape Images in Photoshop

Glass Bottomed Boat -  landscape photography tips from pros

Pros know the importance of post-processing. That is one of the main reasons they shoot in RAW to capture all the uncompressed image data, which leads to higher quality images in the end.

Post-processing can also add that unique element of you. Decide if the shot you took is what you wanted to achieve or you can choose to adjust elements until you get the image you want to present. Digital photography has made it easier to post-process than the dark rooms of yesteryear but it also makes it easier to  go overboard easily. So determine your vision for the final image and learn to execute it properly so you produce an image that represents you.

South Beach -  landscape photography tips from pros

Conclusion

These are just a few of the things to keep in the back of your mind when you are creating images. Staying consistent means staying creative or constantly challenging yourself to try something different or learn something new. When you get to your location, think about how you can make the image your own. There is nothing more amazing than producing a piece that someone can identify as yours even before they confirm you did it. Share with us how else you stay consistent when shooting.

When you get to your location, think about how you can make the image your own. There is nothing more amazing than producing a piece that someone can identify as yours even before they confirm you did it. Share with us how else you stay consistent when shooting and any other landscape photography tips you have learned.

googletag.cmd.push(function() {
tablet_slots.push( googletag.defineSlot( “/1005424/_dPSv4_tab-all-article-bottom_(300×250)”, [300, 250], “pb-ad-78623” ).addService( googletag.pubads() ) ); } );

googletag.cmd.push(function() {
mobile_slots.push( googletag.defineSlot( “/1005424/_dPSv4_mob-all-article-bottom_(300×250)”, [300, 250], “pb-ad-78158” ).addService( googletag.pubads() ) ); } );

The post 5 Tried and True Landscape Photography Tips used by the Pros by Nisha Ramroop appeared first on Digital Photography School.


Digital Photography School

 
Comments Off on 5 Tried and True Landscape Photography Tips used by the Pros

Posted in Photography