RSS
 

Posts Tagged ‘Tips’

10 Tips for Improving Your Flower Photos

25 Mar

Spring is here!

For those of us in the Northern Hemisphere who have been hunkered down for winter, enduring the rain and the snow, the time has finally come to get outside and enjoy some long awaited sunshine.

As the flowers start to emerge from the soil, all the neighbours begin emerging from their houses with gardening tools in hand. I, on the other hand, have my camera in hand ready to capture the spring flowers and I hope you do too!

Here are 10 tips that will help you make the most of your flower photography this spring.

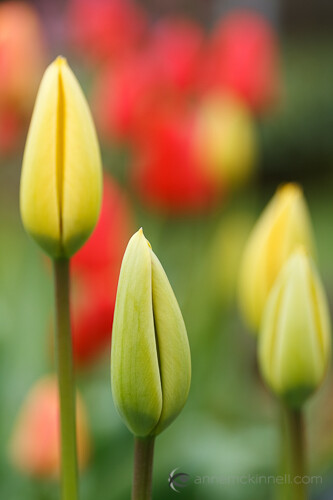
1. Photograph flowers on an overcast day

Okay, not every day in spring is a sunshiny blue sky day. But that’s okay because the white sky days are perfect for photographing flowers.

The soft even light of an overcast day compliments the delicacy of the flowers and there are no shadows and no harsh bright spots, which makes it easier to get a good exposure.

Flowers in soft light by Anne McKinnell

2. Backlight will make your flowers glow

Another type of light that is excellent for flower photography is backlight. Backlight happens when the sun is directly in front of you lighting your flower from behind. Because flower petals are translucent, backlight makes flowers appear to glow.

Try to capture backlit flowers late in the day when the sun is close to the horizon which will cast nice warm light on the rest of your image too. You might even be able to catch some rays of light filtering through the trees.

Backlit flowers by Anne McKinnell

3. Watch out for wind

When it comes to photographing flowers, wind is your enemy. The easiest way to avoid it is to do your photography early in the morning when there is less chance of wind. If there is a bit of wind, you can use a piece of cardboard or your reflector to create a block.

Your other option is to bring a flower inside. I photographed the flower below by taking it inside and placing it in front of a white sheet.

Gerbera by Anne McKinnell

4. Get closer

There are a number of ways to go about making the close up images of flowers we all love.

First, you can use a telephoto lens and zoom in to the flower. In this case, make sure you take note of the minimum focussing distance of the lens. This is usually marked on the outside of the lens. For example, my 70-300mm telephoto lens has a minimum focusing distance of 1.5 meters (or 5 feet). It simply will not focus on anything closer.

There are a couple of solutions for getting around the minimum focussing distance problem. One is to use extension tubes which are hollow tubes that you place between the camera and the lens. Essentially the tubes move the lens farther away from the camera’s sensor which allows the lens to focus on closer objects. The other solution is to use a close-up filter which works like a magnifying glass and attaches to the end of your lens.

Finally, you can use a dedicated macro lens which has the ability to focus on objects that are close to the end of the lens.

Spring Tulips by Anne McKinnell

5. Use a reflector

If your subject is in the shade, you can use a reflector to bounce some light back towards your subject and make the flower more vibrant.

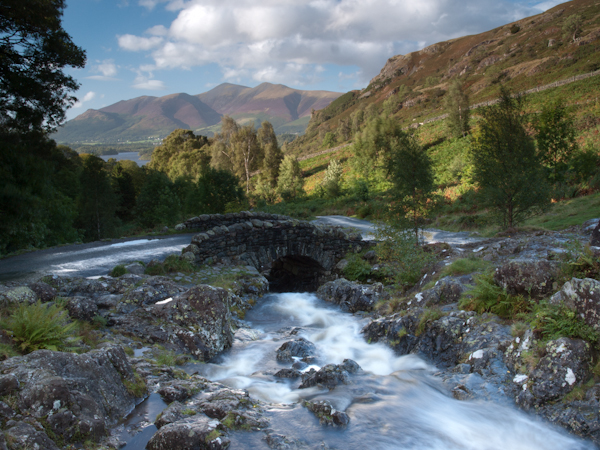
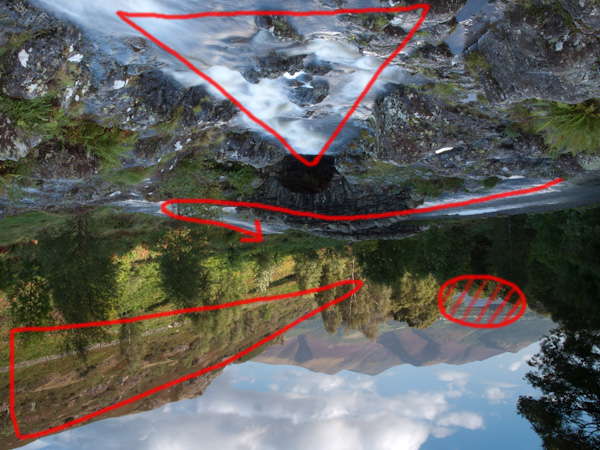
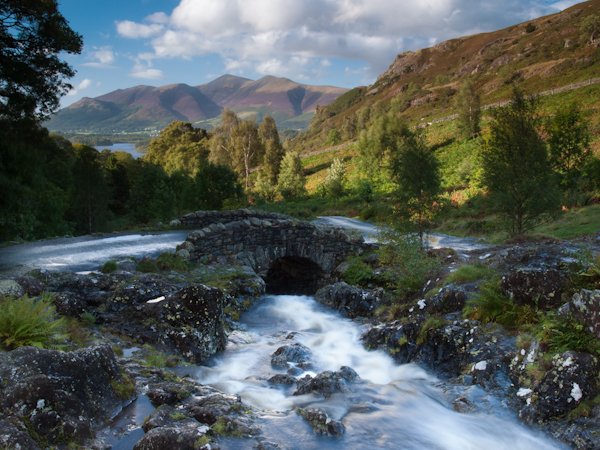
6. Avoid a cluttered background

As with every photograph, the background can make or break the image. Try to change your position so that there is nothing distracting behind your flower.

7. Use a shallow depth of field

Shallow depth of field is when only part of the image is sharp and the rest is soft and out-of-focus. You can achieve this by using a wide aperture (low aperture number) such as f/4 or f/2.8. The effect is even more pronounced if you are using a telephoto lens with a wide aperture.

Flowers and water drops by Anne McKinnell

8. Make it sharp

Even if you are using a shallow depth of field, it is essential that at least part of the flower is sharp. Use a tripod, a cable release or your camera’s two second timer, and the mirror lock up function for the best results.

Remember that even if there doesn’t appear to be much wind, flowers always move. If your flower isn’t sharp, try using a faster shutter speed.

Finally, check your focus and if necessary use manual focus to ensure the camera is focussed on the most important part of the subject.

9. Change your point of view

Move around and try some different angles for more interesting images. Try photographing the flower from behind or underneath to capture a point of view that is different from what we see from a standing perspective.

Behind the flower by Anne McKinnell

10. Focus through another flower

One technique I love is focussing through another flower. Remember how I said in tip #4 that your lens has a minimum focussing distance? You can use that to your advantage! Try positioning yourself so that another flower is in front of your main subject and very close to the end of your lens. The secondary flower will become a blur of colour and your final image will have a more abstract feel.

Flowers using the shoot through technique by Anne McKinnell

If your camera has been gathering dust this winter, now is the perfect time to get yourself and your camera outside to enjoy the sunshine and the flowers and make some beautiful images!

Post originally from: Digital Photography Tips.

Check out our more Photography Tips at Photography Tips for Beginners, Portrait Photography Tips and Wedding Photography Tips.

10 Tips for Improving Your Flower Photos


Digital Photography School

 
Comments Off on 10 Tips for Improving Your Flower Photos

Posted in Photography


5 Tips for Improving Your Portrait Photography

15 Mar

Here are some techniques that you may not be aware of if you’re new to portrait photography. It takes practice, but being aware of these ideas can get you experimenting, and inspire you to try shots you might not have otherwise tried.

1. Frame Tight

Next time you’re watching a movie, pay attention to the close-up shots. See the top of anyone’s head? Probably not very often.

Tightly framed natural light portrait

Tightly framed natural light portrait

Leaving too much space above the head is a common mistake in portrait photography. For a close-up portrait, just cut off the top of the head. You don’t need it. I know it feels weird at first, and to be honest, I would never have tried this if someone hadn’t told me to. But it works because we connect to faces, not the tops of people’s heads. Also cropping out the top of the head (either in camera or in post) brings the eyes higher in the frame and helps you achieve rule of thirds or golden section placement of the face in the frame.

Tight portrait with golden-section crop overlay to show composition.

Tight portrait with golden-section crop overlay to show composition.

2. The eyes have it

The eyes often look best when the iris is centered in the eye. Direct the subject’s gaze to position her eyes such that the iris is about centered. By centered, I mean centered from the camera’s point of view, not the subject’s point of view.

Natural light portrait

Natural light portrait with good eye position and catchlights

I do this one of two ways, depending on the situation. If possible, I raise my left hand and have the subject follow my hand with her eyes until her eyes are positioned favorably. If this isn’t possible, I give directions like “keep your head still and just move your eyes a tiny bit to the left.”

In addition to directing your subject’s gaze to position the eyes, also take note of the catchlights in the eyes. A large, soft light source will create the most attractive catchlight. Windows without direct sunlight shining through them work great, as well as clear open sky.

3. Let the kids run wild!

You’ve heard this before but I’ll mention it again. When photographing children, one of the best ways to get natural smiles and fun photos is to shoot them in their natural habitat, which probably isn’t a photo studio.

Boy on a swing

And he only kicked me once.

Aside from a great portrait tip, this is also good all around practice to improve your photography skills. Kids at play are fast and unpredictable. Learning to frame, focus, and shoot before the moment has passed takes practice and patience.

4. Watch the hands

When it comes to portrait photography, hands are rarely neutral. Usually they are either adding to your photo, or taking from it. Make it a point to pay attention to your subject’s hands.

When photographing women, showing the hand in profile with the fingers curled works well. Often this looks more feminine and alluring than showing the back of the hand. Consider this example:

Natural light portrait

For portraits of women, showing the hand in profile with the fingers curled often works well.

Have you ever heard a subject complain “I don’t know what to do with my hands?” If you’ve ever stood in front of a large group of people to give a speech, then you know this feeling. When we’re put on the spot, it’s hard to do know what to do with our hands.

If idle hands are messing with your portrait, then put them to work. Sometimes solving the hand problem is as simple as handing the hands something to handle. Think creatively about using a prop to give your subject something to do with her hands.

Woman trying on an earring

Woman trying on an earring

Woman playing with a classic Konica

Woman playing with a classic Konica

5. Shoot into the sun

Morning and evening are great times for backlit portraits. When the sun is low in the sky, you can use it as a rim light to highlight the subject’s hair. This works best if you can position your subject against a darker background, like a shaded area, without loosing the light on the subject’s head.

Backlit portrait using the sun as a rim light

Backlit portrait using the sun as a rim light

I hope I’ve given you a few new ideas to try next time you set out to shoot a portrait. Let me know your thoughts on this article by commenting below or reaching out to me on my Facebook page. I do my best to respond to questions and comments.

Post originally from: Digital Photography Tips.

Check out our more Photography Tips at Photography Tips for Beginners, Portrait Photography Tips and Wedding Photography Tips.

5 Tips for Improving Your Portrait Photography


Digital Photography School

 
Comments Off on 5 Tips for Improving Your Portrait Photography

Posted in Photography


Tips for Objective Evaluation of Composition

12 Mar

Composition is one skill within photography that we can probably never master, but just continually develop.  The composition we choose when taking a photograph, i.e. where we choose to place the boundaries of the frame, the perspective we choose to employ from the chosen focal length, how we choose to arrange objects within a scene etc, all influence the way a viewer interacts with the image, and so are all crucial to the success of any given image.

When a composition of an image is broken down to the most basic level, it can almost always be considered as the balance and interaction between different shapes, patterns and light within the scene.  It is very easy to critically assess the photographs of others in this way within a couple of seconds of laying eyes on them, however, how often do we apply that objective critique to our own images?

Here I've outlined the major components that contribute to the composition of this image, namely the three stones leading in from the foregound, the two blocks of dark tone acting as triangles drawing in from the right, and the movement in the clouds leading the eye in from the top of the image

Here I’ve outlined the major components that contribute to the composition of this image, namely: the three groups of stones leading in from the foregound, the two blocks of dark tone acting as triangles drawing in from the right, and the movement in the clouds leading the eye in from the top of the image.

Personally, there are times when I find it very difficult to ‘see’ my own images in this way as I can have a strong emotional attachment to the image that can cloud my judgement.  What do I mean by emotional attachment?  One of the big draws of photography for me is to be outside, amongst nature, seeing scenes unfold in front of me that no-one else is witnessing at that point in time.  Therefore, after photographing an awe-inspiring sunrise across a landscape, it can be difficult for me to separate the resulting image from the experience of being there whilst taking the image – I can end up seeing my images through ‘rose tinted’ glasses and not judging them with the objectivity that others will.

One effective way to overcome this is to not process images immediately, but to leave them for a few days or weeks until the memory of that moment of taking the photographs isn’t quite so fresh in your mind.  That way, you will see the image with fresh eyes, as others will.

Another method I find very useful is to rotate the image by 180°, i.e. turn it upside down, during post processing.  When you do that, the image in front of you no longer resembles the landscape that you captured, but instead resembles the series of shapes and patterns the make up the composition of the landscape.  When the image is upside down, it becomes very easy to be objective about how well balanced elements within the landscape are and to see the distribution of positive/negative space; therefore it becomes easier to decide where to crop an image or to see where you may need to dodge/burn to help direct the eye to the points of interest.

An image from the Lake District, UK, straight out of the camera.  It is a very busy landscape, with a lot going on

An image from the Lake District, UK, straight out of the camera. It is a very busy landscape, with a lot going on, so I needed to whether the composition works as is, or if any additional processing could help lead the eye of the viewer.

By turning the image upside down, it is easier to distill the key components of the composition, namely: the cascade of water running towards the bridge, the road over the bridge to lead the eye further into the scene, and the hatched circle of interest in the background, being pointed towards by the triangle of well lit trees

By turning the image upside down, it is easier to distill the key components of the composition, namely: the cascade of water running towards the bridge, the road over the bridge to lead the eye further into the scene, and the hatched circle of interest in the background, being pointed towards by the triangle of well lit hill side.

The final image, with processing influenced by the upside-down evaluaiton

The final image, with processing influenced by the upside down evaluation.

So, if you haven’t tried this before, give it a try the next time you’re processing images and I think you’ll be surprised how useful it can be, and not just with landscapes either.  Do you have any other tips for ensuring you are evaluating the composition of your images objectively?  If so, please share them in the comments.

Post originally from: Digital Photography Tips.

Check out our more Photography Tips at Photography Tips for Beginners, Portrait Photography Tips and Wedding Photography Tips.

Tips for Objective Evaluation of Composition


Digital Photography School

 
Comments Off on Tips for Objective Evaluation of Composition

Posted in Photography


Guardian photographers share tips for getting a portrait in ten minutes

09 Mar

Kofi-Annan-010.jpg

British newspaper The Guardian is known for its editorial photography, but like all working pros, the staff photographers sometimes only get a few minutes to capture their subjects. In an article posted on the Guardian’s Photo Blog, several of the paper’s photographers share their tips for getting portraits in a hurry. Click through for some pictures, and a link to the article at guardian.co.uk.

News: Digital Photography Review (dpreview.com)

 
Comments Off on Guardian photographers share tips for getting a portrait in ten minutes

Posted in Uncategorized


5 Tips to for Getting Sharper Images

05 Mar

An important element of photography is getting sharp, crisp images. You may be struggling with focus, especially if you are fairly new to DSLR photography. It is extremely frustrating to go out shooting, assuming you’ve got nice clear, sharp images, only to get home to find out they aren’t quite as sharp, or even in focus, as you had hoped.

There are several things you can do to improve your chances of getting sharper images. Here are a few to get you started, if you have other tips please share them in the comments below.

Five steps for achieving sharp images

#1 Pick the focus point manually

focus-points
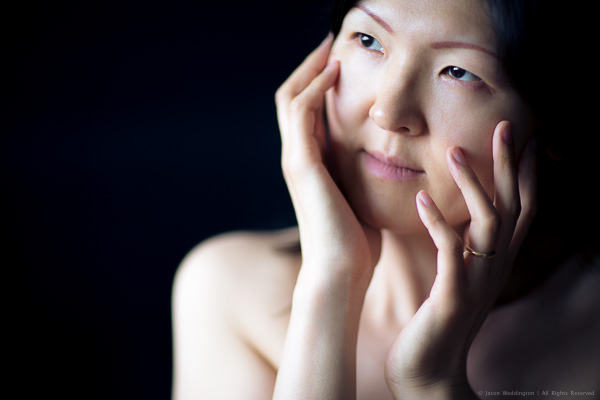
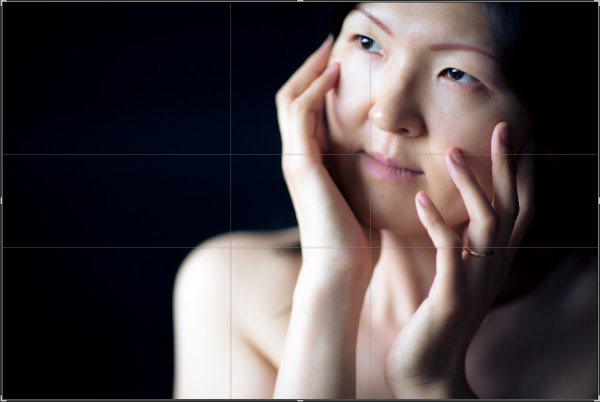
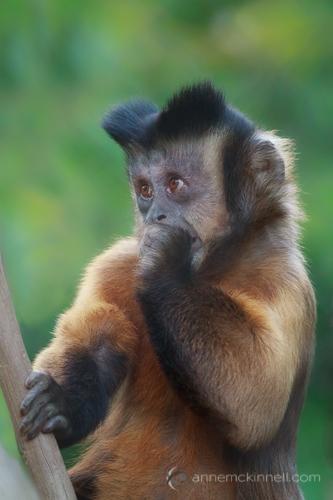
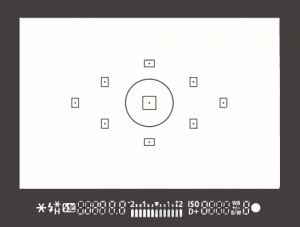
On most SLRs, and some of the mirrorless or four thirds cameras, there is an option of selecting what point it uses to focus. Meaning, when you look through the camera and see some flashing dots or squares (or something similar to the image on the right), those are your focus zones or spots. Make sure it is NOT set for the camera selecting which of those spots are targeted for focusing. When the camera chooses where to focus it can often pick the wrong thing. If you have a subject that is behind something in the foreground the camera will usually pick the closest object, which is not your intention, and you’ll end up with the wrong thing in focus.

Find the setting that allows you to adjust which target focus zone the camera uses to focus. Depending on the camera make and model, that can usually be adjusted with a dial or joy stick on the back of the camera, while you are looking through the view finder. This frees you to choose the most appropriate zone or spot for your subject or scene.

#2 Select the right focus mode

Canon-focus-modes
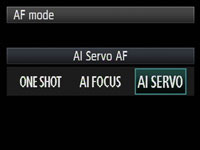
Most cameras have a few different types of focus modes. On Canon you’ll see them as Single (One Shot), AI (stands for Artificial Intelligence) Focus and AI Servo. On Nikon the modes are AF-S, AF-C and AF-A.  Choose the one that bests fits for the subject you’re photographing.

Single (or AF-S) means that the camera will focus and lock on a single object and will not refocus until you release your finger from the shutter button. AI Servo (AF-C) is for continuous focusing when you have a moving subject.  In this mode when you depress the shutter button half way, the camera will continue to focus on the subject as it moves away or towards you. It does not lock focus until you press the button down fully and take the photo. In AI Focus (AF-C) the camera will choose between the previous two based on whether the subject is moving or not.

#3 Set your minimum shutter speed accordingly

min-shutter-speedThere is much debate about this subject in terms of how slow is too slow for hand holding your camera. Some instructors will say 1/60th of a second, I tend to use another rule of thumb which is 1 over the focal length of your lens. So if you are shooting with a 200mm lens, then 1/200 is how fast you need to be shooting to get rid of blur caused by camera shake. The longer lens you select, the more amplified any movement will become. If you are shooting with a cropped sensor camera, remember that 200mm is now acting like a 350mm so that changes your minimum shutter speed to 1/400. If you use a lens that has image stabilization then you can often stretch it a little bit more, say one or two stops, depending on how steady your hands are. You also want to make sure you are holding your camera in the most stable position with your left hand UNDER the body and lens (sort of cupping it) and both elbows in tight to your body. Then, hold your breath and shoot!

#4 Make use of back button focusing

Another much debated topic is whether or not to use the back button focusing option now available on most DSLRs. I’m not here to get into that debate, if you want to know more about it you can read 3 Reasons Why You Should Switch to Back Button Focus by James Brandon. The basic idea is that instead of using your shutter button to focus, you separate the focus function to a button on the back of the camera, that you press with your thumb.

Taken using back-button focus

Taken using back-button focus

I use it for many things including; portraits where I want the subjects off centre and don’t want to do “focus, lock, recompose” for every frame, any time I want to focus on a moving target (you have a better chance of getting it sharp this way than with the shutter button focus), for HDR photography when I’m bracketing and don’t want the focus to shift accidentally between shots, for night photography when I focus with the assistance of a flashlight and don’t want it to move afterwards (other option is switch to manual focus every time but it’s too easy to forget to focus at all then).

It does take a little getting use to, but after a friend of mine that shoots sports for the local newspaper showed me how to use it properly I never looked back. So when she says it’s better for action focus on critical, fast moving subjects, I listen cause she knows what she’s talking about!

#5 Use a tripod and remote trigger or release

Tri-pod = three legs. Three is better than two right? In some the case of photography – yes! The tripod is your friend.

I think you know what they are and what they’re for, but not many photographers own one or use it. Placing your camera on a tripod will help you get sharper images, if you’re doing it right. Get a good sturdy one, don’t cheap out on a $ 49 tripod on sale at the big box store and put your $ 2000 SLR on it. Do you put cheap tires on your high end sports car – I think not! A flimsy tripod won’t do you any good if it can’t hold the weight of your camera and is constantly slipping or loosening. Worse case scenario has your whole rig crashing to the ground, not good. Invest in a good one, do some research, make sure it is made for still photos not video, and it can hold the weight of your camera. A lightweight one made of carbon fibre is a good option, but expect to pay more for that option.

In addition to a tripod I also suggest getting a remove trigger or shutter release. They come in a few varieties including ones that attach directly to the camera, wireless ones, and even fancy programmable ones for doing timed exposures and auto exposure brackets. Like anything, the more fancy shmancy features you want, the more $ $ $ you will pay. But do get one, because it allows you to fire the camera without touching it, thus reducing any possible vibrations during the exposure. I also tell my students to turn of the IS (or VR) on their lens once the camera is on tripod. This is because the IS/VR runs a little motor inside the lens that vibrates it to help compensate for camera shake. On tripod you do NOT want your lens vibrating, even a tiny bit. The camera manufacturers would like us to believe that their cameras are smart enough to know when that’s happened and turn off the IS automatically. Maybe they are. Maybe they aren’t. I like to take no chances, so I just turn it off.

Me playing with a view camera at a mock western town in AZ. The guy posing as the photographer let me have a look through it, for old times sake.

Me playing with a view camera at a mock western town in AZ. The guy posing as the photographer let me have a look through it, for old times sake.

When I started photography school (technical college) the first camera they allowed us to use was a 4×5″ view camera. If you’ve ever seen one you’ll know it’s not possible to use it without a tripod. In hindsight, some 25 years later, I think those photo school instructors were actually pretty smart! At the time I just thought they wanted us to suffer hauling all this heavy gear around. By putting the camera on a tripod you will instantly slow down and put more time into setting up your shot. With the advent of digital and the popularity of SLRs and now even micro four thirds and mirror-less cameras, it’s become so easy to just grab the camera and fire off a few images. So besides the obvious benefit of stabilizing your camera so you can shoot at slower shutter speeds then we discussed in #3 above (if you want to do night photography it’s essential), using a tripod also forces you to put a little more time and effort into it. I find when that happens it often results in a better image aesthetically as well as technically.

Well this was a longer tip than I expected to write, whew!  To sum up, if you are having trouble with blurry images, try these tips out for yourself. I’m pretty sure you’ll have a bit more success.

So give it a go, and let me know how it’s working for you!

Post originally from: Digital Photography Tips.

Check out our more Photography Tips at Photography Tips for Beginners, Portrait Photography Tips and Wedding Photography Tips.

5 Tips to for Getting Sharper Images


Digital Photography School

 
Comments Off on 5 Tips to for Getting Sharper Images

Posted in Photography


7 Tips for Photographing at the Zoo

27 Feb

Zoos … love ‘em or hate ‘em?

I think it depends on the zoo. I much prefer open range zoos where the animals have tons of space to roam around and live almost as they would in the wild. I can’t stand to see animals in cages especially when they pace back and forth in frustration. But zoos do play an essential role in conservation and education.

When it comes to photographing at the zoo it’s easy to get distracted by the sheer joy of seeing the animals and forget everything we have learned about photography. Try to remember that all the rules of good composition still apply such as balance, the rule of thirds and, most importantly, no cluttered (or unnatural looking) backgrounds.

Here are some tips for your next zoo visit:

1. Choose the right zoo

The type of zoo you choose makes all the difference to your photography (and to the animals). Zoos with large open areas for the animals to roam tend to make better photographs because the images look more natural when you cannot see any fences.

Giraffes by Anne McKinnell

Giraffes at The Living Desert, Palm Springs, California.

2. Wait for a special moment

When the animals are right there in front of you don’t just snap away because you can. When you have this opportunity to be so close to them try to be patient and wait for a special moment to make a unique image.

Baby Elephant by Anne McKinnell

Baby Elephant at the San Diego Safari Park, California.

3. Dealing with fences and rails

Tufted Capuchin by Anne McKinnell

Tufted Capuchin at the San Diego Zoo, California.

If you are at the kind of zoo with fences, you can use a wide aperture to reduce the depth of field which should make any fences out-of-focus.

This is easier to achieve if there is greater distance between the animal and the fence.

It is also easier to make the fence disappear if it does not have direct light on it. Find a portion of the fence that is in the shade if it is in front of or behind your subject.

When I made this image of a monkey there was netting both between me and the monkey and behind the monkey. With a 400mm lens at f/5.6 only the monkey is in focus.

4. When to go

If it’s a hot day the animals will often be in the shade where they are more difficult to photograph. Try to go as soon as the zoo opens in the morning when it’s cooler and the animals are more active. You will find fewer people and more animals in the morning.

Overcast days are great for the zoo! Just keep the sky out of your image and enjoy the soft light with no harsh shadows.

If it is a bright sunny day you can use a polarizing filter to remove glare from the animal’s skin or fur.

5. Don’t forget the butterfly zoo

Butterfly by Anne McKinnell.

Butterfly at Butterfly Gardens, Victoria, British Columbia.

One of my favourite types of zoo is a butterfly zoo.

One thing to remember about a butterfly zoo is that they are very hot inside. If you live in a cold country like I do and you visit in winter remember that your lens will need to make the transition to the warmer climate. When your lens is exposed to the warm humid air condensation will form and it might take awhile for it to go away.

One way to deal with this is to go in the restroom and put your lens under the warm air from the hand dryer for awhile to warm it up before you go inside.

Another option is to put your camera and lens in a ziplock bag before you enter and then let it acclimate inside the bag. It will take about 20 minutes before you will be able to take your camera out of the bag without condensation appearing. I prefer the hand dryer method!

Butterfly zoos tend to have beautiful light and often there are more than just butterflies. At Butterfly Gardens in Victoria, British Columbia, there are a number of birds as well and the light does wonders for the colour of the flamingos.

Caribbean Flamingo by Anne McKinnell

Caribbean Flamingo at Butterfly Gardens in Victoria, British Columbia.

6. Equipment

Baby Bear by Anne McKinnell

Baby Bear at Bear Country, Rapid City, South Dakota.

You probably won’t need a huge lens because you can usually get fairly close to the animals in a zoo. I find most of my zoo images have a focal length between 100mm and 300mm.

As far as a tripod goes, I think this is one occasion when it’s perfectly okay leave your tripod at home.

The animals are moving so you are going to need a fast shutter speed anyway. Use at least 1/500 second shutter speed and image stabilization.

When I go to a zoo I usually take my camera with only one lens and a polarizing filter. That’s it! It makes it much easier to move around to get the right angle and you’ll have less to carry on a long hot day.

7. Focus

Snow Leopard Kitten by Anne McKinnell.

Snow Leopard Kitten at Westcoast Game Park, Bandon, Oregon.

Always focus on the eyes.

When you are using a shallow depth of field to remove background distractions part of your animal may be out-of-focus too.

That’s okay as long as the eyes are in focus.

In this image I made of a snow leopard kitten, with a 300mm lens and an aperture of f/5.6, only the nose and eyes are sharp.

Zoos provide both opportunities and challenges for photographers. I hope these tips help you make better images during your next zoo visit.

Post originally from: Digital Photography Tips.

Check out our more Photography Tips at Photography Tips for Beginners, Portrait Photography Tips and Wedding Photography Tips.

7 Tips for Photographing at the Zoo


Digital Photography School

 
Comments Off on 7 Tips for Photographing at the Zoo

Posted in Photography


8 Tips for Working with Models Every Photographer Should Know

27 Feb

Photographing people often requires a completely different bag of tricks comparedto photographing landscapes or static objects. As someone who personally loves taking candid shots, it’s taken me a lot of practice to get used to working with models in such a way that I get the perfect look and feel I want for my photo shoots every time. If you’re Continue Reading

The post 8 Tips for Working with Models Every Photographer Should Know appeared first on Photodoto.


Photodoto

 
Comments Off on 8 Tips for Working with Models Every Photographer Should Know

Posted in Photography


Tips For Choosing The Right Photographer For The Occasion

27 Feb

Choosing the right photographer for your special day can be a real concern for some, you want to have beautiful photos of the day that you can treasure forever. So it makes sense to do your homework before deciding on a photographer.

Here are some things you should be aware of before hiring your photographer to ensure your day goes as smoothly as possible.

Digital Or Film?

While the vast majority of photographers these days have made the switch to digital, there are some photographers who prefer to keep it traditional and use film. It is down to personal choice and budget as to which method you choose, bear in mind using film will be more expensive due to the process of developing the prints afterwards. The drawback of film is that it is not quite so easy to make changes to your prints, even switching a colour print to black and white. With digital, there is no danger of over-exposure and the photographer can literally take thousands of shots at no extra cost to you.

Today’s digital photography offers sharp, clear, bright photographs with great clarity. What’s more, digital film allows the photographer to quickly and easily edit the photographs, put them onto DVD and email the shots to the client. This means you can share your photographs with family and friends without waiting weeks after the event.

Choosing A Photographer

No photographer is alike; they have their own individual style which reflects in their work. Depending on the occasion in which you want the photographer for, you need to check out their portfolio. For example, a wedding photographer should have an extensive range of photographs in different conditions, outside, indoor, candid, formal and more classic shots. Businesses and corporations may wish to use a commercial photographer. Make sure the photographer you select has adequate experience in photographing most events such as weddings, christenings and graduations etc. Check out their colour and black and white work as there can be variations on both styles.

Personality

A sign of a good photographer is one that is prepared to listen to what you want and work closely with you to get the best results, a good photographer will never dismiss your ideas and tell you that he/she knows best, they will want you to be happy with their work and though they may offer their opinion the final decision should always rest with the customer. Also evaluate how they work with other people. A family photographer, particularly working with children should be patient and accommodating.

Experience

How long have they been in the business for? Do they have experience in working at many different events? Make sure they have at least a few years’ experience under their belt before hiring them for an important event. This will ensure that there are no tears when looking at the images of the day. Check out testimonials and ask around for references of your chosen photographer.

Pricing

Before signing on the dotted line, make sure the photographer is upfront about all of the costs involved. And don’t be afraid to ask. Be wary of photographers that offer a very low fee initially as you can get caught out when purchasing the prints as they most likely charge extremely high prices to buy the prints.

Get a full written and signed contract of what you are paying for, the hours, the location/s, the date/s of the event etc. Does the photographer have a cancellation policy? What about copyright?

By following these guidelines will assure that you will have a permanent record of your special day for many years to come.

This post was written by the team at Beck Photographic – the premier Northampton wedding photographers.

dslrBlog

 
Comments Off on Tips For Choosing The Right Photographer For The Occasion

Posted in Photography


Photography Tips That You Should Try Today!

19 Feb

On top of being an awesome hobby, photography is also a magnificent art form. You can produce professional quality photographs by experimenting with your camera’s setting, taking shots from different perspectives and using a variety of natural and artificial lighting techniques.

When preparing for a trip, pack your equipment carefully. Take all different kinds of lenses, and make sure you take cleaning accessories and enough batteries. You should avoid taking any equipment you will not use, and consider how each item you bring will be useful to your goals.

You do not want to risk missing a fantastic photo because you do not know which camera setting to use or how to adjust it properly. Do not pick a preset because you need to modify your settings. Experiment with your camera’s features to see how different settings affect your photos.

When you go travelling, look around for new ideas on all the different things you can shoot. If you do not know where to start, take a look at some postcards. There are also postcards highlighting the major attractions in town, so make sure you include these on your subject list.

Even with drastic technological improvements in cell phone cameras, lighting is still an issue for most of them. Cell phone cameras generally lack a flash. Therefore, you’ll need to compose your shot to take advantage of the available lighting. Zooming in is a great way to cut out some of the shade or shadows around the user.

One technique for capturing a great shot is to start taking pictures at a distance and then move forward, taking additional photos, until your subject fills the frame. The viewer will have the ability to more clearly see a shot’s details. Sometimes, these details can increase the interest of the shot to the viewer.

Always hold your camera at your eye level, or adjust your body so that the camera’s perspective is level with your own. This is a great way to pull the viewer to the photo because it creates a personal atmosphere. If you want to take pictures of children, kneel to their eye level.

If you are photographing a bride or another person wearing white clothing, make sure to use a contrasting background color. Majority of cameras have auto focus, so it takes in all the shades present in the full shot. White is almost always “washed out” in shots like this.

You can get free photo editing software, and have a little fun with it. All photographers use some type of photo editor, so you don’t need to feel bad about using it. It can make the difference between a so-so photo, and one you want to frame. with only a few minor modifications.

Though you may not think you need a flash outside, take a look and make sure. Bright sunlight can create harsh, dark shadows on your subjects’ faces. Set your camera to the setting that allows you to use a technique called “fill flash” when you see shadows. This setting will eliminate the shadows that appear in deep facial folds.

Don’t be afraid to break some photography rules with your camera. Good photography takes unique style, and you want to show the world a new view through your lens. Try to stay away from taking pictures that are described as ‘classic’. Experiment with new angles, and be creative.

Your photography skills will improve from a mere hobby to a work of art. Produce photographs that you are proud of and wish to share with the world by utilizing some of the tips here. It will take a lot of practice, but take some of these tips and give it a go.

Thanks for reading. The author is an editor at camerashq

dslrBlog

 
Comments Off on Photography Tips That You Should Try Today!

Posted in Photography


5 Tips on How to Choose the Right Lens

19 Feb

Lens lust is a terrible thing. It didn’t quite make the list of the 7 Deadly Sins, but can still be an agonizing process that will have your significant other wondering if Zeiss Prime is the codename for an escort service. Choosing the right lenses is also a lonely decision. I get questions almost daily from people wondering which lens Continue Reading

The post 5 Tips on How to Choose the Right Lens appeared first on Photodoto.


Photodoto

 
Comments Off on 5 Tips on How to Choose the Right Lens

Posted in Photography