RSS
 

Posts Tagged ‘Tips’

Macro Photographer Teresa Franco Shares Her Best Phoneography Tips!

07 May

Scenario: A ladybug turns your shoulder into its new resting spot. What do you do?

Some might say Make a wish. Teresa Franco? She’d say Take a photo.

Snapping a photo of something so tiny can be a challenge. Do not let your camera phone deceive.

You can use your phone to get great macro shots of the tiniest objects, from crystal-ball-esque dew drops on a leaf to a caterpillar snacking on a blade of grass.

Teresa Franco is living proof. Have you seen her macros? They’re the best of the best on Instagram!

We asked her how she does it, and she shared all her favorite phone lenses, apps, and tips for getting fantastic photos of nature’s tiniest details.

So the next time a bug takes a liking to your shoulder, you’ll be set.

Phoneography Tips with Teresa Franco

p.s. WE ARE HIRING A WEB DEVELOPER. If you love photography and San Francisco and codes, APPLY HERE.

p.p.s. WE ARE ALSO HIRING AN EVANGELIST/BIZ DEV HERO. Creative deal-maker types, APPLY HERE.

Who’s Teresa?

Teresa first caught our eye with her undeniably legit macro skills.

Once we realized she wasn’t using a DSLR or a 3-piece lighting setup — that was when we were really impressed.

Teresa’s a nursing student who happened upon her awesome talent for macro while perusing Instagram one day.

That’s when she discovered the Olloclip, a three-in-one phone lens that lets you shoot fisheye, wide-angle, and macro photos on your phone.

When she’s not studying up on medical stuffs, she’s chasing grasshoppers and fungi to get the best macro photos ever.

The advantage to shooting macro on your phone?

Its small size and light weight makes it very easy to maneuver around tight spaces like under a tiny mushroom or between blades of grass.

It also allows me to free up one hand to use to stabilize a flower or a branch when it’s windy.

What’s in your phoneography camera bag?

before

  • Microfiber lens cleaning cloth — gotta keep my lenses clean
  • Snacks
  • My iPhone
  • Squidcam, Photojojo, and Olloclip macro lenses
  • I love my i.Trek Super Mount (a phone tripod adapter). I use it by itself. It’s great for stabilizing your iPhone when you’re very low on the ground.
  • iPhone charger
  • iPhone earphones with remote

What apps do you use? Do you edit your photos?

before
My go to camera app is Camera Awesome (for iOS).

It has a “Fast Burst” option that comes in very handy when I’m taking photos of flying/jumping/crawling bugs. I also love that you can lock in the focus. I use both of these features all the time.

The biggest problem I have with macro photography is lighting. So when I edit my photos, I usually just increase the “brightness” in Snapseed (works for both Android & iOS).

I also like VSCO CAM (iOS) and Vintique filters (iOS). I try not to edit my photos too much because I lose a lot of important details.

How many shots does it take to get that one photo? before

Before, I used to follow a bug and blast the camera button like crazy and just hope that one of the hundreds of photos that I took will come out decent.

Now, I’m more patient and can usually anticipate their next move. I’m proud to say that I can take 1-3 photos of a bug and walk/run away very happy.

Your top 3 fave Instagrammers?

before

  • @tanaka_tatsuya creates miniature worlds using household items and tiny little figures. I just want to shrink myself and live in his world.
  • @alozor lives in the same city as me, but when I see his photos, I always think “Where in San Diego is this??” “I’ve been living here for fifteen years, how come I’ve never seen this??”. He also knows when and where to catch the best California sunset.
  • @movable takes us behind the streets of Shanghai. He knows how to make grungy post-apocalyptic street alleys look so elegant.

What are your top 3 macro things to shoot?

I love sharing photos of the little things in nature that people don’t usually pay attention to. Photographers tend to go for the most colorful flower.

I want to show people that beauty can be found in the most mundane. My favorite subjects:

  1. Little seedlings and sprouts
  2. Dry petal curls
  3. Mushrooms- there’s something magical about them

Your advice for aspiring macro photographers.

beforeDon’t be discouraged if your first few photos come out blurry.

Everything in life takes practice. 

If you want to take photos of flying/crawling/hopping bugs, experiment with different camera apps that have fast shutter speeds. 

Have patience. A lot of it! I promise it will yield rewarding results.

So like, any extra editing tips?

beforeI would suggest to try as much possible to keep the tones of your photos consistent.

It makes for a pretty and attractive gallery. If you like using filters, use photo editing apps such as “Vintique” that let you adjust the settings of each filter — that way you can still make a style of “your own” even when you’re using pre-set filters.

Your top 3 places to shoot macro photos.

beforeIf I want to take photos of mushrooms, usually go to the park early in the morning before sunrise.

I also love going to local nurseries because they have a wide variety of flowers, plants, and trees on display.

The best thing about living in California is that there is green EVERYWHERE you go, all year round. If you’re ever in San Diego and you see a girl with an iPhone out in public on her elbows and knees, it’s probably me.

How do you get out of a creativity rut?

beforeI look at photos of my favorite photographers — Instagram, Flickr, online portfolios, photography books.

I also love watching sci-fi and japanese animation. Hayao Miyazaki is definitely the inspiration behind my whimsical photographs of moss forests and toadstools.

More Phoneography Tips & Inspiration

before

  • Photojojo’s 10 great tips to improving your phone photos (pictured above!)
  • Read up on tips from awesomesauce phoneographer, Dirk Dallas
  • Bring your phone photos into *real life* — 5 ideas here

Related posts:

  1. Dirk Dallas Shares His Favorite Phoneography Apps, Tips & More! Extra photos for bloggers: 1, 2, 3 If a photo…
  2. 10 Tips to Make Your Phone Photos Amazing;
    Plus, Our New Phoneography Blog! Phoneography is the best. No matter where you go, you’ve…
  3. How To Make Macro Photos Without Buying An Expensive Macro Lens! Extra photos for bloggers: 1, 2, 3 Photography: it can…


Photojojo

 
Comments Off on Macro Photographer Teresa Franco Shares Her Best Phoneography Tips!

Posted in Equipment


10 Tips to Improve Your Food Photography Styling

27 Apr

This is a guest post by Jules Clancy of Stonesoup.

While portrait photographers need to be skilled in the art of getting their subjects to relax in front of the camera to get a great shot, we food photographers have things a little easier. At least our subjects (mostly) can’t talk.

image1guest.jpg

But that doesn’t mean you should forget to apply a little charm in the food styling department.

The more time spent making the food attractive as possible, the easier things are when it comes to taking the shot.

So here are 10 tips to help you improve your food styling, naturally.

1. Use less food than you normally would

While it may seem more generous to serve plates piled high with food, an over crowded plate can look less appealing than a minimalist spread. Think about how you can use the white space of the plate to frame your dish.

image2guest.jpg

2. Use paper to add texture to plates

Lining plates with parchment or baking paper helps to add visual interest and soften the lines of your plates.

3. Look for contrast with backgrounds

While there are times when all white on white can be visually striking, I find I get better shots if I go for contrast. So a pale coloured food and plate gets a dark background where as a vibrantly coloured dish tends to be best with a simple white background.

image3guest.jpg

4. Allow food to spill over naturally

Getting a bit messy really helps to add movement and life to your photographs, rather than having everything confined to plates and bowls.

5. Choose simple crockery and tableware

While highly decorative China and napery are beautiful on their own, they can detract from the visual impact of the food. Plain plates, especially classic white allow the food to be the star.

image4guest.jpg

6. Emphasise the natural beauty of the food

Try and think about what it is that makes a particular dish look delicious and then serve it in a way to flaunt it.

For example, I love the golden, cripsy skin of a well roasted chicken. Rather than carve the chook into individual slices with tiny slivers of skin visible, the whole bird tends to look best.

7. Get some work-in-progress shots

It can be easy to focus on getting the final plated-up food shot and miss out on some great opportunities along the way. Try taking a few shots during the preparation and cooking process.

image5guest.jpg

8. Try and capture the ‘yum’ factor

Think about what makes your subject really delicious and then aim to highlight this characteristic in your shot. Ice cream is a great example. It’s all about smooth creaminess and licking drips from the sides of your cone or bowl.

9. Always be on the lookout for ideas

Inspiration can strike from anywhere. When you’re eating out or even just flicking through your favourite food mag, take note of what looks appealing and what doesn’t.

image6guest.jpg

10. Dig in and reshoot

Once you have a shot of the whole food that you love, eat or serve some out and then take another shot. Often a half finished plate is more appetizing than the original whole.

A few great food photography blogs:

  • What Katie Ate
  • Wrightfood
  • Souvlaki for the Soul

For more tips on improving your food photography see:

  • Food Photography – An Introduction
  • 11 Great Camera Angles for Food Photography
  • 7 Tips for Aspiring Food Pornographers
  • Food Photography Tips and Techniques
  • 10 Tips for Mouth Watering Food Photography
  • A Basic Food Photography Kit

Also check out our Snapn Food Guide to food photography.

Jules Clancy is a qualified Food Scientist, and self-taught food photographer. She blogs about her commitment to cooking recipes with no more than 5 ingredients over at Stonesoup.

Post originally from: Digital Photography Tips.

Check out our more Photography Tips at Photography Tips for Beginners, Portrait Photography Tips and Wedding Photography Tips.

10 Tips to Improve Your Food Photography Styling


Digital Photography School

 
Comments Off on 10 Tips to Improve Your Food Photography Styling

Posted in Photography


3 Tips to Ruin Your Photo with a Watermark

22 Apr

Strange as it may seem: photographers, who should be highly creative persons with fine artistic taste tend to be bloody awful designers. But don’t get me wrong here. I’m not expecting someone to be able to design me an outstanding corporate logo just because he is a great photographer. But the massacre begins even at the level of watermarking their Continue Reading

The post 3 Tips to Ruin Your Photo with a Watermark appeared first on Photodoto.


Photodoto

 
Comments Off on 3 Tips to Ruin Your Photo with a Watermark

Posted in Photography


10 Pro Motion Control Time-Lapse Tips

19 Apr

As I’ve been documenting landscapes and cityscapes with time-lapse photography the past several years I’ve learned some key lessons, many times the hard way. If you’re new to time-lapse here’s a quick definition from my eBook Photographing the 4th Dimension – Time that discusses slow shutter & video techniques:

Time-lapse videos are produced when hundreds of sequential images are displayed in rapid succession. The line between still photo and video is directly tied to how the human visual system works. Images are retained in our visual memory for roughly one-fifteenth of a second.1 As a result we can differentiate still photos when they’re played to us at a frequency of 10-12 images per second (video lingo being frames per second or fps). Standard video playback frequencies are 24 and 30 frames per second, both of which easily fool our visual system, via the Phi phenomenon, into seeing continuous motion versus still images.

To save you the hardship of enduring the same mistakes I’ve made over the years here are 10 motion control time-lapse tips to get you shooting like a pro including some gear recommendations.

_Q2A4768_full_600c

1. Setup Early
To avoid a last minute rush or worse yet missing fleeting lighting conditions be sure to setup early.  If you’re rushed you’re bound to make careless errors and even put your gear at risk of falling. It pays to take your time, arrive early, carefully setup, review your setup and take a test sequence if time permits. This is a sure fire way to make sure that your actual shoot goes to plan.

jmg-giveaway-HEADERalt
Enter to Win My Ultimate Time-Lapse Photography Setup
Over $ 5000 in prizes – http://bit.ly/WGy7Jw

2. Compose Anticipating Subject Movement
Anticipate the movement of your subject(s). Time-lapse subjects really shine when you take the time to anticipate not only where your camera will move, but where elements in your frame will move during a sequence. Clouds, water, traffic, people, etc. will have a line of movement if you take the time to carefully observe the scene you’re going to photograph you can compose your frame to maximize the impact of this movement. Here again having the necessary time on hand, not rushing, will be advantageous for you to properly evaluate your subject(s).

3. Know Your Move
“The move” is the line of movement your camera will take on a motion control system as your time-lapse sequence runs. As you setup a shot be sure you evaluate the scene and your surroundings to find a move that will highlight your subject best. At the same time be sure that during the sequence your setup won’t be put in harms way during the move either by passing pedestrians, vehicles, losing balance & falling, etc.

_MG_9494-600c4. Variation
Vary the direction of your moves (left to right, right to left, down to up & up to down) and even consider capturing video at a normal 24 or 30 fps. Having a variety of footage will allow you to edit together different sequences with enough variation that your audience won’t find the editing predictable while providing opportunity for smooth transitions between scenes.

5. Know & Read The Weather
As with still photography the most interesting conditions often come about from bad weather (see Make the Best of Bad Weather). Capturing sequences of bad or changing weather can be quite dramatic. To do this the first step is to monitor the weather in the area of your shoot. Time your shot when transitioning weather is most likely to happen. On the flip side since many motion control rigs contain metal, monitoring the weather can also help you say safe by avoiding conditions where lightning might be a possibility.

6. Be Organized Don’t Forget Anything
One best practice I like to follow is to carry the little things that can make or break a shoot. Murphy’s Law always has a way of tripping up a photographer so I like to travel very well prepared even if it costs me in having a heavier bag. Items I carry with me include tools (ex small hex wrench set), extra batteries, extra screws, backup equipment such as an extra camera body & lens, lens clothes, levels, rain covers, filters, etc. There are some very versatile bags out there to help carry these “little” things.  See In Pursuit of the Ideal Time-lapse Camera Bag: Gura Gear Bataflae 32L for the bag I’ve chosen.

7. Choose the Right Equipment & Lenses
Trial and error with gear can be costly both in time and money if you’re not careful. In most instances I shoot with lenses of a focal length ranging from 15mm to 50mm, but for some shots I’ve been known to use a 70-200 or 300mm lens… it all depends on the subject. (see What lens do you use for your Landscape photographs?) When it comes to hardware and software specific to motion control time-lapse my choices are below:

  • Dynamic Perception Motion Control Dolly [win this]
  • eMotimo robotic tripod head (see full eMotimo review with example videos) [win this]
  • Backup Intervelometer(s): Canon TC-80N3 and TriggerTrap
  • Adobe Lightroom
  • Adobe After Effects [win this]
  • BG Render Pro (AfterEffects plugin)
  • For more gear ideas visit my Ultimate Time-Lapse Photography Setup giveaway page

eMotimo & Dynamic Perceptions Examples
http://www.youtube.com/watch?v=1vxQAnfjKrQ
http://www.youtube.com/watch?v=k5HKaplJa_4

8. Don’t Forget Narrative
While it’s great to highlight cool time-lapse sequences always keep in mind how your sequences will piece together to tell a story. Narrative is always important to achieve a deeper connection with your audience. A series of time-lapse sequences without narrative is merely a demo reel.

9. Faster & Higher Capacity CF/SD Cards
When it comes to CF/SD cards faster is always better. As your camera snaps off sequential images you’ll want media that will allow for the fastest write speeds possible. If your CF/SD cards are too slow then your camera’s buffer might fill up and you’ll experience lag in your sequences as your camera tries to empty its cache & write files to your card(s) before taking another photo. Note: A 300X card = 45MB/s write speed. 1X = 150KB/sec Higher capacity cards (ex. 32GB, 64GB and 128GB) will also allow you to capture numerous sequences on the same card.  Use of such cards will also allow you to focus on your subject and less on juggling cards. While some worry use of high capacity cards puts you at greater risk for data loss I’ve yet to experience an issue and chalk this up to regular formatting after downloading images off the card(s).

10. Know Your Time
Don’t lose track of time or mis-calculate sequence times as it can result in the loss of a sequence or keep you tied up for extremely long periods of time. There are now several time-lapse apps for mobile phones to help even the most fatigued photographer get the right sequence calculations. When all else fails once can always revert to the simple use of a calculator

Post originally from: Digital Photography Tips.

Check out our more Photography Tips at Photography Tips for Beginners, Portrait Photography Tips and Wedding Photography Tips.

10 Pro Motion Control Time-Lapse Tips


Digital Photography School

 
Comments Off on 10 Pro Motion Control Time-Lapse Tips

Posted in Photography


The Secret of Creating a Strong Image – 5 Tips for Creating a Story in Your Image

18 Apr

Article and photos by Oded wagenstein.

In an era when we are drowning in images and lots of people and talents are competing for the viewers’ eyes or the magazines’ attention, have you ever wondered what makes you have a longer look at an image?

Is it the person that was photographed? Perhaps a certain color or an angle?

What is the secret of the photographers that mange to get their work published on magazines and newspapers? What is the secret of taking a strong image that lasts?

1.jpg

The secret of all strong images is their ability to provide the viewer a story .

Since the dawn of time, People gathered around the fire and shared stories with each other.

It doesn’t matter what subjects you like to shoot. If you want to become a good photographer, you have to be a good storyteller first. An image with a story, one that evokes emotion and curiosity will rise above other images and catch the viewer’s attention.

So what is the stuff of which “visual stories” are made from?

In most cases it is an emotion that the image creates. It can be empathy, curiosity or even negative emotions such is anger.

Even if you are dealing with macro or landscape photography it is better to have an image that tells a story. However, the best way for me to get a story is with people photography, as people are a large “pool” of stories and emotions.

Here are 5 tips for finding your “visual story” in Travel photography before departure, and on the road:

1. Preparation needed

The thing that makes the difference between an amateur and a professional in almost every field is usually preparation.

A professional photographer will start working even before leaving home, while an amateur photographer will wait for things to happen in front of their eyes in the field. Professionals will gather information that will help them exceed the potential of getting those photogenic stories on the road in minimum time and by doing so, increase the amount of good strong images.

2.jpg

What are the things that are worth checking before going to shot on a trip for example? Here are some classic examples:

Will there be any festival or photogenic event during your stay? Festivals are a great place for finding stories. Is there any taboo related to photography or culture in general in the country you are going to visit, that you must know? For example, the hill tribes that can be found on the mountains of Asia (as the woman from the Karen tribe in photo number 2) mostly believe that taking their photo would also take their soul. And trust me, the custom officers in your home country would not like the “soul” attached to your camera.

The best thing you can do to get this kind of information is to get the advice of a photographer who has already been there. Online photography forums would love to help you with that.

Want to take your photography to the next step? – Take a journey deeper into the place and read a little bit about the culture and history, prior to arrival.

The best tip someone has given me is to learn a few words of the local language. Locals appreciate people who try to speak their language (even if they laugh at them a bit at first)

Learning “Hello”, “Thank you” and ” may I take your photo?” will do wonders to your story telling images.

2. Getting closer

3.jpg

Taking photos of people from a distance with telephoto lens may be safer and will not ruin the spontaneity of the story, but there’s nothing like the narrative and emotional quality of close-ups in people photography.

Sometimes I want to photograph people from just a few inches away and still keep the spontaneity and intimacy.

What do I do? – I look for this moment in which the person returns to routine activity, after creating a bit of a connection with them and letting them understand that my camera and I don’t have any bad intentions.

I never approach people while the camera is hanging from my neck. It is threatening and may result in negative responses from the locals.

After greeting the person (in their language) I sit with them for a while, let them get used to my camera and me and only later I begin taking photos

Never ever forget- people don’t like to feel they are on a show for you. Always treat them with respect. The best way to do so is with the help of a local. So go to the next Section

3. Best ice breaker

4.jpg

Professional photographers use a fixer, which is a local who knows their needs as photographers and helps them to get around.

You can use a fixer, but you can also find your “fixer” in a much more interesting way and for free, in most cases. You can connect with local at your age in advance to your visit on the basis of “culture exchange”. The local will help you get to the best places and will also recommend which places to avoid. They will speak for you in their local language and will be the best “ice breaker”. All you have to do is be polite but it won’t hurt to bring your host something for your own country, like postcards or a unique product related to your place.

If you can find a photography student to be your fixer, it can be an exciting experience for both of you.

Hanging with a local as a friend or with a professional fixer does not give exemption from the previous section of “getting closer”.

4. The Stories generators

5.jpg

Feeling lost? Feeling unpleased with the photos you took? You can always try to visit a “story generator”. It can be anywhere that people Gather: a market, a central square or a festival. Just be alert and keep your eyes open and the stories will simply appear before your eyes.

The best tip for finding a “story generator” place is just to go to the places that interest you. It could be a church, a busy street, a quiet beach or even an abstract shooting of a building. Go with your passion and you will find your stories.

5, Last one for the road – get lost

We talked about the preparations and the work needed for good story finding, but sometimes all you need is to leave the tour guidebook in the hotel room and just go outside to walk the streets and roads looking for the unexpected.

Some of my best stories and photos came to me with this way of traveling.

Don’t forget to check with the locals or your fixer about the places that should be avoided and always, but always, check the time of your last ride home.

Oded Wagenstein is a travel photographer. His photographs were published on numerous magazines and websites world wide.

He is known for his intimate culture portraits. In his works he put the emphasis on understanding the culture and achieving good relationship with the person being photographed pre-shooting.

You can join his Travel photography group on Facebook and continue to discuss on travel and people photography:

Post originally from: Digital Photography Tips.

Check out our more Photography Tips at Photography Tips for Beginners, Portrait Photography Tips and Wedding Photography Tips.

The Secret of Creating a Strong Image – 5 Tips for Creating a Story in Your Image


Digital Photography School

 
Comments Off on The Secret of Creating a Strong Image – 5 Tips for Creating a Story in Your Image

Posted in Photography


8 Tips to Become Excellent at Minimalist Photography [+2 bonuses inside]

17 Apr

Less is more! You’ve definitely heard that old saying before, and it couldn’t apply more to the genre of minimalist photography. People’s exact definitions of minimalist photography may vary from person to person, but in general, this style of photography can be summed up in the following way. It makes sure that all of the attention is focused upon the Continue Reading

The post 8 Tips to Become Excellent at Minimalist Photography [+2 bonuses inside] appeared first on Photodoto.


Photodoto

 
Comments Off on 8 Tips to Become Excellent at Minimalist Photography [+2 bonuses inside]

Posted in Photography


Tips for Shooting Landscapes with a Telephoto Lens

10 Apr

Landscape photography is often synonymous with wide-angle lenses, strategically placed foreground elements and all encompassing vistas that stretch from the very near to the very far.  There is no doubt that using that approach can create wonderful images that lead the viewer through a grand landscape however there is also merit in taking a different approach and using a telephoto lens.

Telephoto Landscape - Rolling Farmland

This rolling farmland was isolated using a focal length equivalent to 280mm, f/13, 1/200s, ISO 200, using a tripod

Often, when photographing a landscape, there is a particular element of the scene that has caught your eye and made you want to capture the image.  With a telephoto lens, it is possible to isolate that key element and bring it to the fore of the composition, rather than let it get lost amongst the other distractions introduced when shooting with a wide angle.  You will find that a telephoto lens will also compress the perspective of the landscape, brining distant objects much closer, giving a different sense of scale to when using a wide-angle lens.

The approach taken to shoot landscapes with a telephoto lens is similar to when using a wide-angle lens, though there are some additional considerations.  Here are a few tips to help you along the way:

1. Composition: Look for a strong feature of the landscape and try to isolate it within the frame, leaving out unnecessary elements that detract from the composition, for example, the sky – we often feel the need to include the sky within landscape images, however if it doesn’t add significant interest, or would detract from the main element, why not leave it out?

2. Sturdy support: You will want to use a sturdy tripod to ensure you can shoot without suffering from camera shake.  Telephoto lenses are very sensitive to the slightest movement so a solid support is key to capturing sharp images.  If shooting handheld, a good rule of thumb is to aim for a shutter speed quicker than ‘1/focal length’ to avoid camera shake however depending on the available light that is not always possible, hence the recommendation for a tripod.

3. Camera shake: Utilise ‘mirror lock-up’ or a remote shutter release (even both) to further reduce the chances of vibrations.  When the shutter is pressed, the movement of the mirror can introduce vibrations that can cause loss of sharpness, so the ‘mirror lock-up’ feature (found within the menus of most DSLRs) introduces a small delay between lifting the mirror and opening the shutter.

4. Image Stabilisation: Switch off any image stabilisation features on the lens or within the camera body.  That feature that you rely on when shooting handheld can actually introduce camera shake if left on when your camera is mounted on a tripod, and when using a telephoto lens, those movements will be exaggerated and result in a softer image.

Telephoto Landscapes - Tuscan Sunset

A Tuscan landscape captured using a focal length equivalent to 120 mm

5. Aperture selection: Be aware of the optimum aperture required to capture the scene in sharp focus.  When the subject is distant, a large depth of field can be easily achieved (even with a telephoto lens) so consider using apertures within the ‘sweet spot’ of your lens (typically f/8 to f/11).

6. Filters: If you do chose to incorporate the sky within a telephoto landscape you may find that the dynamic range of the scene is greater than your camera can capture in one shot.  Typically, you may use graduated neutral density filters to overcome this, however it is more than likely that the diameter of your wide-angle lens will differ to your telephoto lens, meaning you may not have the appropriate filter ring size to use with your telephoto lens.  Adapter rings are fairly cheap to buy and keep in your camera bag just in case, otherwise think about capturing bracketed exposures (exposed correctly for the sky and land) in order to blend them together later on.

Telephoto Landscapes - Panorama

A panorama stitched from 7 images taken at a focal length equivalent to 100 mm.

7. Panoramas: Telephotos lenses are great for capturing panoramas as there is very little distortion due to focal length.  This means you can zoom in even further on a feature within the landscape and capture a number of images to stitch together into one panoramic image (even though the final field of view may not actually be that wide).

Seeing compositions that work with a telephoto lens may be challenging initially, however it won’t be long before you start isolating elements of the landscape in your minds eye.  A good exercise is to go out and challenge yourself to shoot landscapes with only your telephoto lens.  You will find that the change of focal length may be refreshing as even local landscapes can be transformed to something unfamiliar when seen through a telephoto lens.

Post originally from: Digital Photography Tips.

Check out our more Photography Tips at Photography Tips for Beginners, Portrait Photography Tips and Wedding Photography Tips.

Tips for Shooting Landscapes with a Telephoto Lens


Digital Photography School

 
Comments Off on Tips for Shooting Landscapes with a Telephoto Lens

Posted in Photography


The 10 Ultimate Camera-Care Tips for Beginners and Experts Alike

29 Mar

The most important thing you can do for your camera is to take care of it well. If you look after your camera properly, it will reward you with a long life. A lot of people know how to take pictures, but not everyone knows how to extend the life of their camera through proper care. If you want to Continue Reading

The post The 10 Ultimate Camera-Care Tips for Beginners and Experts Alike appeared first on Photodoto.


Photodoto

 
Comments Off on The 10 Ultimate Camera-Care Tips for Beginners and Experts Alike

Posted in Photography


10 Tips How to Avoid Blurry Pictures when Shooting from a Kayak

28 Mar

Pentax Optio WG3 waterproof camera 
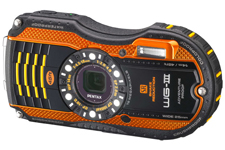
Compact waterproof digital cameras like Pentax Optio W-series or Olympus Tough series are popular among paddlers. They may not offer the highest image quality among point-and-shoot cameras, but they still produce decent pictures. Most importantly, you can photograph in conditions where other cameras are better kept in a dry case or box.

However, new camera owners are often getting pretty bad, blurry pictures and are really disappointed with a purchase. Shooting on water from a kayak or canoe requires some extra efforts and practice from a paddling photographer. Here are a few tips which may help. This is an update of my old post written 5 years ago. Cameras are getting better, but, I believe, the tips below are still valid. I have been using Pentax Optio waterproof cameras starting from the original model WP, then W10, W30, and, currently, WG2 is attached to my life jacket.

1. Use the automatic mode

I do not have any special settings for my camera. On water I use exclusively the P (program) mode. Of course, in addition to the P mode I use the movie mode and interval drive mode quite often.

You can program the green button to do useful adjustments without a need to go through a setup menu. I am using two functions assigned to the green button: exposure correction and, much less often, white balance setups. Typically, I underexpose my shots to avoid overexposed areas with wash out details. Coincidentally, it shortens the exposure time which helps to avoid blurry pictures, but this is not a main purpose of this adjustment.

2. Keep the camera steady

This is the most important tip. However, it is not so easy when paddling, especially, when water is not calm. Ideally, you should hold the camera in both hands. In addition, it is quite easy to shake the light and small camera just by pressing a shutter button.

3. Use a paddle shaft to stabilize the camera

Here is a short video clip demonstrating how I am doing it.

This technique really helped me when I was starting to paddle a tippy Sisson Nucleus kayak. You can achieve two goals: to stabilize the camera and to stabilize your kayak. You have your paddle ready for bracing. This technique does not work with strong, gusty winds.

You can go further with this idea and attach or mount your the camera more permanently to your paddle – see a camera cradle by Mark Sanders.

4. Use a self timer

The 2 second selftimer available in Pentax Optio is very useful to avoid shaking the camera when pressing the shutter button. I recommend it, especially, when you are holding the camera with one hand (shooting on an extended arm or from some unusual angles).

5. Keep your lens clean of condensation, water drops, water residue

I keep my camera in a small neoprene pouch attached to my life jacket and usually do not have problems with water or dirt on my lens. The camera is always on a tether. Shooting with a camera mounted on a deck and exposed to splashes is another story.

6. Pay attention to light and sun position

Try to shade you camera lens from a direct sunlight to avoid a lens flare. Do not shoot against the sun.

It is possible, at least for Pentax, to glue (epoxy) some step-up rings and to attach lens hood to your camera. I am using much simpler solution: an improvised lens hood attached with an electric tape to the camera.

You can expect the best “sweet” light for shooting when the sun is low, so after the sunrise and before sunset. Do not expect too much from this camera in low light conditions, but do not give up with shooting as soon as the sun is down. Consider shooting some silhouettes or water reflections then.

7. Use flash

Sometimes, I use flash to add light to objects in my fore plan. Usually, a soft flash option works better for a kayak deck. Be aware of any reflective tape on your kayak or gear.

8. Shoot multiple frames

Don’t limit yourself to a single shot for a given scene. Repeat the shot. Try different angles, horizontal and vertical format. You will increase your chances to get that great shot. Digital memory is cheap. You can always erase unsuccessful pictures later.

9. Photoshop …

Downloading pictures from the camera to your computer is not the end of your work as a photographer.
Use Photoshop or other image editing software to post process your pictures. Most often, I rotate my pictures to make horizon horizontal, adjust the exposure with levels, crop and resize them, and, finally, apply some sharpening. You cannot save completely blurred pictures in Photoshop, but you can improve most of them.

10. Practise

There are no reasons not to take and use the camera wherever you go. It is small and waterproof. Experiment and have fun.

Time to to time it is useful to browse through the camera manual. You may find something new and exciting in a jungle of all these options and settings.

More tips?

Could you share tips from your experience with a kayak or canoe photography? Are your on water pictures worse than these shot on land?

Some related articles where I am sharing my experience from paddling and shooting with Pentax Optio WP, W10 and W30 cameras:

  • Pentax Optio W20 Waterproof Camera Review, Tips, and Sample Photos
  • Kayak Photography: Using Your Paddle to Stabilize the Camera – Video Clip
  • 7 Tips on Kayak Photography: How Did You Shoot It?
  • No Viewfinder? 10 Tips on Shooting Pictures without Viewfinder
  • Is Pentax Optio W10/W20 the Paddler’s Camera? Many Boats, Many Cameras …
  • Kayak Photography Links – Tips and Hints for Paddling Photographers


paddling with a camera

 
Comments Off on 10 Tips How to Avoid Blurry Pictures when Shooting from a Kayak

Posted in Photography


10 Tips To Get Over Photographer’s Block

27 Mar

Going through a creative rut can be frustrating, and sometimes scary, but it is usually temporary. Photographer’s block can happen to you at any time. It’s up to you to turn it into a positive experience and grow in the process.

Get lost on purpose! Don’t think about what you are going to shoot, just get out with your camera. Something will trigger your photographic eye along the way.

Get lost on purpose! Grab your camera with no goal in mind and you will soon see something that triggers your photographic eye.

1-Push yourself, take risks and make mistakes.

The saying is not that we learn from our successes, but that we learn from our mistakes! Experiment with different techniques and genres and don’t be afraid to fail.

2-Get out of your comfort zone.

Try something that seems completely out of character for you. If you are a rather shy person, go out and shoot some street photography or make street portraits of strangers! You never know whether you are going to love it or hate it until you try it.

3-Spend time with other photographers.

More often than not, we are the only ‘photography nut’ in our family. It can be very frustrating at times but we cannot force others to love the craft as much as we do. As long as your family is supportive of your passion, don’t expect them to share your excitement every time you see something that turns you on photographically. Get together with other photographers by joining or creating a photo walk group in your area. You will get your fix and grow as a photographer by seeing and learning something new with each outing.

4-Take a class.

Whether it is in a physical classroom or online, taking a photography class can help you get your groove back. Participating in a workshop, whether it’s a day long in your hometown or a week-long adventure in an exotic location, will definitely help motivate you.

5-Seek inspiration.

Visit museums and art galleries. Look at photography and other art forms such as paintings and sculptures. Pick up a large book of photographs from artists you’ve long admired and slowly page through it, paying attention to the composition, light and story. Look at the work of emerging artists on line. The goal is to immerse yourself in something beautiful.

6-Become a mentor.

Go out with someone who just picked up a camera and help them get started. I can guarantee you that sharing your love for photography and technical knowledge with someone who is just learning will rekindle your creativity. You will learn something in the process and feel really good about yourself.

7-Get lost on purpose!

Don’t think about what you are going to shoot, just get out with your camera. Something will trigger your photographic eye along the way.

8-Pick a theme.

It may be as simple as photographing the color yellow, reflections in puddles or people walking their dogs. Leaving the house with a theme in mind will keep you focussed and turn your photo walk into a treasure hunt.

9-Start a project.

Commit yourself to a long term project such as a 52-week project or a series of self portraits. Get extra motivation by doing it as part of a group via your favorite social media platform.

10-Try new gear!

Borrow or rent a new lens for a weekend. Try something fun like shooting with a fish eye lens or a tilt-shift. Easier yet, you can experiment with a camera phone and fun Apps!

Conclusion

It’s okay to take a little break too! Remember that creativity is a process, not a result. A creative block is not something to fear. It is part of being an artist.

Please share your experience with the readers of Digital Photography School. Thanks!

Post originally from: Digital Photography Tips.

Check out our more Photography Tips at Photography Tips for Beginners, Portrait Photography Tips and Wedding Photography Tips.

10 Tips To Get Over Photographer’s Block


Digital Photography School

 
Comments Off on 10 Tips To Get Over Photographer’s Block

Posted in Photography