RSS
 

Posts Tagged ‘Three’

Huawei Honor 6 Plus offers three 8MP cameras

17 Dec

Huawei has announced the Honor 6 Plus with not one, not two, but three 8MP cameras. One serves as a selfie-capture unit at the front while the other two are lined up side-by-side on the rear of the device. As on the HTC One M8 the dual lens setup allows for refocusing of already captured images. Read more

Articles: Digital Photography Review (dpreview.com)

 
Comments Off on Huawei Honor 6 Plus offers three 8MP cameras

Posted in Uncategorized


Win One of Three Lenses from Tamron!

11 Dec

Over the last few years here at dPS, we’ve run very some very popular competitions with our partners to give away to lucky dPS readers some of their great photographic products.

We are lucky enough to be able to do it again this week!

For this competition, Tamron is giving away THREE prizes!

These three unique prizes are designed to help every level of photographer create BETTER pictures. Tamron is the world’s most awarded photographic lens line. Each will be won by a different dPS reader. Here’s what you could win:

  • Tamron 16-300mm Di II VC PZD Macro – Value $ 629
  • TWO – Tamron SP 70-300mm Di VC USD – Value $ 449
Tamron 16 300mm Di II VC PZD Macro 600Tamron 16-300mm Di II VC PZD Macro 70 300VC USD model A005 600Tamron SP 70-300mm Di VC USD

Learn a little more about Tamron here: Tamron.com

How to Win

To win this competition you’ll need to:

  • Visit the above lens information pages and learn more about each lens and its core use.
  • Leave a comment below and tell us why you’d like to win and HOW you would you utilize each lens. Please note: there is a limit of 1 entry per person.

Do this in the next 14 days and on December 26, 2014, the sales team at dPS will choose what it considers the best three answers and we will announce the winners in the following days.

Deadline Is December 23, 2014 at Midnight PDT (UTC-8). Comments left after deadline will not be considered.

16300VC 3 Ian Plant Photo

Photo by Ian Plant

By best – we’re looking for people who have an understanding of the lenses and how they will best suit your needs. So you’ll need to check out the product pages to put yourself in the best position to win.

There’s no need to write essay length comments to win – but we’re looking to hear what you like about the lenses and how it would help your development as a photographer, professionally, personally, or both.

This competition is open to everyone, no matter where you live – but there is only one entry per person. To enter – simply leave your comment below.

Tamron logo

About Tamron

Disclaimer: Tamron is a paid partner of dPS.

googletag.cmd.push(function() {
tablet_slots.push( googletag.defineSlot( “/1005424/_dPSv4_tab-all-article-bottom_(300×250)”, [300, 250], “pb-ad-78623” ).addService( googletag.pubads() ) );
} );

googletag.cmd.push(function() {
mobile_slots.push( googletag.defineSlot( “/1005424/_dPSv4_mob-all-article-bottom_(300×250)”, [300, 250], “pb-ad-78158” ).addService( googletag.pubads() ) );
} );

The post Win One of Three Lenses from Tamron! by Darlene Hildebrandt appeared first on Digital Photography School.


Digital Photography School

 
Comments Off on Win One of Three Lenses from Tamron!

Posted in Photography


Not dead yet: Sony announces three A-mount lenses

28 Nov

Among all of the excitement around the a7 II, Sony quietly announced a new A-mount lens last week. The 70-300mm F4.5 – F5.6 G SSM II lens for A-mount offers faster AF tracking, a new Nano AR coating, and weatherproofing, and will be available in February for $ 1150. The company also announced the development of Vario-Sonnar T* 24-70mm F2.8 ZA SSM II and 16-35mm F2.8 ZA SSM II A-mount lenses, which will arrive next Spring with similar improvements. Read more

Articles: Digital Photography Review (dpreview.com)

 
Comments Off on Not dead yet: Sony announces three A-mount lenses

Posted in Uncategorized


Which Three Lenses do You Need for Photography?

28 Aug
Camera lenses

I used an 85mm lens fitted with a 500D close-up lens to create this photo of a Chinese Water Dragon.

Two things occurred to me When I read Phillip VanNostrand’s article The Only Three Lenses You Need for Travel Photography. One, is that his choice of lenses would not be my choice. Two, is that you cannot recommend three lenses for every photographer to use, as everybody’s requirements are different.

Imagine if you went to a showroom to buy a new car and the salesperson said “Sir, the only car for you is a Ford Focus”. Fine, if that’s the car you happen to want. But how annoying would it be if the salesperson insisted that you should buy a Ford Focus if it didn’t fit your needs?

A professional would establish your requirements first by asking you questions. How many miles do you drive a year? How many people does the car need to transport? Do you need lots of storage space? How important is fuel economy? Safety? What is your budget? And so on. When the answers to are known, the salesperson can make a recommendation.

It’s the same for lenses. My needs are different from yours because we are different people with different priorities and requirements.

Please don’t take this as a criticism of Phillip’s article (which is a great read, and the comments are fascinating). I learned this lesson when I wrote my article Buyers’ Guide – Prime Lenses vs Zoom Lenses in which I came down in favour of primes (my personal preference). Some readers quite correctly pointed out that the convenience of zooms makes them invaluable in certain situations. I realized that I was imposing my preferences on other people.

The three lenses I couldn’t do without

So here’s my question. If you could only own three lenses, which ones would they be? That’s right, three lenses to cover you for all the types of photography that you do. And, taking it further, if you could only own one lens, which one would you choose?

It’s a hypothetical question for most, as we are free to buy as many lenses as we like. But there is a semi-serious point behind it. Creativity works best within constraints, and limiting your lens collection to three is certainly a constraint. Also, it is possible to put together a good selection of three lenses that cover you for most situations on a limited budget – there is no need to spend many thousands of dollars on expensive glass if you can’t afford, or don’t want to.

Before you give your answer, have a think about your requirements, because they will drive your choice of lenses. These are my requirements:

  • My lenses must be light and relatively small. I don’t want to carry around a large, heavy bag full of gear.
  • My lenses must be good value for money. I don’t have a budget as such but when I buy a lens I need to know that I will use it a lot, it will last for decades and that I won’t have buyer’s remorse.
  • The autofocus must be reasonably quick and quiet.

To get the debate started, here’s my choice of three lenses, in order of preference. Bear in mind that I’m a Canon user so that naturally influences my choice of lens, and that I use a full-frame camera.

85mm f/1.8 lens

This is my favourite lens. I use the 85mm f/1.8 for portraits, close-up photos and landscapes that benefit from selective framing and compression. It’s light, relatively inexpensive and the image quality is excellent. The only weakness of this lens is that the minimum focusing distance is 85cm (2.8 feet), so it is not so good for close-up photography. I get around that by attaching a 500D close-up lens (this is technically a lens, although I think of it as a filter and I’m not including it in my choice of three) which gives me excellent quality for close-up images as long as I stop down to f/2.8 or smaller.

Camera lenses

The 85mm f/1.8 lens is ideal for portraits, especially those taken in low light, like this one.

Camera lenses

The 500D close-up lens that I use with my 85mm lens for close-up photography.

40mm f/2.8 pancake lens

While I love the quality and versatility of 50mm prime lenses, they are too middle of the road in terms of focal length for me to include one in my choice of three. Instead, I’m selecting the Canon 40mm f/2.8 pancake lens. I love this lens because it is extremely small and has high image quality. On my full-frame camera the focal length sits on the borderline between wide-angle and normal focal lengths, and turns out to be a surprisingly useful focal length. I use this lens a lot and I love it.

Camera lenses

The 40mm lens is ideal for scenic photos like this.

Camera lenses

The 40mm lens is also idea for photos where the composition demands a gentle wide-angle, in this case for the converging verticals effect created by shooting from a low viewpoint.

24mm f/2.8 IS lens

This is the newest addition to my lens collection and while I’m still getting to know it, the 24mm f/2.8 become one of my favourites. There’s something special about the 24mm focal length – it’s ideal for landscapes and scenic photos without being too wide. The maximum aperture of f/2.8 is a little limiting (I like to experiment with wide apertures for creative effect) but I can live with it as the lens is much lighter, cheaper and smaller than the Canon 24mm f/1.4L lens.

Another thing I like about it is the Image Stabilizer (IS). Theoretically with this engaged I can handhold the camera at shutter speeds down to around 1/2 second and still get sharp images. Yet anything moving within the frame will record as a blur – lots of creative potential there.

Camera lenses

The 24mm lens is great for environmental portraiture, where you want to show you subject and include a dramatic background.

If I had to chose just one of these lenses, what a difficult decision! If I could only ever have one lens, and it had to be one of these three, I think I would go for the 85mm f/1.8. Otherwise I would go for something like the Canon 24-105mm f/4L lens. It’s bigger and heavier than my primes but it covers a very useful set of focal lengths.

Your choice

Now it’s your turn. If you could only own three camera lenses, which ones would they be? If you could only own one lens, which would you choose?  Please let us know why. What are your personal requirements? It should make for an interesting discussion.


Understanding Lenses ebook bundle

Understanding Lenses ebooks

My ebooks Understanding Lenses Part I and Understanding Lenses Part II will help Canon EOS owners decide what lenses to buy for their cameras. They are both filled with lots of tips to getting the most out of your Canon lenses. Click the links to learn more.


The post Which Three Lenses do You Need for Photography? by Andrew S. Gibson appeared first on Digital Photography School.


Digital Photography School

 
Comments Off on Which Three Lenses do You Need for Photography?

Posted in Photography


Three Types of Light: Diffused, Backlight and Reflected – What are They and When to use Them

26 Aug

Light: it is the main component for every image that you will take. It does however come in many different forms, producing very different results. Some of these types of light are diffused, backlit and reflected. There will be times when each of these types of light is more readily available than another, or even in some cases multiple types of light at once. Some people create their full photographic style by using a certain type more, or less, exclusively in their work. But, knowing how to first spot the different light forms will allow you to take full of advantage of every scenario and add depth, variety and a sense of individuality to your images.

Figure 3

Diffused Light

Diffused light that which is not harsh and direct, it has been softened in some way. A great example is when you are outside and the sun is shining, with no clouds in the sky. The light is harsh and you will notice that there will be a lot shadows falling on or around your subject. But, if clouds are in the sky and they block out some of that harsh sunlight, the light then becomes diffused.

You can use diffused lighting to your advantage in a great way. If you are shooting portraits on an overcast (diffused) day, you are pretty much shooting with nature’s own softbox. You will be able to work with your subject easier, and have different angles to shoot from, because you won’t be limited by the harsh lines and shadows that undiffused light can create. Overcast (diffused) lighting is preferred by many photographers, as it is a flat and even light. If it were a particularly sunny and bright day, shooting in the shade would also offer you some diffused lighting.

Figure 1

This particular image shows the use of diffused lighting, using the shade of the building to soften the light, while also reflecting light shades back to the subject.
Figure 2

Backlight

Backlighting is where you are illuminating your subject from the back, as opposed to from the front, or the side. Working with backlight you can silhouette your subject, or give them a glow. To Silhouette your subject, you would meter for the sky and to create a glow around your subject, you would meter for the subject itself. You need to place your subject in front of your preferred light source and allow that light to illuminate your subject. If you are using the sun as your light source, different times of the day will give you different types of backlighting. The lower the sun falls, the softer the light will feel. You may find that sometimes you will have to move yourself into a position where your camera can autofocus or switch to full manual, as the light can be so strong that your focusing point struggles to find what it is you want to focus on.

Figure 4

Reflected Light

Reflected light can be found everywhere, on most surfaces. Reflected light is literally the light that is reflected from a particular surface or material. If you were to shoot a portrait next to a white building, the light hitting the building would be reflected on to your subject, creating a soft light. If you were in the middle of the red Moroccan Atlas Mountains and you were to shoot a portrait, there would be a softer red reflection coming onto your subject from the ground. Or, if you were doing a portrait session outside and you wanted to bounce some additional light into your subject’s face, you could use an actual reflector. They normally come in two colours; one side gold, and one side white.

Reflected light tends to be quite soft and takes on the colour of the surface/material that it is being bounced off.

Figure 5

The reflector was being used with the gold side to reflect a warm glow onto the subject’s face.

Figure 6

  • How To: Silhouette Photography / Self Portraits
  • Tips for Photographing in Different Weather Conditions
  • Let’s Talk About Light – 3 Types of Lighting Conditions and how to Use Them
  • Choosing the Right Color Reflector for Your Photography

The post Three Types of Light: Diffused, Backlight and Reflected – What are They and When to use Them by Natasha Cadman appeared first on Digital Photography School.


Digital Photography School

 
Comments Off on Three Types of Light: Diffused, Backlight and Reflected – What are They and When to use Them

Posted in Photography


Canon offers three new wireless Pixma inkjet photo printers

20 Aug

Canon has announced three new Pixma All-in-One inkjet printers, the Canon Pixma MG7520, MG6620 and MG5620 (MG7550, MG6650 and MG5650 in Europe). They all offer wireless support with Apple AirPrint connectivity, as well as compatibility with Canon’s Easy-PhotoPrint+ web application and Pixma Printing Solutions. Read more

Articles: Digital Photography Review (dpreview.com)

 
Comments Off on Canon offers three new wireless Pixma inkjet photo printers

Posted in Uncategorized


The Only Three Lenses You Need for Travel Photography

29 Jul

The only three lenses you need for travel photography anywhere in the world are a fisheye lens, a 50mm, and a 135mm (or similar telephoto).

You can agree and finish this article right here, or you can read on to see exactly why I would choose only these three lenses to take with me anywhere in the world.

Canon fisheye 15mm 2.8

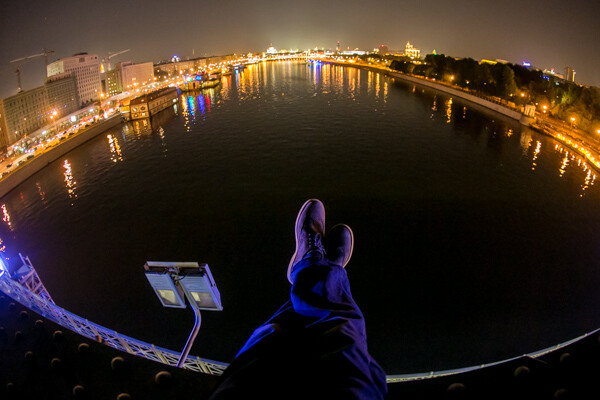
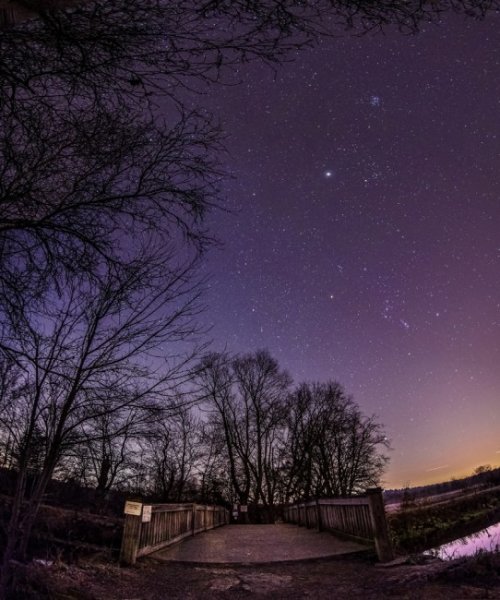
Night shot from atop a bridge in Moscow, using the Canon fisheye 15mm f/2.8

Before I say anything else, the fisheye I have in mind has an aperture of f/2.8, the 50mm has an aperture of f/1.4, and the 135 has an aperture of f/2.0. Popular, cheaper variations on these lenses would be the 24mm f/2.8, 50mm f/1.8, and the 100mm f/2.8 Macro. I’d also like to address what I imagine a popular response to this article might be: “What about the 24-105mm?” This lens is weak for a couple of reasons. The maximum aperture on this lens is f/4, which ends up being very limiting if you are trying to travel light (and going without an off camera flash).  Also, prime lenses are always superior in quality to zoom lenses. There are less moving parts and the image quality is cleaner. If you think having just one lens to cover a greater range is easier, just remember what you gain in convenience (by having one lens) you lose in quality, weight, and ability to “see” in the dark.

Each of these lenses are used for very specific reasons. Just as we wear different shoes for different purposes throughout our week, such as; sneakers for exercise, dress shoes for work, and slippers around the house – we use different lenses to convey different feelings, emotions, and to use as different tools to capture our experiences. Some lenses really are better than others for certain things. For example, portraits are best taken with lenses between 85mm and 135mm. The distortion to the face/ears is minimized and the truest proportions are found in this range.

On the other hand, you wouldn’t normally reach for a lens like this when shooting a landscape scene (there are always exceptions to every rule, and it’s fun to see what happens when you break the general guidelines). Great lenses for landscapes tend to be a bit wider, somewhere between 15mm and 50mm. I recently took only these three lenses with me on the Trans Siberian Railway from Russia through Mongolia into China. Here are MY reasons for bringing the 15mm Fisheye, 50mm f/1.4, and the Canon 135mm f/2.0 with me on this trip of a lifetime.

The Canon Fisheye 15mm f/2.8

canon fisheye 15mm

From Moscow, Russia

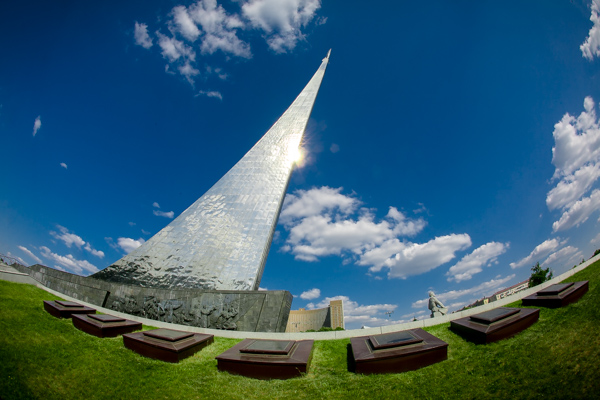
The Canon 15mm lens is my antidote to boring building pictures. When traveling abroad (or around your own town/city/village), interesting buildings are inevitably photographed. Oh, that old bridge with locks attached to it? Better take a picture. Oh, look at that old cathedral in the Kremlin, better take a picture. If it’s there, it must be important. Well, you can add your photo to 1.5 million other photographs right there on Flickr or Google images that look exactly like the one you just took.

What will you do to differentiate yourself? How can you take a picture that will make someone pause for more than half a second?  Ad companies are excited when someone spends 4-8 seconds looking at a photo. Can you get someone to look at one photo for that long? What would it take? For me, I decided I would never take boring, straight photos of buildings ever again. I’d either edit them in unusual ways (like creating an HDR image, or process it in very contrasted black and white), at unusual times of day, or I would attempt to photograph it differently than every other tourist before me.

canon fisheye 15mm

The subways in Moscow, Russia

Canon fisheye 15mm 2.8

Selfies are easy with the fisheye lens. That bag on my shoulder could hold my camera, three lenses, my laptop, batteries, some magazines and a book.

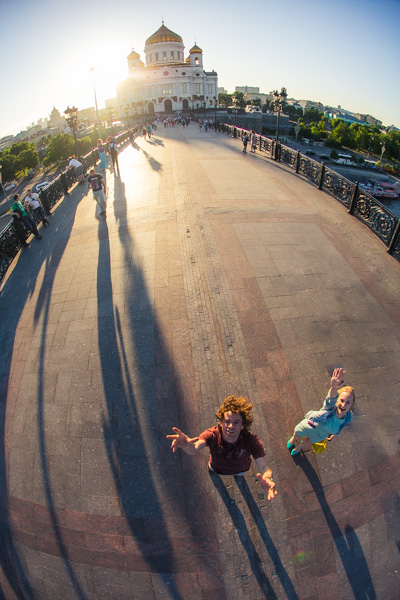
Shooting with a fisheye lens can be really fun, actually. Hold your camera up to your eye with a fisheye lens on, move the camera upwards and watch the horizon bend down sharply at the sides, creating a “globe” feel to your image. Tilt the camera down and watch the earth curve up like a big “U”. Buildings become warped and distorted in unusual ways, like a piece of Gaudi’s architecture. Stand in the middle of the street and point the camera straight upwards and watch the buildings on the side loom over you, like in a Dr. Seuss book.

canon fisheye 15mm

My bunkmates on the Trans Siberian Railway

Fisheye lenses can capture an entire room, cabin of a train, or a bathroom easily. They make selfies on your DSLR incredibly easy. You can take incredible photos of the stars at night. And best of all, they are great for doing the Camera Toss. (I suppose I should recommend NOT trying this ever, anywhere). Fisheye lenses add an element of fun and whimsy to travel photos, which I find otherwise a bit boring and predictable. It’s also an incredibly light and compact lens to travel with, which is why I always bring it along on my trips now.

canon fisheye 15mm

My camera toss, where I throw my camera with a fisheye lens high up into the air to capture a scene like this

The 50mm f/1.4

The 50mm lens is a standard, go-to, all-around lens. And while the Fisheye lens brings a lot of whimsy and fun to my travel pictures, some scenes just don’t call for that. I’ve heard it said that the 50mm is the closest representation to what we see naturally with our eyes. This lens is my best choice of the three options for Canon 50mm lenses. For only about $ 300, this lens has fantastic optics and a powerful aperture. It’s made of real glass lenses unlike the cheaper, lower quality 50mm f/1.8. And it focuses fast, unlike the much more expensive 50mm f/1.2, which happens to be twice as heavy.

Canon 50mm 1.4

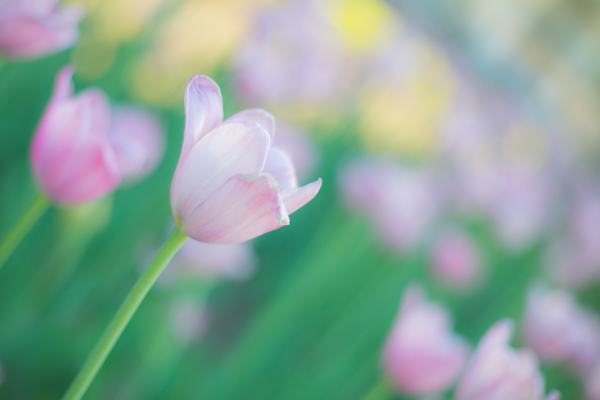
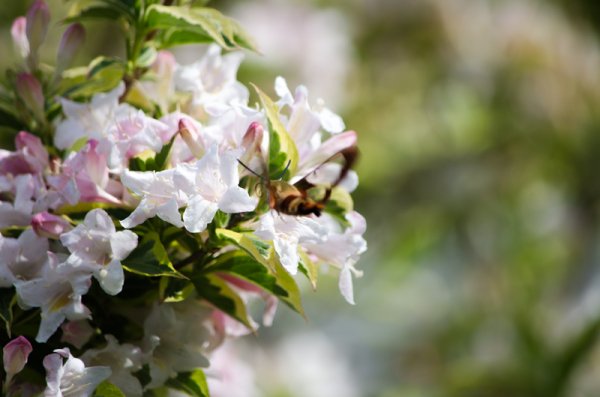
A garden scene in Moscow, Russia taken with the 50mm f/1.4. Such lovely bokeh!

This is a great, inconspicuous lens on a camera body because it doesn’t stick out too much like a 70-200mm would, and the quality is just superb, as I’ve already said. It is extremely lightweight, and you could honestly walk around the entire day with just this lens. What I associate most with the 50mm f/1.4 lens is street photography. I love to take that lens and get lost down side streets and alleyways. I like to take photos of strangers on the street with this lens. The focal length is just right, so it feels as though the viewer is standing there by him or herself. It captures just enough of a scene to convey what is there.

Canon 50mm 1.4

A retired math teacher from Texas on the Trans Siberian Railway

The 50mm f/1.4 is also a great lens for portraits (though I prefer the 135mm f/2.0). It produces lovely bokeh. It forces you to get up close to your subject, making the portrait more intimate. You can’t hide behind a telephoto like the 135mm or a 70-200mm. You are an arm’s distance away, and being that close sometimes shows up on the subject’s face in interesting ways.

low light with the Canon 50mm 1.4

My Mongolian host preparing milk tea in the yurt.

The last thing that I think the 50mm f/1.4 does best, is capture images in low light situations. Trying to capture dinner in a restaurant at night using candlelight only? Totally possible. That light reflecting across the river at night? 50mm does it best! Sleeping in yurts for four nights in a row? Getting that delicious yurt light from the top of the tent is easy with the 50mm.

Canon 50mm 1.4

Taken in the back alleys of Beijing, China with my 50mm lens, my favorite street photography lens.

Fun fact: of my top 200 images from the trip, 112 of them were taken with the 50mm.

The 135mm f/2.0

The granddaddy of all these lenses, the 135mm f/2.0 has a special POW feel to it. Because it is a telephoto, it pulls the background in for a nice compact feel to the images. It is a great portrait lens as it completely obliterates the background in a sea of dreamy bokeh. And one special fact about the Canon 135mm f/2.0: it has the ability to focus at a distance of 1 meter (3 feet), which makes it almost like a macro lens.

Canon 135mm 2.0

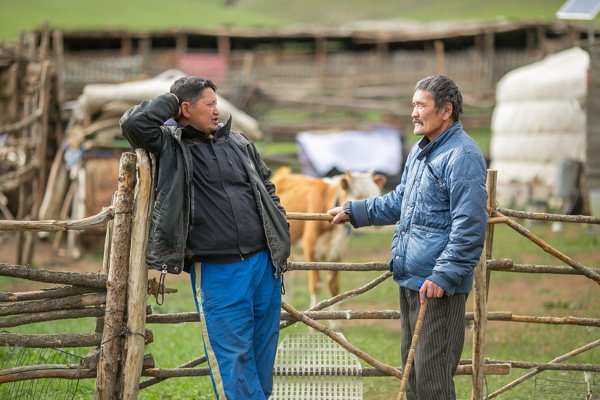
My host on the left, after we road horseback from one village to the next, in Mongolia. Taken with the 135mm f/2.0

This lens is fun for me because it has similar properties to the 70-200mm, but it weighs nearly half as much, which will save your back and shoulders after a long day of walking around. This is a fun lens to spy on people from afar, if you are afraid of the straight-on street style encounters you get with the 50mm. This is actually a really interesting lens to do landscapes with if you have enough room. Look at this side-by-side comparison of basically the two same scenes, and look what the 135mm does to the mountains and landscape in the background. It really pulls them towards you, the viewer and truly implies the scope of the scene.

Fisheye versus 135mm

The same view from the fisheye and the 135mm. Notice the mountain with the bright spot in the background of the fisheye; it’s almost non-existent. With the telephoto the mountain becomes a major player in the photo.

Canon 135mm 2.0

Taken on my way to the oldest and deepest freshwater lake in the world. Lake Baikal, in Siberia, Russia.

canon 135mm 2.0

In the Kremlin, Moscow, Russia. This is one instance where I enjoy breaking the rules and using a telephoto lens to capture an idea of a building, rather than the whole thing with a 50mm or Fisheye lens.

I hope these images and words have inspired you. It’s really fun to limit yourself to prime lenses and feel how they work (and don’t work) in various situations. Being that close to just a few lenses over a month of travel really allows you to get to know the equipment well. So now let’s see some travel photos you’ve taken with prime lenses!

The post The Only Three Lenses You Need for Travel Photography by Phillip VanNostrand appeared first on Digital Photography School.


Digital Photography School

 
Comments Off on The Only Three Lenses You Need for Travel Photography

Posted in Photography


Three Tips to Help you Capture Beauty in the Everyday Moments

27 Jul

When it comes to creating family photo albums, there can be a tendency to create a book filled with your family’s “greatest hits”, the best moments of the year, if you will. Of course, those special moments like birthdays, vacations, and that one perfect Christmas card photo are important to include, but for most of us, they really don’t do a good job of capturing the little moments that make up the majority of our lives.

MeredithClark6

The other day, I was looking through a photo album with my four-year-old daughter Lizzy. As usual she skipped right past all the formal photos of her and her sister, and went right to a candid snapshot of her crying on the floor when she was about two. She’s heard the story of why I took that photo a number of times, but she always asks to hear it again, and so I told her;

“You were crying because I made us blackberry cobbler with whipped cream for breakfast one morning, can you believe that? I thought it would be a special treat, but you just wanted cereal like you had every day, and you were so mad at me that I’d made you something else!”

We both sat on the couch long after that laughing, talking, and telling stories about what Lizzy was like when she was two. To her, those are the important pictures – not the sunset sessions, not the formal portraits of her and her sister, not the perfectly composed family photos (which carefully observe the rule of thirds). To her, the little day-to-day moments really are the big things in life. They are the things that she remembers, and the more I think about it, the more I have realized that they really do belong in our family photo albums, perhaps more than anything else.

So, without further ado, here are my top three tips to help you capture the moments of beauty in the everyday:

1. Tell a Story

MeredithClark1

Look through the camera with the goal of capturing what’s happening in your life right at this moment. Maybe it’s the way your girls are sitting together, heads touching, reading a book. Maybe it’s the collection of coffee mugs on your table that speak to late nights at work. Maybe it’s the dirty feet of your kiddos hanging off the swings that speak to summers spent playing in the backyard.

MeredithClark2

Maybe it’s the collection of bottles drying on the counter that you really wish would hurry up and dry so that you could put them away and not look at them again until tomorrow. I’ve been there. Trust me when I tell you to take a picture of them before you put them away today. Because in a few years, when your kids are older and bottles are the last thing on your mind, you’ll look back on that photo and instantly be transported back to what life was really like with a young baby, counter full of bottles and all.

2. Look For Beauty Everywhere

MeredithClark3

It can be easy to overlook people, places, and things that you see every day, but there’s still beauty there if you take some time to look for it. Last fall, I was commissioned by a client to take some photos of the town that we live in. At first, I had a very difficult time thinking of any place that I’d want to photograph, because everything just felt ordinary to me. I wanted to do something unique and special, and had a difficult time thinking of how to make that happen. It took a few weeks of walking around town while holding my camera, shooting nothing, and sighing heavily before I started to be able to look at things with fresh eyes. I began to see color texture, and character, even in the old wooden house that I drive by all the time. It may be a normal and everyday thing for me, but that doesn’t mean there’s no beauty in it.

MeredithClark4

Is your dinner preparation particularly colorful? That can be beautiful. Are your kids holding hands on the couch one morning? That can be beautiful too. Is that homemade vanilla ice cream slowly dripping down a waffle cone? There’s beauty there. Those weeds outside that really need to be mowed, but in the meantime have grown into tall, prickly, textured creatures? I think they can be pretty beautiful as well.

MeredithClark5

3. Sit Back and Watch

One of the best ways to make sure that your family photos truly capture your family’s personality is to make sure that you include many candid photos. But of course, capturing true candid shots can be easier said than done, especially with children around! My best tip is to spend a lot of time sitting, watching, and holding your camera. It may not happen the first time you bring out your camera (or even the second!), but as your family realizes that you’re not going to be saying “Look right here and say cheese!” over and over, they’ll start to relax and do their own thing, and that’s when the real magic happens. Quietly pick up your camera and start shooting. You’ll start to see their real smiles and expressions, and when it comes to photos of your family and friends, those genuine smiles are always the best ones!

MeredithClark7

For more family photo ideas and projects check out these articles:

  • 10 Ways Photography Makes You a Better Parent
  • How to Create a Family Photo Essay
  • Documentary Photography – Six Tips for Creating a Legacy

The post Three Tips to Help you Capture Beauty in the Everyday Moments by Meredith Clark appeared first on Digital Photography School.


Digital Photography School

 
Comments Off on Three Tips to Help you Capture Beauty in the Everyday Moments

Posted in Photography


Three Tips for Being Ready to Shoot Faster so you Never Miss a Shot

11 Jul

We’ve all heard one of the cornerstones of making better photographs is to slow down; be deliberate and take your time. This is very true. In no way am I advocating not being purposeful in your shooting. However, sometimes there are situations when the difference between getting a good image, instead of a blurred and washed out frame, is separated by only a few precious seconds. This is especially true when it comes to working in action filled situations like sports or street photography, but it can also be just as easy to miss moments in nature and landscape photography if you go into situations ill prepared.

Here are three tips that can improve your reaction time and make you more ready to obtain quality images for processing when you find yourself in those “shoot from the hip” scenarios.

Being Ready to Shoot Faster – Never Miss a Shot

Be Self Aware

Knowbeforeyougo

“Know thyself.” No, Socrates wasn’t a photographer (though I’m sure he would have been awesome). In this case, the saying of “know thyself” means becoming aware of your surroundings more so than having a deep introspective understanding of your own self, although that’s a good thing to have, usually. We exercise this on a daily basis, albeit almost unconsciously. You notice a stain on your shirt, or you see the little boy chasing a ball towards the street, or you see a dark alley that’s just a little too dark to walk down alone. You can incorporate this same inherent awareness into your photography to make you a faster shooter.

Here’s an example: Let’s say you find yourself taking an afternoon to work on your street photography. When you first begin your expedition, it’s very bright outside. You are probably still able to shoot at a reasonably fast shutter speed and low ISO. As the evening starts giving way to night, there is of course less available light. So, a good idea would be to begin thinking about bumping up your ISO so that you can maintain the same exposure settings. Or alternatively, slowing down your shutter speed or increasing the size of your aperture (remember, low F-number means a bigger opening and more light into the lens such as f/2.8). Keep in mind however, that a higher ISO will introduce more noise into your final image, but it will have less of an overall impact than changing the shutter and aperture settings.

In photography, your surroundings are in a state of constant flux. So, to be a good photographer, you must be aware of the changes in your surroundings and mould yourself the best you can in order to produce consistent and quality work. This means learning to understand what is happening around you, whether it be: changing lighting conditions, approaching weather, wind, the presence or absence of people and objects, – the list goes on indefinitely. Anticipate what is going to happen next and make adjustments now, to save time later.

Shoot Comfortably

This would seem to go without saying, but you still see many photographers looking down right uncomfortable or awkward while they’re out shooting. Sadly, the majority of the pain is self-inflicted. To shoot faster and to be ready for the shot when the time is right, your camera must be available for use at a moments notice without restricting your movement or causing discomfort. One of the best ways to make this happen is to have your camera suspended from a quality camera strap. Camera straps, like most things, can become a very personal item for new and seasoned photographers alike. Don’t buy a strap because its got pretty flowers embroidered on it or because its made from the latest space age whatever-foam. Do a quick search for “camera strap” here on dPS and you will find a large number of reviews and write-ups of great camera straps. But don’t stop there. Shop around, read reviews, ask your photographer friends and sift camera forums. Being able to comfortably retrieve your camera quickly is key to not missing great images.

Have a budget? Most of us do, even more of us can’t afford to spend thousands on the latest lens or camera body that we dream of owning. Luckily, the majority of the accessory market is crammed with makers competing to sell you their wares. It’s easier than ever to strike a balance between what you need and what you can afford. If you can, have more than one camera strap in your kit so you can choose what fits best for a particular outing.

Badstrap

Prepare Beforehand

This is the big one, yet many people don’t seem to understand that preparation is golden. A close cousin to situational awareness, research and preparation prior to any photo work should become second nature and will pay huge dividends. It will also make you a faster shooter and help to prioritize your workflow, not to mention make you appear more competent as a photographer.

Preparedness

Know what you’re walking into beforehand and prepare accordingly. Are you going on a hike? Find out what wildlife and plants are native to the area and pack your bag with long lenses so you can get close to your subjects from a distance. Travelling abroad? Be sure to read up on the local attitudes towards photography before you start snapping away to avoid any awkward confrontations or worse. Of course, the most unpopular, but useful, aspect of being well prepared is practice, practice, pactice. Practice, and then practice some more. Want faster and more smoother lens changes? Practice at home, so you lose less time in the field and have fewer fumbles. Practice finding your camera adjustment buttons without looking. This will save you loads of time and frustration when you find yourself shooting at night. If you haven’t figured it out by now, the key word here is practice. Practice everything and you will be amazed at how much easier quicker most things suddenly become.

Do you have any other tips for shooting faster and being ready? Please share them in the comments below.

The post Three Tips for Being Ready to Shoot Faster so you Never Miss a Shot by Adam Welch appeared first on Digital Photography School.


Digital Photography School

 
Comments Off on Three Tips for Being Ready to Shoot Faster so you Never Miss a Shot

Posted in Photography


Three Uses for High ISO you Might Not Know

25 Jun

You may already know that the ISO setting is used to control your camera’s sensitivity to light. When you use a high ISO setting essentially you are telling your camera to become more receptive to the available light. This is most often used when you are photographing in low light situations in order to maintain a proper exposure. However, there are at least three other reasons you might consider using a high ISO setting when you’re either in a good light situation or on a tripod.

Freezing fast motion

when to us high ISO

Use a high ISO setting to freeze fast motion – 1/8000th ISO 1,000

The only way to freeze fast motion, like the wings of a hummingbird moth, is to shoot with an extremely fast shutter speed. The above photograph was shot with a shutter speed of 1/8000th of a second in order to freeze the insect’s wings. However, even in the bright mid-afternoon sun, a shutter speed that fast required bumping the ISO setting on the camera to 1,000 to maintain an even exposure.

Below, is an example of why shooting at 1/8000th of a second was necessary. Even at 1/800th of a second the insect’s wings were barely visible. In order to ensure that the motion was frozen it meant that more light was needed in a shorter amount of time and the only way to get this (without a faster lens) is to bump up the ISO on the camera.

when to us high ISO-4

ISO 500 1/800th – even at that speed the wings are blurry.

Night sky photography

when to use high ISO 4

Use high ISO to capture the stars

Many different techniques come into play when you want to photographing the stars, but one of the more important things to remember is to increase that ISO setting. The reason you want to photograph the stars with a higher ISO, even though you’re using a tripod, is that as the earth rotates, the stars move across the sky and you don’t want to capture that movement in your photograph (unless you are doing star trails)

By using an ISO in the 800 to 1,000 rang,e with a fast wide-angle lens, you will be able to capture enough stars to fill the sky.  For more on photographing the stars check out: How to Photograph the Stars.

Hand-holding a long lens

when to us high ISO-3

Use high ISO when shooting handheld with a long lens

If you’re shooting handheld with a long lens, you have to remember the shutter speed rule: 1/focal length (35mm equivalent).  This rule basically means that if you’re using a 300mm lens on a 1.5x crop factor DSLR then the minimum or slowest shutter speed that you can use is 1/450 (1/300 on full frame).

The bald eagle above was shot at a 450mm equivalent focal length using a shutter speed of 1/500th of second and an ISO of 1,000. Any slower on the shutter speed and you begin to run the risk of introducing camera shake.

What other uses can you think of for high ISO?

Do you ever shoot with an ISO of 800 or higher? What’s the highest you’ve ever shot? Share with us some examples and of course, if you have any other uses for high ISO that you think I’ve forgotten please share those below as well!

The post Three Uses for High ISO you Might Not Know by John Davenport appeared first on Digital Photography School.


Digital Photography School

 
Comments Off on Three Uses for High ISO you Might Not Know

Posted in Photography