RSS
 

Posts Tagged ‘Things’

10 Crucial Things You Need to Think About for Portrait Photography

20 Oct

Darlene’s Portrait Fundamentals course is on sale for $ 75 (50% off) now until November 3rd only. Find out more or grab the deal over at Snapndeals.com.


There are many pieces to doing a portrait – it’s not easy. You have to think about the technical stuff like exposure and focus, as well as the non-technical stuff like composition and working with a live subject. It can be daunting if you’re just starting out doing portrait photography so let’s break it down into all the pieces so you can work on one at a time, then put it all together.

Portrait tips dps717px 04

Here are the 10 crucial elements you need to think about when doing portrait photography:

  1. Lighting Pattern
  2. Lighting Ratio
  3. Quality of light
  4. Lens selection
  5. Background
  6. Exposure/metering
  7. Sharpness – getting it in focus
  8. How to position the subject (posing)
  9. Facial view and camera position
  10. Expression

THE TECHNICAL STUFF

#1 Lighting pattern

This is how the light falls on the subject’s face. How you set up the light will determine the mood of the final portrait and whether or not the subject is flattered. Lighting partner is a critical piece to get right. There are four main type of patterns and two styles, they are:

  • Split lighting
  • Loop lighting
  • Rembrandt lighting
  • Butterfly lighting
  • Short lighting
  • Broad lighting
Portrait tips 02

Left – Split lighting. Right – Loop lighting.

Portrait tips 01

Left: Broad lighting. Right: Short lighting. Notice how different she looks in each image, particularly her nose!

Knowing what each looks like and when to use them is very important. Read more here: 6 Portrait Lighting Patterns Every Photographer Should Know.

#2 Lighting ratio

A ratio is a comparison of one thing to another and in terms of lighting it is comparing the dark and light sides of the face. How much difference is there is from the shadow, to the highlight side? The greater the ratio, the more contrast the image will have, and the more moody the portrait will become. The lower the ratio, the less contrast, and the portrait will have a lighter, fresher feeling.

Look at the following examples:

Portrait tips 03

In the images above the ratio on the left is very strong, about 16:1 or four stops. The missing is about 4:1 or two stops, and the right is almost 1:1 or even. The only difference from one to the next is use of a reflector. Notice how the mood and feel of the portrait changes, as the contrast is adjusted.

For more detail on ratios read: Lighting Ratios to Make or Break your Portrait

#3 Quality of light

Another aspect of lighting you need to decide is whether you will use hard or soft light.

Hard light is produced by a small light source and is characterized by high contrast, enhanced texture of the subject, added drama, and harsh well edge-defined shadows. Examples of hard light sources are:

  • The sun (even though it is large, it is far away so its relative size is small)
  • A bare light bulb
  • The small built-in flash on your camera (including your speedlight without modifiers)

Here are two portraits done using hard light. Which is more appropriate use of this type of lighting for the subject?

Portrait tips dps717px 08

Portrait tips dps717px 05

Soft light is produced by a very large light source. It is low contrast (or can even be quite flat), less textureenhancing, and is more forgiving and flattering for people photography. Examples of soft light sources are:

  • The sky on an overcast day
  • Large studio softboxes
  • A large reflector like 42” or 52”
  • An on-camera flash that has been bounced off a ceiling or wall

Here are two portraits done using soft light. Which is more appropriate use of this type of lighting for the subject?

Portrait tips dps717px 09

Portrait tips dps717px 07

So along with the ratio, the quality of light will have a great affect on the mood and feeling of your portrait. Choose soft light for portraits that flatter the subject, and choose hard light for an edgier look with more grit and drama.

#4 Lens selection

The lens you select will change the appearance not only of the subject, but the background as well.

Using a wide angle lens will introduce distortion and cause the subject’s face to look abnormal, sort of stretched. It will also allow you to see a large sweeping view of the background behind them.

Portrait tips dps717px 13

Notice how the shape of her face and her features are distorted? This is not something most people will desire.

However, there may be instances where you want this look such as a humorous portrait, kids, or an editorial style portrait of a street vendor at a market where you want to see his environment.

Portrait tips dps717px 12

The wide angle view adds to the comical nature of this portrait.

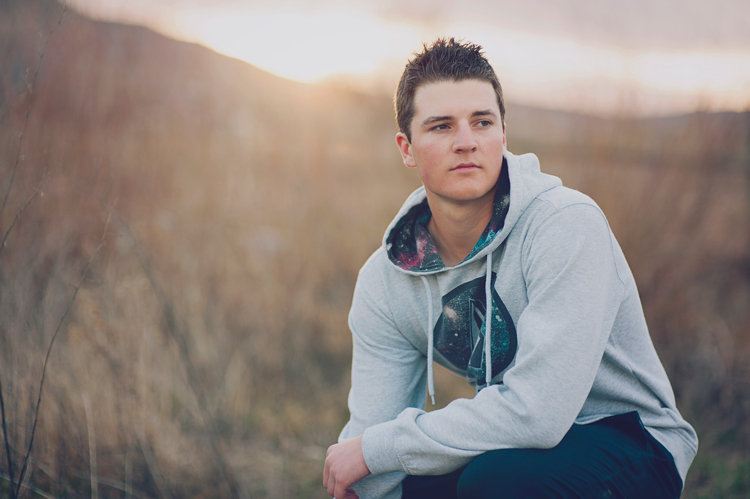
Telephoto lenses compress perspective – this does two things. First it is usually more flattering to the subject, their facial features look less distorted. Second, it simplifies the background by seeing less of it, and often it’s less in focus as well (dependant on distance to the background) putting more emphasis on the subject, which is what you want. Read more at: How to Achieve Blurred Backgrounds in Portraits.

Portrait tips dps717px 14
Same girl as the portrait above. Compare her face in the two images, and take note of the background as well. See how much less of the room, and how it is more out of focus than the wide image above?

Portrait tips dps717px 11
The long lens used for this image has compressed the background and because it is so far away (across the river on the other side) it is really out of focus and provides a soft background to enhance the portrait, not take away from the girl.

#5 Background

One thing many of my students forget to control and think about is the background. It’s so easy to be focused on all the other stuff and working with your subject that you forget to even look at the background.

Two things you want to make sure about for the background are: it makes sense with the portrait, and doesn’t distract the viewer from the subject. There are four things that can do that, watch for them in your background and adjust your camera position or composition accordingly if they show up:

  • Contrast
  • Bright colours (warm tones are the worse for distraction like red and yellow)
  • Sharpness
  • Bright areas
Portrait tips dps717px 15

See how the bright areas, which are also high contrast, in the background draw your attention away from the wedding couple?

Any or all of those can draw the eye away from the subject if they are in your background. The eye is attracted to the brightest area of an image, as well as the sharpest. So get your portrait subject away from the background far enough to get it out of focus, and watch for hot spots that grab the eye. Sometimes simply moving your camera a foot or two to the left or right can eliminate trouble areas and give you a cleaner background – allowing the subject to be the star.

Portrait tips dps717px 16
Use of multiple techniques here have drastically improved this portrait over the one above. The background is now solid, out of focus, and it does not take your eye away from the couple but rather compliments the overall portrait.

#6 Exposure and metering

For a portrait where the subject is not moving, I almost always use the following camera settings:

  • Manual shooting mode
  • Single shot drive mode (when I press the button it takes one image only)
  • Single point focus (not multi or zone)
  • One-shot or AF-S focus mode to focus and lock (not continuous)
  • Shade White Balance preset (as I am usually working in the shade, if you’re in the bright sun choose that – but pick one that matches your lighting condition and leave it, anything but AWB!)
  • Shoot in RAW

That gives me the most control over doing one very important thing – having a consistent exposure from one frame to the next. That may not seem like a bit deal but if you ever decide to do portraits for a friend or have real paying clients – you want to be able to show them the images on the back of the camera and not worry about the one in the middle that was black cause you forgot to adjust the exposure.

Photodune 1733468 camera controls m

The other thing it does is makes editing in the post-production stage much faster.

So basically set your exposure, do a test shot (review it for exposure using the histogram), then don’t touch it unless you either move to a new location, or the light changes.

#7 Sharpness – getting it in focus

I already mentioned the settings I use for focus above. Back button focus is something I highly recommend as well. It allows me to lock focus on the subject, precisely on their eye if I’m in close enough, and then recompose my portrait and shoot away. Unless the subject or I move, changing the distance between us, there is no need to refocus.

Here are a few more focus tips from a past article I did: 5 Tips for Getting Sharper Images. Obviously if you’re shooting a moving target, like kids in action, you’ll want to choose different focus settings. Try Continuous focus (Servo or AF-C) and burst mode (continuous shooting mode or drive).

THE AESTHETIC STUFF

#8 Posing the subject

Getting your subject or model into a comfortable, yet flattering pose can be tricky. People are generally nervous when being photographed and will look to you for guidance on how to stand, hold their body, turn their head, and adjust their hands. So you need to have a few ideas ready for them, making sure they can hold it comfortably and they look good at the same time.

Here are a few tips:

  • You’ve likely heard this before, but if it bends – bend it. Meaning get them out of a stiff body position bending one leg slightly, and bending elbows and wrists.
  • Get them to shift their weight away from the camera (hip away) it will be more flattering that way.
  • Add a slight head tilt for ladies to add a touch of femininity.
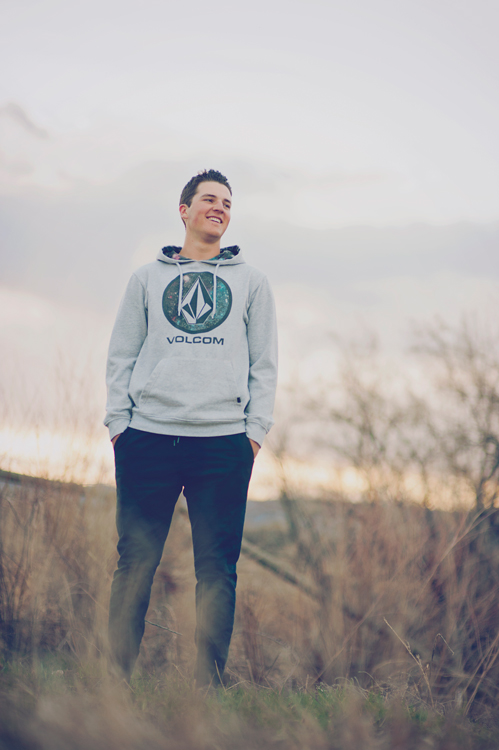
  • To get people to turn their body when standing – tell them to turn and point their feet, the body will follow naturally.
  • Turn shoulders slightly to narrow the body width, which is more flattering for most people.
  • Let them pose naturally and just make slight tweaks or adjustments. Watch how they move on their own so it still looks like them.
Portrait tips dps717px 17

Left – stiff and boring. Right – bend the parts that bend and make a more dynamic pose, it’s also more flattering, and in this case feminine.

For more tips on posing read these dPS articles:

  • Portrait Posing Tips- How to Help People to Relax and Take Better Photos
  • Tips for Posing Men
  • Posing Guide for Photographing Women: 7 Poses to Get You 21 Different Photos
  • Or grab the dPS ebook Portraits: Strike the Pose

#9 Facial view and camera position

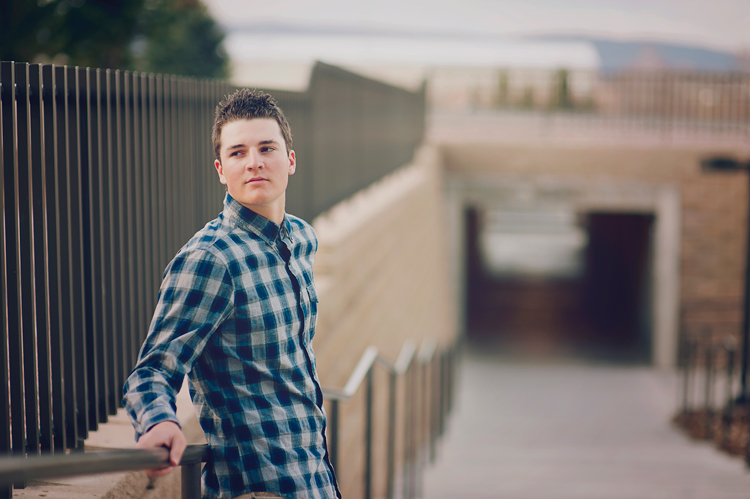
How you position the subject’s face is another factor that determines how flattering the portrait will be, and the mood. Some people look really great in full face view (facing the camera directly) while most benefit from turning slightly to one side, thus narrowing the face a little.

Profile view is something people cannot see in the mirror, so many have never seen theirs, and have no idea what they look like from the side. Only by trying it out will you see and know if it’s flattering for them.

The key to choosing the right angle for their face is to observe them. Do they tend to turn slightly when talking to you? Take note – that is probably the side the subconsciously prefer.

Portrait tips dps717px 18
Three different views of the same girl’s face (above). She has a really gorgeous profile and a square jaw. I think the profile and last image (¾ face view) are the most flattering for her but she looks great in any image. Not all your portrait subjects will have that, so you have to help them look their best by making choices like this. If in doubt, shoot all three and choose later, or let them pick. You’ll learn from the subject what they like and what they think looks flattering.

Tip: for people who have a bump on their nose that do not want it to show – try photographing them facing both ways. One way will show the bump, the other it will be hidden. How you do that is shoot one way with the light say off to camera right. Then trade places with them so the light is coming from the other way and do a second shot. See which shows, and which hides the bump – then you’re ready to go.

What camera position you choose will decide what you’re emphasizing on the subject. A low camera angle can show height (especially if shooting full body) and make someone look taller, but it also emphasizes the body more. Not a good choice if someone wants to appear slimmer. Getting low down near kids level puts you closer to the action and makes them appear less small.

A slightly above eye level camera angle will emphasize the face and minimize the body, a good choice for most people. It also makes kids look smaller and can be effective if that’s the look you want. A really high angle will make the forehead prominentant (perhaps not the best choice for a receding hairline).

Just be conscious that where you place your camera will affect the final look of the portrait.

#10 Expression

Portrait tips dps717px 20

Even though my Spanish is limited I was able to talk to this little girl and got this reaction and expression. She is holding a photo of her auntie’s ultrasound and her new baby cousin to be that she was really excited about. I just asked her to show me her baby primo (cousin) and she did this.

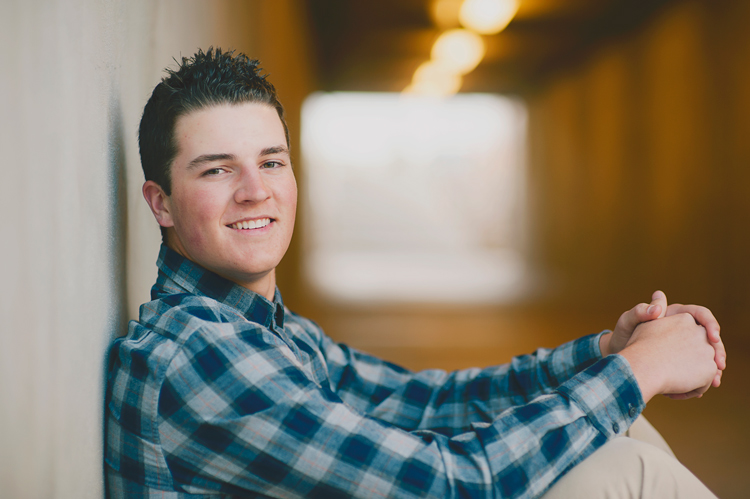
Okay, this is the ultimate thing you need to get right for great portraits. You can nail all nine points above, but if the subject has a bad expression, they will not like the image. There is one big tip I have for getting the best expressions in your portraits – talk to the subject and interact with them. There is one huge barrier to doing that which I see happen all the time.

There is a big black thing in between you and the real person sitting in front of you!

Yes, I mean the camera. Try this exercise if you dare:

Get a friend, or one of your kids or grandkids, to pose for you. Now put the camera up to your eye and take a few shots. How did it feel to you? Did you feel connected to your subject? Ask them how they felt?

Now put the camera on a tripod – yes the dreaded beast we all hate but it a necessary evil – and take a few shots using a remote trigger to fire the camera. How did you feel then? What about your subject? Were you able to make them laugh or smile? I’m going to go out on a limb and guess that you both had a better experience the second time and you got better expressions in the photos.

The key to expression is eye contact and you cannot do that with a camera between you.

Portrait tips dps717px 21
I’ve photographed Bob many times. He is a volunteer at an old coal mine where I do a workshop twice a year. He was a miner way back in the day and is as spry in his 70s as many people who are 40! He loves telling stories about the mine and ghosts so I just get him talking and let him go. We have fun, he loves being a “model” for a day, and it shows in the images.

Try it and see if it doesn’t make a difference. The tripod will also make you slow down and think about your camera, settings, and everything. Your tripod is not evil, it is your friend. Make friends with your tripod and use it.

Putting it all together

Whew! See I told you doing portraits is a lot to think about. But you can do this, you got this. Just take it one step at a time. If you aren’t at the stage of getting all 10 of these things yet, just pick one at a time and work on that. Choose patient models that will help you and practice. The only way to get better is by doing.

My students often ask me, “How do you make it look so easy?” – then answer – I’ve been doing this a really long time and it becomes instinct and subconscious after so many hours. Put in your 10,000 hours and we’ll talk!

If you have any questions or want to share your images – please do so in the comments below.


snapdeal-330-x-220Darlene’s Portrait Fundamentals course is on sale for $ 75 (50% off) now until November 3rd only. Find out more or grab the deal over at Snapndeals.com. Take more professional looking portraits in 30 days! The Portrait Fundamentals course covers everything you need to know, from camera basics to using a multi-flash set-ups. Over 6.5 hours of video lessons with two experiences instructors.

googletag.cmd.push(function() {
tablet_slots.push( googletag.defineSlot( “/1005424/_dPSv4_tab-all-article-bottom_(300×250)”, [300, 250], “pb-ad-78623” ).addService( googletag.pubads() ) ); } );

googletag.cmd.push(function() {
mobile_slots.push( googletag.defineSlot( “/1005424/_dPSv4_mob-all-article-bottom_(300×250)”, [300, 250], “pb-ad-78158” ).addService( googletag.pubads() ) ); } );

The post 10 Crucial Things You Need to Think About for Portrait Photography by Darlene Hildebrandt appeared first on Digital Photography School.


Digital Photography School

 
Comments Off on 10 Crucial Things You Need to Think About for Portrait Photography

Posted in Photography


Top 10 Things to do When Your New Camera Arrives

20 Oct

TripodAtGoldenGate

I recently found myself in the position of having to buy a new camera. It is an exciting time, but the new camera will take some getting used to.

Once you have put the battery in, the lens on, and inserted the memory card, it’s time to make your camera your own. Here are some steps to do so:

#1 Set your diopter

If your camera has a viewfinder, there will be a tiny dial near the eye piece. This is called the diopter and it affects how you see through the lens. Be sure to set it for your eyes, or things might not appear sharp when you look through the viewfinder.

Diopter

Actually, if you’ve been shooting for a while and have never set your diopter, go ahead and do it now. You might be amazed at how much clearer things appear.

#2 Set your Modes

You already know to set your mode dial (get it out of Automatic), but there are some other modes to worry about.

First, set the Drive Mode to what you want. I suggest Continuous because it will allow you to bracket your photos, or just shoot rapidly. If you do it now, you won’t be in the field wondering why your camera is only taking one photo at a time.

Next, you will need to set your Metering Mode. This is the way the camera determines the proper exposure level. The camera can either use a large portion of the scene to measure the brightness level, or just one specific point. The choices you have are:

  • Automatic Mode: which is called Evaluative by Canon, Matrix by Nikon, and Multi-Segment by Sony
  • Partial Metering: where the camera uses the center portion of the scene to measure light
  • Spot Metering: where the camera meters using only one specific point (small area)

Any one of these modes is fine, just be sure to set the one you like best (Spot metering is more advanced so use with caution until you are up to speed with it).

Finally, set your Autofocus Mode, and by that I mean setting the focus points. You can either have the camera automatically select the focus points, or you can do it. If you do it yourself, set it so that the camera uses the center point to focus, it is the fastest and most accurate.

#3 Add your externals

Most of the time you will be adding a few things to your camera. Obvious items are the strap and the battery grip, if you have one. But another item you should add right away is the quick release plate for your tripod. That way, you won’t forget it, and you will also be able to put the camera on the tripod quickly when you are in the field.

Tripod-Plate

While we are on the subject of external items, this is probably a good time to make sure you have an intervalometer, or remote shutter release, that is compatible with your new camera. These things are very cheap these days, so go ahead and get one.

#4 Arrange Image Review

All cameras will show your picture on the LCD after you take it. The camera will not necessarily do it the way you want though. Here are the settings to check to make sure it is set up according to your preferences:

  • Length of time: In the camera’s menu, there will be an option to set the length of time your image appears. You might as well set this on its longest setting, as you can always click it away.
  • Orientation: If you shoot with your camera turned to a vertical orientation, sometimes the camera will turn the image on your LCD so it fits horizontally on the screen. The result is a tiny image, so you may want to turn this off (Note: this may be called “Auto Rotate” in some cameras).
  • Show Histogram: Definitely set your review so that it shows the histogram with the image review. That is the best way to make sure you have a proper exposure.
  • LCD brightness: Set your LCD brightness level to the highest level. Otherwise, when you are out in the sun you will have a very difficult time seeing the LCD at all.

While I am on the subject of the LCD, I want to mention one tricky little item for Canon shooters. On many Canon cameras, to use the Live View function, you have to go into the menu and enable it. I recently rented a Canon camera and actually thought it was broken because the Live View didn’t work. Turns out, I just needed to enable it!

#5 Set the Image Quality

The next setting to check is image quality. This is where you tell the camera what type of file to create.

Do I have to tell you that this setting should be Raw? No? Good. You might as well have the camera also create a JPEG while you are at it though. It won’t cost you anything but a small amount of memory.

#6 Create a Custom Menu

There are certain things you will only want to access sometimes, but you will want to get to them fast. Mirror Lock-up and Auto Bracketing come to mind for me. Fortunately, most cameras allow you to create a custom menu. That way you can add the features and settings you use the most, to one menu screen. That will save you a lot of time digging around in your camera’s menu.

Custom-Menu

My custom menu settings

#7 Set up Back Button Focus

Normally your camera will focus when you press the shutter button halfway down. That works okay, but the better way is to set your camera to instead focus when you press a button on the back of the camera. This way the focus will not automatically reset with each picture. The setting will be in your camera’s menu.

#8 Protect your gear

I suggest using a label maker to put a label with your name and phone number on each camera, lens, or other piece of equipment you own. We are all careful with our gear, but sometimes things move fast, and I know people that have inadvertently left lenses or other items behind. What are the odds that someone who finds something you left behind will actually call the number on the label to return the item? I don’t know. Maybe they are not high. But I do know that the odds of someone returning something with no ability to identify where it came from to be precisely zero percent.

You can also add some protection for your gear by registering it with Lenstag. It is a free service where you register your camera and/or lenses with them, then if your item is stolen they put the word out to help you recover it. Does it actually work? Mercifully I’ve never had anything stolen, so I don’t know. But it is free so you might as well try it.

#9 Set up the Wifi

Almost all new cameras have a Wifi feature these days. To take advantage of it, you will have to download an app to your phone and go through a set-up process. It’s best to sit down and do that right away so that when you are out and about you are ready to take advantage of the Wifi feature.

Wifi

Set up the connection between your camera and your phone to enable remote shooting and camera image viewing.

#10 Read the Manual

You knew this was coming, didn’t you? Yes, you need to read your camera manual. Yes, it can be tedious, but you’ll be glad you did.

Do you have any other tips to add for new camera owners? Please share in the comments below.

googletag.cmd.push(function() {
tablet_slots.push( googletag.defineSlot( “/1005424/_dPSv4_tab-all-article-bottom_(300×250)”, [300, 250], “pb-ad-78623” ).addService( googletag.pubads() ) ); } );

googletag.cmd.push(function() {
mobile_slots.push( googletag.defineSlot( “/1005424/_dPSv4_mob-all-article-bottom_(300×250)”, [300, 250], “pb-ad-78158” ).addService( googletag.pubads() ) ); } );

The post Top 10 Things to do When Your New Camera Arrives by Jim Hamel appeared first on Digital Photography School.


Digital Photography School

 
Comments Off on Top 10 Things to do When Your New Camera Arrives

Posted in Photography


It’s the little things: Nikon Small World Photomicrography Competition winners

17 Oct

Thirty years after it first began, the Nikon International Small World Competition continues to highlight outstanding photography of the invisible world right in front of our eyes – the world captured by photomicrography. The competition is open to professionals and amateurs alike worldwide, and first prize nets the winner $ 3,000 toward the Nikon gear of their choosing. Read more

Articles: Digital Photography Review (dpreview.com)

 
Comments Off on It’s the little things: Nikon Small World Photomicrography Competition winners

Posted in Uncategorized


28 Refreshing Photos of Ordinary Things

25 Jul

As photographers we like to get out and travel to find unique and interesting things to photograph. But there are photographic subjects everywhere – all you need to do is look around and get creative.

Here are some photos of every day, ordinary objects – where the photographers have gotten creative with lighting, cropping, and composition. Take note – you can do this too!

~lzee~bleu~

By ~lzee~bleu~

JLS Photography - Alaska

By JLS Photography – Alaska

Maria Teresa Ambrosi

By Maria Teresa Ambrosi

Hiroyuki Takeda

By Hiroyuki Takeda

Holley And Chris Melton

By Holley And Chris Melton

Giusi Barbiani

By Giusi Barbiani

Flavio~

By Flavio~

Theilr

By theilr

Darlene Hildebrandt

By Darlene Hildebrandt

Tom Roeleveld

By Tom Roeleveld

Jo Christian Oterhals

By Jo Christian Oterhals

Michael Porter

By Michael Porter

Harry (Howard) Potts

By Harry (Howard) Potts

Johann Coetzer

By Johann Coetzer

Herr Hans Gruber

By Herr Hans Gruber

DorkyMum

By DorkyMum

Caro Wallis

By Caro Wallis

Georgie Sharp

By Georgie Sharp

Roland Peschetz

By Roland Peschetz

Benjamin Lehman

By Benjamin Lehman

Pascal Bovet

By Pascal Bovet

Michael Pardo

By Michael Pardo

Mbgrigby

By mbgrigby

Jared Tarbell

By Jared Tarbell

IMorpheus

By iMorpheus

William Warby

By William Warby

Daniel Wehner

By Daniel Wehner

Javier Morales

By Javier Morales

googletag.cmd.push(function() {
tablet_slots.push( googletag.defineSlot( “/1005424/_dPSv4_tab-all-article-bottom_(300×250)”, [300, 250], “pb-ad-78623” ).addService( googletag.pubads() ) ); } );

googletag.cmd.push(function() {
mobile_slots.push( googletag.defineSlot( “/1005424/_dPSv4_mob-all-article-bottom_(300×250)”, [300, 250], “pb-ad-78158” ).addService( googletag.pubads() ) ); } );

The post 28 Refreshing Photos of Ordinary Things by Darlene Hildebrandt appeared first on Digital Photography School.


Digital Photography School

 
Comments Off on 28 Refreshing Photos of Ordinary Things

Posted in Photography


10 Things Photoshop Beginners Want to Know How to Do

22 Jun

Terry White is an Adobe Photoshop expert and in this video he answers the 10 things that Photoshop (particularly for Photoshop CC) beginners want to know how to do including:

  1. How to touch up a photo; how to make people look better
  2. Layers and adjustment layers; what are they and how to use them
  3. Working with layer masks
  4. How to crop a photo
  5. Adjusting the exposure and using the Adobe Camera Raw filter
  6. Removing something from an image
  7. Move or copy objects in a photo
  8. How to put a person from one photo onto a new background (or putting two photos together)
  9. How to add text
  10. Saving photos and saving formats that are shareable

It’s a bit of a long one but some really good tips in here that I’m sure you’ll find helpful if you’re new to Photoshop.

He also mentioned grabbing a Wacom tablet to use for your editing instead of a mouse. I use one in Lightroom as well and it is much better and more precise and doesn’t leave you with a cramped hand after working on images for hours.

googletag.cmd.push(function() {
tablet_slots.push( googletag.defineSlot( “/1005424/_dPSv4_tab-all-article-bottom_(300×250)”, [300, 250], “pb-ad-78623” ).addService( googletag.pubads() ) ); } );

googletag.cmd.push(function() {
mobile_slots.push( googletag.defineSlot( “/1005424/_dPSv4_mob-all-article-bottom_(300×250)”, [300, 250], “pb-ad-78158” ).addService( googletag.pubads() ) ); } );

The post 10 Things Photoshop Beginners Want to Know How to Do by Darlene Hildebrandt appeared first on Digital Photography School.


Digital Photography School

 
Comments Off on 10 Things Photoshop Beginners Want to Know How to Do

Posted in Photography


Things to Know About Protecting Your Images Online

25 May

It is the digital age and therefore vitally important to have a presence on the internet. Photographers, both professional and novice, are using the internet more than ever to showcase their skill. This is imperative from a business and marketing standpoint, but with every great tool comes those who exploit it. Photographers are stuck between marketing themselves in the most Continue Reading

The post Things to Know About Protecting Your Images Online appeared first on Photodoto.


Photodoto

 
Comments Off on Things to Know About Protecting Your Images Online

Posted in Photography


4 Things Commercial Photographers Need to Discuss with Their Small Business Clients

20 Apr
Lead architects of a high-end design firm.

Lead architects of a high-end design firm.

Providing successful images for a business can be very rewarding, especially when it’s for a budding business that you get to witness growing. While all businesses, big and small, essentially have the same demands, a small business is most likely still learning how to work with various professionals and creating their processes as they go. Diving into a project with a small business can lead to lots of time and money being wasted if terms and project details are not discussed openly, early on. The following are some key factors to discuss with your small business client during an initial consultation so that conflicts can be avoided down the line:

1. Brand

Large family-run urban farm.

Large family-run urban farm

While we are hired in part because of the individual style that we have developed over time, a business’s brand is the first thing that needs to come across to their audience. When working with a small business especially, the branding should be clearly defined in order to be able to provide images that will be a great benefit to them. Do they have certain color palettes they work with? Are their graphics portraying a more formal brand, or a very casual brand? Are they nature-oriented, or do they work in traditional office spaces? What clientele are they catering to? All of these are questions that should be addressed in the initial consultations. A small business may still be developing their brand or creating a branding package, so without a brand to guide the images, there may be a need for updated photos once the brand is clearly defined. Expressing this to a client will not only help them understand that professional photography is an investment intended to last a long time, but it will also show them that you are keeping their best interest in mind for their long-term success.

2. Budget

Small businesses will typically have very low budgets, so the decision to invest in professional photography services will be a big one for them. Regardless of the cost for your services, there is likely to be very little (if any) wiggle room in their budget allowance. Being aware, and respectful, of the client’s budget restrictions will not only help ensure that there is less run-around in the planning stages, but it will also give the client more confidence that you are an ally. If you offer packages geared towards commercial work, consider having several options to select from, or to use as a kick-off for budget discussions. Often a custom quote is required depending on their specific needs, but some packages to give the client a ballpark idea of pricing can let them know what they can expect to spend.

Independent financial advisor.

Independent financial advisor

3. Timeline

Depending on how experienced your small business client is, their timeline for getting final images may not be very realistic. This is where it’s your job to educate clients on your process and, more importantly, on your specific ability to turn around jobs in a time crunch. Knowing their expectations about timing and delivery will be vital in creating a quote, coordinating any vendors (venue, props, assistants), and making sure that the client gets their images in time to use them.

Do they require any extensive editing techniques or talent that requires outsourcing? Did they request a location or backdrop that requires reservations and a long wait for booking? Will they need models, and if so, do they have specifics in mind? Are they planning on using these images for a specific event, or marketing campaign that has a set date? Which leads to the final factor to keep in mind…

Home-based food business products.

Home-based food business products

4. Usage

Many folks will assume that if they hire you to take photos, they then get to keep the photos and do as they wish with them. In reality, commercial work is generally very specific about what usage is permitted. If they are planning to use the photos on a product label, do you get any royalty from that product sale? If they are hiring you because of a large print marketing campaign, can they then use the images in email campaigns several years down the line? Are you granting them use for a certain amount of time, or can they use these images forever? Once you turn over the images, are they allowed to do any alterations to them?

While there is no one answer to these questions, be sure to discuss the planned use of these images and to clearly specify it in a contract. Both parties need to be in agreement with what is decided, and having this discussion up front will once again show your client that you value your work and intend to be completely open with them about terms.

Owner of a co-working space.

Owner of a co-working space

Although there are many factors to discuss with your client at the beginning of a project, these four points will help get the basic information clarified, and get both parties on the same page. These discussion points will also go a long way to helping you create a quote for them that is accurate and all-inclusive; avoiding time-consuming confusion farther into the project.

Do you have any additional points of conversation that are a must for initial client consultations? Please share in the comments below.

googletag.cmd.push(function() {
tablet_slots.push( googletag.defineSlot( “/1005424/_dPSv4_tab-all-article-bottom_(300×250)”, [300, 250], “pb-ad-78623” ).addService( googletag.pubads() ) ); } );

googletag.cmd.push(function() {
mobile_slots.push( googletag.defineSlot( “/1005424/_dPSv4_mob-all-article-bottom_(300×250)”, [300, 250], “pb-ad-78158” ).addService( googletag.pubads() ) ); } );

The post 4 Things Commercial Photographers Need to Discuss with Their Small Business Clients by Natalia Robert appeared first on Digital Photography School.


Digital Photography School

 
Comments Off on 4 Things Commercial Photographers Need to Discuss with Their Small Business Clients

Posted in Photography


6 Things to Consider Before Becoming a Professional Photographer

15 Apr

192

So, you’ve got a nice camera, you really love photography, and you’ve been thinking that maybe it would be nice to make a little bit of money from this passion you’ve discovered. Before you decide to make that leap, read on. You may be convinced to throw that idea out the window, or you may find that you truly are ready, and it’s time to try your hand at photography as a career.

Before we go any further, I have to clarify something about the photos in this article. First of all, I had to include photos, because every article is better with pictures, right? Secondly, this session was inspiring, fun, and an example of every reason that I LOVE being a photographer. This client does not exemplify any of the cons of the business. Also, for this article “professional photographer” is defined as someone who gets paid to take photos, particularly portrait photographers.

137

1. You’re not good enough…yet

Maybe you love photography, and maybe you get a lot of compliments on your photos, but you may not be a good enough photographer to actually take money from people yet. Do you sometimes take a bunch of photos where the majority of them are garbage? Do you often say to yourself, “I’ll fix that later in Photoshop?” If your photos aren’t consistently in focus, exposed correctly, and great IN CAMERA, before you get to Photoshop, you’re not ready.

If you look at other professional photographers’ work and wonder how on earth they got their photos to look like that, you are not ready. I don’t mean that you have to be able to produce photos exactly like the photographers that you admire. I’m saying that you should have an understanding of how they achieve the look they get. You should know how light, depth of field, angles, etc., contribute to the photo. You should have an idea of how much of the photo is a result of post-processing.

Having a nice camera does not qualify you to be a professional photographer.

151

2. You don’t have enough experience

This goes along with not being good enough, but experience is important. You have to be consistent every time. You have to know that every single session you do will result in good photos, and that you can roll with the punches if conditions aren’t ideal. You have to know your camera settings inside and out, because when you’re chasing a naughty toddler around, you don’t have time to try to figure out what your shutter speed should be.

I’ll admit that I didn’t have enough experience when I started. I did some sessions for friends and family, then requests started coming in. I didn’t really have the goal of making money with my photography, but when people started asking me, I thought, “Hey, why not?” Some of my early sessions are dear to my heart, but some of them I look at and cringe. I feel bad that people paid money for me to experiment and find out who I was as a photographer.

182

3. You don’t want to lose the love of photography

Once you turn a passion into a job or career, you have a very real possibility of it turning into something you do because you have to, and not because you want to. I’m not saying this happens to everyone, but I’ve seen enough professional photographers burn out and quit, that I know it’s a very real thing. You may think that it will be fantastic to make money doing something you love, but are you ready for the possibility of not loving that thing anymore?

True confession here: I rarely get my camera out anymore for anything except a paid session. When I’m on vacation, sometimes the last thing I want to do is “work” while I’m there, and I certainly don’t want to drag my camera around when I’m supposed to be having fun.  Then, if I do take some photos just for the heck of it, they sit there on my computer forever, because I don’t really feel like sorting and editing yet another batch of photos. This doesn’t happen to every pro photographer, but I’m being real here. Sometimes I wish that I could just take photos because I love it, but the truth is, I’m often too tired after my paid sessions for the week to get my camera out again. I still love photography, but it’s more that I love my job; I love the photos and what I can create, I love working with people, but I don’t love photography just for photography’s sake anymore.

186

4. You don’t want to deal with business stuff

Taxes, business licenses, contracts, equipment upkeep, scheduling, email, phone calls – it’s all a very real part of running a photography business, and it takes far more time and effort than you’d like to believe. Being a professional photographer is not just happily snapping some photos, collecting money, and then spending all of that money on anything you’d like. There are expenses, lots and lots of expenses. There are boring, repetitive tasks. There are hours spent doing behind the scenes stuff.

No matter how great of a photographer you are, if you aren’t good at the business side of things, you are going to struggle as a photographer. It’s hard. It’s frustrating. Sometimes it’s overwhelming. Some days horrible things happen, like The Cloud losing your entire photography calendar (yes, speaking from experience). Sometimes you have to ask people for money, and that’s not easy for everyone. You have to be able and willing to run a pretty tight ship with scheduling, collecting money, and sticking to your policies. You have to decide your policies, and your fees, and how you are going to do business beforehand, because believe me, people will ask you to change all of it for them, and you have to be ready for it.

165

5. You don’t like to deal with difficult people

Luckily for me, I actually really love working with people, but even then, sometimes some people are hard to deal with. When people are paying you money to photograph them, sometimes they expect you to do anything and everything they want, and sometimes, even when you’ve done your best, they aren’t happy with you. If you are sensitive, like I am, that kind of criticism can be very hard to take.

Most of the people you will take photos for are fantastic, wonderful people, who love your work, and love you, which is why they hired you. That doesn’t happen every time though. Sometimes you have to spend lots of time on the phone talking to a worried client (what about the weather? what about junior’s bad haircut? what about clothes they’ll wear? what if they smile awkwardly?). Or someone who has lots of ideas they saw on Pinterest, and wants to discuss every one of them with you, in depth, even if they aren’t even remotely your style of photography. Sometimes you’ll show them their gallery and they’ll say they love it, except can you photoshop every single wrinkle off of their face? Questions are great, and most people don’t have unreasonable demands. But, you have to know that sometimes people are just not on the same page as you are, and you have to be able to work with them, and do your best to keep them happy.

155

6. It isn’t the fairytale job you think it is

I hear from people all the time about how much fun it must be to be a photographer, and how much they wish they could be a photographer too. Many people who jump into the photography business, without doing a lot of research and self-evaluation, get a harsh slap to the face when they realize that it’s work. A lot of work. Many people pop in the “professional photographer” scene on a whim, and pop right back out of it within a year or two, and sometimes don’t even last a few months. It’s work to get clients. It’s work to keep clients. They don’t just fall in your lap, waving hundred dollar bills and smiling their pearly whites for your camera.

You’re going to have competition, and sometimes criticism from others. Sometimes the world of photographers can get pretty nasty. You will find wonderful people to collaborate with, and those who encourage you, but you will also find some that will tear you down if they get the chance.

There are many benefits of running your own business, but it’s also hard. You have to know what you are doing, and if something goes wrong, it’s all on your shoulders. Being a professional photographer is much more than loving to take pictures. When you realize all of the work it’s going to be, you might decide that taking photos for the love of it, and because you’re an artist, may be much more fulfilling in the end.

169

Do I sound a little bitter? I know that I might, but I want to be realistic here. I think being a photographer is such a romanticized notion, that there are oodles of people just itching to jump into photography as a business, without really knowing what they’re getting into. I’ve learned so much over the years, and sometimes I wonder if I would have even started had I really understood all of the cons.

Then, remember why I do this. Yes, it’s a job, and it’s hard. Yes, I hate the business side of things sometimes. Yes, some days I want to go hide in a hole and bury my camera there. But most of the time I feel blessed beyond measure to be a photographer. I love the people I get to work with. I love creating beautiful photos, and capturing real personalities. I love happy clients, and I love that I can create memories for them that will last forever. Right now I wouldn’t trade this job for any other, because now, that I’ve learned and lived through the hard parts of my job, I know that it’s all worth it, for me.

Now you get to decide: will it be worth it for you?

googletag.cmd.push(function() {
tablet_slots.push( googletag.defineSlot( “/1005424/_dPSv4_tab-all-article-bottom_(300×250)”, [300, 250], “pb-ad-78623” ).addService( googletag.pubads() ) ); } );

googletag.cmd.push(function() {
mobile_slots.push( googletag.defineSlot( “/1005424/_dPSv4_mob-all-article-bottom_(300×250)”, [300, 250], “pb-ad-78158” ).addService( googletag.pubads() ) ); } );

The post 6 Things to Consider Before Becoming a Professional Photographer by Melinda Smith appeared first on Digital Photography School.


Digital Photography School

 
Comments Off on 6 Things to Consider Before Becoming a Professional Photographer

Posted in Photography


10 Things I Discovered at the WPPI 2015 Trade Show

18 Mar

Vegas-Mar2015-0117-600px.jpgWedding and Portrait Photographers International (WPPI) holds an annual conference and trade show. It’s a massive photography convention with over 10,000 attendees converging on Las Vegas, Nevada each year. I’ve personally attended it over 12 times – both as photographer and trade representative. This year I decided to go just to see some old friends I haven’t seen in way too long, meet some others I’ve only ever seen online, and to make some new contacts.

In this article I’ll share with you my top 10 things I discovered at the trade show this year at WPPI 2015, and how you could apply some things to your photography:

10 things I discovered at the WPPI 2015 trade show

#1 Westcott’s Ice Light

This seemed to be the hot ticket item of the show with constant line ups just to see and order one. Weighing in at just 1.3lbs (0.58kg), The Ice Light is an ultra-portable, battery operated, LED light you can take anywhere. It’s not cheap though – while the light itself is light, the price is a bit heavy at $ 450 USD.

This finn promo video will give you an idea what it’s all about:

Will it help you take better photos? Probably not – educating yourself will do that. But it might be a fun tool (aka toy) in your arsenal if the budget allows.

#2 Photographer’s Ignite

From Wikipedia: Ignite is a style of presentation where participants are given five minutes to speak on a subject accompanied by 20 slides. Each slide is displayed for 15 seconds, and slides are automatically advanced.

Photographer’s Ignite started in 2006 and has become really popular. As the last event at WPPI 2015 the large room was filled pretty much to capacity. You can see some sessions from their archives which I shared the other day.

There were some really great five minute talks, many of which inspirational. A great way to end a conference and head home – with ideas in your head. But remember, only taking action will move you forward. So watch as many of the sessions as you want – then get moving and DO something.

#3 Some really cool camera bags for ladies

Sorry guys there were man-style bags too, lots of them – I just didn’t scope them out this time around. One of my favourites (unisex) are ThinkTank – check those out!

Kelly Moore Bags

This were literally flying off the shelves at the show, I even saw men purchasing them for their wives and people arguing over the last one of a particular style. They were that hot.

Vegas Mar2015 0111 600px

What’s so great about Kelly Moore bags? Well, they don’t look like a camera bags – they look like purses. The inserts come out too so you can put in lots of camera gear and fill them, half gear and personal stuff, or just use it as a purse without inserts. I know many female pro photographers that swear by these bags. Some can even double as a diaper bag for mom photographers.

Vegas Mar2015 0114 600px

They look pretty well made and stylish, I have to say.

Porteen Gear’s design your own bags

I found these online a while ago but hadn’t seen one in person. One of the booth’s had some on display and they lived up to my expectations.

Vegas Mar2015 0123 600px

Well made, high-quality materials, and you get to pick all the materials and colours so you can make a totally unique bag that only you own. You can even play with their Bag Builder tool online to see your bag virtually before you order. Select your bag size and style, leather color, accent color, the interior lining material and the strap and see your bag built in front of your eyes. With over 30 leathers and 100+ accent colours – you can be conservative or go crazy and show your style!

Vegas Mar2015 0126 600px

#4 – Some of our dPS trusted suppliers

As Editor of dPS I also took some time to stop in and meet some of our trusted vendors and suppliers like Tamron (who will be supplying one of our writers with their new 15-30mm f/2.8 lens to review for you), B&H Photo Video, and Adorama (more than a camera store). If you’re even in New York City, stop in and visit both of those stores. They are massive and you can get lost inside – but I do forewarn you – you may want to leave your credit card behind for safety!

I also found some new companies and make a few connections with some third party brands to see if we can get some items to review for you. Stay tuned to the Cameras and Equipment section for more when that’s available. Two products I found particularly interesting were the Nissin flashes and Sirui tripods.

#5 Storage and backup solutions

Vegas Mar2015 0049 600px

No the photo above has nothing to do with storage but photos of hard drives is a bit boring, so it’s a the token photos of an Elvis impersonator singing the Beach Boys instead. Only in Vegas!

How to save, backup and archive your images can be a big issue. I’ve been researching (okay my tech husband has) solutions for a while. One we’ve been looking at is the Synology system. I found three others I hadn’t heard of before at the show as well. Here is a list of them – keep in mind this is not a recommendation only a list as I know very little about them. Before purchasing and setting up any backup system do your due diligence and research to find the one that’s right for your situation.

  • Qnap – might be an excellent option for a small home user or photographer.
  • CRU – have a free backup information booklet available on their site.
  • G-Technology – these guys had a lot of really well known photographers endorsing their products. The only thing I disliked about them was that you have to use their drives, they are proprietary. Most other systems allow you to put any brand of drive into the system.

All of these are available on Amazon, but remember, please do your research before buying anything.

#6 Friends

Attending a photography workshop or conference is a great chance to make new friends, or see old ones. I did a little of both on this trip.

Longtime friends

Vegas Mar2015 0037 600px

One of my past incarnations, and why I’ve been to so many WPPI conferences, was the role of client support (North American representative) with Queensberry albums in New Zealand. They make some of the best wedding albums for professional photography studios (for wholesale resale to clients only). I worked with them for over nine years and made lifelong friends with my fellow workers and the company owners. Above you see Sonya (company director, used to be my boss), and Raktim (he’s my brother from different parents, mine in Canada, his in India).

Vegas Mar2015 0033 600px

It’s been six years since we have been in the same room together and we all agreed it’s been too long. Have you made friends at a conference or event in the past? Did you keep in touch? It’s a small world now – there’s no excuse not to – reach out to your “old” friends now.

Vegas Mar2015 0017 600px

I also got to see my friend, photographer Renee Robyn speak for the first time. She does amazing work with models, Photoshop and light. She’s travels regularly and does workshops all over the world. If this style is up your alley check out her work. I will warn you she’s not G-rated though (her images and her language), so enter with caution if you’re sensitive.

New and online friends

Along with connecting with some longtime friends I also met some of my online or virtual ones for the first time. That included Mr. Frederick Van Johnson who’s podcast This Week in Photo I’ve had the honour of guest hosting several times. We even recorded an episode from a hotel room in Vegas (it was me and about nine other guys in the room, could have used dPS writer and another TWiP host Valerie Jardin for some extra female energy).

Vegas Mar2015 0081 600px

Don’t you just love the high-tech lighting going on here for the video? They had every lamp in the room in front of us. It was a lot of fun as we discussed the show, where photography is going, what’s hot and more. You can watch or listen to the episode here.

I was also honoured to be interviewed by Frederick in the Panasonic booth for a women photography entrepreneurs Q&A session, with Catherine Hall.

Vegas Mar2015 0137 600px

#7 Education overload

There were LOTS of choices opportunities for learning including: books, workshops, DVDs, online courses, and more – an almost overwhelming number of choices are available. The best plan is to pick one or two sources for education and stick to those – we hope you pick dPS – and then focus on doing and putting it into practice. We even discussed this on the podcast (link above), that learning + action is one of the keys to doing better photography.

#8 – That an 8mm fisheye lens is a really cool toy

Vegas Mar2015 0274 600px

Just days before I left for Vegas my much anticipated Amazon shipment arrived with a new Rokinon 8mm fisheye lens, for my Fuji X-T1 mirrorless camera (APS-C sensor). On the cropped sensor it’s equal to about 12mm and man is it cool.

It’s completely manual (manual focus and exposure) and the camera doesn’t even recognize it. I have to shoot in a mode that tells the camera there is no lens on the front. But the camera does still adjust the exposure. Focus is a bit tricky but using the focus peaking feature on my camera helps. I have more than a few out of focus shots, so more use of the lens and practice is required yet.

Vegas Mar2015 0276 600px

Notice how wide the angle of view is; I had the lens touching the fence in this image and it’s still in the shot.


Vegas Mar2015 0256 600px

If you’ve never tried a fisheye lens give it a go, you can be super creative. But learn to use it wisely. You must put something in the frame close to the lens as the subject or you’ll just have a wide mess of nothing. See if you can borrow or rent one, or perhaps even pick up an old film lens and adaptor.

Vegas Mar2015 0301 600px

An obligatory selfie in the car’s reflective surface.

#9 That I really love travelling with the Fuji X-T1

A few months ago I invested in a mirrorless system and chose the Fuji X-T1. I admit I’ve had some issues with it, including it completely quitting on me in Nicaragua and having to be shipped back to Canada. But it’s got a new motherboard now and that seems to have been the issue (I got a dud – great!) as it has had no further issues.

The whole reason I added this camera (I didn’t switch, I still use my Canon 5D MkIII for portraits) to my lineup is for travel. I’ve been doing this a long time and I’m getting tired of hauling around so much heavy gear all the time. On this occasion I just grabbed the camera, 35mm f/1.4 lens (super light-weight and small) and the Rokinon 8mm. With the camera and lens around my neck, I was able to walk around every day carrying just my purse and extra lens inside. It was awesome!

Not convinced – read some dPS articles on mirrorless cameras and you decide if it’s right for you. It may be – it may not be.

#10 Sometimes getting away is a good recharge

You’ve probably heard this before, but getting away from home – if even only for a couple days – can be a great energy reboot and boost for your creativity. You don’t even have to go far – a neighbouring town, a drive in the country for the afternoon even, just a change of scenery and routine can be just the thing you need.

So that’s what I discovered at the 2015 WPPI show. Have you attended WPPI or any other photography conference? What were your take aways?

googletag.cmd.push(function() {
tablet_slots.push( googletag.defineSlot( “/1005424/_dPSv4_tab-all-article-bottom_(300×250)”, [300, 250], “pb-ad-78623” ).addService( googletag.pubads() ) ); googletag.pubads().enableSingleRequest();
googletag.pubads().disableInitialLoad();
googletag.pubads().collapseEmptyDivs( true );
googletag.enableServices();
} );

googletag.cmd.push( function() { googletag.display( ‘pb-ad-78623’ ); } );

googletag.cmd.push(function() {
mobile_slots.push( googletag.defineSlot( “/1005424/_dPSv4_mob-all-article-bottom_(300×250)”, [300, 250], “pb-ad-78158” ).addService( googletag.pubads() ) ); googletag.pubads().enableSingleRequest();
googletag.pubads().disableInitialLoad();
googletag.pubads().collapseEmptyDivs( true );
googletag.enableServices();
} );

googletag.cmd.push( function() { googletag.display( ‘pb-ad-78158’ ); } );

The post 10 Things I Discovered at the WPPI 2015 Trade Show by Darlene Hildebrandt appeared first on Digital Photography School.


Digital Photography School

 
Comments Off on 10 Things I Discovered at the WPPI 2015 Trade Show

Posted in Photography


5 Things You Should Know About Lightroom Before Starting

27 Feb

So you just installed Lightroom, now what?

You could spend some time just playing around and learning through doing, but if you’re looking for a nudge in the right direction here are a few simple concepts that I wish I’d thought about before starting my own Lightroom journey – hopefully it helps you! Five things you should know about Lightroom before you start:

#1 Your organizational strategy

organize-in-lightroom
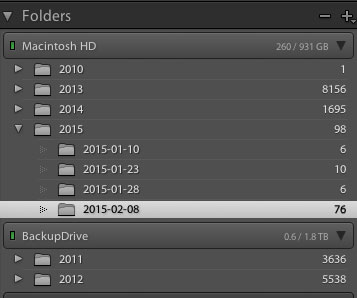
This might not seem important at first, but Lightroom is an amazing organizer of your photographs if you choose to use it as one. So before you start haphazardly uploading photographs into your Lightroom catalog try to come up with some sort of basic organizational strategy first.

Some ideas for organization include:

Organizing by date, by location of shoot, or by specific events. Think about your style of photography and the subject matter you plan on shooting. For example a wedding photographer would probably want to organize by date/bride-groom name, where as a wildlife photographer may organize by location/animal.

Lightroom has many different tools for organizing your photographs from colors, star rating and flags. You could for example use flags as a simple yes/no option to quickly cull images, while colors could be for various states of post production workflow (i.e. blue is for images that need to be processed and green is for images that are finalized and shouldn’t be touched).

This might sound overwhelming at first, but if you get into this habit early on, it will simply become a part of your Lightroom workflow, and trust me an organized Lightroom library makes things a lot easier when you’re dealing with thousands of photographs.

#2 How you want to import photos

This is a simple question, but one that you should know the answer to before you get started with Lightroom. When you first open up the import dialog box you’ll be asked whether you want to Copy as DNG, Copy, Move, or Add. Knowing the difference between these four options will help you make the best choice for your workflow. So here’s the Cliff’s notes version:

  1. Copy as DNG – Converts the file type to Adobe’s .DNG format. Read all about Adobe’s DNG format here.
  2. Copy – Retains the original file type of your image (on your computer or memory card) and copies it to a new location on your computer or hard drive.
  3. Move – Moves the image from one place to another on your computer (or from the memory card).
  4. Add – Adds the image to a Lightroom catalog without moving its physical location on your computer or copying it.

For a more detailed look at importing photographs in Lightroom check out: Quick Tip: Importing to Lightroom Made Easier

#3 How to use the Lightroom Develop Module

lightroom develop module
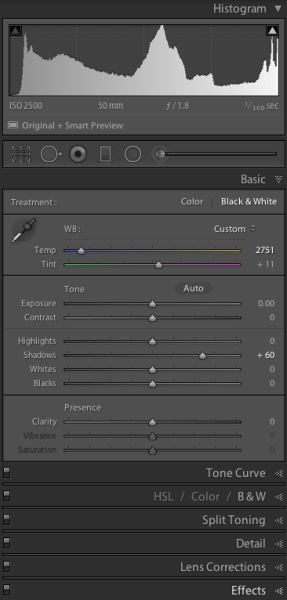
Now that you’ve got your organizational strategy situated you’re starting to get into the fun stuff, before you go all hack and slash post-production on your first photograph it does help to learn some basic fundamentals. Here’s three quick points to get you started.
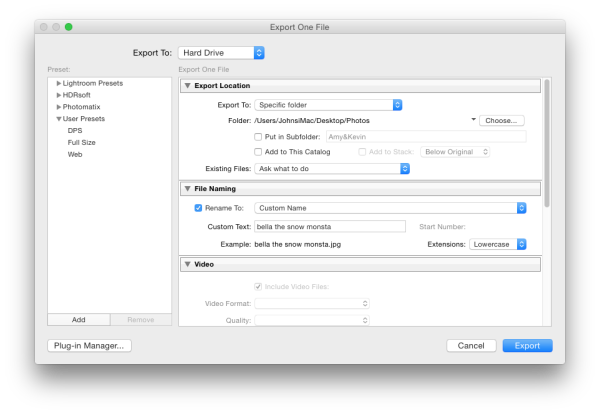
  1. Learn what the basic tab does – The basic tab is the workhorse of Lightroom it is what will bring your image to life. At a minimum master these five Lightroom sliders and you’ll be on the road to successful image processing.
  2. Learn the art of local adjustments – Once you’re comfortable with Lightroom’s basic tab you’ll probably want to move onto learning things like how to apply adjustment brushes, graduated filters and radial filters to your images. These tools function in much the same way as the sliders within the basic tab, however, they allow you to have more isolated and local control over your images.
  3. Learn the finishing touches – Finally within the develop module you’ll want to learn a bit about the finishing touches that Lightroom is capable of providing. Things like the clone/heal tool, sharpening, and noise reduction are a good place to start. You may also want to learn about how to remove chromatic aberrations and correct for lens distortion as well. These types of tools are subtle, but powerful, and really will bring the entire image together as a final printable work.

#4 What are presets and how you should use them

While you may be tempted to start with presets it’s better that you learn your basic tab and various other tools first – why? Simply because all presets are created from these settings so once you learn those settings not only will you know a lot about the presets you’re choosing, but you’ll also be able to create your own.

When it comes to presets think of them as a starting point, not a finished product. Learn how to use them to speed up your workflow by creating your favorite looks within a preset, then applying what you know about the various sliders in the basic tab to fine tune the results.

For more info on Lightroom presets: A Concise Guide to Lightroom Develop Presets

#5 What your export settings should be

Here you are, ready to export your first photograph from Lightroom, and just when you thought you had everything figured out, this screen pops up. What do you do now?

Lightroom Export

First you’ll want to remember that Lightroom doesn’t save your processed images, only the instructions of how to process them, that’s why you need to export (export = “save as”) a file out of Lightroom. This image is separate from the original camera RAW file, and as a result will need its own name, and place of organization.

You’ll want to determine what file type and size you’re going to export, and whether or not you want Lightroom to automatically add a watermark to your photographs. These things are all going to be preferences for your own work and there’s no right or wrong way to go about doing it, but you should learn about the implications of each before you start exporting hundreds of photographs.

What Else?

What else would you tell someone who’s just getting their feet wet with Lightroom? Leave us a comment below and let us know!

googletag.cmd.push(function() {
tablet_slots.push( googletag.defineSlot( “/1005424/_dPSv4_tab-all-article-bottom_(300×250)”, [300, 250], “pb-ad-78623” ).addService( googletag.pubads() ) ); } );

googletag.cmd.push(function() {
mobile_slots.push( googletag.defineSlot( “/1005424/_dPSv4_mob-all-article-bottom_(300×250)”, [300, 250], “pb-ad-78158” ).addService( googletag.pubads() ) ); } );

The post 5 Things You Should Know About Lightroom Before Starting by John Davenport appeared first on Digital Photography School.


Digital Photography School

 
Comments Off on 5 Things You Should Know About Lightroom Before Starting

Posted in Photography